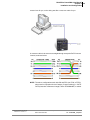
1
DNA PPCx PowerDNA Cube Manual December 2012 Edition PN Man-PPCx-1212 Version 3.7 © Copyright 1998-2012 United Electronic Industries, Inc. All rights reserved. i No part of this publication may be reproduced, stored in a retrieval system, or transmitted, in any form by any means, electronic, mechanical, by photocopying, recording, or otherwise without prior written permission. Information furnished in this manual is believed to be accurate and reliable. However, no responsibility is assumed for its use, or for any infringements of patents or other rights of third parties that may result from its use. All product names listed are trademarks or trade names of their respective companies. See UEI’s website for complete terms and conditions of sale: http://www.ueidaq.com/company/terms.aspx Contacting United Electronic Industries Mailing Address: 27 Renmar Avenue Walpole, MA 02081 U.S.A. For a list of our distributors and partners in the US and around the world, please see http://www.ueidaq.com/partners/ Support: Telephone: Fax: (508) 921-4600 (508) 668-2350 Also see the FAQs and online “Live Help” feature on our web site. Internet Support: Support [email protected] Web-Site www.ueidaq.com FTP Site ftp://ftp.ueidaq.com Product Disclaimer: WARNING! DO NOT USE PRODUCTS SOLD BY UNITED ELECTRONIC INDUSTRIES, INC. AS CRITICAL COMPONENTS IN LIFE SUPPORT DEVICES OR SYSTEMS. Products sold by United Electronic Industries, Inc. are not authorized for use as critical components in life support devices or systems. A critical component is any component of a life support device or system whose failure to perform can be reasonably expected to cause the failure of the life support device or system, or to affect its safety or effectiveness. Any attempt to purchase any United Electronic Industries, Inc. product for that purpose is null and void and United Electronic Industries Inc. accepts no liability whatsoever in contract, tort, or otherwise whether or not resulting from our or our employees' negligence or failure to detect an improper purchase. NOTE: Specifications shown in this document are subject to change without notice. Check with UEI for current status. ii Table of Contents Chapter 1 Introduction . . . . . . . . . . . . . . . . . . . . . . . . . . . . . . . . . . . . . . . . . . . . . . . . . . . . . . 1 1.1 1.1.1 PowerDNA Overview . . . . . . . . . . . . . . . . . . . . . . . . . . . . . . . . . . . . . . . . . . . . . . . . . 2 What’s in the Package . . . . . . . . . . . . . . . . . . . . . . . . . . . . . . . . . . . . . . . . . . . 3 1.2 Overview . . . . . . . . . . . . . . . . . . . . . . . . . . . . . . . . . . . . . . . . . . . . . . . . . . . . . . . . . . . 3 Chapter 2 Installation and Configuration . . . . . . . . . . . . . . . . . . . . . . . . . . . . . . . . . . . . . . . 8 2.1 2.2.1 2.2.2 2.2.4 2.2.5 2.2.6 2.2.8 Initial Installation - Overview . . . . . . . . . . . . . . . . . . . . . . . . . . . . . . . . . . . . . . . . . . . . 8 Inspect the package. . . . . . . . . . . . . . . . . . . . . . . . . . . . . . . . . . . . . . . . . . . . . 9 Install Software . . . . . . . . . . . . . . . . . . . . . . . . . . . . . . . . . . . . . . . . . . . . . . . . 9 IP Addresses on the PowerDNA Cube . . . . . . . . . . . . . . . . . . . . . . . . . . . . . 12 Improving Network Performance . . . . . . . . . . . . . . . . . . . . . . . . . . . . . . . . . . 13 PowerDNA Explorer Quick-Start . . . . . . . . . . . . . . . . . . . . . . . . . . . . . . . . . . 17 Firmware Update Instructions . . . . . . . . . . . . . . . . . . . . . . . . . . . . . . . . . . . . 20 2.3 Mounting and field connections . . . . . . . . . . . . . . . . . . . . . . . . . . . . . . . . . . . . . . . . 22 2.5 Peripheral Terminal Panel Wiring . . . . . . . . . . . . . . . . . . . . . . . . . . . . . . . . . . . . . . . 25 Chapter 3 PowerDNA Explorer . . . . . . . . . . . . . . . . . . . . . . . . . . . . . . . . . . . . . . . . . . . . . . 26 3.1 The Main Window . . . . . . . . . . . . . . . . . . . . . . . . . . . . . . . . . . . . . . . . . . . . . . . . . . . 26 3.2 3.2.1 3.2.2 3.2.3 3.2.4 3.2.5 3.2.6 3.2.7 3.2.8 Menu Bar . . . . . . . . . . . . . . . . . . . . . . . . . . . . . . . . . . . . . . . . . . . . . . . . . . . . . . . . . File Menu . . . . . . . . . . . . . . . . . . . . . . . . . . . . . . . . . . . . . . . . . . . . . . . . . . . . Network Menu . . . . . . . . . . . . . . . . . . . . . . . . . . . . . . . . . . . . . . . . . . . . . . . . View Menu . . . . . . . . . . . . . . . . . . . . . . . . . . . . . . . . . . . . . . . . . . . . . . . . . . . Help Menu . . . . . . . . . . . . . . . . . . . . . . . . . . . . . . . . . . . . . . . . . . . . . . . . . . . Toolbar. . . . . . . . . . . . . . . . . . . . . . . . . . . . . . . . . . . . . . . . . . . . . . . . . . . . . . Device Tree . . . . . . . . . . . . . . . . . . . . . . . . . . . . . . . . . . . . . . . . . . . . . . . . . . Settings Panel . . . . . . . . . . . . . . . . . . . . . . . . . . . . . . . . . . . . . . . . . . . . . . . . Digital Input/Output Layer Settings . . . . . . . . . . . . . . . . . . . . . . . . . . . . . . . . 26 26 26 29 30 30 30 31 34 Chapter 4 The PowerDNA Core Module . . . . . . . . . . . . . . . . . . . . . . . . . . . . . . . . . . . . . . . 45 4.1 4.1. Device Architecture of DNA-CM . . . . . . . . . . . . . . . . . . . . . . . . . . . . . . . . . . . . . . . . . 46 Device Architecture of DNA-PPC. . . . . . . . . . . . . . . . . . . . . . . . . . . . . . . . . . 47 Chapter 5 Programming Layer-Specific Functions . . . . . . . . . . . . . . . . . . . . . . . . . . . . . . 48 5.1 Overview . . . . . . . . . . . . . . . . . . . . . . . . . . . . . . . . . . . . . . . . . . . . . . . . . . . . . . . . . . 48 5.2 5.2.1 5.2.2 5.2.3 Memory Map . . . . . . . . . . . . . . . . . . . . . . . . . . . . . . . . . . . . . . . . . . . . . . . . . . . . . . . Startup sequence (DNA-CM-5/8) . . . . . . . . . . . . . . . . . . . . . . . . . . . . . . . . . . Startup Sequence (DNA-PPC-5/8) . . . . . . . . . . . . . . . . . . . . . . . . . . . . . . . . Interfacing to the CM Module Using a Serial Interface . . . . . . . . . . . . . . . . . 5.3 5.3.1 How to Update Firmware . . . . . . . . . . . . . . . . . . . . . . . . . . . . . . . . . . . . . . . . . . . . . 55 Clock and Watchdog Access . . . . . . . . . . . . . . . . . . . . . . . . . . . . . . . . . . . . . 55 5.4 5.4.1 5.4.2 5.4.3 5.4.4 Common Layer Interface . . . . . . . . . . . . . . . . . . . . . . . . . . . . . . . . . . . . . . . . . . . . . Channel List . . . . . . . . . . . . . . . . . . . . . . . . . . . . . . . . . . . . . . . . . . . . . . . . . . Configuration Flags . . . . . . . . . . . . . . . . . . . . . . . . . . . . . . . . . . . . . . . . . . . . EEPROM User Area Access . . . . . . . . . . . . . . . . . . . . . . . . . . . . . . . . . . . . . PowerDNA Layer Signaling . . . . . . . . . . . . . . . . . . . . . . . . . . . . . . . . . . . . . . 5.5 Register Map and Description. . . . . . . . . . . . . . . . . . . . . . . . . . . . . . . . . . . . . . . . . . 62 5.6 Register Descriptions . . . . . . . . . . . . . . . . . . . . . . . . . . . . . . . . . . . . . . . . . . . . . . . . 63 48 49 50 50 55 55 57 58 60 5.6.1 5.6.2 5.6.3 Valid EM/CM Combinations for Non-Buffered Modes. . . . . . . . . . . . . . . . . . 68 FIFO Access . . . . . . . . . . . . . . . . . . . . . . . . . . . . . . . . . . . . . . . . . . . . . . . . . 70 Command Mode . . . . . . . . . . . . . . . . . . . . . . . . . . . . . . . . . . . . . . . . . . . . . . 71 Appendix A . . . . . . . . . . . . . . . . . . . . . . . . . . . . . . . . . . . . . . . . . . . . . . . . . . . . . . . . . . . . . . . 72 A.1 Configuring a Second Card under Windows XP . . . . . . . . . . . . . . . . . . . . . . . . . . . . . 72 A.2 Configuring a Second Card under Windows 2000 . . . . . . . . . . . . . . . . . . . . . . . . . . . 75 A.3 Configuring a Second Card under Windows NT . . . . . . . . . . . . . . . . . . . . . . . . . . . . . 78 A4 Configuring a Second Card under Windows 95/98/SE/ME. . . . . . . . . . . . . . . . . . . . . 80 Index . . . . . . . . . . . . . . . . . . . . . . . . . . . . . . . . . . . . . . . . . . . . . . . . . . . . . . . . . . . . . . . . . . 85 List of Figures Chapter 1 Introduction . . . . . . . . . . . . . . . . . . . . . . . . . . . . . . . . . . . . . . . . . . . . . . . . . . . . . . 1 1-1 DNA-PPCx Cube Specifications .................................................................................... 6 Chapter 2 Installation and Configuration . . . . . . . . . . . . . . . . . . . . . . . . . . . . . . . . . . . . . . . 8 2-1 Typical MTTTY Startup Screen.................................................................................... 11 2-2 PowerDNA Explorer Startup Screen............................................................................ 17 2-3 Update Firmware Menu Item ....................................................................................... 20 2-4 Password Dialog Box................................................................................................... 20 2-5 Firmware Update Progress Dialog Box........................................................................ 21 Chapter 3 PowerDNA Explorer . . . . . . . . . . . . . . . . . . . . . . . . . . . . . . . . . . . . . . . . . . . . . . 26 3-1 PowerDNA Explorer Main Window .............................................................................. 26 3-2 Preferences.................................................................................................................. 26 3-3 Address Ranges Dialog Box ........................................................................................ 27 3-4 Edit Address Ranges Dialog Box................................................................................. 27 3-5 After a Network >>Scan Network................................................................................. 28 3-6 Password dialog box for Store Config and Store All Configs....................................... 29 3-7 Password Dialog Box for Update Firmware. . .............................................................. 29 3-8 Example of a Wiring Diagram ...................................................................................... 30 3-9 Example of the Device Tree......................................................................................... 31 3-10 Example of IOM Settings Panel for a PowerDNA cube ............................................... 31 3-11 Example of Device Layer Settings for a Layer............................................................. 33 3-12 Screen from Network >> Read Input Data................................................................... 34 3-13 Example DIO-405 Layer Inputs.................................................................................... 35 3-14 Example DIO-405 Layer Outputs................................................................................. 36 3-15 Example of DIO-403 Layer Inputs................................................................................ 37 3-16 Example of DIO-403 Layer Outputs............................................................................. 37 3-17 Example of DIO-403 Layer Outputs............................................................................. 38 3-18 Example DIO-403 Layer Configuration ........................................................................ 38 3-19 Example DIO-403 Layer Initialization........................................................................... 39 3-20 Example AO-302 layer................................................................................................. 40 3-21 Example AI-201 layer................................................................................................... 41 3-22 Example CT-601 layer ................................................................................................. 42 3-23 Example Quadrature controls ...................................................................................... 42 3-24 Example Bin Counter controls ..................................................................................... 43 3-25 Example Pulse Width Modulation (PWM) controls ...................................................... 43 3-26 Example Pulse Period controls .................................................................................... 43 3-27 Example of Started Counter......................................................................................... 44 Chapter 4 The PowerDNA Core Module . . . . . . . . . . . . . . . . . . . . . . . . . . . . . . . . . . . . . . . 45 4-1 PowerDNA Core Module (CPU and NIC) .................................................................... 45 4-2 FreeScale ColdFire Controller Architecture ................................................................. 46 4-3 PowerPC Controller Architecture ................................................................................. 47 Chapter 5 Programming Layer-Specific Functions . . . . . . . . . . . . . . . . . . . . . . . . . . . . . . 48 5-1 Changing the IP Address ............................................................................................. 54 5-2 CM Interconnection Diagram ....................................................................................... 60 DNA-PPCx PowerDNA Cube Manual Chapter 1 Introduction Chapter 1 Introduction This document is intended to serve as a user manual for a PowerDNA Cube system. It describes the PowerDNA Cube Distributed Network Acquisition system, its components, specifications, and instructions for set up and operation. PowerDNA is the umbrella name that describes a real-time distributed I/O system with exceptional flexibility and performance. PowerDNA system consists of three parts: (1) Input/Output Modules (a.k.a. I/O Modules, IOMs, Cubes) distributed throughout a process, large piece of equipment, facility, or other structure; (2) Cubes connected via copper -or- fiber optic cables to (3) a host PC with a dedicated Ethernet interface card and running Windows, Linux, or an RTOS. Cubes may also be operated in stand-alone data-logger mode. The PowerDNA Cube is available in either a 5- or 8-layer configuration. Two of these layers are occupied by the Core Module. The Core Module consists of the CPU Layer and the NIC (network-interface control) Layer, with connectors for either 100Base-T copper or 100Base-FX fiber-optic cable. The remaining 3 or 6 slots in the Cube are factory-configured with your selection of I/O Layers. For information on these data-acquisition layers, visit www.ueidaq.com. This document gives further details about the features and functions of various system components. Details on programming the system are contained in the companion document(s): the PowerDNA API Reference Manual, and various layer manuals. Who should read this manual? This manual has been written to make the installation, configuration, and operation of the PowerDNA cube as straightforward as possible. However, it assumes that the user has basic PC skills and is familiar with the Microsoft Windows XP/2000/ NT/9x, QNX or Linux/RTLinux/RTAI Linux operating environments. Organization of this manual This PowerDNA User Manual is organized as follows: © Copyright 2009 all rights reserved United Electronic Industries, Inc. • Chapter 1—Introduction An introduction to the cube. • Chapter 2—Installation and Configuration Provides instructions for installing and configuring the cube • Chapter 3—The PowerDNA Explorer Provides an overview of PowerDNA Explorer Main Window, menu bar, toolbar, Device Tree, setting panel, IOM settings, and Device layer settings. • Chapter 4—PowerDNA Core Module Describes the function and architecture of the CPU and NIC layers • Chapter 5—Programming Layer-specific Functions Describes device architecture, memory map, startup sequence, setting parameters, updating firmware, common layer interface. Tel: 508-921-4600 www.ueidaq.com Date: December 2012 Vers: 3.6 File: PowerDNA _Chap1.fm 1 DNA-PPCx PowerDNA Cube Manual Chapter 1 Introduction • Appendix Provides an overview of how to determine the version of PowerDNA, update the firmware, and configure the Ethernet card in various Windows OS and Linux installations. • Index Alphabetical listing of the topics covered in this manual. NOTE: Refer to the DAQBIOS Protocol Manual for detailed information about Host / IOM Communication, how DAQBIOS works, the DAQBIOS Engine, Real-Time Operation with an IOM, and Asynchronous Operation with an IOM. Conventions To help you get the most out of this manual and our products, please note that we use the following conventions: Tips are designed to highlight quick methods to get the job done, or to reveal uncommon knowledge and ideas. NOTE: Notes alert you to important information. CAUTION! Caution advises you of precautions to take to avoid injury, data loss, or a system crash. Text formatted in bold typeface generally represents text that should be entered verbatim. For instance, it can represent a command, as in the following example: “Instruct operator of how to run setup using a command such as setup.exe” Other PowerDNA Documentation This PowerDNA User Manual is one part of the documentation set available for the PowerDNA system. We offer other resources you might want to read before programming an application. They are available either on the PowerDNA Software Suite CD or can be downloaded from the UEI web site. In particular, we recommend the PowerDNA API Reference Manual, PowerDNA Quick Start Manual, UEIDAQ Framework Reference Manual, UEIDAQ Framework User Manual, and the UEIDAQ Framework Getting Started Manual. Feedback We are interested in any feedback you might have concerning our products and manuals. Comments and recommendation can be sent by email to [email protected]. 1.1 PowerDNA Overview This chapter provides an overview of the key features of the PowerDNA system, and how the system works. Thank you for purchasing a PowerDNA Cube system. We designed this product © Copyright 2009 all rights reserved United Electronic Industries, Inc. Tel: 508-921-4600 www.ueidaq.com Date: December 2012 Vers: 3.6 File: PowerDNA _Chap1.fm 2 DNA-PPCx PowerDNA Cube Manual Chapter 1 Introduction family from the ground up to provide the best possible features, reliability, and performance at an economically sound price. 1.1.1 What’s in the Package Inspect the package. Included you should find: The PowerDNA Cube Preinstalled with your selection of I/O Layers Power supply (DNA-PSU-24: 100-240V 50-60Hz to 24VDC) Ethernet cable with either RJ-45 connector (for copper) or SC-type (for fiber optic 100-Base-FX cable) Serial cable (for initial configuration) Additional accessories may be included, depending on your order. 1.2 Overview The PowerDNA system consists of a hardware Cube and software suite. The software suite is located both on the PowerDNA / PowerDAQ CD shipped with the Cube and on the website: www.ueidaq.com The software that supports the system consists of two components: PowerDNA Software Suite PowerDNA low-level driver; PowerDNA Explorer (and demo); Example code for C & Java Additional example code & docs for UEIDAQ Framework C/C++, C#, VB.NET, ActiveX (VB6, Delphi), MATLAB, LabVIEW, DASYLab, LabWindows/CVI, OPC The Windows PowerDNA Software Suite contains the following software: • © Copyright 2009 all rights reserved United Electronic Industries, Inc. PowerDNA low-level driver The interface between the cube hardware and higher-level languages. Tel: 508-921-4600 www.ueidaq.com Date: December 2012 Vers: 3.6 File: PowerDNA _Chap1.fm 3 DNA-PPCx PowerDNA Cube Manual Chapter 1 Introduction • PowerDNA Explorer The essential tool for configuring and testing the cube. See Chapter 3 for use. • Multi-Threaded TTY Client For initial setup of the cube on the network, upgrades, and calibration. • Example C & Java code Facilitates jumping in and learning — this code will compile and execute on the cube. In addition to the examples in the PowerDNA Software Suite, the UEIDAQ Framework contains example code for higher-level languages (C++, VB, Java), and also several graphical programming languages (e.g., LabVIEW, DASYLab). The framework facilitates and expedites test development: an experiment can be set up in less than twenty lines of code. The framework function calls are portable between programming languages. The Linux software package includes: • DAQLib - Library for writing programs using PowerDNA IO modules (cubes) • UeiPalLib - Platform abstraction library needed for building the DAQLib • DAQLib_Samples - Example programs demonstrating how to use the DAQLib to work with various layer types Instructions on use can be found in the readme.txt of the package. The hardware / PowerDNA cube is composed of: • External casing – in two compact sizes: Core Module + 3 I/O Layers: 3.95” × 4.1” × 4.0” Core Module + 6 I/O Layers: 5.8” × 4.1” × 4.0” • Core Module [2 layers at the top] -- The CPU Layer [PowerPC | Coldfire] Integrated CPU with real-time kernel in firmware; Cube can operate as a standalone unit -- The NIC Layer [100BaseT | Fiber 100-Base-FX] Can lLink cube to any PC over commercial Ethernet, Daisychain 64 Cubes over one Ethernet network © Copyright 2009 all rights reserved United Electronic Industries, Inc. • Optional I/O-layers (refer to www.ueidaq.com for details) • Resolutions to 24 bits; read/write to a Cube’s I/O Layers every 1 msec • Analog Input -- High-gain & low-gain -- Strain Gauge module -- Simultaneous Sampling module • Analog Output with optional current/voltage booster add-in card Tel: 508-921-4600 www.ueidaq.com Date: December 2012 Vers: 3.6 File: PowerDNA _Chap1.fm 4 DNA-PPCx PowerDNA Cube Manual Chapter 1 Introduction • Controller Area Network (CAN) Bus layer • Counter-Timer • Digital I/O • Power-Conversion layer Chapter 2 details the configuration and operation of the cube’s Core Module. Chapter 4 details the behavior and architecture of the cube’s Core Module. Detailed information on the hardware layers is found in the layer-specific manuals and on the website (www.ueidaq.com) © Copyright 2009 all rights reserved United Electronic Industries, Inc. Tel: 508-921-4600 www.ueidaq.com Date: December 2012 Vers: 3.6 File: PowerDNA _Chap1.fm 5 DNA-PPCx PowerDNA Cube Manual Chapter 1 Introduction 1.3 Specifications Figure 1-1 lists the Technical Specifications for the PowerDNA PPCx Cubes. Technical Specifications: Standard Interfaces To Host Computer 10/100Base-T, standard RJ-45 connector Daisy chain output 10/100Base-T, standard RJ-45 connector Config/General RS-232, 9-pin “D” Sync Custom cable to sync multiple cubes I/O Slots Available DNA-PPC8 6 slots DNA-PPC5 3 slots Host Communications 100 meters max, CAT5 cable Distance from host Ethernet data 2 megabyte per second transfer rate up to 1 megasample per sec (16-bit samples) Analog data transfer rate DMAP I/O mode update 1000 I/O channels (analog and/or digital) in less than 1 millisecond, guaranteed Processor CPU Freescale MPC5200, 400 MHz, 32-bit Memory 128 MB (not including on-board Flash Memory which contains OS kernel, I/O drivers and firmware) Status LEDs Attention, Read/Write, Power, Communications Active Environmental Temp (operating) Tested to -40 °C to 85 °C Temp (storage) -40 °C to 100 °C Humidity 0 to 95%, non-condensing Vibration (IEC 60068-2-64) 10–500 Hz, 5 g (rms), Broad-band random (IEC 60068-2-6) 10–500 Hz, 5 g, Sinusoidal Shock 50 g, 3 ms half sine, 18 shocks at 6 orientations; (IEC 60068-2-27) 30 g, 11 ms half sine, 18 shocks at 6 orientations Altitude 70,000 feet, maximum Physical Dimensions DNA-PPC5 4.1” x 4.0” x 4.0” DNA-PPC8 4.1” x 4.0” x 5.8” Power Requirements Voltage 9 - 36 VDC (AC adaptor included) Power Dissipation 4 W at 24 VDC (not including I/O boards) Figure 1-1DNA-PPCx Cube Specifications © Copyright 2009 all rights reserved United Electronic Industries, Inc. Tel: 508-921-4600 www.ueidaq.com Date: December 2012 Vers: 3.6 File: PowerDNA _Chap1.fm 6 DNA-PPCx PowerDNA Cube Manual Chapter 1 Introduction 1.4 DC Power Thresholds Table 1-1 below describes the DC power thresholds for DNA-PPCx PowerDNA Cubes. Table 1-1. DC Power Thresholds for DNA-PPCx Cubes Backplane Power Rail Voltage Turn-on, V1 Reset, V Turn-off, V2 +3.3V, +2.5V 8.8 8.4 7.7 Analog Power Supply +24V 8.5 – 7.8 Fan Power Supply +12V 8.8 – 8.4 On-layer DC/DCs that use input power +VIn 7.8 to 8.8 – 7.5-8.5 Logic Power Supply Notes Varies with the layer used. 1. Turn-on, V: The value of Vin at which corresponding DC/DCs turn on. 2. Turn-off, V: The value of Vin at which corresponding DC/DCs turn off. NOTE: A DNA-PPC core module consumes only 240mW when Vin is below 7.7V. © Copyright 2009 all rights reserved United Electronic Industries, Inc. Tel: 508-921-4600 www.ueidaq.com Date: December 2012 Vers: 3.6 File: PowerDNA _Chap1.fm 7 DNA-PPCx PowerDNA Cube Manual Chapter 2 Installation and Configuration Chapter 2 Installation and Configuration Installation consists of: 2.1 Initial Installation Overview • PowerDNA software package installation • Cube hardware setup • Configuration This section outlines the steps to be taken in Section 2.2. STEP 1: Install the PowerDNA software suite. The latest software suite can be found online at www.ueidaq.com/download; a copy is also included on the CD. STEP 2: Connect the serial cable: from Cube RS-232 port to the host computer serial port a. Start a TTY client: Start >> Programs >> UEI >> PowerDNA >> MTTTY b. Change the Baud rate to 57600 and Click Connect. STEP 3: Connect the power supply to the Cube. STEP 4: The Cube comes pre-configured with an IP address. Using MTTTY, type [Enter] to test the prompt, for Coldfire: DQ> for PPC: =>. Then type: DQ> show ip: 192.168.100.2 netmask: 255.255.255.0 STEP 5: (optional) The recommended method of connection to the Cube is via a direct Ethernet cable connected to an external NIC. Connecting the cube directly to a LAN usually requires a change of IP address on the Cube. For example, your system administrator has assigned you the unused IP, 192.168.0.65. Here is how to change the IP to this example IP: DQ> set ip 192.168.0.65 DQ> store DQ> reset // // // // Sets this Cube’s IP to 192.168.1.10 Saves the newly changed configuration Reboots the cube for the new IP to take effect To make sure that the PowerDNA Cube is alive, ping it: C:\> ping –n 1 192.168.0.65 STEP 6: Use PowerDNA Explorer for graphical configuration (see Chapter 3). © Copyright 2009 all rights reserved United Electronic Industries, Inc. Tel: 508-921-4600 www.ueidaq.com Date: December 2012 Vers: 3.6 File: PowerDNA _Chap2.fm 8 DNA-PPCx PowerDNA Cube Manual Chapter 2 Installation and Configuration 2.2 2.2.1 2.2.2 Initial This section reviews how to perform an initial hardware and software setup when you first receive a PowerDNA Cube. Installation – Start-to-finish Guide Inspect the package Install Software Inspect the contents of the shipping package. With a standard PowerDNA Cube, you should find: • The PowerDNA Cube itself, preinstalled with your selection of I/O Layers. • The DNA-PSU-24 universal powerline brick, which plugs into an outlet and provides 24V dc output. The supply comes with a plug for the mains, an adapter cable ending in a Molex connector for plugging into the DNA Cube, and a daisychaining cable for supplying additional Cubes with power from the same supply (max. of three Cubes total). • Serial cable for initial hardware configuration and firmware downloading. • CD-ROM with support software This section describes how to load the PowerDNA software suite onto a Windows- or Linux-based computer and run some initial tests. The latest PowerDNA support software is online at www.ueidaq.com/download; a known working copy is also on the PowerDNA Software Suite CD. A. Software Install: Windows 9x/2000/XP The PowerDNA CD provides two installers: • PowerDNA Software Suite: low-level driver and PowerDNA tools • UEIDAQ Framework: high-level programming examples (optional) Both installers automatically search for third-party IDE and testing suites, and add themselves as tools to the found suites. Install third-party applications (e.g., LabVIEW, MsVS2003) before installing the PowerDNA Software Suite or UEIDAQ Framework. To install the PowerDNA Software Suite, do the following: STEP 1: Log in as Administrator. STEP 2: Run Setup. a. Insert the PowerDNA Software Suite CD into your CD-ROM drive. Windows should automatically start the PowerDNA Setup program. An installer with the UEI logo and then PowerDNA Welcome screen should appear. If none appears, run setup.exe from the CD drive: Start >> Run >> d:\setup.exe >> OK. If you downloaded the most recent executable from www.ueidaq.com, double-click to run the executable. b. Choose the PowerDNA Software Suite option. c. Unless you are an expert user and have specific requirements, we advise you to select Typical installation and accept the default © Copyright 2009 all rights reserved United Electronic Industries, Inc. Tel: 508-921-4600 www.ueidaq.com Date: December 2012 Vers: 3.6 File: PowerDNA _Chap2.fm 9 DNA-PPCx PowerDNA Cube Manual Chapter 2 Installation and Configuration configuration. The Software Suite installer requires and automatically installs Sun’s Java VM (JRE) for you, in addition to the full complement of tools. As an alternative, use the custom option to display and ensure that all of the packages necessary are installed. d. Companion Documentation: Quick Start Guide, Configuration & Core Module, I/O Layer Manuals, Low-level Programming Guide e. SDK: includes/lib for C/Java, examples, and Sun’s JRE; (The SDK is not the UeiDaq Framework). f. PowerDNA Apps: PowerDNA Explorer, MTTTY g. PowerDNA Components (incl. DLL files) h. PowerDNA Firmware i. Click Next to continue through the dialogs. j. Click Finish to complete installation; restart the computer. This Software Suite installed the bare-minimum tools needed in later steps: MTTTY, PowerDNA Explorer, and the low-level driver. UEIDAQ Framework provides the structure for developing applications under C/C++, C#, VB.NET, ActiveX (VB6, Delphi), MATLAB, LabVIEW, DASYLab, LabWindows/CVI, OPC, and other programming languages. NOTE: Because the installation process modifies your Windows registry, you should always install or uninstall the software using the appropriate utilities. Never remove PowerDNA software from your PC directly by deleting individual files; always use the Windows Control Panel/AddRemove Programs utility. B. Software Install: Linux Linux: The PowerDNA_*.tgz file in the CD\Linux folder contains the software package for Linux. To extract the file to a local directory, enter: tar -xjvf /path/to/powerdna*.tgz Follow the instructions in the readme.txt contained therein. © Copyright 2009 all rights reserved United Electronic Industries, Inc. Tel: 508-921-4600 www.ueidaq.com Date: December 2012 Vers: 3.6 File: PowerDNA _Chap2.fm 10 DNA-PPCx PowerDNA Cube Manual Chapter 2 Installation and Configuration 2.2.3 Initial Boot-up This procedure is needed to prepare for network configuration. Do the following steps: STEP 1: Familiarize yourself with front-panel layout. Note that all connections are made on front of the unit; no rear access is required in a rack-mounted configuration). STEP 2: Attach the serial cable to the host PC and to the DNA Cube RS-232 port. a. Run a terminal-emulation program (MTTTY) on the PC. Any terminalemulation program may be used (MTTTY, Minicom, TeraTerm, etc.) Note that Hyper Terminal probably will not work with a PowerDNA Cube. b. Verify that COM parameters are set: 57600 baud, 8 bits, no parity, 1 stop bit. c. Click Connect in MTTTY, or use the commands on one of the other terminal-emulation programs to establish communication with the Cube. STEP 3: Power up the Cube (9-36V DC) by attaching the Molex-type power connector leading from the bundled DNA-PSU-24, a user-supplied source, or a daisychained line from another PowerDNA Cube. Note that the DNA-PSU-24 plugs into a 100-240V, 50/60-Hz outlet. Also note that the Cube does not have an On/Off switch. STEP 4: As soon as the Cube powers up, it runs through self-diagnostic mode and generates output on the terminal program. A typical readout might be: Figure 2-1. Typical MTTTY Startup Screen The boot process displays the model, serial number, and position of layers. © Copyright 2009 all rights reserved United Electronic Industries, Inc. Tel: 508-921-4600 www.ueidaq.com Date: December 2012 Vers: 3.6 File: PowerDNA _Chap2.fm 11 DNA-PPCx PowerDNA Cube Manual Chapter 2 Installation and Configuration Type show <CR> to display information about cube configuration: DQ> show name: "IOM_1234" model: 0x1005 serial: 0012345 mac: 00:00:11:AA:BB:CC fwct: 1.2.0.0 srv: 192.168.100.3 ip: 192.168.100.2 gateway: 192.168.100.1 netmask: 255.255.255.0 udp: 6334 // IOM or I/O Module – is another // name for a Cube // Core Module > Model Number (1005: // ColdFire) // Core Module > Serial Number (S/N) // of Cube //Core Module > NIC Layer > MAC // Address // Define Cube procedure on startup // IP Address of firmware server // IP Address of this Cube // IP Address of gateway // IP Subnet Mask of this Cube // UDP Port to receive commands on All parameters can be changed; most notably, the cube’s configured IP, gateway, and subnet mask (netmask). 2.2.4 IP Addresses on the PowerDNA Cube The PowerDNA Cube ships with a preconfigured factory default IP address in nonvolatile memory (usually 192.168.100.2). This is a static IP address; the PowerDNA Cube never retrieves its IP address from a DHCP server. This section describes why and how to change the default IP address. Should you change the IP? Yes, if you plan to use the Cube on a LAN where. • High sampling rate is not necessary • Some samples may be dropped due to network congestion and collisions • The cube should be accessible by multiple parties on the LAN • Multiple Cubes operate (and interact) on the same network Alternatively, if you plan to use the Cube for high-speed measurements where reliability is necessary – a direct connection between the host PC and a NIC1 is recommended. For a direct connection, see the following section, “Improving Network Performance” How to change the IP. Both PowerDNA Explorer and a terminal-emulation program can change the IP. Consult your system or network administrator to obtain an unused IP. Let’s say, for example, that your system administrator assigns you the IP 192.168.0.65. To change the IP from the terminal program, enter the following commands: 1. NIC - Network Interface Controller; a commercially available Ethernet (i.e. IEEE 802.3) adapter. © Copyright 2009 all rights reserved United Electronic Industries, Inc. Tel: 508-921-4600 www.ueidaq.com Date: December 2012 Vers: 3.6 File: PowerDNA _Chap2.fm 12 DNA-PPCx PowerDNA Cube Manual Chapter 2 Installation and Configuration DQ> set ip 192.168.0.65 Enter user password > powerdna DQ> store DQ> reset // Sets this Cube’s IP to 192.168.0.65 // The default password is “powerdna” // Saves the newly changed configuration // Reboots the cube for the new IP to //take effect You can set any parameters listed with the “show” command in this manner. Connect the PowerDNA Cube to your switch with the bundled CAT5e cable. If you can establish communications with a Cube, but later want to modify the IP address, you can also do so from within PowerDNA Explorer. After the exploratory process, go to the field where the application displays the IP address. Enter the new IP address and then hit <Return>. This action downloads the new IP address into the Cube’s non-volatile memory. You might also need to change the gateway and network mask to match settings on your LAN. 2.2.5 Improving Network Performance To improve PowerDNA network performance, we recommend that you use a separate commercially available network interface controller (NIC) card and set up a dedicated mini-network for PowerDNA. The goal of this section is to facilitate creation of such a network: For example, assume that your office uses a Class C network (the class intended for small networks with fewer than 256 devices) and your host is configured with a static IP or via DHCP—Dynamic Host Configuration Protocol — a protocol for assigning dynamic IP addresses to devices on a network. STEP 1: Obtain your networking configuration by using the Command Prompt: Start>>Programs>>( Accessories>>) Command Prompt C:\> ipconfig © Copyright 2009 all rights reserved United Electronic Industries, Inc. Tel: 508-921-4600 www.ueidaq.com Date: December 2012 Vers: 3.6 File: PowerDNA _Chap2.fm 13 DNA-PPCx PowerDNA Cube Manual Chapter 2 Installation and Configuration Ethernet adapter NIC1 - Local Area Connection: Connection-specific DNS Suffix : IP Address. . . . . . . . . : 192.168.1.10 Subnet Mask . . . . . . . . . . . : 255.255.255.0 Default Gateway . . . . . . . . . . : 192.168.1.1 Linux users can use the more verbose “ifconfig” command instead. Here, the subnet range 192.168.1.0-192.168.1.255 is being used by NIC1. IP Addressing: The range of usable addresses is defined by the IP address and subnet mask. An IP address is a number that is split into the range of 0.0.0.0 and 255.255.255.255. Here, the IP address is 192.168.1.10. The subnet mask indicates where an address stops. For example, a subnet mask 255.255.255.240 has 15 usable addresses (255.255.255.255 – 255.255.255.240). Here, the subnet is 255.255.255.0, or 255 addresses. The subnet limits from anything.anything.anything.0 up to the max. The usable range for 192.168.1.10/255.255.255.0 is 192.168.1.1 to 192.168.1.254 (192.168.1.0 and 192.168.1.255 are reserved for Router and Broadcast messages). The usable range for 192.168.0.4/255.255.0.0 is 192.168.0.1 to 192.168.255.255 The usable range for 192.168.100.2/255.255.255.0 is 192.168.100.1 to 192.168.100.254 Not every IP address from 0.0.0.0 to 255.255.255.255 is usable; however, these three ranges of IP addresses are guaranteed open for private use: 10.0.0.0 – 10.255.255.255 172.16.0.0 – 172.31.255.255 192.168.0.0 – 192.168.255.255 You need not use the entire set. STEP 2: Install the secondary NIC card. STEP 3: Set up a network that does not overlap the existing one. The address space 192.168.1.0 – 192.168.1.255 is used. The IP address block, 192.168.2.1 – 192.168.2.255 is available and in the private range. Let us choose 192.168.100.1 – 192.168.100.255 for the PC’s secondary NIC: IP: 192.168.100.3 Netmask: 255.255.255.0 Gateway:192.168.100.3 Using the Network (Connections) in the control panel: Start >> Programs >> Control Panel >>Network (Connections) Right-click the adapter to bring up the properties window. Open the TCP/IP properties of the adapter and edit to your liking. © Copyright 2009 all rights reserved United Electronic Industries, Inc. Tel: 508-921-4600 www.ueidaq.com Date: December 2012 Vers: 3.6 File: PowerDNA _Chap2.fm 14 DNA-PPCx PowerDNA Cube Manual Chapter 2 Installation and Configuration NOTE: Refer to the Appendix at the end of this document: “Configuring a Second Ethernet Card” for step-by-step instructions on how to do this. STEP 4: Confirm the network configuration at the Command Prompt: Start >> Programs >> (Accessories >> ) Command Prompt C:\> ipconfig Ethernet adapter NIC1 - Local Area Connection: Connection-specific DNS Suffix . : IP Address. . . . . . . . . . . . : 192.168.1.10 Subnet Mask . . . . . . . . . . . : 255.255.255.0 Default Gateway . . . . . . . . . . : 192.168.1.1 Ethernet adapter NIC2 - Local Area Connection 2: Connection-specific DNS Suffix . : IP Address. . . . . . . . . . . . : 192.168.100.3 Subnet Mask . . . . . . . . . . . : 255.255.255.0 Default Gateway . . . . . . . . . : 192.168.100.3 STEP 5: Set up the PowerDNA Cube to use the same subnet, namely: Cube IP: 192.168.100.2 Gateway:192.168.100.3 Netmask: 255.255.255.0 // this is the factory default To do this from a serial terminal-emulation program, enter the following commands when you get the DQ command prompt: DQ> set ip 192.168.100.2 DQ> set gateway 192.168.100.3 DQ> set netmask 255.255.255.0 DQ> store DQ> reset // // // // // Sets this Cube’s IP address to 192.168.100.2 Sets this Cube’s Gateway to 192.168.100.3 Sets the subnet mask to 255.255.255.0 // Saves the newly changed configuration // Reboots the cube for the new IP to take // effect. STEP 6: Connect the PowerDNA Cube to your PC’s second NIC, using the bundled CAT5 cable. The green lights should light up (try the other port, otherwise). STEP 7: Ping the cube to make sure that it is alive. C:\> ping –n 1 192.168.100.2 Pinging 192.168.100.2 with 32 bytes of data: Reply from 192.168.100.2: bytes=32 time<1ms TTL=128 Ping statistics for 192.168.100.2: Packets: Sent = 1, Received = 1, Lost = 0 (0% loss), The above is a successful response. A “Request Timed Out” message indicates error. © Copyright 2009 all rights reserved United Electronic Industries, Inc. Tel: 508-921-4600 www.ueidaq.com Date: December 2012 Vers: 3.6 File: PowerDNA _Chap2.fm 15 DNA-PPCx PowerDNA Cube Manual Chapter 2 Installation and Configuration STEP 8: The Cube should now be configured as follows, where NIC1 uses a straightthrough, and NIC2 uses a cross-over cable to the NIC In (or a straight-through cable will connect to NIC Out). STEP 9: You may now use PowerDNA Explorer to access the cube. See Chapter 3. 2.2.5.1 Troubleshooting The following checklist may assist you in troubleshooting a Cube. The PG (Power Good) LED is on: the Cube plugged in using 9-36V DC. The green lights on NIC In or NIC Out are blinking: CAT5e cable is connected © Copyright 2009 all rights reserved United Electronic Industries, Inc. Use the command prompt to ping <cube IP> (e.g., ping 192.168.100.2) a. Disable (temporarily) the firewall on the secondary NIC. b. Check the secondary NIC network settings. c. Check the cube’s network settings. Use MTTTY and hit Connect. Press [Enter] to display the DQ> or => prompt. (No prompt indicates that you are not connected) Verify that the serial cable is firmly connected to the RS-232 port. Verify the settings: 57600 baud, no parity, 8 data bits, 1 stop bit. Try COM1, COM2, COM3 then hit Connect and press [Enter]. Reboot the cube. The start-up screen should display upon restart. If all else fails, contact UEI support at: [email protected] Type “show” to verify the Cube’s IP, Subnet Mask, and Gateway Tel: 508-921-4600 www.ueidaq.com Date: December 2012 Vers: 3.6 File: PowerDNA _Chap2.fm 16 DNA-PPCx PowerDNA Cube Manual Chapter 2 Installation and Configuration 2.2.6 PowerDNA Explorer Quick-Start Ensure that the computers are on a valid subnet and have valid IPs Finally – contact UEI for support at: [email protected] PowerDNA Explorer does just what its name implies: it “explores” the LAN, looking for connected PowerDNA Cubes. Chapter 3 covers the PowerDNA Explorer in detail. This section/page only provides a quick-start guide. The PowerDNA Explorer identifies PowerDNA Cubes on a selected network – the discovered Cubes are listed on the left-hand-side pane. Select a cube to display pertinent hardware and firmware information. Select a layer of a specific cube to manipulate its inputs or outputs. In brief, this useful tool lets you verify that the Cube is communicating with the host and that the I/O Layers are functioning properly. To scan the network for PowerDNA Cubes, provide a set of addresses to scan. Do the following: STEP 1: Select Network >> Address Ranges from the menu: Figure 2-2. PowerDNA Explorer Startup Screen STEP 2: Add the IP address of the PowerDNA Cube (e.g., 192.168.100.2); click Done. STEP 3: Now scan the LAN for PowerDNA Cubes: Network >> Scan Network One or more gray cube-like icons will display in the left-hand-side of the cube. If no cube icons are displayed, see the Troubleshooting note in the previous section. © Copyright 2009 all rights reserved United Electronic Industries, Inc. Tel: 508-921-4600 www.ueidaq.com Date: December 2012 Vers: 3.6 File: PowerDNA _Chap2.fm 17 DNA-PPCx PowerDNA Cube Manual Chapter 2 Installation and Configuration STEP 4: Double-click a cube to see its information and list the layers: The screenshot above is from the PowerDNA Explorer Demo. The “demo” is just a simulator for users without cubes – or for new users who want to explore the PowerDNA Explorer program without reading/writing to real hardware. Run this program and hover your mouse over the buttons to read the tool-tips and learn through interacting with the program. Some quick notes: To use the layer, the “Enabled” check box should be set. To read from a layer, click the second-to-last button: “Read Input Data” To write to the layer, change the value and click the third (or fourth) button with the red arrow on top of the cube: “Store Configuration”. The cube with the blue arrow above it restores the configuration. To change the IP, change the number, deselect the field, and “Store Configuration”. Take care not to set the IP Address to outside of the network’s configuration subnet -or- to an IP address that is currently in use, as the cube will then become unreachable. See Chapter 3, PowerDNA Explorer, for additional information and instruction. © Copyright 2009 all rights reserved United Electronic Industries, Inc. Tel: 508-921-4600 www.ueidaq.com Date: December 2012 Vers: 3.6 File: PowerDNA _Chap2.fm 18 DNA-PPCx PowerDNA Cube Manual Chapter 2 Installation and Configuration 2.2.7 Updating Firmware Firmware in a PowerDNA Cube’s CPU layer stores configuration data, along with a user application (user-app is compiled on a host PC). Updated firmware is periodically released to introduce new features and to improve the performance of existing features. Updated releases of the firmware are bundled with the entire PowerDNA Software Suite, available for download at any time from the UEI web site (www.ueidaq.com). CAUTION! If you update the firmware in a Cube, be sure to use the PDNA Explorer from the same release as that new firmware. After installing the PowerDNA Software Suite, browse to the installation’s Firmware directory (e.g. C:\Program Files\UEI\PowerDNA\Firmware). The directory may contain MTTTY, updated firmware installation instructions “FirmwareInstall.html,” and two sub-directories containing the firmware. Choose the sub-directory corresponding to the architecture of your cube: ColdFire (CF/CM) with extension S19, or PowerPC (PPC), with extension MOT. Determining the version of your PowerDNA cube with PDNA Explorer: Before updating the firmware of a PowerDNA cube, check the cube version to determine which update method to use. a. Supply power to the PowerDNA cube. b. Connect the PowerDNA cube to its network. c. Start PowerDNA Explorer on the Microsoft Windows desktop from Start >> Programs >> UEI >> PowerDNA >> PowerDNA Explorer d. Choose Network Scan Network e. Select the PowerDNA cube you wish to query (by clicking the cube). f. The version is given in the FW Ver field. If the FW Ver field has is version 2.x.x, or 3.x.x (let x be any version number), you should follow the Firmware Update Instructions [CM5, CM8] section below. For other versions of firmware (e.g., 1.x.x), refer to the user manual on the CD © Copyright 2009 all rights reserved United Electronic Industries, Inc. Tel: 508-921-4600 www.ueidaq.com Date: December 2012 Vers: 3.6 File: PowerDNA _Chap2.fm 19 DNA-PPCx PowerDNA Cube Manual Chapter 2 Installation and Configuration that accompanied your device when you purchased it. 2.2.8 Firmware Update Instructions Before using a new release of the libraries and applications to communicate with your PowerDNA cube, you must install the latest version of the firmware on the PowerDNA cube. The version of the firmware must correspond to the version of the PowerDNA Software Suite — mismatched versions cause an error. Instructions for updating the PowerDNA Cube via PowerDNA Explorer (over an Ethernet LAN line), and over an MTTTY (serial line) follow. To upload firmware with PowerDNA Explorer over LAN, do the following: STEP 1: Supply power to the PowerDNA cube. STEP 2: Connect the PowerDNA cube to its network. STEP 3: Start PowerDNA Explorer on the Microsoft Windows desktop from Start >> Programs >> UEI >> PowerDNA >> PowerDNA Explorer STEP 4: Choose Network >> Scan Network STEP 5: Select the PowerDNA cube to be updated. STEP 6: Select Network >>Update Firmware…from the menu. Figure 2-3Update Firmware Menu Item STEP 7: Click on “Yes” when you see the prompt: “Are you sure you want to update firmware…” STEP 8: Double-click on the dq_ram.S19 file. STEP 9: Enter the password to continue. More information about passwords can be found in the “Interfacing to the CM module using a serial interface” section of this manual. PowerDNA cubes come with the default password set to powerdna. powerdna Figure 2-4Password Dialog Box © Copyright 2009 all rights reserved United Electronic Industries, Inc. Tel: 508-921-4600 www.ueidaq.com Date: December 2012 Vers: 3.6 File: PowerDNA _Chap2.fm 20 DNA-PPCx PowerDNA Cube Manual Chapter 2 Installation and Configuration STEP 10: Wait for the progress dialog to complete. The PowerDNA cube will then be updated and running the new firmware. Figure 2-5. Firmware Update Progress Dialog Box Each cube is updated in three steps. First, the firmware is transferred to the cube. Second, the firmware is written to the flash memory. During this step, the R/W light on the front of the cube is lit, in addition to the PG light. Third, the cube is reset. During this step, the ATT, COM, and PG lights are lit, and the R/W light will turn on and off periodically. When the cube is finished resetting, only the PG light is lit. To upload firmware over serial port using a terminal client (MTTTY, do the following): Under DNA-CM5 and DNA-CM8: STEP 1: Establish communications between the PC and a Cube over the serial link. STEP 2: Press the Hardware Reset switch on the front of the Cube to reset the CPU Layer. STEP 3: While the Cube is starting up again, press <Ctrl>+<A> to activate the download screen (indicated by a #> prompt). If you get to the DQ> prompt, you waited too long and must return to Step 2. STEP 4: Enter the dl command to enter the firmware-download routine. STEP 5: Transfer the file. Depending on which terminal-emulation package you decide to run, you usually initiate the download with a command similar to “send”. In MTTTY, go to the top menu and select Transfer >>Send file (text). When it asks for a file, go to the PowerDNA\Firmware directory and select the .S19 or .MOT firmware file. The download procedure will take roughly a minute. STEP 6: To tell the Cube to save the new firmware into EPROM, enter the commands upuser <CR> update STEP 7: Enter go to complete the firmware-update procedure and return to the DQ> prompt. Under DNA-PPC5 and DNA-PPC8: STEP 1: Establish communications between the PC and a Cube over the serial link. STEP 2: Press the hardware Reset switch on the front of the Cube to reset the CPU Layer, or type: reset all STEP 3: While the Cube is starting up again, Press ESC to go into u_boot. © Copyright 2009 all rights reserved United Electronic Industries, Inc. Tel: 508-921-4600 www.ueidaq.com Date: December 2012 Vers: 3.6 File: PowerDNA _Chap2.fm 21 DNA-PPCx PowerDNA Cube Manual Chapter 2 Installation and Configuration STEP 4: Type the command to erase firmware download area in the Flash memory: => erase all => loads romimage.mot// loads stores firmware into the flash while // downloading it. STEP 5: Transfer the Motorola firmware file. Use Transfer » Send File, and select \Program Files\UEI\PowerDNA\ Firmware_PPC\romimage_3_x_y.mot A progress bar will appear in the lower left corner of MTTTY indicating progress. STEP 6: Wait for the upload to complete (it may take a few minutes). STEP 7: After the process finishes, enter the fwjmp command. The PowerDNA cube will then be updated and running the new firmware. At this point, only the PG light on the cube remains lit. 2.3 Mounting and Mount the Cube directly to the application hardware either by screwing it directly to the machine or by using the optional DIN rail clip (DNA-DR). A norfield connections mal DIN rail comes with screws you can use to mount the rail onto another surface or piece of equipment. However, because the Cubes are designed to fit into applications where space is at a premium, it may sometimes be difficult to attach the rail in this way. For such cases, we include a special adhesive tape for attaching the rail to any desired surface. CAUTION! Take care when deciding on which surface you plan to mount a Cube. For example, using the adhesive strip, you can normally attach the DIN rail to a wall without causing any damage, as shown below — unless the wall has a sensitive coating such as delicate paint or wallpaper. © Copyright 2009 all rights reserved United Electronic Industries, Inc. Tel: 508-921-4600 www.ueidaq.com Date: December 2012 Vers: 3.6 File: PowerDNA _Chap2.fm 22 DNA-PPCx PowerDNA Cube Manual Chapter 2 Installation and Configuration 2.4 Wiring 100BaseTX/100BaseFX Wiring Configurations Typical wiring configurations for 100BaseTX/100BaseFX networks are shown in the following figures. Cubes may also be connected with standard straight-through lines through a switch. Alternatively, a cross-over cable may be used to directly connect to a cube, as shown below. This improves performance (and isolates the cube from problems with the switch). For a fast connection in the field, you may connect a straight through cable to the NIC Out jack, as shown below. Use the NIC In jack to connect out to the LAN. The reason that this works is that in the NIC Out jack, the Rx/Tx lines are © Copyright 2009 all rights reserved United Electronic Industries, Inc. Tel: 508-921-4600 www.ueidaq.com Date: December 2012 Vers: 3.6 File: PowerDNA _Chap2.fm 23 DNA-PPCx PowerDNA Cube Manual Chapter 2 Installation and Configuration crossed over for you, so the wiring acts like a cross-over cable for you. A crossover cable is the same as a straight-through except the Rx/Tx lines are inverted, as shown below: NOTE: The above configurations work with CM and PPC (not FCM, or FPPC) when used in conjunction 8-wire Category 5 copper cabling (i.e. CAT5/ CAT5e) less than 100meters in length, and a 10/100Mbit NIC, or switch. © Copyright 2009 all rights reserved United Electronic Industries, Inc. Tel: 508-921-4600 www.ueidaq.com Date: December 2012 Vers: 3.6 File: PowerDNA _Chap2.fm 24 DNA-PPCx PowerDNA Cube Manual Chapter 2 Installation and Configuration For FCM and FPPC cubes, use a fiber NIC, as shown below: In this diagram, NIC1 is a copper NIC connecting the PC to the LAN (optional). NIC2 is an Intel network card in the PC used to connect to the cube’s built-in fiber ports. A multi-mode optical cable with SC-type plugs like this one is used to connect to the Tx/Rx plugs. In 100Base-FX mode, the maximum transmission range (without a repeater) is 2km at full-duplex, or 400m at half-duplex. The cube uses an HFBR-5803 transmitter capable of communication at 100Mbps. 2.5 Peripheral Terminal Panel Wiring © Copyright 2009 all rights reserved United Electronic Industries, Inc. Refer to the companion layer manuals for proper wiring to layers. Tel: 508-921-4600 www.ueidaq.com Date: December 2012 Vers: 3.6 File: PowerDNA _Chap2.fm 25 DNA-PPCx PowerDNA Cube Manual Chapter 3 PowerDNA Explorer Chapter 3 PowerDNA Explorer PowerDNA Explorer simplifies configuration and setup of a PowerDNA cube under Microsoft Windows. This section describes the various menus in PowerDNA Explorer. NOTE: The PowerDNA Explorer DEMO lets you safely explore the menus and layer screens without the need for using actual PowerDNA cubes. 3.1 The Main Window The Main Window of the PowerDNA Explorer is shown in Figure 3-1. Figure 3-1. PowerDNA Explorer Main Window The Main Window is the window you see when the PowerDNA Explorer is first launched and is where you do most of your work. It has four main parts: the Menu Bar, the Toolbar, the Device Tree, and the Settings panel. 3.2 3.2.1 Menu Bar File Menu The Menu Bar contains the following menus and menu items. Preferences brings up the preferences dialog. The preferences dialog allows you to specify the network timeout interval. This is the length of time PowerDNA Explorer will wait for response from a PowerDNA cube before giving up with an error. It defaults to 100 milliseconds. Figure 3-2. Preferences Exit exits the application. If there are unsaved device settings changes, you are prompted for confirmation. 3.2.2 Network Menu Address Ranges brings up the Address Ranges dialog, allowing you to specify © Copyright 2009 all rights reserved United Electronic Industries, Inc. Tel: 508-921-4600 www.ueidaq.com Date: December 2012 Vers: 3.6 File: PowerDNA _Chap3.fm 26 DNA-PPCx PowerDNA Cube Manual Chapter 3 PowerDNA Explorer where to scan for devices. Figure 3-3. Address Ranges Dialog Box The Address Ranges dialog allows you to specify the IP addresses and UDP port to use to find devices. You can specify individual addresses as well as address ranges. The specified items appear in a list that can be added to and deleted from. This list defaults to a single range item that specifies the range 192.168.100.2 ... 192.168.100.10. Figure 3-4. Edit Address Ranges Dialog Box Scan Network scans the network for devices and populates the device tree. How much of the network is scanned depends on the settings in the Network © Copyright 2009 all rights reserved United Electronic Industries, Inc. Tel: 508-921-4600 www.ueidaq.com Date: December 2012 Vers: 3.6 File: PowerDNA _Chap3.fm 27 DNA-PPCx PowerDNA Cube Manual Chapter 3 PowerDNA Explorer Ranges dialog. Figure 3-5. After a Network >>Scan Network If you choose Scan Network when the device tree is already populated, any new devices discovered will be added to the tree. Any existing devices that are missing will be removed from the tree, unless you have made unsaved changes to such a device's configuration, in which case it will be marked in the tree as missing. Reload Config re-reads the configuration of the current device selected in the Device Tree. If you have made changes to the settings in the settings panel for the current device, Read will replace those settings with the device's current settings, after prompting for confirmation. Store Config writes the currently selected device's changed settings to the device. The button is disabled for devices that haven't been modified. Store All Configs writes all of the changed devices' settings to the devices. The button is disabled if no devices have been modified. Read Input Data is enabled when the currently selected device is an input device layer. It reads the current input values to the device and causes them to be displayed in the settings panel. Update Firmware… loads a firmware update file to all connected PowerDNA cubes if Host PC is selected. It updates only one PowerDNA cube when the specific PowerDNA cube is updated. More details about this can be found in the section Updating firmware in a version 2.0 PowerDNA cube. Note that writing certain configuration changes to a PowerDNA cube running firmware 2.0.16 will bring up a password dialog box. More information about passwords can be found in the “Interfacing to the CM module using a serial interface” section of this manual. PowerDNA cubes come with the default password set to “powerdna”. © Copyright 2009 all rights reserved United Electronic Industries, Inc. Tel: 508-921-4600 www.ueidaq.com Date: December 2012 Vers: 3.6 File: PowerDNA _Chap3.fm 28 DNA-PPCx PowerDNA Cube Manual Chapter 3 PowerDNA Explorer Figure 3-6. Password dialog box for Store Config and Store All Configs Figure 3-7. Password Dialog Box for Update Firmware . . . 3.2.3 View Menu © Copyright 2009 all rights reserved United Electronic Industries, Inc. Show Wiring Diagram is a friendly reminder of the connector pins for a specific layer. All layers have this option, and we display this one as an example. The wiring diagrams in PowerDNA Explorer match the wiring diagrams in this manual in the sections for each layer. Tel: 508-921-4600 www.ueidaq.com Date: December 2012 Vers: 3.6 File: PowerDNA _Chap3.fm 29 DNA-PPCx PowerDNA Cube Manual Chapter 3 PowerDNA Explorer Figure 3-8. Example of a Wiring Diagram 3.2.4 Help Menu About PowerDNA Explorer shows the About ... box, which shows the program icon, program name, version number, company name, and copyright notice. 3.2.5 Toolbar The toolbar contains the following buttons: Scan Network, Reload Config, Store Config, Store All Configs, Read Input Data, and Show Wiring Diagram. They duplicate the functionality of the corresponding menu items as described above. 3.2.6 Device Tree When the application is first launched, the tree contains just a root item representing the host computer. When you select Scan Network from the Network menu or the toolbar, the device tree gets populated with all central controllers, IOMs, and device layers accessible from the network, as filtered through the Network Ranges dialog. Central controllers, if any, appear as children of the Host PC item. IOMs that are connected to the PC without use of a central controller also appear as direct children of the Host PC item. Each item has an icon indicating whether it is a central controller, IOM, or layer. The text label for each item is the device's model number, name, and serial © Copyright 2009 all rights reserved United Electronic Industries, Inc. Tel: 508-921-4600 www.ueidaq.com Date: December 2012 Vers: 3.6 File: PowerDNA _Chap3.fm 30 DNA-PPCx PowerDNA Cube Manual Chapter 3 PowerDNA Explorer number. Layers are also labeled with their layer number in parentheses. Figure 3-9. Example of the Device Tree When an item is selected in the tree, the settings panel changes to reflect the settings for that device. The first time an item is selected, the device is queried as though you had invoked the Read command. On subsequent selections of the same item, the last settings are re-displayed. Thus, if you made changes but did not write them to the device, the changes are remembered. Invoking the Read command will re-read the device and overwrite the current settings in the settings panel. Devices whose settings have changed, but have not been written are displayed in bold italics in the tree to provide a visual cue. Changed devices that become missing on a subsequent invocation of Scan Network turn red in the tree. (Unchanged items that become missing are simply removed from the tree.) 3.2.7 Settings Panel The settings panel presents a set of controls that allow you to change the settings of the device currently selected in the device tree. 3.2.7.1 IOM Settings The settings panel has the following controls when an IOM is selected in the tree. Figure 3-10. Example of IOM Settings Panel for a PowerDNA cube Name shows the IOM name. It can be changed. Model shows the model number of the IOM. FW Ver shows the version of the firmware installed on the PowerDNA cube. S/N shows the serial number of the IOM. © Copyright 2009 all rights reserved United Electronic Industries, Inc. Tel: 508-921-4600 www.ueidaq.com Date: December 2012 Vers: 3.6 File: PowerDNA _Chap3.fm 31 DNA-PPCx PowerDNA Cube Manual Chapter 3 PowerDNA Explorer MAC shows the MAC address. It cannot be changed, and thus is informational only. IP Address shows the IP address of the IOM. It can be changed. Mode shows the mode the PowerDNA cube is in: Initialization, Configuration, Operation, or Shutdown. These modes are described in the section, IOM Modes. © Copyright 2009 all rights reserved United Electronic Industries, Inc. Tel: 508-921-4600 www.ueidaq.com Date: December 2012 Vers: 3.6 File: PowerDNA _Chap3.fm 32 DNA-PPCx PowerDNA Cube Manual Chapter 3 PowerDNA Explorer 3.2.7.2 Device Layer Settings Figure 3-1 shows the screen for displaying device layer settings. Figure 3-11. Example of Device Layer Settings for a Layer Each layer has the following settings. © Copyright 2009 all rights reserved United Electronic Industries, Inc. • Model shows the model number of the layer. • Info shows some key features of the layer: A for analog, D for digital, In for input, Out for output, and a number of channels available. • S/N shows the layer's serial number. • Mfg. Date shows the manufacturing date of the layer. • Cal. Date shows the date of the last calibration done to the layer. • Enabled is a checkbox that, when unchecked, excludes the device from configuration. The device is excluded from the Store All Configs command, and the Reload Config command is disabled. Also, the device appears gray in the tree. All devices are enabled by default. Tel: 508-921-4600 www.ueidaq.com Date: December 2012 Vers: 3.6 File: PowerDNA _Chap3.fm 33 DNA-PPCx PowerDNA Cube Manual Chapter 3 PowerDNA Explorer • Select Network >>Read Input Data to update the Value column of any layer, as shown below: Figure 3-12. Screen from Network >> Read Input Data At the screen shown above, you can add/edit channel names. After editing names, choose Network >> Store Config to save changes to the layer. This is true for all layers. Also, if you have changed a configuration value, but have not chosen Network >> Store Config to save them, previous values can be re-read from the layer, using Network >> Reload Config. AI-205 and AI-225 layer screens are same as the AI-201 layer, but with different input ranges and number of channels. In addition, digital and analog output layers have settings specific to their layer types. 3.2.8 Digital Input/ Output Layer Settings © Copyright 2009 all rights reserved United Electronic Industries, Inc. We'll use the DIO-405 as an example to start with, then show how the DI-401, DO-402 and DIO-403 are different. NOTE: Use Network >> Read Input Data to see immediate input values in Input tabs. Use Network >> Store Config to save values to the layer. Tel: 508-921-4600 www.ueidaq.com Date: December 2012 Vers: 3.6 File: PowerDNA _Chap3.fm 34 DNA-PPCx PowerDNA Cube Manual Chapter 3 PowerDNA Explorer Figure 3-13. Example DIO-405 Layer Inputs © Copyright 2009 all rights reserved United Electronic Industries, Inc. Tel: 508-921-4600 www.ueidaq.com Date: December 2012 Vers: 3.6 File: PowerDNA _Chap3.fm 35 DNA-PPCx PowerDNA Cube Manual Chapter 3 PowerDNA Explorer Figure 3-14. Example DIO-405 Layer Outputs Reference is a reference voltage. 0 level/1 level are hysteresis values described fully in the DIO-401/2/5 section of this manual. Input/Output/Initialization/Shutdown tabs switch between settings for init and shutdown states, as well as operation mode configuration, and display of current data. All tabs contain the following columns: • The unnamed first column contains the channels. • Name is a user-defined string. Value contains 0 or 1. It is a drop-down menu for output channels allowing you to select 0 or 1. The DI-401 layer just has Reference and 0 and 1 Level controls, and Input tab. The DO-402 layer just has Output, Initialization, and Shutdown tabs; no Reference value or Level sliders. The DIO-403 layer is different because it groups 8-bits at a time into ports, and three ports into two channels. For the sake of abstraction in PowerDNA Explorer, we'll call all the ports channels. • © Copyright 2009 all rights reserved United Electronic Industries, Inc. Tel: 508-921-4600 www.ueidaq.com Date: December 2012 Vers: 3.6 File: PowerDNA _Chap3.fm 36 DNA-PPCx PowerDNA Cube Manual Chapter 3 PowerDNA Explorer Figure 3-15. Example of DIO-403 Layer Inputs Figure 3-16. Example of DIO-403 Layer Outputs Input/Output/Configuration/Initialization/Shutdown tabs switch between settings for init and shutdown states, as well as operation mode configuration, and display of current data. Input/Output tabs get/set the current input/output values. They contain the following columns: © Copyright 2009 all rights reserved United Electronic Industries, Inc. Tel: 508-921-4600 www.ueidaq.com Date: December 2012 Vers: 3.6 File: PowerDNA _Chap3.fm 37 DNA-PPCx PowerDNA Cube Manual Chapter 3 PowerDNA Explorer • The unnamed first column contains the channels. • Name is a user-defined string. • 7 through 0 contain the values 0 or 1. For the output tab, they are checkmarks for output channels allowing you to select 0 (unchecked) or 1 (checked). Figure 3-17. Example of DIO-403 Layer Outputs Figure 3-18. Example DIO-403 Layer Configuration © Copyright 2009 all rights reserved United Electronic Industries, Inc. Tel: 508-921-4600 www.ueidaq.com Date: December 2012 Vers: 3.6 File: PowerDNA _Chap3.fm 38 DNA-PPCx PowerDNA Cube Manual Chapter 3 PowerDNA Explorer Configuration tab gets/sets the current input/output directions per port. It contains the following columns: • The unnamed first column contains the channels. • Name is a user-defined string. • In/Out contains toggle switches to select whether the channel is to be used for input or for output. Figure 3-19. Example DIO-403 Layer Initialization Initialization/Shutdown tabs allow you to set a port as input or output, and set output values. They contain the following columns: © Copyright 2009 all rights reserved United Electronic Industries, Inc. • The unnamed first column contains the channel names. • Name is a user-defined string. • Mode specifies whether the channel is input or output. • 7 through 0 contain the values 0 or 1. They are checkmarks for output channels that allow you to select 0 (unchecked) or 1 (checked). Tel: 508-921-4600 www.ueidaq.com Date: December 2012 Vers: 3.6 File: PowerDNA _Chap3.fm 39 DNA-PPCx PowerDNA Cube Manual Chapter 3 PowerDNA Explorer 3.3 Analog Output Layer Settings We'll use the AO-302 as an example. NOTE: Use Network >> Read Input Data to see immediate input values in Input tabs. Use Network >> Store Config to save values to the layer. Figure 3-20. Example AO-302 layer You can change output, initialization, and shutdown values. You can also change Output Range using the combo box, and this only affects values displayed in initialization and shutdown tabs. You can then choose Network >> Store Config to apply all changes to the layer. Output Range is a popup allowing you to choose between -10...0V, 0...+10V, and -10...+10V. Output/Initialization/Shutdown tabs switch between settings for init and shutdown states, as well as operation mode configuration. The Output, Initialization and Shutdown tabs contain the channel list table, which has the following columns: © Copyright 2009 all rights reserved United Electronic Industries, Inc. • The unnamed first column contains the channel names. • Name is a user-defined string. • Value contains a slider to set the voltage to output from the channel and the numerical voltage value, which you can input directly. The actual voltage depends on the selected output range. Tel: 508-921-4600 www.ueidaq.com Date: December 2012 Vers: 3.6 File: PowerDNA _Chap3.fm 40 DNA-PPCx PowerDNA Cube Manual Chapter 3 PowerDNA Explorer 3.4 Analog Input Layer Settings We'll use the AI-201 as an example to start with. The AI-202 and AI-205 are similar. NOTE: Use NetworkRead Input Data to see immediate input values in Input tabs. Use NetworkStore Config to save values to the layer. Figure 3-21. Example AI-201 layer Input Range shows the specified input range. It cannot be changed, and thus is informational only. The Data table contains the values currently coming into the device. The table is initially blank until you invoke Refresh Data, unless auto-refresh is activated in the preferences dialog. The table has three columns: © Copyright 2009 all rights reserved United Electronic Industries, Inc. • The unnamed first column contains the channel names. • Name is a user-defined string. • Value shows the current value. Tel: 508-921-4600 www.ueidaq.com Date: December 2012 Vers: 3.6 File: PowerDNA _Chap3.fm 41 DNA-PPCx PowerDNA Cube Manual Chapter 3 PowerDNA Explorer 3.5 Counter/ Timer Layer Settings We'll use the CT-601 as an example. Figure 3-22. Example CT-601 layer The CT-601 layer has 8 counters. Each counter can be set to one of four different modes: Quadrature, Bin Counter, Pulse Width Modulation (PWM), or Pulse Period. When you change the mode of a counter using the mode combo box, the controls for that counter will change to those appropriate for the mode. Figure 3-23. Example Quadrature controls © Copyright 2009 all rights reserved United Electronic Industries, Inc. Tel: 508-921-4600 www.ueidaq.com Date: December 2012 Vers: 3.6 File: PowerDNA _Chap3.fm 42 DNA-PPCx PowerDNA Cube Manual Chapter 3 PowerDNA Explorer Figure 3-24. Example Bin Counter controls Figure 3-25. Example Pulse Width Modulation (PWM) controls Figure 3-26. Example Pulse Period Controls After setting the configuration for a counter, you can choose NetworkStore Config to store the settings on the device. Clicking the Start button will also write you configuration to the layer. Clicking the Start button for a counter will start that counter on the layer. The Start button will turn into a Stop button, and the other controls for that counter will become disabled until you click Stop. While the layer is running, you can choose NetworkRead Input Data to retrieve runtime values from the counter, which will display in the read-only text field(s) of the counter control panel. © Copyright 2009 all rights reserved United Electronic Industries, Inc. Tel: 508-921-4600 www.ueidaq.com Date: December 2012 Vers: 3.6 File: PowerDNA _Chap3.fm 43 DNA-PPCx PowerDNA Cube Manual Chapter 3 PowerDNA Explorer Figure 3-27. Example of Started Counter © Copyright 2009 all rights reserved United Electronic Industries, Inc. Tel: 508-921-4600 www.ueidaq.com Date: December 2012 Vers: 3.6 File: PowerDNA _Chap3.fm 44 DNA-PPCx PowerDNA Cube Manual Chapter 4 The PowerDNA Core Module Chapter 4 The PowerDNA Core Module The top two slots of any 5- or 8-slot cube are occupied by the Core Module. The Core Module consists of a CPU and peripheral devices (RS-232, NIC, SD, etc). The NIC is either a copper (100BaseT) or a Fiber-optic (10/100Base-FX) interface. The CPU is either FreeScale ColdFire (DNA-CM) or PowerPC CPU (DNA-PPC). In addition, an RS-232 port is provided for configuration, and activity lights for status. Figure 4-1. PowerDNA Core Module (CPU and NIC) This chapter focuses on the device architecture of the Core Module — no layers. © Copyright 2009 all rights reserved United Electronic Industries, Inc. Tel: 508-921-4600 www.ueidaq.com Date: December 2012 Vers: 3.6 File: PowerDNA _Chap4.fm 45 DNA-PPCx PowerDNA Cube Manual Chapter 4 The PowerDNA Core Module 4.1 Device Architecture of DNA-CM The CM controller architecture can be represented as follows: Figure 4-2. FreeScale ColdFire Controller Architecture The core of the system is a FreeScale (formerly Motorola) ColdFire MCF5272 processor. The processor is directly connected to the following components: • Network interface MII port • RS-232 port • IrDA port • 2MB user flash memory • 4MB system flash memory • 64MB of SDRAM • Bus bridge • Control logic • LEDs • Watchdog timer with real-time clock (battery backed) Not all components are available for control from the CPU. The CPU can program flash memory, set the LEDs, set up the watchdog timer, set the real-time clock and use 256 bytes of backed-up memory in the watchdog timer chip. All functions are available at the firmware level only (described in iom.c/iom.h). © Copyright 2009 all rights reserved United Electronic Industries, Inc. Tel: 508-921-4600 www.ueidaq.com Date: December 2012 Vers: 3.6 File: PowerDNA _Chap4.fm 46 DNA-PPCx PowerDNA Cube Manual Chapter 4 The PowerDNA Core Module 4.1.1 Device Architecture of DNA-PPC The PowerPC controller architecture can be represented as follows: Figure 4-3. PowerPC Controller Architecture The core of the system is a FreeScale PowerPC MPC5200 400MHz processor. The processor controls the following components: • Network interface MII port • RS-232 port • SYNC port • 4MB system flash memory • 128MB of 266MHz DDRAM • Bus bridge All functions are available at the firmware level only (iom.c/iom.h). © Copyright 2009 all rights reserved United Electronic Industries, Inc. Tel: 508-921-4600 www.ueidaq.com Date: December 2012 Vers: 3.6 File: PowerDNA _Chap4.fm 47 DNA-PPCx PowerDNA Cube Manual Chapter 5 Programming Layer-specific Functions Chapter 5 Programming Layer-specific Functions 5.1 Overview This chapter describes tools and facilities used for programming module-specific functions — memory maps for various CPUs, register descriptions, procedures for startup, setting parameters, loading/updating firmware, setting up triggers, synchronization, and clock lines. 5.2 Memory Map The ColdFire-based CM has the following memory map: Device Start Address End Address Size Description SDRAM 0x0 0x4000000 64MB SDRAM_ADDRESS Interrupt table 0x0 0x400 Firmware load address 0x20000 End address and size depends on firmware size Firmware start address 0x20400 First execution instruction of firmware IMM 0x10000000 Memory map register - IMM_ADDRESS On-board PLD 0x60000000 Watchdog timer 0x60008000 0x61000000 1024 Processor address map 1MB EXT_SRAM_ADDRESS IOM_WDTIMER – within PLD access space Processor RAMBAR 0x80000000 User flash memory 0x90000000 0x90400000 4MB FLASHAUX_ADDRESS Layer – CS2 0xA0000000 0xA00FFFFC 1MB EXT_DEV_ADDRESS2 Layer – CS3 0xA0100000 0xAFFFFFFC 256M EXT_DEV_ADDRESS3 The PowerPC-based CM has the following memory map: Device Start Address End Address Size Description SDRAM 0x0 0x8000000 128MB SDRAM_ADDRESS Exception table 0x0 IMM 0x10000000 On-board logic 0xA00E0000 Watchdog timer 0xA00E8000 0x3000 12k Processor address map Memory map register - IMM_ADDRESS 0xA00EFFFC 64kB EXT_SRAM_ADDRESS IOM_WDTIMER – within PLD access space Processor RAMBAR 0x80000000 Layer – CS2 0xA0000000 0xA00FFFFC Layer – CS3 0xA0100000 0xAFFFFFFC 256M © Copyright 2009 all rights reserved United Electronic Industries, Inc. 1MB Tel: 508-921-4600 www.ueidaq.com Date: December 2012 EXT_DEV_ADDRESS2 EXT_DEV_ADDRESS3 Vers: 3.6 File: PowerDNA _Chap5.fm 48 DNA-PPCx PowerDNA Cube Manual Chapter 5 Programming Layer-specific Functions Device Start Address End Address Size Description SDRAM 0x0 0x8000000 128MB SDRAM_ADDRESS Flash (parameters) 0xFFC00000 0xFFC0FFFF 64kB Parameters (64 sectors) Flash (firmware) 0xFFC10000 0xFFEFFFFF 3MB Firmare (3MB – 64kB) Falsh (U-Boot) 0xFFF00000 0xFFFFFFFF 1MB U-Boot Two address ranges are interesting for host software: Layer Address Space (0xA0000000 – 0xA00FFFFC and 0xA0100000 – 0xAFFFFFFC). The first address range is dedicated to devices located on CS2 line and accommodates sixteen layers with 64k memory map each. The second address range is designated for fast devices located in CS3 line and it accommodates fifteen devices with 16MB memory map each. 5.2.1 Startup sequence (DNA-CM-5/8) fwad: fwgo: fwsz: fwcp: fwst: After reset, the processor starts monitor execution from flash memory. The monitor initializes the processor and the address map, retrieves information from the parameter sector of the flash memory, and tests system memory and other system resources. If “fwgo” parameter is set to “autorun”, the monitor waits for three seconds for the user to send Ctrl-A (which is transmitted over the serial interface.) If sent, the monitor aborts loading firmware into memory and brings up the monitor command prompt (to load a new firmware version, for example). Otherwise, the monitor reads the firmware from the flash memory and stores it in RAM. Then, the monitor executes the firmware. The following parameters are critical to copy firmware and start it from the proper address: 0xFFE40000 0x1 0x100000 0x20000 0x20400 These parameters can be reviewed using the “show” command while at the monitor “#>” prompt. “fwad” is the initial address where firmware is stored. This address shall be set before storing firmware or executing it. “fwgo” defines whether the monitor should load firmware (1) or should display a command prompt. “fwsz” defines the size of the stored firmware. Default value is 0x100000 – one megabyte. “fwcp” defines the address to which the monitor copies firmware from flash memory. The default is 0x20000. Firmware is compiled to run from this address. “fwst” defines firmware entry point. Firmware entry point follows vector table and is located with offset 0x400 from the beginning of the firmware code. These parameters are pre-programmed at the factory and there is no known reason for a user to change them. The monitor command “fwjmp” causes the monitor to load and execute firmware. © Copyright 2009 all rights reserved United Electronic Industries, Inc. Tel: 508-921-4600 www.ueidaq.com Date: December 2012 Vers: 3.6 File: PowerDNA _Chap5.fm 49 DNA-PPCx PowerDNA Cube Manual Chapter 5 Programming Layer-specific Functions 5.2.2 Startup After reset, the processor reads the boot-up sequence located at 0xfffff100. This command sequence is a part of U-Boot code. U-Boot initializes all major Sequence (DNA-PPC-5/8) subsystems of the CM including DDRAM and Ethernet interface. After initializing, U-Boot performs a command list stored in its environment sector under the bootcmd entry. Standard commands to launch firmware are either fwjmp or go 0xffc10000, depending on the version of U-Boot installed. U-Boot then gives up control to the firmware code located at 0xffc10000. Firmware self-expands into the DDRAM, initializes exception table, and starts execution. 5.2.3 Interfacing to the CM Module Using a Serial Interface There are two ways to set up CM parameters. The first one is the use of serial interface and the second one is the use of DaqBIOS calls. To connect to the serial interface, the user should connect an extender 9-wire serial cable to the PowerDNA cube (plug male connector) and your PC COM1 serial port (plug female connector). Some cables have a female-to-female connector. If so, you should use a gender-changer. Set up your terminal to the proper serial port, 57600 bit rate, no parity, eight data bits, and one stop bit. Alternately, using StartRun…on the Microsoft Windows desktop, type \Program Files\UEI\PowerDNA\Firmware\mttty.exe Click FileConnect. Once a connection to the PowerDNA cube is established, tap “Enter” once. The PowerDNA cube should respond with either a “DQ>” prompt (this is firmware prompt) or a “#>” prompt (monitor prompt). Once you see the “DQ>” prompt, you can type “help<enter>” to receive the list of all available commands. The following commands are available: DQ> help help set show store mw mr time pswd ps test simod reset dqping mode [ID] log ver devtbl netstat Display this help message Set parameter Show parameters Store parameters (flash) Write wr <addr> <val> (hex) Read rd <addr> (hex) Show/Set time Set password Show process state # Test something System Init/Module Cal Reset system Send DQ_ECHO to <mac addr> Set current mode Display log content Show firmware version Show all devices/layers Show network statistics help set option value show store mw mr time [mm/dd/yyyy] [hh:mm:ss] pswd {user|su} ps [value] test [test number] simod [routine] reset [all] dqping [MAC|IP] mode {init|config|oper|shutdown} log [start [end]] -1 = clear ver devtbl netstat One of the most useful commands is “show”: DQ> show © Copyright 2009 all rights reserved United Electronic Industries, Inc. Tel: 508-921-4600 www.ueidaq.com Date: December 2012 Vers: 3.6 File: PowerDNA _Chap5.fm 50 DNA-PPCx PowerDNA Cube Manual Chapter 5 Programming Layer-specific Functions name: model: serial: mac: fwct: srv: ip: gateway: netmask: udp: "IOM_22811" 0x1005 0022811 00:0C:94:00:59:1B 1.2.0.0 192.168.0.229 192.168.0.67 192.168.0.1 255.255.255.0 6334 This command displays current values of every major PowerDNA cube parameter. To change parameters, use “set” command (type set for “set” command syntax). DQ> set Valid 'set' options: name: <Device name> model: <Model id> serial: <Serial #> mac: <my ethernet address> fwct: <autorun.runtype.portnum.umports> srv: <Host IP address> ip: <IOM IP address> gateway: <gateway IP address> netmask: <netmask IP address> udp: <udp port (dec)> For example, to set a new IP address, type: DQ> set ip 192.168.100.100 Other parameters can be changed the same way. Once parameters are set, however, you have to store them into non-volatile flash memory: DQ> store Flash: 1212 bytes of 1212 stored! CRC=0x8975E34A Old=0x8975E34A Configuration stored DQ> After parameters are stored, the you should reset the firmware (start firmware execution from the beginning without full hardware reset): DQ> reset Stopping… DaqBIOS (C) UEI, 2001-2004. Running PowerDNA Firmware Built on 16:39:15 Oct 1 2004 Initialize uC/OS-II (Real-Time Kernel v.252) Configuration recalled 3 device detected © Copyright 2009 all rights reserved United Electronic Industries, Inc. Tel: 508-921-4600 www.ueidaq.com Date: December 2012 Vers: 3.6 File: PowerDNA _Chap5.fm 51 DNA-PPCx PowerDNA Cube Manual Chapter 5 Programming Layer-specific Functions Address Irq Model Option Phy/Virt S/N Pri DevN -------------------------------------------------0xA0000000 2 205 1 phys 0023115 10 0 0xA0010000 2 205 1 phys 0023117 20 1 0xA0020000 2 205 1 phys 0023119 30 2 ------------------------------------------------Current time: 18:53:45 11/01/2004 IOM: TCP/IP/DQ stack. MAC=00:0C:94:00:59:1B To perform a full hardware reset, use: DQ> reset all The full reset performs a physical reset of the CPU and initiates the whole startup sequence. Some commands (mr, mw, set, and store particularly) require entering a user password. Once the password is entered, these commands become enabled until firmware reset. There are two levels of password protection available. The first is user level and the second is super-user level. Super-user level is currently used only for updating firmware over the Ethernet link. DQ> pswd user sets up a user level password. First, you’ll be asked about your old password and then (if it matches) to enter the new password twice. DQ> pswd su sets up a super-user level password. First, you’ll be asked about your old super-user password and then (if it matches) to enter the new super-user password twice. PowerDNA cubes come with the default password set to “powerdna”. Some DaqBIOS commands require clearing up user or super-user passwords. Use DqCmdSetPassword() before calling these functions. The PowerDNA API Reference Manual notes which functions are password-protected. Another useful command is “devtbl”. This command displays all I/O layers found and initialized by firmware along with assigned device numbers. Use these device numbers in host software to address these devices. Priority tells in which order device drivers are located in the device stack. A device with a lower priority number receives a shared interrupt first. The firmware sets up device driver priorities when it registers device drivers. “simod” is a command for system initialization and module calibration. “simod 0” is used to initialize initial layer parameters – serial number, option, etc. We do not recommend use of this command in the field. “simod 1” allows layer calibration. Different layers have different calibration procedures, explained in respective sections of this document. “simod 3” allows you to perform factory tests – this is a non-destructive command. WARNING: Once you use the “simod 0” command, the layer warranty is void. © Copyright 2009 all rights reserved United Electronic Industries, Inc. Tel: 508-921-4600 www.ueidaq.com Date: December 2012 Vers: 3.6 File: PowerDNA _Chap5.fm 52 DNA-PPCx PowerDNA Cube Manual Chapter 5 Programming Layer-specific Functions 5.2.4 Setting Parameters name: model: serial: mac: fwct: srv: ip: gateway: netmask: udp: Using the serial interface, you can set up the following parameters: <Device name> <Model id> <Serial #> <my ethernet address> <autorun.runtype.portnum.umports> <Host IP address> <IOM IP address> <gateway IP address> <network mask> <udp port> “Name” sets the device name (up to 32 characters) “Model” sets the device model (factory programmed, do not change). Valid values are 0x1005 – 100-Base-T five-layer PowerDNA cube, 0x1008 – 100-BaseT eight-layer PowerDNA cube, 0x1105 – 100-Base-FX (fiber optics) five- layer PowerDNA cube, 0x1108 – 100-Base-FX eight-layer PowerDNA cube. “Serial” sets the PowerDNA cube’s serial number (factory programmed, do not change) “MAC” sets the PowerDNA cube’s MAC Ethernet address (factory programmed, do not change) “fwct” defines the behavior of the monitor upon boot-up. Valid values for “autorun” are zero – stay in monitor after initial boot sequence, or one – copy firmware to SDRAM memory location and execute from there. Valid values for “runtype” are TYPE_IOM=2, TYPE_AUTO =4 and TYPE_SA=8. For normal operation, use TYPE_IOM. “portnum” and “umports” parameters are reserved in the current release and should be set to zero. “Srv” sets the host IP address. You have to set the host IP address only if raw Ethernet protocol is in use (used in homogenous IOM networks only.) This parameter is ignored when the PowerDNA cube is used over the UDP protocol or from the host. “IP” specifies the IOM IP address. This is the most important parameter a user must change to allow the PowerDNA cube to be visible on the network. The PowerDNA cube responds to every UDP packet containing a DaqBIOS prolog sent to this address. Since the current release does not support DHCP, the user should set up the IP address. “gateway” specifies where the PowerDNA cube should send an IP packet if a requested IP packet exists outside of the PowerDNA cube network (defined by the network mask). Ask your system administrator if you use your PowerDNA cube on the office network. “netmask” specifies what type of subnet the PowerDNA cube is connected to. The factory sets netmask to type C IP network – 254 nodes maximum “udp” specifies what port the firmware should use if a network packet originated from this PowerDNA cube without a previous request from the host side. If the PowerDNA cube replies to a DaqBIOS packet, it uses the source IP address from the IP packet header and source UDP port from UDP packet header. Let’s assume that user wants to connect a PowerDNA cube to the dedicated © Copyright 2009 all rights reserved United Electronic Industries, Inc. Tel: 508-921-4600 www.ueidaq.com Date: December 2012 Vers: 3.6 File: PowerDNA _Chap5.fm 53 DNA-PPCx PowerDNA Cube Manual Chapter 5 Programming Layer-specific Functions network (secondary NIC adapter in the host PC). Let’s also assume that host IP address on this dedicated network is: IP address: 192.168.100.28 Network mask: 255.255.255.0 Gateway: ignored DNS: ignored Figure 5-1. Changing the IP Address Set PowerDNA cube address to any address in the range of 192.168.100.1 through 192.168.0.254 excluding 192.168.100.28 – the host IP address. For example, type: DQ> set ip 192.168.0.2 Then: DQ> store This sequence of commands stores a new IP address in the flash parameter sector. Then, you have to reset the PowerDNA cube. PowerDNA cubes come from the factory with IP addresses already preset for 192.168.x.x network. The factory IP address can be found on the label located © Copyright 2009 all rights reserved United Electronic Industries, Inc. Tel: 508-921-4600 www.ueidaq.com Date: December 2012 Vers: 3.6 File: PowerDNA _Chap5.fm 54 DNA-PPCx PowerDNA Cube Manual Chapter 5 Programming Layer-specific Functions on the back of the PowerDNA cube along with factory MAC address. After the IP address is set, the user can establish communication with the PowerDNA cube using the PowerDNA Explorer. 5.3 5.3.1 How to Update Firmware Clock and Watchdog Access See the Appendix for this information. To show and set up the date and time, use the “time” command, as follows: DQ> time Current time: 17:39:22 11/01/2004 To set up time of the day, enter: DQ> time 17:40:00 To set up date, enter: DQ> time 11/03/2004 Date and time are stored in the battery-backed real-time clock chip. 5.4 5.4.1 Common Layer Interface Channel List The Common Layer Interface is the protocol used in a PowerDNA cube for communication between the IOM and its layers. A channel list specifies what channels and in which sequence each should be acquired/output. Every layer has its own specific set of channel list flags. The firmware takes care of this hardware dependency. Please see the specific layer description to find out what channel list flags are supported. Users should use the following flags, generalized for all layers. // Channel list entries definition channel number // gain and special, module-specific #define DQ_LNCL_NEXT (1UL<<31) #define DQ_LNCL_INOUT (1UL<<30) #define DQ_LNCL_SS1 (1UL<<29) #define DQ_LNCL_SS0 (1UL<<28) #define DQ_LNCL_IRQ (1UL<<27) #define DQ_LNCL_NOWAIT (1UL<<26) #define DQ_LNCL_SKIP (1UL<<25) #define DQ_LNCL_CLK (1UL<<24) lower 16 bits are reserved for settings // channel list has next entry // input or output subsystem // subsystem (high) // subsystem (low) // fire IRQ // execute this step but don't // wait // for the next CV // execute this step and discard // data // for the next CV // wait for the next channel list / / clock #define DQ_LNCL_CTR #define DQ_LNCL_WRITE © Copyright 2009 all rights reserved United Electronic Industries, Inc. (1UL<<23) (1UL<<22) // clock counter once // write to the channel but not // update Tel: 508-921-4600 www.ueidaq.com Date: December 2012 Vers: 3.6 File: PowerDNA _Chap5.fm 55 DNA-PPCx PowerDNA Cube Manual Chapter 5 Programming Layer-specific Functions #define #define #define #define #define #define #define DQ_LNCL_UPDALL DQ_LNCL_TSRQ DQ_LNCL_SLOW DQ_LNCL_RSVD2 DQ_LNCL_RSVD1 DQ_LNCL_RSVD0 DQ_LNCL_DIFF (1UL<<21) (1UL<<20) (1UL<<19) (1UL<<18) (1UL<<17) (1UL<<16) (1UL<<15) // // // // // // // update all written channels copy TS along with data (i+=2) slow down operation reserved reserved reserved differential mode There are a few helper macros defined to simplify setting gain and subsystem flags. #define DQ_LNCL_GAIN(G) ((G & 0xf)<<8) #define #define #define #define #define // set gain DQ_LNCL_GETGAIN(E) ((E & 0xf00)>>8) // pull out gain DQ_LNCL_GETCHAN(E) (E & 0xff) // pull out channel DQ_EXTRACT_SS(flags) (((flags) & (LNCL_SS1 | LNCL_SS0))>> 28) DQ_EXTRACT_DIR(flags) (((flags) & LNCL_INOUT) >> 30) DQ_SS_DIR(ss, dir) (((ss) << 1) | (dir)) The configuration flags serve various functions: DQ_LNCL_NEXT - specifies that there is a following channel list entry in the channel list. A channel list entry without this flag set is considered the last one. Advanced and ACB functions add this flag automatically DQ_LNCL_INOUT - specifies whether this is an input or output channel for multifunction layers DQ_LNCL_SS1 – specifies the subsystem to which the channel belongs. Do not use for single-subsystem layers DQ_LNCL_SS0 - specifies the subsystem to which the channel belongs. Do not use for single-subsystem layers DQ_LNCL_IRQ – causes the layer to fire an IRQ upon processing this entry. Required for special real-time cases DQ_LNCL_NOWAIT – causes the layer to temporarily “forget” about the CV clock and start execution of the next channel list entry right after the current one is completed DQ_LNCL_SKIP - prohibits storing the data specified in this channel list entry into the data output FIFO or prohibits advancing the data input FIFO pointer. This flag is used to increase the settling time DQ_LNCL_CLK – causes the channel list machine to wait for the next channel list clock. Normally, the state machine executes the whole channel list on a single CL clock. DQ_LNCL_CTR – perform a pulse on the selected line. This flag is used for synchronization purposes DQ_LNCL_WRITE - write the output to the double-register but do not propagate the physical signal to the output. DQ_LNCL_UPDALL – clock all output channel double-registers to update them simultaneously. This entry is usually used with the DQ_LNCL_WRITE entry when the user needs to write data to the output channels sequentially and update them at the same time. In this situation, the user should use the DQ_LNCL_WRITE flag for every entry. To update all outputs with previously written values, the DQ_LNCL_WRITE flag should be combined with the DQ_LNCL_UPDALL flag. © Copyright 2009 all rights reserved United Electronic Industries, Inc. Tel: 508-921-4600 www.ueidaq.com Date: December 2012 Vers: 3.6 File: PowerDNA _Chap5.fm 56 DNA-PPCx PowerDNA Cube Manual Chapter 5 Programming Layer-specific Functions DQ_LNCL_TSRQ - insert a timestamp into the output data DQ_LNCL_SLOW – double the settling time for this channel DQ_LNCL_DIFF – acquire the channel in differential mode (rather than singleended or pseudo-differential) The channel number occupies the first eight bits of the channel list entry. The maximum number of channels on one device cannot be larger than 256. Bits [11…8] contain gain information. The number of gains and the gain are specific for every layer type. See powerdna.h for layer specific gain macros. 5.4.2 Configuration Flags Configuration flags occupy a 32-bit configuration word. The upper part of the configuration word contains layer-specific flags. // Standard part (lower 16 bits) of layer configuration word // Please notice that for multiple-subsystem layers one should pass // multiple configuration uint32s in config_io() // #define DQ_LN_TSCOPY (1L<<18) // copy timestamp along with the // data #define DQ_LN_MAPPED (1L<<15) // For WRRD (DMAP) devices #define DQ_LN_STREAMING (1L<<14) // For RDFIFO devices - stream the //FIFO data automatically // For WRFIFO - do NOT send reply // to WRFIFO unless needed #define DQ_LN_RECYCLE (1L<<13) // if there is no data taken/ // available // overwrite/reuse data #define DQ_LN_GETRAW (1L<<12) // force layer to return raw // unconverted data #define DQ_LN_TMREN (1L<<11) // enable layer periodic timer #define DQ_LN_IRQEN (1L<<10) // enable layer irqs #define DQ_LN_PTRIGEDGE1 (1L<<9) // stop trigger edge MSB #define DQ_LN_PTRIGEDGE0 (1L<<8) // stop trigger edge: 00 // software, 01 - rising, // 02 - falling #define DQ_LN_STRIGEDGE1 (1L<<7) // start trigger edge MSB #define DQ_LN_STRIGEDGE0 (1L<<6) // start trigger edge: 00 // software, // 01 - rising, 02 - falling #define DQ_LN_CVCKSRC1 (1L<<5) // CV clock source MSB #define DQ_LN_CVCKSRC0 (1L<<4) // CV clock source 01 - SW, 10 // HW, 11 -EXT #define DQ_LN_CLCKSRC1 (1L<<3) // CL clock source MSB #define DQ_LN_CLCKSRC0 (1L<<2) // CL clock source 01 - SW, 10 // HW, 11 -EXT #define DQ_LN_ACTIVE (1L<<1) // “STS” LED status #define DQ_LN_ENABLED (1L<<0) // enable operations DQ_LN_ACTIVE is needed to switch on the “STS” LED on CPU layer. DQ_LN_ENABLE enables all operations within the layer DQ_LN_CLCKSRC0 selects the internal channel list clock (CL) source as a time base. AI-201 supports the CL clock only where the time between consecutive channel readings is calculated by the rule of maximizing setup time per channel. If you’d like to clock the CL clock from an external clock source such as SYNCx line, set the DQ_LN_CLCKSRC1 flag as well. © Copyright 2009 all rights reserved United Electronic Industries, Inc. Tel: 508-921-4600 www.ueidaq.com Date: December 2012 Vers: 3.6 File: PowerDNA _Chap5.fm 57 DNA-PPCx PowerDNA Cube Manual Chapter 5 Programming Layer-specific Functions DQ_LN_CVCKSRC0 selects the internal conversion clock (CV) source as a time base. Setting CV clock allows having an equal time period between conversions of different channels. It is mostly used when the user is interested in a phase shift between different channels. The user can select either the CL or CV clock as a time base. If both clocks are selected, the CL clock is taken as a time base and the CV clock determines the delay between converting channels (i.e. setting time.) IS (Isolated Side) DQ_LN_STRIGEDGE0, DQ_LN_STRIGEDGE1 define the start trigger edge and source. The source can be either software command or external trigger edge. DQ_LN_PTRIGEDGE0, DQ_LN_PTRIGEDGE1 define the stop trigger edge and source. The source can be either software command or external trigger edge. DQ_LN_TSCOPY – copy timestamp at the end of every channel list DQ_LN_MAPPED – set this flag to declare DMap mode DQ_LN_STREAMING – set this flag to declare ACB mode DQ_LN_RECYCLE – this flag affects output operation. If this flag is set and layer does not receive output data, it will recycle old data until new data is available; otherwise, the layer will stop at the last value output DQ_LN_GETRAW – tells the layer to return uncalibrated unconverted data. This flag makes sense only for layers with software calibration (AI-225, for example). Moving calibration and conversion of data to host unloads IOM processor DQ_LN_TMREN – use a real-time timer to retrieve data from the PowerDNA cube. When this mode is selected, the firmware programs the layer to store one channel list worth of data in the buffer. On a timer tick, the firmware transfers this data from the layer output buffer to the packet. This function is used when the hardware allows only a selected set of update rates, but the user needs something in between. For example, AI-225 can convert data with fixed fre- quency equal 6.875Hz * 2n, where n = [0…9]. To receive an exactly 500Hz data stream from this layer, one should specify that this layer be updated upon a timer tick. DQ_LN_IRQEN – use interrupts to retrieve data from the layer output buffer via packets. This is preferable mode of operation. 5.4.3 EEPROM User Every I/O layer has an E2PROM chip that contains 2048 bytes of layer-specific information. Area Access Model and option numbers identify every layer. The model number is hardcoded inside layer logic and option numbers are stored inside E2PROM. E2PROM is divided into certain access areas (some of them can be missing in different layer types): typedef struct { DQEECMNDEVS ee; DQCALSET_xxx_ calset; DQOPMODEPRM_xxx_ opmodeprm; DQINITPRM_xxx_ initprm; DQSDOWNPRM_xxx_ sdownprm; DQCNAMES_xxx_ cname; } DEVEEPROM_xxx_, *pDEVEEPROM_xxx_; The first part of the layer E2PROM is common device information defined as: © Copyright 2009 all rights reserved United Electronic Industries, Inc. Tel: 508-921-4600 www.ueidaq.com Date: December 2012 Vers: 3.6 File: PowerDNA _Chap5.fm 58 DNA-PPCx PowerDNA Cube Manual Chapter 5 Programming Layer-specific Functions typedef struct { /* header is standard for all devices */ /* superuser access */ uint16 model; /* device model to verify EEPROM identity */ uint16 option; /* device option */ uint16 total; /* total EEPROM size - EEPROM read is expensive */ /* if this field <32 or >2048 read all2048 bytes */ uint32 sernum; /* serial number - pad to %07d when printing */ uint32 mfgdate; /* manufacturing date: 0xmmddyyyy */ /* user access */ uint32 caldate; /* calibration date: 0xmmddyyyy */ uint32 calexpd; /* calibration expired: 0xmmddyyyy */ /* header is followed by device-specific data structures */ } DQEECMNDEVS, *pDQEECMNDEVS; CALSET_xxx_ contains layer calibration information. Firmware writes this information automatically upon entering initialization mode. OPMODEPRM_xxx_ contains layer parameters for operation mode. For example, AI-201 has the following parameters stored: typedef struct { uint32 chlst[AI201_CHAN]; // channel list - full uint32 conf; // control word - layer API flags uint32 cvclk; // CV clock uint32 clclk; // CL clock uint32 trig; // trigger configuration … } DQOPMODEPRM_201_, *pDQOPMODEPRM_201_; This structure varies from one major firmware revision to another. When the firmware switches the layer into operation mode, it processes stored configuration information as it would process configuration parameters received from host. All working fields in the internal device information structure are filled and the unit is ready to switch into operation mode. By programming the DQOPMODEPRM structure ahead of time and storing it into E2PROM, you can avoid programming the IOM every time before switching into operation mode. INITPRM_xxx_ contains initial I/O directions and output levels. The firmware sets up the direction and the level on every output line on entering initialization state. SDOWNPRM_xxx_ contains final I/O directions and output levels. The firmware sets up the direction and the level on every output line on entering shutdown state. CNAMES_xxx_ contains channel names. The length of the channel names depends on the layer type. Only 512 bytes are allocated for channel names. Thus, AI-205 layer (four channels) can have channel names as long as 32 characters while DIO-403 channel names (48 channels) cannot be longer then 10 characters. There is a set of functions written to read, write, and store these parameters into E2PROM. Functions DqCmdGetParameters()/DqCmdSetParame© Copyright 2009 all rights reserved United Electronic Industries, Inc. Tel: 508-921-4600 www.ueidaq.com Date: December 2012 Vers: 3.6 File: PowerDNA _Chap5.fm 59 DNA-PPCx PowerDNA Cube Manual Chapter 5 Programming Layer-specific Functions ters() access modal parameters, while DqCmdSaveParameters() stores parameters into E2PROM. 5.4.4 PowerDNA Layer Signaling Setting up triggering, synchronization, and clocking lines Most PowerDNA layers have the following interconnection diagram: DqAdvAssignIsoSync() DIO 0 pin 3 (CLKIN) DqAdvAssignSyncx() EXT0 IS Logic DIO 1 pin 4 (TRIGIN) EXT1 DIO 2 pin 22 (CLKOUT) INT1 INT0 DqAdvAssignIsoDio() selects direction, level, and connection between signals SYNC0 NIS Logic SYNC1 signals SYNC2 SYNC3 TMR0 TMR1 CL IN CV IN CL OUT CV OUT Start Trig Stop trig Time Stamp DqAdvSetClockSource() DqAdvSet TriggerSource() Figure 5-2. CM Interconnection Diagram • DIO0/CLKIN – pin 3 on the FJIO1 DB-37 connector. By default, this pin is an input, connected to the ISO_EXT0 synchronization line and through this line to the NIS logic • DIO1/TRIGIN – pin 4 on the FJIO1 DB-37 connector. By default this pin is an input, connected to the ISO_EXT1 synchronization line and through this line to the NIS logic DIO2/CLKOUT – pin 22 on the FJIO1 DB-37 connector. By default this pin is an output connected to the ISO_INT0 line from the NIS logic The PowerDNA API exposes six specially designated functions to control these lines, as follows: • © Copyright 2009 all rights reserved United Electronic Industries, Inc. Tel: 508-921-4600 www.ueidaq.com Date: December 2012 Vers: 3.6 File: PowerDNA _Chap5.fm 60 DNA-PPCx PowerDNA Cube Manual Chapter 5 Programming Layer-specific Functions • DqAdvSetClockSource() This function selects external clock source for CL (or CV) clock. The clock can be selected from internal sources, EXTx lines (signals from the isolated side), and SYNCx interface signals (inputs) • DqAdvSetTriggerSource() This function selects external clock source for start and stop trigger. Clock can be selected from internal sources, EXTx lines (signals from the isolated side), and SYNCx interface signals (inputs) • DqAdvAssignIsoDio() This function selects direction and signal assignment for external DIO line. EXT0/1 lines are assigned to DIO0/1 lines when DIO lines are in the input state. • DqAdvAssignIsoSync() This function selects signal assignment for INT lines. This function allows selecting what signal from isolated side of the layer logic will be assigned to INTx lines. Signals can be selected from internal clock sources and SYNCx lines. • DqAdvAssignSyncx() This function selects a signal for each of the SYNCx lines. When a SYNC line is selected, it switches to the output state. All other layers “listen” to this command on the system bus and release that SYNC line from use (switch to the input mode). This organization prevents two layers from driving the same line. • DqAdvWriteSignalRouting() This function writes and activates selected signal routing. This function transfers created configuration to the cube and activates it. Cube sends current synchronization configuration as a reply. NOTE: Please note that to take advantage of using external clocks for the layer clock and/or trigger, the source should be selected as external. This means that, in clocking configurations, the following bits should be set up: DQ_LN_CLCKSRC1 – external CL clock is selected DQ_LN_STRIGEDGE1 – external start trigger is selected DQ_LN_PTRIGEDGE1 – external stop trigger is selected If internal sources are selected for those signals, all external signal configurations do not affect layer clocking. The same interface applies to the CPU layer. The CPU layer has one external input and one output routable to the SYNCx interface as well as multiple clocks. It is possible to include an IEEE 1588 implementation with an atomic clock (1us) resolution in the future. © Copyright 2009 all rights reserved United Electronic Industries, Inc. Tel: 508-921-4600 www.ueidaq.com Date: December 2012 Vers: 3.6 File: PowerDNA _Chap5.fm 61 DNA-PPCx PowerDNA Cube Manual Chapter 5 Programming Layer-specific Functions 5.5 Register Map and Description Register Offset All CTU registers are located at addresses starting at Base+DQ_CLI_CTUxS, where x is the CTU number 0-7. The I/O FIFO uses the standard PowerDNA FIFO locations starting at Base+0x1800. Name Description DQ_CTU_STR CTU status register Counter/timer status register contains status bits related to CTU functionality. (read) DQ_CTU_CTR CTU control register Counter/timer control register contains control bits related to CTU functionality. (write) DQ_CTU_CCR CTU counter control register Counter/timer Counter Control register – defines mode of the operation of the counter and prescaler. (write) DQ_CTU_PS Prescaler Divider Program prescaler divider (PS) (default value – 0) and read back current value of the prescaler counter. (read/write) DQ_CTU_CR Count Register Current value of the count register. (read) DQ_CTU_LR Program Load Register Write access sets new value of the load register LR also copying the same value into the count register CR. (write) DQ_CTU_IDBC Clock Debouncing Program input clock-debouncing register IDBC. CTU will expect Register input clock to remain stable for the specified number of 66MHz clocks before processing/ qualifying it. (write) DQ_CTU_IDBG Gate Debouncing Program input gate-debouncing register IDBG. CTU will expect Register input gate line to remain stable for the specified number of 66MHz clocks before processing/ qualifying it. (write) DQ_CTU_PC Period Count Register Period count register PC is used in a measurement modes when averaging for the multiple periods is required because of the highspeed or unstable nature of the incoming signal. Results of the measurement are accessible only after specified number of periods on the incoming signal are detected. (read/write) DQ_CTU_CRH CTU Capture Register High Read: Provide access to the capture register high. Write: Set value of the compare register 0. (read/write) CTU Capture Register Low Read: Provide access to the capture register low. Write: Set value of the compare register 0. (read/write) Time Base Register TBR defines time-base divider for the time-based capture modes. Bit 31 (MSB) of the TBR. (write) DQ_CTU_CR0 DQ_CTU_CRL DQ_CTU_CR1 DQ_CTU_TBR DQ_CTU_FCNTI Input FIFO Count CTU Input FIFO – FIFO0 Count. (read) Register DQ_CTU_FIRQI Input FIFO IRQ Level CTU Input FIFO – FIFO0 IRQ. (write) DQ_CTU_FDTI Input FIFO Data Register CTU Input FIFO – FIFO0 Data In. (write) DQ_CTU_FCNTO Output FIFO Count Register © Copyright 2009 all rights reserved United Electronic Industries, Inc. CTU Output FIFO – FIFO1 Count. (read) Tel: 508-921-4600 www.ueidaq.com Date: December 2012 Vers: 3.6 File: PowerDNA _Chap5.fm 62 DNA-PPCx PowerDNA Cube Manual Chapter 5 Programming Layer-specific Functions Register Offset Name Description DQ_CTU_IRQO Output FIFO IRQ CTU Output FIFO – FIFO1 IRQ level - reserved. (write) Level DQ_CTU_FDTO Output FIFO Data CTU Output FIFO – FIFO1 Data Out. (read) Register DQ_CTU_ISR Interrupt Status Register ISR shows current status of the enabled interrupts. (read) DQ_CTU_IER Interrupt Enable Register IER is used to specify specific interrupt conditions should generate an interrupt. (write) DQ_CTU_ICR Interrupt Clear Register ICR allows clearing of “fired” interrupt bits. If interrupt condition persists, interrupt will be fired again. (write) DQ_CTU_FDDO Output Data FIFO FDDO is a reserved register used for the time sequencer version of Register CTU implementation. (write) DQ_CTU_TEST0 Test Register 0 TEST0 is a reserved test read-only register. In current implementation, read from TEST0 returns 0x01234567. (read) DQ_CTU_TEST1 Test Register 1 TEST1 is a reserved test read-only register. In current implementation, read from TEST1 returns 0xABCD0123. (read) The following table shows Counter/Timer Units 0-7 registers with 0x80 offset increment representations. 5.6 Register Descriptions 0x2000-0x207C DQ_CLI_CTU0S CTU0 I/O registers 0x2080-0x20FC DQ_CLI_CTU1S CTU1 I/O registers 0x2100-0x217C DQ_CLI_CTU2S CTU2 I/O registers 0x2180-0x21FC DQ_CLI_CTU3S CTU3 I/O registers 0x2200-0x227C DQ_CLI_CTU4S CTU4 I/O registers 0x2280-0x22FC DQ_CLI_CTU5S CTU5 I/O registers 0x2300-0x237C DQ_CLI_CTU6S CTU6 I/O registers 0x2380-0x23FC DQ_CLI_CTU7S CTU7 I/O registers This section lists bit descriptions for various status registers. 0x2000 RD – CT0_STR – CTU0 Status Register The CTU Status register is used to report current operational status of the counter/timer unit via dedicated bits for every status condition reported. The Status register mirrors some of the ISR (interrupt status register) bits, but it reports current status while ISR reports latched status of the “fired” interrupts © Copyright 2009 all rights reserved United Electronic Industries, Inc. Tel: 508-921-4600 www.ueidaq.com Date: December 2012 Vers: 3.6 File: PowerDNA _Chap5.fm 63 DNA-PPCx PowerDNA Cube Manual Chapter 5 Programming Layer-specific Functions Bit Name Description Reset 31 DQ_STR_EN When read as 1 indicates that CR is enabled in CT0_CTR DQ_CTR_EN bit. 0 30 DQ_STR_BUSY When read as 1, indicates that CR is counting or 0 if current counting operation is complete 0 29 DQ_STR_CR0L When read as 1, indicates that current value of CR < CR0 0 28 DQ_STR_CR0GE When read as 1, indicates that current value of CR >= CR0 0 27 DQ_STR_CR1 When read as 1, indicates that current value of CR >= CR1 0 26 DQ_STR_IN0 Report current value of direct input pin 0 25 DQ_STR_GT0 Report current value of direct gate pin 0 24 DQ_STR_IN1 Report current value of de-bounced input pin 0 23 DQ_STR_GT1 Report current value of de-bounced gate pin 0 22 DQ_STR_IHL When read as 1, indicates that 1-0 transition was detected on the input pin since last read from CTx_STR. This bit will be automatically cleared after each read. 0 23 DQ_STR_ILH When read as 1, indicates that 0-1 transition was detected on the input pin since last read from CTx_STR. This bit will be automatically cleared after each read. 0 22 DQ_STR_GHL When read as 1, indicates that 1-0 transition was detected on the gate pin since last read from CTx_STR. This bit will be automatically cleared after each read. 0 19 DQ_STR_GLH When read as 1, indicates that 0-1 transition was detected on the gate pin since last read from CTx_STR. This bit will be automatically cleared after each read. 0 18 DQ_STR_OU Report current value of output pin 0 17 DQ_STR_IRQ Read as 1 if interrupt was requested 0 16 DQ_STR_CRH Report 1 if data is available in CRH 0 15 DQ_STR_CRL Report 1 if data is available in CRL 0 14 DQ_STR_IFE Report 1 if input FIFO is empty 0 13 DQ_STR_IFH Report 1 if input FIFO is at least ½ full 0 12 DQ_STR_IFF Report 1 if input FIFO is full 0 11 DQ_STR_OFE Report 1 if output FIFO is empty 0 10 DQ_STR_OFH Report 1 if output FIFO is at least ½ full 0 9 DQ_STR_OFF Report 1 if output FIFO is full 0 0x2000 WR – CT0_CTR – CTU0 Control Register The CTU Control register is used to set and control some parameters of the operation mode of the counter/timer via specific bits and bit fields. Note that the generic interrupt mask/enable/control/status is reported via layer IER (0x1C), IMR(0x20), ISR/ICR (0x24) registers. Layer-specific bits are described later in the section. Status conditions that lead to the interrupt request are enabled/dis© Copyright 2009 all rights reserved United Electronic Industries, Inc. Tel: 508-921-4600 www.ueidaq.com Date: December 2012 Vers: 3.6 File: PowerDNA _Chap5.fm 64 DNA-PPCx PowerDNA Cube Manual Chapter 5 Programming Layer-specific Functions abled via CTx_CTR register. The following are the DQ_CT0_CTR bit descriptions for the CTU0 register. Bit Name Description Reset 31 DQ_CTR_EN Enable (1)/Disable (0) counter register. When disabled, CR along with pre-scaler and de-bouncer circuitry, freezes its current operation, which may be re-enabled by writing a one to the DQ_CTR_EN bit. 0 30 DQ_CTR_IFE Input FIFO enable (1) disable(0). Depending on the operation mode, when enabled, fetches one 32-bit word from the input FIFO to the CR0 at the same time the counter register is reloaded with LR value 0 29 DQ_CTR_IFS Input FIFO transfer size. Used only when DQ_CTR_IFE = 1. 0 - 1 word, 1- 2 words. Defines one (CR0) or two words (CR0/CR1) and is loaded whenever a time "end-of-count" condition is detected 0 29 DQ_CTR_IIE Enable (1)/Disable (0) inversion of the input pin. Value of the pin is inverted at the input before debouncing circuitry 0 28 DQ_CTR_GIE Enable (1)/Disable (0) inversion of the gate pin. Value of the pin is inverted at the input before debouncing circuitry 0 27 DQ_CTR_OIE Enable (1)/Disable (0) inversion of the output pin. When enabled – output pin polarity is inverted at the last stage of creating the output 0 26 DQ_CTR_OU Current value of the output pin in GPIO mode (valid if DQ_CTR_EN bit = 0 and DQ_CTR_GPIO=1) 0 25 DQ_CTR_OFE Output FIFO – enable (1)/disable(0). Depending on the operation mode, when enabled, copies one or two 32-bit words from the input CR or CRH/CRL into the output FIFO when counter reaches end of count condition 0 24 DQ_CTR_CLFI If this bit is set during write to CTR, all input paths will be cleared (CRH/CRL and input FIFO), FIFO will contain 0 samples, and CRH/ CRL will be set to 0. Reset input FIFO before initiating any HOSTCTU transfers 23 DQ_CTR_CLFO If this bit is set during write to CTR, all output paths will be cleared (CR0, CR1, LR and output FIFO), FIFO will contain 0 samples, and all registers affected will be set to 0. Reset output FIFO before initiating any CTUHOST transfers 22 DQ_CTR_CLR If this bit is set during write to CTR, CTUx will be reset to the default state, and all registers/FIFO will be cleared © Copyright 2009 all rights reserved United Electronic Industries, Inc. Tel: 508-921-4600 www.ueidaq.com Date: December 2012 Vers: 3.6 File: PowerDNA _Chap5.fm 65 DNA-PPCx PowerDNA Cube Manual Chapter 5 Programming Layer-specific Functions Bit 21 Name DQ_CTR_GPIO 20-0 Description Reset If this bit is set, GPIO operation of the "clkout" pin is enabled DQ_CTR_EN DQ_CTR_GPI O DQ_CTR_OU 0 0 x 0 1 0 0 0 1 1 1 1 x x Defined by the current CTU mode 0 clkout Remains in a last state Reserved 0 0x2004 WR – CT0_CCR – CTU0 Counter Control Register The CTU Counter Control register is used to set current mode for the counter and pre-scaler. The following table lists the CT0_CCR Bit descriptions. © Copyright 2009 all rights reserved United Electronic Industries, Inc. Tel: 508-921-4600 www.ueidaq.com Date: December 2012 Vers: 3.6 File: PowerDNA _Chap5.fm 66 DNA-PPCx PowerDNA Cube Manual Chapter 5 Programming Layer-specific Functions Name Bit 31 3028 DQ_CCR_EC2 Reset Description State Enable re-load of the CR by the value loaded in LR when it reaches 0 end of count. End of count is limited by one of the combinations of DQ_CCR_EC2/1/0 bits 0 Set end of count mode: DQ_CCR_EC1 (0)000 – DQ_EM_CR0, end, when it reaches CR0 (CR=CR0) DQ_CCR_EC0 (1)001 – DQ_EM_CR1, end, when it reaches CR1 (CR=CR1) DQ_CCR_RE (2)010 – DQ_EM_FFF, end, when it reaches 0xFFFFFFFF (3)011 – DQ_EM_PC, end, when X periods of the signal are captured. X is defined via CTx_PC (0x2018) register. In width (1/2 period) measurement mode end, when positive part of the input signal is captured. (4)100 – DQ_EM_TBR, end, when the time-base counter reaches 0. 2427 DQ_CCR_CRM3 DQ_CCR_CRM2 DQ_CCR_CRM1 DQ_CCR_CRM0 Note: All other modes are reserved for future use and will be recognized as a mode 0 Set counter mode: 0 (0x0)0000 – DQ_CM_CT counter (CR acts as a standard count-up counter, 66MHz base clock used as a PS source) (0x8)1000 – DQ_CM_ECT counter (CR acts as a standard countupcounter, debounced CLKIN clock used as a PS source) (0x9)1001 – DQ_CM_HP capture ½ period mode (CR captures ½ period of the input signal starting from the rising edge of the deglitched input and copies it into CRH). (0xA)1010 – DQ_CM_NP capture full period (CR captures length of the full period, copies positive part of the period into CRH and negative (low) into CRL, if CTx_PC > 0 – continue this process increasing CRH/CRL for the length of positive/negative part of every period (0xB)1011 – DQ_CM_QE quadrature encoder mode (0x4)0100 – DQ_CM_TCT same as 0x0 but with trigger (0xC)1100 – DQ_CM_TECT same as 0x8 but with trigger (0xD)1101 – DQ_CM_THP same as 0x9 but with trigger (0xE)1110 – DQ_CM_TNP same as 0x9 but with trigger Note, that all modes, except mode 0 are using debounced CLKIN pin as a clock source for the pre-scaler. Trigger source (Harware/ Software) is selected using DQ_CCR_TRS bit © Copyright 2009 all rights reserved United Electronic Industries, Inc. Tel: 508-921-4600 www.ueidaq.com Date: December 2012 Vers: 3.6 File: PowerDNA _Chap5.fm 67 DNA-PPCx PowerDNA Cube Manual Chapter 5 Programming Layer-specific Functions Name Bit 23 DQ_CCR_PSG 22 DQ_CCR_TRS 21 DQ_CCR_ENC Description Enable(1)/Disable(0) hardware gate on the prescaler. If enabled, GATE input, when positive, enables pre-scaler counter. Note, that DQ_CTR_EN bit in CTR may be effectively used as a software gate, when DQ_CCR_PSG = 0. Select Hardware(1)/Software(0) trigger source for the triggered 0 modes. Hardware-triggered modes will start at low-high transition on the GATE input. In software trigger mode, DQ_CTR_EN bit in CTR should be used as a trigger (DQ_CTR_EN will be cleared at the end of the counting operation if CCR_TRS bit is cleared and triggered mode is selected DQ_CM_Txx) This bit complements DQ_CCR_TRS bit and works only in a triggered mode – if set (1), enables auto-clear of the DQ_CTR_EN bit at the end of the current operation. x x DQ_CM_HP DQ_CM_NP DQ_CM_THP DQ_CM_TNP DQ_CM_QE DQ_EM_TBR x DQ_EM_PC DQ_EM_FFF DQ_CM_CT DQ_CM_ECT DQ_CM_TCT DQ_CM_TECT DQ_EM_CR1 Valid EM/CM Refer to the table below for the possible EM/CM combinations (x – valid mode): Combinations for NonBuffered Modes DQ_EM_CR0 5.6.1 Reset State 0 Notes x Use DQ_EM_CR0 for single-clock pulse generation, DQ_EM_CR1 for PWM mode, DQ_EM_FFF for wrap-around counter x For continuous non-buffered operation of QE, it is recommended you use DQ_EM_TBR mode, but disable timebase counter by writing 0x1 to TBR x x x x 0x2008 WR – CT0_PS – CTU0 Prescaler Set value of the pre-scaler. Prescaler is a 32-bit count-down counter output of which is used to clock counter register (CR). Source for the prescaler is automatically selected based on current value of the CCR_CRMx bits. Note that if © Copyright 2009 all rights reserved United Electronic Industries, Inc. Tel: 508-921-4600 www.ueidaq.com Date: December 2012 Vers: 3.6 File: PowerDNA _Chap5.fm 68 DNA-PPCx PowerDNA Cube Manual Chapter 5 Programming Layer-specific Functions pre-scaler is loaded with 0, it will be by-passed and an input signal will be used as an input clock for the count register CR (but GATE pin if used will still affect the counter). 0x2008 RD – CT0_PS – CTU0 Prescaler Current Value Read current 32-bit value of the prescaler. 0x200C RD – CT0_LR – CTU0 Load Register 32-bit value, stored in the load register LR, will be loaded into the main counter CR at the beginning of each counting cycle. 0x200C RD – CT0_CR – CTU0 Count Register Current Value Current value of the count register, latched at the time of the read. 0x2010 WR – CT0_IDBC – CTU0 Input Pin Debouncing Filter Counter Register Program input clock-debouncing register 32-bit register IDBC. CTU0 will expect input clock to remain stable for the specified number of 66MHz clocks before processing/qualifying it. 0x2014 WR – CT0_IDBG – CTU0 Gate Pin Debouncing Filter Counter Register Program input gate-debouncing register IDBG. CTU0 will expect input gate line to remain stable for the specified number of 66MHz clocks before processing qualifying it. 0x2018 RD – CT0_PC – CTU0 Current Value of the Period Counter Register 32-bit current value CTU0 period count register CT0_PC Set CTU0 period count register Period count register (PC) is used in a measurement mode when averaging for multiple periods. It is required because of the high-speed or unstable nature of the incoming signal. Results of the measurement will be accessible only after specified number of periods on the incoming signal are detected. Start of the period is assumed to be a rising edge of the de-bounced input CLKIN line. 0x201C RD – CT0_CRH – CTU0 Capture Register HIGH This 32-bit register is used to store results of the measurements in ½ or N period measurement modes. In N periods (N is defined by the value stored in the PC register), measurement mode provides accumulated number of 66MHz counts during the positive part of all periods measured. 0x201C WR – CT0_CR0 – CTU0 Set Value of Compare Register 0 32-bit compare register zero (CR0) is used to define shape of the output signal. In all modes except quadrature encoder and measurement modes, counter register CR counts up from the value loaded in LR register and output toggles from low to high when CR=CR0. Depending on the other configuration parameters selected, counter may continue count, restart itself, or stop, when value of the CR reaches value stored in CR0 register. CR0 may be used in conjunction with © Copyright 2009 all rights reserved United Electronic Industries, Inc. Tel: 508-921-4600 www.ueidaq.com Date: December 2012 Vers: 3.6 File: PowerDNA _Chap5.fm 69 DNA-PPCx PowerDNA Cube Manual Chapter 5 Programming Layer-specific Functions CR1 for the complex PWM waveform generation 0x2020 RD – CT0_CRL – CTU0 Capture Register LOW 32-bit register is used to store results of the measurements in N period measurement modes. In N periods, (N is defined by the value stored in the PC register) measurement mode provides accumulated number of 66MHz counts during the negative (low) part of all periods measured. 0x2020 WR – CT0_CR1 – CTU0 Set Value of the Compare Register 1 32-bit compare register one (CR1) is used to define shape of the output signal. In all modes except quadrature encoder and measurement modes, counter register CR counts up from the value loaded in LR register and output toggles from low to high when CR=CR0, then output stay high until CR0<=CR<=CR1. Depending on the other configuration parameters selected, counter may continue count, restart itself, or stop, when the value of the CR reaches the value stored in CR1 register. CR1 may be used in conjunction with CR0 for the complex PWM waveform generation 0x2024 WR – CT0_TBR – CTU0 Time-base Divider Register 32-bit TBR (write-only) register defines time-base divider for the time-based capture modes. 5.6.2 FIFO Access 0x1800/0x2028 RD – CT0_FCNTI – CTU0 Input FIFO Count Register 9-bit, LSB valid, return number of samples available (written from the host to layer) in the input FIFO of the CTU0. 0x1808/0x2030 WR – CT0_FDTI – CTU0 Input FIFO Data Input Register 32-bit write-only register for the input FIFO. 0x1810/0x2034 RD – CT0_FCNTO – CTU0 Output FIFO Count Register 9-bit, LSB valid, returns number of samples available in the output FIFO of the CTU0. 0x1818/0x203C RD – CT0_FDTO – CTU0 Output FIFO Data Input Register 32-bit read-only register for the input FIFO. 0x2040 WR – CT0_IER – CTU0 Interrupt Enable Register Interrupt generation unit in every CTU is similar to the IGU in PDNA CLI logic except it does not have interrupt mask register for the simpler operation. Interrupt from any of the available sources, if enabled, latched in ISR 0x2040+RD (Interrupt Status register) and forces IRQ request into logic HIGH state. IRQ line remains in HIGH state until all IRQ requests are cleared via ICR 0x2044+WR (Interrupt Clear Register). The IER register is a bit field in which each bit enables one interrupt source. The following are the CT0_IER Bit descriptions. © Copyright 2009 all rights reserved United Electronic Industries, Inc. Tel: 508-921-4600 www.ueidaq.com Date: December 2012 Vers: 3.6 File: PowerDNA _Chap5.fm 70 DNA-PPCx PowerDNA Cube Manual Chapter 5 Programming Layer-specific Functions Bit Name Reset State 31 DQ_IR_CPT Request interrupt if counter completes current operation 0 30 DQ_IR_CR0L Request interrupt if current value of CR < CR0 0 29 DQ_IR_CR0GE Request interrupt if current value of CR >= CR0 0 28 DQ_IR_CR1 Request interrupt if current value of CR >= CR1 0 27 DQ_IR_LHI Request interrupt if low-high transition was detected on the input pin (deglitched) 0 26 DQ_IR_LHG Request interrupt if low-high transition was detected on the gate pin (deglitched) 0 25 DQ_IR_HLI Request interrupt if high-low transition was detected on the input pin (deglitched) 0 24 DQ_IR_HLG Request interrupt if high-low transition was detected on the gate pin (deglitched) 0 23 DQ_IR_CRH Request interrupt if data is available in CRH 0 22 DQ_IR_CRL Request interrupt if data is available in CRL 0 21 DQ_IR_IFE Request interrupt if input FIFO is empty 0 20 DQ_IR_IFH Request interrupt if input FIFO is at least ½ full 0 19 DQ_IR_IFF Request interrupt if input FIFO is full 0 18 DQ_IR_OFE Request interrupt if output FIFO is empty 0 17 DQ_IR_OFH Request interrupt if output FIFO is at least ½ full 0 16 DQ_IR_OFF Request interrupt if output FIFO is full 0 Reserved 0 15-0 5.6.3 Description Command Mode 0x2040 RD – CT0_ISR – CTU0 Interrupt Status Register This register should be used to define source of the interrupt from the CTU. It will show “1” in the bits that are the source for the interrupt. The ISR keeps its value until cleared by a write to the ICR or by system reset. CT0_ISR Bit description The ISR bits match IER. 0x2044 RD – CT0_ICR – CTU0 Interrupt Clear Register Writing one to any of the bits in ICR will clear matching bit in ISR, thus clearing the interrupt request based on that bit. Note, that if the interrupt condition still exists and is enabled – it will be “fired” again immediately. CT0_ICR Bit description The ICR bits match IER/ISR. © Copyright 2009 all rights reserved United Electronic Industries, Inc. Tel: 508-921-4600 www.ueidaq.com Date: December 2012 Vers: 3.6 File: PowerDNA _Chap5.fm 71 DNA-PPCx PowerDNA Cube Manual Appendix A A.1 Configuring a Second Ethernet Card Under Windows XP To configure a second Ethernet card for your system, use the following procedure: A. Set Up Your Ethernet Card (NIC). If you already have an Ethernet card installed, skip ahead to the next section, “Configure TCP/IP”. If you have just added an Ethernet card, to install it, do the following: STEP 1: From the Start menu, select Control Panel, and click Printers and Other Hardware. STEP 2: From the menu on the left, click Add Hardware and follow the on-screen instructions. NOTE: We recommend that you allow Windows XP to search for and install your Ethernet card automatically. If Windows XP does not find your Ethernet card, you will need to install it manually by following the manufacturer's instructions. Once your Ethernet card has been installed, continue to the next section. B. Configure TCP/IP. STEP 1: From the Start menu, select Control Panel. STEP 2: Under the heading Pick a Category, click Network and Internet Connections. STEP 3: Under pick a Control Panel icon, click Network Connections. STEP 4: If you see an icon under LAN or High-Speed Internet heading for your second NIC, skip ahead to step 10. STEP 5: If there is no icon under LAN or High-Speed Internet for your second NIC, proceed to step 4. STEP 6: From the menu on the left, click Create a new connection to launch the New Connection Wizard. STEP 7: Click Next and proceed to the Network Connection Type window. STEP 8: Select Connect to the Internet and click Next. STEP 9: Select Set Up My Connection Manually and click Next. STEP 10: Select Connect Using a Broadband Connection that is always on and click Next. STEP 11: Click Finish. © Copyright December 2012 United Electronic Industries, Inc. Tel: 508-921-4600 Date: December 2012 www.ueidaq.com Vers: 3.6 File: PowerDNA_Appendix.fm 72 DNA-PPCx PowerDNA Cube Manual STEP 12: In the Network Connections window, double-click the second icon under LAN or High-Speed Internet. STEP 13: In the next window (see illustration below), click Properties. STEP 14: Click the General tab, click once on Internet Protocol (TCP/IP), then click Properties. STEP 15: Click the General tab, click Use the Following IP Addresses, and in the corresponding boxes, enter 192.168.100.1 for the IP address, 255.255.255.0 for the Subnet Mask, and leave blank the router (or default gateway) information. STEP 16: Click Use the Following DNS Server Addresses. STEP 17: Make sure the Preferred DNS Server box and the Alternate DNS Server box are blank. STEP 18: Click OK or Close until you return to the Network Connections window. STEP 19: Close the Network Connections window. C. Troubleshooting If you encounter problems connecting to the network, first check to make sure the Windows XP Internet Connection Firewall is turned off. Follow the instructions below: STEP 1: From the Start menu, select Control Panel. STEP 2: Under the heading Pick a Category, click Network and Internet Connections. STEP 3: Under pick a Control Panel icon, click Network Connections. STEP 4: Double-click the icon under LAN or High-Speed Internet. In the next window, click Properties. © Copyright December 2012 United Electronic Industries, Inc. Tel: 508-921-4600 Date: December 2012 www.ueidaq.com Vers: 3.6 File: PowerDNA_Appendix.fm 73 DNA-PPCx PowerDNA Cube Manual STEP 5: Click the Advanced tab and uncheck the box Protect My Computer and Network by limiting or preventing access to this computer from the Internet (see illustration below). STEP 6: Click OK or Close until you return to the Network Connections window. STEP 7: Close the Network Connections window. D. Using the Windows XP Alternate Configuration Setting If you're using a computer with only one Ethernet port, such as a laptop, you can configure Windows XP to automatically switch settings depending on which network it's connected. Windows XP users have the ability to configure a second IP address setting under the Control Panel that will allow Windows to pick the correct computer IP setting, based on the device that it finds connected to the Ethernet port. Under this configuration, your primary IP setting is configured for Obtain IP Address Automatically for connection to your company Network, and your secondary IP setting (Alternate Configuration) is configured for 192.168.100.1 with a subnet mask of 255.255.255.0 for connection to the PowerDNA cube or DNR-12. The following steps allow you to configure your alternate IP address, starting at the Control Panel. STEP 1: Double click on Network Connections STEP 2: Double click on Local Area Connections STEP 3: Click on the Properties button STEP 4: Select Internet Protocol (TCP/IP) and click on the Properties button STEP 5: Select the Alternate Configuration tab STEP 6: Select User Configured STEP 7: Enter 192.168.100.1 for the IP address STEP 8: Enter 255.255.255.0 for the Subnet mask STEP 9: Close all open configuration windows using OK or Close Use the following screen to configure the Alternate Configuration tab located under the Windows XP network configuration screen located in the Windows XP Control Panel. © Copyright December 2012 United Electronic Industries, Inc. Tel: 508-921-4600 Date: December 2012 www.ueidaq.com Vers: 3.6 File: PowerDNA_Appendix.fm 74 DNA-PPCx PowerDNA Cube Manual Once you have this configuration in place, your computer will look for the attached device on your Ethernet port during “Boot Up” or during a Windows “Log On” operation. If it sees a powered on PowerDNA cube connected to the Ethernet port, it will automatically switch to using the secondary IP address. If the computer sees a DHCP network connected to the Ethernet port, it will use the primary IP configuration and negotiate an IP address with your company network as required. If you are in the office and you want to check your email: Plug in the Ethernet cable for your company’s network connection into your computer and either power up your computer and log onto the network as you normally do, or if your computer is already powered on, perform a Windows “Log Off” and then a “Log On” and log onto your company network as you normally do. If you are working in the field with a PowerDNA cube or DNR-12: Plug in the Ethernet cable from the data acquisition system into your computer and make sure that the data acquisition system is powered on. Then, either power up your computer and bypass your network log on screens, or if your computer is already powered on, perform a “Log Off” and then a “Log On” and bypass your network logon screens. A.2 Configuring a Second Ethernet Card Under Windows 2000 © Copyright December 2012 United Electronic Industries, Inc. This section describes procedures for configuring a second Ethernet Card under Windows 2000. The procedure is as follows: Tel: 508-921-4600 Date: December 2012 www.ueidaq.com Vers: 3.6 File: PowerDNA_Appendix.fm 75 DNA-PPCx PowerDNA Cube Manual A. Set Up Your Ethernet Card (NIC) Windows 2000 will normally detect and install your Ethernet card and TCP/IP automatically. To check that your card has been installed, run through the following steps. STEP 1: From the Start menu, select Settings and then select Network and Dial-up Connections. STEP 2: If you see a Local Area Connection icon, your Ethernet card has been detected and installed, skip ahead to the section Configure TCP/IP. If you do not see this icon, proceed to step 3. STEP 3: From the Start button, select Settings, then Control Panel. Double-click on the Add/Remove Hardware icon and follow the on-screen instructions. We recommend that you allow Windows 2000 to search for and install your Ethernet card automatically. If Windows 2000 does not find your Ethernet card, you will need to install it manually by following the manufacturer's instructions. STEP 4: Once your Ethernet card has been installed, click OK and continue with the next section. B. Install TCP/IP STEP 1: From the Start menu, select Settings and then select Network and Dial-up Connections. STEP 2: In the Network and Dial-up Connections window, double-click on the Local Area Connection 2 icon STEP 3: In the Local Area Connection 2 Status window, click Properties:. , STEP 4: If Internet Protocol (TCP/IP) is listed, make sure the box next to it contains a check mark, and go to Configure TCP/IP.. STEP 5: If Internet Protocol (TCP/IP) is not listed, click on Install. © Copyright December 2012 United Electronic Industries, Inc. Tel: 508-921-4600 Date: December 2012 www.ueidaq.com Vers: 3.6 File: PowerDNA_Appendix.fm 76 DNA-PPCx PowerDNA Cube Manual STEP 6: In the next window, double click on Protocol.. STEP 7: Select Internet Protocol (TCP/IP), and click OK. STEP 8: Make sure the box beside Internet Protocol (TCP/IP) contains a check mark, and proceed to the next section, Configure TCP/IP. C. Configure TCP/IP STEP 1: From the Start menu, select Settings and then select Network and Dial-up Connections. STEP 2: In the Network and Dial-up Connections window, double-click on the Local Area Connection 2 icon. STEP 3: In the Local Area Connection 2 Status window, click Properties: STEP 4: Click once on Internet Protocol (TCP/IP). Then click Properties. © Copyright December 2012 United Electronic Industries, Inc. Tel: 508-921-4600 Date: December 2012 www.ueidaq.com Vers: 3.6 File: PowerDNA_Appendix.fm 77 DNA-PPCx PowerDNA Cube Manual STEP 5: Select Use the following IP address, and type 192.168.100.1 In the Subnet mask box, type 255.255.255.0. Leave the Default Gateway box blank. STEP 6: 6Select Use the following DNS server addresses and: Make sure the Preferred DNS server box and the Alternate DNS server boxes are blank. STEP 7: Click OK, click OK in the TCP/IP Properties window, click OK in the Local Area Connection window and click Close in the Local Area Status window. STEP 8: Close the Network and Dial-up Connections window. A.3 Configuring a Second Ethernet Card Under Windows NT A. Set Up Your Ethernet Card (NIC) If you installed your Ethernet interface before (or at the same time as) you installed Windows NT, then the system should have automatically detected it and you should proceed to the next section, “Install and Configure TCP/IP.” Optionally, you may follow steps 1-3 below to confirm that your interface is recognized. If you obtained an Ethernet interface after Windows NT was already on your computer, do the following: STEP 1: From the Start menu, select Settings and then select Control Panel. STEP 2: Double-click on the Network icon. STEP 3: Click on the tab labeled Adapters. You should then see an entry for your Ethernet card. If you do not see one, continue to step 4 to install it. Otherwise, click OK and skip ahead to Install and Configure TCP/IP. STEP 4: Click Add... and follow the on-screen instructions. Select your Ethernet card from the list shown, or, if it is not included in the list, click Have Disk... and insert the diskette that came with the card. Even if your card does appear in the list, it's a good idea to use the diskette to make sure you have the latest drivers. STEP 5: Restart your computer if Windows gives you the option to do so. Wait for the system to restart before continuing with the next section. © Copyright December 2012 United Electronic Industries, Inc. Tel: 508-921-4600 Date: December 2012 www.ueidaq.com Vers: 3.6 File: PowerDNA_Appendix.fm 78 DNA-PPCx PowerDNA Cube Manual B. Install and Configure TCP/IP STEP 1: From the Start menu, select Settings and then Control Panel. STEP 2: Double-click on the Network icon, then click the Protocols tab. STEP 3: In the list of Network Protocols, look for TCP/IP Protocol. If you don't see it, click Add..., select TCP/IP Protocol, and then click OK. STEP 4: Select TCP/IP Protocol in the list of Network Protocols and then click Properties... A Microsoft TCP/IP Properties window will open. STEP 5: Click on the IP Address tab if it is not already selected. STEP 6: Make sure that the radio button next to Specify an IP address is selected. STEP 7: Enter 192.168.100.1 for IP Address, 255.255.255.0 for Subnet Mask, and leave blank the Gateway Address (in the Default Gateway box.) © Copyright December 2012 United Electronic Industries, Inc. Tel: 508-921-4600 Date: December 2012 www.ueidaq.com Vers: 3.6 File: PowerDNA_Appendix.fm 79 DNA-PPCx PowerDNA Cube Manual STEP 8: Click on the DNS tab. Leave blank the Host Name and Domain fields. STEP 9: Click OK to close the Microsoft TCP/IP Properties window. STEP 10: Click Close to close the Network control panel. STEP 11: Restart your computer. STEP 12: You should now be able to access network-based services. A.4 Configuring a Second Ethernet Card Under Windows 95/98/ SE/ME A. Set Up Your Ethernet Card (NIC) If you installed your Ethernet card before (or at the same time as) you installed Windows 95/98/ME, then the system should have automatically detected it and you should proceed to the next section, Install TCP/IP. Optionally, you may follow steps 1-3 below to confirm that your card is recognized. If you obtained an Ethernet interface after Windows 95/98/Me was already on your computer, then do the following: STEP 1: From the Start menu, select Settings and then select Control Panel. STEP 2: Double-click on the System icon, then click on the tab labeled Device Manager. © Copyright December 2012 United Electronic Industries, Inc. Tel: 508-921-4600 Date: December 2012 www.ueidaq.com Vers: 3.6 File: PowerDNA_Appendix.fm 80 DNA-PPCx PowerDNA Cube Manual STEP 3: Double-click on Network adapters to display a list of the network interfaces that are installed on your computer. If you see two entries other than the Dial-Up Adapter, one is your second Ethernet card. Skip ahead to Install TCP/IP. If you do not see your second Ethernet card, continue to step 4 to install it. STEP 4: If an entry for your second Ethernet card appears here, you probably do not need to run any software included with your card, but keep the software handy just in case you need it later to resolve a problem. STEP 5: Note the name of your second Ethernet card. STEP 6: Close the System Properties window (the Control Panel window should still be open). STEP 7: Open the Add New Hardware control panel and follow the on-screen instructions. We recommend that you allow Windows to search for and install your card automatically. STEP 8: Restart your computer if Windows gives you the option to do so. Then continue with Install TCP/IP. B. Install TCP/IP To determine whether TCP/IP software is already installed on your computer, follow these steps: STEP 1: From the Start menu, select Settings and then Control Panel. STEP 2: Double-click on the Network icon. Click on the Configuration tab if it is not already selected. © Copyright December 2012 United Electronic Industries, Inc. Tel: 508-921-4600 Date: December 2012 www.ueidaq.com Vers: 3.6 File: PowerDNA_Appendix.fm 81 DNA-PPCx PowerDNA Cube Manual STEP 3: Look in the box labeled The following network components are installed. STEP 4: If you see IPX/SPX-compatible Protocol or NetBEUI in the list, select it, then click the Remove button to delete it. These protocols are used by some networked applications, especially games, but they may interfere with your Ethernet connection. STEP 5: If you don't see TCP/IP for your second Ethernet card, then continue with step 4. If you do see TCP/IP for your second Ethernet card, skip ahead to Configure TCP/IP. Do these steps only if you do not see TCP/IP listed in your Network control panel for your second Ethernet card. STEP 6: In the Network control panel, click the Add... button. STEP 7: In the Select Network Component Type window, choose Protocol and click the Add... button. STEP 8: In the Select Network Protocol window, select Microsoft under Manufacturer and TCP/IP under Network Protocols. © Copyright December 2012 United Electronic Industries, Inc. Tel: 508-921-4600 Date: December 2012 www.ueidaq.com Vers: 3.6 File: PowerDNA_Appendix.fm 82 DNA-PPCx PowerDNA Cube Manual STEP 9: Click the OK button to return to the Network control panel, then click the OK button again to exit the control panel. STEP 10: Restart your computer if Windows gives you the option to do so. Then continue with Configure TCP/IP. Configure TCP/IP STEP 1: From the Start menu, select Settings and then Control Panel. Double-click on the Network icon. Click the Configuration tab if it is not already selected. STEP 2: In the box labeled The following network components are installed, select TCP/ IP. TCP/IP is listed at least twice, so choose the one followed by the name of your second Ethernet card (do not choose TCP/IP -> Dial-up Adapter). STEP 3: Click the Properties button. STEP 4: In the TCP/IP Properties window, click on the IP Address tab. STEP 5: Make sure that Specify an IP address is selected. STEP 6: Enter 192.168.100.1 for IP Address and 255.255.255.0 for Subnet Mask. STEP 7: Click on the DNS Configuration tab. © Copyright December 2012 United Electronic Industries, Inc. Tel: 508-921-4600 Date: December 2012 www.ueidaq.com Vers: 3.6 File: PowerDNA_Appendix.fm 83 DNA-PPCx PowerDNA Cube Manual STEP 8: Select Enable DNS. Make sure the Host and Domain information is blank. STEP 9: Click on the Gateway tab. Make sure the box labeled New gateway is blank. STEP 10: Click the OK button to return to the Network control panel. STEP 11: Click OK to exit the Network control panel. STEP 12: Restart your computer if Windows gives you the option to do so. © Copyright December 2012 United Electronic Industries, Inc. Tel: 508-921-4600 Date: December 2012 www.ueidaq.com Vers: 3.6 File: PowerDNA_Appendix.fm 84 DNA-PPCx PowerDNA Cube Manual Index C modifying C class network 13 Configuring a Second Ethernet Card Under Windows 95/98/SE/ME 80 Configuring a Second Ethernet Card Under Windows NT 78 Configuring a Second Ethernet Card Under XP 72 D N Network mask 13 Network performance improving 13 R Repairs 25 Reset button Field connections 22 Firmware updating 19 Front-panel layout 11 26 21 S Self-diagnostics 11 Setup program 9 show command 12 Subnet 15 G T 13 Terminal-emulation program U I/O layers modifying 25 IP address default 12 modify 13 © Copyright 2009 all rights reserved United Electronic Industries, Inc. Mounting 22 Power supply for Cubes 9 PowerDNA Explorer F I 12 P DHCP 13 DIN rail 22 DNA-DR 22 DNA-PSU-24 9 Documentation 2 Gateway mask M Upgrades W 25 Windows Registry Tel: 508-921-4600 Date: October 2010 11 10 www.ueidaq.com Vers: 3.6 File: DNA_PPCx_ManualIX.fm 85