1
MOUNTING THE WEAPON
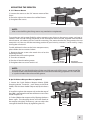
A. 7/8” Weaver Mount
1) Loosen the screws on the 7/8” weaver mount of the
Orion.
2) Place the sight on the weaver base of the firearm.
3) Re-tighten the screws.
Screws
NOTE:
After a round of firing the fixing screws may need to be re-tightened.
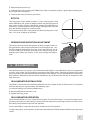
To provide you with greater flexibility when mounting your Orion on the mount system, we have installed a small rail with a fixing projection on the base of the mount bracket, together with the determined weaver rail indents that are used for mounting. The mount bracket has two grooves that can
accept this rail. You can shift the mounting position of your Orion by an extra 1/3 of an inch by simply
turning the rail around.
Screws
To add additional inches to the Orion weapon mount,
please follow the instructions below:
1) Remove the two screws that attach the rail to the
mounting bracket.
2) Remove the rail from the groove.
3) Turn the rail around.
4) Put the rail into the other groove.
5) Re-tighten the two screws on the rail.
Grooves
7/8”weaver
Mounting system
Rail with a
fixing projection
NOTE:
Occasionally, you may find that the rail does not slide out easily. If this occurs, rotate one of the
removed screws into the threaded aperture in the center of the fixing projection. This will work
as a jack and release the rail out of the groove.
B. Quick Release Weapon Mount (optional)
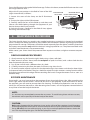
1) Loosen the Quick Release Weapon Mount (QRM)
clamping device. To do this, push down on the lever
holder; with the lever holder depressed, flip the levers
up.
2) Install the sight on the weapon rail so that the stop of
the QRM is positioned inside one of the transverse slots
of the weapon rail.
3) Fix the QRM on the weapon rail by flipping the levers
down again. The clamping device must be fitted on
the weapon rail tightly. If necessary, you can adjust the
strength of the lever clamp by tightening the nut.
nut
clamping
device
lever
holders
levers
5