1
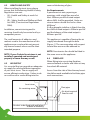
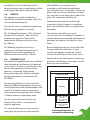
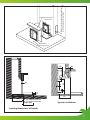
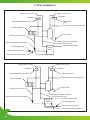
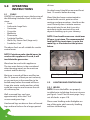
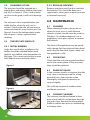
Multifuel Backboiler
Inset Stove
Instruction Manual
All the comfort of a stove with the benefit of heat to your house.
INDEX
Page
1.0INTRODUCTION
......................................................................................... 1
2.0 IMPORTANT SAFETY NOTES ............................................................... 1
3.0 TERMS & CONDITIONS OF GUARANTEE ...................................... 2
4.0
Installation INSTRUCTIONS
4.1Performance
..................................................................................... 3
4.2 Health and Safety ........................................................................... 4
4.3 Air Supply .......................................................................................... 4
4.4Fireplace
............................................................................................. 4
4.5Hearth
................................................................................................. 5
4.6Chimney/Flue
.................................................................................. 5
4.7 Installing and Back Filling ......................................................... 6
4.8 Heating and Hot Water System ............................................... 9
4.9 System Controls .............................................................................. 9
4.10 Checks Before Lighting ................................................................ 9
4.11Commissioning............................................................................... 9
5.0 OPERATING INSTRUCTIONS
5.1Fuels
..................................................................................................... 10
5.2 Lighting and Controlling ............................................................ 10
5.2.1
Wood
...................................................................................... 10
5.2.2
Smokeless Fuel
................................................................... 11
5.3 Overnight Burning ......................................................................... 11
5.4 Clearance of Ash ............................................................................. 12
5.5 Throat Plate (Baffles) .................................................................... 12
5.5.1
Initial Burning
..................................................................... 12
5.5.2
Regular Checking
.............................................................. 12
6.0MAINTENANCE
6.1Cleaning
............................................................................................. 12
6.2 Door Seals .......................................................................................... 12
6.3 When Not in Use ............................................................................. 12
6.4 Chimney Cleaning ......................................................................... 12
6.5 Chimney Fires ................................................................................... 13
6.6 Fume Emission ................................................................................ 13
6.7Servicing
............................................................................................ 13
7.0 TROUBLE SHOOTING............................................................................... 13
1.0INTRODUCTION
We would like to thank you for purchasing a high efficiency, Firebird multifuel backboiler
inset stove (hereinafter referred to as “the inset stove”). The design for this product stems
from our original concept, “the Firebird backboiler”. The stove is manufactured in its
entirety in our factory in Baile Mhic Íre, Macroom, Co. Cork, using the highest standard
of workmanship and latest technology.
This instruction manual has been produced for the reference and guidance of qualified
installation technicians.
You should ensure that all installation, servicing and commissioning works are carried
out by a competent person. It should be noted that it is the responsibility of the installer/
householder to ensure that the inset stove is properly commissioned. Failure to do so may
invalidate the warranty.
2.0 IMPORTANT SAFETY NOTES
• The term multifuel refers to commercially available solid fuels such as wood, smokeless
coal and anthracite. Liquid fuels should never be used when lighting or filling the fire.
• THIS INSET STOVE SHOULD ONLY BE INSTALLED IN OPEN VENTED SYSTEMS.
• Do not store liquid fuels in close proximity to the inset stove.
• The inset stove is designed in such a way, that under normal burning conditions, the
fumes pass up through the chimney flue and do not escape into the home. Please
ensure that the flue system is checked regularly, that no cracks or openings are evident
and that the seals on the inset stove are in good condition.
• ENSURE THE BAFFLES ARE ALWAYS IN PLACE WHEN LIGHTING THE INSET STOVE AND
NEVER LIGHT A FIRE IF THE BAFFLES ARE NOT IN PLACE.
• THE INSET STOVE DOOR SHOULD NOT BE KEPT OPEN WHEN THE FIRE IS LIT/ BURNING.
• The inset stove should never be over stocked/over filled. The draught settings should be
reduced if this occurs.
• A mechanical air supply should never be added to the inset stove.
• The inset stove reaches high temperatures and can be hot to touch. Ensure that safety
guards (in accordance with BS6539) are in place.
• Do not place any furniture or combustible material within 800mm of the inset stove.
• Please read this manual carefully prior to installation of the inset stove.
• Installation of the inset stove, must conform to Building Regulations at all times.
1
3.0 TERMS & CONDITIONS OF GUARANTEE
• This Firebird product is designed and manufactured to give many years of trouble-free
service. We provide a comprehensive warranty of 5 years on the inset stove.
• The warranty will only apply if the inset stove is installed by a competent person and is
serviced annually thereafter.
• The following terms, laid out in the guarantee must be adhered to:
(a) All claims under the guarantee must be received within 5 years from the
date of installation, provided installation has occurred within 12 months
from date of purchase.
(b)The inset stove must be installed and commissioned by a competent
person and as set out in this instruction manual.
(c) Maintenance should be carried out at the intervals outlined in this manual.
(d)Installation of the inset stove must be in accordance with this manual and
all relevant standards and codes of practice.
(e) Firebird can accept no liability in respect of any defect arising from
incorrect installation, negligence, fair wear and tear, misuse, alteration or
repair by unqualified persons.
(f ) The guarantee extends to reasonable labour costs except under clause (a),
where any valid claim made after 3 years will not include labour costs.
(g)Firebird’s prior authorisation must be obtained before examination or
repair of the inset stove takes place.
(h)Firebird will examine all claims made under the guarantee and for any
claims deemed invalid, costs incurred will be borne by the householder.
(i) The inset stove must be used for domestic heating purposes only.
(j) Any defective part removed under any or all of the guarantees,
MUST be returned to Firebird.
THE STATUTORY RIGHTS OF THE HOUSEHOLDER
ARE NOT AFFECTED BY THIS GUARANTEE
2
4.0 INSTALLATION INSTRUCTION
4.1PERFORMANCE
The following highlights the output and test performance of the inset stove:
Firebird 16” Multifuel Backboiler Inset Stove
Fuel Type
Wood
Ancit
Ancit
Output to Water - kW
7.3
8.3
7.2
Output to Space - kW
2.5
3.6
0.2
Efficiency - %
75.0
79.9
81.5
CO (@13% O2)
0.61
0.36
0.44
BS Standard
Test Type
BS EN 13229:2001
Intermittent
Intermittent
Continuous
Maximum water operating pressure: 3 bar. Minimum safe distance from
combustible materials: sides 75mm and shelf 200mm.
Firebird 18” Multifuel Backboiler Inset Stove
Fuel Type
Wood
Ancit
Ancit
Output to Water - kW
6.9
12.1
7.1
Output to Space - kW
2.6
3.6
1.7
Efficiency - %
77.0
81.0
79.6
CO (@13% O2)
0.91
0.43
0.41
BS Standard
Test Type
BS EN 13229:2001
Intermittent
Intermittent
Continuous
Maximum water operating pressure: 3 bar. Minimum safe distance from
combustible materials: sides 75mm and shelf 200mm.
Heat outputs and efficiencies are based on heat over a one hour period, using Ancit solid
fuel. Outputs are obtained by independent testing to BS Standard EN 13229, burning Ancit
solid fuel.
The appliance is capable of intermittent operation when burning wood logs and both
intermittent and continuous operation when burning smokeless fuel.
3
4.2 HEALTH AND SAFETY
When installing the inset stove, please
ensure that the following Health & Safety
Regulations are met:
• UK - Health and Safety at work Act
1974.
• IRL - Safety, Health and Welfare at Work
Act 2005, (Construction Regulations
2006).
Installation, commissioning and/or
servicing should only be carried out by a
competent person.
The small amounts of adhesives and
sealants used in the manufacture of this
appliance are cured and do not present
any known hazards when used for their
intended purpose.
NOTE: If your Firebird inset stove is not
installed, operated and maintained
properly a house fire may result!
4.3 AIR SUPPLY
It is essential that you provide an adequate
air supply for safe and efficient operation
of your inset stove. The air supply will
ensure efficient combustion. Failure to do
so could result in smoke filling into the
room or blackening of glass.
Air Requirements
A permanent air entry opening or
openings, with a total free area of at
least 550mm2 per kW of rated output
above 5kW, shall be provided. Under no
circumstances should this be less than
6500mm2.
If a flue draught stabiliser is fitted, then the
first 5kW of rated output is 300mm2 per kW
and the balance of the rated output is
850mm2 per kW.
This appliance is capable of having the air
supply introduced through the base.
(Figure 1.) The same equation with respect
to total free area must be adhered to.
NOTE: No extractor fan should be fitted in
the same room as the appliance.
4.4FIREPLACE
When fitting into an existing fireplace,
remove fireback or boiler and clear out any
loose back fill material.
Access from the side of the chimney breast
should be made available to facilitate pipe
work connections.
Inset stove
Air receiving zone
Flexi pipe
Air duct terminal
fixed to wall
Air duct to be fixed with wall plate
at back of chimney
4
In addition, access to the front of the
chimney breast may be required, via a hole,
for fixing the flue pipe and back filling.
4.5HEARTH
The appliance must be installed on a
hearth that can take the weight and is of a
non-combustible material.
all installations are carried out in
accordance with building regulations
and manufacturer’s instructions. Always fit
pipes with the narrow side down, to allow
any creosote to run down the inside of the
pipe. This avoids possible fire risk.
Ensure that when installing the appliance,
the following regulations are met:
Firebird recommend that a thorough
inspection of the chimney is carried out
prior to installation and on a regular basis
thereafter.
IRL - Building Regulations 1997, Technical
Guidance Document 5, states that the
hearth must extend in front of the appliance by 500mm and to the sides
by 150mm.
The chimney should be of sound
construction, free from debris, capable of
withstanding extremely high temperatures
and have no evidence of cracks or other
faults.
UK- Building regulations for class 1 appliances state that the hearth must
extend in front of the appliance by 300mm and to the sides by 150mm.
Best installation practice is to install a flue
lining suitable for solid fuels. A rigid
connection adaptor should be used to
connect the flue liner to the insert stove.
4.6CHIMNEY/FLUE
In order for the appliance to have sufficient
draw to perform satisfactorily, a height of
no less than 4.5 meters, vertically from the
top of the appliance to the top of the
chimney, is required. Alternatively,
chimney design with sufficient draught
can be calculated, in accordance with
EN13384-1.
Pipe bends should be kept to a minimum
and there should be no more than two 45˚
bends on any installation.
Do not connect the insert stove to a
chimney flue which is connected to
another appliance.
It is essential that you use only stainless
steel pipes for your inset stove and that
Opening
min 620 for facia
Facia area
min 565 max 600
The existing chimney must be checked
before installing the appliance (It must be
sound, free from cracks and blockages and
swept). It should not have an excessive
cross sectional area (greater than 250mm
x 250mm square or equivalent area).
Fireplace surround
16” inset - min 405
max 470
18” inset - min 455
max 520
16” inset - min 500
18” inset - min 550
for facia
Limiting dimensions of
surround and opening
5
Flues should not pass through ceilings,
floors or any form of combustible walls
without adequate, approved insulation
having been installed, to protect the
combustible material.
4.7 INSTALLING AND BACK FILLING
1. Remove the inset stove from its
packaging and inspect for any
damage.
2. Place adjustable legs to the bottom of
the inset stove if required.
3. Fit the appliance into the opening,
making sure it is central. A good seal
should be made between the flange
and the surround. The adjustable legs
can be used to level the inset stove if
required.
4. Remove any excess fire cement from
around the flange.
5. Make the connections to the boiler
and ensure the primary flow pipe rises
from the boiler so that no air is
trapped in the boiler.
6. Before back filling, fill the system
with water and check the boiler
connections for leaks. Ensure that
the materials used for back filling are
non-combustible.
7. An expansion pipe must be fitted to
the inset stove water outlet pipe,
which must be vented to atmosphere,
above the height of the header tank.
There should not be any valves
between the inset stove and the vent
pipe outlet and it must not be
possible to obstruct the outlet in
anyway.
8. Fit the flue connector to the top of the
appliance so that it is central to the
chimney and extends to the point
where the chimney narrows.
Ensure that the flue manufacturer’s
instructions are adhered to at all
times.
9. All voids must be filled and the flue
pipe flaunched into the chimney,
so that no soot can collect when
sweeping the chimney.
10.Make good the holes in the front and
side of the chimney breast, ensuring
they are airtight. Remove any material
from inside the appliance and check
the flue pipe is clear.
Fixing screws
Flue liner
Flexible liner
Flue adaptor
Flue gatherer
Inset stove
6
Allow access from side of chimney breast
to facilitate pipework installation
Fireplace surround
Inset stove
X
X
Inset facia
Fixing screws
160
130
100
60
120
40
375
140
160
60
60
375
min 415
for 16" inset min 350 mm
for 18" inset min 400 mm
to open door
Typical installation
Limiting dimensions of hearth
7
Typical schematics
Open vent 22 mm
Open vent 22 mm
Overflow
Overflow
Cold water
tank
Feed and expansion tank
Domestic hot water draw off
Gravity radiator
Drain cock
Gravity return 28 mm
Indirect hot water cylinder
Gravity flow 28 mm
Central heating flow
Minimum return thermostat
Circulating pump
Back
boiler
Central heating return
Drain cock at lowest point
Injector tee
Open vent 22 mm
Open vent 22 mm
Overflow
Overflow
Cold water tank
Feed and expansion tank
Domestic hot water draw off
Gravity radiator
Drain cock
Gravity return 28 mm
Minimum return thermostat
Back
boiler
Indirect hot water cylinder
Gravity flow 28 mm
Central heating flow
Circulating pump
Central heating return
Drain cock at lowest point
8
4.8 HEATING AND HOT
WATER SYSTEM
The central heating system must comply
with BS5449 part 1.
The hot water cylinder must be indirect
and should comply with BS1566 part 1.
The system must be open vented and the
header tank should not be more than 12
meters above the boiler.
In case of pump failure or a power cut,
the system should be able to work on
gravity to the hot water cylinder.
In addition, the fire should be quenched,
using best practice. Dumping of hot water
(i.e. running hot water taps) may be
required.
NOTE: The system should never be valved.
Depending on the size of the room into
which the appliance is fitted, a radiator in
the same room may give greater flexibility
in operating the system and ensure
sufficient heat to the room.
4.9 SYSTEM CONTROLS
The system pump may not be controlled
by time switches. The inset stove can be
controlled with pipe thermostat. Ensure
that all controls are installed to building
regulations.
4.10 CHECKS BEFORE LIGHTING
Note: Prior to lighting the inset stove,
allow sufficient time for the back fill to dry
at normal conditions.
The following checks should be carried out
prior to lighting a fire in the inset stove:
1.
2.
3.
4.
5.
The fire grate is in place.
The flue is clear.
Ensure that baffles are in place.
Check the door fitting.
The system is full with water and
vented.
6. Has a suitable inhibitor been added?
4.11COMMISSIONING
Light the fire and check all joints and seals.
Ensure that fumes and smoke are being
taken up the chimney and no fumes are
entering the room.
The heating system should be balanced in
accordance with best plumbing practice.
Before completing the commissioning,
the householder should be advised as to
the operation of the inset stove and the
heating controls.
The instruction manual should remain
with the householder.
Radiators can be fitted with thermostatic
or manual valves. Please note: no valves
must be fitted to radiators where they act
as the heat leak.
9
5.0OPERATING
INSTRUCTIONS
5.1FUELS
HEATAS Ltd. approval covers the burning of
the following smokeless fuels in this inset
stove:
• Ancit.
• Anthracite Large Nuts.
• Centurion.
• Cosycoke.
• Maxibrite.
• Phurnacite.
• Sunbrite Doubles.
• Welsh Dry Steam Coal (large nuts).
• Smokeless Coal
The above fuels are all suitable for smoke
control areas.
of time.
Air dried wood should be seasoned for at
least 12 months before burning.
Wood that has been contaminated or
treated with varnish, paint or other
coatings and preservatives, should not be
used. Not only does it release noxious
chemicals into the air, but it can also
contribute to the amount of tar and
deposits building up in your chimney.
NOTE: You should never over stock/over
fill your inset stove. The recommended
level to fill the inset stove, is up to the
metal lip, as illustrated on the picture
below.
NOTE: Petroleum coke should never be
used on this appliance. If used, it will
invalidate the guarantee.
Wood can be used in this appliance.
The two main factors to be considered
when burning wood, are the moisture
content and the density.
Moisture in wood will have an effect on
the CV (amount of heat per unit volume),
as any moisture in the wood has to be
boiled away before the wood will burn.
It can also create smoke and tars which
could be corrosive and increase the risk
of a chimney fire.
Well-seasoned logs can have approximately twice the CV of unseasoned green logs.
Hard wood logs are denser than soft wood
logs and tend to burn for a longer period
10
Metal Lip - recommended fill level.
5.2 LIGHTING AND CONTROLLING
5.2.1WOOD
NOTE: Ensure the baffles are properly
installed prior to lighting the inset stove as
per Figure 1 and 2 on the next page. Carry
out all checks as per 4.10.
Place some kindling and a firelighter on
top of the grate, add some dry kindling
and two to three logs.
Fully open out the secondary air control
(right hand side) and open the primary air
control (left hand side) to about half way.
See Figure 3.
Light the fire and close the door.
The room should be kept well ventilated
on the first lighting, as there may be an
odour and some smoke may be released.
This is just the paint reacting to the heat
and will only last for a short time.
Figure 3.
Figure 4.
When the fire is well lit, adjust the primary
and secondary air controls to give you the
required level of flame. See Figure 4. For
best results, wood will generally need more
secondary air than primary air.
Refuel the appliance when there is still a
good bed of glowing embers. Place the
required amount of logs on the bed, open
the secondary air control fully and close
the door.
Once the new fuel has taken, adjust the
secondary air control.
Figure 1.
Figure 2.
5.2.2 SMOKELESS FUEL
The same applies as with wood, but
you will require more primary air than
secondary air with smokeless fuel.
When burning Homefire or Anthracite
smokeless fuel, always have the secondary
air fully open on ignition. Leave it open for
3-5 minutes and adjust thereafter.
5.3 OVERNIGHT BURNING
To achieve slow burning/overnight
burning with smokeless coal, close the
secondary air and open the primary air
slightly. Please note that slow burning may
cause the glass to blacken and cause sooty
deposits in the flue way.
Furthermore, these settings are guidelines
and are dependent on the draft and fuel
quality.
11
5.4 CLEARANCE OF ASH
The ash pan should be emptied on a
regular basis and always before it becomes
too full. See Figure 5. If ash is left to build
up close to the grate, it will cause damage
to it.
The ash pan is best emptied before you
riddle the fire, when the ash is at its
coolest. Check under the ash pan once a
week and clean this area if necessary. See
Figure 6. Ensure the bottom plate (under
the ash pan) is always replaced after
cleaning.
5.5
THROAT PLATE (BAFFLES)
5.5.1 INITIAL BURNING
In the first month after installation, the
baffles should be checked before each
ignition, to establish a burning pattern to
fuel type. This is necessary because some
fuels deposit more soot than others.
Figure 5.
5.5.2 REGULAR CHECKING
Remove and clean any fly ash or soot that
has built up. This should be done on a
regular basis, about once a month or more
as deemed necessary.
6.0MAINTENANCE
6.1CLEANING
When cleaning the glass, always do so
when the inset stove is cold. Abrasive
cleaners or pads should never be used on
the glass. For stubborn deposits, use a
proprietary stove glass cleaner or ceramic
hob cleaner.
The front of the appliance may be wiped
with a damp, lint free cloth and then dried
with a dry lint free cloth. Again, make sure
the appliance is cold.
6.2 DOOR SEALS
Check that the seals are in good condition
and in the correct place. If they are worn,
they should be replaced.
6.3 WHEN NOT IN USE
In the summer months or anytime that the
inset stove is not being used for a long
period of time, clean out the inside
thoroughly and open the primary air
control slightly.
Figure 6.
This will help to prevent condensation,
and hence corrosion.
6.4 CHIMNEY CLEANING
The chimney should be cleaned at least
once a year and this can be done through
the inset stove. Remove the throat plates
(baffles) and fire bars prior to undertaking
a chimney clean.
12
6.5 CHIMNEY FIRES
If the instructions in this manual are
followed and the chimney is cleaned once
a year, chimney fires should not occur.
Should the chimney go on fire, close both
air intakes and ensure the door is fully
closed. This should be enough to ensure
the chimney fire dies. If the fire continues,
then call the fire brigade. Do not open the
inset stove door at any time during this
period as it may cause re-ignition. Leave
the door closed until the inset stove is cold.
The chimney must be swept and carefully
examined for damage after a chimney fire.
6.6 FUME EMISSION
Fume emission is potentially dangerous.
There will however be the occasional
emission of fumes when opening the door
to clean out ashes or filling the fire.
Take the following actions immediately, if
you suspect persistent fume emission:
1. Open all windows and doors to
ventilate the room.
2. Let the fire go out.
3. Call professional help to find the
problem and rectify it.
4. Do not light the fire until the problem
is rectified.
6.7SERVICING
The following is a guideline checklist which
can be used during servicing. Note that
other checks may be required (system
dependant):
- Check flue to ensure it is clear and free
from soot.
- Remove baffles, clean and ensure they
are replaced correctly.
- Check air supply to room or inset stove.
Ensure that it is clean, secure and free
from debris.
- Ensure that all seals are in good
condition.
- Ensure that air wash openings are clear.
7.0 TROUBLE SHOOTING
FIRE WILL NOT BURN
Check that:
• Primary and secondary air inlets are
open with no obstructions.
• Chimney and baffles are clear.
• Correct fuel is being used.
• Air supply to room is adequate and not
blocked.
FIRE NOT RESPONDING TO AIR
CONTROLS/OVER BURNING
Check that:
• The door is fully closed.
• Both air controls to the appliance are
fully closed.
• The door seals are in place and in good
condition.
• The correct fuel is being used.
REDUCING BLACKENING OF GLASS
This stove is designed with an air wash, the
function of which is to reduce deposits on
the glass. Please note that certain fuel
types can cause blackening of glass.
Check that:
• The appliance is not being starved of
air.
• Bad quality fuel or damp fuel is not
being used.
• The balance between primary and
secondary air is correct.
ADVERSE WEATHER CONDITIONS
Draught may be affected during bad/poor
weather conditions. In this case, air
adjustments may be required.
13
Ireland
Northern Ireland
United Kingdom
FIREBIRD
FIREBIRD PRODUCTS
FIREBIRD UK
www.firebird.ie
www.firebird.ie
www.firebirduk.co.uk
Udaras Industrial Estate,
Baile Mhic Íre,
Co. Cork, Ireland.
t: +353 (0)26 45253
f: +353 (0)26 45309
e: [email protected]
Shean, Forkhill,
Newry,
BT35 9SY.
t: (028) 3088 8330
f: (028) 3088 9096
e: [email protected]
Central Avenue,
Lee Mill Industrial Estate Nr. Ivybridge,
Devon PL21 9PE
t: +44 (0)1752 691177
f: +44 (0)1752 691131
e: [email protected]
Photographs, Illustrations & Specifications. This catalogue was correct at the time of going to print. However, Firebird’s policy is one of continuous development.
The right is reserved to change specifications, colour, and prices of the models and items illustrated and described in this publication at any time. Whilst every care
has been exercised in the production of this catalogue, Firebird cannot accept any liability for errors or omissions. For the latest details always consult Firebird.
MLIS002