1
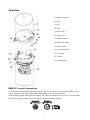
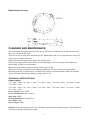
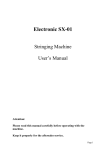
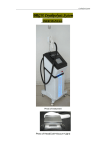
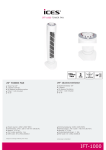
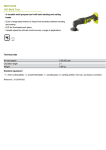
ANTI WATER DOME
USER MANUAL
WP01
KEEP THIS MANUAL FOR FUTURE NEEDS
1
2
Thank you for your patronage. We are confident that our excellent products and service can satisfy
you.
For your own safety, please read this user manual carefully before installing the device.
In order to install , operate, and maintain the lighting safety and correctly. We suggest that the
installation and operation should be done by the verified technician and follow the instruction
strictly.
INTRODUCTION:
Thank you for having chosen this professional device.
You will see you have acquired a powerful and versatile device.
Unpack the device. Inside the box you should find:
1. The fixture device
2. One set of quick lock assembly;
3. One waterproof core plug
4. Two piece of waterproof nut
5. Two pieces of waterproof dome.
6. Two cover for XLR connection cable
7. Two safety rope and this manual
Please check carefully that there is no damage caused by transportation. Should there be any,
consult your dealer and don’t install this device.
SAFETY INSTRUCTIONS
This device has left the factory in perfect condition. In order to maintain this condition and to
ensure a safe operation, it is absolutely necessary for the user to follow the safety instructions and
warning notes written in this user manual.
If the device has been exposed to temperature changes due to environmental changes, do not switch
it on immediately. The arising condensation could damage the device. Leave the device switched
off until it has reached room temperature.
This device falls under protection-class I. Therefore it is essential that the device should be earthed.
The electric connection must carry out by qualified person.
If the external flexible cable or cord of this luminaire is damaged, it shall be exclusively replaced by
the manufacturer or his service agent or a similar qualified person in order to avoid a hazard.
-1-
Make sure that the available voltage is not higher than stated at the end of this manual.
Make sure the power cord is never crimped or damaged by sharp edges. If this would be the case,
replacement of the cable must be done by an authorized dealer.
Always disconnect from the mains, when the device is not in use or before cleaning it. Only handle
the power cord by the plug. Never pull out the plug by tugging the power cord.
During initial start-up some smoke or smell may arise. This is a normal process and does not
necessarily mean that the device is defective, it should decrease gradually.
Please be aware that damages caused by manual modifications to the device are not subject to
warranty. Keep away from children and non-professionals.
Important:
Damages caused by the disregard of this user manual are not subject to warranty. The dealer
will not accept liability for any resulting defects or problems.
DESCRIPTION OF THE DEVICE
Features
·Protect the lighting fixture from the rains and moisture in outdoor performance;
·All parts on the base are waterproof
·Suitable for different position installation no matter on the floor or on the trussing;
·Excellent air circulation system to avoid over heat to the lighting fixture inside
·Separate power supply for lighting fixture from the dome itself, keep the cooling after the lighting
stop running
-2-
Overview
1) Water proof sack
2) Screw
3) Nut
4) Vent
5) Power out 1
6) Power out 2
7) DMX-In socket
8) DMX-Out socket
9) Safety eyelet
10) Carrying handle
11) Vent-pipe
12) Clamp
13) Moving head
DMX-512 control connection
Connect the provided XLR cable to the female 3-pin XLR output of your controller and the other
side to the male 3-pin XLR input of the LED lighting. You can chain multiple
LED lighting together through serial linking. The cable needed should be two core, screened cable
with XLR input and output connectors. Please refer to the diagram below.
-3-
Installation
When install the device as upward(Choose A pvc bag)
1.Take out the base from the packing and let it stand on the floor
2.Put the fixture at the middle of the plate, and connect the power to the "power out" socket; also
connect the DMX to "DMX out" socket.
-4-
3.Set up the transparent cover to the base, and make sure the stickers are well put on. Then connect
the power and DMX.
When install the device as downward (Choose B pvc bag)
1. Release the 8 screws and 6 nuts on the plate.
2. Take out the plate and reverse it,take out vent's pipe by released the 4 screws.
-5-
3. Put back the plate, and fix back the screws and nut.
4. Take out the bracket from the packing.
5. Set the quick-lock to the fixture, then fix the quick-lock to the bracket with the M12 screw. Fix
the safety-cable to the fixture.
6. The quick-lock and the bracket must well be fastened.
-6-
7. Put the fixture onto the plate and lock the bracket to the plate. Then fast the safety-rope to the
safe eyelet, At last, install the transparent cover to the base, to make sure the sticker is well fixed.
8. Make sure the bracket and the fixture well locked, also fast the safety-rope to the truss. Then fix
the vent's pipe onto the plate. At last, connect the DMX and power.
Attention: When the dome connect with power, the fans start to work, it will come the air
pressure, then the dome can be used. When the power off, the dome will loss the air pressure, the
dome won't resist water and can’t be used. If you don't need to use the dome, please keep the units
at the dry place. When you hang up the dome, do fasten the safety-cable from the fixture to the
dome, and the safety-cable from the dome to the truss. As to get the water-proof, the pipe
of fan must be well locked to the plate.
-7-
Dimensional drawing
CLEANING AND MAINTENANCE
We recommend a frequent cleaning of the device. Please use a soft lint-free and moistened cloth.
Never use alcohol or solvents!
There are no serviceable parts inside the device. Maintenance and service operations are only to be
carried out by authorized dealers.
Should you need any spare parts, please use genuine parts.
If the power supply cable of this device becomes damaged, it has to be replaced by authorized
dealers only in order to avoid hazards.
Should you have further questions, please contact your dealer.
This device is only constructed for a standing installation. The device must only be installed
absolutely planar at a vibration-free, oscilation-free and fire-resistant location. Make sure that the
device is installed absolutely planar by using a water-level.
TECHNICAL SPECIFICATIONS
Power supply:
□AC 100V~ ,50Hz; □AC 120V~ C,50Hz; □AC 208V~, 50Hz; □AC 220V~ ,50Hz; □AC 230V~ C,50Hz;
□AC 240V~, 50Hz;
□AC 100V~ ,60Hz; □AC 120V~ C,60Hz; □AC 208V~, 60Hz; □AC 220V~ ,60Hz; □AC 230V~ C,60Hz;
□AC 240V~, 60Hz;
Power output: max. 1700W
Power consumption: max. 1500 W
Max. load: 45kgs
Packing dimensions: 83x68x27cm
Net weight: 25kgs
Gross weight: 30kgs
Remark: errors and omissions for every information given in this manual excepted. All information
is subject to change without prior notice.
-8-
-9-
- 10 -