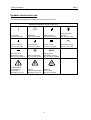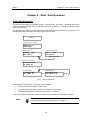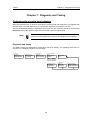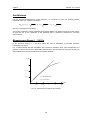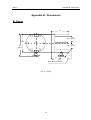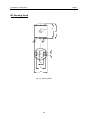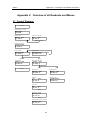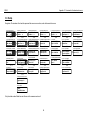
1
Y-195SRG3 MKS SRG - 3 Spinning Rotor Vacuum Gauge Instruction Manual SRG-3 2.4538E-03 4s 436Hz SP1/SP2 mbar Ar REMOTE CONTRAST POWER MKS Instruments Deutschland GmbH ESC ON ENTER OFF Edition 2012-08 MKS Products provided subject to the US Export Regulations. Diversion or transfer contrary to U.S. law is prohibited. Copyright © 2009 by MKS Instruments Deutschland GmbH. All rights reserved. No part of this work may be reproduced or transmitted in any form or by any means, electronic or mechanical, including photocopying and recording, or by any information storage or retrieval system, except as may be expressly permitted in writing by MKS Instruments. Printed in the Federal Republic of Germany Baratron® is a registered trademark of MKS Instruments, Inc., Andover, MA, USA SRG-3 Table of Contents Table of Contents Safety Information ............................................................................................................................... 7 Symbols Used in This Instruction Manual..................................................................................... 7 Symbols found on the unit ............................................................................................................ 8 Safety Procedures and Precautions ............................................................................................. 9 Chapter 1: Description ..................................................................................................................... 11 Delivered Equipment .................................................................................................................. 11 Unpacking ................................................................................................................................... 11 Customer Support....................................................................................................................... 12 Intended Use .............................................................................................................................. 12 About this handbook ................................................................................................................... 12 Technical Data ............................................................................................................................ 13 Chapter 2: Control Elements and Connectors ................................................................................. 15 Front Panel ................................................................................................................................. 15 Rear Panel .................................................................................................................................. 16 Mains Power and Fuses ....................................................................................................... 16 Connectors ................................................................................................................................. 16 Connectors for Sensing Head SRG-SH700 ........................................................................ 16 SCOPE ................................................................................................................................. 16 AUX CH1 (Channel 1) .......................................................................................................... 17 AUX CH2 / AOUT / REM CTRL............................................................................................ 17 Wiring example for connector AUX CH2 /AOUT / REM CTRL ...................................... 18 RELAY .................................................................................................................................. 18 RS-232.................................................................................................................................. 19 PRINTER .............................................................................................................................. 19 Chapter 3: Installation ...................................................................................................................... 21 Installation, Mounting .................................................................................................................. 21 Rack Mounting or Table Top? .............................................................................................. 21 CE related notices for Installation and Operation ...................................................................... 22 Line Power .................................................................................................................................. 22 Mounting of Flange and Measuring Head................................................................................... 22 Chapter 4: Start / End Operation ..................................................................................................... 25 Initial Switching On ..................................................................................................................... 25 Startup step by step: ............................................................................................................. 26 Difficulties at startup? ........................................................................................................... 27 iii Table of Contents SRG-3 Ending Operation / Switching Off ................................................................................................ 27 Switching off from measurement mode ................................................................................ 28 Status Messages after stopping the sphere ......................................................................... 29 Chapter 5: Operation / Measuring .................................................................................................... 31 Readouts in Measurement Modes .............................................................................................. 31 How to interpret the displays................................................................................................. 32 Further Displays .................................................................................................................... 34 Measuring Pressure .................................................................................................................... 35 Prior to measuring ................................................................................................................ 35 Sampling Interval ........................................................................................................................ 36 Determination of the Residual Drag ( Offset ) ............................................................................ 36 Determining the offset step by step: ..................................................................................... 36 Pressure Readout ....................................................................................................................... 38 Measuring up to 100 Pa .............................................................................................................. 38 Chapter 6: Setup .............................................................................................................................. 39 Generell ...................................................................................................................................... 39 7.0 Gas Parameter ..................................................................................................................... 40 8.0 Sensor Parameter........................................................................................................... 42 9.0 Readout settings ............................................................................................................. 44 10.0 Printout settings ............................................................................................................ 45 11.0 Configuring outputs....................................................................................................... 47 12.0 Configuring auxiliary inputs ........................................................................................... 48 13.0 Configuring the serial interface ..................................................................................... 50 Operating with Data Sets ............................................................................................................ 51 Structure ......................................................................................................................... 51 Storage ........................................................................................................................... 51 Create a data set ............................................................................................................ 51 Select a data set ............................................................................................................. 53 Setup reset ..................................................................................................................... 53 Lockout setup menu ....................................................................................................... 54 Chapter 7: Diagnosis and Tuning .................................................................................................... 55 Optimizing the sensing head adaption ........................................................................................ 55 Diagnosis and tuning ............................................................................................................ 55 Tuning procedure.................................................................................................................. 56 Diagnosis .............................................................................................................................. 57 iv SRG-3 Table of Contents Pickup signal............................................................................................................................... 58 Indication on display ............................................................................................................. 58 Diagnose with oscilloscope................................................................................................... 58 Magnetizing the sphere ........................................................................................................ 59 Chapter 8: Error Messages and Troubleshooting ............................................................................ 61 Display and print error messages .............................................................................................. 64 Chapter 9: Bakeout .......................................................................................................................... 65 Chapter 10: Theory .......................................................................................................................... 67 Principle of Measurement ........................................................................................................... 67 Measurement .............................................................................................................................. 68 Accomodation Factor σ............................................................................................................... 68 Gas Mixtures............................................................................................................................... 69 Measurement Range 1 - 100 Pa................................................................................................. 69 Appendix A: Printout Examples ....................................................................................................... 71 Measurement Data ..................................................................................................................... 71 Definition of the statistical terms: ................................................................................................ 72 Setup/Data Set ........................................................................................................................... 73 Error Messages .......................................................................................................................... 74 Diagnostics ................................................................................................................................. 75 System Parameters .................................................................................................................... 76 Appendix B: Dimensions .................................................................................................................. 79 B1 Flange ................................................................................................................................... 79 B2 Sensing Head ........................................................................................................................ 80 B3 Electronic Unit ....................................................................................................................... 81 Appendix C: Overview of all Readouts and Menus.......................................................................... 83 C1 Control Displays ................................................................................................................... 83 C2 Measurment modes ............................................................................................................. 84 C3 Data sets .............................................................................................................................. 84 C4 Setup .................................................................................................................................... 85 MKS Worldwide Calibration & Service Centers ................................................................................ 86 v Table of Contents SRG-3 List of Figures Fig. 1: Front Panel................................................................................................................................. 15 Fig. 2: Rear Panel ................................................................................................................................. 16 Fig. 3: Rack angles assembly ............................................................................................................... 21 Fig. 4: Rubber feet assembly ................................................................................................................ 21 Fig. 5: Mounting the sensing head ........................................................................................................ 23 Fig. 6: Ball/Flange Assembly................................................................................................................. 24 Fig. 7: Startup Sequence ...................................................................................................................... 25 Fig. 8: Readouts in Measurement Modes ............................................................................................. 31 Fig. 9: Sensing Head SRG-SH.............................................................................................................. 67 Fig. 10: Saturation by influence of Viscosity ......................................................................................... 69 Fig. 11: Flange ...................................................................................................................................... 79 Fig. 12: Sensing Head........................................................................................................................... 80 Fig. 13: Electronic Unit .......................................................................................................................... 81 List of Tables Table 1: Gas Table .......................................................................................................................... 40 Table 2: Error Messages.................................................................................................................. 64 vi SRG-3 Safety Information Safety Information Symbols Used in This Instruction Manual Definitions of WARNING, CAUTION, and NOTE messages used throughout the manual. Warning The WARNING sign denotes a hazard. It calls attention to a procedure, practice, condition, or the like, which, if not correctly performed or adhered to, could result in injury to personnel. Caution The CAUTION sign denotes a hazard. It calls attention to an operating procedure, practice, or the like, which, if not correctly performed or adhered to, could result in damage to or destruction of all or part of the product. Note The NOTE sign denotes important information. It calls attention to a procedure, practice, condition, or the like, which is essential to highlight. 7 Safety Information SRG-3 Symbols found on the unit The following table describes symbols that may be found on the unit. Definition of Symbols found on the unit | On (Supply) IEC 417, No. 5007 Off (Supply) IEC 417, No. 5008 Earth (ground) IEC 417, No. 5017 Protective earth (ground) IEC 417, No. 5019 Frame or chassis IEC 417, No. 5020 Equipotentiality IEC 417, No. 5021 Direct current IEC 417, No. 5031 Alternating current IEC 417, No. 5032 Both direct and alternating current IEC 417, No. 5033-a Class II equipment IEC 417, No. 5172-a Three phase Alternating current IEC 617-2 No. 020206 Caution, refer to accompanying documents! ISO 3864, No. B.3.1 Caution! Risk of electric shock! ISO 3864, No. B.3.6 Caution! Hot surface! IEC 417, No. 5041 8 SRG-3 Safety Information Safety Procedures and Precautions The following general safety precautions must be observed during all phases of operation of this instrument. Failure to comply with these precautions or with specific warnings elsewhere in this manual violates safety standards of intended use of the instrument and may impair the protection provided by the equipment. MKS Instruments assumes no liability for the customer’s failure to comply with these requirements. DO NOT SUBSTITUTE PARTS OR MODIFY INSTRUMENT Do not install substitute parts or perform any unauthorized modification to the instrument. Return the instrument to an MKS Calibration and Service Center for service and repair to ensure that all safety features are maintained. SERVICE BY QUALIFIED PERSONNEL ONLY Operating personnel must not remove instrument covers. Component replacement and internal adjustments must be made by qualified service personnel only. GROUND THE PRODUCT AND USE PROPER ELECTRICAL FITTINGS Dangerous voltages are contained within this instrument. All electrical fittings and cables must be of the type specified, and in good condition. All electrical fittings must be properly connected and grounded. This product is grounded through the grounding conductor of the power cord. To avoid electrical shock, plug the power cord into a properly wired receptacle before connecting it to the product input or output terminals. A protective ground connection by way of the grounding conductor in the power cord is essential for safe operation. Upon loss of the protective-ground connection, all accessible conductive parts (including knobs and controls that may appear to be insulating) can render an electrical shock. USE THE PROPER POWER CORD Use only a power cord that is in good condition and which meets the input power requirements specified in the manual. Use only a detachable cord set with conductors that have a cross-sectional area equal to or greater than 0.75 mm2. The power cable should be approved by a qualified agency such as VDE, Semko, or SEV. USE THE PROPER POWER SOURCE This product is intended to operate from a power source that does not apply more voltage between the supply conductors, or between either of the supply conductors and ground, than that specified in the manual. USE THE PROPER FUSE Use only a fuse of the correct type, voltage rating, and current rating, as specified. 9 Safety Information SRG-3 This page left blank. 10 SRG-3 Chapter 1: Description Chapter 1: Description Delivered Equipment The basic system consists of: 1 control unit SRG-3 - EL, mounted in a ½ x 19“-housing 1 sensing head SRG - SH 700 with connection cable, length 3 m 1 measuring flange SRG - BF with thimble, mounting rails and retaining screw for measuring head A measuring stainless steel sphere (sensor, rotor) is located in the thimble, a retaining clip prevents it from falling out. A magnet at the closed end of the tube serves as a fixture for safe transportation (must be removed prior to operation) 1 calibration data sheet for each calibrated measuring sphere 1 set mating connectors 4 rubber feet for tabletop use 2 Replacement fuses 1 Power cord 1 Instruction manual (this document) 1 RS232 Interface manual Optional: Extension head cable, lenght 3 m. Additional flanges with measuring spheres, calibrated / uncalibrated. Calibration by the German Calibration Service DKD-K-04601 Further options upon request. Compatible Printer with Centronics Interface (printers not included): • Epson EPL-5600 • Epson TM-U220PD • Hewlett Packard HP 400 • Hewlett Packard HP 5652 And others. Unpacking MKS has carefully packed the equipment so that it will reach you in perfect operating order. Upon receiving the unit, however, you should check for defects, cracks, broken connectors, etc., to be certain that damage has not occurred during shipment. Note Do not discard any packing materials until you have completed your inspection and are sure the unit arrived safely. If you find any damage, notify your carrier and MKS immediately. Please refer to the last page of this manual for a list of MKS calibration and service centers. 11 Chapter 1: Description SRG-3 Customer Support Standard maintenance and repair services are available at all of our regional MKS Calibration and Service Centers, listed on the last page. In addition, MKS accepts the instruments of other manufacturers for recalibration using the Primary and Transfer Standard calibration equipment located at all of our regional service centers. Should any difficulties arise in the use of your equipment, or to obtain information about companion products MKS offers, contact any authorized MKS Calibration and Service Center. If it is necessary to return the instrument to MKS, your service center can inform you about the need for an ERA Number (Equipment Return Authorization Number) or a form for declaration of decontamination or any other regulations before shipping. The ERA Number expedites handling and ensures proper servicing of your instrument. Please refer to the last page of this manual for a list of MKS Calibration and Service Centers. Warning All returns to MKS Instruments must be free of harmful, corrosive, radioactive, or toxic materials. Intended Use The spinning rotor gage SRG-3 serves for vacuum pressure measurement only. Any use with explosive or flammable substances ist not allowed. Combination with electronic controllers and valves for establishing pressure control systems is possible. Please contact MKS Instruments for information about proven configurations and selection of adequate controllers, valves and cables. About this handbook 1. This handbook describes the manual operation. For operation via the remote interface refer to the extra interface manual. 2. Displays and menues are equally numerized, except those for head control. 3. Appendix C provides complete charts for quick reference. 4. The sensing sphere may also be referred to as ball, rotor or sensor. 5. The arrow → refers to a section, indicated in italics, in this manual which gives additional information. 6. Italics refer to identically titled sections, figures etc. which may be written, however, in a different format. 7. Connectors are shown in fat letters, e.g. AUXCH1. Switches, button key etc. Are shown in brackets, e.g. [ENTER] 8. Special versions are not described in this document. 12 SRG-3 Chapter 1: Description Technical Data Measuring Range: Accuracy in the range up to 1 Pa: -5 5 x 10 to 100 Pa 1 % of measuring value + U U expresses the residual drag variation. in the range 1 to 100 Pa: increasing up to 10 % of the measured value(typical). Long Term Stability: better than 1 % over 1 year. Pressure Display: Pascal, mbar or Torr * (user selectable). Printout according to display. Measuring Rate: adjustable from 1 s to 60 s. Analog Output: 0 - 10 VDC into 2 kΩ min. load; linear or logarithmic scaling; pressure range adjustable. Limit Switches: 2 SPDT relays, adjustable. nominal switching capacity (resistive load): 1A 30VDC, 0.5A 25VAC eff. Monitor Output: BNC-socket for oscilloscope. Interface: Power Supply: a. RS – 232 b. USB (USB 2.0 compatible) 85 - 265 V; 47 - 63 Hz Line Fuse: 1,25 A (SB) Housing: ½ x 19“-rack; 2 HE; depth approx. 185 mm incl. cable bend radius. Measuring Head SRG-SH 700: Stainless steel housing with coil system and 3 m connecting cable; max. operating temperature: 65°C Flange SRG - BF: DN 40 CF, bakeable to 400°C; all components of stainless steel. Sphere (Ball, Rotor): Material: Diameter: Density: Wetted Materials: Flange and rotor Weight (control unit): ca. 2,5 kg stainless steel 1.4034 4,5 mm 3 7,70 g/cm The SRG-3 is compliant to the regulations for conformity (CE) of the European Community (EU). *) displaying mbar and Torr can be disabled in the setup menu. 13 Chapter 1: Description SRG-3 This page left blank. 14 SRG-3 Chapter 2: Control Elements and Connectors Chapter 2: Control Elements and Connectors Outline dimensions of the control unit are shown in appendix B3. Front Panel SRG-3 2.4538E-03 4s 436Hz SP1/SP2 mbar Ar REMOTE CONTRAST POWER ESC ON ENTER OFF Fig. 1: Front Panel Display: Two lines. Readout depending on mode or menu. POWER Push button. Switches the unit on and off. To power the unit the line power switch at the rear panel must also be switched on. Configuration will be stored after switching power off. ENTER To call up a selection list. To confirm an entered value or selected setting. ESC Escape to the previous mode, finally to primary display. Arrow Keys: Left / Right to call up and steer the cursor, Up / Down to select and edit parameter. ON , OFF Starts / Stopps the rotor (sphere). Starts / Stopps printer. Disables / Enables access to setup menu. SETPOINT LED, lit with one or both setpoint/s (setpoint1 or 2) being activated. REMOTE LED, lit by operation via RS232 interface. CONTRAST Allows adjustment of display contrast. 15 Chapter 2: Control Elements and Connectors SRG-3 Rear Panel MAIN PWR PICKUP MOTOR AUX CH2 AOUT / REM CTRL RELAY AUX CH1 RS-232 SUSP I O +15V FUSE DAMP PRINTER USB -15V SCOPE LINE IN Fig. 2: Rear Panel Mains Power and Fuses LINE IN Receptable for line power cord. MAIN PWR I = On; unit can be toggled on and off by front panel button switch. 0 = Off; front panel button switch disabled. F1, F2 1,6 A for power output ± 15 V or 24 V. FUSE Line fuse 1,25 A SB (compartment with replacement fuse). Connectors Connectors for Sensing Head SRG-SH700 (all with mechanical latch incorporated) Name Pins Function PICKUP 2 Measurement signal input from sensing head MOTOR 4 Ball drive output SUSP 3 Suspension. Vertical positioning of the ball. DAMP 6 Damping. Horizontal stabilization of the ball. SCOPE Output. To display the sensing signal on an oscilloscope. 16 SRG-3 Chapter 2: Control Elements and Connectors AUX CH1 (Channel 1) 15-pins, sub-D, socket For connection of a pressure transducer, vacuum meter, thermometer etc. with linear (proportional) DC voltage signal output. Pin Function 2 Signal Input -11 V to +11 V 5 ± 15 V Ground 6 - 15 V ; 1,0 A max. 7 + 15 V ; 1,0 A max. 12 Ground for Pin 2 15 Chassis Ground Other pins unused. Pin 6 and 7 can be de-activated (→ Setup 12.4). AUX CH2 / AOUT / REM CTRL 15-pins, sub-D, socket For connection of a pressure transducer etc. as with AUX CH1. Additional control inputs and status outputs plus a scaleable analog DC voltage output (→Setup 11.3). Pin Function 2 Signal Input -11 V to +11 V 3 Error (out) status 4 Measure Pulse (out) status 5 ± 15 V Ground 6 - 15 V ; 1,0 A max. 7 + 15 V ; 1,0 A max. 8 + 24 V (Input) 9 Run Command 10 Stop Command 11 - 24 V (Ground for Pin 8) 12 Ground for Pin 2 13 Signal Output 0 -10 V 14 Ground for Pin 13 15 Chassis Ground Other pins unused. Pin 6 and 7 can be de-activated (→ Setup 12.4). 17 Chapter 2: Control Elements and Connectors SRG-3 Wiring example for connector AUX CH2 /AOUT / REM CTRL Remote Control Connection 8 7 6 5 4 3 2 1 15 14 13 12 11 10 9 STOP RUN + 24V ERROR MEASURE - RUN: Starts ball drive with automatic stop at selected operation speed. STOP: Brakes ball speed to zero. MEASURE: Indicates activated measurement mode. ERROR: Indicates failure with ball drive/signal. RELAY 9-pins, sub-D, pin Provides access to both trip point relays (configuration →Setup 11.1 and 11.2) and to the status relay READY. The status relay READY will be activated as soon as the SRG has switched to measurement mode, e.g. after drive up to operation speed. Pin Function 1 Relay READY N.C. 2 Relay READY N.O. 3 Relay SP2 COM 4 Relay SP1 N.C. 5 Relay SP1 N.O. 6 Relay READY COM 7 Relay SP2 N.C. 8 Relay SP2 N.O. 9 Relay SP1 COM 18 SRG-3 Chapter 2: Control Elements and Connectors RS-232 9-pins, sub-D, socket Pin Function 2 RXD (out) 3 TXD (in) 5 Ground (isolated) Other pins unused. PRINTER Centronics-Printer Port, 25-pins, sub-D, socket. Compatible Printer are EPL-5600 (Epson), TM-U210-PAR (Epson), TM-U220PD (Epson), HP 400, HP 5652 (Hewlett Packard) and others. Pin Function 1 Strobe (out) 2 D1 (out) 3 D2 (out) 4 D3 (out) 5 D4 (out) 6 D5 (out) 7 D6 (out) 8 D7 (out) 9 D8 (out) 10 Acknowledge (in) 11 Busy (in) 12 Paper out (not used) 13 Select Paper (not used) 14 Autofeed (not used) 15 Error (not used) 16 Reset (not used) 17 Select In (not used) 18 -25 Ground (isolated) 19 Chapter 2: Control Elements and Connectors SRG-3 This page left blank. 20 SRG-3 Chapter 3: Installation Chapter 3: Installation Installation, Mounting The SRG-3 is designed for use in dry and warm environment with sufficient ventilation. The device must be installed in such a way that air can circulate free. Do not cover the openings at the instrument’s housing. If there are heat loss generating devices located next to the unit make sure that no excessive heat is transferred to the unit. Rack Mounting or Table Top? The SRG-3 fits to a 19“ half rack or maybe used on top of a table. Three screws on each side allow disassembling of the rack angles. Rubber feet give the device a stable stand on a table. (Screws are TX10) Fig. 3: Rack angles assembly Fig. 4: Rubber feet assembly Note Position the unit with proper clearance to allow air cooling, so that the unit can operate within the specified temperature range. Do not cover the openings at the instrument’s housing. Note With respect to the guidelines and rules for compliance to the conformity of the European Community (CE) notice must be taken to the following information. 21 Chapter 3: Installation SRG-3 CE related notices for Installation and Operation To comply with the directives of the European Community (EC) for electrical conformity (CE) it is mandatory to meet the following requirements: Note The instrument complies to EN61326-2-2 with the requirements for laboratory applications. Braided shielded cables must be used. The compatible sensor head is SRG-SH700-V3. • The SRG-3 is very sensitive against signals in the frequency range of 300 Hz to 2 kHz. The sensing head should therefore not be located in amplitude modulated RF environment of more than 1 V/m and not be installed close to video monitors, power transformers, induction heaters and other sources of strong electromagnetic fields. Caution • In the presence of very high electromagnetic induction, e.g. close to transmitters or heating coils, the sensing head may be damaged. • Use only shielded cables and connectors to connect to the RS 232 interface with cable shield connected directly to the ground terminal screw (3 mm thread size) on the rear panel. • Use only shielded cables for connection of the relay and analog outputs. The cable shield should be connected directly to the ground terminal screw (3 mm thread size) on the rear panel. Warning! Never use the SRG without proper connection to protective ground potential! Line Power Set the main power switch on the rear panel to the OFF position. Plug the line power cable into the socket on the rear panel. Check that the plug fits firmly with the socket. It is recommended to operate the SRG-3 via an uninterruptable power supply (UPS)! Otherwise in case of a power down the sphere will not be kept suspended and its surface may be alterated when hitting the thimble surface at high rotational speed. A new calibration could be necessary! Mounting of Flange and Measuring Head Before mounting the flange check that the measuring head can easily slide between the upper and lower bar. If this is not the case then untighten the bars with an 3 mm Allen type wrench and retighten the bars after correct adjusting. The thimble should be in centered position within the hole of the measuring head. Do not force (press) the head onto the flange and do not turn it on the thimble. The quality of the measurement results depends to a large extent on the proper installation of the measuring flange and measuring head. The flange should be mounted in such a position that a) no disturbances and vibrations occur b) no interference is to be expected. c) no mechanical shocks exist as for example caused by pneumatic valves, operating people etc.. Vibrations cause high levels of the residual drag and instability of the pressure measurement. 22 SRG-3 Chapter 3: Installation The measuring sphere should not be touched! The measuring sphere should not be touched! 1° max. Caution Top ! Fig. 5: Mounting the sensing head With reference to Fig. 5, the axis of the measuring flange should be vertical within max. ± 1° (set for example, using a plumb-line). In this way, it will be ensured that the subsequently mounted measuring head is installed in a vertical position. Incorrectly adjusted flanges can lead to erroneous results, especially under high vacuum at the limits of the resolution. Additionally, the residual drag may increase to even higher values. The measuring head is pushed forward as far as the rails allow, with the cable outlets pointing downwards. It is then withdrawn until the positioning sphere clicks into place and is secured by the locking screw (finger tight). This procedure ensures that the sphere in the thimble is easily captured. For example, it can roll forward against the retaining clip if the flange is slightly inclined. Caution The connecting cables of the measuring head must be kept away from areas of high temperature (pump, heating coil, etc.). The surrounding flexible plastic tubing cannot withstand temperatures greater than 50°C. Plug in the four connectors of the sensing head cable assembly to the mating connectors PICKUP, DAMP, SUSP and MOTOR on the rear panel of the instrument (Fig. 2). Please note! The enclosed Ball/Flange Assembly is supplied with the ball installed in the tube. The tube has a small clip installed to prevent the ball from falling out. Additionally, a small button magnet is applied to the closed end of the tube to restrain the ball from moving and being damaged during shipment. The magnet is hold in place by a shrink tube or tape. 23 Chapter 3: Installation SRG-3 The magnet must be removed from the tube prior to install the sensing head! It is recommended to save the magnet for future use, e.g. for shipping the ball/flange assembly to a calibration laboratory. The magnet may also be used to re-magnetize the ball if its magnetism is too low for generating a useful signal (→chapter 7 Diagnosis and Tuning) MAGNET BALL CLAMP TAPE FLANGE Fig. 6: Ball/Flange Assembly Note: Each of the four connecting cables (and extension cable, if used) is separately shielded. The metal braided shields are electrically connected to the housing of the operating electronics. In order to avoid ground loops, and the possible associated inductive currents, the shield is not connected to the measurement head housing. The measurement head housing is connected via the fixing screw to the vacuum system. Optimum shielding of the measuring system can only be achieved when good groundings for the vacuum system and operating electronics are used. The latter usually is given by the power supply cable. When the measuring head is dismounted (e.g. during bakeout), it should be safely protected against the entry of small metal pieces (small screws, wire-ends, etc.). For a description of bakeout, see section 9. After installation is completed evacuating of the vacuum system can be started. For best use of the -6 spinning rotor gage performance a base vacuum of p < 5 x 10 Pa is recommended. The following chapter describes how to start and how to end the operation of the SRG. 24 SRG-3 Chapter 4: Start / End Operation Chapter 4: Start / End Operation Initial Switching On Assuming that the steps of preparation (flange - sensing head – line power - grounding) have been correctly performed and the vacuum chamber has been evacuated (p < 100 Pa), the system can be taken into operation. The following flow chart shows the sequence of switching on power and drive up of sphere. For a detailed description follow the instructions Startup Step by Step. Power ON Firmware version / copyright SRG-3 V1.0.0 ©2007 KW 2s Starting sensor (if option Auto Start: Off) Starting... mbar 10s 15Hz Ar or Idle mbar 10s 0Hz Ar [ON] (Manual start) ... Waiting for 1st reading 0.0000E+00 mbar 3s 440Hz Ar ... Pressure reading 2.4538E-03 mbar 10s 439Hz Ar Printount started [ON] 2.4538E-03 mbar 10s 439Hz P Ar [OFF] Fig. 7: Startup Sequence For the first time of operation, it is strongly recommended • to follow the steps described herein exactly. • avoid mechanical disturbances during acceleration of the sphere • to optimize the adaption of head and electronics (→ chapter 7) If this is disregarded, the sphere and/or the control unit may attain an undefinable condition. Note Before starting the system it is strongly recommended to carefully perform the head adjustment procedure (→chapter 7). 25 Chapter 4: Start / End Operation SRG-3 Startup step by step: Action / Display • Rear panel line power switch on. For 2-3 s the following readout appears: SRG-3 V1.0.0 ©2007 KW • Comments If rear panel switch is already switched on then press button key [POWER] at front panel. In case of request for assistance please report the firmware version to MKS (here: V1.0.0). Then the SRG switches automatically to: Starting... mbar 10s 15Hz Ar 1. The sphere (ball, rotor) is levitated to a centered vertical position. If Auto Start: On (→Setup 8.4) has been selected the sphere will automatically be accelerated to the upper limit of the selected operational speed (factory setting: 440 1/s). 2. • Or displays: Idle mbar 10s 0Hz Ar • After the sphere has reached the upper limit the readout appears: 0.0000E+00 mbar 3s 440Hz Ar • If Auto Start: Off (→Setup 8.4) has been selected the sphere will just be levitated but the motor drive remains switched off. Press [ON] to accelerate the sphere to the upper limit of the selected operational speed In this example an upper limit of 440 Hz was choosen. The SRG switches automatically to the measuring mode and displays seconds to next reading (STNR) in the left corner of the bottom line. After completing the first measuring cycle the first measurement value will be displayed: 2.4538E-03 mbar 10s 439Hz Ar Now the SRG-3 continuously measures in intervals as selected in the setup menu (→Setup 8.1, Meas Time). Each time the STNR becomes zero the measurement value will be updated. Now the system is ready for measurement mode but does at this time not necessarily measure precisely. If a printer is connected to the SRG you can now operate it by means of the [ON] and [OFF] keys. The following chapter 5 describes all processes and inputs necessary to obtain accurate measurement results. To stop the sphere press [OFF] twice. With the first press the information Standby appears, meaning that measuring mode and ball drive are de-activated. After the next press the message Shutdown... comes up and the sensor speed display shows the stopping cycle to 0 Hz. To re-start the motor to drive up the sphere press again the [ON] key. 26 SRG-3 Chapter 4: Start / End Operation Difficulties at startup? (also refer to chapter 7, Diagnosis and Tuning and chapter 8, Error Messages and Troubleshooting) Error Message Cause and Remedy No Sensor No rotor detected. Ball probably rolled to the clamp at the front end of the thimble. Loose locking screw at lower bar of flange, move head as close as possible to the flange. As soon as the sphere will be recognized the message Dismount appears. Move head back and secure it by means of the fixing screw (fingertight!). Press [ON] and the sphere will be accelerated or the message Idle appears, depending on the choosen drive control mode. Err 34 Rotor signal too low or/and sphere has not come to operational speed. Press [ON] and motor drive starts again. Readout: Starting... Unstable Caution Mechanical disturbances (violent shocks, heavy vibrations etc.). If this just happens once the SRG will re-stabilize the sphere, otherwise the source of influence must be eliminated. Do not switch off the SRG via the rear panel switch or remove line power in any other way after a calibrated ball has being accelerated. The sphere will drop down and bounce around in the thimble. This might change the ball’s surface thus changing the calibration. It is therefore recommended to operate the SRG-3 via an uninterruptable power supply (UPS)! Continue with chapter 5, Operation / Measuring or with chapter 6 Setup or with the section following next if the operation shall be ceased. Ending Operation / Switching Off Before you switch off the system the rotor speed must be reduced to ≈ 0. Switching off de-activates the suspension of the rotor and without stopping before the calibration might be alterated by friction of the rotor’s surface with the inside wall of the thimble. Same precaution applies if any work is done on the apparatus, e.g. when heavy shocks or vibrations may cause overload to the suspension circuitry or if the sensing head shall be removed for any reason. Tipp: Note the values shown in the diagnosis menus 5.1 and 5.2 as reference data. After restarting the system similar values shall be obtained. (continued next page) 27 Chapter 4: Start / End Operation SRG-3 Switching off from measurement mode There are two ways to end operation and switch off the unit. 1) Directly switching off Action / Display • Press button [POWER] at front panel. This readout appears: Stopping... mbar 10s 423Hz Ar • And the stopping of the sphere begins. After stopping finally to speed ≈ 0 this information appears temporarily: Idle mbar 10s 0Hz Ar 2) Comments And the unit switches off by itself. Now you can also put the rear panel switch to the Off position. Stopping the sphere to speed ≈ 0 Action / Display • Comments Press button [OFF] . This readout appears: Standby mbar 10s 438Hz Ar • For complete stopping press [OFF] again and the stopping of the sphere begins. • After stopping finally to speed ≈ 0 this information appears temporarily: Idle mbar 10s 0Hz Ar The sphere is now in a coasting mode and the selfstarting re-acceleration is de-activated. The display of the actual rotor speed will be continued (as long as the rotor provides a valuable signal). Press [ON] to return to the measurement mode. Now you can switch completely off the SRG. 28 SRG-3 Chapter 4: Start / End Operation Status Messages after stopping the sphere When removing the sensing head with the SRG being powered the following readout temporarily appears: Dismount mbar 10s 0Hz Ar and then changes to No Sensor mbar 10s 0Hz Ar meaning that the head control circuitry is still active (does not cause any harm to the unit). For deactivating the circuitry press the [OFF] button. The following readout comes up: Disarmed mbar 10s 0Hz Ar After the sensing head being re-installed you can start again the measurement mode by pressing the [ON] key. Note: After the conditions for operation in measurement mode have been attained the zero offset must be checked (and in most cases actualized). If the sensing head is removed for a longer period (for example in case of system bakout or to change the flange), the SRG should then be switched off completely. Caution Before switching off make sure that the sphere has stopped to zero speed. Switching off at high rotational speed may change the calibration. 29 Chapter 4: Start / End Operation SRG-3 This page left blank. 30 SRG-3 Chapter 5: Operation / Measuring Chapter 5: Operation / Measuring Readouts in Measurement Modes The SRG-3 provides these readouts in the measurement modes: 0.0 Standard display 2.4538E-03 mbar 9s 439Hz Ar 0.1 Measured value / aux. ch. 1 2.4538E-03 mbar 0.2462V Aux1 0.2 Measured value / aux. ch. 2 2.4538E-03 mbar 2.4579E-03 Aux2 1.0 Raw value and signal level 1.1439E-04 1/s 8s 438Hz 10.4dB 1.2 Zero adjustment options 1.1 Offset used for measured value Zero Offset: 0.0000E+00 mbar Zero Adj: Mean 2.4535E-03 mbar ENTER Select option: Off / Curr / Mean 2.1 Print options 2.0 Printout status Print: Off #14 0min 10 of 10 Print: Cont ENTER Select option: Off / Next / Cont Setup / Diagn 3.1 Analog output status 3.0 Trigger status Trig: SP1 off RDY on SP2 off Aout: 2.00V/Dec 8.293V Optimizing and tuning sensing head chapter 7 Error messages chapter 8 5.0 Version / serial number SRG-3 V1.0.0 S/N G500305G40 Fig. 8: Readouts in Measurement Modes 31 Chapter 5: Operation / Measuring SRG-3 How to interpret the displays (Numbers of titles correspond to those in the overview in appendix C.) 0.0 Standard display Measurement value/ sensor status Unit 2.4538E-03 mbar 9s 439Hz P Ar Seconds to next readout (STNR) Selected gas Print status (shown: printer activ) Sensor speed 0.1 / 0.2 Measurement value / aux. ch. 1/2 2.4538E-03 mbar 0.2462 V Aux1 Engineering unit as selected in setup menu. 1.0 Raw value and signal level 1.1439E-04 1/s 8s 438Hz 10.4dB The raw value is the relative change in rotational speed of the sensing sphere, measured in 1/s. This value includes the residual drag which is pressure independent. The signal level must be at least -10 dB to be accepted by the controller. Good measurement conditions are given with signals between 0 and 6 dB (→chapter 7, Diagnosis and Tuning). 1.1 Offset used for measured value Zero Offset: 0.0000E+00 mbar Here the actual (manually entered or automatically determined) offset value is displayed. 1.2 Zero adjustment options Zero Adj: Mean 2.4535E-03 mbar Value stored with [ENTER]. Zero Adj: Mean = stores the mean value of the last n measurement values as offset. (n → Setup 8.5 Background Average Option). Curr = stores the actual measurement value as offset. Off = no zero adjustment. 32 SRG-3 Chapter 5: Operation / Measuring 2.0 Printout status Print: Off #14 0min 10 of 10 Shown: Printer is switched off. Last printout was current number #14 with 10 measurement values. Interval = 0 (→Setup 10.1) For examples of printouts refer to appendix A. 2.1 Print options Print: Cont To select the printout mode and to provide status information. Choose line with and set mode with keys. Store with [ENTER]. After execution of the choosen mode the setting returns to Off. Upper line: Print: Off = no printing Next Reading = print next value Cont = print continuously Statistics = executes printout of n values with statistical analysis. (n → Setup 10.1 Max Count). Setup File = printout of setup Error History = prints all stored error messages. (→chapt. 8, Error Messages a. Troubleshooting; Apppendix A, Printouts) Diagnostics = data related to sensor and measuring head. Data should be at hand when calling MKS for support in case of troubles. Page Feed = new sheet (when using single sheet printers) Bottom line: 0min 10 of 10 1min usw. = continuous printout. Example shown: 10 values of total 10 printed. = 1 printout per minute Note: Printing can also be initiated or stopped in the standard display 0.0 by means of the [ON] or [OFF] key, respectively. 3.0 Trigger status Trig: SP1 off RDY on SP2 off Informs about the status of the trip limit relays: Relay of setpoint 1 (SP1) Relay of setpoint 2 (SP2) Relais ‚READY’ (RDY) On = relay activated; Off = relay de-activated. 33 Chapter 5: Operation / Measuring SRG-3 3.1 Analog output status Aout: 2.00V/Dec 8.293V Informs about status of the analog output. Shown here: Scaling = 2 V per decade (→Setup 11.3) Actual output = 8293 mV 5.0 Version / serial number SRG-3 V1.0.0 S/N G500305G40 Shows firmware version and serial number. Please add these data to any support request. Further Displays Additional readouts are • Error messages (→chapter 8) • Sensing head adjustment and damping values (→chapter 7, Diagnosis and Tuning) • Setup (→chapter 6, Setup Menus) and will be discussed in the respective chapters. 34 SRG-3 Chapter 5: Operation / Measuring Measuring Pressure Prior to measuring Pressure measurement requires to have provided these actions first: 1. Flange and sensing head installed (→chapter 3; chapter 7). -6 2. System evacuated to base pressure, ideally to p < 5 x 10 Pa. 3. Ball (sphere, rotor, sensor) accelerated to operational speed, readout stabilized. 4. Setup completed. 5. Offset (residual drag) determined, value entered and zero readout checked. For measuring pressure the following parameters must be determined and stored: Parameter Refer to setup menu, chapter, look at... a) Gas specific Molecular mass Setup 7.1 Viscosity Setup 7.2 Temperature Setup 7.4 b) System specific Surface coefficient of sensing sphere, accomodation factor σ , Calibration sheet, Setup 8.1 Ball diameter (in mm) Calibration sheet, for uncalibrated balls refer to Specifications 3 Density of ball material (in g/cm ) Residual drag This chapter: Determination of the Residual Drag (Offset) c) Depending from sampling interval This chapter: Sampling Interval, Setup 8.1 Meas Time Refer to chapter 6, Setup Menus for how to enter parameters and how to configure the system. Prior to take over any numeric input the SRG-3 checks if the number falls in the acceptable range. If not correct the SRG limits to the lowest or highest numeric value and displays this number. All inputs must be confirmed with the [ENTER] key. In case of inactivity the display switches about 60 s after the last entering automatically back to the standard display 0.0 . 35 Chapter 5: Operation / Measuring SRG-3 Sampling Interval The sampling interval, also called measurement time, determines the cycle of measurement outputs. If in setup 8.1 a measurement time for example of 10 seconds is choosen, you allow the SRG this time to carry out multiperiod measurements to determine the relative deceleration rate and to calculate and display the respective pressure. Then the next cycle of 10 s will start and be shown in the standard display 0.0. The right choice of an adequate measurement interval depends on: • Required stability, resolution and accuracy of the measurement. The better the reproducibility shall be, the longer is the time required for one interval. • Pressure range. The lower the pressure is the smaller the slowing down of the rotor speed will be and the measurement result becomes more and more inaccurate. Therefore longer intervals for measuring the deceleration rate will be required. In case of higher pressures shorter intervals are necessary. The user can choose the measurement time from 1– 60 s. In case of high pressure (= high deceleration rate) it is also possible to have the interval automatically adapted by Aut 1 or Aut 2 (→Setup 8.4). Quite often the measurement time is set much too high than really necessary. Good numbers from experience are -5 -2 • 10 s for 10 Pa < p < 10 Pa -2 • 5 s for 10 Pa < p < 1 Pa • for pressures up to 100 Pa refer to section Measuring up to 100 Pa Determination of the Residual Drag ( Offset ) Eddy currents in the measuring sphere are produced by the rotational movement in the suspending magnetic field which leads to a pressure independent additional drag. This system-specific -6 contribution is equivalent to the gas friction in air of some 10 mbar. The residual drag (offset) must always be determined again when: a) b) c) d) the sphere suspension was deactivated the measurement head was dismounted the temperature changes considerably the rotor frequency changes considerably Determining the offset step by step: (recommended procedure) a) b) c) d) e) -6 Evacuate the flange/thimble below the SRG’s resolution, preferable to p ≤ 10 Pa Allow the ball/flange-assembly to get in thermal balance with the environment ( after drive up of the sphere minimum 30 minutes should be waited) Enter all (valid) parameters or choose the appropriate data set Enter correct temperature value Set Background Average (→Setup 8.5) to 10 or higher number. The larger the number the more accurate the resulting mean value for the offset will become 36 SRG-3 f) g) h) i) Chapter 5: Operation / Measuring Set the measuring interval with respect to the requested resolution and stability Switch to standard display 0.0 by pressing [ESC]. Switch to readout 1.1 and check for Zero Offset = Null ? Go to readout 1.2 0.0 Standard display 2.4538E-03 mbar 9s 439Hz Ar 1.0 Raw value and signal level 1.1439E-04 1/s 8s 438Hz 10.4dB 1.2 Zero adjustment options 1.1 Offset used for measured value Zero Offset: 0.0000E+00 mbar Zero Adj: Mean 2.4535E-03 mbar j) If in 1.1 Zero Offset ≠ Null , then select Zero Adj: Off and confirm with [ENTER]. k) Wait until the SRG has stored the number of measurements as entered in section e), which is the result of multiplying Background Average x Measurement Time , then confirm in readout 1.2 the input Mean by [ENTER]. Now all pressure measurement readouts will be corrected by the amount of the residual drag, meaning that the SRG is now measuring pressure correctly. The remaining fluctuations of the pressure readout values determine the minimum resolution available. Switch to 1.1 any time you want to read the stored offset. Repeat steps i) to k) if the offset as determined by the procedure above seems to be not enough accurate. Increase, if necessary the number in the Background Average menu and/or the measuring time in Setup 8.1. Some advices: • If just a quick and rough zero setting is requested then switch to readout 1.2 and select Curr and the currently displayed measurement value will be taken as offset. • Another way to determine the offset: Set Offset in Setup 8.6 to zero, then measure a reasonable number (ten or more values), calculate the mean value and enter this number in 8.6. A printer connected to the SRG may be helpful.. • For actual offset see Setup 8.6. • When operating via computer it will normally be easier to carry out the zero setting by means of this computer. • Check the zero readout periodically and re-adjust if necessary. The frequency for checking depends on the acceptable uncertainty of measurements and is last not least also a matter of experience. • By frequent re-accelerations in a short time the ball’s temperature can be increased by a significant amount. This leads to a change of the zero offset. When returning to low pressure measurements it is advised to allow the sphere (and thimble) sufficient time to stabilize again. • When changing the engineering unit for pressure the SRG calculates and changes automatically the stored offset value accordingly. • Zero setting can also be done when the deceleration rate 1/s is displayed. It is, however, important to know that when then changing to pressure units, the offset must be determined in that pressure unit. 37 Chapter 5: Operation / Measuring SRG-3 • In the calibration sheet of MKS Instruments you will usually find a value for the offset. This value refers only to the time and conditions of the calibration and shall just give the user an idea of what is realistic. The user, however, must determine the residual drag at the location and under the conditions of use. Note Check the zero readout periodically and re-adjust if necessary. Pressure Readout After all steps as described above have been performed the SRG-3 will correctly display the actual pressure in the thimble, provided that all concerned parameters had been set correctly. Use of the switching keys or data transfer is allowed during measuring, displaying and printing. The measurement interval Meas Time should be adjusted with respect to the pressure range and to the expected reproducibility and stability. During a re-acceleration cycle the measurement is stopped. Measuring up to 100 Pa -2 The linear measuring range of the SRG typically ends at a few 10 mbar. With higher pressures, the relation between decrease of rotor frequency and pressure becomes increasingly non-linear (→ Chapter 10, Theory). The SRG-3 is fitted with a program to correct this non-linearity. All pressure measurements are checked by the microcomputer and are corrected before being output. But the higher pressure the lower the accuracy will be (refer to Specifications ). In order to initialize the linearization program, it is necessary to input the parameter Viscosity (→Setup 7.2). If parameter viscosity is set to zero, the correction factor is constantly = 1. Because the deceleration rate will be high in the upper pressure range it is necessary to keep the measurement interval sufficiently short to ensure that the measurement cycle will be completed before the re-acceleration cycle starts. Also possible is to select an automatic adaption of either the measurement interval or the speed window of the sphere (→Setup 8.4). Due the high breaking rate in the upper pressure range it is important to keep the measuring time sufficiently short to prevent excessive heating of the rotor. If the sphere has significantly increased ist temperature, the SRG may display negative pressure values after pumping down. The ball will accelerate then by cooling and contraction (pirouette effect), thus increasing rotational speed. Allow the sphere to accommodate with the ambient temperature. Note -2 For pressure measurement above 10 mbar we recommend the use of ® capacitance manometers Baratron . The signal input connectors Aux1 and Aux2 offer the possibility to connect a pressure transducer with linear voltage output, e.g. a capacitance manometer Baratron, to the SRG and have the pressure displayed via the displays 0.1 or 0.2. Refer to Setup 12.0 ff. for more details. 38 SRG-3 Chapter 6: Setup Chapter 6: Setup General System configuration and entering parameters is done in the setup menu. Refer to appendix C3 and C4 for schematics showing the complete structure. Call up the setup menu: • Select the standard display: 0.0 Standard display 2.4538E-03 mbar 9s 439Hz Ar • Press cursor to go to: 6.0 Current setup no. / timestamp Setup #0 2007-09-06 13:47 • Select with cursor and a preselected setup menu (data set), e.g. setup #5: or 6.0 Current setup no. / timestamp • enter via [ENTER] the setup menu to read or change settings: 7.0 Gas parameter menu Setup Menu: Gas <> Setup #5 2007-09-06 13:47 For routine work with standard parameters, e.g. for standard calibration runs, the use of data sets according to section 6.0 is recommended. Section Operating with Data Sets, at the end of this chapter provides detailed information about configuring, how to store and activate such data sets. A schematic of the complete setup menu contains appendix C4. Detailed information to each single setup follow on the next pages in this chapter. The setup consists of seven parameter sections, each with several sub menus: Gas – Sensor – Readout – Printout – Output – Input – Interface. Use cursor to steer from one section to the next. Access to each sub-menu is achieved by using the [ENTER] key or the cursors. Editing within the submenus , parameter selection and settings is done using the and cursors. Note Any change in the setup will convert the original data set to data set #0. To give the data set back again a specific number you must use the Save As command (Menu 6.2). The setup menu provides a reasonable number of settings. However, for the pure measurement mode with the SRG head (without the Aux.Inputs) and manually operated, only the shade marked fields must be considered. All other settings do not affect the intrinsic SRG measurement. 39 Chapter 6: Setup SRG-3 7.0 Gas Parameter 7.0 Gas parameter menu Setup Menu: Gas <> Press [ENTER] or cursor to proceed to the sub menus 7.1 to 7.4 . 7.1 Gas selection / mass units Gas: Ar AMU: 039.944 Select the gas type. The mass can also be changed. Store any changes with [ENTER]! Employ Usr 1 8 to store user defined gases or mixtures. Select: Gas Air Ar 1 Molecular weight (factory settings) Viscosity [µ Pa s] at 20°C (→ 7.2) Temp.-coefficient of viscosity -1 [µ Pa s K ] (→ 7.2) Air 028.960 018.192 0.0536 Argon 039.944 022.330 0.0660 C2H2 Acetylen 026.020 018.084 0.0325 CF4 Freon-14 088.010 017.247 0.0550 CH4 Methane 016.043 010.980 0.0330 CO2 Carbon Dioxide 044.010 014.663 0.0450 D2 Deuterium 004.027 012.468 0.0248 H2 Hydrogen 002.016 008.873 0.0210 He Helium 004.003 019.651 0.0585 HF Hydrogen Fluorine 020.006 012.269 0.0423 N2 Nitrogen 028.016 017.630 0.0460 N2O Nitrous Oxide 044.013 014.560 0.0475 Ne Neon 020.183 031.381 0.0697 O2 Oxygen 032.000 020.386 0.0618 SF6 Sulfur Hexaflouride 146.050 015.147 0.0450 SO2 Sulfur Dioxide 064.063 012.500 0.0400 XE Xenon 131.300 022.470 0.0725 Usr 1Usr 8 User defined 028.016 017.630 0.0460 Table 1: Gas Table Note It is the user’s responsibility to ensure that the used gases or gas mixtures are compatible with the wetted materials of sphere, thimble and flange. 1 References: • Walter Blanke, Thermophysikalische Stoffgrößen, Springer Verlag 1989 • ATP Handbook, 1972 40 SRG-3 Chapter 6: Setup 7.2 Viscosity / temp. Coefficient Visc: 022.330 Tco: 0.0660 Refer to table 1 on previous page. Here the values for the gases as selected in section 7.1 are displayed, factory set or user set data, respectively. The values can be accepted or may be changed. For values Visc: ≠ 0 the SRG-3 automatically linearizes the calibration curve in the upper pressure range, where the curve becomes more and more non-linear with increasing pressure, thus minimizing the measurement error (→chapter 10: Measurement Range 1 - 100 Pa). In case of Visc: = 0 no correction is done. 7.3 Destination selection Save As Gas: Usr1 Stores the gas parameters as defined in 7.1 and 7.2 as gas type „USER#“ and assignes the respective data automatically to the measurement. When operating via the serial interface you can also assign a name of your choice, e.g. MIX3, with four characters maximum. 7.4 Temperature Temp: +0020.00°C Enter the temperature of the system. The unit can be selected in menu 9.1. 41 Chapter 6: Setup SRG-3 8.0 Sensor Parameter 8.0 Sensor parameter menu Setup Menu: Sensor <> Press [ENTER] or cursor to proceed to the sub menus 8.1 to 8.6. 8.1 Accomodation / measure time Accomm: 1.000 Meas Time: 10 The accomodation factor, formula symbol: Sigma σ, is determined at the calibration of the sphere (rotor, sensor, ball) and is documented in the calibration sheet. In case of using un-calibrated balls contact MKS for best approach. Input range: 0,1 – 2 (no unit). Typical values for Sigma are between 0,94 and 1,00. Measurement Time (Meas Time): Sampling interval in seconds used to determine the next displayed measurement value. Large intervals increase the stability and reproducibilty but increase also the delay time; too small intervals, however, may lead to unuseful measurement values. Input range: 1 - 60 s. Typical values are 5 s to 10 s. 8.2 Sensor diameter / density Diameter: 4.500 Density: 7.700 Diameter and density are documented in the calibration sheet. For un-calibrated balls refer to Specifications or contact MKS. Input range: Diameter: Density: 1 – 6 mm 3 6 – 10 g/cm 8.3 Speed limits Upper Speed: 440 Lower Speed: 430 The speed limits determine the ‚window’ within the sensing sphere will rotate. The variable adjustment allows to keep the sphere signal free from resonance effects, e.g. induced by rotating pumps. Note that changing the frequency of rotation also changes the residual drag. Therefore the -1 speed window should be kept small, typically 10 s . In most applications frequency change of this magnitude are negligible. -1 Input range: 405 – 810 s . 42 SRG-3 Chapter 6: Setup 8.4 Control modes Auto Start: On Ctrl Mode: Aut1 Auto Start: On After power switched on and test routines executed the rotor will automatically be accelerated to the upper speed limit as entered in 8.3. Auto Start: Off After power switched on the rotor will be suspended but not accelerated. Press the [ON] key at the front panel to start the motor or send the respective command via the interface. Ctrl Mode: Aut1 Automatic control with fixed speed limits (sampling interval will be reduced at high pressure). As soon as the rotor has lowered its rotational speed as stored in 8.3 the motor is switched on and drives the sphere again to the upper limit of the speed window. Ctrl Mode: Aut2 Constant measurement time. At higher pressures the lower limit of the speed window will be reduced if necessary. Ctrl Mode: Off Switching to standby mode when the rotor speed falls below the lower limit per menu 8.3. 8.5 Background average option Bgd Average: 10 The SRG executes continuous averaging of the last measurement values. The number of values is selected here (in this example: 10 values). The actual mean value can be used for zero setting at any time without the need of making an extra measurement. The larger the number the more precisely the mean value will be. The actual mean value can then be seen in display 1.1. Input range: 0 – 50; settings of 0 and 1 de-activate the averaging. 8.6 Zero offset Offset: 0.0000E+00 mbar Here the zero offset can be entered manually. If the pressure unit mbar, Pa or Torr is changed, the offset value will automatically be adapted. Attention: The offset value will not be adapted when it was determined in the unit 1/s or when changing the readout from pressure unit to 1/s ! Zero adjustment can also be done easily in menu 1.2. 43 Chapter 6: Setup SRG-3 9.0 Readout settings 9.0 Readout settings menu Setup Menu: Readout < > Press [ENTER] or cursor to proceed to the sub menus 9.1 to 9.4. 9.1 Display unit / temperature scale Displ Unit: mbar Temp Scale: °C Displ Unit Select pressure units Pa, mbar, Torr or unit 1/s for the deceleration rate. The deceleration rate DCR indicates the change of rotor rotation per one revolution, thus being the basic value of measurement. Temp Scale Select between degree Celsius °C and Kelvin K. 9.2 Decimal places / display timeout Dec Places: Aut Dsp Timeout: 30 Dec Places Decimals of the pressure readout can be set to automatic or fixed number. Aut (automatic setting): Decade of measurement p≥ Number of decimals -3 -1 4 -4 -2 3 -5 -3 2 -6 -4 1 10 mbar or Torr or 10 Pa 10 mbar or Torr or 10 Pa 10 mbar or Torr or 10 Pa p≤ 10 mbar or Torr or 10 Pa Setting to 1 – 4 generates this fixed number of decimals. In case of a leading negative sign four decimals will be reduced to three. Dsp Timeout After the time in seconds, as entered here, the SRG-3 will switch back to readout 0.0 or 0.1 or 0.2. Selecting Off disables the display timeout. Setup menus will always be set back after 60 seconds. 44 SRG-3 Chapter 6: Setup 9.3 Set clock / calendar Date: 2007-09-07 Time: 16:57 To enter date and time. These data will be listed on a printout. 9.4 SI units option SI only: Off SI only: On Only SI units will be accepted. All readouts in mbar, Torr and ° C are disabled. 10.0 Printout settings Refer to appendix A for typical examples. 10.0 Printout settings menu Setup Menu: Printout <> Press [ENTER] or cursor to proceed to the sub-menus 10.1 to 10.4. 10.1 Statistics count / print interval Max Count: 010 Interval: 000 Here you can choose how many measurement values shall be printed and enter the printout intervals. The printer must be activated in readout 0.0 with the [ON] key. Max Count: 000 001 bis 100 Continuous printout. Determines the number of printouts. After printing the last measurement value the printer will stop. Interval: 000 Each measurement value will be printed. ≤ 120 Print at selected intervals in minutes. Example: one print every 15 minutes when 15 is selected. > 120 Printing sets of consecutive readings, specified by Max Count Example for 180 and Max Count = 10: every 3 hours (= 180 minutes) one printout with 10 values plus statistical evaluation. Readout/Display 2.0 shows the actual status of the printouts. 45 Chapter 6: Setup SRG-3 10.2 Header / footer options Header Opt: Std Footer Opt: Std To configure head and foot lines of printouts. Header Opt: Std Col Off Standard format (statistics) Only column headers No headers Footer Opt: Standard format (statistics) Count statement only No footers Std Cnt Off 10.3 Data column options Data Opt: Std Here you can select what shall be printed in addition to the measurement values. Std Aux1 Aux2 Prints an asterisk * when Unstable’ was displayed during a measurement cycle Setp Prints an asterisk * when a trip limit (Setpoint) was activated Prints data of signal input Aux CH1 in the left column instead of time Prints data of signal input Aux CH2 in the left column instead of time 10.4 Printer port / auto page eject Print Port: Par Page Eject: On Print Port: Par Ser Off Printer on parallel interface (Centronics) Printer connected to RS232 interface Printer ports de-activated Page Eject: On / Off enables or disables the automatic paper eject on a single sheet printer. 46 SRG-3 Chapter 6: Setup 11.0 Configuring outputs This menu serves to configure and set the setpoints and the analog output. 11.0 Output configuration menu Setup Menu: Outputs <> Press [ENTER] or cursor to proceed to the sub-menus 11.1 bis 11.3. 11.1 Setpoints Setp1: 1.000E-01 Setp2: 1.000E-02 To set the setpoints for the trip limit relays Setp1 and Setp2. -5 3 Range (each setpoint): 10 – 10 Pa -7 10 – 10 mbar -8 7,5*10 – 7,5 Torr -8 -1 10 – 0,1 s 11.2 Setpoint hysteresis Hys1: -5.000E-02 Hys2: -5.000E-02 To set the hysteresis for the trip limit relays Setp.1 and Setp.2. Range: -0,5 - 1 <0 lowers OFF trip point by fraction of setpoint level 0 no hysteresis >0 raises ON trip point by fraction of setpoint level 11.3 Analog output full scale / span Full: 1.000E-02 Span: 5 The parameter Full determines the pressure associated with the full scale of the analog output Uout = 0 – 10 V . Range: -5 3 10 – 10 Pa -7 10 – 10 mbar -8 7,5*10 – 7,5 Torr -8 10 – 0,1 1/s The parameter Span sets the scaling: Lin 1 - 10 linear scale logarithmic, number of decades 47 Chapter 6: Setup SRG-3 Conversions: a) Linear scale: Example: p= Uout = 10 mV ; p(Full) = 100 Pa P= b) Logarithmic Scale Example: U out ⋅ p( Full ) 10 V 0,01V ⋅ 100 Pa = 0,1 Pa 10V p = p( Full ) ⋅ 10 U out −1)) 10 V Uout = 7,40 V ; p(Full) = 1 Pa ; Span = 5 P = 1 Pa Note ( Span ( ⋅ 10 ( 5⋅( 7 , 40 V −1)) 10 V = 0,05 Pa The voltage range of the analog output is always 0 – 10 V, independent of the selected scaling! The analog output is refreshed in the rhythm of the sampling interval (Meas Time), e.g. every 5 seconds or up, thus not being suitable for most pressure control applications. Interfering effects like shocks caused from pneumatic valves can generate violent amplitudes with unintended responses of the trip limit relays. 12.0 Configuring auxiliary inputs 12.0 Aux. input configuration menu Setup Menu: Aux Inputs < > There are two analog input ports on the SRG-3 which support external pressure transducers with linear signal voltage or can be used with temperature sensors. The respective readout is provided in the displays 0.1. and 0.2. Press [ENTER] or cursor to proceed to the sub-menus 12.1 bis 12.4. 12.1 Aux. input modes Mode1: Raw Mode2: Raw Choose the engineering unit for each channel: Raw raw value without scaling. Incoming signal will be displayed in volts. Temp display of temperature in °C or K , as defined in sub-menu 9.1. Press display in units of pressure, as defined in sub-menu 9.1. Spcl special. User defined displaying without units. 48 SRG-3 Chapter 6: Setup 12.2 Aux. input scales Scal1: 1.000E+00 Scal2: 1.000E+00 Scaling of the inputs is always 1/V and always refers to pressure unit Pascal Pa or to temperature unit Kelvin K, independent from the display unit selected in 9.1. The voltage range is fixed to 0 – 10 V. Example # 1 for pressure: Scale (Scal1 ; Scal2) is set to 1.000E+01 meaning 10 Pa/V. An input signal of 5 V will be displayed as 50 Pa or 0,5 mbar or 0,375 Torr. Example # 2 for pressure: An absolute pressure transducer with full scale range 1 Torr and linear output 0-10 V is connected. 1st conversion: 1 Torr = 133,322 Pa 2nd conversion: 1,33322 Pa = 1V Scaling: 1.333E+00 An input signal of 4,5 V will be displayed as 6 Pa or 0,06 mbar or 0,045 Torr. The conversion can be easily verified using mode Raw in 12.1. Example for a temperature sensor: Scale (Scal1 ; Scal2) is set to 2.000E+02 meaning 200 K /V. An input signal of 1,00 Volt will be displayed as 200 K or – 73,2 °C. An input signal of 1,45 Volt will be displayed as 290 K or 16,8 °C. Note The auxiliary inputs accept negative signals. Check for correct polarity when connecting a gage otherwise negative pressures or temperatures will be displayed. 12.3 Aux. input offsets Ofs1: +0.000E+00 Ofs2: +0.000E+00 This sub-menu serves for zeroing the signal inputs of Aux1 and Aux2. The values always refers to pressure unit Pascal Pa or to temperature unit Kelvin K, independent from the display unit selected in 9.1. Example for an absolute pressure transducer: The pressure transducer’s full scale range is 10 mbar with linear output 0 – 10 V. The resolution is -5 -5 specified as 10 mbar, meaning that at a pressure of p ≤ 10 mbar the value 0 (Null) shall be displayed. -5 After evacuating below 10 mbar and sufficient warm up (follow manufacturer’s instruction) the remaining output signal is + 65 mV. Conversion: Scale (Scal1 or Scal2): Conversion: Enter (Ofs1 or Ofs2): 10 mbar = 1000 Pa = 10 V. 1.000E+02 ( 100 Pa per 1 Volt). 65 mV = 6,5 Pa. -6.500E+00 (negative because a positive offset has to be compensated). 49 Chapter 6: Setup SRG-3 12.4 Aux. input power supply Aux Power: Off Via internal relays the supply voltage output ± 15 V can be switched on and off. 13.0 Configuring the serial interface Detailed instructions for operation via the standard RS232 interface are given in the extra handbook RS 232 INTERFACE (included in the shipment). 13.0 Serial comm settings menu Setup Menu: Serial Comm < > Press [ENTER] or cursor to proceed to the sub-menus 13.1 to 13.2. 13.1 Baud rate / promt option Baud: 9600 Prompt: Std Available settings: Baud(rate): 1200, 2400, 4800, 9600, 19200 Prompt: Std, User, Off For more information refer to handbook RS 232 INTERFACE. 13.2 Prompt characters Ackn: 62 (>) Nack: 63 (?) Described in the handbook RS 232 INTERFACE. 50 SRG-3 Chapter 6: Setup Operating with Data Sets Structure 6.0 Current setup no. / timestamp Setup #0 2007-09-06 13:47 ENTER Load Setup #1 2007-09-06 13:47 ENTER Select setup file (1...16) Enter setup menu 6.3 Settings options 6.2 Save settings menu 6.1 Load settings menu Save As: Setup #1 ENTER Select setup file (1...15) Settings: Reset ENTER Reset to factory defaults Storage Up to 15 individually defined data sets can be stored by the user. Setup #16 instead is a fixed stored factory set default and serves besides factory and service related purposes to provide the operator a means to have a complete data set ready for use with which a system will work if there is no serious fault. Create a data set Example: The following parameter data shall be stored as Setup# 3 : • Argon • Sensor (sphere, rotor) with 4,5 mm diameter and 7,9 g / cm density • Accommodation factor 0,997 • Temperature 24,5 °C • Measuring time / sample interval 8 s • Speed window 420 – 430 Hz • Offset 3,8 x 10 Pa • Display in Pa 3 -4 other parameters arbitrary. (continued next page) 51 Chapter 6: Setup SRG-3 Proceed as follows: Action / Display • Comments Select standard display: 0.0 Standard display 2.4538E-03 mbar 9s 439Hz Ar • Press cursor to display: 6.0 Current setup no. / timestamp In this example the current data set was Setup# 5 Setup #0 2007-09-06 13:47 • Press [ENTER] to enter the setup menu: 7.0 Gas parameter menu Setup Menu: Gas <> • Set parameters in menus 7.0., 8.0, 9.0 • Press [ESC] to return to standard display: Press [ESC] several times, if necessary 0.0 Standard display 6.1109E-04 Pa 9s 439Hz Ar • Press cursor to display: 6.0 Current setup no. / timestamp Because of changing parameters now Setup#0 appears Setup #0 2008-11-06 15:01 • (the original Setup #5 is still unchanged and stored) Press cursor key twice to display: 6.2 Save settings menu x = actually stored data set Save As: Setup #x • Press cursor to select the desired number for the new data set (#3 in our example) and store with [ENTER]: 6.2 Save settings menu Setup #0 is now being stored as Setup #3 Save As: Setup #3 Establishing or changing data sets can be carry out very comfortable when operating the SRG remotely by a computer. 52 SRG-3 Chapter 6: Setup Select a data set Action / Display • Comments Select standard display: 0.0 Standard display 2.4538E-03 mbar 9s 439Hz Ar • Press cursor to display: 6.0 Current setup no. / timestamp In this example the current data set was Setup#3 Setup #3 2008-11-06 15:25 • Press cursor key to display: 6.1 Load settings menu x = actually stored data set Load Setup #x 2008-11-06 15:27 • Press cursor to select the number of the desired data set and confirm with [ENTER]: • Press [ESC] to return to standard display Press [ESC] several times, if necessary Setup reset Action / Display • Comments Select standard display: 0.0 Standard display 2.4538E-03 mbar 9s 439Hz Ar • Press cursor to display: 6.0 Current setup no. / timestamp In this example the current data set was Setup#3 Setup #3 2008-11-06 15:25 • Press to enter menu 6.3 : 6.3 Setting options Settings: Reset • Confirm with [ENTER] All data sets will be reset to factory default (= Setup#16). • Press [ESC] to return to standard display Press [ESC] several times, if necessary. Measurement values will now base upon Setup#16 data (except auxiliary inputs). 53 Chapter 6: Setup SRG-3 Lockout setup menu Switch to menu 6.0 Current setup no. / timestamp and press the [ON] key. In the upper right corner an asterisk * appears and the SRG will not accept any inputs to the setup menu. To disable press the [OFF] key. The asterisk * disappears. Note There is no manual access to the setup menu when operating via the RS232 interface. 54 SRG-3 Chapter 7: Diagnosis and Tuning Chapter 7: Diagnosis and Tuning Optimizing the sensing head adaption With new delivered units or when for example the sensing head was replaced, it may happen that the rotor drive or the ball suspension are not optimally aligned to the electronic circuitry. This can be identified already on installation of the head onto the measuring flange by the message No Sensor, even if the sphere is captured in the sensing head’s magnetic field. Note Before starting the system it is strongly recommended to carefully perform the head adjustment procedure as described in the following. Diagnosis and tuning The SRG provides two adjustments: Suspension and Drive (Motor). The following chart gives an overview, for a detailed procedure see next page. 5.0 Version / serial number SRG-3 V1.0.0 S/N G500305G40 5.2 Suspension diagnostics 5.1 Damping level Damp A: -45dB B: -48 dB Susp: -0.006V Servo: -0.8107V 5.3 Head adjustment menu* Head Adjust: Default Head Adjust: Save ENTER Select option: Default/ Suspension/Drive/Save 5.4 Default adjustment Defaulting... Bias=0.000V 55 5.5 Suspension adjustment Adjusting... Bias=0.947V 5.6 Drive adjustment Sweep: 16375Hz A=305mA B=298mA Chapter 7: Diagnosis and Tuning SRG-3 Tuning procedure • Dismount the sensing head and place it on an isolating, non magnetic plate. (e.g. wooden table) • Switch with cursor to readout 5.0 Version/serial number. • Select with cursor menu 5.3. • Select with cursor the adjustment mode Suspension for adjusting the magnetic suspension of the sphere and press the [ENTER] key. The menu 5.4 Default adjustment will appear, then for a moment the last stored bias value, e.g. Bias =0.000V. The system now performs automatically the optimum adaption of the suspension circuitry, followed by displaying the new bias value, e.g. BIAS = – 2.032 V. • The readout switches automatically back to menu 5.1 Damping Level (menu explained in the next section). • Select again with cursor menu 5.3. • Select with cursor the adjustment mode Drive for adjusting the motor drive and press the [ENTER] key. The menu 5.6 Drive adjustment appears. Now the SRG-3 optimizes the adaption of the motor drive circuitry to the head coil inductivities and stores the new values of Sweep. • The readout switches automatically back to menu 5.1 • Switch again to menu 5.3 • Select Save and store with [ENTER] the actual tuning values. Without storing the adjustment settings will be lost after power down. • The SRG switches automatically back to the standard display 0.0 • Mount the sensing head onto the flange • Repeat procedure if necessary • Before starting measurement check the zero readout. Correct zero offset if necessary. To reset the adjustment settings to factory defaults switch to menu 5.3 and select Default, confirmed with [ENTER]. Note: • Adjustment does only match the sensing head that was connected to the SRG. • When switching off the SRG the stored setting will be safely kept in memory. It will be deleted with a new Save or a default command. • After each tuning the zero pressure readout must be checked. 56 SRG-3 Chapter 7: Diagnosis and Tuning Diagnosis 5.1 Damping level Damp A: -45dB B: -48dB Provides information about the lateral stabilization of the sphere. The more negative values are the less intervening of the electronics is necessary as the sensing system is inherently symmetric and stable. Display indicates Improvement/Remedy -35 dB....-60 dB Good values, stable system -- -80 dB Lowest achievable value. -- May appear randomly but not continuously. > -12 dB Unstable A=B= -80 dB (constantly) Poor stability. No measurement values will be displayed. Eliminate sources of vibrations, shocks etc. Change the speed window to avoid resonance effects with pumps, electric drives etc. Change location of head/flange. Sensing head dismounted. Cable ‚Suspension’ not connected --Connect cable to the 6-pole mating connector on rear panel. 5.2 Suspension diagnostics Susp: -0.006V Servo: -0.8107V Specific sensing head data, derived from the head-to-electronics adaption and also depending from the vertical symmetry head-sphere-thimble. Tipp: Document these numbers after having successfully completed the adjustment procedure. They may serve as reference data when the measuring system will be re-started after a shutdown. 57 Chapter 7: Diagnosis and Tuning SRG-3 Pickup signal To fulfill the condition that resolution, reproducibility and accuracy of the pressure measurement meet the specifications the pickup signal must be sufficient high and stable. Indication on display Action / Display • Starting from standard display: 0.0 Standard display 2.4538E-03 mbar 9s 439Hz Ar • Press cursor to switch to: 1.0 Raw value and signal level 1.1439E-04 1/s 8s 438Hz 10.4dB The signal level in above example is 10,4 dB. The SRG requires a minimum level of -10 dB, otherwise no pressure measurement is done. For good measurement results values of about 6 dB are recommended. Higher signal level can (but not must) improve stability and thus reproducibility, but can also increase the residual drag, thus increasing the zero offset. Diagnose with oscilloscope On the rear panel you will find the connector SCOPE. This output provides the same conditioned and amplified pickup signal as it is fed into the unit´s counter electronics. The signal there should be a stable and clear sinus wave of about 6 Vpp magnitude. The stability, however, is more significant than a sinus form and the signal’s magnitude. 58 SRG-3 Chapter 7: Diagnosis and Tuning Magnetizing the sphere If the signal’s amplitude is too low the magnetism of the rotor (ball, sphere) can be increased. This is done through the thimble’s wall, with sensing head dismounted, using a permanent magnet. The small button magnet that originally was located at the end of the thimble (→chapter 3, Fig. 6) is well suited for this procedure. Slide the magnet along the thimble until you feel the rotor. Caution: The flux of the magnet is high and the level of magnetization normally does increase the offset and should be kept as low as possible. Therefore use first a few sheets of paper between magnet and thimble. It is difficult to reduce too high magnetism can be reduced. A proven method is baking. Do not use a de-magnetizing coil in case of calibrated balls! Check the signal again after the sphere has been accelerated to the operation speed. Repeat the procedure of magnetizing if necessary. Sometimes it turns out to be sufficient just to re-install the sensing head. With the following suspension the sphere may be lifted to a different axial position, producing now a good signal. The main source of interference leading to unacceptable instability is quite often the transfer of vibrations from the pumps or cycles of pneumatic gate valves. These can be reduced by antivibration mounts, bellows etc. but also by choosing a different place for installation of the ball/flange assembly. Rotor sphere, thimble and head are carefully selected at the factory prior to calibration and delivery to provide optimum performance. Appropriate care is given by MKS Instruments on the adjustment of the measuring head and the stabilization electronics. Note In order to improve the signal level and stability and/or to reduce the zero offset it takes sometimes not more than to stop the sphere, remove the sensing head, re-mount it and start the system again. By a randomly taken different axial position the sphere may provide then a useful signal. Adaption of the Rotor Frequency The factory set default value for the rotor frequency limits is 430 - 440 Hz. To avoid interference with harmonic frequencies (e.g. from a turbo pump) the low and high limits can be changed. As the residual drag generated by eddy currents changes with the rotor speed the window size given by the limits however, should be kept small (typically 10 Hertz). 59 Chapter 7: Diagnosis and Tuning SRG-3 This page left blank. 60 SRG-3 Chapter 8: Error Messages and Troubleshooting Chapter 8: Error Messages and Troubleshooting If an operation is ceased because of exceeding the allowable execution time limit one of the following error messages will be displayed. In the standard display 0.0 the blinking error message is shown until the message is confirmed with [ESC] or until a respective command, e.g. MSG, is received via the serial interface. Error messages are also transferred through the serial interface. There is a number of requests and commands available to handle these alerts. Detailed instructions are given in the extra handbook RS 232 INTERFACE (included in shipment). The following handles only the manual operation. The listing of possible causes and their remedies does not necessarily claim to be absolutely complete. Error message Problem / Possible cause and remedy Err 07 MLC not recognized The levitation controller (MLC) could not be recognized during power-up. A hardware problem is likely. Contact MKS service for assistance. Err 13 Motor current failure The motor output is not capable of providing the required drive current. 1. 2. Err 14 Adjusting head failed Err 15 Tuning motor failed 1. The tuning procedure was terminated unsuccessfully. 2. Err 21 No rotor detected No sensor (sphere, ball) was detected. The MOTOR plug is not in place. Make sure that the gauge head is connected properly and try again. The motor circuit is not tuned to its resonant frequency. Dismount the gauge head and start the tuning procedure ‘Drive’ (→chapter 7). Then reinstall the head and try again The adjustment procedure has been started with the sensor fitted. Dismount the gauge head and try again. The MOTOR plug is not in place. Make sure that the gauge head is connected properly and try again. The resonant frequency of the motor circuit could not be found within the predefined range. Make sure that both gauge head and unit have assumed room temperature and try again. If the error persists, a hardware problem is likely. In this case, contact service for assistance. Make sure that the sensor is fitted and the gauge head is mounted properly (→ chapter 3), then try again. 61 Chapter 8: Error Messages and Troubleshooting Err 22 Mounting rotor failed The instrument is unable to levitate the sensor. SRG-3 1. 2. Err 23 Rotor touched down 1. A persistent overload caused a safety shutdown of the levitation controller while the rotor was spinning. 2. 3. Err 31 Drive test failed The sensor speed did not increase during acceleration test. Err 32 Brake test failed The sensor speed did not decrease during deceleration test. See Err 31. Err 33 Controlling speed failed The sensor could not reach its initial speed with the allowed number of tries. 62 The suspension circuit of the gauge head shows significant zero error. Dismount the gauge head and perform a zero adjustment (→chapter 8), then reinstall the head and try again. The sensor is of a non-supported size or type or the gauge head is mounted in a way as to prevent the sensor from reaching its levitated position. Make sure that you are using the correct type of sensor and that the gauge head is mounted properly (→ chapter 3). A DMT command was sent before the sensor had been stopped (RCS > 3). Mind to stop the sensor before issuing the DMT command (see commands RCS and STP). The gauge head was dismounted before the sensor had been stopped (RCS > 3). Mind to stop the sensor before dismounting the head (see commands RCS and STP). The gauge head was bumped or exposed to vibration causing levitation control excitation. Mount the gauge head in a way as to avoid mechanical disturbance. The sensor signal is most likely interfered by stray signals or by vibration picked up by the gauge head. Such interference may originate from vacuum pumps operating in close vicinity. Monitor the sensor signal at the SCOPE output with a spectrum analyzer or an oscilloscope to identify the problem (→ chapter 7). Make sure that the signal path is free from interference. If this is not possible, try shifting the speed window This may occur if the sensor signal is interfered or too noisy to obtain a useful speed indication. Monitor the sensor signal at the SCOPE output with a spectrum analyzer or an oscilloscope to identify the problem (→ chapter 7). Make sure that the signal path is free from interference. In case of a weak signal, dismount the gauge head, magnetize the sensor, then reinstall the head and try again. SRG-3 Err 34 Chapter 8: Error Messages and Troubleshooting Bad signal level The sensor signal did not gain the minimum level (-10dB) required for measurement. 1. 2. 3. The PICKUP plug is not in place. Make sure that the gauge head is connected properly and try again. The remanent magnetization of the sensor is too small to produce a sufficient signal. Dismount the gauge head, magnetize the sensor, then reinstall the head and try again (→chapter 7). The sensor may experience excessive friction due to (a) high pressure, (b) touching the tube wall (excentric suspension) or (c) electrostatic fields (if the sensor is contained in a glass tube). Make sure the gauge head is mounted properly, the pressure is in the specified range, and, if a glass tube is used, take measures to prevent electrostatic charging. Err 35 Speed window too small The measurement could not be completed within the speed limits. The window is too small to attain a reading at the current pressure. Either increase the window by adjusting the speed limits or change to automatic mode Aut 2 (chapter 6: Setup, 8.3, 8.4), then try again. Err 36 Spurious signal The measured signal is not the sensor signal. 1. 2. 3. 63 The measured sensor speed seems to increase due to interfering signals picked up by the gauge head. An internal overflow occurred due to interfering signals picked up by the gauge head. The measured sensor acceleration is out of range, so the speed control is very likely locked to a harmonic of the sensor signal. Monitor the sensor signal at the SCOPE output with a spectrum analyzer or an oscilloscope to identify the problem. Make sure the signal path is free from interference and try again. Chapter 8: Error Messages and Troubleshooting Err 61 SRG-3 Printer data overrun Data overrun occurred in continuous print mode because the printer is not ready to accept data. The print job has been aborted. 1. 2. 3. 4. The printer is stopped by paper out or another error. Make sure that the printer is ready and has sufficient paper, then try again. The printer is not online. Make sure the printer is online and ready, then try again. The printer may have received a spurious command during hot plugging. Reset the printer by cycling the power switch, then try again. The printer cable is not connected properly. Check the connection, then try again. Table 2: Error Messages Display and print error messages Error messages will always be stored. They can be read and printed out later as well as being read via the RS232 interface. More information for remote operation with RS232 is given in the extra handbook INTERFACE (included in delivery). The following instructions refer to the manual operation only. Starting from the standard display 0.0 switch with cursor readout 4.0. Continue according to the following chart: 4.0 Date / error count / oper. hours 2007-09-07 12:36 4 Errs 398h 4.2 Error history options 4.1 Error history Last: Err 13 2007-09-07 10:23 Scroll through error history Error History: Print ENTER Select option: Print/Erase 3: Err 21 2007-09-05 14:17 Display 4.0: Date and time (here: 7.September 2007, 12:36 ); 4 error messages in memory; 398 hours of operation. Display 4.1: Latest detected failure (here: Err 13, problem with rotor drive); use cursor to get all stored error messages displayed with date and time of occurrence (here: error number 3 = Err 21, rotor not detected). Display 4.2: Select Print for printing or Erase to clear the error memory. After emptying the readout 4.0 displays 0 Errs. Appendix A contains an example for a error listing printout. 64 SRG-3 Chapter 9: Bakeout Chapter 9: Bakeout The measuring flange (or only the measuring cylinder, the thimble) can be heated up to 400 °C. The bakeout temperature should be at least 200 °C. The calibrated rotor spheres are always baked before calibration in the measuring flange system. From experience, this results in the best long term stability. The heating should be repeated at the place of measurement to give the best stability. The measurement head must be removed before the ball/flange assembly is baked. After bakeout, the flange system must be cooled down to the surrounding temperature before the system is operated. If the rotor sphere is not in thermal equilibrium with its ambience, it experiences an accelerating component by contraction upon cooling. This can lead to a negative pressure display; a positive drift of the pressure display is observed until a temperature equilibrium has been attained. Note The inherent remanent magnetic field of the rotor can be reduced during bakeout. A remagnetization is recommended before starting again operation. 65 Chapter 9: Bakeout SRG-3 This page left blank. 66 SRG-3 Chapter 10: Theorie Chapter 10: Theory Principle of Measurement The central component of the spinning rotor gauge is a freely rotating steel sphere in a vacuum, which is decelerated by friction with gas molecules. The relative deceleration is proportional to the pressure. Fig. 9 shows details of the measurement head. The drawing shows the rotor sphere (R) in the measurement cylinder (thimble) of the flange. Two permanent magnets (M) create a strong homogenous magnetic field in the region of the measurement cylinder. When the rotor is in the working position i. e. with its center on the cylinder axis, an unstable vertical position is attained. Stabilization is achieved by two opposing coils (S) which amplify the upper and lower field of the permanent magnets according to the deviation of the rotor. Horizontal deviations of the rotor are prevented by four coils (L). The rotor is driven by a twophase motor consisting of four coils (D). The signal pick-up is performed by two coils (P) which are placed opposed from each other and are switched in series. Fig. 9: Sensing Head SRG-SH 67 Chapter 10: Theorie SRG-3 Measurement The spinning rotor gauge determines the pressure by measuring the relative rate of deacceleration of a metal sphere which is freely rotating in a vacuum ambience. The formula used for this relationship is: p = ( - dω / dωt ) • (1/σ ) • ( π / 10 ) • ( a • ρ ) • c - [OFS] with: - dω / dωt = relative retardation of the sphere per unit time c= (8 ⋅ R ⋅ T ) / (π ⋅ M ) = average molecular speed 3 R = gas constant 8,314 • 10 (Nm/kmol • K) T = absolute temperature in Kelvin (K) M = molecular weight a = radius of sphere ρ = density of sphere [OFS] = residual drag σ = accommodation factor, surface coefficient, sigma factor etc. Accomodation Factor σ The accomodation factor is dependent on the surface conditions of the sphere and can (theoretically) be 0 in case of an ideal smooth surface and 1,27 (= 4/π) in case of a “technically roughened” surface. Standard spheres as provided by MKS are of stainless steel and are the same as used in ball bearings. The surface is not threatened to provide best corrosion resistance and the real accomodation factors are between 0,95 and 1,05. The exact value is documented in the calibration sheet. The accomodation factor σ is determined for each rotor sphere. This is done in the calibration laboratority of MKS Instruments Germany by calibration against a gas friction manometer which serves as a transfer standard. This reference is routinely checked by the Physikalisch-Technische Bundesanstalt (PTB). 68 SRG-3 Chapter 10: Theorie Gas Mixtures For the pressure measurement of gas mixtures, it is necessary to know the resulting relative molecular mass. For n gases in a mixture: Mres = ( a1 • σ1 • M (1) + a2 • σ2 • M ( 2 ) + ...an • σn M ( n ) )2 with a(n) = fractional part of gas(n). The friction coefficient of each individual gas generally differs only slightly from that of other gases so that the use of the coefficient of the dominant gas in general is sufficient for an exact measurement. Measurement Range 1 - 100 Pa In the pressure range p ≥ 1 Pa (0,01 mbar) the ratio of retardation to pressure becomes increasingly non-linear. Fig. 10 demonstrates that the retardation ratio reaches a saturation level. This corresponds to a pressure of about 100 Pa and is particularly determined by the viscosity of the gas and by the free space between the rotor and measurement cylinder (thimble). Pi [Pa] 1 0,10 0,01 Pi = indicated pressure Pr = real pressure Pr [Pa] 0,01 0,10 1 10 Fig. 10: Saturation by influence of Viscosity 69 100 ,0 Chapter 10: Theorie SRG-3 The linearization program of the SRG - 3 corrects the deviation in this pressure range, however an increase in the measurement uncertainty of up to 10 % must be considered, caused by an increased heating up of the rotor and gas according to the continuous repetition of the sphere drive. The correction factor can be read via the RS232 interface (read only)! Note If the value for viscosity is entered as zero (no viscosity), no linearization will be done. Note For most accurate pressure measurement above 10 mbar we ® recommend the use of a capacitance manometer Baratron with 100 Pa full scale range. -2 70 SRG-3 Appendix A: Printout Examples Appendix A: Printout Examples The following examples were created with 9-pin matrix printer TM-U220PD (Epson) connected to the rear panel Centronics printer port. Measurement Data a) Printout of 10 single measurement values, completed with statistical evaluation. SRG-3 VACUUM GAUGE 1.0.4 Serial no. G500307G40 Setup 0 from 2008-11-08 Date 2008-11-08 #2 Time Press [Pa] 17:17:57 17:18:02 17:18:07 17:18:12 17:18:17 17:18:22 17:18:27 17:18:32 17:18:37 17:18:42 1.0450E-02 1.2170E-02 1.0860E-02 1.0910E-02 1.1950E-02 1.0510E-02 1.1740E-02 1.1280E-02 1.0680E-02 1.1830E-02 Count Mean value Max. dev. Std. dev. Mean std. 10 1.1240E-02 9.3200E-04 6.4000E-04 2.0000E-04 71 Appendix A: Printout Examples SRG-3 b) th The asterisk * preceeding the 6 measurement value indicates that the measurement was disturbed (→ error message UNSTABLE, OVERLOAD etc). SRG-3 VACUUM GAUGE 1.0.4 Serial no. G500307G40 Setup 0 from 2008-11-08 Date 2008-11-08 #8 Time Press [Pa] 17:28:49 17:28:54 17:28:59 17:29:04 17:29:09 17:29:14 17:29:19 17:29:24 17:29:29 Count Mean value Max. dev. Std. dev. Mean std. 1.1030E-02 9.9760E-03 1.1970E-02 1.0500E-02 1.0830E-02 * 1.1990E-02 1.0200E-02 1.1310E-02 1.1560E-02 9 1.1040E-02 -1.0700E-03 7.3300E-04 2.4000E-04 Any printout with three or more measurement data will be closed with statistical evaluation. Definition of the statistical terms: MEAN VAL: Average X of the measurements N X = 1/N • ∑ Xi i =1 MEAN STD: Average standard deviation. This is the quotient derived from the standard deviation and the square root of the number of measurements MEAN STD = STD DEV / N According to the rules of statistical analyses of measured results, this average standard deviation standard deviation of a test sample - represents the measurement error of the average value. It must not be overseen that the accuracy of the measurement system is specified by 1% + U (see Technical Data). STD DEV: Standard deviation calculated from N ∑ ( Xi − X )² /( N − 1) i =1 MAX. DEV: Difference between the average value and the maximum differing measurement values. 72 SRG-3 Appendix A: Printout Examples Setup/Data Set (→ chapter 5: 2.1 Print options) SRG-3 VACUUM GAUGE 1.0.4 Serial no. G500307G40 Setup 0 from 2008-11-08 Date 2008-11-08 17:34:18 Gas: Gas type Air Mol mass [u] 28.960 Visc [uPas] 18.192 Tco [uPas/K] 0.0536 Gas temp [°C] 20.0 Sensor: Accommodation 1.000 Meas Time [s] 5 Ball diam [mm] 4.5000 Ball dens [g/cm^3] 7.700 Upper limit [Hz] 440 Lower limit [Hz] 430 Auto start Off Speed control Aut1 Backgnd average 5 Offset [Pa] 2.3447E-01 Readout: Unit Pa Temp scale °C Dec places Auto Displ timeout [s] 30 Printout: Count 0 Interval [min] 0 Header option Std Footer option Std Data option Std Page eject On Outputs: Setp1 [Pa] 1.0000E+00 Setp2 [Pa] 1.0000E+00 Hyst1 -0.05 Hyst2 -0.05 Full [Pa] 1.0000E+00 Span (decades) 5 Aux inputs: Mode1 Raw Mode2 Raw Scale1 1.0000E+00 Scale2 1.0000E+00 Offst1 0.0000E+00 Offst2 0.0000E+00 Aux power Off Serial com: Baud rate (8N1) 9600 Promt option Std Pos ackn char 62 (>) Neg ackn char 63 (?) 73 Appendix A: Printout Examples SRG-3 Error Messages (→ chapter 5: 2.1 Print options) SRG-3 VACUUM GAUGE 1.0.4 Serial no. G500307G40 Operating hrs 541 Date 2008-11-08 17:12:44 Logged messages: 2008-11-08 17:10 Err 23 2008-11-08 17:10 Err 36 2008-11-08 17:08 Err 36 2008-11-08 17:07 Err 61 74 SRG-3 Appendix A: Printout Examples Diagnostics Printout for diagnose and service support. (→ chapter 5: 2.1 Print options) SRG-3 VACUUM GAUGE 1.0.4 Serial no. G500307G40 Operating hrs 541 Date 2008-11-08 17:35:59 This printout contains, amongst others, information about sensing head tuning) Sensor: Head power On Status Ready Rotor speed [Hz] 437.9 Signal level [dB] 7.1 Damp level A [dB] -31.6 Damp level B [dB] -32.9 Data processing: Sample time 17:35:56 Sampl intvl [s] 5.00 Packets 136 DCR [1/s] 9.6578E-05 Mean speed [Hz] 438.07 Actual temp [K] 239.15 Cal factor [Pa s] 2.5197E+03 Corr factor 1.0027E+00 Table index 8 Levitation: Control Active Detect [V] -0.086 Det offset [V] 2.337 Bias [V] -2.889 Damping A [V] 0.077 Damping B [V] 0.075 Speed Control: Drive Off Drive curr A [A] 0.334 Drive curr B [A] 0.329 Accel coeff [s^-2 A^-2] 91.3 Drag [1/s] 9.6578E-05 I/O status: Switch state -2Analog out [V] 5.9581 Aux inp 1 [V] 0.0012 Aux inp 2 [V] 0.0020 Aux power Off MKS may ask you for this printout in case of troubles with your SRG. 75 Appendix A: Printout Examples SRG-3 System Parameters Contains settings of the SRG controller. (→ chapter 5: 2.1 Print options) SRG-3 VACUUM GAUGE 1.0.4 Serial no. G500307G40 Operating hrs 541 Date 2008-11-08 17:27:15 Scale factors: Bias 6544.7798 Aout 5705.5322 Aux1 25.0000 Aux2 25.0000 Vdet 25.1200 Vsens 25.1200 Vserv 25.1200 Vsig 8.2580 VdmpA 7.7000 VdmpB 7.7000 IdrvA 1.0600 IdrvB 1.0600 Offsets: Bias 32823 Aout 1711 Aux1 0 Aux2 0 Vdet 2048 Vsens 2048 Vserv 2048 Vsig 0 VdmpA 0 VdmpB 0 IdrvA 0 IdrvB 0 Levitation params: Bias [V] -2.889 Detect level [V] 2.500 Overld level [V] 1.000 Unstbl level [V] 0.250 Speed control params: Motor freq [Hz] 15625 Min current [A] 0.150 Init accel coeff [s^-2 A^-2] 180.0 Init drag [1/s] 0.010 Drive timo [ms] 20000 Signl holdoff 70 Max trials 5 Signal params: Timebase [Hz] 60000000 Min speed [Hz] 390 Min signal [V] 0.316 Min packet size 24 Other params: Start sweep [Hz] 17026 Stop sweep [Hz] 14895 Options 0 Created 2008-09-15 12:30 Changed 2008-11-04 14:59 76 SRG-3 Appendix A: Printout Examples 77 SRG-3 Appendix B: Dimensions Appendix B: Dimensions B1 Flange 63 26,2 –0/+0,1 69 25,2 –0/+0,1 85 [min] 35 41 Clearance for cabling Fig. 11: Flange 79 Appendix B: Dimensions SRG-3 B2 Sensing Head ∅ 51 9,5 52 10 15 31 44 Fig. 12: Sensing Head 80 SRG-3 Appendix B: Dimensions B3 Electronic Unit 241 203,3 18,85 86 18,85 185 Fig. 13: Electronic Unit (top: front and rear panel; bottom: side view) 81 88 76,2 226 Appendix B: Dimensions SRG-3 This page left blank. 82 SRG-3 Appendix C: Overview of all readouts and menus Appendix C: Overview of all Readouts and Menus C1 Control Displays Power ON Firmware version / copyright SRG-3 V1.0.0 ©2007 KW 2s Starting sensor If option Auto Start: Off Starting... mbar 10s 15Hz Ar or Idle mbar 10s 0Hz Ar [ON] (Manual start) ... Waiting for 1st reading 0.0000E+00 mbar 3s 440Hz Ar ... Pressure reading 2.4538E-03 mbar 10s 439Hz Ar Printout started [ON] 2.4538E-03 mbar 10s 439Hz P Ar [POWER] Stopping sensor [OFF] [OFF] Sensor in standby mode Stopping... mbar 10s 423Hz Ar Standby mbar 10s 438Hz Ar ... [OFF] [ON] Shut down Stopping sensor Restarting sensor Stopping... mbar 10s 419Hz Ar Starting... mbar 10s 426Hz Ar ... ... Sensor idle Pressure reading Idle mbar 10s 0Hz Ar 2.4538E-03 mbar 10s 439Hz Ar ... ... Sensor idle Idle mbar 10s 0Hz Ar [OFF] Dismount gauge head Dismount mbar 10s 0Hz Ar [OFF] Disarmed (autom. sensor control off) Dismount mbar 10s 0Hz Ar 83 Appendix C: Overview of all readouts and menus SRG-3 C2 Measurement modes 0.0 Standard display 2.4538E-03 mbar 9s 439Hz Ar 0.1 Measured value / aux. ch.1 2.4538E-03 mbar 0.2462V Aux1 0.2 Measured value / aux. ch.2 2.4538E-03 mbar 2.4579E-03 Aux2 1.0 Raw value and signal level 1.1439E-04 1/s 8s 438Hz 10.4dB 1.2 Zero adjustment options 1.1 Offset used for measured value Zero Offset: 0.0000E+00 mbar Zero Adj: Mean 2.4535E-03 mbar ENTER Select option: Off / Curr / Mean 2.1 Print options 2.0 Printout status Print: Off #14 0min 10 of 10 Print: Cont ENTER Select option: Off / Next / Cont Setup / Diagn 3.1 Analog output status 3.0 Trigger status Trig: SP1 off RDY on SP2 off Aout: 2.00V/Dec 8.293V 4.0 Date / error count / oper. hours 2007-09-07 12:36 4 Errs 398h 4.2 Error history options 4.1 Error history Last: Err 11 2007-09-07 10:23 5.0 Version / serial number Damp A: -45dB B: -48dB Adjusting... Bias=0.947V ENTER Select option: Default / Suspension / Drive / Save 5.1 Damping level 5.5 Suspension adjustment Defaulting... Bias=0.000V 3: Err 21 2007-09-05 14:17 SRG-3 V1.0.0 S/N G500305G40 5.4 Default adjustment ENTER Select option: Print / Erase Scroll through error history Error History: Print 5.2 Suspension diagnostics Susp: -0.006V Servo: -0.8107V 5.3 Head adjustment menu Head Adjust: Default Head Adjust: Save C3 Data sets 6.0 Current setup no. / timestamp Setup #0 2007-09-06 13:47 ENTER Enter setup menu 6.1 Load settings menu Load Setup #1 2007-09-06 13:47 ENTER Select setup file (1..16) 6.2 Save settings menu Save As: Setup #1 ENTER Select setup file (1..15) 6.3 Setting options Settings: Reset ENTER Reset to factory defaults 84 5.6 Drive adjustment Sweep: 16375Hz A=305mA B=298mA SRG-3 Appendix C: Overview of all readouts and menus C4 Setup Navigation: The windows in the head line represent the seven menu sections, each with several sub menus. 7.0 Gas parameter menu Setup Menu: Gas <> 8.0 Sensor parameter menu 7.1 Gas selection/mass units Gas: Ar AMU: 039.944 Temp: +0020.00°C 9.1 Display unit/temperature scale Accomm: 1.000 Meas Time: 10 Diameter: 4.500 Density: 7.700 Upper Speed: 440 Lower Speed: 430 Max Count: 010 Interval: 000 Dec Places: Aut Dsp Timeout: 30 Header Opt: Std Footer Opt: Std Date: 2007-09-07 Time: 16:57 9.4 SI units option SI only: Off 10.4 Printer port/auto page eject Print Port: Par Page Eject: On 8.5 Background average option Bgd Average: 10 8.6 Zero offset Offset: 0.0000E+00 mbar Only the shade marked fields have an influence to the measurement result. 85 Hys1: -5.000E-02 Hys2: -5.000E-02 Full: 1.000E-02 Span: 5 Mode1: Raw Mode2: Raw 12.3 Aux. input offsets Ofs1: +0.000E+00 Ofs2: +0.000E+00 12.4 Aux. input power supply Aux Power: Off Setup Menu: Serial Comm < > Scal1: 1.000E+00 Scal2: 1.000E+00 13.0 Serial comm settings menu 13.1 Baud rate/prompt option Baud: 9600 Prompt: Std 13.2 Prompt characters 12.2 Aux. input scales 11.3 Analog output full scale/span 12.1 Aux. input modes Setp1: 1.000E-01 Setp2: 1.000E-02 Setup Menu: Aux Inputs < > 11.1 Setpoints Data Opt: Std 12.0 Aux input configuration menu 11.2 Setpoint hysteresis 10.3 Data column options Setup Menu: Outputs <> 9.3 Set clock/calendar Auto Start: On Ctrl Mode: Aut1 11.0 Output configuration menu 10.1 Statistics count/print interval 8.4 Control modes Displ Unit: mbar Temp Scale: °C Setup Menu: Printout <> 9.2 Decimal places/display timeout 10.2 Header/footer options 7.4 Temperature 10.0 Printout settings menu 8.3 Control modes Setup Menu: Readout < > 8.1 Accommodation/measure time 8.2 Sensor diameter/density 7.3 Destination selection Save As Gas: Usr1 9.0 Readout settings menu 7.2 Viscosity/temp. coefficient Visc: 022.330 Tco: 0.0660 Setup Menu: Sensor <> Ackn: 62 (>) Nack: 63 (?) MKS Worldwide Calibration & Service Centers SRG-3 MKS Worldwide Calibration & Service Centers UNITED STATES GERMANY/BENELUX MKS Instruments, Inc. Corporate Service Center 90 Industrial Way Wilmington, MA 01887-4610 Tel (978) 284-4000 Fax (978) 284-4303 MKS Instruments, Deutschland GmbH Schatzbogen 43 D-81829 München Tel 49-89-420008-0 Fax 49-89-42-41-06 Email: [email protected] MKS Instruments, Inc. HPS Division, Vacuum Components, Valves & Gauging 5330 Sterling Drive Boulder, CO 80301 Tel (303) 449-9861 Fax (303) 449-2003 ITALY G. Gambetti Kenologia Srl. Via A. Volta No. 2 20082 Binasco (MI), Italy Tel 39-2-90093082 Fax 39-2-905.2778 JAPAN CANADA MKS Japan, Inc. Harmonize Building 5-17-13, Narita-Higashi Suginami-Ku, Tokyo 166, Japan Tel 81-3-3398-8219 Fax 81-3-3398-8984 MKS Instruments, Canada Ltd. 30 Concourse Gate Nepean, Ontario, Canada K2E 7V7 (613) 723-3386 Tel (800) 267-3551 (CAN only) Fax (613) 723-9160 KOREA FRANCE MKS Korea Co., Ltd. st 1 Floor DK Plaza-I 375-1 Geumgok-dong Bundang-gu,Seongnam Kyonggi-do Korea 463-805 Tel 82-31-717-9244 Fax 82-31-714-9244 MKS Instruments, France s.a. 43, Rue du Commandant Rolland B.P. 41 F-93352 Le Bourget, Cedex, France Tel 33(1)48.35.39.39 Telex 233817 F Fax 33(1)48.35.32.52 UNITED KINGDOM MKS Instruments, U.K. Ltd. 1 Anchorage Court Caspian Road Altrincham, Cheshire WA14 5HH, England Tel 44-161-929-5500 Fax 44-161-929-5511 DENMARK MKS Denmark ApS Ndr. Strandvej 119G DK-3150 Hellebæk Tel 45-44 92 92 99 Fax 45-44 92 94 99 Email: [email protected] SINGAPUR TAIWAN MKS Instruments, Inc. BLK 4010 Techplace I #01-08/09 Ang Mo Kio Avenue 10 Singapore 569623 Tel (65) 6451 1062 Fax (65) 6451 0172 MKS Instruments, Taiwan 10F, No.93, Shoei-Yuan Street Hsinchu City 300 Taiwan, R.O.C. Tel 886-3-575 3040 Fax 886-3-575 3048 86