1
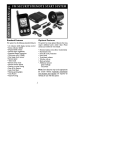
INSTALLATION MANUAL A-PASS TOUCH WIRE INSTALL : ☞ Caution: Main power should be connected at Key box not Fuse box ☞ Caution: If you can not find the “Factory Alarm Rearm output” and “Factory Alarm Disarm output” connect the Black, Red, Brown and Orange color wire only. (Factory Alarm rearm, disarm function is not available) Pin Color Description 1 Black (-) System Ground Input 2 Red (+12V) System Power Input (at Key box) 3 Brown (-) Unlock Output 4 Orange (-) Lock Output 5 *Blue (-) Factory Alarm Rearm Output (Special vehicle only) 6 *White (-) Factory Alarm Disarm Output (Special vehicle only) Components Keypad Main unit wire 1. Mounting Procedure 1. Find the plus, ground, door lock, door unlock line to connect. 2. Connect to the main unit and check the touch operation status. 3. Remove the connector from the main unit. 4. Peel off the protective vinyl on the keypad. 5. A-PASS TOUCH placement : We recommend placing it center of the Pillar of the front windshield. The direction of #1, 6 is downside, and #5, 0 are upside (Left side handle) The direction of #5, 0 is downside, and #1, 0 are upside (Right side handle) Please make sure to affix keypad completely to avoid air bubble forming. 6. Peel off the red protection vinyl on the main unit. 7. Align the keypad and main unit precisely. LED and numbers should be matched. Make sure to align the LED’s to the LED holes on the keypad. (or to align the main unit to the white line on the back of the keypad). And connect the wire. 8. Align the white wire of the connector to the arrow mark on main unit. ☞ Notices 1. If the glass is tinted, it is recommended that you cut off the keypad size and attach the main unit on it. 2. Unplug the connector in case of poor behavior and re-connect it. 3. Check sensing 1) Touch the ENTER button until all LED’s light up (about 2 seconds) 2) In order to toggle between “1~5” and “6~0”, touch the Enter/Shift button speedily (about 0.5 second) 4. Touch area Touch the rectangular area between two numbers softly FAQ Q1: There are no responses when touch the keypad. 1) Unplug the connector in case of poor behavior, re-connect it. (All LED’s blink 3 times) 2) Check the glass if tinted or not. (Tinted glass may avoid the normal touch responses) 3) Touch the rectangular area between two numbers. 4) Check the air bubble between glass and keypad. 2. Programming of Lock Pulses (default :1) ** Most of the vehicles is at default state. Programming of Pulse Duration (default : 0.8 sec) No Lock Pulses Unlock Pulses 1 Press and release the reset button on the back of the main unit 2 Hold down buttons “2” and “3” Hold down buttons “3” and “4” together with two fingers on the keypad together with two fingers on the keypad (from outside the windshield) until all LED (from outside the windshield) until all LED light up. light up. 3 Let go of the buttons. The LED # 1,2,3,4,5 will stay on. 4 Choose between 1,2,3,4,5 for the desired number of lock pulses. 5 Hold down the SHIFT/ENTER button until all LED blink 3 times. 1. Press and release the reset button on the back of the main unit. 2. Hold down buttons “4” and “5” together with two fingers on the keypad. (from outside the windshield) until LED # 1,2,3 light up. 3. Let go of the buttons “4” and “5”. LED # 1,2,3 will stay on. 4. For 0.8 seconds, press and release button #1. For 3.5 seconds, press and release button #2. For 0.3 seconds, press and release button #3. 5. Hold down the SHIFT/ENTER button until all LED blink 3 times. Programming of Factory Reset : 1. Press and release the reset button on the back of the main unit. 2. Hold down buttons “1” and “4” together with two fingers until all LED’s light up. (from outside the windshield). This will do Factory Reset. USER’S MANUAL The system can be locked or unlocked by “touching” the A-PASS TOUCH with a PIN of 4 - 10 digits. Enter/Shift Key Touch area LED Indicator 1. PIN Registration (default PIN CODE “0000”) a. Press and release the reset button on the back of the main unit. b. Hold down the buttons “1” and “2” together with two fingers on the keypad (from outside the windshield) until all LED’s blink 3 times. c. Enter 4∼10 digit PIN and touch the ENTER until the LED will indicate the PIN number in order, and all LED’s blink 3 times. * In order to toggle between “1∼5” and “6∼0”, touch the “SHIFT/ENTER” button 2. System Control 1) Unlock the door a. Touch the ENTER button until all LED’s light up. b. Enter 4∼10 digit PIN code. c. Touch the ENTER button until #1,2,3 LEDs light up and select the button 2 for door unlock. 2) Lock the door a. Touch the ENTER button until all LED’s light up. b. Enter 4∼10 digit PIN code. c. Touch the ENTER button until #1,2,3 LEDs light up and select the button 1 for door lock. 3) LED Scan On/Off (Scan feature only works with the door locked) a. Touch the ENTER button until all LED’s light up. b. Enter 4∼10 digit PIN code. c. Touch the ENTER button until #1,2,3 LEDs light up and select the button 3 for LED scan * On/ Off: By the same process, change to off state ☞ Cautions If you make the input mistake 5 times, the system will be blocked for 10 minutes. Then you can use the system again after 10 minutes. Please keep your PIN-CODE safe when you use the A-PASS TOUCH Operating temperature: -22°F ∼ 176°F