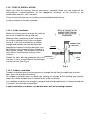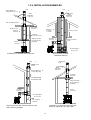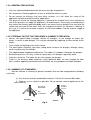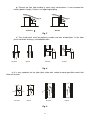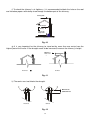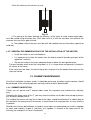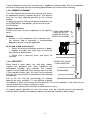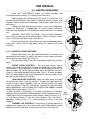
1
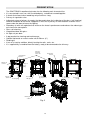
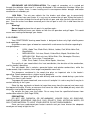
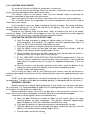
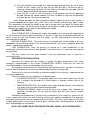
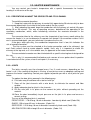
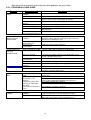
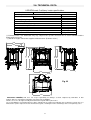
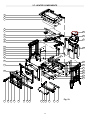
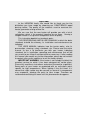
WELCOME
to the HERGÓM family. We would like to thank you for the
distinction you have made by choosing our CRAFTSBURY wood
burning heater. The quality of the materials used to construct this
heater, guarantee a long service life.
We are sure that the new heater will provide you with a lot of
satisfaction, which is the greatest incentive for our team. Owning a
Hergóm Heater is a sign of an exceptional sense of quality.
This instruction booklet has two basic parts:
THE PROFESSIONAL INSTALLER’S MANUAL in which the basic
standards to build the chimney, its installation and maintenance are
indicated.
THE USER MANUAL indicates how the heater works, also its
preservation, cleaning, safety standards, etc. Please read the entire
manual. Its aim is to familiarise you with your heater, indicating
standards for its installation, operating and maintenance that will be
very useful to you. Keep it and consult when necessary. If after reading
this manual you require any further information, please do not hesitate
to contact your current supplier or to call the factory directly.
IMPORTANT WARNING: If the heater is not suitably installed, the
excellent service for which it has been designed will not be given.
Please fully read these instructions and entrust the work to a specialist.
Some parts of your heater are protected with an anti-caloric paint,
specific for high temperatures. When lighting it the first times it is
normal that slight smoke may be caused, as some of its components
may evaporate, allowing the paint to take shape. Therefore we
recommend ventilating the room until this phenomenon disappears.
CONTENT
Chapter
PRESENTATION
THE PROFESSIONAL INSTALLER’S MANUAL
1.1- INTRODUCTION
1.2.- CHIMNEY INSTALLATION FOR SOLID FUELS
1.2.1- FLUE SYSTEM COMPONENTS
1.2.2- TYPES OF INSTALLATIONS
1.2.3- INSTALLATION EXAMPLES
1.2.4- GENERAL PRECAUTIONS
1.2.5- EXTERNAL FACTORS THAT INFLUENCE A CHIMNEY’S OPERATION
1.2.6- SUMMARY OF STANDARDS
1.2.7- GENERAL RECOMMENDATIONS FOR THE INSTALLATION OF THE HEATER
1.3.-CHIMNEY MAINTENANCE
1.3.1- CHIMNEY INSPECTION
1.3.2- CHIMNEY CLEANING
1.3.3- CREOSOTE
THE USE MANUAL
2.1- HEATER OPERATING
2.1.1- CONTROLS AND FEATURES
2.1.2- FUELS
2.1.3- LIGHTING YOUR HEATER
2.2- HEATER MAINTENANCE
2.2.1- PREVENTION AGAINST CREOSOTE AND ITS CLEANING
2.2.2- JOINTS
2.2.3- GLASS
2.2.4- CLEARING AND ELIMINATING THE ASHES
2.2.5- CAST IRON
2.2.7- CONTROLS
2.3- PRODUCTS FOR THE PRESERVATION
2.4- SAFETY
2.4.1- GENERAL PROCEDURES
2.4.2- DISTANCES TO THE COMBUSTIBLE AREAS
2.5- DRAUGHT PROBLEMS
2.5.1- PROBLEM SOLVING GUIDE
2.6- TECHNICAL DATA
2.7- HEATER COMPONENTS
PRESENTATION
•
•
•
•
•
•
•
•
•
•
•
•
•
The CRAFTSBURY wood burning heater has the following main characteristics:
It is constructed in cast iron, with assembled parts, sealed and screwed together.
A hearth that allows to burn wood logs of up to 45 cms. long.
Primary air regulation valve.
Indirected system of primary air supply, that descends down the inside plan of the glass (self cleaning)
towards the bottom of the hearth. Supplied, as well, with a primary air hole located in a nozzle in the
space under the door to favour the lighting.
Secondary air with self regulation that increases the heater’s performance and reduces the unburnt gas
emission to the atmosphere.
Glass self-cleaning.
Hinged front door with glass.
Air-tight ash pan door.
A top practical for cleaning and maintenance.
Optional horizontal or vertical smoke exit Ø150 mm. (6”)
Double grill
It lets of its heat by radiation, directly heating the walls, roofs, etc. .
It is supplied fully assembled from the factory, ready to be connected to the chimney.
Vertical or
horizontal
smoke exit
Practical top
fastener
Secundary air
collector
Primary air
collector
Ash pan
drawer
Front
door
handle
Primary air
hole for
lighting
Double grill
Front door
with glass
air tight
ash pan door
Primary air
control
Fig.-2
/
Ash pan
door handle
Heater air
inlet
PROFESSIONAL INSTALLER’S MANUAL
SPECIAL RECOMMENDATIONS FOR THE CHIMNEY INSTALLATION AND MAINTENANCE
FOR HEATING APPLIANCES THAT OPERATE
WITH SOLID FUELS
1.1- INTRODUCTION
The way the appliance chimney duct is installed, whether it is a heater, fireplace or
compacto for solid fuels, will definitely have an influence on the safety and its good functioning.
It is very important to install the chimney correctly.
The installer must be aware of the general character standards in force and also the local
ones, when installing the chimney for solid fuels.
The recommendations we offer you in this text, will help you take the right decisions.
Should you have any doubts call us directly to the factory. There is a Customer Service
Department at your disposal.
1.2- CHIMNEY INSTALLATION FOR SOLID FUELS.
1.2.1- FLUE SYSTEM COMPONENTS.
A flue system has several components:
Connector to the appliance, cleaning register, cowls, draught cutting valve, insulating roof and
wall protectors, insulating bushings, coverings, protecting chambers, etc.,.... and the chimney
duct.
To safely install a heating appliance, it is absolutely necessary to install all these elements
following the standards established by the manufacturer, especially regarding the distances to
the combustible surfaces.
Chimney Connector
• The chimney connector is the run of tubes that links the heater with the chimney. The
chimney connector must have the manufacturer’s specified diameter. The material will be
special steel for flue tubes, either with an anti-caloric paint protection, vitrified enamels, or,
stainless steel with refractory characteristics. In general use the tubes manufactured for this
function.
• Never use aluminium or galvanised sheet. These materials do not withstand the extreme fire
temperatures.
• The chimney connector must be the shortest possible, avoiding, when possible, horizontal
sectors and elbows at 90º. The use of horizontal tubes or too many elbows increases the
loss in draught and the accumulation of creosote in the chimney.
• In the case of fitting horizontal sectors, it is recommendable to have a minimum ascending
inclination of 5º
• Plan a cleaning register. Simplify the tube connection to the heater by using additional
accessories such as telescopic tubes or cleaning Ts.
• The telescopic tubes allow detaching the chimney with no need of moving the appliance and
to easily inspect and carry out the maintenance.
• The cleaning Ts simplify the chimney cleaning.
• Seal all the chimney connector joints well with refractory filler.
• Should there be drilled holes in the connection adjusting ring of the appliance, secure the
chimney connector to the heater’ s adjusting ring with appropriate screws. This secures the
adjustment and avoids vibration that may provoke the joints separating.
.
Cowls
There is a wide range of cowls for chimneys.
It is important that it be well secured and the distance from the chimney is at least the same as
its diameter.
Draught cutting valve
• In general, in a correct installation it is not necessary to fit a draught cutting valve.
• Some installations nevertheless may be benefited by having a draught cutting valve, such as
in tall chimneys that may create stronger draughts than normal.
• In any case the draught cutting valve may help to regulate the draught. A solid fuel appliance
requires a draught of between 1,5 and 2,5 mm c.a. (See the manufacturer’s characteristics)
(See technical data Page 28).
• Should the chimney draught be higher, the installation of a draught cutting valve is
recommended.
• The draught valves should never totally shut out the smoke passage. A minimum of a 20%
of the passage must be kept always free.
Coverings, protectors, ...
• Respect the distances to the combustible areas of the heater and the chimney duct,
recommended by the manufacturer.
• If this is not possible, shield these materials with appropriate protectors.
• There are special protectors to fit on the combustible walls when the chimney connector
passes near or through them. Your mission it to protect the wall from the fire.
• You must install a wall protector, when you install a chimney connector through a
combustible wall, or near it, and that may be susceptible to deterioration.
• The insulating bushings internally protect the combustion wall. You must use this part when
connecting your chimney through walls or roofs.
Chimney Duct
The chimneys for solid fuel appliances, must be built with brickwork, or prefabricated with
materials that withstand high temperatures.
Therefore if you are going to build a chimney for your heating appliance, you have two
alternatives:
• Brickwork Chimneys.
• Metal Chimneys
•
There are no great differences regarding the performance and operating between a brickwork
chimney and a metal one.
Whenever possible, place your chimney inside the house to obtain a better draught, and
accumulate less creosote, leading to a longer working life.
Do not install an appliance unless you are absolutely sure the chimney is valid to be used.
Before installing the appliance, examine the chimney to detect any cracks, bad connections,
oxidation, lost pieces of cement, or other deterioration and obstruction signs.
Ensure the chimney size is adequate for your appliance. Seek advice on the dimensions
recommended by the manufacturer.
To use a smaller or excessively larger chimney, may make the heating appliance not operate
adequately, contributing to the creosote formation.
BRICKWORK CHIMNEYS
The advantages of these chimneys are:
•
The mass of bricks and/or tiles reduces the cooling of smoke in the chimney.
•
The characteristic of the bricks in accumulating heat allows the house to remain warm for
longer after the fire has been put out.
•
It may be built to one owns taste.
•
If it is well built, it may be more fire-resistant than metal chimneys.
Brickwork chimneys must be well lined to avoid smoke cooling. They must be built using
materials that withstand high temperatures and corrosion.
Make sure the chimney is really clean and that it operates correctly, this will avoid draught
losses, and the creosote formation.
Make sure the size of your chimney is appropriate and
not too high.
Should it be excessively high, a draught cutting valve
must be fitted.
If the brickwork chimney is of a larger section than the
one recommended by the appliance manufacturer,
another metal chimney with appropriate size should be
installed inside it, so as to avoid operating problems and
the creosote accumulations.
SEAL ON
E
O
F
T
H
E
ENDS
In this case it will be convenient to seal one of the
brickwork chimney ends against the tube to avoid the
formation of draughts that may cool the chimney. (See
Fig.-3)
It is recommendable that this sealing be carried out on
the upper part, to take advantage of the heat that is
produced in the whole chimney sector. In the same way,
it is recommended to form circulation in the inside of this
chamber between the tubes and the brickwork chimney
to allow a certain relief and to avoid extreme heat that
would damage the walls (cracks, etc...) For this all
needed is to fit this chamber with a lower grille and an
upper one (15X10 cm.) The air will circulate by natural
convection, carrying the hot air from the lower area to the
higher one, of the house.
METAL CHIMNEYS
The advantages of these chimneys are:
Fig.- 3
•
Easy to install.
•
Slight changes in chimney direction may be made,
leading to greater flexibility in the choice of location for the heater.
•
As there are curved elbow joints, the sharp edges that make the draught difficult are
removed.
Ensure all the chimney tubes are well fitted in and their joints are completely air tight.
1.2.2- TYPES OF INSTALLATIONS
When you install the chimney and the accessories, especially make sure you respect all the
manufacturer’s recommendations for the appropriate distances of the chimney to the
combustible materials, walls and roofs.
There are basically two ways of installing a metal prefabricated chimney:
Inside installation or outside installation
1.2.2.1- Inside installation
DETAIL OF PASSAGE OF THE
CHIMNEY TUBES THROUGH
COMBUSTIBLE WALLS AND
FRAMEWORKS
When the chimney passes through the inside of
the house through the ceilings and roof.
When possible, choose the inside installation.
An inside installation heats faster and keeps
the heat. In this way it contributes to a better
draught and reduces the creosote formation.
CHIMNEY TUBE
Appropriate firebreak insulating bushings must
be fitted when the chimney passes through the
floors and/or ceilings. The insulation must be at
least 50 mm. thick from the chimney to the
structure.
THERMAL
INSULATOR
FRAMEWORK
METAL
Protect the walls with wall protectors when the
chimney is not at a safe distance and damages
may be caused. (See Fig.-4)
END
Fig. 4
1.2.2.2- Outdoor installation
Outdoor installation when the chimney passes through the wall from the appliance and after
goes up on the outside of the house.
An outdoor installation does not benefit by heating the outside of the building and normally
lowers the smoke temperatures in relation to the inside installation.
In an outdoor installation the draught is not good and through experience it is demonstrated that
it increases the creosote accumulation.
If your installation is outdoors, use double tubes with an insulating chamber. 1.2.3- INSTALLATION EXAMPLES
Extendible
Rod
Supported
to the roof
Cowl
Cowl
Gutter
Adjustable
to the
roof
Gutter
Adjustable
to the
roof
Attic
insulating protector Fire
cutting
#
Protector
Double closure
"
Chimney
Protector
Refractory
()
Covering
#
or similar
!
&!
Chimney
section
$
Chimney
$!closure
Protector
Bushing
protector
$
Support
box with
inserted
chimney
!
beginning
Heater$
connector
#
$!
Brickwork
chimney
Cleaning register
(+
Access door
%&'
Installation
in a two floor house with attic.
$!')*
Metal
Chimney through
!
a brickwork chimney
Cowl
Cowl
Gutter
Gutter
Adjustable
to the roof
External
Chimney
&!
section with lining
#
Insulating
Protector
,
Tie-down
Clamp
fixed to the wall
$
Support
Box with
!
inserted
chimney
beginning
Heater
$
#
Connector
Bushing
protector
Cleaning register
(+
Access door
Lower
Support
#
$!
Chimney
Installation
in a one floor house with attic.
%&'
Chimney
supported
in the upper part.
$!
$!
External Chimney
with clamp fixed to the wall
#!Lower Chimney
Support.
1.2.4- GENERAL PRECAUTIONS
•
Only use special prefabricated metal chimneys for high temperatures. •
Do not connect a heating appliance to any air distribution duct or system.
•
Do not connect to chimneys that have other services, as it will affect the safety of the
appliance’s operating and of the other applications.
•
The premises where the heating appliance is going to be installed must have sufficient air
inlet to the premises to supply the appliance’s air requirements. Excessively insulated houses
may cause the chimney operating badly and in fact cause inverse draughts that may take the
smoke into the inside of the room, when for example the kitchen air extractor is working. In
this case it is necessary to make a special air inlet from outdoors into the room to supply to
the appliance.
1.2.5- EXTERNAL FACTOR THAT INFLUENCE A CHIMNEY’S OPERATION:
•
•
•
•
•
•
•
Houses with good indoor insulation, without air draughts; as not enough air enters the
heater, it causes a poor draught. This may be corrected by supplying air from outside to the
heater.
Trees and/or tall buildings close to the house.
The wind speed. Generally, persistent strong winds increase the draught, although stormy
winds may decrease the draught.
The indoor/outdoor temperature difference. The colder it is outdoors, the better the draught.
Barometric pressure. On rainy, humid or stormy days, the draught is generally weak.
Liveliness of the fire. The hotter the fire, the stronger the draught.
Cracks in the chimney, badly sealed or a dirty appliance door, air inlets through the tube
joints, another appliance connected to the chimney, etc. may produce unsuitable draughts.
1.2.6- SUMMARY OF STANDARDS
Next we indicate a summary of general standards that must be respected when building
a chimney:
e) Use resistant and non-combustible materials. Do not fit in cement fibre tubes.
f) Choose a run as vertical as possible. Do not connect several appliances to the
same chimney.
Correct
deviation
Excessively
flat deviation
Ash
accumulation
Incorrect
Correct
Fig.-6
g) Prevent the flue from ending in areas near constructions, it must exceed the
closest peak in height, if there is an adjoining building.
Incorrect
Correct
Fig.-7
h) The inside walls must be perfectly smooth and free of obstacles. In the tube
joints with brick chimneys, avoid bottlenecks.
Incorrect
Correct
Incorrect
Correct
Fig.-8
e) It is very important for the tube joints to be well sealed to cover possible cracks that
allow air to enter.
Incorrect
Correct
Incorrect
Fig.-9
Correct
f) To check the chimney’s air tightness, it is recommended to block the hole on the roof
and introduce papers with damp straw through the bottom part of the chimney.
Closing slab
Smoke Escape
(Cover)
Papers and
damp straw
Fig.-10
g) It is very important for the chimney to stand out by more than one metre from the
highest part of the house. If the draught needs to be increased, increase the chimney’s height.
Minimum 1
meter over
Correct
Incorrect
Fig.-11
h) The cowls must not hinder the draught.
Minimum the
same diameter
Incorrect
Correct
Fig.-12
Clean the chimney at least once a year.
Fig.-13
j) The joining of the tubes forming the chimney, in the event of using simple metal tubes,
must be sealed using refractory filler. Each tube must fit in with the next one, to avoid that the
creosote that may form, goes outside.
k) The outdoor metal chimneys must be built with double heat-resistant tubes special for
solid fuel.
1.2.7- GENERAL RECOMMENDATIONS FOR THE INSTALLATION OF THE HEATER:
•
Install the heater on an insulated base.
•
It is important to insulate the heater from the floor to avoid it absorbs great part of the
appliance’s calories.
•
Situate the heater in the most adequate place to obtain the best performance.
The best location tends to be the living-room, as it is a large room and generally situated in
the centre of the house.
If the house has two floors, the best thing to do is to place it on the bottom floor and near the
staircase hollow.
1.3- CHIMNEY MAINTENANCE
Once the installation has been made, it should be preserved; therefore regular controls should
be performed so the chimney operates correctly and to avoid its deterioration.
1.3.1- CHIMNEY INSPECTION
Certain runs of special and T formed tubes make the inspection and maintenance relatively
easy.
Detaching the lower cover of the T, you may clean the whole set of tubes from the top by means
of a chimney sweeper brush.
The residue that comes off from the inside of the tubes should be collected in a rubbish bag or
bin located in the lower part of the chimney. A mirror fixed at an angle permits an easy chimney
inspection.
Should your chimney be brickwork, instead of sheet tubes we recommend you install a trapdoor
to clean and regularly inspect it. Normally, this trapdoor is situated at the lower part of the
chimney (for example in a house’s basement).
If your brickwork chimney was not built with a trapdoor or cleaning door, then the inspections
will have to take place from the connecting point between the heater and the chimney.
1.3.2- CHIMNEY CLEANING
The most effective way to clean the chimney is by means
of appropriate chimney sweeper brushes. The brushes
must be the best adjusted possible to the chimney
section.
To delay the general cleaning, we advise to regularly use
the HERGÓM Anti-soot product, you will find at any of
our Distributors.
Regular Inspections
Perform each one of these inspections in the specifiedIF THERE
IS NO
CLEANING
SI NO
HAY
PUERTA DE
LIMPIEZA,
DESMONTAR
DOOR,
DETACH
THE
terms.
EL TUBOTUBE
CONECTOR
E
CONNECTOR
AND
INSPECCIONAR
CON UN
INSPECT
WITH A MIRROR
Monthly:
• Perform a visual inspection of the creosote level of
the chimney and its connector is recommended,
depending on the use of the appliance.
ESPEJO
At the end of and at all seasons:
• Detach the chimney connector and clean in depth.
• Replace the tubes that show signs of excessive
wearing out or deterioration.
• Check, and if necessary clean and repair the
chimney.
1.3.3- CREOSOTE
A MIRROR THAT
Fig.-ALLOWS
14
A VISUAL INSPECTION
When wood is burnt slowly, tars and other organic
ESPEJO QUE PERMITE
vapours are produced that, when combined with
LA
INSPECCIÓN VISUAL
atmospheric humidity, form creosote. The creosote
vapours can be condensed if the chimney walls are cold.
CLEANING DOOR
If the creosote catches light, this may cause extremely
hot fires. Any accumulation of creosote must be removed
PUERTA DE LIMPIEZA
immediately.
Due to the fact that the accumulation of creosote
depends on many variables, it is very difficult to predict
the moment at which the chimney must be cleaned. The visual inspection is the safest way to
ensure whether your heater’s chimney is clean.
We therefore recommend installations to which access is easy.
To protect against possible fire, the flue system must be installed correctly and perfectly
secured. When checking, immediately replace any oxidised, cracked or broken parts.
/
USE MANUAL
2.1- HEATER OPERATING
Once your CRAFTSBURY heater has been installed, and
connected to the chimney, it is ready to have the fire lit.
Before lighting the heater for the first time, it is necessary that
you get familiarised with your heater’s different control systems and
features, how to choose the wood logs, how to light it and use it on a OPEN daily basis.
Though the operating of your heater is easy, the combustion CLOSE
process of solid fuels is complicated, as several factors intervene,
and time and experience are needed to understand how it is carried
out.
Fig.15
ALWAYS TAKE INTO ACCOUNT that the heater produces
heat and therefore you must keep children, clothes, furniture...away
from it as the contact with it may cause burns.
We will next give you some advice on how to adequately get to
know your heater and its operating, which we request you read
carefully:
2.1.1- CONTROLS AND FEATURES
Fig.16
Before lighting any fire, get familiarised with the location and
operating of the controls as well as the parts of your heater and learn
how they are used. (See Fig. 2 Pag. 5)
For your own safety in no case should you modify any of these
parts.
FRONT DOOR CONTROL: The front door allows you to
Door stopper
access the inside of the hearth to load the wood logs in your heater
and to clean it, and it provides a view of the fire through the glass. To
open the door, lift up the control handle up to the position (as on a
Fig.17
clock) of 10 o’clock and pull from the door. Fig.15. To close the door,
push the door against the frame lowering the control handle to the
position (as on a clock) of 8 o’clock.
ASH PAN DOOR CONTROL: Open this door when you need
to remove the ashes from the heater. To open the door push the
control handle slightly upwards until the closing latches are freed
from their pocket. (Fig. 16), and without releasing it, lower the door
lightly downwards, until the door leans against the stoppers located
under the ash pan drawer. (Fig. 17).
Fig.18
In order to close it, the process is the other way round. Lift the door
PRIMARY
holding it from the control handle upwardly till the closed position and AIR
REGULATION
slightly pressing in the direction of the heater, lower the lever as far
as the closing latches fit into the initial location. (Fig. 19) So this
operation results easier, it is recommended to carry it out two
handed.
PRIMARY AIR CONTROL: The primary air control permits to
regulate the amount of air that enters the hearth. Moving the control
towards the left the primary air entrance increases. (See Fig.-19)
Fig.19
.
SECONDARY AIR SELF-REGULATION: The supply of secondary air is carried out
through the deflector tubes and it is evenly distributed in the combustion chamber. When the
combustion is higher, there is more heating and in consequence better draught and better
contribution of secondary air.
ASH PAN: The ash pan collects the fire cinders and allows you to conveniently
eliminate the ashes from your heater. It is very easy to remove the ash pan. When the heater is
cold, shove the ashes through the hearth grill to the ash pan, and after carefully slip out the ash
pan. Once the ashes have been removed, push the ash pan in until it fits in and close the ash
pan door.
Warning!
Do not forget to place the ash pan in its position again.
Never should you leave your heater on with the ash pan door and grill open. This could
cause over-heating and damage your heater.
2.1.2- FUELS
Your CRAFTSBURY burning wood heater is designed to burn only high calorific power
hard wood logs.
As guidance some types of wood are named with a reference classification regarding its
energetic power:
•
HIGH : Apple Tree, Black Birch, Walnut, Jatoba, Oak, White Holm Oak,
Black Beech
•
MEDIUM HIGH: Ash-tree, Beech, Yellow Birch, Maple, Red Holm Oak
•
MEDIUM LOW: Black ash-tree, White Birch, Elm, Norwegian Pine tree,
Slash Pine, Cherry-tree, Tamarind tree
•
LOW: Pine, Cedar, Fir-tree, White Poplar, Lime-tree,
The quality of your wood affects the heat contribution, the duration of the combustion,
and the heater’s operating.
The soft woods, low in calories, generate higher and quicker combustions, while the
harder woods, high in calories, burn longer and produce more heat.
The dampness contained in the wood also plays an important role in the heater’s
operating. Green wood contains a higher level of dampness.
Therefore, the green logs light up with difficulty and must be stored during a year to be
able to use them in your heater.
To prepare the green wood well, one must cut it and pile it in such a way that it may be in
contact with dry air for a year.
Store the logs on planks or blocks to keep them away from the ground, and cover only
the top part of the pile. Plastics or canvases that cover the sides of the wood pile only retain the
dampness and avoid the wood from drying.
Do not pile the logs near the heater. Do so away from the specified distances from
combustible materials (See Page 25/26)
PRECAUTION
DO NOT USE CHEMICAL OR INFLAMMABLE LIQUIDS SUCH AS GASOLINE,
NAPHTHALENE, KEROSENE, GAS-OILS, OILS, PELLETS, COAL, ARTIFICIAL WOOD, OR
ANY OTHER MATERIAL TO LIGHT YOUR HEATER. DO NOT BURN RUBBISH.
Once you have understood your heaters controls and you have chosen the adequate
wood you are ready to light the fire.
2.1.3- LIGHTING YOUR HEATER
It is essential that the first lighting is carried out in a slow way.
The cast iron must be warmed up: Excessive heat on a new heater may cause cracks in
the iron or cause damages to other parts of the heater,
The volcanic stones of the hearth’s walls must be warmed slowly to eliminate the
dampness contained in them and in the joint cement.
When you light the fire for the first time, your heater will let off some smoke and gases.
This is normal due to the evaporation of the paint components and the oils used to
manufacture your heater.
If you consider it necessary, open a window to ventilate the room. The smoke and gases
normally persist during the first 10 or 20 minutes of the lighting. The smells and smoke will
disappear when the heater is “cured”.
During the first lightings there may be other smells of materials that are in the nearby
area to the heater. These smells will disappear in time. You may reduce these smells opening
the windows or by other means, creating ventilation around the heater.
LIGHTING THE HEATER FOR THE FIRST TIME
h) Open the door and place a couple of lighting tablets on the base. Put some
crossed splinters on the tablets. The splinters should be approximately about 10
pieces of 10/15 mm in diameter and 25/40 cms. long.
i) Fully open the primary air control sliding the control forward.
j) Light the tablets. Leave the front door half open, without fully closing it, until the
splinters start to burn and the draught begins to rise.
k) Close the door and let the fire light. Keep the door closed while the heater is
working. Ensure the ash pan door is firmly closed.
l) AT ALL TIME KEEP YOUR EYES ON YOUR HEATER to keep a low fire. The first
fire must heat the heater but it should not burn when you touch it. You should add
some pieces of wood to the fire to reach an adequate temperature in the first
lighting.
m) Once the heater is hot, but does not burn to the touch, close the primary air by
sliding the control to the limit inwardly, and let the fire completely go out.
n) Let your heater cool down entirely.
The first time you light it and the first lighting of each season, must be carried out as
previously described. Your patience will be compensated by years of a good operating of your
heater.
NOTE: As the gas temperatures have been low during the first lighting, the creosote has
formed quickly. The glass on the door has probably got dirty. A subsequent hot fire will clean it.
ORDINARY LIGHTING
Before carrying out a regular lighting operation, if your heater has not been used often,
for a long time, it is recommendable to follow the first lighting procedure, at least, to minimize
the tensions of a strong fire on a cold heater.
Before loading the heater, ensure the ash pan door is closed and the ash pan is in its
place. If the ash pan door should open, the heater could over-heat and get damaged.
To perform a normal lighting, do so in the following way:
g) Open the door and place a couple of tablets on the hearth’s base. Put some
crossed splinters on some newspapers. The splinters should be approximately
about 10 pieces of 10/15 mm in diameter and 25/40 cms. long.
h) Fully open the primary air control by moving the control towards the front.
i) Light the tablets up. Leave the front door half open, without fully closing it, until the
splinters start to burn and the draught begins to rise.
j) Close the door and let the fire light.
k) Once the splinters have caught fire, open the door and add logs, first small ones,
to form the fire. Make sure the logs are far from the glass, so that the glass’s
cleaning system works correctly. On the other hand, keep the front door and the
ash pan door closed while the heater is operating.
l) Once the fire is well lit, use the primary air to regulate the level of operating
desired. Moving the control towards the front, to obtain a high level of operating,
and inwardly for a low level of operating.
Note: When you open the door to load the wood or replace the logs in your heater, it
is recommendable to first open only a little, wait a few seconds and then after open it wide.
This procedure will permit the hearth to be free of smoke when you open the heater door
wide and so it does not fill the room. Likewise, to reload on a bed of hot and red embers
reduces the smoke and will intensify the combustion rapidly.
COMBUSTION LEVELS
HIGH COMBUSTION: Fully load the hearth with wood on the hot and red ember bed or
on the flames and entirely open the primary air control. A high level is recommended once or
twice a day to heat the chimney and the heater up well, preventing the creation and
accumulation of creosote.
MEDIUM COMBUSTION: Place the primary air control lever at the middle of the run,
appropriate for the heating needs of the area to be warmed. This level is adequate when the
heater is going to be unattended.
LOW COMBUSTION: Close the primary air control for a slow combustion. A low
combustion level during excessively long periods is not convenient as it stimulates the creosote
accumulation.
The flue system must be often checked if the low combustion level is used on a
continuous basis.
EXCESSIVE FIRE PRECAUTION
Excessive fire means that the heater is running at higher temperatures than those
previously recommended in the section COMBUSTION LEVELS. Excessive fire must be
carefully avoided as it may cause damages to your heater.
The symptoms of excessive fire, even during short periods of time, are roars in the heater
and the connecting duct to the chimney, and decolouring of the chimney tube.
Excessive fire may be caused by an extreme draught in the chimney, inappropriate fuel
or incorrect operating.
Correct an excessive fire situation in the following way:
o EXCESSIVE DRAUGHT: The draught depression must not be more than 2.5 mm
c.a. A draught that exceeds this value requires a draught cutting valve in the
chimney.
o INAPPROPRIATE FUEL: Do not burn coal, heaps of dried splinters, waxed logs or
any others than the natural wood recommended.
o OPERATING ERROR: Make sure all the joints are in good state. Replace the
frayed or crushed joints. Do not light the heater with the front, side or ash pan
doors open.
Controlling the temperature is the best way to determine if the heater has excessive fire.
If you suspect your heater has excessive fire, contact your supplier immediately. The damages
caused by excessive fire are not covered by the warrantee. The results of an excessive fire may
include deformations or burning of internal parts, decolouration and deformation of external
parts and damages on the enamel.
NOTE: ANY SYMPTOM OF EXCESSIVE FIRE MAY ANNUL YOUR WARRANTEE!!
2.2- HEATER MAINTENANCE
You may control your heater’s temperature with a special thermometer for heaters
locating it in the centre of the top.
2.2.1- PREVENTIONS AGAINST THE CREOSOTE AND ITS CLEANING.
To avoid the creosote formation:
1. Keep the heater with the primary air control fully open during 30 minutes daily to burn
the creosote deposited in the inside of the heater and of the flue system.
2. After reloading the wood, keep the combustion with the primary air control fully open
during 20 or 30 minutes. This way of operating ensures, beforehand, the operating of the
secondary combustion, which, when functioning, minimises the creosote formation in the
chimney.
The connector tube to the chimney must be inspected at least every month during the
season the heater is in use to determine if creosote has formed. If the creosote residue is of 6
mm in accumulated depth, you must eliminate it to reduce the fire risk.
If the glass often gets dirty, the combustion temperature level is low; this indicates the
risk of creosote formation.
The flue system must be checked at the heater connection and in the chimney’s top
end. Cold surfaces tend to create deposits rapidly, that’s why it is important to check the
chimney at the top end, as it is the coldest area, as opposed to the heater connection.
The accumulated creosote must be eliminated with a specific cleaning brush designed for
this use.
This is why it is recommended that before each season of use a professional inspection
is carried out of all the system, clean it and repair it, if necessary.
2.2.2- JOINTS
The joints normally must be changed every 2 or 3 used seasons, depending on the
heater’s use. If the sealing of the door is missing, a new joint ensures an adequate sealing and
improves the heater’s operating. Contact your supplier to provide you with a set of joints for your
heater.
To replace the door joints proceed in the following way:
6. First take away the old one with a tool or knife tip.
7. Clean all the joint channels with a wire brush, to eliminate the cement and fibre
residue.
8. Apply adequate glue for joints in the channels.
9. Put the new joint in its place on the cement for joints without spreading out the
material.
10. Close the door immediately to put pressure on the joint in its place and ensure a
correct sealing.
The use of the following joints is required:
FRONT DOOR: 1.70 m long, 10 mm in diameter. Low density black cord (Code J38)
GLASS: 1.50 m long 6.5 mm. In diameter, (Code J14)
SIDE DOOR: 1.25 m long 10 mm in diameter Low density black cord (Code J38)
ASH PAN DOOR: 0.90 m long 6.5 mm in diameter. (Code J14)
2.2.3- GLASS
Do not use the heater with the door glass broken. Do not knock or slam the front door
when shutting.
If deemed necessary, you may clean the door glass with a Hergóm Window Cleaner that
is provided by your supplier.
Never try to clean the glass when the heater in operating or the glass is hot.
Most of the particles deposited, may be cleaned following the cleaner’s use instructions.
To clean the difficult particles, open the door pull it upwards and detach it from the
heater, leaving the turning pins on the door. (Be aware of putting away the pins and washers in
order to later fit the door on again).
Place the door on a table or working surface and apply the cleaning product on the glass
letting it work during a few minutes.
Leave the door in a horizontal position, to allow the cleaning product to better penetrate
the glass surface.
Dry the cleaning product with a soft cloth.
Important: To knock or scratch the glass will deteriorate its integrity. Do not use
blades or metal sponges, or other abrasive materials as tools to clean the glass.
The door glass is ceramic, manufactured specially for the use of wood heaters.
Do not use any other glass that is not ceramic manufactured for the use of these wood
heaters. Make the replacement of the glass through your supplier.
If the door glass breaks it must be replaced immediately.
Contact your supplier to request a glass and necessary parts for its repair.
Should you replace the glass yourself, use working gloves and safety glasses.
The procedure to change the glasses and glass joints is the following:
1. Open the door and pull it upwards and detach it from the heater, leaving the turning
pins on the front. (Take care in putting away the pins and washers to later fit the door
on again).
2. Place the door front down horizontal on a flat surface.
3. Apply penetrating oil on the glass cramp screws. Withdraw the screws and lift the
cramps and the ceramic fibres that may be under them.
4. Carefully lift the door’s damaged glass and throw it away in the rubbish
5. If you deem necessary, replace the ceramic fibre cord. Tear it out from its position and
clear the leftovers of it. Apply the special cement for joints, and place the new ceramic
fibre cord with the measurements before detailed.
6. Place the glass on the joint in its position on the door.
7. Screw in the glass fastening cramps once again, placing the corresponding ceramic
fibres under them.
8. Fit the door in its position again.
2.2.4- CLEARING AND ELIMINATING THE ASHES.
The ashes will be cleared when the heater is cold. Use a protecting glove when the ash
pan is hot. Be very careful when you handle, store or throw away the ashes.
To remove the ashes from the hearth proceed in the following way:
7. Open the hearth door and shake the ashes so they fall on the ash pan.
8. Sift the ashes that remain on the grill with a scraper or another adequate tool.
9. Remove the ash pan from its location and empty the ashes. The ashes must be
thrown away from the hearth into a metal container with an appropriate hermetic top.
Do not introduce any other object or rubbish inside the container. Cover the container
with the top and let the ashes cool down. Do not place the container on combustible
surfaces or vinyl floors, as the container may be very hot.
10. While you get rid of the ashes, place the closed ash container on a non combustible
floor or on the ground outdoors, far from all combustible materials.
11. If necessary clean where the ash pan is placed.
12. Put the ash pan in its place by pushing it to the back in its position. Ensure the ash
pan is well fitted in its location.
In another way, the ashes may be cleared with a shovel through the side or front door.
The ashes must be kept in the closed container until the embers are completely cold.
NEVER place the ashes in wooden or plastic containers, or in paper or plastic bags,
regardless of the time elapsed since the fire has been put out. The embers inside the ash bed
keep heat during a long time once they have been removed from the hearth.
2.2.5- CAST IRON
The external cast iron parts are vitrified with majolica enamel.
The enamels may be cleaned with a normal window cleaning product. Generally all
needed is to clean it with a slightly damp cloth. (Do not wet the painted parts as oxidation will
appear if it is not quickly dried.)
The enamel with which your Craftsbury heater is treated, while operating, most specially
in high combustion moments, may show changes in its texture and colour, causing fine cracks
that go back to their natural state when the heater cools down.
This process occurs due to the different expansion coefficients of the materials used in
the elaboration of this special high quality enamel.
Do not use damp cloths to clean the painted parts.
The paint used is an anti caloric 600ºC one which is specific for heaters. If you decide to
repair your heater, contact your supplier to purchase the special paint.
2.2.7- CONTROLS
Your heater is an appliance that is under extreme temperatures and under the corrosive
effect of combustion residues. Its regular maintenance is essential to obtain a longer duration
and better use of it. For this, we recommend to frequently carry out the following controls:
DURING THE PERIOD IN USE
a) Visually inspect the chimney. Clear the soot and tar should they have started to
accumulate on the heater’s inner walls.
b) Check that the doors close hermetically; if necessary adjust them.
WHEN THE PERIOD OF USE ENDS
a) ) Inspect and clean the chimney. (See Page 14/15)
b) Clean the inside of the heater with the vacuum cleaner and inspect it. The soot
and tar (creosote) that accumulates on your heater’s walls reduces the performance.
c) Check the door hinges. They must be replaced when the closure is not perfect.
2.3- PRODUCTS FOR PRESERVATION
Industrias HERGÓM S.A. supplies a series of products for the preservation of your
Heater and chimney:
Anti-caloric paint, refractory filler, anti-soot, lighting tablets, window clearer, etc...
Fig. 20
2.4- SAFETY
2.4.1- GENERAL PROCEDURES
There are certain risks to be taken into account when operating your solid fuel heater,
whatever the brand. These risks may be minimised if the instructions and recommendations
provided in this manual, are followed.
Next you will find a series of standards and recommendations, although we especially
advise you to use your good common sense:
1. - Do not heat your heater excessively nor for a long time.
2. - Keep any combustible material (furniture, curtains, clothing, etc.) at a minimum safety
distance of 0.90 m
3. - The ashes must be emptied into a metal container and immediately removed from
the house.
4. - Never use combustible liquids to light your heater. Keep any type of inflammable
liquid (Gasoline, petrol, alcohol, etc.) at a distance.
5. - Make periodic inspections of the chimney and clean it whenever necessary
13. - Do not situate the heater near combustible walls.
Warning
Gas, wood or pellet fireplaces heat up when lit. As a result it is necessary to be cautious
and keep a certain distance away, especially children, old people, people with special
needs and pets while the fire is on.
Make sure that children and anyone else not used to the workings of a fireplace, are
supervised by an older person when near.
To avoid burns and also to protect vulnerable people it is advisable to use a fireguard or
screen. The use of heat resistant gloves are recommended when in contact with the
fireplace.
2.4.2DISTANCES TO COMBUSTIBLE SURFACES
When installing a heater, take into account the necessary safety distances, not only from
the heater but also the chimney, to the combustible surfaces (wooden or papered walls, wooden
floor, etc)
If there is adequate protection on these surfaces, these distances may be reduced (Fig.21).These same distances must be respected when the walls or nearby area coverings are
susceptible of deteriorating or deforming due to the temperature effect (varnishes, paints,
P.V.C., etc.)
CRAFTSBURY HEATER
DISTANCES TO COMBUSTIBLE
SURFACES
Fig. 21
P
ARALLEL WALLS
O
BLIQUE WALLS
2.5- DRAUGHT PROBLEMS.
Next you will find a list of the problems that are common to any type of heater. All these
problems are correctable and at times only require small adjustments for the heater to continue
its normal operating
Do remember that the weather affects the heater operating.
Should your heater have smoke escapes to the inside of the house, most probably what
is happening is the following:
-If your chimney is newly built:
a) That the draught is not sufficient.
b) That the section or height is not the adequate.
c) That there may be a bottleneck in a sector of the whole set.
-If it is an existing chimney:
a) That the chimney is partially blocked up by soot.
b) That there may be some internal or external breakage where it takes air in.
c) That it may have less section or height than required by the new appliance.
Next you will find a guide that will help you solve problems on your heater:
2.5.1- PROBLEM SOLVING GUIDE
PROBLEM
The heater lets off
smoke
POSSIBLE CAUSE
Inadequate heater
handling
Cold chimney
Blocked up chimney
Over-dimensioned
chimney
Narrow chimney
Too shorter chimney
Chimney with infiltrations
More than one appliance
connected to the chimney
AIR BOUNCE
BACKS OR GAS
EXPLOSIONS
Inadequate heater
handling
Extremely low
combustion level
Excessive ash
accumulation
UNCONTROLLED
OR LOW
COMBUSTION
Badly sealed or open door
Excessive draught
Deteriorated sealing
refractory filler
Excessively long chimney
Over-dimensioned
chimney
Strong winds
Excessive draught
INSUFFICIENT
HEAT
DAMAGE TO THE
ENAMEL
Poor quality or green
wood.
Low combustion level
Air filtrations in the
chimney
Cold chimney outer part.
Chimney or connection
tube ooze.
Too much heat lost in the
house
Inadequate heater
handling
Excessive draught
SOLUTIONS
Fully open the primary air for a minute. Then open the door...
Pre-heat the chimney when you light the cold heater.
Inspect the chimney and connector to check if it is blocked up
or it has an excessive accumulation of creosote .
Re-install the chimney with the appropriate diameter
Install an induced draught, or replace the chimney.
Lengthen the chimney.
Seal the connections between the chimney sections and dirty
door openings.
Disconnect the rest of the appliances and seal the entrances.
Fully open the heater’s primary air control for a minute before
opening the door and keep it completely open for some
minutes after reloading the fuel.
Use your heater with the appropriate combustion level.
Empty the ash pan more frequently.
Close the door well or change the sealing cords.
Check the installation. Obtain a low combustion level or
install a draught cutting valve.
Reseal the heater with refractory cement
Shorten your chimney or install a draught cutting valve.
Re-install the chimney with the appropriate diameter.
Install a cowl.
Draught with an excess of 2.5 mm. c.a. may be corrected by
installing a draught cutting valve.
Use only wood dried in the open air, preferably dried for at
least a year.
Make your chimney work with a higher level.
Change to an insulated system pre-fabricated chimney or a
chimney with appropriate brickwork measurements.
Re-install or insulate your chimney.
Check the installation.
Seal windows, seal house openings.
Do not make excessive fire in your heater. Control your
heater’s temperature. Use only appropriate wood.
Check the draught. You may need a draught cutting valve.
Make your heater work at a low combustion level.
/
2.6- TECHNICAL DATA
HERGÓM mod. Craftsbury heater specifications
Maximum Power
WOOD (Type oak, beech…)
Admits logs of wood of length:
Front Door
Height
Width
Smoke Adjusting Ring
Metal Chimney
Recommended Chimney height
Brickwork Chimney. Estimated minimum measurements.............
Smoke exit .........................................................
Primary Air Control ...........................................
Secondary Air Supply ...............................
Weight ..........................................................................
11,5 Kw
450 mm.
350 mm.
430 mm.
150 mm. φ Int.
150 mm. φ Int.
5 a 6 metres
175 x 175
Horizontal/Vertical
Manual regulation
Venturi System
130 Kg.
720
630
220
350
660
580
710
(*) Estimated value. This information may vary subject to the specific characteristics of each installation and the
quality of the fuel used.
(**)For other heights contact the Supplier or Manufacturer (Estimate values.)
540
440
340
430
330
530
Ø150
Fig. 22
570
INDUSTRIAS HERGÓM, S.A., does not accept responsibility for damages occurred, originated by alternations in their
products that were not authorised in writing, nor for defective installations.
Likewise, it reserves the right to modify their manufactured goods with no prior notice.
The responsibility due to manufacturing vice will be submitted to the criteria and verification of its technicians, being in any case
limited to the repair or replacement of its manufactured goods, excluding the works and damages that such repair may cause.
.
2.7- HEATER COMPONENTS
1 2 3 4
5
43
6
42
7
41
8
9
10
11
12
13
14
40
15
16
39
38
17
37
36
18
35
34
33
19
20 21 22
23
24
25 26
27 28 29
30
31
32
Fig. 23
ORDER
Code
Name
1
HF00629 CRAFT-TOP
2
J12
3
CL00588 CRAFT-ROOF PROTECTOR
4
CL00585 CRAFT-DEFLECTOR PROTECTOR FRONT SUPPORT
5
J00138
6
CL00589 CRAFT-SECONDARY TUBE 1
7
CL00590 CRAFT-SECONDARY TUBE 2
8
CL00591 SECONDARY TUBE 3
9
HF00623 LOWER SECONDARY COLLECTOR
10
HF00625 RIGHT/LEFT SIDE
11
HF00627 LEFT INNER SIDE
12
HF00636 SECONDARY NOZZLE
13
Q00267
BRICK 206X146X30
14
J00104
REFACTORY BRICK 4 X 9 IN
15
HF00633 CRAFT-TOP GRILL
16
HF00622 CRAFT-PRIMARY COLLECTOR
17
HF00631 CRAFT-FRONT
18
Q00231
CRAFT-HEARTH DOOR GLASS
19
Q00233
CRAFTSBURY-ASH PAN WOODEN HANDLE
20
Q00270
CRAFT- HEARTH DOOR CLOSING ELBOW (5010-081)
21
Q00271
CRAF- FRONT DOOR CLOSING AXIS 5390-050
22
HF00634 CRAFT-HEARTH DOOR
23
J38
NHC BRAIDED CERAMIC FIBRE 3/8"AVERAGE DENSITY
24
J14
NHC BRAIDED CERAMIC FIBRE 1/4"
25
CL00427 NEW HERIT 1-GLASS STAINLESS ST. CRAMP
26
HF00620 CRAFT_TRAY
27
CL00587 CRAFT-ASH PAN CONTROL CLOSING CONTROL ROD
28
CL00593 CRAFT-ASH PAN CONTROL LEFT LATCH
29
CL00586 CRAFT-ASH PAN CONTROL LATCH SHEET STOPPER
30
HF00635 CRAFT-ASH PAN DOOR
31
CL00583 CRAFT-ASH PAN CONTROL RIGHT LATCH
32
J12
33
CL00582 CRAFT-ASH PAN
34
HF00621 CRAFT-ASH PAN DRAWER
35
HF00625 RIGHT/LEFT SIDE
36
HF00626 CRAFT-INNER RIGHT SIDE
37
HF00630 CRAFT-BOTTOM
38
CL00581 CRAF-PRIMERY AIR VALVE
39
HF00632 CRAFT-BOTTOM GRILL
40
HF00637 CRAFT-BACKSIDE
41
HF00628 CRAFT-SMOKE EXIT
42
HF00624 CRAFT-TOP SECONDARY COLLECTOR
43
HF00293 SHELBURNE-BENN-SMOKE ADJUSTING RING
NHC BRAIDED CERAMIC FIBRE 1/2"
CRAFT-CERAMIC DEFLECTOR
NHC BRAIDED CERAMIC FIBRE 1/2"