1
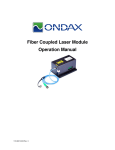
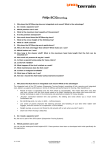
Press Fit Bottom Bracket
REAM
DEPTH
BORE
DIAMETER
Relevant Press Fit
Bottom Bracket
Measurements
SHELL WIDTH
PF24
PF30
Shell Width
Press Fit Bottom Bracket Specifications
Bore Diameter (ø mm)
Min. Ream Depth
Spindle Type
68mm
13.0mm
30mm MTB/ROAD
73mm
13.0mm
30mm MTB
86.5mm
10.0mm
24mm ROAD
10.0mm
24mm MTB
10.0mm
24mm MTB
46.00 (+0.00/-0.05)
89.5mm*
41.00 (+0.00/-0.05)
92.0mm
Weight
Weight Ceramic
101.5g
97.4g
92.5g
88.8g
* Requires 2.5mm spacer included with Press Fit 24mm Bottom Bracket
24mm and 30mm Press Fit Spindle BB Assembly
BB
bearing
spindle
sleeve
BB cup
assembly
Center
sleeve
Bicycle frame
and bottom
bracket shell
BB cup
assembly
BB
bearing
spindle
sleeve
Congratulations! Since 1976, Chris King has been supplying cyclists with the best made, most reliable components in the market. With proper installation and maintenance, you can expect to enjoy many years of exceptional performance
from the legendary quality that is built into each and every component we make.
Press Fit 24 & Press Fit 30 Bottom Bracket Installation
Bottom Bracket (BB) installation requires specialized tools. We recommend that a qualified professional bicycle mechanic perform the procedure. To ensure proper installation, when applicable, the use of high quality reaming and facing
tooling is strongly recommended.
Preparation of Bottom Bracket Shell
Proper preparation of the BB shell is required for best BB performance, durability, longevity and reduces the possibility of installation problems. The bottom bracket shell must measure to the exact specifications indicated in the Press Fit
Bottom Bracket Specifications Table.
FOR CARBON FIBER FRAMES PLEASE CHECK WITH MANUFACTURER REGARDING FRAME PREPARATION.
1. Every bottom bracket shell should be reamed and faced, even if the frame is new and appears to have been prepped by the factory.
2. Ream and face the BB shell to ensure that the bore is sized correctly and is concentric.
3. Face the BB shell to ensure that the ends are square and parallel to each other. Be sure to remove all frame paint from BB shell/BB cup interface.
4. Using a small file, deburring tool, or sand paper carefully remove any sharp edges or burrs from the BB shell edges.
5. Clean BB shell surfaces to remove any chips, shavings, and/or cutting oil.
Installation of Bearing Cups
1.
2.
3.
Apply a generous coating of anti-seize to the inside of the BB shell on the bicycle frame. Use Zinc or Copper based anti-seize when installing onto a titanium frame.
Make sure that the one side of the center sleeve is pressed into either BB cup, be sure to seat the O-ring on the outer edge of the BB cup.
Before pressing the cups into the frame, remove both spindle sleeves (black plastic pieces) from the inner diameter of both bottom bracket bearings by hand. If not removable by hand, carefully insert the tip of a small screwdriver or
penknife under outer flange of BB bearing spindle sleeve and gently pry it out of the bearing using alternating prying locations.
Press Fit BB Installation
1.
2.
3.
Using a headset press such as Park Tool HHP-2 or similar with Chris King cup adapters (1” for Press Fit 24 and 1-1/4” for Press Fit 30), press one cup in at a time, this prevents cups from misaligning during installation (we recommend
that the first cup being pressed be the one with center sleeve attached).
Once one cup is secure continue by pressing the second cup into the other side, while the cup adapter is still in place on the stationary cup.
Wipe off any excess anti-seize that may have purged during pressing, and reinstall the spindle sleeves.
Crank Installation
Follow crank arm manufacturer’s instructions to determine spacer orientation. Proper spacer configuration is essential for correct bearing preload, chain line and crank arm positioning. Chris King Press Fit 24mm BB’s are designed to work
directly with 24mm spindle crank systems. Chris King Press Fit 30mm BB’s are designed to work directly with 30mm spindle crank systems.
Some bottom bracket and crank set configurations require the appropriate conversion kit in order to be compatible with Chris King Press Fit systems. Please refer to www.chrisking.com/bbconversionkits to determine if your system requires
an additional conversion kit for proper installation. Additional conversion kits are available through any authorized Chris King dealer, or directly from Chris King.
Tech note: If your bicycle has a 89.5mm BB shell we have included a 2.5mm spacer with each Press Fit 24mm BB to ensure proper fit. Install the 2.5mm at the outside position on the driveside of the crank spindle.
1. Clean crank spindle and apply a thin layer of grease to spindle surface.
2. Spindle should be inserted into BB using only hand pressure. Use of excessive force may cause bearing to separate. If fitting issues are encountered, contact Chris King Customer Service for assistance at [email protected] or call
800-523-6008.
3. Before passing spindle through second BB bearing, be sure spindle is properly aligned with BB bearing spindle sleeve. Follow crank arm manufacturer’s installation instructions to properly install crank assembly and achieve optimal
BB bearing preload.
4. Check for bearing play by pushing/pulling the crank arm toward/away from the frame. To eliminate bearing play, confirm proper spacer orientation and readjust bearing preload.
Tech note: three white plastic spindle spacers have been included to fine tune the bearing preload on your Press Fit 24mm BBs, Press Fit 30mm crank systems do not require the use of these spacers. They each have a thickness
of .33 mm. These spacers are only required when fine tuning of the BB bearing preload is necessary. Additional spacer kits are available through any authorized Chris King dealer, or directly from Chris King Precision Components.
5. Periodically check adjustment during the first 100 hours of use. Keeping optimal preload on BB bearings will help maximize their longevity. DO NOT RIDE LOOSE.
Bottom Bracket Maintenance
Chris King bearings are designed to provide the maximum life of any bottom bracket with a minimum of maintenance. Besides an occasional bearing preload adjustment, the only service necessary is an occasional cleaning and re-greasing
of the bearings. Riding conditions will dictate how often you will neeed to service your BB. In wet conditions, service may be necessary as often as every 3 months; in dry conditions, up to every 6 months. See the Bottom Bracket Grease
Guide on our website at chrisking.com/tech for lubrication and maintenance interval details.
Service of Bearings
The BB bearings can be serviced by two different methods. When rotating the inner bearing race, if resistance or drag is detected but the bearing is feels smooth, a re-lubrication is due. Proceed to BB Bearing Re-lubrication with Chris
King BB Injector Tool section, below. If a Chris King BB Injector Tool is not available, proceed to BB Bearing Cleaning and Re-lubrication section. If the bearing feels gritty, contaminated, or if significant resistance is detected, then it is
necessary to fully clean and re-lubricate the bearing. Proceed to BB Bearing Cleaning and Re-lubrication section. All BB bearing service can be performed with the BB mounted to the bicycle frame.
Bottom Bracket Bearing Re-lubrication with Chris King BB Injector Tool
The BB bearing can be easily flushed with new grease using the Chris King BB Injector Tool. Chris King Press Fit 24 bottom brackets utilize our 24mm Injector Tool while our Press Fit 30 bottom brackets require our 30mm Injector Tool.
This service should be performed periodically.
1. Remove crank set assembly and spindle from BB according to crank set manufacturer’s instruction.
2. Remove BB bearing spindle sleeves from the inner diameter of both bottom bracket bearings by hand. If not removable by hand, carefully insert the tip of a small screwdriver or penknife
under outer flange of BB bearing spindle sleeve and gently pry it out of the bearing using alternating prying locations.
3. Insert BB Injector Tool into bearing.
4. Attach grease gun tip to grease fitting on BB Injector Tool.
5. While continuously pressing the BB Injector Tool into the bearing to form a seal, slowly pump small amounts of synthetic waterproof grease into the bearing. Between pumps, turn the
bearing by rotating the Injector Tool back and forth. This motion allows the new grease to be evenly distributed within the bearing, and completely purges the old grease and contaminants
through the front seal. This motion also helps prevent the black rubber seal from accidentally dislodging. If the seal dislodges, remove the bearing snap ring and then follow steps 8 and
9 in the BB Bearing Cleaning and Re-lubrication section.
6. Wipe purged grease from bearing surface.
7. Reinstall bearing spindle sleeve by pressing the sleeve back into bearing’s inner race by hand.
BB Bearing Cleaning and Re-lubrication
1.
Chris King BB Injector Tool
Remove crank set assembly and spindle from BB according to crank set manufacturer’s instruction.
2.
Remove BB bearing spindle sleeves from the inner diameter of both bottom bracket bearings by hand. If not removable by hand, carefully insert the tip of a small screwdriver or penknife under outer flange of BB bearing spindle sleeve
and gently pry it out of the bearing using alternating prying locations.
3. Carefully, using a small screwdriver, pick, or penknife, remove the snap ring by inserting tool into split of snap ring. Gently work one end of the snap ring toward bearing center until it is out of its groove. Follow the ring around with the
tool until the snap ring is completely dislodged.
4. Lift and remove exposed rubber seal to access the interior of the bearing.
5. Thoroughly flush the bearing with a light spray lubricant (e.g., WD-40™) and blow dry with compressed air.
Some solvents, synthetic lubricants, and greases with high-pressure additives may attack and damage seals and other nonmetallic materials. Minimize exposure to these substances and thoroughly dry bearing assembly after cleaning.
Do not use citrus-based cleaners.
If a Chris King BB Injector Tool is available proceed to BB Bearing Re-lubrication with Chris King BB Injector Tool section and follow steps 3 through 6, then proceed to step 7, below. If an injection tool is not available, proceed to step 6.
6. For BBs with stainless steel ball bearings, apply a bead (approx. .3ml) of waterproof synthetic grease around the top of the bearing. For BBs with ceramic ball bearings, apply enough grease to lightly coat the balls inside the bearing,
using approximately .1ml (a pea-sized amount) of waterproof synthetic lightweight grease. This can be accomplished by applying a light a bead of grease 1/8 to 1/4 of the way around the bearing. Rotate the inner race to work grease
throughout the ball area. See the Bottom Bracket Grease Guide at chrisking.com/tech for details.
7. Wipe dirt and other contaminants from the seals and snap rings. Used snap rings and seals can be reinstalled unless warped, punctured, or otherwise damaged. If damaged, replacement seals and snap-rings are available through
any authorized Chris King dealer or directly from Chris King, at www.chrisking.com/store.
8. Replace rubber seal between inner and outer bearing race.
9. Insert one edge of snap ring into groove of outer bearing race. Press along entire groove until snap ring is fully seated; a small gap should be visible between both ends of the snap ring.
10. Turn inner race of bearing by hand to test for binding. If bearings do not run smooth, repeat steps 3-9. Binding is often a result of improperly seated seals and/or snap rings.
11. Reinstall bearing spindle sleeve by pressing the sleeve back into the bearing’s inner race by hand.
12. Reinstall crank set according to crank set manufacturer’s instructions.
Questions? Please e-mail us at [email protected] or call the Customer Service at 800-523-6008.
Replacement parts can be purchased through any authorized Chris King dealer, or directly from Chris King. Common spare parts are available online at www.chrisking.com/store.
Warranty
Chris King Precision Components warrants its bicycle bottom brackets to be free from defects in materials or workmanship for a period of 5 years from the original date of purchase. Any Chris King product that is found by Chris King
Precision Components to be defective in materials or workmanship will be repaired or replaced at the sole discretion of Chris King Precision Components providing it is returned to the factory freight prepaid. This warranty does not cover
damage or failure resulting from misuse, abuse, alteration, neglect, normal and reasonable wear and tear, crash or impact, failure to perform routine maintenance as instructed, or use other than that for which the product was intended.
If a defect is found, our entire liability and your sole remedy shall be, at our option, free repair or replacement of the Chris King product. Chris King Precision Components shall not be held liable for any indirect, special, or consequential
damages. The warranty does not cover any Chris King Precision Components product where the serial number has been altered or removed. This written express warranty is in lieu of all other warranties, implied or expressed, and does
not cover any representation or warranty made by dealers beyond the provisions of this warranty. This warranty gives you specific legal rights, and you may also have other rights which vary state to state.
Thank you for your purchase!
Made in the USA
All Chris King Precision Components products are manufactured 100% in the USA using industry leading environmental and quality control
standards.
All trademarks, registered trademarks, and logos are of their respective holders.
© King Cycle Group, 2013. All rights reserved.
Chris King Precision Components™
2801 NW Nela Street, Portland, Oregon 97210
800.523.6008 | www.chrisking.com | [email protected]
rev. 5/13-A # 19491