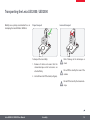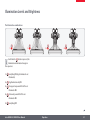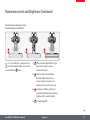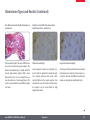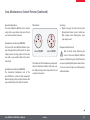
1
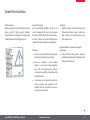
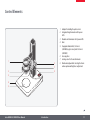
Leica LED2000 / LED2500 User Manual Contents General Instructions General Instructions Important Safety Notes Symbols Used Safety Instructions 4 5 6 7 Introduction Control Elements 11 Assembly Installation of Leica LED2000 / LED2500 Assembling the Optics Carrier 14 16 Operation Controlling the Illumination Illumination Levels and Brightness The Correct Height for the Arc Illuminator Illumination Types and Results 20 21 24 25 Leica LED2000 / LED2500 User Manual Service Care, Maintenance, Contact Persons 30 Specifications Technical Data Dimensional Drawings Leica LED2000 / LED2500 34 35 2 General Instructions Leica LED2000 / LED2500 User Manual General Instructions3 General Instructions Safety concept Before using your Leica stand for the first time, please read the “Safety Concept“ brochure included with your instrument. It contains additional information on handling and care. Use in clean rooms The Leica LED2000 / LED2500 stand can be used in cleanrooms. The user has to evaluate the final suitability within the required cleanroom class. There is no special certification for specific cleanroom categories or applications. Cleaning OO Do not use any unsuitable cleaning agents, chemicals or techniques for cleaning. Leica LED2000 / LED2500 User Manual OO Never use chemicals to clean colored surfaces or accessories with rubberized parts. This could damage the surfaces, and specimens could be contaminated by abraded particles. OO In most cases, we can provide special solutions on request. Some products can be modified, and we can offer other accessories for use in clean rooms. Servicing Repairs may only be carried out by Leica Microsystems-trained service technicians. Only original Leica Microsystems spare parts may be used. OO Responsibilities of person in charge of instrument OO Ensure that the Leica stand is operated, maintained and repaired by authorized and trained personnel only. General Instructions4 Important Safety Notes Instructions for use The Leica LED2000 / LED2500 can be configured in a variety of ways in the Leica product range. You can find information on individual system components on the interactive CD-ROM together with all relevant user manuals in additional languages. Keep it in a safe place, and readily accessible to the user. User manuals and updates are also available for you to download and print from our website www.leica-microsystems.com. This operating manual describes the special functions of the Leica LED2000 / LED2500 stand and contains important instructions for its operational safety, maintenance, and accessories. Leica LED2000 / LED2500 User Manual The “Safety Concept” booklet contains additional safety information regarding the service work, requirements and the handling of the stands, accessories and electrical accessories as well as general safety instructions. You can combine individual system articles with articles from external suppliers (e.g. cold light sources, etc.). Please read the User Manual and the safety instructions from the supplier. Before installing, operating or using the instruments, read the user manuals listed above. In particular, please follow all safety instructions. To maintain the unit in its original condition and to ensure safe operation, the user must follow the instructions and warnings contained in these user manuals. The microscope illumination is in the exempt group (risk group 0) according to EN 62471:2008 when used according to its intended use. • of the illumination equipment – either Never look directly into the LED beam with or without optical instruments – as this increases the risk class. Failure to observe this notice poses a risk of eye damage. General Instructions5 Symbols Used Warning! Safety hazard! This symbol indicates especially important information that is mandatory to read and observe. • Warning of hazardous electrical voltage This symbol indicates information that must be read and observed. Danger due to hot surface This symbol warns against touching hot surfaces, e.g. those of light bulbs. Failure to comply can cause the following: Failure to comply can cause the following: OO OO Hazards to personnel Functional disturbances or damaged instruments Leica LED2000 / LED2500 User Manual OO OO Hazards to personnel Functional disturbances or damaged instruments Important information This symbol indicates additional information or explanations that are intended to provide clarity. General Instructions6 Safety Instructions Description OO The Leica LED2000 / LED2500 stands are designed for use in Leica S-series stereomicroscopes (S4; S6; S8 Apo); M-series (M50, M60, M80) and DMS-series (DMS300, DMS1000). The integrated power LED illumination ensures optimal lighting conditions. Intended use OO Refer to “Safety Concept” booklet Non-intended use OO Refer to “Safety Concept” booklet Never use the Leica LED2000 / LED2500 stand and its components for IvD / IvF and/or medical applications, since they are not intended for these. The instruments and accessories described in this User Manual have been tested for safety and potential hazards. The responsible Leica affiliate Leica LED2000 / LED2500 User Manual must be consulted whenever the instrument is altered, modified or used in conjunction with non-Leica components that are outside of the scope of this manual! Unauthorized alterations to the instrument or noncompliant use shall void all rights to any warranty claims. OO In warm and warm-damp climatic zones, the individual components require special care in order to prevent the build-up of fungus. Responsibilities of person in charge of instrument OO Refer to “Safety Concept” booklet Ensure that: Place of use OO Refer to “Safety Concept” booklet OO OO Electrical components must be placed at least 10 cm away from the wall and from flammable substances. Avoid large temperature fluctuations, direct sunlight and vibrations. These conditions can distort measurements and micrographic images. OO The Leica LED2000 / LED2500 stand and accessories are operated, maintained and repaired by authorized and trained personnel only. OO All operators have read, understood and observe this User Manual, and particularly the safety regulations. General Instructions7 Safety Instructions (Continued) Repairs, service work OO Refer to “Safety Concept” booklet OO Only original Leica Microsystems spare parts may be used. OO Before opening the instruments, switch off the power and unplug the power cable. OO Avoid contact with powered electrical circuits, which can lead to injury. Transport OO Use the original packaging for shipping or transporting the individual modules of the Leica LED2000 / LED2500 and the accessory components. OO In order to prevent damage from vibrations, disassemble all moving parts that (according to the user manual) can be assembled and disassembled by the customer and pack them separately. Leica LED2000 / LED2500 User Manual Integration in third-party products Siehe Booklet “Sicherheitskonzept” OO Optimal arrangement of workplace, work assignments and work flow (changing tasks frequently). OO Thorough training of the personnel, giving consideration to ergonomic and organizational aspects. OO Disposal OO Refer to “Safety Concept” booklet” Legal regulations OO Refer to “Safety Concept” booklet” EC Declaration of Conformity OO Refer to “Safety Concept” booklet” The ergonomic design of the Leica LED2000 / LED2500 aims to limit the strain on the user to the lowest possible level. Health risks Workplaces with microscopes facilitate and improve the viewing task, but they also impose high demands on the eyes and holding muscles of the user. Depending on the duration of uninterrupted work, asthenopia and musculoskeletal problems may occur. For this reason, appropriate measures for reduction of the workload must be taken: General Instructions8 Safety Instructions (Continued) Technical safety To connect the Leica LED2000 / LED2500 to power, use a power cable that meets the power cable specifications in your country. The power socket used has to be equipped with a 16 A or 10 A fuse. Only connect the instrument to a grounded power socket that has been installed according to regulations. The power supply voltage has to correspond to the voltage specified on the identification label. Make sure that the ground connection is neither defective nor interrupted, since otherwise a malfunction poses a risk of fatal injury. Never unplug the power plug with moist or wet hands. There is danger of an electric shock. Leica LED2000 / LED2500 User Manual General Instructions9 Introduction Leica LED2000 / LED2500 User Manual Introduction10 Control Elements 1 2 3 6 7 8 1 Adapter for holding the optics carrier 2 Integrated ring illuminator with 4 power LEDs 3 Movable arc illuminator with 3 power LEDs 4Base 5 Stage plate black/white; 120 mm ∅ (LED2000) or glass insert plate 120 mm ∅ (LED2500) 6 Focusing drive 7 Locking screw for the arc illuminator 8 Membrane keyboard for selecting the illumination option and brightness adjustment 4 5 Leica LED2000 / LED2500 User Manual Introduction11 Control Elements (Continued) Rear side of the Leica LED2000/ LED2500 1 2 3 1 5 V / 500 mA USB port (e.g. for supplying power to a Leica DMS300 / DMS1000) 2 Power socket 3 Power switch • ing to a computer or other computer The USB port is not suitable for connect- systems. Since the USB output has a voltage of 5 V, there is a danger of damage being incurred from improper use. Leica LED2000 / LED2500 User Manual Introduction12 Assembly Leica LED2000 / LED2500 User Manual Assembly13 Installation of Leica LED2000 / LED2500 Unpacking the base The stand is supplied completely assembled. Connecting to AC power • ciently large, level, non-slip surface. Unpack the instruments on a suffi3 1 2 1. Ensure that the power switch on the base is set to “0”. 2. Insert the power cable into its socket and connect it to a grounded power outlet. 3. Switch the Leica LED2000 / LED2500 on using the main switch on the rear side of the base. Leica LED2000 / LED2500 User Manual Assembly14 Installation of Leica LED2000 / LED2500 (Continued) Inserting the stage plate or glass insert plate The Leica LED2000 is supplied with a stage plate (black/white, 120 mm ∅). It may be used with the black or white side facing up, depending on the required contrast. For the Leica LED2500, please use the provided glass insert plate. 1 1 2 Insert the stage plate by gently pressing against the tension spring. Leica LED2000 / LED2500 User Manual 2 Remove the stage plate by gently pressing on the rear part. Assembly15 Assembling the Optics Carrier Adapter position on the LED2000 / LED2500 1 Installing an optics carrier on the Leica LED2000 / LED2500 stand requires that an adapter be installed at a different height, depending on the specific optics carrier. The marking has to be on the top of the carrier if the carrier is required. Leica LED2000 / LED2500 User Manual 2 3 1. For Leica S4 / S6 and Leica M80 instruments, the adapter is fastened in the lower position. 2. For Leica S8 APO instruments, the adapter is fastened in the upper position. 3. For Leica M50 / M60 and Leica DMS300 / DMS1000 instruments, the Leica LED2000 / LED2500 is used without an adapter. Assembly16 Regulating the Resistance of the Focusing Drive Safety when focusing When using the focusing drive, do not insert objects or fingers between the optics carrier and stand. Failure to observe this point can result in damage or injury. The focusing drive is used to set the sharpness by regulating the working distance between the microscope and the product. You can find an overview of the various objectives and their working distances in the Technical Data for the applicable microscopes. Is the focus movement too loose or too tight? Does the outfit tend to slide downwards? No problem – the resistance can be adjusted to suit the weight of your equipment and personal preferences: Leica LED2000 / LED2500 User Manual 1 1 1. Grasp the drive knobs with both hands and turn them towards each other until the desired resistance is reached for focusing. Assembly17 Transporting the Leica LED2000 / LED2500 Mobility was a primary consideration for us in developing the Leica LED2000 / LED2500. Incorrect transport Proper transport To transport the stand safely: 1. Remove all cables and ensure that the stereomicroscope and all accessories are attached firmly. 2. Use both hands to lift the stand (see figure). Leica LED2000 / LED2500 User Manual Risk of damage to the microscope or stand. Do not lift the stand by the cover of the column. Do not lift the stand by the stereomicroscope. Assembly18 Operation Leica LED2000 / LED2500 User Manual Operation19 Controlling the Illumination Via the power LEDs The Leica LED2000 and LED2500 stands feature power LEDs. The high-performance LEDs provide uniform illumination at a daylight-like light temperature. At the same time, they use considerably less power and generate considerably less warmth than conventional illumination systems. The Leica LED2000 uses power LEDs in the ring and arc illuminators. They also provide transmitted illumination in the base of the Leica LED2500. Switching the illumination on and selecting the illumination type 1. Turn on the power switch on the rear of the Leica LED2000 / LED2500. The microscope illumination is in the exempt group (risk group 0) according to EN 62471:2008 when used according to its intended use. 2. Press the button to switch on the illumination. • of the illumination equipment – either 3. Continue pressing the button to cycle through the various illumination combinations. Never look directly into the LED beam with or without optical instruments – as this increases the risk class. Failure to observe this notice poses a risk of eye damage. 4. Press the and buttons to adjust the illumination intensity in 10 steps. To switch the illumination off completely, press the button or use the power switch. The Leica LED2000 / LED2500 remembers the last illumination combination, restoring it the next time you switch the instrument on. Leica LED2000 / LED2500 User Manual Operation20 Illumination Levels and Brightness The illumination combinations 1x 2x 3x 4x Each time the button is pressed, the illumination combination changes in this sequence: 1x everything ON (ring illuminator & arc illuminator) 2x ring illuminator only ON 3x the upper two power LEDs of the arc illuminator ON 4x the lowest power LED of the arc illuminator ON 5x everything OFF Leica LED2000 / LED2500 User Manual Operation21 Illumination Levels and Brightness (Continued) Special features of the Leica LED2500 The brightness of the transmitted light unit cannot be adjusted separately – it is set together with the arc illumination and the ring light. There are three scenarios for transmitted light from the Leica LED2500: 1. A diffuse variant of the transmitted light illumination for generating a large area of uniform transmitted light. This enables effective illumination of large samples that already have a high contrast. 2. Centrally directed transmitted light illumination, which generates a defined contrast. The illumination function is particularly recommended if the sample has low intrinsic contrast. The contrast and brightness in the outer area of the illumination decrease along with this. 3. All LEDs are switched on. This generates the maximum brightness of the transmitted light illumination. Leica LED2000 / LED2500 User Manual Operation22 Illumination Levels and Brightness (Continued) The illumination combinations of the transmitted light unit (LED2500) 1x 2x The Leica LED2500 is equipped with a transmitted-light unit that can be turned on and off with the button. Leica LED2000 / LED2500 User Manual 3x 1x diffuse transmitted light ON (for a large, high-contrast samples requiring uniform illumination) 2x directed, central transmitted light illumination ON (suitable for lowcontrast samples; the contrast and brightness decrease in the outer area) 3x combination of diffuse and directed transmitted light illumination (maximum brightness of the transmitted light) 4x transmitted light OFF Operation23 The Correct Height for the Arc Illuminator Adjusting the arc illuminator Depending on the situation, it is advisable to adjust the height of the arc illumination. To do so, first focus the sample and then optimize the height of the arc illumination until the corresponding result is attained. 1 2 3 The height of the arc illuminator can be adjusted independently of the focus to ensure the best possible illumination for your requirements. 1. Loosen the screw of the arc illuminator so that the illuminator is free to move. 2. Move the arc illumination up and check the result through the eyepiece of the stereomicroscope. 3. Retighten the screw. Leica LED2000 / LED2500 User Manual Operation24 Illumination Types and Results Take advantage of the options! The combination of ring light, arc illumination and transmitted light illumination (only Leica LED2500) provides you with a broad range of different illuminations. Take advantage of this flexibility to provide the best possible illumination for your specimens. You will be surprised at how you can improve your results. We would like to use a few examples to inspire you to find the best kind of illumination for your specific requirements through testing. Depending on the application and specimen, each of the four illumination types provides new information. As there is no such thing as an „ideal illumination setting“, we recommend cycling through the sequences until you find the setting best suited to your specimen. Use the buttons of the Leica LED2000 and LED2500 to change the illumination scenarios and to adjust the brightness. Feel free to experiment – it‘s worth it! Leica LED2000 Leica LED2000 / LED2500 User Manual Leica LED2500 Operation25 Illumination Types and Results (Continued) All power LEDs are on Ring illuminator on This setting achieves the greatest brightness, while the effects of highlights and shadows are reduced by the dominant ring illuminator. This setting is ideal for observing dark, flat, nonreflective specimens. This illumination type results in very bright, homogeneous lighting virtually without shadows. The ring illuminator is often used when observing specimens with strongly fissured or porous surfaces. Leica LED2000 / LED2500 User Manual Operation26 Illumination Types and Results (Continued) Only the upper two power LEDs of the arc illuminator are on Only the lowest power LED of the arc illuminator is on The resulting side light results in images with pronounced light/shadow effects not unlike those of a swan-neck light guide. Scratches and other recesses become easier to identify. This illumination results in a pseudo-darkfield effect. The image becomes darker and exhibits extreme contrasts. The 3D effect of flat specimens is enhanced. Dirt and dust particles become very easy to identify. Leica LED2000 / LED2500 User Manual Operation27 Illumination Types and Results (Continued) The diffuse transmitted light illumination is switched on Only the central LED of the transmitted light illumination is switched on The transmitted light of the Leica LED2500 can be used to examine transparent samples. The uniform transmitted light is ideally suited for colored, high-contrast samples. With a large diameter of 60 mm, it is also suitable for overview observations at low magnifications. The results can be optimized using different brightness levels. diffuse transmitted light only directed transmitted light Semi-transparent samples are optimally contrasted with the optimized transmitted light. The centrally positioned LED, which emits directed light onto the sample, enables clear visualization even of structures that have very low contrast. Can be used ideally for high magnification levels. The images clarify how the directed transmitted light improves the contrast of the sample. As a result, the structures and differences within the sample are brought out significantly better. Leica LED2000 / LED2500 User Manual Operation28 Service Leica LED2000 / LED2500 User Manual Service29 Care, Maintenance, Contact Persons General We hope you enjoy using your Leica LED2000 / LED2500. Leica stands are renowned for their robustness and long service life. Observing the following care and cleaning tips will ensure that even after years and decades, your Leica stand will continue to work as well as it did on the very first day. Leica LED2000 / LED2500 User Manual Warranty benefits The guarantee covers all faults in materials and manufacture. It does not, however, cover damage resulting from careless or improper handling. Contact address If your instrument no longer works perfectly, contact your Leica Microsystems representative. You can find information on worldwide Leica representatives on the Leica Microsystems website: www.leica-microsystems.com. Service30 Care, Maintenance, Contact Persons (Continued) Care OO Keeping all optical components clean is important for maintaining good optical performance. OO OO OO If any optical surface becomes badly coated with dust or dirt, flush the surface using a syringe or by brushing it off with a camel hair brush before attempting to wipe it clean. Optical surfaces should be cleaned using a lint-free cloth, lens cloth or cotton swab soaked in ethanol or a commercially available glass cleaner. Do not use alcohol. OO OO Protect your stand from moisture, fumes and acids and from alkaline, caustic and corrosive materials and keep chemicals away from the instruments. Plugs, optical systems and mechanical parts must not be disassembled or replaced, unless doing so is specifically permitted and described in this manual. OO Protect your stand from oil and grease. OO Do not grease guide surfaces or mechanical parts. Protection from dirt Dust and dirt will affect the quality of your results. OO Put an optionally available dust cover over the stand when it will not be used for a long time. OO Keep accessories in a dust-free place when not in use. Avoid excessive use of solvents. The lint-free cloth, lens cloth or cotton swab should be soaked with solvent, but not so wet that solvent runs over the lens. Leica LED2000 / LED2500 User Manual Service31 Care, Maintenance, Contact Persons (Continued) General information The Leica LED2000 / LED2500 can be cleaned easily with a soap solution and water. Do not use caustic or abrasive c leansers. Special notes on the Leica LED2000 The base of the Leica LED2000 features openings through which spilled liquids can drain. Simply remove the stage plate and clean the base with a soap solution. Wipe it dry with a clean cloth. Special notes on the Leica LED2500 The transmitted illumination unit of the Leica LED2500 is sealed and thus waterproof. Remove the glass plate and clean the base with soap solution. Wipe it dry with a clean cloth. Leica LED2000 / LED2500 User Manual Servicing OO Repairs may only be carried out by Leica Microsystems-trained service technicians. Only original Leica Microsystems spare parts may be used. The buttons Danger of electric shock Leica LED2000 Leica LED2500 Risk of electric shock. Removing the cover of the Leica LED2000 / LED2500 exposes electrically live parts, which, if touched, The buttons of the illumination are waterproof. Clean the membrane switches with soap solution. Wipe then dry with a clean cloth. Do not use abrasive cleansers! can cause potentially fatal injuries. Have technical service carried out by a Leica Microsystems authorized dealer. Service32 Specifications Leica LED2000 / LED2500 User Manual Specifications33 Technical Data Leica LED2000 / LED2500 Light sources Illumination Integrated power supply Power LEDs, 1.2 Watt (4 LEDs for the ring illuminator, 3 for the arc illuminator) Incident light (4-point ring illumination) Oblique light (3-point arc illumination) 4 switchable scenarios Transmitted light (5 LEDs with central LED for high contrast) 3 switchable scenarios Average LED life approx. 25 000 hours Color temperature 6 100 K (Incident light) 5 800 K (Transmitted light LED2500 only) Cooling Thermo-management for the LEDs, silent and vibration-free Illumination control Incident light and transmitted light can be controlled separately Intensity setting 10 steps Leica LED2000 / LED2500 User Manual 100 V – 240 V ~ 50 / 60 Hz Automatic adjustment to local voltage Power consumption max. 30 W USB port * +5 V / 500 mA Standards compliance CE, cUL, UL ESD design antistatic * No data transfer or control is possible NOT suitable for connecting to a computer Specifications34 Dimensional Drawings Leica LED2000 / LED2500 103.3 25 89.6 29.45 42 178.5 26.5 MAX: 124.3 MIN: 170.6 358.5 132.5 35 MAX: 301.6 MIN: 174.6 46 230.5 150 60 257.1 330.6 Dimensions in mm Leica LED2000 / LED2500 User Manual Specifications35 The statement by Ernst Leitz in 1907, “With the User, For the User,” describes the fruitful collaboration with end users and driving force of innovation at Leica Microsystems. We have developed five brand values to live up to this tradition: Pioneering, High-end Quality, Team Spirit, Dedication to Science, and Continuous Improvement. For us, living up to these values means: Living up to Life. INDUSTRY DIVISION The Leica Microsystems Industry Division’s focus is to support c ustomers’ pursuit of the highest quality end result. Leica Microsystems provide the best and most innovative imaging systems to see, measure, and analyze the microstructures in routine and research industrial applications, materials science, quality control, forensic science investigation, and educational applications. Leica Microsystems – an international company with an experienced worldwide customer service network. Active worldwide Tel. Fax Australia ∙ North Ryde +61 2 8870 3500 2 9878 1055 Austria ∙ Vienna +43 1 486 80 50 0 1 486 80 50 30 Belgium ∙ Diegem +32 2 790 98 50 2 790 98 68 800 248 0123 847 405 0164 Canada ∙ Concord/Ontario +1 Denmark ∙ Ballerup +45 4454 0101 4454 0111 France ∙ Nanterre Cedex +33 811 000 664 1 56 05 23 23 Germany ∙ Wetzlar +49 64 41 29 40 00 64 41 29 41 55 Italy ∙ Milan +39 02 574 861 02 574 03392 Japan ∙ Tokyo +81 3 5421 2800 3 5421 2896 Korea ∙ Seoul +82 2 514 65 43 2 514 65 48 Netherlands ∙ Rijswijk +31 70 4132 100 70 4132 109 +852 2564 6699 2564 4163 People’s Rep. of China ∙ Hong Kong ∙ Shanghai 21 6039 6000 21 6387 6698 Portugal ∙ Lisbon +351 21 388 9112 21 385 4668 Singapore +65 6779 7823 6773 0628 Spain ∙ Barcelona +34 93 494 95 30 93 494 95 32 Sweden ∙ Kista +46 8 625 45 45 8 625 45 10 Switzerland ∙ Heerbrugg +41 71 726 34 34 71 726 34 44 United Kingdom ∙ Milton Keynes +44 800 298 2344 1908 246312 +1 800 248 0123 847 405 0164 USA ∙ Buffalo Grove/lllinois +86 10IDS12060EN ∙ Copyright © by Leica Microsystems (Schweiz) AG, CH-9435 Heerbrugg, 2014. Subject to change. LEICA and the Leica Logo are registered trademarks of Leica Microsystems IR GmbH. www.leica-microsystems.com