1
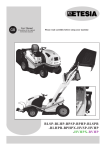
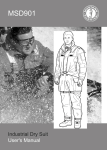
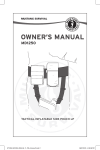
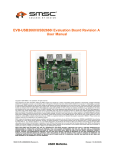
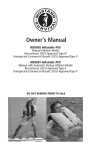
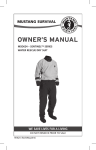
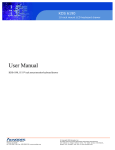
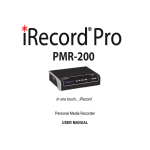
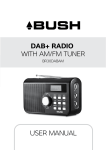
Owner’s Manual
RESCUE STICKTM MRD100
THROWABLE EMERGENCY RESCUE INFLATABLE
READ AND UNDERSTAND OWNER'S MANUAL BEFORE USING THIS DEVICE
Failure to follow user Instructions could result in death or serious injury.
Refer to them frequently for continuing safe operation and to instruct other users.
If you pass this device to someone; include these instructions as well.
US Patents 7,004,807 and 7,128, 629
CONTENTS
Page i Symbols
1 Introduction
1 General Safety Rules
2 Specific Safety Rules
2 Inspection, Storage and Maintenance
3 Storage
3 Operation
4 Re-arming and Repacking
4 Drying and Deflating
5 Disassembly
6 Re-arming
7 Repacking
8 Training
9 Service
9 Limited Warranty
SYMBOLS
Symbol
Signal
Meaning
WARNING:
Indicates a potentially hazardous situation, which, if not
avoided, could result in death or serious injury.
CAUTION:
Indicates a potentially hazardous situation, which, if not
avoided, could result in minor or moderate injury.
FIGURE 1
Indicates that failure to read and understand the user manual
READ AND
UNDERSTAND could result in death or serious injury.
INSTRUCTION
MANUAL:
WARNING:
Indicates a potentially hazardous situation, which, if not
avoided, could result in death or serious injury. CO2 cylinders
are under extreme pressure. Use caution when handling them.
When servicing, wear protective eye wear.
DO NOT REMOVE PRIOR TO SALE.
i
Rescue Stick™ Owner’s Manual
INTRODUCTION
Congratulations on your purchase of the Mustang Survival Rescue Stick™, which provides rapid
flotation assistance to a person at risk of drowning. Simply remove the baton shaped Rescue
Stick™ from its protective container and throw near the victim. Once contact is made with the
water, it inflates in seconds to a large horseshoe shape, providing 35lbs of buoyancy, keeping a
person afloat and their head above water until help arrives.
WARNING: Do not attempt to use or service this product until you read and
completely understand the owner's manual. Only a qualified service technician
should perform service or repairs, other than those found in this manual.
The Rescue Stick™ is a portable water rescue flotation device that you throw to provide emergency
flotation to a conscious victim. When the Rescue Stick™ is thrown into the water, it automatically
inflates into a flotation device.
Measuring only 14” in length and weighing less than 1 lb, the Rescue Stick™ is the most compact
water rescue tool available. Easily stowed in a boat, vehicle, backpack or by the pool so that it will
be accessible when and where you need it.
General Safety Rules
WARNING: Read and understand all instructions. Failure to follow all instructions listed
below and throughout this user manual may result in improper use and/or damage to the
device making it unusable or result in death or serious personal injury.
Know Your Rescue Stick™
Read the user manual carefully. Learn the device applications and limitations as well as the specific
potential hazards related to this device. This device uses CO2 gas, within the handle cartridge, to
inflate the flotation device. Read and understand the handling and care of CO2 cylinders.
Protect Your Rescue Stick™
Store the Rescue Stick™ in its original storage container in a clean dry area. Keep this device away
from fuels, oils, acids and from sharp or pointed objects.
Keep Away From Heat and Moisture
Avoid prolonged exposure to excessive humidity or high temperatures in excess of 140º F or 60ºC.
Inspect Device Periodically
If damaged, do not use. For factory validation, replacement parts or return authorization:
MUSTANG SURVIVAL CUSTOMER SERVICE
3870 MUSTANG WAY
BELLINGHAM, WA 98226 USA
TEL: (360) 676-1782 FAX: (360) 676-5014
E-MAIL: [email protected]
Keep Up Routine Maintenance
Replace bobbin every three (3) years (normal use) or once a year (commercial use).
Rescue Stick™ Owner’s Manual
1
Dispose of Gas Cylinders Only When Empty
SPECIFIC SAFETY RULES
WARNING: CO2 cylinders are under EXTREMELY high pressure. A puncture
or release of freezing liquid CO2 (-50ºF) could result in serious injury or
death. CO2 cylinders and cartridges should be handled with extreme care
by responsible adults. Installing a faulty or spent cylinder will result in the
failure of the Rescue Stick™ to operate and inflate the flotation device.
NEVER throw the Rescue Stick™ directly at the victim in the water. Throw to an area
NEAR the victim.
Inspect the new cylinder and make sure it has no holes or scratches on the
face or rough threads. ALWAYS wear eye protection when changing CO2
cylinders.
CAUTION: This device is water actuated. Trapping moisture inside the storage container
could case premature inflation. Excessive heat coupled with trapped moisture may
accelerate this condition. Ensure that all of the components and the container of your
device are clean and COMPLETELY DRY before re-arming and/or returning the device to
its storage container.
Stow Cool
Do not heat the device or CO2 cylinders over 140ºF or 60ºC. DO NOT incinerate or leave in confined
spaces with direct sunlight such as a car dashboard.
Keep Away From Children
INSPECTION, STORAGE AND MAINTENANCE
READINESS CHECKLIST
Inspect inflation assembly and cell on a clean, dry, flat surface. If any obvious defects such
as: cracks, breaks, punctures or cuts are observed, STOP do not use this device. Factory
inspection and validation is recommended.
The green band inside the clear cap of the inflation mechanism should be clearly visible.
If band is red, STOP do not use this device until a new handle cartridge and bobbin have
been installed. Ensure the cylinder has not been pierced. See RE-ARMING instructions.
Manual actuation lever should be in the upright closed position with green indicator clip
locked in place.
The inflation cell should be clean, completely dry and fully deflated. The oral tube should
be capped in the sealed position, not in the inverted deflate position.
Pressure check: Inflate the flotation cell through the oral tube until the cell is very firm
to the touch. Leave undisturbed in a clean, dry area for 24 hours. There should be no
2
Rescue Stick™ Owner’s Manual
significant loss of pressure after 24 hours.
NOTE: If cell or oral tube is not holding pressure, factory inspection is recommended.
STORAGE
Store the Rescue Stick™ in its original storage container in a clean dry area. Avoid prolonged
exposure to excessive humidity or high temperatures in excess of 140º F or (60º C). Keep this
device away from fuels, oils, and acids and from sharp or pointed objects. Replace bobbin every
three (3) years (normal use) or once a year (commercial use).
With proper care and storage, this device's water sensing element has an approximate shelf life
of three years. Your Rescue Stick™ can be re-armed. After expiration, use re-arm kit MA7206 and
follow RE-ARMING and REPACKING instructions.
WARNING: Failure to inspect, service and maintain your Rescue Stick™ could make it
less effective and/or damage the device making it unusable. A poorly maintained Rescue
Stick™ could result in serious personal injury and a lost opportunity to save a life.
Take care of your Rescue Stick™; someone is counting on it.
OPERATION
In a water rescue situation, time is against you. The Rescue Stick™ is a quick and simple
emergency flotation device to be used when a conscious victim is in the water. This device can be
thrown, near a conscious victim who requires temporary flotation until further rescue efforts begin.
INSTRUCTIONS FOR USE
Step 1 - Throw the device in area near the victim.
Step 2 - The device automatically inflates when immersed in water.
Step 3 - The device can also be manually inflated by pulling “jerk to inflate” tab.
FIGURE 2
WARNING: Unless you are a water rescue professional, entering the water to
rescue a person can be a fatal mistake. Water conditions and the desperate
acts of a victim can easily make you a victim as well.
REACH, THROW, ROW; BUT DON’T GO.
Reach someone in the water with a pole, branch, paddle, ladder and many other things. Throw
them anything that floats, such as a ball, milk jugs, ice chest, inner tube, PFD or Rescue Stick™.
Rescue Stick™ Owner’s Manual
3
RE-ARMING AND REPACKING
WARNING: CO2 cylinders are under EXTREMELY high pressure. Puncture or accidental
release could result in serious injury or death. CO2 cylinders should be handled with
extreme care by responsible adults. Installing a faulty or spent cylinder will result in the
failure of this device to inflate. Inspect the new cylinder to ensure it has no holes or
scratches on the face or rough threads.
WARNING: To properly RE-ARM AND REPACK this device, you must understand and follow
the sequences and steps provided.
DRYING AND DEFLATING YOUR DEVICE
Step 1 - Allow storage container to completely dry out.
Step 2 - Hang inflated cell up by one of its handles inside a warm, dry and clean area to completely
dry out. An inflated cell dries more thoroughly. Keep away from excessive heat or open flame.
Step 3 - To deflate the dry cell: remove cap on oral tube, invert cap and use inverted cap to depress
the internal Pressure Relief Valve (PRV) located at the end of the oral tube. Hug and collapse
the cell while depressing the pressure release valve. Continue to collapse the cell onto itself
until virtually all the air is evacuated (Fig. 4).
FIGURE 4
FIGURE 3
ORAL
INFLATOR
CAP
ORAL TUBE
INFLATOR
CAP
HANDLE
JERK TO INFLATE
TAB
Step 4 - Lay the cell down flat on a clean dry table, printed side up and the open end facing you
Fig.7).
Step 5 - Starting from the left cell leg, tightly roll up the cell in the clockwise direction until you
reach the oral tube (Fig. 5). Tip: wrap cell around detached handle and roll to aid in deflation.
4
Rescue Stick™ Owner’s Manual
Step 6 - Evacuate any air remaining in cell (Fig. 6).
FIGURE 5
FIGURE 6
Step 7 - Follow the RE-ARMING and REPACKING instructions.
DISASSEMBLY
If your device has been inflated, the inflation cell must be inspected (see INSPECTION, STORAGE
AND MAINTENANCE), completely deflated, clean and COMPLETELY DRY before re-arming and
repacking.
Step 1 - Unpack, or open, the Rescue Stick™ assembly on a clean, flat, and dry surface so that the
inflator is visible (Fig. 7).
FIGURE 7
FIGURE 8
Step 2 - Remove the handle, containing the discharged CO2 cylinder, by firmly rotating counterclockwise (Fig. 8). To ensure that you do not re-install a used cylinder, discard immediately. If
cylinder is discharged, replace with new handle. Ensure the cylinder has not been pierced. See
RE-ARMING.
Rescue Stick™ Owner’s Manual
5
Step 3 - Remove clear inflator cap by turning counter-clockwise (Fig. 9).
FIGURE 9
FIGURE 10
Step 4 - Remove the bobbin from the cap. Discard the bobbin. Check the housing to be sure it is
clear of debris, clean and dry (Fig. 10).
CAUTION: The bobbin body may remain in the housing or in the cap assembly when you
remove the cap. The bobbin body must be removed prior to assembly.
RE-ARMING
WARNING: CO2 cylinders are under EXTREMELY high pressure. Failure to
install a bobbin prior to the installation of the CO2 cylinder could result in a
premature puncture of the CO2 cylinder. CO2 cylinders contain freezing liquid
CO2 at -50ºF which could cause serious skin burns and eye injury. A punctured
unrestrained CO2 cylinder can travel at high velocities which could cause
serious injury or death.
WARNING: In order to properly re-arm the device, steps 1 - 4 must be followed exactly.
IMPORTANT: Bobbin must be installed into the inflator HOUSING before screwing on the
inflator cap.
IMPORTANT: Check the date on the bobbin in the re-arm kit. The date should
not be more than three (3) years previous to today’s date. If more than three
(3) years, DO NOT USE and discard the expired bobbin.
Step 1 - To install a valid bobbin, align the slots on the bobbin with those on the housing. The
bobbin will slide in easily if installed correctly (Fig. 11).
FIGURE 11
FIGURE 12
Step 2 - Install cap by screwing clockwise until it meets the housing shoulder (Fig. 12).
6
Rescue Stick™ Owner’s Manual
NOTE: Ensure there is no gap between the cap and the inflator shoulder.
Step 3 - Install new handle (CO2 cylinder) by rotating clockwise into inflator until firmly secured
(Fig. 13). Ensure the cylinder has not been pierced.
FIGURE 13
FIGURE 14
Step 4 - Check to be sure service indicator is green inside clear cap and the green indicator clip is
firmly attached to the activation lever (Fig. 14).
REPACKING
Step 1 - Lay flat on clean dry surface, handle side up (Fig. 15).
FIGURE 15
FIGURE 16
Step 2 - Fold the left cell lobe under the right cell lobe at the FOLD#1 line (Fig. 16). Ensure the
“Jerk to Inflate” tab is placed beside the cell.
Step 3 - With your left hand, fold the J end over to form the letter I at the FOLD#2 line (Fig. 17).
FIGURE 17
FIGURE 18
Jerk to
Inflate Tab
Step 4 - Fold the cell, at the FOLD#3 line, down to the inflator and hold down with your right hand
(Fig. 18).
Rescue Stick™ Owner’s Manual
7
Step 5 - With your left hand, fold the bottom of the cell over the handle, at the FOLD#4 line. Ensure
“Jerk to Inflate” tab is placed beside the cell (Fig. 19).
FIGURE 19
FIGURE 20
Jerk to
Inflate Tab
Step 6 - Tightly roll up the cell starting from the handle end and rolling forward. Ensure “Jerk to
Inflate” tab is outside cell when rolling up (Fig. 20).
Step 7 - Place the handle through the cover loop. Place the rolled cell into cover and close the
cover by fastening the Velcro strips. Ensure “Jerk to Inflate” tab is outside the cover and
accessible (Fig. 21).
FIGURE 21
FIGURE 22
Jerk to
Inflate Tab
Cover Loop
Step 8 - Cover tether should be made snug to the handle. Before returning the device to its storage
container, ensure that the container is clean and completely dry (Fig. 22).
TRAINING
Anyone who can throw a stick can throw the Rescue Stick™ to someone in distress in the water.
On average the Rescue Stick™ can be thrown between 100 and 150 feet – almost triple the
distance of a typical rope bag or life ring. The inflated horseshoe will float with the person in the
water. Regular training will improve throwing accuracy and victim survival rates.
Practise throwing the Rescue Training Stick MRD050 to either dry land or in-water targets of varied
distances. Remember to aim near the target (or victim) for maximum effectiveness. Repeat exercise
until confident with the Rescue Stick™. You can order the MRD050 Training Stick through our
customer service department. More information and suggestions on how to organize a training
session or throwing competition can be found on our web site.
WARNING: To avoid damage, don't use your Rescue Stick™ for dry land training. Always
re-arm your Rescue Stick™ after inflation.
8
Rescue Stick™ Owner’s Manual
SERVICE
Servicing requires extreme care and knowledge and should be performed only by a qualified service
technician. For service and or repair or return authorization, we suggest you contact:
Mustang Survival Customer Service
3870 Mustang Way
Bellingham, WA 98226 USA
Tel: (360) 676-1782 Fax: (360) 676-5014
E-mail: [email protected]
ACCESSORIES
Part Description
Part number
Re-arm kit
MA7206
Rescue training stick
MRD050
WARNING: If you need to return or ship your Rescue Stick™, notify carrier
when shipping CO2 cylinders or devices that contain CO2 cylinders. Packages
containing CO2 cylinders are a shipping hazard. CO2 cylinders have shipping
restrictions, require special marking and must be shipped using ground
transportation only.
LIMITED WARRANTY
Mustang Survival products are warranted to be free from defects in materials and workmanship
for a period of one year from the date of purchase by the initial purchaser (the Customer End
user) under normal and intended conditions and use. Proof of purchase may be required at the
discretion of Mustang Survival. Products, which, in the sole judgment of Mustang Survival, have
received excessive or abusive use or have been altered in any way by a dealer, the Customer or any
other person, will not be covered by this limited warranty. Mustang Survival requires return of the
product (postage or delivery costs prepaid by Customer) for inspection before determining whether
the product will be covered under limited warranty. A return authorization is required before the
goods are returned and should be obtained by contacting our Customer Service Department.
Once returned, Customer Service, Quality Assurance and Sales Departments inspect the product as
required. It is then determined whether the product will be covered under this limited warranty.
If the product is deemed to be covered under our warranty policy, it will either be repaired
or replaced at the sole discretion of Mustang Survival at no charge to the Customer. The only
obligation or liability of Mustang Survival under this limited warranty is to repair or replace the
product and Mustang Survival shall not, under any circumstances be liable for loss of use or any
consequential damages sustained by the Customer. All other warranties expressed or implied, and
remedies with respect to the condition or use of the product, which might otherwise be provided
by law in any jurisdiction, are specifically excluded.
Mustang Survival has a policy of continuous improvement and reserves the right to modify
products or features at any time.
Rescue Stick™ Owner’s Manual
9
WE SAVE LIVES FOR A LIVING
www.mustangsurvival.com
3870 Mustang Way
Bellingham, WA
USA 98226
TOLL FREE
EMAIL
1.800.526.0532
[email protected]
Mustang Survival and seahorse design is a registered trademark of Mustang Survival Corp.
Our commitment to quality has earned our Richmond facilities ISO 9001 registration, the highest of all international standards.
This is our guarantee you’re receiving the ultimate in design and manufacturing.
HT-2100
Printed in Canada (Rev 26 Oct 06)