1
Basic operations
Preparation of power supply
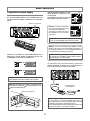
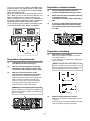
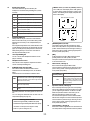
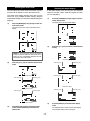
After fully inserting the battery box, slide
up the [EJECT/LOCK] lever to the
LOCK position.
A tab appears as shown on the right
figure and the battery box is locked.
To operate the unit on internal battery power, set AA alkaline or nickel hydride batteries to the supplied battery box
and fit the box to the battery compartment on the right side
panel.
Tab
Battery box compartment
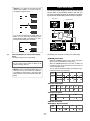
<Memo>: To remove the battery
box, slide down the [EJECT/LOCK]
lever to unlock the battery box.
The battery box is slid to the front a
few millimeters and you can pull it
out by hand.
<Note>: Before you remove the battery box, turn off the
power or set the [POWER] switch to the “EXT position.
Battery box
<Memo>: You can set the battery type (alkaline or nickel
hydride) to be used from the meter display. By default, it is
set for alkaline batteries. If you use nickel hydride batteries,
change the battery type setting (see page 20).
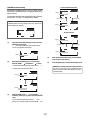
Make sure to set alkaline or nickel hydride batteries to the
battery box in correct direction as marked on the box. Set
four batteries on each side of the battery box.
<Note>: If the battery type setting do not match the batteries currently used, the EMPTY indicator, battery indicator
and alert display do not work correctly.
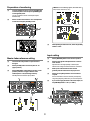
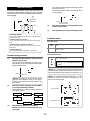
To operate the unit on external power, connect the
optional dedicated AC adaptor or an external battery to
the [DC-IN] connector on the left side panel.
<Note>: Always use eight new alkaline or fully charged nickel
hydride batteries of the same model and same capacity.
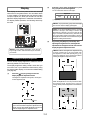
<Note>: Insert the battery box to the battery box compartment in the
correct direction by matching the symbol on the battery box to the
symbol on the panel of the unit.
Optional AC adaptor or
external battery
Battery box compartment
Symbol
<Note>: The rated voltage of the [DC IN] connector is DC 10
V to 24 V. When you connect an external power source to
the [DC IN] connector, use the appropriate power source that
matches the rated voltage of the [DC IN] connector.
For the detail information on the pin assignment of the [DC IN]
connector, see page 12 of “Features and controls”.
Battery box
6