1
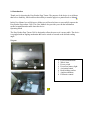
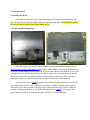
Acceptable User Manual overall, and pretty good job on the troubleshooting.
Could be improved with more info on the battery charging, storage /
transportation, safety warnings, and replacement parts lists. Spelling and
grammar also need improvement, and more images showing the steps should be
included.
Ohio University Mechanical Engineering
Senior Design 2011
User Manual
John Charlton
Brad McQueen
Christopher Nason
Matt Proctor
Aaron Thomas
Table of Contents
Introduction to the System .......................................................................................................................... 1
Introduction and Purpose of Reader ........................................................................................................ 2
Operating Conditions ................................................................................................................................ 3
Diagram of System .................................................................................................................................... 4
Getting Started ............................................................................................................................................. 5
Loading the Reader ................................................................................................................................... 6
Advancing Pages ........................................................................................................................................ 7
Retreating Pages........................................................................................................................................ 8
Troubleshooting ........................................................................................................................................... 9
Wheel not Rotating .................................................................................................................................. 10
Linkages not Rotating ............................................................................................................................... 11
Multiple Pages Turning ............................................................................................................................ 12
1.0 Introduction
Thank you for choosing the Easy Reader Page Turner. The purpose of the device is to aid those
that have a disability, which reduces their ability to turn the pages in a printed book or Manuel.
In this User Manuel you will discover all that you will need to know to successfully operate the
Easy Reader Pager turner 5100. This User Manuel also provides you with the information
needed to maintain and trouble shoot the device.
Operating Mode
The Easy Reader Page Turner 5100 is designed to allow the user to sit it on any table. The device
is equipped with an angling mechanism that can be raised or lowered to the desired reading
angle.
Diagram
1.
2.
3.
4.
5.
6.
7.
8.
Four-bar Mechanism
Wheel Arm
Power switch
Power/low battery light
Activation button
Book holding surface
Angle mechanism
Electronic control
2.0 Getting Started
2.1 Loading the Device
Open book to with-in 25 pages of the desired page. Once open, lift the wheel arm and
place the book on the lip of the reader as shown in the following figure. Ensure that the spine of
the book is lined up with the links of the turning device.
2.2 Advancing/Retreating Pages
Once the media is successfully loaded into the system ensure that the lift wheel arm is
moved to the right side of the media with the rubber wheel resting on the page of media that is to
be turned. Ensure that the on/off switch is in the on position with the green light lit up. Press the
activation button to advance the media by one page. Each time the activation button is pressed
the lift wheel and four bar turning mechanism will complete a single cycle which will turn a
single page. Repeat as needed. If more than one page is turned, see Troubleshooting.
In order for the user to retreat the pages of the media, place the lift wheel arm on the left
side of the media. Once the arm is rotated to the left side of media, a switch will be engaged
which will reverse the operation of the page turner. Ensure that the on/off switch is in the on
position with the green light lit up. Press the activation button to retreat a single page of the
media. Repeat as needed. If more than one page is turned, see Troubleshooting.
3.0 Troubleshooting
3.1 Wheel not Rotating
There can be several causes for the lift wheel not rotating. To determine the root cause follow
the following steps.
Step 1: Is the power on? Check the back of the reader to ensure that the GREEN power light is
illuminated. If the light is not illuminated, then flip the power switch to on. If the switch is set
to on and the light will not illuminate then the battery is depleted and must be charged.
Step 2: Visually inspect the wheel to ensure that the axel isn’t bent. If the axel is bent causing
the wheel to bind while rotating slowly straighten the axel with your hand. Note: Once this is
done the axel will lose considerable strength. All efforts to prevent this from happening should
be taken.
Step 3: The most unlikely cause is a short or severed wire in the arm housing. The only way to
check for this is to deconstruct the arm. If you feel comfortable doing this then ensure that the
parts are replaced properly when reconstructing. Otherwise please contact one of the members
of the design team for assistance.
3.3 Rotating Link not returning to home point
For this system to work properly the rotating link must return to the home point above the turned
page. If this does not happen follow these steps.
Step 1: Press the RESET button located on the base of the reader. This should stop all the
motors from rotating and return the rotating links to the home position.
Step 2: If the previous step does not work then manually return the link to the home position
aproximatley 45⁰ to opposite side being turned.
3.2 Linkage not Rotating
If at some point during the operation of the reader, the linkage that advances the page
ceases to rotate, two things might be wrong.
Is the power on?
The servo motor that drives the gear to move the links needs to be powered with at least 5 volts.
The circuit is set up to deliver the appropriate amount so long as there is power running to the
system. If the power is on and the link is still not rotating, the battery needs to be charged. To do
this, plug the battery into a wall socket and allow to charge for at least 3 hours.
Are the drive gears damaged?
The gears are viewable through the plastic top of the linkage box located in the front of the
reader. Check to see if the nylon (white) gear is rotating, if it is not, the servo motor has become
disconnected from the gear and needs to be taken apart and re-attached. This can be done by
replacing the 4 set screws around the gear.
If the gear is rotating and the link is still not moving, it could be that the gear teeth have worn
down. If this is the case, a new gear will need to be ordered. Refer to the schematic to find the
correct size.
Finally dirt or debris may have got caught in the gear teeth, if this is the case, the box will need
to be taken apart and the gears cleaned. The clean them, submerge under a stream of water until
the dirt is cleared. Allow to dry completely before reinstalling into the reader.
3.4 Multiple Pages Turning
If at some point during operation the mechanism turns more than the desired amount of
pages, the recommended courses of action are to either manually regress the pages to the desired
page or use the reversal operating mode and advance the pages until one reaches the desired
page. If there is a problem with the positioning of the turning mechanism, press the reset button.
This will return the link to the proper starting location. Here is a list of what may have caused the
excess:
The wheel may have acquired dirt.
If this is the case, the wheel will need cleaned. Check the rubber band around the wheel for
damage and/or wear. If this is the case, replace the rubberband with the replacement bands
included. To clean an existing band, just take a cloth towel and gently rub the wheel until the
debris is removed. In the event of a shortage of replacement bands, refer to the schematic for
ordering information.
The media may not be compatible.
Although this was initially designed for all media, some limiting was necessary. As long as the
media is bounded, the machanism should work. The failure rate is higher with a glossy page
coating