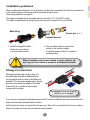
1
P OR TA B LE R E FR IGE RATO R
The National Luna range of products have been
designed and manufactured in South Africa since 1989.
Every product sold is of the highest possible quality,
manufactured with world-class technology,
marketed & serviced by a knowledgeable & dedicated team,
locally & internationally
This manual / handbook is a combined publication,
for models manufactured from 2009.
Identify your model and follow the relevant
colour coded pages for best use.
National Luna Portable Refrigeration Models:
National Luna Classic Range
40-65-80-125 Litre
Double Door 74/95 Litre
Twin Compartment 90 Litre
Weekender 50 LitreTwin
Weekender 52 Litre
Relevant information, common to all models
Please complete the tear-out return card to register your warranty
National Luna fridges have been tested to international safety specifications
SANS 60335-2-24:2003
SANS 60335-1:2007
IEC 60335-2-24:2002
IEC 60335-1:2006
2
Index
Page
Introduction
4
Installation Guidelines
5
Connecting Power
6
Wiring Guidelines
6
Temperature Settings
7
Celsius / Fahrenheit Conversion Chart
8
Speed Control
9
Battery Protection 10
National Luna Classic Range
12
National Luna Double Door and Twin Range
15
National Luna Weekender Range
19
Troubleshooting
26
National Luna Warranty
27
3
Introduction
Congratulations on the purchase of your National Luna portable fridge / freezer.
The National Luna range of portable fridges and freezers are high-performance, high efficiency
refrigerators ideal for harsh conditions and applications that are limited to battery power such as offroad vehicles, caravans and solar installations.
The versatility of each of the National Luna models allows the use of a wide range of AC supply voltage
(85V DC - 265V AC) as well as 12-volt or 24-volt battery power (9.6V AC - 31.5V DC).
The use of a custom-designed digital thermostat and smart control circuitry ensures temperature
stability and low power consumption.
All refrigerator models are built using high quality materials, unique assembly techniques and strict
testing procedures to ensure the highest level of quality and performance.
Precautions
When the refrigerator is used in an automotive application, ensure that it is secured to prevent
accidental movement. The carry handles can be used with straps or tie-downs if necessary.
• A base mounting plate is optional and recommended for most applications.
• Allow a 50mm gap around the refrigerator compressor area for ventilation.
• Do not block or cover the ventilation holes.
• Ensure the correct type of cable and connectors are used for installation.
• Ensure that any power leads connected to the refrigerator will not be pulled or damaged by any movement of the fridge - especially where slides or drawers are used.
• Do not use a power lead that is damaged.
• Do not connect the refrigerator to a power source that does not comply with the input power specifications. (Displayed on the fridge’s rear panel)
• When storing the fridge, ensure that the lid is propped open to allow for aeration. Disconnect the appliance from an electrical source. (Note: When the fridge is switched off, the interior light will still function if the unit is connected to a power source).
4
Installation guidelines
When installing the refrigerator into a vehicle for the first time, ensure that the electrical connections
to the vehicle’s battery are secure and the specified wiring is used.
(See wiring guidelines on page 6)
The fridge is supplied with a pre-made cable for use with a 12 / 24-volt DC supply.
This cable is terminated with a high-quality male plug for connection into your vehicle.
Male Plug
Centre pin ( + )
Female Socket
1. Install the supplied female
socket into your vehicle
in a convenient location.
2. Use a suitable cable to connect the
socket to the vehicle’s battery.
A cable thickness of 4mm2 or greater is
recommended.
When installing electrical outlets in your vehicle, do
not rely on the vehicle’s body for an electrical earth.
Fitting an in-line fuse
Although the fridge has a built-in fuse, it is
recommended to install an additional fuse
on the positive wire as close to the battery as
possible. This will protect against short-circuits
that may occur along the length of the cable.
Ensure that all connections are properly
crimped and insulated.
An automotive fuse with a rating
of 15A is recommended
If you choose to change the attached plug on the DC cable for a different type, first ensure that the
power has been disconnected before cutting it.
Split and strip the wires as required for the new plug. Take care to ensure that the correct polarity is
used on the plug and crimp the connections where possible.
5
Connecting power
All National Luna Portable refrigerators can accept
a DC voltage ranging from 9.6V to 31.5V, as well as
an AC voltage range from 85V to 265V.
Fuse (15amp)
Both power inputs are fuse protected :
- 3.15A Time-lag fuse for AC input.
- 15A automotive blade fuse for DC input.
Fuse 3.15amp
(5x20 Glass Fuse)
An AC and DC source can be connected to the
refrigerator simultaneously. Under these conditions,
the AC supply will be chosen as the primary power
source.
If the AC supply is interrupted, the DC supply will be
automatically selected and operation will continue
normally. (After a 1 minute delay)
Suggested Wiring Specifications
One of the most problematic issues with installing a 12-volt refrigeration system is incorrect wiring.
Most users do not understand the importance of maintaining battery voltage over the distance from
the battery to the installed fridge.
While most car cigarette lighter sockets appear to be adequate, in practise a large voltage drop
occurs between the socket and the car battery. This may result in the fridge shutting down as a
result of a low-voltage condition.
It is recommended the following table be used as a guide to establish what cable thickness is to be
used depending on the distance from the car battery to the fridge. As a rule of thumb one should
use a 1.0 mm2 multi-strand copper wire per meter of distance from the battery.
Cable Size
Max Length between battery & fridge
Cross Section
mm2
12 Volt Operation
Meters
24 Volt Operation
Meters
4
4
8
6
6
12
10
10
20
Note: Two wires (positive and negative) must be connected from the battery to the fridge / plug point.
6
Dynamics of Temperature Settings
Danfoss BD35F compressor
The compressor is controlled by the digital thermostat setting.
The Danfoss BD35F compressor is used on all of the National Luna fridge/freezer product range.
Developed in Germany, it has a unique Multi - Speed (2,000 - 3,500 rpm) capability which makes it
ideal for use in all mobile applications up to an angle of 35 degrees. It can function efficiently in extreme conditions where it is not uncommon to have ambient temperatures above 40ºC.
Inner Bin / Cooling Compartment
To control temperature, the thermostat sensor must be placed in a position in order to take a temperature reading.
For practical purposes National Luna has elected to place this temperature sensor on the metal surface
forming the interior bin of the fridge/freezer. Thus the switching on and off of the compressor will be
controlled by the bin surface area temperature.
The inner volume of the cooling bin (i.e. core/centre temperature) will take time to “pull down” to
equalise the bin temperature. (In practise it is common that the set temperature will be within 3ºC of the
core temperature).
Ambient temperatures surrounding the fridge must also be taken into consideration. Very high outside
temperatures will play a major role in the running time of the fridge. (e.g. The fridge will run longer to
maintain or reach the target temperature set).
When setting temperatures below -12ºC the refrigeration system will have a
larger temperature range between switching on and off
7
Setting the Temperature
The digital thermostat fitted to the
National Luna Portable refrigerator
allows accurate setting of the desired
cooling temperatures.
With the single compartment refrigerators,
temperatures can be selected between
+20°C and -30°C in 1°C increments.
When powering up the fridge the first time, the temperature inside the fridge will be reflected on
the display. (NOTE: the previously set temperature will be in memory)
To select the new cooling temperature, press and hold the
button until the display starts to
flash. (The previous set temperature will be displayed).
Press
or
to raise or lower the desired temperature. The thermostat will accept the
new setting and exit the setting mode 10 seconds after the last button was pressed. (It will now
remember the new set temperature).
The temperature display will reflect the inner bin temperature prior to the new setting. Provided
the new setting is colder, the compressor will then switch on and cool the fridge further to the set
point. (During this time the run indicator light will be displayed).
Temperature Guidelines
ºC
60
The following table is a guideline to setting
the correct temperature range for different
foodstuffs.
ºF
140
43
109.4
32
89.6
12
53.6
6
42.8
0
32
-6
21.2
-12
10.4
-18
-0.4
-24
-11.2
-30
-22.0
Recommended choice of temperatures
Fresh fruits & vegetables
Dairy products
Smoked / prepared meats
3°C to 6°C
Cold beverages
0°C to 4°C
Short-term frozen meats
Frozen meats and fish
Ice cream / frozen desserts
8
-6°C to -11°C
-18°C
Introduction to Smart Compressor Control
National Luna developed a Smart Compressor Control ( advanced automatic speed control) function
which has been fitted as standard to all current models.
• Logic 1 (Setting the bin temperature in a range of +20ºC to -11ºC).
The compressor will operate at 3 speeds : low 2,000 rpm, medium 2,750 rpm and high 3,500 rpm.
On initial start-up the fridge will automatically run at full speed to bring the inner bin temperature
down as fast as possible. It will then step down to medium speed to reach the set temperature point
where the fridge will then switch off. Temperature will then be maintained at low speed.
This logic makes the fridge operate and maintain the desired bin temperature under all ambient
temperature conditions optimising performance and efficiency.
Should the temperature of the fridge contents change, such as when fresh foodstuffs are added, the
fridge will automatically speed up to cool the new contents.
• Logic 2 Deep Freezing (Setting temperature below -11ºC).
When temperatures are set below -11ºC, the Smart Compressor Control will operate at high speed
(initial start-up) to bring temperature down as fast as possible to the desired set point. Thereafter
temperature will be maintained at medium speed.
Speed Control
National Luna refrigerators have an advanced speed
control which will vary the speed of the compressor in
order to conserve power and optimise performance.
For situations where maximum cooling power is
required, press and hold the “Turbo” button until the
indicator is illuminated.
This will bypass automatic control and force high
speed operation.
Selecting the “Turbo” mode will over-ride the Smart Control
function and the unit will run at maximum speed
9
Battery Voltage vs Capacity
• Voltage of a battery can be an indication of its “state-of-charge”.
• The voltage-capacity relationship is most accurate when the fridge is not running and the battery temperature is at 25°C.
• By measuring the voltage, we can estimate the amount of energy remaining in the battery.
• Changes in temperature, battery age and general battery health can influence this relationship and therefore result in inaccurate capacity measurement.
• Normal battery operation takes place between 12.0 and 12.6 volts.
• Depending on the manufacturer’s specifications a normal car’s alternator charges between 13.7 and 14.2 volts.
• A battery should not be discharged below 11.8 volts as a general BATTERY
CAPACITY
BATTERY
VOLTAGE
rule. A “deep-discharged” battery should be recharged as soon as possible to prevent permanent damage.
Danfoss Low Voltage Battery Protection
The Danfoss electronic control unit will cut-out at the low / medium / high selected setting.
Once the compressor has cut-out, it will not restart (cut-in) until the voltage rises.
The table below reflects the set points.
12 VOLT
Battery
Protection
24 VOLT
Cut-out
Cut-out
Cut-in
LOW
9.6
10.9
MED
10.4
11.7
22.8
24.2
HIGH
11.3
12.5
24.6
26.0
Cut-in
Note: these values are measured at the
Danfoss control unit input. It is important
to note that poor / thin wiring and bad connections to the battery can cause a large
voltage drop. When this occurs the fridge
switches off and will re-start again on a
repeat cycle “hunting”.
NOTE: When connecting the fridge for the first time, it will look at the cut-in voltage.
If the battery protection is set on “High” the initial cut in voltage will be 12.5.
If the battery is not fully charged the fridge will not start. Simply select low to start.
When selecting “Low” the fridge will operate within a voltage supply of 9.6-31.5volts.
When using the unit in a 24-volt application
do not select battery protection “LOW”
as this will completely drain the battery bank.
(Causing permanent damage to the batteries)
10
Battery Protection Settings
The refrigerator is equipped with a multi-level
battery protection circuit.
The user has the choice of three voltage levels
at which the compressor will shut down to
protect against excessive battery discharge.
(See page 10)
To change the protection level, press and hold
the
button until the preferred level is reached.
When powered by an AC source, the battery
protection level can be changed but will only
affect operation when the DC source is used.
Selecting the “Low” cut-out setting can cause excessive discharge
resulting in damage to the battery.
Indicator Lights
Status indicators will identify the current operation of the refrigerator.
RUN - This indicator will be illuminated whenever the fridge compressor is running and the compartment is being cooled.
FAULT ID - This indicator is used to identify fault conditions that may occur with the # of
flashes
1
2
3
4
5
refrigerator such as low power supply.
This indicator will flash a pre-determined number of times every 4-seconds when a particular fault occurs (see table below). Also refer to page 26.
Fault description
Low voltage. This is shown when the DC supply voltage is low. The battery could be flat,
wiring losses are too high or there is a poor connection to the power source.
Fan over-current cut-out. There is a problem with the ventilation fan. It is possible that the
ventilation fan is obstructed, blocked or damaged.
Motor start error. The compressor has not started successfully. This can happen in extreme
environments where the refrigerator is heavily loaded and temperature is very high.
Minimum speed error. The motor cannot maintain a minimum speed of 1900 rpm.
This can be the result of an internal electronics failure.
Thermal cut-out. The electronic circuitry has over-heated. This happens in very hot environments. This can occur when the fridge is over-loaded with warm contents and the ambient temperature is high. The electronics will re-set when the temperature has dropped.
11
National Luna Classic Range
40/65/80/125 Litre
Introduction
Developed for performance at high ambient temperatures, minimum power consumption
and high operating efficiency, these single compartment fridges are recognised as the most
powerful in the world.
Low power consumption is achieved using 60mm high-density insulation and a very compact design.
With the aid of an integrated electronic thermostat these units can be accurately set as a
fridge or as a freezer.
Getting to know your portable fridge
Single door (40L - 65L - 80L - 125L)
10
6
4
7
5
8
9
12
1. Lid
2. Interior light (24V 10W)
3. Lid locking latches
4. Cabinet exterior
5. Control panel
6. Carry handles
7. Compressor area
8. AC input with fuse (3.15A)
9. DC input with fuse (15A)
10. Cooling Bin (Evaporator)
Control Panel
Automatic speed control
with TURBO over-ride
Fault identifier light
Run status light
Power ON/OFF and
temperature UP control
Temperature display
SET mode and temperature
DOWN control
Battery protection control
On / Off control
The refrigerator can be turned ON and OFF via
the control panel.
Press and hold the
button for 3 seconds
to turn the fridge ON or OFF.
If power to the refrigerator is interrupted, it will
default to ON automatically.
Note: When the fridge is switched off, the
interior light will still function if the unit is
connected to a power source.
The refrigerator is equipped with a multi-level
battery protection circuit.
The user has the choice of three voltage levels
at which the compressor will shut down to
protect against excessive battery discharge.
Battery Protection
To change the protection level, press and hold
the button
until the preferred level is
reached.
When powered by an AC source, the battery
protection level can be changed but will only
affect operation when the DC source is used.
(Refer to page 10 and 11).
13
Setting the Temperature
The digital thermostat fitted to the
National Luna Portable refrigerator
allows accurate setting of the desired
cooling temperatures.
With the single compartment refrigerators,
temperatures can be selected between
+20°C and -30°C in 1°C increments.
When powering up the fridge, the temperature inside the fridge will be reflected on the display.
(NOTE: the previously set temperature will be in memory)
To select the new cooling temperature, press and hold the
button until the display starts to flash.
(The previous set temperature will be displayed).
Press
or
to raise or lower the desired temperature. The thermostat will accept the new
setting and exit the setting mode 10 seconds after the last button was pressed. (It will now remember
the new set temperature).
The temperature display will reflect the inner bin temperature prior to the new setting. If the new setting
is colder, the compressor will then switch on and cool the fridge further to the set point.
(During this time the run indicator light will be displayed).
Speed Control
National Luna refrigerators have an advanced speed
control which will vary the speed of the compressor in
order to conserve power and optimise performance.
For situations where maximum cooling power is
required, press and hold the “Turbo” button until the
indicator is illuminated.
This will bypass automatic control and force high
speed operation. (Refer to page 9)
Using the TURBO function can
increase power consumption
14
Double Door 74/95 Litre
Twin Compartment 90 Litre
Introduction
The Double door and Twin fridges in this range have only one compressor but due to
National Luna’s unique Dual Control technology, the fridge and freezer compartments can be
set independently. This is like having two fridges in one.
The Double Door range has two lids, one for each compartment.
Double Door Range (74/95 L)
1
10
11
3
6
4
7
5
8
9
15
1. Lid
2. Interior light x 2 - (24V 5W)
3. Lid locking latches
4. Cabinet exterior
5. Control panel
6. Carry handles
7. Compressor area
8. AC input with fuse (3.15A)
9. DC input with fuse (15A)
10. L/H Cooling Bin - Freezer
11. R/H Cooling Bin - Fridge
90 Litre Twin
The Twin has one lid covering both compartments. The freezer compartment has a separate
internal lid. This prevents cold air escaping from the freezer when the main lid is opened,
adding to the efficiency and ensuring stable temperatures within.
1
10
11
3
6
4
7
5
8
9
16
1. Lid
2. Interior light - (24V 5W)
3. Lid locking latches
4. Cabinet exterior
5. Control panel
6. Carry handles
7. Compressor area
8. AC input with fuse (3.15A)
9. DC input with fuse (15A)
10. L/H Cooling Bin - Freezer
11. R/H Cooling Bin - Fridge
Battery protection control
Control Panel
Automatic speed control
with TURBO over-ride
Fault identifier light
Individual run status lights
Power ON/OFF and fridge
temperature UP control
Fridge temperature display
Fridge SET mode and
temperature DOWN control
Freezer SET mode and
temperature UP / DOWN
Freezer temperature display
On / Off control
The refrigerator can be turned ON and OFF via
the control panel.
Press and hold the
button for 3 seconds
to turn the fridge ON or OFF.
If power to the refrigerator is interrupted, it will
default to ON automatically.
Note: When the fridge is switched off, the
interior light will still function if the unit is
connected to a power source.
Battery Protection
The user has the choice of three voltage levels
at which the compressor will shut down to
protect against excessive battery discharge.
To change the protection level, press and hold
the
button until the preferred level is reached.
(Refer to page 10 and 11).
National Luna refrigerators have an advanced
speed control which will vary the speed of the
compressor in order to conserve power and
optimise performance.
For situations where maximum cooling power is
required, press and hold the “Turbo” button until
the indicator is illuminated.
This will bypass automatic control and force high
speed operation. (Refer to page 9)
Speed Control
17
Setting the Temperature
NB - Set one thermostat at a time
74Lt / 90Lt / 95Lt Refrigerators have dual thermostats allowing
individual temperatures to be selected for each of the cooling bins.
The “FREEZER” bin has a temperature range between +20°C and -24°C.
The “FRIDGE” bin has a temperature range between +20°C and -12°C.
It is important that the freezer thermostat should be set at the same or colder temperature than the
fridge thermostat. This will ensure temperatures are accurately maintained and the refrigerator
operates efficiently.
To select the cooling temperature, press and hold the
button until the display starts to flash.
Press
or
to raise or lower the desired temperature. The thermostat will accept the new
setting and exit the setting mode 10 seconds after the last button was pressed.
The same procedure is used on both thermostat controls.
(NOTE: You can only set one thermostat at a time).
The dual control will first operate to cool the R/H fridge bin
before switching to the L/H freezer bin.
The setting of the L/H bin as a fridge, and the R/H bin as a freezer is not an option. The reason for this
is that in order to achieve maximum efficiency (i.e. the lowest average battery power consumption), the
gas-flows within the unit are intentionally biased to flow from the R/H bin to the L/H bin. Thus the freezing
gas could flow from the R/H bin and freeze the contents of the L/H bin.
Recommended Temperature Settings
L/H Freezer Bin
R/H Fridge Bin
Fridge / Freezer
6
6
Freezer / Fridge
- 6
2
Freezer / Freezer
-12
- 6
Deep Freeze / Freezer
-18
-12
18
Weekender 50 Lt TWIN
Weekender 52 Lt SINGLE
Introduction
The National Luna Weekender is a high-performance, low-power portable refrigerator designed
primarily for use in mobile applications.
By reducing the insulation to 42mm thickness, National Luna offers a lightweight fridge/freezer to
meet the demand for maximum fridge capacity where space is a problem.
(Average Power consumption of these fridges would be slightly higher than the 60mm insulation range).
50 Litre Twin
The Weekender 50 Twin is split into a 40-litre fridge compartment and a 10-litre freezer compartment.
Under normal operating conditions, the larger compartment is used as a fridge and the smaller
compartment will attain sub-zero temperatures.
The freezer bin of the Weekender 50-Twin has a separate internal lid. This prevents cold air
escaping from the freezer when the main lid is opened, adding to the efficiency and ensuring stable
temperatures within.
Weekender 50L Twin
14
1. Lid
2. Interior light (24V 10W)
3. Lid locking latches
4. Cabinet exterior
5. Control panel
6. Carry handles
7. Compressor area
8. AC input with fuse (3.15A)
9. DC input with fuse (15A)
10. Fridge Bin (40 Lt) Evaporator
11. Freezer bin (10 Lt) with inner lid
12. Alternative lid handle position
13. Alternative lid latch position
14. Alternative lid hinge positions
2
1
3
12
10
11
13
4
6
7
5
8
9
19
52 Litre Single Bin
This model has been designed to operate as a fridge or freezer and the bin temperature can be set
between +20°C and -30°C.
Weekender 52L
13
11
10
12
4
6
7
5
8
9
20
1. Lid
2. Interior light (24V 10W)
3. Lid locking latches
4. Cabinet exterior
5. Control panel
6. Carry handles
7. Compressor area
8. AC input with fuse (3.15A)
9. DC input with fuse (15A)
10. Cooling Bin (Evaporator)
11. Alternative lid handle position
12. Alternative lid latch position
13. Alternative lid hinge positions
Control Panel
Automatic speed control
with TURBO over-ride
Fault identifier light
Run status light
Power ON/OFF and
temperature UP control
Temperature display
SET mode and
temperature
DOWN control
Battery protection control
Battery manager control
Reverse polarity indicator
On / Off control
The refrigerator can be turned ON and OFF via
the control panel.
Press and hold the
button for 3 seconds
to turn the fridge ON or OFF.
If power to the refrigerator is interrupted, it will
default to ON automatically.
Note: When the fridge is switched off, the
interior light will still function if the unit is
connected to a power source.
Speed Control
National Luna refrigerators have an advanced
speed control which will vary the speed of the compressor in order to conserve power and optimise
performance.
For situations where maximum cooling power is
required, press and hold the “Turbo” button until the
indicator is illuminated.
This will bypass automatic control and force high
speed operation. (Refer page 9).
Using the TURBO function can increase power consumption
21
Setting the Temperature - 50 Litre
The digital thermostat fitted to the National
Luna Portable refrigerator allows accurate
setting of the desired cooling temperatures
in the left hand fridge bin. (40 Litres)
Bin temperatures can be selected between
+20°C and -12°C in 1°C increments.
When powering up the fridge, the temperature inside the fridge will be reflected on the display.
(NOTE: the previously set temperature will be in memory)
To select the new cooling temperature, press and hold the
button until the display starts to flash.
(The previous set temperature will be displayed).
Press
or
to raise or lower the desired temperature. The thermostat will accept the new
setting and exit the setting mode 10 seconds after the last button was pressed. (It will now remember
the new set temperature).
The temperature display will reflect the inner bin temperature prior to the new setting. Provided the
new setting is colder, the compressor will then switch on and cool the fridge further to the set point.
(During this time the run indicator light will be displayed).
Temperature dynamics of this unique fridge/freezer
• The 50 Litre Twin operates on a ratio of cooling capacity between the fridge and the freezer bin.
• The thermostat control is placed on the fridge bin side and controls fridge temperature only.
• The freezer has more cooling capability than the fridge compartment and will cool down to approximately 10°C colder than the fridge.
• The thermostat may be set down as low as -12°C which will aid the cooling down of a large volume of warm goods which have been placed in the fridge.
Under this condition the compressor will run at high speed and possibly continuously if the ambient temperature is very high. The freezer compartment could get extremely cold (i.e -25°C).
It is not ideal to run the fridge bin at low temperatures with the intention of running a dual freezer combination.
This unit was not designed primarily to be used as a dual freezer.
Should the user choose to do so, power consumption will increase above single bin freezers.
During times when the ambient temperature surrounding the
Weekender 50-Twin is below the thermostat setting, the fridge will not be required to run. Under this condition, the freezer compartment will not cool as this requires the fridge compartment to be cooled.
This condition may occur during winter months if the thermostat is not set to
a lower temperature than ambient.
22
Setting the Temperature - 52 Litre
The digital thermostat fitted to the
National Luna Portable refrigerator
allows accurate setting of the desired
cooling temperatures.
With the single compartment refrigerators,
temperatures can be selected between
+20°C and -30°C in 1°C increments.
When powering up the fridge, the temperature inside the fridge will be reflected on the display.
(NOTE: the previously set temperature will be in memory)
To select the new cooling temperature, press and hold the
(The previous set temperature will be displayed).
button until the display starts to flash.
Press
or
to raise or lower the desired temperature. The thermostat will accept the new
setting and exit the setting mode 10 seconds after the last button was pressed. (It will now remember
the new set temperature).
The temperature display will reflect the inner bin temperature prior to the new setting. Provided the
new setting is colder, the compressor will then switch on and cool the fridge further to the set point.
(During this time the run indicator light will be displayed).
The user must take into account that the unit has thinner insulation than the classic range.
At very high ambient temperatures it is not recommended to set the freezer to below -11°C (as the
compressor will automatically speed up to the high power mode in order to attain colder temperatures
and thereby use excessive battery power).
23
Battery Monitor and Protection
The Weekender is equipped with a battery monitor and low-battery “cut-out” protection circuit.
The monitor is intended to give an estimate of the available remaining energy in a 12-volt lead-acid
battery. (For 24V systems the indicated battery voltage should be multiplied by two).
The battery monitor has a built-in low voltage alarm which provides audible warning of a low-battery
condition. To activate the alarm, press and hold the
button until the “ALARM ON” indicator is
illuminated.
In the event of incorrect polarity, the reverse polarity indicator will be on and the fridge will not
operate until the wiring is correctly connected.
The Low battery warning will sound when the voltage
measured by the Weekender is below 10.5 volts.
It’s recommended to re-charge a battery that has
been discharged to this level as soon as possible.
Combined with the battery monitor is a 3-stage battery protection “cut-out”. This feature is used
to prevent the battery from being excessively discharged.
The user has the choice of 3 protection levels. These are linked to the voltages indicated on the
battery monitor, and indicate at which voltage the fridge will cut-out.
Press and hold the
button until the desired level is obtained.
The “MED” and “LOW” settings allow a deep discharge of the battery. However, due to possible
wiring loss in the application vehicle, the voltage detected by the Weekender may be lower than
the actual battery voltage. (See page 6)
For an accurate voltage reading the fridge should not be running.
24
Dual-direction Lid
A special feature of the Weekender is the ability to change the
direction in which the lid opens.
The most common configuration is the front-opening direction
(shown).
If the application prevents the lid from opening fully or the
refrigerator is installed long ways into a vehicle, is may be
advantageous to use the side-opening configuration.
The Weekender is supplied in the front-opening configuration.
In order to change the lid direction, follow these steps :
1. Close the lid. Remove both front latches and lid handles.
2. Re-fit one of the latches and lid handles to the
alternative latch positions on the side of
the refrigerator. (Keep the spare parts safe)
3. Remove all three hinges from the rear of the
refrigerator. Also remove the hinge cover plates from the alternative hinge locations.
4. Re-fit two of the hinges on the side of the refrigerator.
5. Align the lid and ensure that it closes fully before tightening the screws.
6. Keep the spare hinge and screws in a safe place.
The Weekender will now be in the side-opening configuration
NOTE: Take care not to apply excessive pressure when locating the screws to the inside retaining nuts.
(They can be pushed too far back or incorrectly angled).
Three hinge cover plates are supplied
(2 fitted) with the Weekender for covering the
unused hinge holes.
Tip - The optional Weekender protection jacket has
a side pocket which is ideal for keeping the spare
hinge and latch parts.
25
Troubleshooting
In the event of unusual or undesired operation, consult the table below before contacting a
service agent.
Problem
The fridge will not run
when connected to 12V,
but only when connected
to 230V mains.
Fault ID light flashes once
every 4 seconds.
The ventilation fan is
noisy or not running
The Fault ID light is
flashing twice every
4 seconds.
Possible Cause
Remedial Action
12 Volt polarity reversed.
The battery is discharged.
Check polarity to battery is correct.
Recharge the battery.
The DC supply has inadequate
wiring, causing voltage loss.
(See page 6 and 10)
Ensure all connections are secure.
Ensure supply has 4mm2 wire or
thicker and that the vehicle’s body
is not used as an earth.
Fridge is initially connected to a Select “Low” on battery protection
battery that is not fully charged. (See page 10)
The ventilation fan is blocked or Check the ventilation fan for
damaged.
obstructions.
There is excessive dust or dirt
build-up on the fan
If the fan is broken, return the
refrigerator to an authorised agent
for repair.
The Fault ID light is flashing 3
times every 4 seconds.
The compressor failed to start
correctly.
High pressure due to over-load
or electronic failure.
Under high pressure conditions
this fault will rectify itself automatically when gas pressures equalise.
Continuous 3-flash conditions may
require electronic control replacement by an authorised service
agent.
The Fault ID light is
flashing 4 times every
4 seconds.
The compressor is not maintaining the correct
minimum speed.
Continuous 4-flash conditions may
require electronic control replacement by an authorised service
agent.
The Fault ID light is
flashing 5 times every
4 seconds.
Compressor area is
over-heated.
The cooling fan is in-operative.
Ambient temperature very high.
Fridge over-loaded.
Check fan.
Ventilation inadequate.
Wait for ambient temperature to
drop. (See page 11).
The thermostat display is
showing “ P r f “
The internal temperature probe
is faulty, damaged or
disconnected.
Contact a National Luna service
agent for a probe replacement
26
NATIONAL LUNA LIMITED WARRANTY - SOUTH AFRICA
This National Luna Warranty supersedes any other advertised Guarantee or
Warranty provided with this appliance by any wholesaler or retailer.
National Luna warrants this product to be free from defects in materials and / or workmanship
under normal use and service to the original purchaser subject to the following :
1.
2.
3.
At any time within THREE YEARS from the date of purchase by the original purchaser, National Luna will at its discretion replace or repair without cost to the owner, and if through an authorised service agent, any part found to be defective by National Luna.
Where parts are replaced by an authorised service agent, the labour account for the work done will be for the owner’s account.
This warranty does not apply to light bulbs, fuses, cooling fans or items where the length of life depends on the amount of use and care given.
The Danfoss BD35F compressor has a 1-year manufacturers guarantee.
Correct completion and submission of the Warranty registration card supplied with this booklet allows for an additional 2-year warranty to be provided by National Luna on the compressor.
4. Removal of the serial number on the appliance will render this warranty void.
5. National Luna may consider a warranty void if modifications have been made to this appli-
ance which may cause undesirable or hazardous operation or may be the cause of the
malfunction of this product.
6. National Luna shall not be responsible for any damages of any kind resulting from incorrect voltages or faults with regards to power supply which fall outside of the appliance operating specifications.
7. National Luna shall not be responsible for damage to the appliance caused by negligent use, storage of hazardous chemicals, use of corrosive substances, fire, flood,
civil-disturbances, lightning or any other natural phenomenon.
8. Warranty returns to the factory for repairs - in the event where the unit has been shipped to the factory for repairs, transport costs will be for the owners account.
9. National Luna will not accept any responsibility for the consequential loss or damage caused by, or due to the malfunctioning of this appliance.
10. National Luna shall not be held responsible for any injuries to persons caused by the incor-
rect or negligent usage of this appliance.
11. Repair work to be done in terms of this warranty must be referred to National Luna for written authorisation before any work is carried out.
12. National Luna reserves the right to refuse repair or service under warranty if the Warranty registration card or original proof of purchase cannot be produced.
For tracking and warranty purposes, please fill in the information below
Serial No :____________________________
Model :______________________________
Date purchased : ______________________
Invoice No : ___________________________ 27
Dealer’s name / Stamp :
www.nationalluna.com
National Luna - South Africa
Tel : +27 (0)11 452-5438
Fax : +27 (0)11 452-5263
NL - 13-5-2011 - M - R