1
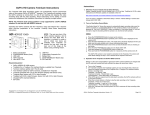
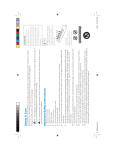
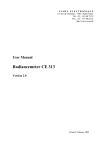
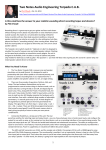
Kingdom Hall Audio 3 Screenshot User Guide V 1.0 July 29, 2014 Table of Contents The Audio Mixer .............................................................................................................................. 3 Music Player Section ...................................................................................................................... 4 Recording the Meeting ................................................................................................................... 5 Keyboard Shortcuts......................................................................................................................... 7 Connection to other Kingdom Halls Appendix ......................................................................................................................................... 8 Special Notes................................................................................................................................. 10 Feedback or Suggestions KH Audio App Icon Starts Application KH Audio 3 Screenshot User Manual V 1.0 Page 2 of 10 The Audio Mixer Music Volume Master Volume Private Meeting Microphone Channel Auto Mute the Roving Microphones Volume Presets Manual Mute of Roving Microphones Signal Level Manual Mute of ALL Microphones Volume Controls Adjusting the volume levels Click on its slider knob and move the mouse up or down to change setting. You can also click somewhere in the slider to have the knob move directly to that level. Pressing the number key corresponding to a mic channel will bring that channel up to its preset level. When signal is present, the green light is lit. If the gate is open, the orange indicator is lit. The arrow shows that this is the channel that is active at the moment. By pressing the plus [+] or minus [-] key on the keyboard , you can adjust the level of the channel with this indicator: Pressing the [R] key will lower all mic channels one notch each time it is pressed. Volume presets do not affect the music volume at any time. If you select a volume preset while playing a meeting song, the preset will be selected and the microphone volumes will go to their appropriate settings 5 seconds before the song ends or if the song is stopped. KH Audio 3 Screenshot User Manual V 1.0 Page 3 of 10 Music Player Section Track Window Click on the button in front of the meeting song or title you want to change. Click the Play button (or press spacebar on keyboard) to start the song selected. When the song starts, the Play button turns into the Stop button. With the exception of the music channel, all of the channels on the mixer will mute automatically when a song starts. They will return to the previous settings when the song finishes or stops. Background Music Play button and selection box. Keyboard Tips Use the Return Key (or Enter) until the correct song is selected. To Change the song number After you select the song: • Holding the Command key ( ) type the number of the song. • Press the Return Key (or Enter) to select next song. The Play or Stop buttons start and stop music. You also can use the spacebar. Please note: Songs cannot be paused and restarted. Playing the song again will start it from the beginning. External Track Play button shows up when you drag an external file into track window. KH Audio 3 Screenshot User Manual V 1.0 Page 4 of 10 Recording the Meeting Erases all recordings listed. Only press Delete All if you want to erase all recordings in this list. Select to use the AutoRecord feature. Splits audio recordings into separate tracks while recording. Click to Start or Stop the Recording. A folder named Recordings has been created on the computer desktop. This is where all of your recordings reside. KH Audio 3 Screenshot User Manual V 1.0 Page 5 of 10 To burn an Mp3 CD (must have a CD burner attached to system): Open the folder Recordings. Select the date of the recording(s) to be used. Select the files Select “Burn Items to Disc” Insert a blank CD Give the disk a name When the burning is complete, eject the disc KH Audio 3 Screenshot User Manual V 1.0 You should not attempt to burn a CD while the meeting is still in progress. Wait until after the closing prayer before burning any CDs! After the closing prayer (and not before!), you will be ready to burn the tracks to CD. Page 6 of 10 Keyboard Shortcuts Command ( ) + a Number Key [Spacebar] [M] [R] Command ( ) + [R] [+] [-] Changes the song number. If music is playing, stops the music. If no music is playing, starts the currently selected song. Mute all sound coming from any microphone while key is pressed. Reduce all microphone channels by one notch. Mute and Un-Mute the roving microphones. Raise the volume a notch on the microphone currently being spoken into indicated by the: Lowers the volume a notch on the microphone currently being spoken into as indicated by the: Connections to other Kingdom Halls You are able to use this selection to connect to another Kingdom Hall if the installation crew configured this option. KH Audio 3 Screenshot User Manual V 1.0 Page 7 of 10 Appendix Automatically muting the roving microphones is done as soon as a signal is detected on the designated reader microphone. When a signal is “heard” again on the main microphone, the roving microphones will be faded in immediately. To enable this feature make sure you have checked Auto Mute Roving Mics. Automatically Recording Meetings is done from the opening song to the closing song. Make sure that the Auto Record checkbox is checked. To split tracks click the Split button. This will create a new track for a talk during a meeting, while the recording is progressing, click the Split button to create a marker for a new file. This causes a new track to be created, and the previous one is already converted to Mp3. Songs that are automatically recorded are split into another track. Click Stop to finish recording, or system will stop automatically 5 minutes after the meeting is over. Background Music tracks are played by clicking the Background Music Play button. The computer will play the background music selected until you press Stop or push the spacebar on the keyboard. Then meeting song Play button is shown, and you are now ready to start playing the songs for the meeting. When you stop playing the background music, the system will fade out the music. Also while playing background music, all other mixer channels remain and do not mute. This allows the chairman to make announcements, or call the audience to attention. Master Volume Fader control provides a way to increase or decrease all volumes at once. Typically you would not use this slider as Volume Presets do not include the master volume. This slider needs to be at an appropriate level during the meetings. You should only use it to adjust the general volume levels of the audio system. Standard level for this control is 0 dB. Manually muting the roving microphones is done manually when you click the Mute Roving button. The Mute button toggles into Un-Mute. To bring the microphones back to their original level, click it again or push the Command ( ) + [R] key again. This can also be done if the microphones were muted automatically. Manually Recording Meetings is done if automatic recording is not checked, you can manually start recording. The recording is started by clicking the Start button. You can stop the recording at any time by clicking the same button, which will toggle to Stop during recording. You can do multiple recordings (any amount of tracks you want) and they can be burned onto an MP3 CD after the meeting. Meeting songs are displayed by the song selection radio button. If no music is playing, the selected song number and title is displayed in the “track window”. They will stop automatically if you do not stop them beforehand. After the song automatically stops, the song selection will advance to next song. KH Audio 3 Screenshot User Manual V 1.0 Page 8 of 10 Mixer Inputs have Green signal indicators to show you where the system detects an audio signal. Orange signal indicators show you where the system detects activity and as turned that channel “on”. The level meters of each channel show you the signal levels controlled by the volume you set. Muting the system can be done by the master Mute All button or by Mute Roving. By clicking and holding the Mute All this will temporarily mute all signals in the system. As soon as you let the mouse button go, the master will return to its previous level. This is very useful when attendants are adjusting the microphones on stage. Hold it while they are moving the mikes to avoid unwanted sounds through the system. You can also do this by holding down the [M] key on the keyboard. Playing External Tracks can be used for special occasions like weddings, drama rehearsals, or another event that you may have a custom made track with the desired music or track. To play this type of external track just drag the track onto the music playback window. When the track is dropped on the window a new External Track Play button will appear below the track window. After the track starts, the button disappears. This and any other external tracks must be drug into the window to play again. Private Meeting is for any confidential meeting. Check the Private Meeting checkbox above the Volume Presets. This disables the channel 2 amplifier output (libraries), FM Transmitter output and the Telephone System output. No audio will be broadcasted other than through the channel 1 amplifier which should only be connected to the main auditorium loudspeakers (amp channel 2 is connected to libraries, restrooms, office, etc.). Reset Button is used if trouble strikes, you can use the Reset button next to the I/O indicator up at the top of the screen. Use this as a last resort! This will reset all functions back to original as if you just restarted the application. Volume Presets are provided to significantly reduce the need to manually handle each microphone channel. If you click on a Volume Preset, the volume of all microphone channels will automatically move to the level set for that preset. Feel free to change sliders as you want. You can always reselect any preset at any time. Vocal Renditions or Music In Other Languages can be played if these files are installed. Use the selector box in the section for Background Music to choose any of the available languages. KH Audio 3 Screenshot User Manual V 1.0 Page 9 of 10 Special Notes Feedback or Suggestions This computer software can be adapted, so please send any feedback or suggestions for improvement to Br. Tony de Rijk at the following email address: [email protected]. KH Audio 3 Screenshot User Manual V 1.0 Page 10 of 10