1
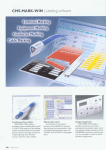
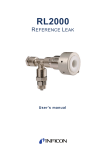
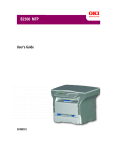
SERVICE
MANUAL
nipa63e1-a (1410)
Type no. ILS.210.306
Sensistor ILS500
Leak Detection System
Sensistor ILS500 F
Tracer Gas Filler
1
Content
nipa63e1-a (1410)
Safety During Service
1
General Information
7
1.1
1.2
About This Document
Versions
7
7
2
Components
8
2.1
2.2
2.3
Exploded View (ILS500)
Exploded View (ILS500 F)
Interior View ILS500
8
10
13
3
Troubleshooting
15
4
Service Instructions
16
4.1
4.2
4.3
4.4
4.5
4.6
4.7
4.8
4.9
4.10
4.11
4.12
4.13
4.14
4.15
Safety Equipment, Tools and Consumables
Open the Cover
Changing Fuses
Changing Power Supply
Changing Main PCB
Changing Pressure or Vacuum Sensor
Changing Venturi Pump
Changing Gas Valves
Changing Pilot Valves
Changing Valve Block
Changing PLC and AD Module
Changing Display
Changing ISH2000
Changing Panel Cover (ILS500 F Model)
Functional Verification
5
Software Update
5.1
5.2
5.3
Update the Software
Reset to Factory Configuration Parameters
Supported USB Memories
6
Drawings
17
18
19
20
21
22
23
24
25
26
27
28
29
30
31
41
41
41
41
42
3
4
nipa63e1-a (1410)
Safety During Service
Definitions of Warning, Caution and Notice
Warning
Indicates procedures that must be strictly observed to prevent hazards to persons.
Caution
Indicates procedures that must strictly be observed to prevent damage to or destruction
of the instrument.
Notice
Indicates special requirements the user must comply with.
nipa63e1-a (1410)
Safety Instructions
Failure to observe the following precautions could result in serious personal injury:
Warning
Pay attention to the Warnings, Cautions and Notices in the User Manual for the
product before operation.
Warning
The ILS500 must never be introduced to pressures higher than that approved for the
object to be tested and never beyond the ILS500 specification.
Failure to observe the following precautions could result in damage to the equipment:
Caution
During service at the Service Center, all devices must be handled exclusively in an
ESD Protected Area (EPA).
Devices must be transported from one EPA to another only in ESD shielding
packages.
5
Caution
On Customers site, during exchange or maintenance of electronic card, the service
personnel must wear a ESD coat and use disposable wristband.
Caution
Risk assessment is the sole duty of the person handling the ILS500.
Check that all relevant legislation and safety standards are complied with
before putting ILS500 into service.
nipa63e1-a (1410)
Notice
6
1
General Information
The Sensistor ILS500 is an all-in-one tracer gas leak detection system with all
necessary functions integrated in one very compact housing. The Sensistor ILS500 F
is a tracer gas filler.
Please read this Service Manual carefully before performing service on the ILS500.
When reading, please pay particular attention to the WARNINGS, CAUTIONS and
NOTICES found throughout the text.
1.1
About This Document
This document is only intended for INFICON service personnel working with the
ILS500 Leak Detection System.
1.1.1
nipa63e1-a (1410)
1.2
Document History
Revision
Date
Remark
a
10-2014
First edition
Versions
This manual applies to the product versions below.
Unit
Name
Software version
Leak Detector
ISH2000
6 or higher
Tracer Gas Filler
ILS500
3 or higher
Probe
P50
2 or higher
For more information about the latest software versions, please contact your local
INFICON office.
7
2
Components
2.1
Exploded View (ILS500)
58 59 60 61 63 64 65 66 67
68 69 71 72 73 74 75
2
4
30
14
27
31
51
52
10
56
7
1
76
11
26
15
55
nipa63e1-a (1410)
16
28
5
23
6
8
25 48
32
54
18
33
53
24
32
17
27
9
19
21
27
22
8
nipa63e1-a (1410)
Pos
Description
Part No.
Pos
Description
Part No.
1
Power supply ILS500
591-575
32
Torx screw M5x10 fzb
591-954
2
PLC FX3UC
591-718
33
Phillips screw M3x8 fzb
591-483
4
A/D CONVERTER BOARD
591-572
48
Cover plate
591-579
5
Valve ramp
591-565
51
Nut M6
591-586
6
Power inlet
591-576
52
Lock washer M6
591-587
7
DIN rail 35 mm, l=0,50m
591-580
53
Lock washer M5
591-609
8
Fuse holder
591-577
54
Lock washer M4
591-776
9
Hex nut M6M M4 A2
591-019
55
Front stand
591-573
10
Washer BRB 5,3x10x1 A2
591-108
56
Back stand
591-574
11
WEW 35/2
591-434
58
Contact for HMI-PLC
591-614
14
HMI-Panel*
599-027
59
CA51 operating panel cable
591-544
15
Sensistor ISH2000P*
599-073
60
CA52 ISH2000 RS232 cable
591-545
16
Weld box ILS500*
599-025
61
CA53 pilot valve cable
591-546
17
Valve block P510*
599-023
63
CA55 PLC I/O cable
591-548
18
Torx M4x8 fzb
591-260
64
CA56 PLC AIN cable
591-549
19
Pneumatical label 1 ILS500
598-073
65
CA57 PLC RS422 cable
591-550
20
Pneumatical label 2 ILS500
598-074
66
KB1022 printer cable
591-777
21
Electrical label ILS500
598-075
67
CA59 PLC power cable
591-552
22
ILS500 label
598-076
68
CA60 power cable 1
591-553
23
Nipple straight outer g1
591-561
69
CA61 power cable 2
591-554
24
Pneumatic coupling I straight 4 4
591-567
71
CA64 pressure gauge cable
591-571
25
Fuse 2A T
591-578
72
CA73 Rear probe cable
591-955
26
Torx screw M4x6
591-581
73
CA71 ISH2000 power cable
591-956
27
Torx screw M4x12
591-298
74
CA72 ISH2000 APC cable
591-957
28
Torx screw M4x20
591-583
75
PLC and software ILS500
591-845
30
Plastic washer M4 4.3x9x0.8 PA
591-584
76
Torx MC6S 5X25 FZB
591-289
31
ILS500 electronic board
591-603
* This spare part comprises several parts, for details see “Component Details” on page -12.
9
2.2
Exploded View (ILS500 F)
58 59 61 63 64 65 66 67
68 69 71 75
2
4
30
14
27
31
51
52
10
56
7
1
76
11
26
77
55
16
28
23
nipa63e1-a (1410)
5
79
6
8
25 48
32
54
18
33
53
78
24
17
27
9
19
21
20
22
10
nipa63e1-a (1410)
Pos
Description
Part No.
Pos
Description
Part No.
1
Power supply ILS500
591-575
32
Torx screw M5x10 fzb
591-954
2
PLC FX3UC
591-718
33
Phillips screw M3x8 fzb
591-483
4
A/D CONVERTER BOARD
591-572
48
Cover plate
591-579
5
Valve ramp
591-565
51
Nut M6
591-586
6
Power inlet
591-576
52
Lock washer M6
591-587
7
DIN rail 35 mm, l=0,25m
591-580
53
Lock washer M5
591-609
8
Fuse holder
591-577
54
Lock washer M4
591-776
9
Hex nut M6M M4 A2
591-019
55
Front stand
591-573
10
Washer BRB 5,3x10x1 A2
591-108
56
Back stand
591-574
11
WEW 35/2
591-434
58
Contact for HMI-PLC
591-614
14
HMI-Panel*
599-027
59
CA51 Operating panel cable
591-544
16
Weld box ILS500*
599-025
61
CA53 Pilot valve cable
591-546
17
Valve block P510*
599-023
63
CA55 PLC I/O cable
591-548
18
Torx M4x8 fzb
591-260
64
CA56 PLC AIN cable
591-549
19
Pneumatical label 1 ILS500
598-073
65
CA57 PLC RS422 cable
591-550
20
Pneumatical label 2 ILS500
598-074
66
KB1022 Printer Cable
591-777
21
Electrical label ILS500
598-075
67
CA59 PLC power cable
591-552
22
ILS500 label
598-076
68
CA60 Power cable 1
591-553
23
Nipple Straight outer g1
591-561
69
CA61 Power cable 2
591-554
24
Pneumatic coupling I straight 4 4
591-567
71
CA64 Pressure gauge cable
591-571
25
Fuse 2A T
591-578
75
PLC och software ILS500
591-845
26
Torx screw M4x6
591-581
76
Torx screw MC6S 5X25 FZB
591-289
27
Torx screw M4x12
591-298
77
Panel cover ILS500 F
598-069
28
Torx screw M4x20
591-583
78
Torx screw M5x60
591-610
30
Plastic washer M4 4.3x9x0.8 PA
591-584
79
Plug 12 mm
591-976
31
ILS500 electronic board
591-603
* This spare part comprises several parts, for details see “Component Details” on page -12.
11
Component Details
1
2
Pos
12
3
4
Description
Part No.
1
HMI-Panel
599-027
2
Sensistor ISH2000P
599-073
3
Weld box ILS500
599-025
4
Valve block P510
599-023
nipa63e1-a (1410)
2.2.1
2.3
Interior View ILS500
1
10
2
9
3
4
8
5
nipa63e1-a (1410)
7
1
2
3
4
5
6
7
8
9
10
6
Venturi Pump (Ejector)
Evacuation Valve
Tracer Gas Fill Valve
Test Port Valve 2
Vacuum Sensor Control Valve
Pressure Sensor (HP model only)
Vacuum Sensor
Pressure Sensor
Pilot Valve 6
Pilot Valve 1
Pilot Valve Ramp
Position
Valve
5A+6A
Main Air Valve
5B+6B
Venturi Pump Supply
4A
Evacuation Valve
4B
Tracer Gas Fill Valve
3A
Test Port 2 Valve
3B
Sensor Protection Valve
2A
Tooling Valve 1
2B
Tooling Valve 2
1A
Tooling Valve 3
1B
Tooling Valve 4
13
1
6
2
3
4
1
2
3
4
5
6
14
Main PCB
PLC
AD Module
Fuse holder
Power Supply
USB
nipa63e1-a (1410)
5
3
Troubleshooting
Tested Unit
Tested Feature
Reason for Error
Vacuum and
Pressure Sensors
Zero point
Broken/disconnected Check cable of
cable.
sensors.
nipa63e1-a (1410)
Venturi Pump
Maximum vacuum
Action
Wrong set A/D
parameters.
Check and adjust
Analog Input settings.
Replace sensor if “m”
value needs more
than 20% change.
Broken vacuum or
pressure sensor.
Replace sensor.
No signal to Venturi
pilot valve.
Check ”Venturi
Pump” output.
For more help, please
contact INFICON.
No signal to
Check ”Evac Valve”
Evacuation pilot valve. output.
For more help, please
contact INFICON.
Test Port 2 Valve
Function
No signal to pilot
valve.
Check ”Test Port 2”
output.
For more help, please
contact INFICON.
Tracer Gas Fill Valve
Function
No signal to pilot
valve.
Check “Fill Valve”
output.
For more help, please
contact INFICON.
Evacuation Valve
Function
No signal to
Evacuation pilot
valve.
Check “Evac Valve”
output.
For more help, please
contact INFICON.
Lamp
Function
No signal from PLC.
Check PLC output.
For more help, please
contact INFICON.
Tooling Valves
Function
No signal from PLC.
Check PLC output.
For more help, please
contact INFICON.
15
4
Service Instructions
Caution
During service at the Service Center, all devices must be handled exclusively in an ESD
Protected Area (EPA).
Devices must be transported from one EPA to another only in ESD shielding packages.
Caution
nipa63e1-a (1410)
On Customers site, during exchange or maintenance of electronic card, the service
personnel must wear a ESD coat and use disposable wristband.
16
4.1
Safety Equipment, Tools and Consumables
When performing service of the ILS500 the following equipment may be needed.
1
3
2
T20
5
4
T25
6
7
8
nipa63e1-a (1410)
2400
577
9
Pos Description
Comment
1
Allen Keys (hexagonal 3 and 4 mm)
2
Torx Key (T20 and T25)
3
Screwdriver (Philips 1 or Pozidriv 1)
4
Protective Eyewear
When performing tooling output
test.
5
Protective Ear Plugs
When performing tooling output
test.
6
Tracer Gas
7
Compressed Air (10 bar)
8
Loctite 2400
9
Loctite 577
17
4.2
Open the Cover
nipa63e1-a (1410)
A
Disassemble
1 Unplug power supply.
2 Use a T25 key to remove the two screws holding the cover (A).
3 Slide the cover back and lift it off. Rock the rear end of the cover up and down a few
times to loosen.
Assemble
1 Reinstall the cover (A).
2 Reinstall and tighten the screws.
18
Changing Fuses
Part
Part No.
Qty
Fuse, 2A slow for
Sensistor
ISH2000
591-578
2
Consumables
nipa63e1-a (1410)
4.3
A
Disassemble
1 Unplug power supply.
2 Remove the lid (A) containing the fuses.
3 Remove the fuses.
Assemble
1 Install new fuses.
2 Reinstall the lid (A) containing the fuses.
19
Changing Power Supply
Part
Part No.
Qty
Power supply
591-575
1
Consumables
A
Disassemble
1 Unplug power supply.
2 Open the cover, see “Open the Cover” on page -18.
3 Unplug power supply.
4 Loosen all cables on the power supply (A).
5 Remove the power supply (A) by loosen the two screws in the bottom.
Assemble
1 Install new power supply.
2 Reinstall and tighten the screws.
3 Reinstall all cables.
4 Reinstall the cover.
20
nipa63e1-a (1410)
4.4
Changing Main PCB
Part
Part No.
Qty
Electronic board
591-603
1
nipa63e1-a (1410)
4.5
Consumables
A
Disassemble
1 Unplug power supply.
2 Open the cover, see “Open the Cover” on page -18.
3 Unplug power supply.
4 Loosen all cables on the power supply.
5 Remove the power supply by loosen the two screws in the bottom.
6 Loosen all cables attached to the main PCB (A).
7 Remove the six screws holding the main PCB (A).
Assemble
1 Install new PCB and tighten the screws.
2 Reinstall all cables attached to the main PCB.
3 Reinstall the screws holding the power supply.
4 Reinstall all cables attached to the power supply.
5 Reinstall the cover.
21
Changing Pressure or Vacuum Sensor
Part
Part No.
Qty
Valve block P510
included in 599-023 1
Consumables
A
Disassemble
1 Unplug power supply.
2 Open the cover, see “Open the Cover” on page -18.
3 Unplug power supply.
4 Loosen the cable from the contact.
5 Remove the Sensor contact using a wrench.
Assemble
1 Install the new Sensor contact.
2 Reinstall the cable.
3 Reinstall the cover.
22
nipa63e1-a (1410)
4.6
4.7
Changing Venturi Pump
Part
Part No.
Qty
Valve block P510
included in 599-023 1
Consumables
nipa63e1-a (1410)
A
Disassemble
1 Unplug power supply.
2 Open the cover, see “Open the Cover” on page -18.
3 Remove the exhaust hose from the barbed hose fitting.
4 Unscrew and remove the barbed hose fitting and the plastic washer.
5 Use a 4 mm Allen key to remove the four screws holding the Venturi pump (A).
6 Remove the o-ring under the Venturi pump (A). Remove the hose from Venturi inlet.
Push hose into connector and press orange ring down to release hose, then pull
hose out.
7 Remove the hose fitting from the Venturi pump (A).
Assemble
1 Install new Venturi or use compressed air jet and a cotton bud, pipe cleaner or small
brush to clean the nozzles inside the Venturi.
2 Replace hose fitting on Venturi inlet.
3 Reconnect inlet hose.
4 Clean o-ring and install in groove on valve manifold.
5 Reinstall and tighten the four screws.
6 Put plastic washer inside Venturi outlet and reinstall barbed fitting. Tighten with
spanner.
7 Reconnect the exhaust hose.
23
8 Run through the hardware test again to test that the Venturi delivers adequate max
vacuum.
9 Reinstall the cover.
4.8
Changing Gas Valves
Part
Part No.
Qty
Valve block P510
included in 599-023 1
Consumables
nipa63e1-a (1410)
A
Disassemble
1 Unplug power supply.
2 Open the cover, see “Open the Cover” on page -18.
3 Use a 3 mm Allen key to remove the four screws holding the valve (A) to be
changed.
4 Lift out the old valve (A).
Assemble
1 Install new valve.
2 Tighten the screws 2-3 mm (0.08-0.12 in.) at a time moving the key from screw to
screw so that the valve doesn’t tilt much.
3 Tighten the screws and replace the cover.
4 Run through the hardware test again to test that the changed/removed valve(s)
perform as required.
5 Use hand probe to check that there is no external leakage (this part of Hardware
Test is routine).
24
6 Reinstall the cover.
4.9
Changing Pilot Valves
Part
Part No.
Qty
Valve ramp
591-565
1
Consumables
nipa63e1-a (1410)
A
Disassemble
1 Unplug power supply.
2 Open the cover, see “Open the Cover” on page -18.
3 Use small screw driver to loosen the screw holding the valve (A). You must back the
screw all the way out until you feel it “jumping” in the thread entrance.
4 Push down on the LEDs while pressing the screw down until you feel the locking
mechanism “snap”.
5 Lift the old valve (A) out from the coil side. If the valve does not come off, repeat
steps 3 and 4 making sure the screw is completely backed out.
Assemble
1 Push the screw in while inserting the new valve. Insert the end facing the screw first
and then push the coil side down.
2 Tighten the screw.
3 Reinstall the cover.
25
4.10 Changing Valve Block
Part
Part No.
Qty
Valve block P510
included in 599-023 1
Consumables
nipa63e1-a (1410)
A
Disassemble
1 Unplug power supply.
2 Open the cover, see “Open the Cover” on page -18.
3 Use a Torx screwdriver to loosen the three screws on the back.
4 Loosen the Pilot Valve cable, Vacuum Sensor cable and the Pressure Sensor cable
from the Valve Block (A).
5 Lift the Valve Block (A) out and clean it from contamination.
Assemble
1 Install the new Valve Block.
2 Reinstall all cables.
3 Reinstall and tighten the screws.
4 Reinstall the cover.
26
4.11 Changing PLC and AD Module
Part
Part No.
Qty
PLC FX3UC
591-718
1
A/D CONVERTER
BOARD
591-572
1
Consumables
nipa63e1-a (1410)
A
Disassemble
1 Unplug power supply.
2 Open the cover, see “Open the Cover” on page -18.
3 Loosen all cables attached to the PLC and AD Module (A).
4 Unlock the hooks on the back.
5 Remove the PLC and AD Module (A).
Assemble
1 Install new PLC and AD Module.
2 Lock the hooks on the back.
3 Reinstall all cables.
4 Reinstall the cover.
27
4.12 Changing Display
Part
Part No.
Qty
HMI-Panel
599-027
1
Consumables
nipa63e1-a (1410)
A
Disassemble
1 Unplug power supply.
2 Open the cover, see “Open the Cover” on page -18.
3 Remove both side covers.
4 Use a Torx screwdriver to remove the fours screws holding the display panel.
5 Carefully lift out the display panel.
6 Use a Torx to remove the four screws holding the display (A).
7 Remove the old display (A).
Assemble
1 Install new display.
2 Reinstall and tighten the screws holding the display.
3 Reinstall and tighten the screws holding the panel.
4 Reinstall the cover.
28
Notice
For information about how to replace lamps and buttons in the display
panel, please contact INFICON.
4.13 Changing ISH2000
Part No.
Qty
Sensistor ISH2000P
599-073
1
Consumables
nipa63e1-a (1410)
Part
A
Disassemble
1 Unplug power supply.
2 Open the cover, see “Open the Cover” on page -18.
3 Remove both side covers.
4 Use a Torx screwdriver to remove the four screws holding the ISH2000 (A).
5 Carefully lift out the ISH2000 (A).
6 Loosen all cables attached to the ISH2000 (A).
7 Remove old ISH2000 (A).
29
Assemble
1 Install new ISH2000.
2 Reinstall all cables.
3 Reinstall and tighten the screws.
4 Reinstall the cover.
4.14 Changing Panel Cover (ILS500 F Model)
Part No.
Qty
Panel cover ILS500 F
598-069
1
Consumables
nipa63e1-a (1410)
Part
A
Disassemble
1 Unplug power supply.
2 Open the cover, see “Open the Cover” on page -18.
3 Remove both side covers.
4 Use a Torx screwdriver to remove the two screws holding the Panel Cover (A).
5 Lift out the Panel Cover (A).
30
6 Remove old Panel Cover (A).
Assemble
1 Install new Panel Cover.
2 Reinstall and tighten the screws.
3 Reinstall the cover.
4.15 Functional Verification
4.15.1 Perform Hardware Test
nipa63e1-a (1410)
Notice
Before performing the hardware test, carefully check that your tracer gas
and compressed air feed pressures are correct. Wrongly set pressure can
cause erroneous test results.
Hardware Test
OUTPUTS
Press “TEST”
ILS500 plugged
Vacuum:
0.00 bar
ILS500 + Object
Pressure:
0.00 bar
TEST
STOP
Report
• For troubleshooting and testing of the system, use Service menu.
• For remote troubleshooting, use Service Run menu.
• Venturi Pump and all Gas Valves can be tested automatically.
The hardware test is a diagnostic tool helping you in preventive maintenance as well as
service and repair. The test takes you through a number of steps testing all units that
are subject to wear and should thereby help you to find almost any problem in the
ILS500 system.
Notice
Run through the whole sequence to interpret the results correctly.
You will need the reference table at the end of this section to help you
interpret the test results correctly. Keep this manual at hand when
performing the test.
You can choose to test according to the limits of your specific application.
31
1 Setup all parameters for your test object (or load desired recipe) and connect a leak
free sample.
2 Set test selection switch to ”ILS500 + Object” for application specific hardware test.
You can also test the ILS500 against factory specification. In this case you should
plug both test ports using the plugs delivered with the units.
3 Remove ISO to NPT converters if installed. Set test selection switch to ”ILS500
plugged” for factory specified hardware test.
4 The ”Continue” button will be displayed at the end of each test step. Press
”Continue” for next test step.
Pressure and Vacuum Sensors
Hardware Test
Pressure and Vacuum Sensors
Zero Points are OK
0.00 bar
Pressure:
0.00 bar
STOP
Report
Zero points of pressure and vacuum sensors are tested.
Possible results:
• Zero Points are OK
• Vacuum Zero Point not OK
Offset zero point can result in:
• Incorrect gas filling
• Erroneous vacuum or pressure decay results
Evacuation Valve
Hardware Test
Evacuation Valve
No Internal Leakage
CONTINUE
Vacuum:
-0.03 bar
Pressure:
0.00 bar
STOP
Evacuation valve is checked for internal leakage.
Possible results:
32
Report
nipa63e1-a (1410)
CONTINUE
Vacuum:
• No Internal Leakage
• Internal Leakage
Internal leakage can result in:
• False vacuum decay rejects
• Increased tracer gas consumption
Venturi Pump
Hardware Test
Venturi Pump
Max Vacuum OK
Vacuum:
-0.88 bar
Pressure:
0.00 bar
CONTINUE
STOP
Report
nipa63e1-a (1410)
Checking max vacuum of Venturi pump.
Possible results:
• Max Vacuum OK
• Poor Max Vacuum
Poor max vacuum can result in:
• Failed pre-evacuation
• Slower evacuation
Manifold Tightness (gross)
Hardware Test
Manifold Tightness
No Leakage from Outside
CONTINUE
Vacuum:
-0.82 bar
Pressure:
0.00 bar
STOP
Report
The overall tightness of the manifold is tested using the vacuum raise method.
Possible results:
• No Leakage from Outside
• Leakage from Outside
33
Leaks in the manifold can result in:
• False vacuum decay rejects
• Increased gas consumption
Minor external leakage will be found later during the
gas test step.
Vacuum Sensor Valve
Hardware Test
Vacuum Sensor Valve
Valve works!
CONTINUE
Vacuum:
0.00 bar
Pressure:
0.00 bar
STOP
Report
nipa63e1-a (1410)
This checks that the valve shuts to protect vacuum sensor before filling.
Possible results:
• Valve works
• Faulty!
Malfunction can result in:
• Damage to vacuum sensor
• Failed pre-evacuation
Tracer Gas Fill Valve
Hardware Test
Tracer Gas Fill Valve
No Internal Leakage
CONTINUE
Vacuum:
0.00 bar
Pressure:
0.00 bar
STOP
Report
The step tests the gas fill valve for internal leakage by registering pressure rise behind
the valve.
Possible results:
• No Internal Leakage
34
• Internal Leakage
Internal leakage can result in:
• Erroneous pressure decay results
• False vacuum decay rejects increased gas consumption
Test Port 2 Valve
Hardware Test
Test Port 2 Valve
Valve works!
CONTINUE
nipa63e1-a (1410)
Notice
Vacuum: 0.00
bar
Pressure: 0.00
bar
STOP
Report
This test will fail if both test ports are connected to a test object. Proceed
and then repeat the entire hardware test sequence with both ports
plugged to perform this test step.
This step tests Test Port 2 valve for internal leakage by registering pressure rise behind
the valve.
Possible results:
• No Internal Leakage
• Internal Leakage
Internal leakage can result in:
• False blockage test accepts
Tracer Gas Fill Valve
Hardware Test
Tracer Gas Fill Valve
Valve works!
CONTINUE
Vacuum:
0.00 bar
Pressure:
0.50 bar
STOP
Report
This step tests that tracer gas fill valve opens to fill gas. Test will fail if tracer gas feed
pressure is too low. If this is the case, adjust pressure and restart hardware test from
beginning.
35
Possible results:
• Valve works
• Faulty!
Malfunction will result in:
• Failed gas filling
External Gas Leaks
Hardware Test
Check for Leaks with Hand Probe
Vacuum:
0.00 bar
Pressure:
0.50 bar
CONTINUE
STOP
Report
1 Start by checking all connections between the ILS500 and your test object. Follow
each test line carefully and check every joint.
2 Proceed to check around the gas valves and manifold inside the ILS500.
Manifold Tightness (gross)
Hardware Test
Manifold Tightness
Internal Leakage
CONTINUE
Vacuum:
0.00 bar
Pressure:
0.46 bar
STOP
Report
The overall tightness of the manifold is tested using the pressure decay method. This is
a complement to the gas test, revealing leakage out, through the exhaust etc.
Possible results:
• No Internal Leakage
• Internal Leakage
Internal leakage can result in:
• False pressure and vacuum decay rejects
• Increased tracer gas consumption
36
nipa63e1-a (1410)
The ILS500 is now prepared for a manual test for external leakage. Use the hand probe
to check for leakage
Evacuation Valve
Hardware Test
Evacuation Valve
Valve works!
Vacuum:
0.00 bar
Pressure:
0.00 bar
CONTINUE
STOP
Report
This step tests that evacuation valve opens to release tracer gas to exhaust. Same test
as previously but under pressure instead of vacuum.
Possible results:
• Valve works
• Faulty!
nipa63e1-a (1410)
Malfunction will result in:
• Failure to terminate test cycle
37
Indicator Lamps
Hardware Test
Lamp in Start Button
OK?
CONTINUE
Vacuum:
0.00 bar
Pressure:
0.00 bar
STOP
Report
Hardware Test
Green Lamp (Top Left)
OK?
0.00 bar
Pressure:
0.00 bar
STOP
Report
Hardware Test
Red Lamp (Bottom Left)
OK?
CONTINUE
Vacuum:
0.00 bar
Pressure:
0.00 bar
STOP
Report
This is a “manual” test. The ILS500 lights up one lamp at the time. Simply check that
the right lamp comes on.
1 Check function of each lamp by pressing “Continue”.
2 Remember to check lamps on both touch panel and external control panel (if
installed).
38
nipa63e1-a (1410)
CONTINUE
Vacuum:
START and STOP buttons
Hardware Test
Press Start Button (Top Right)
OK?
Vacuum:
0.00 bar
Pressure:
0.00 bar
STOP
Report
Hardware Test
Press Stop Button (Bottom Right)
OK?
Vacuum:
0.00 bar
Pressure:
0.00 bar
nipa63e1-a (1410)
STOP
Report
This is a “manual” test. The test continues when the correct button is pressed. The test
checks the activated START and STOP buttons only. Use INPUT menu under Service
menu to check buttons that are turned off.
39
4.16
Hardware Error Messages
Error Message
Reason for Error
Corrective Action*
Detector Power Off
No power to the Leak
Detector.
Check the power cable to
the detector (internal or
external).
Detector Error + Check
Probe and Cable**
Probe cable disconnected. Connect cable.
Detector Error + Check
Sensor, Voltage Error**
Gas sensor damaged.
Replace probe or sensor.
Detector Error + Error
[Driver name]**
Active Probe error.
Consult Active Probe
Manual.
Hardware Error
Vacuum Sensor Error
No power to vacuum
sensor.
Check cable to sensor.
Sensor not connected to
AD.
Check connection to AD.
Hardware Error
Pressure Sensor Error
No power to pressure
sensor.
Check cable to sensor.
Sensor not connected to
AD.
Check connection to AD.
Damaged pressure sensor. Replace sensor.
Analog Inputs Power Off
No power to AD module.
Check power cable on left
side of AD module.
Emergency Stop Activated
Emergency Stop not
Reset.
Pull out emergency Stop
Button to reset.
ISH2000 Comm. Error
ISH2000 printer mode
turned off manually.
Restart system.
ISH2000 serial cable
disconnected.
Connect cable (internal or
external).
*
Contact your supplier if the suggested action does not clear the error.
** Error message on ISH2000 display.
40
nipa63e1-a (1410)
Damaged vacuum sensor. Send in for repair.
5
Software Update
5.1
Update the Software
1 Turn the ILS500 on.
2 When the hourglass symbol disappears, press a finger on the screen and hold until
the screen turns gray and following message appears:
“Tap anywhere on screen or touch calibrate will start in 10 seconds.”
3 Lift the finger and press once again to enter the service menu.
4 Click “Erase Project”, then click Yes to delete the project.
5 Turn the ILS500 off.
6 Insert the USB memory with the new Software.
7 Turn the ILS500 on.
8 Wait for the “Update project” window. Click Yes to copy project from USB memory.
The new updates will now be running, this may take a while. The ILS500 will
automatically restart once the new software is loaded into the instrument.
9 Wait for the “Project transfer” window. Click Yes to download PLC program.
10Choose the program you want to run and click Yes.
nipa63e1-a (1410)
11Update is completed and the ILS500 will start as usual.
Notice
5.2
If the update fails, repeat this procedure.
Reset to Factory Configuration Parameters
Notice
After updating the software in ILS500 INFICON recommends to do a
system reset.
1 Click Menu >> Advanced Settings >> Service Menu >> System Reset.
2 Click Yes to reset the ILS500 to factory default.
5.3
Supported USB Memories
The ILS500 supports USB 2.0 full speed 12 Mbps and is backwards compatible with
USB 1.1. USB memories must be USB mass storage device class compatible and
have a maximum power consumption of 200 mA when no external field buss module is
mounted.
41
D
C
B
A
DB 25F
E R E L AY 2
IDC 20-pin
PLCIN
Relay
R S232
C onnector s not mounted
1
AC inlet
230VAC
CA61
IL S500-PCB1- Rev5 (MAN and HMI connectors rem
oved)
DB25F
APUNIT
DB25F
H2000APC
Weid SLD, 8-pin
TOOLING
Weid SLD, 8-pin
CONTROL
Weid SLD, 6-pin
STATUS
Weid SLD, 6-pin
SAFETY
Weid SLD, 5-pin
OPTIN1
Weid SLD, 5-pin
OPTIN2
RJ45
ETHERNET
DB9M
PRINTER
DB9M
Leak Detector
DB37F
HMI
DB25M
MAN
PR I NT E R 1
PL C PW R
DB 9M
Driv ers
Phoenix
4-pin
OPT1
Phoenix
4-pin
Phoenix
3-pin
PWRIN
Phoenix
2-pin
DETPWR
AC/DC supply
2
DB 9M
SENSPWR
IDC 20-pin
PLCOUT
Phoenix 10-pin
AIN34
PL C
U?
E R E L AY 1
A PC
2
DB 37F
DB 25M
1
I L S500 (P510) PC B 1 R ev4
all connections not shown!
HMI1
H 2000
V AL V E S
42
DB9F
3
24VDC
CA60
CA71 (New! Updated CA54)
CA64
CA72 (New! Updated CA62)
CA53
CA55
CA56
CA55
CA52
CA57
CA59
CA51
KB1022 (replaces CA58)
3
4
4
5
6
6
LEMO
(mounted on rear pane
panel)
(New! Updated CA63)
CA73
Front panel
Buttons & LEDs
CA70 (New!)
nipa63e1-a (1410)
SMC valve terminal
HMI adapter PCB
DB37F
HMI (display)
5
DB 9M
7
Date
File
Revision
01B
Author
IL S500 with ISH2000
Block diagram & internal cables
DA
INFICON AB
Box 76
S-581 02 Linköping
Sweden
8
7
8
2013-05-22 Time 15:58:23
Sheet 1 of 1
C:\Altium \MI SC\I L S500-ISH2000\blockdiagram\IL S500-ISH2000_block.SchDoc
A3
Design
Page
Size
Vacuum & pressure transm
im
tters
Headphone
LEMO (front)
ISH2000
PLC A/D
PLC
PLC RS232
Removed from design
LEMO (rear)
DB 25F
D
C
B
A
6
Drawings
43
nipa63e1-a (1410)
INFICON AB Westmansgatan 49, S-58216 Linköping, Sweden
[email protected]
UNITED STATES TAIWAN JAPAN KOREA SINGAPORE GERMANY FRANCE
Vi sit o ur web site fo r con ta ct info rma tion an d sa le s o f fi ces wo rld wid e.
Document: nipa63e1-a (1410)
UNITED KINGDOM HONG KONG
w w w. i n fi c o n . co m