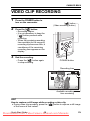
1
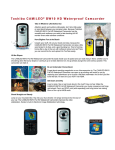
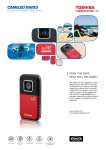
Quick Start Guide
CAMILEO BW10
EN
CZ
DE
DK
ES
FI
FR
GR
HR
HU
IT
NL
NO
PL
PT
RS
RU
SE
SK
SL
TR
AR
Downloaded From VideoCamera-Manual.com Manuals
CAMILEO BW10
INTRODUCTION
Welcome and thank you for choosing a TOSHIBA product.
For your convenience, your TOSHIBA product is furnished with two guides:
a) this Quick Start Guide, and
b) a comprehensive PDF User's Manual on the included DVD.
SAFETY INSTRUCTIONS
1. Do not drop, puncture or disassemble the camcorder; otherwise the
warranty will be voided.
2. Do not expose the camcorder to high temperature or leave it in direct
sunlight. Doing so may damage the camcorder.
3. Use the camcorder with care. Avoid pressing hard on the camcorder
body.
4. For your own safety, avoid using the camcorder when there is a storm or
lighting.
5. Do not use batteries of different specifications. Doing so may lead to the
potential for serious damage.
6. Remove the battery during long periods between usages, as a
deteriorated battery may affect the functionality of the camcorder.
7. Remove the battery if it shows signs of leaking or distortion.
8. Use only the accessories supplied by the manufacturer.
9. Keep the camcorder out of reach of infants.
CAUTION
10. Risk of explosion if battery is replaced by an incorrect type.
11. Dispose of used batteries according to the instructions.
EN
1
Quick Start Guide
Downloaded
From VideoCamera-Manual.com
Manuals
CAMILEO BW10
Important!
Concerning your camcorder’s
waterproof feature
This camcorder complies with JIS IPX8 (formerly JIS protection grade 8)
waterproof standard and can be used in water. Note, however, that
failing to heed the following precautions may result in damage or injury
that is not covered by the warranty. Please take the time to carefully
read and heed the following cautions.
NOTE
k Before using the camcorder
i When closing the slot cover and terminal cover, make sure that no foreign
object such as sand, hair, dust, etc. is caught in the rubber seal.
i Make sure that the slot cover and terminal cover are completely and
securely closed to prevent water from getting inside the camcorder and
damaging it.
i Please note that the camcorder accessories are not waterproof.
k Cautions concerning use in water
i The waterproof properties of the camcorder apply to fresh water and
saltwater only; they do not apply to cleaning substances, chemicals or
water from spas, etc. In case of a splash, immediately wipe off any
moisture.
i Do not immerse in water at a depth greater than 2.0 m (6.56 ft.).
i Do not subject the camcorder to high-pressure water.
i Do not immerse in water for longer than 60 minutes. After 60 minutes of
use in water, allow it to dry for at least 10 minutes.
i Do not immerse in water that is warmer than 40 °C (104°F).
i Do not open and close the slot cover or terminal cover when the
camcorder is wet or while it is immersed in water.
i Do not open and close the slot cover or terminal cover with wet hands.
i Do not open the slot cover or terminal cover on the beach or at the
poolside.
i Do not jolt the camcorder while it is immersed in water. Doing so may
cause the slot cover or terminal cover to open.
Quick Start
Guide
2
Downloaded
From
VideoCamera-Manual.com
Manuals
EN
CAMILEO BW10
NOTE
k Storing and maintaining your camcorder
i Do not leave the camcorder unwashed after it has been immersed in salt
water or if salt water is adhering to it. Doing so may cause corrosion and
discoloration of the plating, as well as deterioration of the camcorder’s
waterproof capability.
i After the camcorder has been used in water, use fresh water to wash it.
Never use soap or detergent to clean the camcorder, as doing so will
cause deterioration of the camcorder’s waterproof capability.
i After washing the camcorder, take care to completely drain it, and use a
dry cloth to wipe off any drops of water adhering to it (page 15).
i Do not leave the camcorder in an environment colder than 0 °C (32°F) or
warmer than 40 °C (104°F), as doing so may cause deterioration of the
camcorder’s waterproof capability.
i Waterproof seals are used in this camcorder. It is recommended that the
waterproof seals be replaced every year with new ones. For replacing the
seals, please consult your dealer.
* Please note that there is a fee for replacing the waterproof seal.
k Other cautions
i Do not subject the camcorder to severe jolts, as doing so may deform the
slot cover, terminal cover or the camcorder body, thus compromising its
waterproof capability. If the camcorder has been subjected to a strong jolt,
please consult with your dealer.
HINT
What is “JIS IPX8” (formerly “JIS protection grade 8”)?
i “JIS IPX8” specifies that a device is protected against the effects of
continuous immersion in water.
EN
3
Quick Start Guide
Downloaded
From VideoCamera-Manual.com
Manuals
CAMILEO BW10
BEFORE RECORDING IN WATER
Make sure that the slot cover and the terminal cover are closed.
If a cover is open, water will get inside the camcorder and damage it.
When closing the slot cover and terminal cover, make sure that no foreign
object such as sand, hair, dust, etc. is caught in the rubber seal.
Terminal cover
Slot cover
There are places in the camcorder where water might accumulate, but this
will not affect its waterproof properties.
To care for your camcorder after using in water, see page 15.
Quick Start
Guide
4
Downloaded
From
VideoCamera-Manual.com
Manuals
EN
CAMILEO BW10
PREPARE THE BATTERY PACK
AND CARD
When using for the first time
The battery pack is already installed in the camcorder. Remove the battery
pack from the camcorder, remove the insulating seal, and reinstall the battery
pack in the camcorder.
EN
5
Quick Start Guide
Downloaded
From VideoCamera-Manual.com
Manuals
CAMILEO BW10
Installing the battery pack and card
Install the card and the supplied battery pack.
i The card is not an included accessory. Please purchase a commercially
sold card.
i The camcorder has an internal memory, which means that you can record
and save the recorded data even if no card is installed.
1 While pressing...
6 Close
2 Pull out
3 Open
4 Insert
kTo remove
5 Insert
<Remove the battery pack>
2 Pull out
1 Press
<Remove the card>
2 Pull out
1 Push in
Quick Start
Guide
6
Downloaded
From
VideoCamera-Manual.com
Manuals
EN
CAMILEO BW10
CAUTION
Close the slot cover and terminal cover securely
i If any cover is not closed or is not closed completely, the camcorder will no
longer be waterproof. When closing a cover, make sure that no foreign
object such as sand, hair, dust, etc. is caught in the rubber seal.
Charging the battery pack
1
Press the power button to turn off the camcorder.
h It is not possible to charge the battery pack while the camcorder is on.
POWER button
2
Use the dedicated USB interface cable (supplied) to connect the
camcorder to a computer.
1 While pressing
2 Open
3 Connect
→To USB connector
on computer
EN
7
Quick Start Guide
Downloaded
From VideoCamera-Manual.com
Manuals
CAMILEO BW10
3
Turn on the computer.
h Charging begins.
h During charging, the multi-indicator is lit orange.
h When charging is completed, the indicator turns off.
h The charging time is approx. 220 minutes.
CAUTION
During charging...
i Do not turn on the camcorder while the battery pack is charging. It is not
possible to charge the battery pack while the camcorder is on.
i Do not turn off the computer while the battery pack is charging. It is not
possible to charge the battery pack while the computer is off.
i With certain computers, it may be possible to charge the battery pack even
when the computer is turned off.
Quick Start
Guide
8
Downloaded
From
VideoCamera-Manual.com
Manuals
EN
CAMILEO BW10
DATE AND TIME SETTING
When the camcorder is first turned on after purchase, the Clock Set Screen
appears. Proceed from step 4 to set the date and time.
1
2
3
4
5
Press the power button to turn on the camcorder.
Press the MENU button.
h The Setting Menu appears.
OK button
Use the [I] and [J] arrow keys
to select “CLOCK SET”, and
press the OK button.
h The Clock Set Screen
appears.
Set the date and time.
h To select the desired setting:
Press the [G] and [H] arrow
keys.
h To change the assigned
value: Press the [I] and [J]
arrow keys.
POWER button
Arrow keys
Press the OK button.
h Assign the desired value to
each setting.
CLOCK SET
6
Press the MENU button.
h The date and time settings
are completed, and you are
returned to the Setting Menu.
DATE
2010/06/01
TIME
00:00
DISP
D/M/Y
OK OK
EN
9
Quick Start Guide
Downloaded
From VideoCamera-Manual.com
Manuals
CAMILEO BW10
VIDEO CLIP RECORDING
1
2
3
Press the POWER button to
turn on the camcorder.
[
] button
(Video recording button)
Press the [
] button.
h Recording begins.
h It is not necessary to keep the
[
] button pressed while
recording.
h When the remaining recording
time available for the currently
recording clip becomes little, a
countdown of the remaining
recording time appears on the
display.
End the recording.
h Press the [
] button again
to stop recording.
POWER button
Recording time
2M
REC 00:00:09
5
Available recording
time remaining
HINT
How to capture a still image while recording a video clip
i During video clip recording, press the [
] button to capture a still image
of the scene at that instant.
Quick Start
Guide
10
Downloaded
From
VideoCamera-Manual.com
Manuals
EN
CAMILEO BW10
SHOOTING SINGLE SHOTS
Capture a still image (single-shot).
1
2
Press the POWER button to
turn on the camcorder.
[
] button
(Photo shooting
button)
Press the [
] button.
h The shutter releases and
the image is captured.
h You can view the captured
image on the monitor by
keeping the [
] button
depressed when you
capture the image.
POWER button
13
00:00:19
EN
11
Quick Start Guide
Downloaded
From VideoCamera-Manual.com
Manuals
CAMILEO BW10
PLAYING BACK VIDEO CLIPS AND
STILL IMAGES
1
Press the play [=] button.
h The display changes to
the Playback Screen.
[=] button
(Play button)
OK button
2
3
Select the image to play back.
h Use the arrow keys to
move the orange frame to
the image you wish to
play back.
h The image information for
the framed image is
shown in the bottom part
of the monitor.
Press the OK button.
h The file you selected is
played back.
<To return to the
recording mode>
h Press the play [=] button.
MENU button
Arrow keys
2010.12.24
14:25 100-0011
Orange frame
Remaining battery
power indication
Quick Start
Guide
12
Downloaded
From
VideoCamera-Manual.com
Manuals
EN
CAMILEO BW10
Deleting files
1
2
3
On the screen in step 2, move the orange frame to the file you wish
to delete, and press the MENU button.
Select “DELETE SINGLE”, and press the OK button.
h If you press [G] or [H], the screen to delete a different file will appear.
When you are finished deleting files, press the MENU button.
When you are finished using the camcorder...
Press the POWER button for at least 1 second to turn the camcorder off.
EN
13
Quick Start Guide
Downloaded
From VideoCamera-Manual.com
Manuals
CAMILEO BW10
COPYING FILES TO A COMPUTER
1
2
3
4
5
Start your computer, and use the supplied USB interface cable to
connect your camcorder to the computer.
h Connect the camcorder’s USB terminal to the computer’s USB
connector.
h The USB Connection Screen appears on the camcorder’s monitor.
Select “COMPUTER”, and press the OK button.
h The screen to select the connection mode appears.
Select “CARD READER”, and press the OK button.
Select an action.
h Select the desired procedure.
Copy the desired camcorder file(s) to the computer.
CAUTION
To access the data in the camcorder’s internal memory...
i Remove the card from the camcorder.
HINT
About the application software
Concerning the application software, the following software is bundled in the
supplied DVD-ROM.
i CAMILEO uploader
With application installed, when your camcorder is connected to your
computer in the YouTube mode, the camcorder is ready to upload to
YouTube.
i MAGIX Video deluxe 15 Plus Trial Software
For editing movies. 30-day trial version.
Quick Start
Guide
14
Downloaded
From
VideoCamera-Manual.com
Manuals
EN
CAMILEO BW10
AFTER USING THE CAMCORDER IN
WATER
After using the camcorder in water, wash it with fresh water and dry it
completely.
1
2
3
Turn off the camcorder, and close the slot cover and terminal cover
securely.
Wash the camcorder with fresh water.
h Fill a shallow basin with fresh water, and immerse the closed camcorder
for about 5 minutes. Rotate the monitor unit several times to clean it
completely.
Dry the camcorder.
h Use a dry cloth to wipe off any drops adhering to the camcorder, and
leave it to dry completely in a well-ventilated place away from direct
sunlight.
h Do not use a hair dryer or the like to dry the camcorder. Exposing the
camcorder to high temperatures may cause the camcorder and/or
waterproof seal to become deformed.
HINT
About the handstrap
i Wash the handstrap in fresh water after detaching it from the camcorder.
i After washing, leave it to dry in a place away from direct sunlight.
CAUTION
i Do not use detergent, as doing so may cause water to leak into the
camcorder.
EN
15
Quick Start Guide
Downloaded
From VideoCamera-Manual.com
Manuals
CAMILEO BW10
TOSHIBA SUPPORT
Need help?
For the latest driver updates, User's Manuals & FAQs please have a look at
the TOSHIBA options & services support page:
computers.toshiba.eu/options-support
Please see
computers.toshiba.eu/options-warranty
for the TOSHIBA hotline numbers.
REGULATORY INFORMATION
CE compliance
This product is CE marked in accordance with the requirements of the
applicable EU Directives.
Responsible for CE marking is Toshiba Europe GmbH, Hammfelddamm
8,41460 Neuss, Germany. A copy of the official Declaration of Conformity can
be obtained from following website:
http://epps.toshiba-teg.com.
Following information is only valid for EU-member States:
Disposal of products
This symbol indicates that this product must not be disposed of
with normal household waste. The product must be disposed of
separately.
Quick Start
Guide
16
Downloaded
From
VideoCamera-Manual.com
Manuals
EN
CAMILEO BW10
Regulation: IEC 60825-1:2001
LED light characteristics
- Continuous illumination
- Wavelength 400 to 750 nm
- Output 65 µW (internal 34 mW)
CAUTION
If an undesignated modification etc. of the LED light used in this product is
intentionally performed, the resulting light intensity that is emitted may exceed
the level that is safe for the eyes. Therefore, do not disassemble the LED
light.
Any repairs must be performed by a designated technician authorized by the
manufacturer.
The use of controls or adjustments or performance of procedures other than
those specified herein may result in hazardous radiation exposure.
EN
17
Quick Start Guide
Downloaded
From VideoCamera-Manual.com
Manuals