1
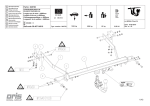
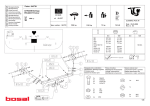
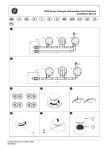
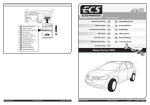
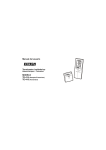
Witter
Detachable
Witter Towbars
Chester CH5 2NY
Detachable Towball Technical Helpline +44 (0)845 2009534
www.witter-towbars.co.uk
Towball Systems
Operation Manual
and
Malcolms Caravans
10-12 Wynnefield Road Rathmines Dublin1
Tel: +353 (0)1 497 5713
E-mail [email protected]
Product Warranty
Garanti.
Vedrørende garantispørsmål:
Henvend Dem til: SLH A.S tlf. +47 32253060
E-mail: [email protected]
eller S. Kjos Import A.S tlf. +47 32784556
E-mail [email protected]
This document contains essential safety information
and must be read and understood before using your
new Witter Detachable Towball System. It should
be stored in the vehicle for future reference.
(ZQ-M-Issue 6)
© 2007 C P Witter Ltd
Registered Office: 5 Temple Square, Temple Street, Liverpool L2 5RH
16
1
StowBar Detachable
Towball System
Upgrade Installation
Terms and Conditions of Warranty
1)
This product warranty is only valid if the Detachable System is registered with
Witter Towbars on-line at www.witter-towbars.co.uk/warranty/ZQ1
A. Receptor
2)
This product warranty is valid for 2 years from the date you purchased the
Detachable System from Witter Towbars or their agents. The Warranty will
be extended for a further year (3 years in total) if you register the Detachable
System within 30 days of the date of purchase.
B. Towball Neck
3)
This product warranty covers faulty materials and workmanship. During
the period this warranty is valid, the Detachable System you have purchased
will be repaired, replaced or have parts replaced free of charge provided
that:
a) the Detachable System is returned to Witter Towbars with evidence of
the purchase date.
b) the Detachable System has been installed and operated correctly.
c) the Detachable System or Towbar has been used within the towing limits
specified by the vehicle manufacturer. (See vehicle handbook).
d) the Detachable System or its mechanism has not been damaged (unless
as a result of faulty materials or workmanship by Witter Towbars).
e) it has not been used for any purpose other than towing a trailer or for use with
a cycle carrier and this does not exceed the towing limits of the towbars
f) the mechanism of the Detachable System has been operated only by
hand (as described in the Operation Manual) or in conjunction with a Witter
ZQR handle.
g) repairs to the Detachable System have not been attempted other than by
Witter Towbars.
4)
C. Handle
P. Safety Chain Plate
W. Weather Cap
FITTING OF TOWBALL RECEPTOR
1.
Remove original bolts at (X) and Towbar Centre Part (if fitted).
2.
Attach Towball Receptor Unit (A), Safety Chain Plate (P) and original Electrical Plate if
removed, to Towbar Centre Profiles using replacement Bolts and Nyloc Nuts.
3.
Tighten Bolts to 96 Nm.
4.
Assemble Weather Cap (W) to the Towball Receptor Unit so as to cover the openings
for the Towball Neck (B) and Handle (C)
This Warranty does not confer any rights other than those expressly set
out above and does not cover any claims for consequential loss or damage.
This warranty is offered as an extra benefit and does not affect your statutory
rights.
FM27936
2
15
StowBar Detachable
Towball System
Operation Manual
Quantum Detachable
Towball System
Operation Manual
General directions for the operation of all Detachable Towball Systems.
1.
13
16
2.
3.
4.
5.
6.
17
This user manual contains information that is essential to ensure the safe operation of the system
and must be kept with the vehicle documents at all times.
We emphasise that a Towbar is a safety critical item, which should be used and installed as stated in the
installation instructions.
The operations should only be performed by hand. (Never use tools of any kind to operate the locking
system. This can result in damage of the locking system, after which safe usage can no longer be
assured, and the warranty would be invalid). It is permissible to use a Witter ZQR handle.
Check the green indicator is correct every time before towing, as shown in diagram 3.
When used in combination with a coupling head with an integrated stabiliser e.g. ALKO or Winterhoff, do not
use grease on the towball.
If the trailer is equipped with a safety cable or brake cable, this must be connected to the special safety hole that
is located in the fixed part of the Towbar (making sure that it cannot come into contact with the operation han-
dle).
7.
If the towball obscures (even partly) the vehicle registration plate, the towball must be removed at all times when
the towbar is not in use and the vehicle is used on public roads.
8.
If there are any doubts or concerns regarding the use or operation of the detachable system, contact either your
local Witter fitting specialist or visit our website where a full instructional video can be downloaded.
Mounting of Detachable Towball Systems.
(Refer to the diagrams on pages 5 & 6).
14
18
1.
2.
3.
15
19
4.
5.
14
Before installing the detachable towball, you must be sure that it is in the ’set’ position. (In this position the 18mm
diameter (Ø18) cylinder is ’set into’ the towball mechanism, or it can be pushed inwards with the fingers). The
operation handle is NOT in the ’set’ position if red is visible in the recess (on the underside). If this is the case,
push the knob in firmly and then rotate the handle fully clockwise to its end position. The handle should now remain in this position (see diagram 1).
Remove the plastic weather cap and ensure that the receiver is clear of any mud, gravel, road debris etc.
Insert
the detachable towball into the Towbar mounted housing until the large pin through the towball is located in the
recess in the Towbar mounted housing (refer to diagram 2). Keep your hands away from the locking system. For
vertical systems pull the towball towards you whilst holding the mechanism in place, after which the towball will
lock automatically. For horizontal systems push the towball downwards. The operation handle will turn to indication green and will also pop out 7mm (diagram 3). CHECK THIS! (If this is not the case, remove the towball and
start again at diagram “1”).
Lock the towball by turning the key anti-clockwise (refer to diagram 4). After this, the operation handle
can no
longer be pushed inwards, also it is no longer possible to turn the handle. If the towball system can be locked this
confirms that the towball is correctly installed. It is essential that the indicator is “green” prior to towing. Remember to remove the key from the lock before starting your journey. The towball is then ready to be used. (Refer to
diagram 5).
The key operated lock is an anti theft device only. It is not involved with the attachment of the towball.
It is safe to tow with the key operated lock un-locked as long as the towball is correctly attached as described
above.
3
StowBar Detachable
Towball System
Operation Manual
Brukerveiledning
QUANTUM AVTAGBART
KULESYSTEM
Generell veiledning for bruk av avtagbart kulesystem.
1
2
3
4
5
6
7
8
Denne manual inneholder viktige sikkerhetsanvisninger og skal oppbevares
sammen med bilens øvrige dokumenter.
Vi vil påpeke at tilhengerfestet er et sikkerhetssystem som bør monteres og behandles med
største forsiktighet.
Betjening av det avtagbare system må kun betjenes manuellt.Bruk ikke verktøy av noen art til
betjening av låsemekanismen, dette kan ødelegge låsen og vil hindre sikker bruk, samt at
garantien vil bortfalle.
Kontroller den grønne indikatoren før hver kjøretur, (ref. tegning 3)
Når kulen brukes sammen med kulekoblinger med innebygget stabilisator som ALKO eller
Winterhof skal det ikke benyttes fett eller olje på kulen.
Tilhengerens sikkerhetskjettinger eller katastrofevire må alltid festes til hull eller egen brakett
for dette formål på den faste delen av tilhengerfestet, påse at de ikke kommer i kontakt med
betjeningshendelen.
Den avtagbare trekkdelen (kulen) skal den alltid være avmontert når tilhengerfestet ikke er i
bruk.
Dersom det er noe tvil om bruk av det avtagbare system, ta kontakt med din
forhandler.
7
10
8
11
9
12
Betjening av det avtagbare system. (se bildeinstruksjon side 5)
Fjern støvdeksel RC fra receptorhuset.
A
B
C
Før installering av den avtagbare kule påse at receptorhuset på tilhengerfestet er rent
og fri for eventuellt snø og is. Påse at betjeningshendelen står på set posisjon, i denne
posisjon er sylinderen (18mm diam.) sunket inn i kulen eller kan lett presses inn med fingren
Hendlen er ikke i set posisjon dersom det røde feltet er synlig i åpningen på undersiden.
I dette tilfelle må hendelen vris medurs til sluttposisjon og stopper, i henhold til (bilde 1)
Plasser den avtagbare del helt opp i huset,(vertikal montasje) inn i huset, (horisontal
montasje). Hold fingrene borte fra låsehendelen, med kulen presset opp / inn gjøres et
lite rykk bakover, den vil da låse automatisk, (bilde 2).
Betjeningshendelen vil nå dreie til grønn posisjon og sprette ut ca. 7mm (bilde 3)
Kontroller dette! Dersom dette ikke er situasjonen, ta kulen ut og start igjen fra punkt
A.
Lås kulen ved å dreie hendelen moturs (bilde 4) med betjeningshendelen låst kan denne ikke
lenger presses inn eller vris i noen retning, når systemet lar seg låse er dette en bekreftelse
på at monteringen er gjort riktig.
Når indikatoren viser grønt og hendelen er låst med nøkkelen er kulen klar til
bruk (bilde 5)
4
13
StowBar Detachable
Towball System
Operation Manual
1
4
2
5
3
6
12
Quantum Horizontal
Detachable Towball
System Operation
5
Quantum Vertical
Detachable Towball
System Operation
StowBar Detachable
Towball System
General Maintenance
MAINTENANCE:
For prolonged life minor maintenance is required, as detailed below:
x
Keep the Towball Receptor Unit, Towball Neck, and Handle in a clean condition. The Towball
Receptor Unit can be washed with warm water and mild detergent to remove dirt ingress. Do
not use liquid solvent.
x
After use place the Towball Neck (B) and Handle (C) inside the bag provided, store preferably
in a dry place, and refit Weather Cap (W).
x
Maintain a thin layer of general-purpose grease (not oil) on the parts of the Handle and Towball
Neck that are inserted into the Towball Receptor Unit. Do not grease the spherical
surface of the towball if it is to be used with a ‘clamp on the ball’ type coupling
stabiliser. Check that all fasteners are tight every 10,000Km.
Vedlikehold.
Etter bruk, vask trekkdelen B og hendelen C med mildt såpevann, (benytt ikke løsningsmidler),
ren for skitt og salt, påse at overflatene på trekkdelen B, hendelen C og innvendig i reseptor
huset A alltid er rene og påført et tynt lag med fett, dette vil lette bruken og beskytte overflater
og nylonforinger. Plasser trekkdelen B og hendelen C i oppbevaringsposen, støvdekslet W
plasseres over hullene i reseptorhuset.
SAFETY:
x
Never leave the detachable towball loose in the car. Always store the towball in a secure
location where it is not free to enter the passenger compartment in the event of a collision or
heavy braking. If not secured the towball could cause serious injuries.
Make sure that when installed the hook on the Handle is correctly engaged over the Pin on the
Towball Neck. (See operating instructions on following page.)
In UK law the driver is responsible for the safe operation and use of a vehicle. Therefore if
there is any doubt as to the integrity of the installation of the detachable towball do not use
for towing. Either contact your local Witter fitting specialist or visit our website at
www.witter-towbars.co.uk.
Viktig.
NB. Trekkdelen B skal kun være montert ved kjøring med tilhenger.
Når den avtagbare kulen ikke er i bruk skal den oppbevares i posen som nedfølger, dersom den
oppbevares i bilen
må den plasseres på et sikkert sted slik at den ved en kraftig oppbremsing eller en eventuell kollisjon ikke
kan forårsake skade.
B
6
W
C
11
Quantum Detachable
Towball System
Operation Manual
Monteringsanvisning
QUANTUM AVTAGBART
TREKKDEL
Innhold:
A
1
T
1
K
2
X
4
FC
1
RC
1
L
1
B
1
ZQM1 1
Receptorhus
Avtarbar trekkdel
Nøkler for avtagbar trekkdel
M12 x 25mm x 1.75mm bolter, sprengskiver og stoppskiver (25mm diam.)
Plastdeksel
Avtagbart plastdeksel
Klistremerke (pil)
Oppbevaringspose
Brukerveiledning
Plasser plastdeksel FC over front av receptorhuset A (horisontal montasje), over topp av receptorhuset A ved
vertikal montasje.
Plasser receptorhuset A mellom platene på tilhengerfestet, monter løslig med bolter X. Dersom vinkelbrakett
EQ1 og kontaktplate ZEP1 medfølger tilhengerfestet monteres disse på venstre side, benytt bolt M10 x 25mm
med mutter og skiver. Kontaktplate ZEP2 monteres med en av boltene X.
Eventuell sikkerhetskjettingplate SC monteres på høyre side i nedre hull.
Plasser Trekkdelen T i receptorhuset i henhold til brukerveiledning, påse at trekkdelen
står rett (vertikal posisjon) trekk til bolter X. Tiltrekkingsmoment: M12 - 95 Nm
Plasser pil L nederst i senter på støtfangeren for å indikere receptorhusets plassering, (vertikal montering).
Dekselet RC skal alltid være plassert i recptorhuset A når trekkdelen Tikke er montert.
Den avtagbare trekkdel skal kun være montert ved kjøring med tilhenger.
Det kan være nødvendig på enkelte modeller med et lite kutt i støtfanger for å gi tilstrekkelig
plass til betjeningshendelen.
Påse at kunden / brukeren får overlevert brukerveiledningen samt blir gitt opplæring i bruk
av systemet.
Vertikal Montasje
Horisontal Montasje
10
Removal of the detachable towball system.
A. Always remove/unhitch the trailer prior to removing the towball (diagram 6), and remove any
accessories if they obstruct the locking system as well as detaching the safety cable.
B. Unlock the towball by turning the key clockwise. (Refer to diagram 7).
C. Hold the detachable towball with the left hand. Push the operation handle into its housing and
turn fully clockwise. The handle should remain in this position (refer to diagram 8).
D. Let the detachable towball slide out of the housing, whilst holding to prevent falling onto the floor.
E. When not in use keep the towball in the bag provided. If kept in the vehicle this must be located
such that it is not free to enter the passenger compartment in the event of a collision.
Maintenance:
The detachable towball requires no special maintenance. A few useful tips are given below.
-
-
The detachable towball and the towbar mounted receiver can be washed with warm water and
mild detergent in the installed position, or wipe with a dry cloth. Do not use liquid solvent for
cleaning purposes.
It is recommended that a small amount of light lubricating oil is used in the key locking
mechanism only.
Place the detachable towball inside the bag provided, and store, preferably in a dry place.
Safety:
-
Never leave the detachable towball loose in the car. Always store the towball in a secure
location where it is not free to enter the passenger compartment in the event of a collision or
heavy braking. If not secured, the towball could cause serious injuries.
-
Make sure that when installed the detachable towball locking system shows the green
indication strip and that the operation handle has popped out. This must be confirmed by locking the
towball.
-
In UK law the driver is responsible for the safe operation and use of a vehicle.
Therefore if there is any doubt as to the integrity of the installation of the
detachable towball, do not use for towing. Either contact your local Witter fitting
specialist, or visit our website www.witter-towbars.co.uk.
7
Quantum Detachable
Towball System
Upgrade Installation
Brukerveiledning
QUANTUM AVTAGBART
KULESYSTEM
Frakobling av det avtagbare system, (følg bildeinstruksjon)
A
B
C
D
E
Fjern alltid tilhenger og utstyr som kan være i veien for betjeningshendelen før kulen frakobles,
(bilde 6)
Lås opp kulen ved å dreie nøkkelen medurs (bilde 7)
Hold kulen med venstre hånd, press betjeningshendelen inn og vri denne medurs helt frem til
den stopper, hendelen skal forbli i denne posisjon, (bilde 8)
Kulen er løs og vil nå gli ut av huset, påse at den taes forsiktig ut slik at den ikke faller i
bakken med fare for å skade betjeningshendelen,(gjelder vertikal montasje), ved
horisontal montasje trekkes kulen bakover ut av reseptorhuset.
Når kulen ikke er i bruk bør den oppbevares i posen som medfølger, dersom den
oppbevares i bilen må den plasseres på et sikkert sted slik at den ved kraftig oppbremsing eller
en eventuell kollisjon ikke kan forårsake skade.
Vedlikehold
Den avtagbare kule krever ikke noe spesielt vedlikehold, noen gode råd nevnes
nedenunder. Kulen kan vaskes med mildt såpevann når den er montert, eller renses med
en tørr klut når den er frakoblet. Benytt ikke flytende, fettløslige midler for rengjøring.
Det anbefales noen dråper tynn olje i låsen.
Kulen oppbevares på et tørt sted
MATERIALS
A
1
T
1
K
2
X
4
FC
1
RC
1
L
1
B
1
ZQM1
1
Receptor/Socket for Towball
Detachable Towball
Keys for Detachable Towball
M12 x 25 x 1.75mm Bolts, Spring Washers and Flat Spacer Washers (25mm O.D.)
Fixed Weather Cover
Removable Weather Cover
Centreline Label
Bag
Operation Manual
INSTALLATION PROCEDURE
1.
2.
3.
4.
Place black plastic fixed weather cap (FC) over forward / (horizontal system) / upper (vertical system) holes of
receptor/socket (A), insert receptor/socket (A) into gap between mounting plates on the Towbar, and loosely attach
using bolts (X).
Notes: The electric plate angle bracket (ZEQ1), which is provided as part of the Towbar, should be refitted on the
left hand side, together with the electrical socket mounting plate (ZEP1). Only use the 25mm O.D. Flat Spacer
Washers (X) where there are no loose components attached, i.e. ZEQ1 (electrical socket angle bracket).
Insert detachable towball unit (T), using procedure detailed in Operation Manual provided, and ensure correct
vertical alignment of the towball before fully tightening bolts (X).
Attach centreline label (L) to lower edge of bumper.
Remove keys (K) from neck of towball, and record the key number in the Operation Manual, together with the
fitter’s name, telephone number, date fitted, vehicle model and registration number and Towbar part number.
Bumper Cut – It may be necessary to trim the bumper to allow adequate clearance around the operation
handle on the right hand side.
Note: It is essential that the customer / end user is familiar with the operation of the towball system, as
detailed in the Operation Manual, which must be handed to the customer / end user.
Recommended torque settings: M12 - 95 Nm
8
9