1
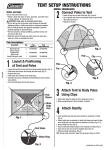
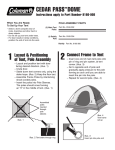
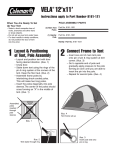
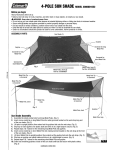
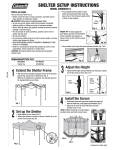
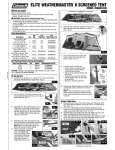
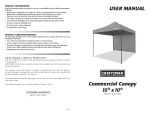
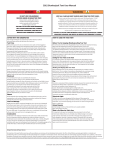
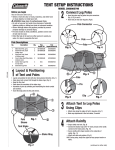
SHELTER SETUP INSTRUCTIONS
MODEL 2000004407
Before you begin
Read all instructions before set up.
• Select a level site clear of rocks, branches, and other hard or
sharp objects, to install your shelter.
WARNING: Keep clear of overhead power lines.
• Do not set up your shelter under trees because of potential
lightning strikes or falling tree limbs in inclement weather.
• Secure with all stakes and guylines provided to prevent property
damage or personal injury.
• For best results in windy conditions, position narrow end of
shelter into the wind.
• Do not drop shelter.
• Do not bounce shelter bag on its end to remove shelter, as these
actions may damage the frame.
• THIS RECREATIONAL PRODUCT REQUIRES A MINIMUM OF TWO
PEOPLE TO ASSEMBLE.
• Under no circumstances should this product be used to cover
automobiles, marine products or similar items.
CAUTION: Avoid pinch points when opening and closing the
shelter frame.
• Pull up sliding bracket located
on upper portion of leg until push
button snaps into place (Fig. 3).
This will ensure top of frame is
fully extended.
Push Button
Fig. 3
HANDY TIP: To fully engage the
push button, grip the top and bottom
frame members and squeeze as
shown in Fig. 3A. Be careful to avoid
pinch points.
Fig. 3A
• Secure shelter top to frame with hook & loop fasteners provided.
(Fig. 4 & 5)
STITCH LINE
Repair Parts List
1
Description
Part Number
Shelter top
5010000764
Fig. 4
Extend the Shelter Frame
• With two persons standing at diagonal corners of the structure,
grab the leg, and pull out to unfold frame. (Fig. 1)
NOTE: Do not unfold frame completely. This will allow easier fit
for draping shelter top over frame.
Extend Lower
Roof Pole
3
Fig. 5
Adjust the Height
• Adjust desired height until push button locks into place, making
sure all four posts are level. (Fig. 6 & 7)
Push
Button
Upper
Portion
of Leg
Push
Button
Fig. 6
Fig. 1
2
Set up the Shelter
• Drape the upper and lower roof top over frame. (Fig. 2)
• Insert the roof poles into shelter pockets (found at the shelter
corners). (Fig. 2A)
Upper Roof
4
Fig. 7
Stake the Shelter
• Secure shelter by driving stakes through the holes in the base
of each frame post. (Fig. 8)
Lower Roof
Roof Pole
Fig. 2
Shelter
Pocket
Fig. 2A
Fig. 8
(continued on other side)
5
Secure the Guylines
• Attach and stake out guylines. (Fig. 9)
Guyline
Fig. 9
7
• Remove stakes and guylines.
• Lower the frame one post at a time by pressing the push button locks located on
lower portion of posts. (Fig. 10)
• Press the push buttons found at upper corners of the frame (Fig. 11) and partially
fold the frame. This will allow easier removal of the shelter top from the frame.
• Remove the upper and lower roof top from frame and fold for storage.
• Press the push buttons (Fig. 12) to fold the lower roof poles to the storage position.
• Collapse shelter frame and store in carry bag.
To Store
1. All stakes must be placed in the
storage bag to prevent damage to the
fabric items placed in the carry case.
2. Make sure all components are clean
and dry before placing in carry case.
3. Store in a clean, dry area.
Push Button
Push Button
Fig. 10
Push
Button
Fig. 11
Things You Should Know:
• Under certain conditions (cold weather, high humidity, etc.)
condensation will form on the inside of your shelter. Condensation
is caused by water vapor from your breath, perspiration, or any wet
clothing inside the shelter. It is NOT LEAKAGE through the shelter fabric.
• Tree limbs, tree sap, bird droppings, or moisture steadily dripping
off tree limbs can cause damage to the shelter fabric and its coating
resulting in leaks or loss of flame-resistant properties.
• Never store shelter, even for a short period of time, without drying it
thoroughly and brushing off caked dirt. Do not pack stakes inside your
shelter. Use a separate storage bag.
• Stakes should be removed by pulling on the stake itself. NEVER PULL
ON THE SHELTER TO REMOVE STAKES AS THIS COULD RESULT IN
PROPERTY DAMAGE OR PERSONAL INJURY.
• Do not leave your shelter set-up for weeks at a time. Be aware that
exposure to ultraviolet rays from the sun can seriously damage material
and/or cause it to become discolored.
• This product is not intended to be used during heavy rain, wind,
hail, snow or other inclement weather. Excess water build-up can
cause the frame system to be come unstable, and possibly collapse,
causing injury.
Fig. 12
• The shelter top, screen, and sun wall (if included) should be carefully
removed during windy conditions to avoid damage to product or
personal injury.
• DO NOT use gas or flame sources under or near this product.
WARNING: Keep all flame and heat sources away from
this tent fabric.
This tent meets the flammability requirements of CPAI-84. The fabric may
burn if left in continuous contact with any flame source. The application
of any foreign substance to the tent fabric may render the flame-resistant
properties ineffective.
The Coleman Company, Inc. • 3600 North Hydraulic • Wichita, Kansas 67219
1-800-835-3278 in the United States • www.coleman.com
MADE IN CHINA • PRINTED IN CHINA
© 2009 The Coleman Company, Inc. All rights reserved.
, and
are registered trademarks of
Coleman®,
The Coleman Company, Inc.
4010005758 (20091204)
STITCH LINE
6
Disassembly