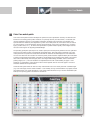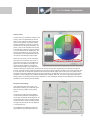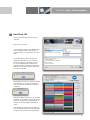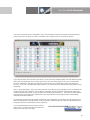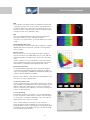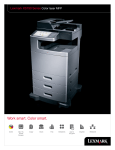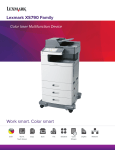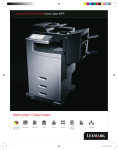
1
Konica Minolta Color Care 2 User Manual Colour management Color Care Index Index Preface . . . . . . . . . . . . . . 3 Installation . . . . . . . . . . . . . 4 System setup - Linearization . . . 45 Linearization . . . . . . . . . . . . . . . . . . . . . . . . . 45 Testing the linearization . . . . . . . . . . . . . . . . . . . 46 Minimum system requirements . . . . . . . . . . . . . . . . 4 Installation using Apple Mac OS X . . . . . . . . . . . . . . . 5 Installation using Windows . . . . . . . . . . . . . . . . . . 9 Measuring instrument EFI ES-1000 or X-Rite Eye One pro . 12 Software activation . . . . . . . . . . . . . . . . . . . . . . 13 Installation support . . . . . . . . . . . . . . . . . . . . . . 16 Change of computer and 14-day demo . . . . . . . . . . . 17 Printing targets . . . . . . . . . . . . . . . . . . . . . . . . 49 Measuring targets . . . . . . . . . . . . . . . . . . . . . . 50 Averaging several targets . . . . . . . . . . . . . . . . . . 51 Calculation of ICC profile . . . . . . . . . . . . . . . . . . . 51 Color Care Module . . . . . . . . 21 System setup - Final acceptance . 52 Color Care target . . . . . . . . . . . . . . . . . . . . . . . 21 Color Care catch - Measurement and Analysis . . . . . . . 25 Color Care catch - Measurement routines (catch jobs) . . . 27 Color Care catch - Handling measurement data . . . . . . . 28 Color Care profiler . . . . . . . . . . . . . . . . . . . . . . 29 Color Care match patch . . . . . . . . . . . . . . . . . . . 30 Final Check 100 . . . . . . . . . . . . . . . . . . . . . . . 53 Final Check 95 / Final Check 90 . . . . . . . . . . . . . . . 56 System setup - Hardware setup . 31 Color Density Control . . . . . . . . . . . . . . . . . . . . . 32 Density Balance . . . . . . . . . . . . . . . . . . . . . . . 34 Printer Gamma Adjustment . . . . . . . . . . . . . . . . . . 36 System setup - Profiling . . . . . 49 Production control . . . . . . . . 57 Standard control - Color Care target . . . . . . . . . . . . . 57 Media Wedge (v2.0 / v3.0) . . . . . . . . . . . . . . . . . . 57 Profile adjustment . . . . . . . . 58 Creation of measurement and reference file . . . . . . . . . 58 Profile adjustment . . . . . . . . . . . . . . . . . . . . . . 58 System setup - Gamut test . . . . 40 Comparison with ISO reference (offset print) . . . . . . . . . 41 Comparison with digital printing system . . . . . . . . . . . 44 2 Color Care Preface Preface You have decided on a comprehensive quality assurance system with Konica Minolta Color Care. The Color Care program ensures seamless integration of the manufacturer's in-house quality assurance for hardware and consumables, the standardized setup of printing systems with Color Care by the Konica Minolta service personnel, and daily production monitoring by you as the end user. You thus enjoy a high production security, independent of location, printing system and workflow configuration. That is why the Konica Minolta Color Care software is programmed as a RIP and machine-independent control system with freely definable reference data and measurement routines. Meaning that you could not be better prepared for the digital printing challenges of today and tomorrow. Quality with clear definitions from Konica Minolta Quality assurance starts with the clear definition of a system's performance. Konica Minolta communicates these definitions in a straightforward and verifiable manner within the Color Care program. Konica Minolta uses the Color Care system to define instrument and service parameters for on-site installation and quality control as early on as the hardware evaluation and testing of consumables. Standard machine installation and maintenance A printing system is only ever as good as its maintenance status. The service personnel from Konica Minolta check the compliance of parameters with Color Care in accordance with the stipulations of your maintenance agreement for installation and maintenance of the printing system. This ensures that all Konica Minolta printing systems can be installed and serviced according to the same specifications, regardless of their location. The standard Color Care printing system setup serves as a basis for the defined, documented and comprehensible starting point for further quality assurance in daily production. Quality assurance in daily production You are monitoring the stability of your production with Color Care software. The Color Care software contains components for end task monitoring and linearization, as well as modules for the small-scale adjustment of a printer profile or the manufacture of a new profile for additional paper or larger color deviations. Color Care also includes the Media Wedge measurement and evaluation for documenting your customer print quality. 3 Color Care Installation Installation Konica Minolta Color Care can be run using Windows or Mac OS X. The range of functions and file formats are identical. Measurement, reference and job data can be switched between the operating system platforms without a problem. The installation routines are very similar and the software is activated online. Minimum system requirements Apple Computer n Apple Computer with Intel processor n Mac OS X 10.5.8 or higher n minimum 512 MB of available RAM Windows Computer Intel Pentium III or 4 processor n Windows XP with SP3 n minimum 256 MB of available RAM n All systems Minimum 500 MB of free hard drive storage n DVD/CD-ROM drive n Color monitor with resolution of at least 1280x800 pixels and a color depth of 24 bit (16,7 million colors) n Internet access for activation of software (one-time) n Measuring instrument (not included) Spectral photometer EFI ES-1000 or X-Rite i1Pro, X-Rite i1iSis XL n Some of the product illustrations may contain optional accessories. Konica Minolta does not warrant that any process or specifications mentioned will be error-free. Specifications are subject to change without notice. Microsoft, Windows and the Windows logo are trademarks or registered trademarks of Microsoft Corporation in the United States and/or other countries. All other brand and product names may be registered trademarks or trademarks of their respective holders and hereby acknowledged. 4 Color Care Installation Installation using Mac OS X The installation routine follows the normal procedure. Start the program by double-clicking on "Color Care v2.0 Installer" and follow the instructions: Fig.1: Start of installation Fig.2: Entry of user password for the software installation 5 Color Care Installation Fig. 3: Start window Fig. 4: Terms and Conditions of license Fig. 5: Please confirm Terms and Conditions of license by clicking "Agree" 6 Color Care Installation Fig.6: Select installation directory Fig 7/8: Please enter your installation password here. You will find the installation key in the software cover for Color Care 1.0 Fig. 9: End of installation 7 Color Care Installation Fig.10: "Konica Minolta Color Care" program folder After successful installation, the "Konica Minolta Color Care" folder will be located on your computer, usually in the "Programme" folder. The folder contains the four Color Care modules: Color Color n Color n Color n n Care Care Care Care catch: match patch: profiler: display: Measurement and Quality Control Small-scale adjustment of existing profile Calculation of new ICC profiles Monitor calibration 8 Color Care Installation Installation using Windows The installation routine follows the normal procedure. Start the program by doubleclicking on "Color Care v2.0 Installer.exe" and follow the instructions: Fig.1: Start of installation Fig.2: Setup start screen 9 Color Care Installation Fig.3/4: Please close all other programs, click on "Next" and confirm the Terms and Conditions of license by clicking "Yes" Fig.5: Now enter your installation password. You will find the installation key in the software cover for Color Care 1.0 10 Color Care Installation Fig.6: Select installation directory Fig.7/8: End of Installation 11 Color Care Installation Fig.9: Please restart your Windows system before first starting the Color Care software. After successful installation, the "Konica Minolta Color Care" folder will be located on your computer, usually in the "C:\ Programme" folder. The folder contains the three Color Care modules: n Color Care catch: Measurement and Quality Control n Color Care match patch: Small-scale adjustment of existing profile n Color Care profiler: Calculation of new ICC profiles n Color Care display: Monitor calibration In the start menu, you will also find a new entry "Konica Minolta Color Care" which contains the links for starting the three program modules, as well as the folders for targets, jobs, etc. Fig.10: "Konica Minolta Color Care" contents in the start menu Drivers for measuring instrument EFI ES-1000 or X-Rite Eye One pro The Konica Minolta Color Care target is oriented towards measurement using X-Rite Eye One pro or the identical EFI ES-1000. It also contains profiling and linearization targets for the X-Rite i1iSis XL. For Apple systems, the required measuring instruments are installed together with Color Care. You can simply attach your measuring instrument after installation and use immediately. Windows computers, however, request the specification of the driver when the instrument is first connected. The appropriate device driver is provided on your EFI-CD or in the scope of supply of the measuring instrument. The Eye One driver is also contained in the Color Care CD. You can use both instruments; Color Care catch does not differentiate between EFI ES-1000 and X-Rite Eye One Pro. 12 Color Care Installation Activating the Color Care module The software is activated via the Konica Minolta online license server. A TAN number is contained within the software cover which enables you to authorize the software activation, a process similar to online banking. The software will then be registered to the machine ID of the computer on which Color Care is installed. If you would like to populate several workplaces with Color Care, you will also require a corresponding number of licenses. Without activation, only the basic measurement functions of the Color Care catch module can be used (Color Care measure functionality). For the analysis functions, profile calculation and profile adjustment, the Color Care module must be activated on the respective computer. Overview of procedure: n Open a Color Care module Ü the licensing window appears IMPORTANT: Please ensure that there is no USB stick connected to your computer during licensing! n The "License..." button brings you directly to the Konica Minolta license server n Log in here, enter TAN number and download lic.-file (license key) n Please click on the "Install License File..." button in the license window and download the lic.-file Procedure in detail: n Open one of the Color Care modules (Example: Color Care catch). If Color Care is not yet activated, the licensing window will appear automatically. Depending on which module you have started, the licensing window will look slightly different. The function is, however, identical. In Color Care catch, for example, check the 'control', 'certify' and 'pro' software functions and click on the "License..." button. You will be automatically connected to the Konica Minolta license server. The machine ID of your computer is automatically transferred during this process. IMPORTANT: USB sticks can interfere with the calculation of the machine ID. For the activation of your software, please remove all USB sticks before starting a Color Care module. [Tip] No Internet connection? Then please note the machine ID and generate the license key using another computer at http://www konicaminolta eu/colorcare/license 13 Color Care Installation n Please register if this is your first time visiting the Konica Minolta license server. To do this, click on the "Register" button. After registration, you will receive a confirmation e-mail. Please open this e-mail and click on the link to activate your account. Automatic backups of your license data will be saved in this account. If you must re-install your computer, you will find your activations here. If you have already set up an account, simply log in using the e-mail address and password. If you have forgotten your password, you can request a new one by clicking on "Forgot your password?" n If you have directly selected the "License..." button, you will be automatically taken to the "Licensing" page after login. The machine ID has already been entered. Now enter your TAN number. Your TAN number can be found in your Color Care CD cover. If you have logged in manually from another computer, click on "Licensing" on the left-hand side after login and enter the TAN number and machine ID of the computer on which Color Care is to be activated. If the TAN and machine ID are entered correctly, please click on "Submit". [Tip] Please type in the numbers carefully The machine ID always has 11 digits and 1 dash (12 in total) in the format 0123456789-5 The TAN always has 3 groups with 4 characters each, comprising lower case letters and figures The lower case letters prevent mix-ups such as o/0 and i/1 Please be aware of the l/1 difference, however! 14 Color Care Installation n After the transfer of the TAN and machine ID, the server will show the corresponding software license. Start the lic.-file download by clicking on "Start License Key Download". n Depending on how your browser is configured, the lic.-file download will start automatically. You will then find the file "Color_Care_2_xxxxxx.lic" in your standard download folder. By clicking on "here", you can also activate the file download manually. Save the file to, for example, your desktop. 15 Color Care Installation n Now return to the Color Care licensing window. Click on "Install License File" to load the downloaded file "Color_Care_2_ xxxxxx.lic". Color Care installs your license on the system and, after a short period, will display the license status "Permanent". The lic.-file in your download folder can now be deleted as the license information is saved in the system. When accessing the lic.-file again (e.g. for a reinstallation of your computer), you will find a backup of this file in your account on the Konica Minolta license server on the page "My Licenses". n Close the licensing window and restart the Color Care module. Although every Color Care module has its own licensing window, all other modules will always be activated automatically. Installation support Further information and support regarding Color Care software installation and activation is available by telephone or e-mail. Please make sure that you have carried out all the steps correctly before contacting the support team. Telephone support is available from Mon. - Fri. from 09:30 - 13:00 and 14:00 - 17:30 (CET/CEST). n Telephone: +49 (0)511 7404 424 n E-mail: [email protected] For questions regarding the function of your Konica Minolta printing system, please contact your local Konica Minolta sales partner. Should you not have a Konica Minolta contact partner, you will find contact data for your country of residence at the following address: http://www.konicaminolta.eu/business-solutions/company/contact.html 16 Color Care Installation Change of computer and 14-day demo Konica Minolta Color Care is licensed on the respective computer hardware. The software is activated via the Konica Minolta online license server. The TAN number affixed to the CD cover is no longer valid following activation of a computer. If the computer hardware must be replaced, a change of computer can be requested via the Konica Minolta license server. Following validation of your details, you will receive a license for the new hardware. Konica Minolta generally sends the new license within one working day. To ensure that a new computer is immediately functional, the license server also generates a 14-day demo activation 24 hrs a day which activates the complete range of software functions. Overview of procedure: n Open a Color Care module Ü the licensing window appears IMPORTANT: Please ensure that there is no USB stick connected to your computer during licensing! n "14-Days Demo License..." and "License..." will bring you directly to the Konica Minolta license server n Please log in here and generate the 14-day demo (14-days Tryout License) or request a new permanent license (Licensing Ü 2. Without TAN).The demo license file can be downloaded immediately; a new permanent license will be send to you by e-mail following verification of your data. n Please click on the "Install Licence File..." button in the license window and load the lic.-file Procedure in detail: n Open one of the Color Care modules (Example: Color Care catch). If Color Care is not yet activated, the licensing window will appear automatically. Depending on which module you have started, the licensing window will look slightly different. The function is, however, identical. For example in Color Care catch, check the 'control', 'certify', and 'pro' functions and click on "14-Days Demo License..." or "License...". You will be automatically connected with the Konica Minolta license server. The machine ID of your computer is transferred automatically. [Tip] No Internet connection? Then please note the machine ID and generate the license key using another computer at http://www konicaminolta eu/colorcare/license 17 Color Care Installation n Please register if this is your first time visiting the Konica Minolta license server. To do this, click on the "Register" button. After registration, you will receive a confirmation e-mail. Please open this e-mail and click on the link to activate your account. Automatic backups of your license data will be saved in this account. If you must re-install your computer, you will find your activations here. If you have already set up an account, simply log in using the e-mail address and password. If you have forgotten your password, you can request a new one by clicking on "Forgot your password?" n If you have selected a change of computer via the "License..." button, you will be automatically taken to the "Licensing" page after login. Scroll to the area "2. Without TAN". The machine ID has already been entered. Complete the field entries, select "Purpose" and then "Hardware Replacement" and then click on "Submit". If you have manually logged in using a different computer, after login click on "Licensing" on the left-hand side, scroll to the area "2. Without TAN" and complete the form. Enter the machine ID of the computer you would like to use for activation of Konica Minolta Color Care. [Tip] Please type in the numbers carefully The machine ID always has 11 digits and 1 dash (12 in total) in the format 0123456789-5 18 Color Care Installation n If you require immediate activation using a new computer, you can start the 14-day demo. This license is generated automatically by the license server. The button "14-Days Demo License..." will take you directly to the demo activation page after login. If you log in to your account from another computer, please select "14-Days Tryout License" on the left. Enter the product and your machine ID and click on "Submit". n The remaining procedure is the normal activation process: After providing the product code and machine ID, the server displays the corresponding software license. Start the lic.-file download by clicking on "Start License Key Download". Depending on how your browser is configured, the lic.-file download will start automatically. You will then find the file "Color_Care_2_xxxxxx.lic" in your standard download folder. By clicking on "here", you can also activate the file download manually. Save the file to, for example, your desktop. 19 Color Care Installation n Now return to the Color Care licensing window. Click on "Install License File" to load the downloaded file "Color_Care_2_ xxxxxx.lic". Color Care will now install your license in the system and will display, after a short period, the license status "DEMO: 13 day(s) remaining". The lic-file in your download folder can now be deleted as the license information is saved in the system. n Close the Licensing window and restart the Color Care module. Although each Color Care module has its own Licensing window, all other modules are also activated automatically. 20 Color Care Module Color Care Module The Konica Minolta Color Care software is structured in separate modules: Four separate modules are available for quality assurance, ICC profiling, printer profile adjustment and monitor profiling The central element of the quality assurance system, which is also used for system setup and daily monitoring, is the Konica Minolta Color Care target. Konica Minolta Color Care software module: n Color Care catch - Measurement and analysis software for quality control n Color Care profiler - ICC profiling with fully automatic dynamic color composition adjustment n Color Care match patch - Fast patch of small system drifts through adjustment of the printer profile n Color Care display - Monitor calibration Color Care target v2 4 The test form from Konica Minolta Color Care combines test elements measurable using a spectral photometer with test samples for visual evaluation. The color measurement makes a consistent color display possible by standardizing installation routines. Furthermore, the visual test elements allow for an additional evaluation of parameters which are difficult to ascertain metrologically. Metrological elements n 1) Gamut - Density n 2) Linearization - RIP n 3) Offset simulation - Color profile Visual elements Test sample for resolution and accuracy of colors n Gray background: structured as gray balance strip test n 3% tonal value test: visual test of the printing behavior at 3% or 97% n Black dot test: single-colored, tricolor and four-colored 300%- and 400%-black in direct comparison n 5 mm frame for border evaluation and positioning accuracy n 21 Color Care Module Metrological test elements 1) Gamut - Density With this wedge, it can be determined with just one strip measurement whether the paper currently in use and the setting of the full tonal densities or maximum toner job on the printing system correspond to the Konica Minolta specifications. If the gamut of a printing system is too low for a selected purpose, extensive calibration and setup work for RIP and color management is pointless. Checking this wedge thus ensures that the device and material provide a sufficient basis for calibration and profiling. 2) Linearization - RIP Step 2 of a system installation is checked with this test element. The analyzed software shows the colorimetric deviations of the full tones, as well as the nominal tonal value curve deviation. Checking the linearization ensures that there is an optimal basis for the profiling. If the nominal values are not achieved here, the ICC profile can still correct this. The 4 primary color wedges are measured. The CMY wedge (E) is predominantly for the visual evaluation of the layered printing of colors. An optimally installed system will display a typical red-brown coloration of the CMY wedge. 3) Offset simulation - Color profile The measurement form 3) checks the final installation status of a system. Linearization and color space adjustment using ICC profiles are activated. This test element is the most important element of the Konica Minolta Color Care target. The wedge contains all 46 fields of the Ugra/Fogra Media Wedge 2.0, as well as 17 additional mixed colors which guarantee a practice-oriented evaluation of a printing system. A distinctive feature here is that the gamut fields of the Ugra/Fogra Media Wedge in strip A100% have been combined and from these strips, there is also a 95% (A95%) and 90% version (A90%). This facilitates a simple and efficient, as well as easily understandable, classification of printing systems or materials. In both images and documents, there is seldom a 100% color match. The intense weighting of these colors in Ugra/Fogra Media Wedge only really makes sense for contract proof systems. For digital printing systems in comparison, the exact reproduction of mixed colors is much more important for a visually appealing result from your average document. This classification of printing systems or print materials establishes clarification between client, designer and print service provider. Work can thus also be carried out, for example, using low-priced or very thin paper that is ISO-compliant in terms of the print color space but for which lies outside the ISO gamut limits. Quality assurance takes place with the Color Care scalability of all systems and materials. In addition to the measurement, the wedge also allows for a visual evaluation of the image reproduction at the gamut limit. As the dashes between A100%, A95% and A90% are broken, it is a good idea to check where the print still differs. 22 Color Care Module Visual test elements Resolution and Fitting On the left border of the test form, there is a test wedge for assessing the sharpness/detail resolution with vertical and horizontal strips of up to 300 dpi. The evaluation is carried out with zoom. The strip shows both primary colors and a 4c black with 300%, light and medium tone against paper white and the contrast in the medium-tone area. The mixed colors contain an average black generation. The evaluation of the average sharpness is thus possible taking into account the halftoning. The last field group displays the 2-, 3- and 4-color layered print of the full tones and thus serves to check the fit of the inking unit imaging. Using a printout with/ without color management, the sharpness effect of a 4-colored reproduction generally needed for single-colored document details for a correct display of color is evaluated. Light / Depth image and Maximum black This test element displays the 3% tone in comparison to the paper white, as well as the 97% tone as opposed to the full tone. The evaluation is carried out once again by zoom as the measuring instruments can often no longer reliably detect such slight differences. For offset printers, at least 3% and 97% of paper or full tone must be distinguished. For digital printing systems, it is not compulsory that this is evaluated as a KO criteria on account of the technical specifications. Nevertheless, this criterion should be verifiable during installation of a system. On the right-hand side, the system can be tested to see how it deals with the various black tones in the print data. The test sample contains the single-color black (K100), a tricolor full tone black (C100 M100 Y100 K0), the four-colored full tone black (C100 M100 Y100 K100) and a four-colored black with 300% overall color application in an ISO offset print-oriented black generation (C75 M65 Y65 K95). The fields are marked by appropriate symbols. Printing without color management allows for an evaluation of the strength of the black (K100) in comparison to the colored black (CMY100). Printing with color management shows the reproduction of the black dots of the print data. With ISO coated_v2, the fields K100, CMY100 and the four-colored 300% black should still separate. 23 Color Care Module Background The test form background is divided into strips of 30% black and the corresponding ISO gray balance. If the print conforms to the ideal ISO print conditions, the strips are not visible. This test element also reacts to surface inhomogeneities. Strong print fluctuations on the surface make a metrological evaluation pointless. Such prints can be quickly recognized by the background composition. 5 mm border marking The gray background defines the DIN A4 format. The gray frame which surrounds all test elements displays a 5 mm border within the DIN-A4 format. The print edges and the accuracy of the paper guide can be displayed on the screen if printing without scaling. 24 Color Care Module Color Care catch - Measurement and Analysis Color Care catch is the most comprehensive Color Care module. It is the central measurement and analysis tool of the Color Care group. You will be working with this program most of the time as it is used for the daily quality assurance. Color Care catch has 4 functions in total: n "catch control" function - Colorimetric analysis of a measurement incl. 3D evaluation and label print, for system setup, system acceptance, and daily production control n "catch certify" function - Typographical analysis of primary colors and dot gain, similar to the certification of an offset print, for checking the linearization n "catch pro" function - Measurement and averaging of measurement data for profiling, import of reference and external measurement data n "catch statistics" function - Online transfer of color measurements to QA systems (iQIP, OPAQA) or to a separate FTP server for centralizing quality assurance Job Manager In order to ensure a simple operation despite a greater variety of functions, Color Care catch works with so-called 'jobs'. A job is the complete definition of a measurement routine (target, measuring instrument, storage location, type of evaluation, reference and tolerance values...). Therefore, the Job Manager initially appears when Color Care catch starts and it is here that the requested measurement routine is selected. On the left you will find the job templates which sort the jobs and on the right are the jobs found in the template. In the area below, you will find a commentary box regarding the currently selected job. Above, you can select where to save the jobs. The jobs can thus be managed for several employees separately. In this folder, your settings and measurement data are automatically stored. For your production control, select, for example, the "Konica Minolta Color Care" job template on the left and on the right, "3 - Final Check 100". By clicking "OK", the measurement window opens for the measurement of area 3) of the Konica Minolta Color Care target. Working with Color Care catch is generally divided into 3 steps: n Job Manager: Select job n Measurement window: Carry out measurement n Analysis module (control and certify): Check measurement data 25 Color Care Module Workflow 1. Job Manager: Select job 2. Measurement window: Carry out measurement 3. Analysis module (control and certify): Check measurement data Color Care catch: One measurement program - many applications a) Gamut test b) Linearization test c) ∆E analysis/Quality assurance d) Profiling The various measurement routines are accessed from Job Manager Depending on the job setting, different targets appear in the measurement window In each job, the processing of the measurement data is also scheduled In the example, you will see a colorimetric 3D analysis for the gamut test, a dot gain diagram for the testing of linearization, an ∆E analysis in accordance with ISO and the storage of a measurement file for the ICC profiling of your printing system 26 Color Care Module Color Care catch - Measurement routines (catch jobs) The measurement routines of Color Care catch are managed in the jobs folder. Measurement routines for new machines, paper or standards can be very easily added due to open storage. The structure of a job folder is always in three parts: Job folder Ü Job templates folder Ü Job folder. Your measurement data and PDF reports are automatically stored and numbered consecutively (-001, -002, -003,...) in the respective job folder. The default jobs folder on Apple computers is found in the user's Documents folder, and in the Windows version is under "My Documents" or Documents. You can use the jobs folder anywhere, even on network drives. The reference templates are found in the "Reference Files" subfolder of the respective job folder. If you receive a new jobs folder with new measurement routines from Konica Minolta, select this folder under "Jobs folder". In order to access your old jobs, change back to your old jobs folder under "Jobs folder". Alternatively, you can add the new job templates, jobs and references to your existing jobs folder. The job manager then displays the new and old measurement routines together when the program is next started. Structure of a job folder (example) n Red: Jobs_KM n Orange: Job template folder n Yellow: Job folder n Green: - .cie .mmd .pdf .png .c4j .xml = Standard jobs folder Contents of the job folder ISO measurement files (001, 002,...) Raw measurement files (encrypted) Report files (if generated) Short report (if generated) Job file (XML, measurement parameters) Status files (if generated) 27 Color Care Module Color Care catch - Handling measurement data Loading measurement data If you would like to work on a measurement once again, select the corresponding job and open the measurement window. Then click on the "Load" button. A dialog will appear which displays the measurement number of the automatic number sequence. Select the required measurement file and confirm with "OK". Mark more than one file and click on "Average" in order to calculate an average for the measurement data. Files not included in the job folder can be imported for further processing by pressing "Import" in the job folder. The required data is added to the current measurement window. For averaging and data import, you should thus first create a new empty measurement file with "New Measurement". Opening an evaluation In order to re-access an evaluation window, use the menu entry "Results: control" (colorimetric analysis, ∆E, 3D-analysis,...) or "Results: certify" (typographic analysis, primary colors, dot gain/linearization). Alternatively, you can use the corresponding key combinations. Storage The measurements are provided automatically with the job name, numbered sequentially (001, 002,...) and stored in the job folder. No measurement is lost this way. You can, however, store an additional measurement file with open file name and path by clicking on the menu command "File Ü Save As...". Files which are not in the job folder can also be reimported. To do this, use the "Import" button in the load dialog (see above). Comments For optional comments, you will find two fields in the header of the measurement window. The comments are saved within the measurement file. 28 Color Care Module Color Care profiler This program creates ICC profiles for your paper and printing requirements. The measurement of the color management target is usually performed using Color Care catch. At the end of the measurement, a measurement file is saved (xxxxxxx.CIE). The operation of the Konica Minolta Color Care profiler is very simple: drag the measurement file onto the printer symbol and enter the file name for the profile. Complicated settings for overall color application, maximum black, black generation, etc. do not require Color Care profiler. The program contains an intelligent measurement data analysis which automatically recognizes what, colorimetrically, is the best color composition for your printer and your paper from the target measurement values. The system automatically recognizes, through this internal measurement data analysis, for which color composition usable density and/or satiation gains can be achieved, how much black toner can be used in the black dot, how a soft transition from color to non-color can be achieved, etc.... At the same time, the program fundamentally tries to use as much black as possible in order to achieve solid prints with high density for a low average color composition. This measurement data analysis is not restricted to a specific printing procedure. With the Konica Minolta Color Care profiler, you also receive excellent ICC profiles for printing systems such as inkjet printers, offset, intaglio print, solvent and latex print, etc. All that is required is that the printing system is activated in CMYK. The measurement of the target is, in most cases, carried out with an EFI ES-1000, or an X-Rite i1Pro or X-Rite i1iSis and Color Care catch. However, the Color Care profiler also processes measurement data from other programs and measuring instruments. Any CMYK targets can be used. The minimum requirement is that the measurement file is available in ISO format and it contains the measurement values in XYZ or LAB, as well as the target CMYK values. For the digital print, Konica Minolta recommends the use of measurement technology with UV filters for profiling and quality control, due to the greatly varying degrees of optical brighteners used in printing papers. 29 Color Care Module Color Care match patch Color Care match patch has been developed to optimize the color reproduction accuracy for selected color locations in an existing printer profile. Therefore, it is primarily used for proof documents, i.e. absolute colorimetric reproduction priority (or with relative colorimetric rendering intent if the paper tone already corresponds well to the reference). The adjustment by Color Care match patch can, at the same time, be used at any color location. It is most frequently used for the improvement of spot color reproduction (e.g. company logos, product colors, etc....), as well as the optimization of problem fields in quality control targets such as the Color Care target or the Ugra/Fogra Media Wedge. The operating principle is quite simple. You create a proof print with the printer profile that is to be optimized. This proof print should contain a metrologically analyzable target. This target will be measured. Color Care match patch then compares this measurement file with the reference file and displays the color differences. You can now select the color location for which the printer profile should be adjusted. Match patch calculates a patch for these fields and generates a revised ICC profile based on the existing printer profile. The program thus works fundamentally with all targets (Color Care target, Media Wedge, ECI2002, IT8/7.x, basICColor profiling targets, etc...). The color locations are adjusted each time with a soft blending of approx. 10 ∆E. Therefore, for optimization, colors should not be too close together and not more than approx. 100 colors should be selected for the optimization. Universal small system drifts can also be evenly matched with Color Care match patch with a suitable target (e.g. Color Care target, Area 3: Offset simulation - Color Profile), as long as the deviations only slightly exceed the tolerance limits. For greater deviations, a new printer profile should be set up or another linearization (calibration) of the printing system should be first carried out. 30 Color Care, Hardware setup System setup - Hardware setup The main purpose of the system setup is to set the hardware to a defined state which is maintained during production. Color Care 2 therefore contains various measurement routines for machine setup using print formats that are stored in the firmware of Konica Minolta printing machines. These are used for internal machine settings for homogeneity, linearity/gamma and print density. In Color Care catch, these are labelled with "Job 0 - ..." accordingly. After these settings, the evaluation of the printing paper and linearization/profiling in the RIP (job 1-2-3...) are performed using the Color Care target. The hardware setup contains 3 measurement routine types, which can each contain print templates for multiple paper formats. n Job 0 - Color Density Control: Measurement routine for density and tone value gradation for X-Rite i1pro and X-Rite i1iSis and 3 paper formats. The measurement files are then loaded onto the machine n Job 0 - Density Balance: Complete settings for density, tone value gradation and homogeneity for X-Rite i1pro and X-Rite i1iSis and various paper formats. The measurement files are then loaded onto the machine n Job 0 - Printer Gamma Adjustment: Printer Gamma Adjustment, reference values for various bizhub PRO/PRESS color printing systems for measurement with and without UV filters. The machine settings are adjusted according to the evaluation by Color Care 2. For more detailed information about workflows on Konica Minolta digital printing machines (printing targets, loading the measurement data, setting the printer gamma adjustment, etc.) refer to the printing system user manual and to separate instructions for hardware configuration. The targets and technical background of the test and settings routines are also explained there. This Color Care manual describes how to use the measurement routines in Color Care catch. 31 Color Care, Hardware setup Color Density Control Connect the measuring instrument to your computer. Open Color Care catch. In the Job Manager, choose "Color Care - Job 0 - color density control" as a job template on the left, and on the right, select one of the jobs according to your measuring instrument and the printed target/paper format. Click on OK - the measurement window opens. i1iSis: Click on "Start" The instrument now performs a selfcalibration and prompts you to insert your printout. Wait until the LED on the instrument flashes green (device is ready for measurement), and then insert your printout into the instrument. Position the paper on the left-hand edge of the measuring instrument. The black position markers on the printout should be approx. 1 cm from the edge of the paper. If necessary, cut your printout to fit. The i1iSis performs the measurement fully automatically, and transfers the measurement data to Color Care catch. After the measurement, choose "File" -> "Save As ..." to save your measurement file under a file name and storage location of your choice (usually on a USB stick), and load them onto your digital printing machine (see hardware documentation). 32 Color Care, Hardware setup i1pro: Color Care catch first prompts you to calibrate your measuring instrument. Place your ES-1000 / i1Pro on the calibration tile and follow the software instructions. Please ensure that the calibration tile is clean, dust free and, above all, free from dark fluff. The software will notify you when the calibration is finished. Do not remove the device from the reference tile before the calibration is finished. Click in the first measurement field to set the instrument to "spot measurement". The targets are not designed for the i1Pro strip measurement, and must be recorded field by field using spot measurement. After the measurement, choose "File" -> "Save As ..." to save your measurement file under a file name and storage location of your choice (usually on a USB stick), and load them onto your digital printing machine (see hardware documentation). 33 Color Care, Hardware setup Density Balance Connect the measuring instrument to your computer. Open Color Care catch. In the Job Manager, choose "Color Care - Job 0 density balance" as a job template on the left, and on the right, select one of the jobs according to your measuring instrument and the printed target/paper format. Click on OK - the measurement window opens. i1iSis: Click on "Start" The instrument now performs a self-calibration and prompts you to insert your printout. Wait until the LED on the instrument flashes green (device is ready for measurement), and then insert your printout into the instrument. Position the paper on the left-hand edge of the measuring instrument. The black position markers on the printout should be approx. 1 cm from the edge of the paper. If necessary, cut your printout to fit. The i1iSis performs the measurement fully automatically, and transfers the measurement data to Color Care catch. After the measurement, choose "File" -> "Save As ..." to save your measurement file under a file name and storage location of your choice (usually on a USB stick), and load them onto your digital printing machine (see hardware documentation). 34 Color Care, Hardware setup i1pro: Color Care catch first prompts you to calibrate your measuring instrument. Place your ES-1000 / i1Pro on the calibration tile and follow the software instructions. Please ensure that the calibration tile is clean, dust free and, above all, free from dark fluff. The software will notify you when the calibration is finished. Do not remove the device from the reference tile before the calibration is finished. Click in the first measurement field to set the instrument to "spot measurement". The targets are not designed for the i1Pro strip measurement, and must be recorded field by field using spot measurement. After the measurement, choose "File" -> "Save As ..." to save your measurement file under a file name and storage location of your choice (usually on a USB stick), and load them onto your digital printing machine (see hardware documentation). 35 Color Care, Hardware setup Printer Gamma Adjustment Connect the measuring instrument to your computer. Open Color Care catch. In the Job Manager, choose "Color Care - Job 0 gamma offset" as a job template on the left, and on the right, select one of the jobs according to your measuring instrument (i1Pro with/without UVcut filter) and your printer. For each measurement jobs, target values for the different Konica Minolta print values/ toners are stored. Click on OK - the measurement window opens. The target is found in Administrator mode. The following parameters are measured: - Paper white (1) - the K, C, M, Y color fields in the sequence highlighted with the pink square (2,3,4,5) - The middle CMY field (6) 36 Color Care System setup - Gamut test i1pro: Color Care catch first prompts you to calibrate your measuring instrument. Place your ES-1000 / i1Pro on the calibration tile and follow the software instructions. Please ensure that the calibration tile is clean, dust free and, above all, free from dark fluff. The software will notify you when the calibration is finished. Do not remove the device from the reference tile before the calibration is finished. Click in the first measurement field to set the instrument to "spot measurement". The target is not designed for the i1Pro strip measurement, and must be recorded field by field using spot measurement. After the measurement, a short evaluation is displayed. This shows you whether the target values have been achieved using the current machine settings. After you have closed the window, you can still view this by choosing "Window"-> "Results: control" from the menu bar. 2,5 ∆E is defined as the tolerance. If there are greater deviations, change the setting on your print system and repeat the test. Color Care catch provides several tools for detailed analysis of the measurement results: 1) Display the measurement and ∆E values in the measurement window (mouse-over) 2) Display the measurement and ∆E values in the spectral analysis window 3) Display the measurement and ∆E values in the PDF report 4) Graphical display in 3D analysis and drift indicator 37 Color Care System setup - Gamut test 1) Display the measurement and ∆E values in the measurement window: The simplest method of displaying the individual values is the mouse-over function in the measurement window. Move the mouse to the required measurement field and leave the cursor over it for 1-2 seconds. A yellow window appears containing field information, measurement values, target values, and ∆E values. 2) Display the measurement and ∆E values in the spectral analysis window: Select a field and open the spectral analysis window from the menu bar ("Window"->"Open Spectrophotometer"). You can now click on the fields in the measurement window. The spectral analysis window shows the spectrum, the target, measurement, and ∆E values. 38 Color Care System setup - Gamut test From the analysis window, you can call two graphical representations of the color deviations: - 3D analysis - Drift indicator The 3D diagram displays the measurements 3-dimensionally in L*a*b* color space in comparison to the reference values. Thus size, location and direction of the color deviations of all fields can be analyzed together. The drift indicator displays the average deviations itemized by color drift (∆ab), brightness deviation (∆L), and saturation deviation (∆C). The 3D diagram has the following elements: Grid lines: reference gamut Large dots: reference dots n Small dots: measurement n Line between large and small dot: Error vector (depending on measurement and tolerance value in gray, green, yellow or red) n n Operation: Click + drag: Turn and tilt the pigment n Shift + click + drag: Scroll up and down n /Ctrl + click + drag: Zoom n Click on the measurement dot: Measurement, reference and ∆E value displayed (below left) n View presets: predefined views n Select components: Activation and deactivation of measurement dots, gamut lines and error vectors n The 3D analysis is the most efficient for this task. Zoom in the diagram until you can clearly recognize the 6 measurement dots, and click on the individual dots to display the target, measurement, and ∆E values. 39 Color Care System setup - Gamut test System setup - Gamut test The basic prerequisite for a successful system installation is that the paper and the hardware setup of the printing system can cover the required target color space. If the "raw gamut" of the system is already smaller than the target setting (generally the full gamut of the standard offset print in accordance with ISO12647 on paper class 1/2 or ISOcoated_v2 / Fogra39), extensive setup work would serve no purpose. The Color Care target therefore contains, in area 1) Gamut - Density, a gamut test strip with which the color and density range can be compared colorimetrically with the required reference. In the 3D-evaluation graphic, there are differences of gamut, paper tone, as well as 1c-, 3c- and 4c black, visible. The quick gamut analysis thus avoids unnecessary setup work with unsuitable materials and/or machine settings. There are two courses of action possible here: n Comparison with the target color space (e.g. ISOcoated_v2): The raw gamut of the system must be greater in all other color areas than the target color space so that it can be fully simulated. This is the standard procedure as, apart from the ISO reference, no other data is required. n Comparison with a reference machine: If there is a reference machine available for the requested material, the Color Care target can be dumped on both machines and the reference machine measurement can be used as a guideline for installing the hardware on the second printing system. In this way, machines can be optimally suited to each other with regard to hardware settings. Carry out an internal machine calibration to create a reproducible hardware status. The paper for the system setup should also be stored in a cool, dry place to ensure sound, restorable conditions. Print the Color Care target. At this point, it is solely about achieving the maximum gamut. As color space simulation and linearization always restrict the gamut, deactivate both for the gamut test. Further details regarding the RIP and machine settings can be found in the corresponding Color Care Setup Guide included with your hardware. 40 Color Care System setup - Gamut test Comparison with ISO reference (Offset print) Connect the measuring instrument to your computer. Open Color Care catch. In Job Manager, select "Konica Minolta Color Care" as a job template on the left and on the right, the job "1 - Gamut vs. Offset". Click "OK". The measurement window will open and request the calibration of your measuring instrument. Place your ES-1000 / Eye One Pro on the calibration tile and follow the software instructions. Please ensure that the calibration tile is clean, dust free and, above all, free from dark fluff. The software will notify you when the calibration is finished. Do not remove the device from the reference tile before the calibration is finished. Now measure the 1) Gamut - Density strip of the Color Care target. The measured color values appear on the right-hand side, the reference values are depicted on the left. The warning signs can be ignored during the gamut measurement. Crucial here is the 3D analysis. 41 Color Care System setup - Gamut test After the measurement, the analysis window opens automatically. The ∆E values are not yet relevant here. The raw gamut must only be greater than the target gamut. This can be checked with the 3D analysis. Click on this button. The 3D diagram displays the measurements 3-dimensionally in L*a*b* color space in comparison to the reference values. Thus size, location and direction of the color deviations of all fields can be analyzed together. The 3D diagram has the following elements: Grid lines: reference gamut Large dots: reference dots n Small dots: measurement n Line between large and small dot: Error vector (depending on measurement and tolerance value in grey, green, yellow or red) n n Operation: Click + drag: Turn and tilt the pigment n Shift + click + drag: Scroll up and down n /Ctrl + click + drag: Zoom n Click on the measurement dot: Measurement, reference and ∆E value displayed (below left) n View presets: predefined views n Select components: Activation and deactivation of measurement dots, gamut lines and error vectors n Aim: The measurement dots should all lie outside of the reference gamut. 42 Color Care System setup - Gamut test Example 1: All measurement values lie outside of the reference gamut. The printing system can fully reproduce the target color space ISOcoated_ v2. Continue with the linearization. Example 2: All measurement values lie within the reference gamut. The printing system will never achieve the target color space ISOcoated_v2 with this paper and this hardware setting. Use different paper or improve the hardware setup of the machine. 43 Color Care System setup - Gamut test Comparison with digital printing system The workflow of the gamut testing on a reference digital printing system is identical to the offset print. For the ∆E and 3D-analysis, as good an overlapping as possible of the measurement and reference points is required. Create an individual reference measurement file by measuring a print of the reference machine and then storing a measurement file in the measurement window with "File Ü Save As ..." (e.g. on your desktop). Now close the measurement window, mark again in the job manager the job "1 - Gamut" and click on "Edit". Select in "Edit Job" on the "control" tab, the measurement file just created as reference. When closing the "Edit Job" window, Color Care catch will ask if the changes should be saved in the existing job or as a new job. If required, give the new job a suitable name. 44 Color Care Setup - Linearization System setup - Linearization The linearization of a printing system forms the basis for the ICC profile setup. Only a well linearized system can be well profiled. If an ICC profile must also correct rough errors in the linearization, the best possible reproduction quality will no longer be achieved. The normal RIPs today all have a linearization function. The linearization routines are usually integrated into the RIP and are not openly accessible. Generally, no information is given about the quality of the CMYK curves, however the possibility exists to check the effect of the linearization curves. This can all be done with Color Care. The Color Care target also contains, in area 2) Linearization - RIP, scale wedges for the 4 basic colors Thus, after linearization of the printing system, a primary color and dot gain check is carried out, similar to certification with an offset machine. Color Care is, therefore, completely independent of the RIP used and can be used for every printing system. In the predefined jobs, reference curves specific to printing systems are given. The system has also, however, the dot gain curves in accordance with ISO12647 so that aligned systems can also be evaluated with these tonal value curves. Proceed as follows: n Linearization of the RIP: Carry out the linearization of your RIP as usual with the measuring instrument and RIP standard routine. Information regarding the linearization of your RIP and the machine settings can be found in the corresponding Color Care Setup Guide included with your hardware. n Check the resulting tonal value reproduction properties with Konica Minolta Color Care: Print out the Color Care target a second time. The printout must be WITH linearization but without color management, i.e. without color space simulation or reference profile. Using Color Care, analyze the linearization result. If the target full tones are no longer achieved, change the RIP settings of the full tonal densities for the next linearization. If the curves are very jagged due to print fluctuations of the linearization printout or through measurement fluctuations, simply carry out the linearization once more, if necessary after a new machine calibration. Information regarding your RIP settings and possible options with unsatisfactory linearization results can be found in the corresponding Color Care Setup Guide included with your hardware. 45 Color Care Setup - Linearization Testing the linearization Connect the measuring instrument to your computer. Open Color Care catch. In Job Manager, select "Konica Minolta Color Care" as a job template on the left and on the right, the job "2 - Linearization". Click "OK". The measurement window will open and request the calibration of your measuring instrument. Place your ES-1000 / Eye One Pro on the calibration tile and follow the software instructions. Please ensure that the calibration tile is clean, dust free and, above all, free from dark fluff. The software will notify you when the calibration is finished. Do not remove the device from the reference tile before the calibration is finished. Now measure the strips in area 2) Linearization - RIP of the Color Care target. The measured color values appear on the right-hand side, the reference values are depicted on the left. After the measurement is finished, the 'certify' module opens automatically for the analysis of primary colors and dot gain. 46 Color Care Setup - Linearization Primary colors In the first tab, you will find the analysis of the primary colors. The linearization of the RIP does not only change the tonal value reproduction of the system, it generally restricts the full tonal density. If there is too great an interference here, the gamut decreases. The primary colors in the evaluation then migrate in the direction of the color space center and out of the tolerance circle. Adherence to the primary color locations is very important as the saturation of the linearized full tones can no longer be increased by the ICC profile. Below the color circle, you will find the display options for the primary color chart. In the center of the chart, you can display the paper tone or the black color location. For full tonal density problems, the option to "Show density change" is also helpful: this function will tell you in advance how the full tone of the color location has changed when the densities are raised or lowered. If the full tone lies outside the tolerance circle and runs past the density prediction curve at the tolerance area, it is very likely that no steady ISO compliance will be achieved with the paper used. In this case, other paper should be tested and changes should be made to the full tonal density in the RIP. Move the mouse over the dot of the density prediction in order to display the calculated densities (ISO-compliant; Status E). Your RIP may possibly display other density values, as here the American density standard T is used. Familiarize yourself with the differences of the density predictions for the measurement dot density. Dot gain and spreading: If the status light above left is green, the linearization is setting up a sufficiently good basis for the ICC profiling of the printing system. The tonal value chart has several display modes. Most significant is the depiction of the dot gain in separate CMYK diagrams. As various reference curves or tolerances apply for black and other colors according to ISO, the green tolerance areas are only depicted in the separate view. The spreading view (differences C/M/Y Ü gray balance) can be activated below left. 47 Color Care Setup - Linearization If the tonal value production of the system displays slight deviations from the nominal values after linearization, it can still, however, produce superb printing results. Because in contrast to the gamut deficits, the tonal value reproduction can still be patched to a great extent with "harmonious deviations" by the ICC profile. It is important that the spreading of the CMY curves is OK and the curves display as few kinks as possible. If all 3 CMY curves are too low or too high, yet similar and continuous or the black curve is almost beside the tolerances, the linearization can be used in this way even when the tolerances are exceeded. The chart above is a good example of this. Ensure that you save the PDF report to your documentation and retain the measurement data. For a detailed analysis of the measurement values, click on the data points. In the upper left section, the measurement, reference and tolerance values are then displayed at the respective location. If the cursor is positioned over a measurement point, a brief information message will be displayed for the corresponding measurement field with ID, % value, dot gain and density value. 48 Color Care Setup - Profiling System setup - Profiling The printer ICC profile describes the printing system as it has been set up with hardware setup and RIP/ linearization. The printer profile does not generally change the printing properties, in contrast to linearization and hardware setup. It adjusts the data before you activate the printer for linearization and is only then active if it is set against a simulation profile in a color space conversion. For a profile conversion, there are always 2 profiles required: n n Source profile Target profile = Reference or simulation profile = Printer profile If you shut down the simulation or do not designate any simulation profile, the printer profile will also be inactive. The data is then only adjusted through linearization and hardware settings during printing. Printing targets Print the color management target. Linearization must also be active here, color management or the color space simulation must not; however. The Konica Minolta Color Care folder contains the single-page CMY target and the 4-page IT874-target for the ES-1000/i1Pro incl. i1iO, and i1iSis. More color fields does not automatically mean a more precise profiling result. For a fluctuating system, a better result is often achieved by averaging several printouts of a small target. Rotating the print direction frequently achieves a further smoothing when averaging measurement data. 49 Color Care Setup - Profiling Measuring targets (example: IT874) Connect the measuring instrument to your computer. Open Color Care catch. In the Job Manager, choose "Printer Profiling CMYK" as a job template on the left, and on the right choose the job "Color Care Profiler - IT874random - i1Pro" (or "Color Care Profiler - CMYK-Target - i1Pro", if you have printed the single-page basICColor CMYKick-Target). Click "OK". The measurement window will open and request the calibration of your measuring instrument. Place your ES-1000 or i1Pro on the calibration tile and follow the software instructions. Please ensure that the calibration tile is clean, dustfree and, above all, free from dark fluff. The software will notify you when the calibration is finished. Do not remove the device from the reference tile before the calibration is finished. Now measure the stripes on pages 1-4 of the IT874 target (or the one page of the Color Care CMYK target). The measured color values appear on the right-hand side, the lefthand side displays the average values for monitoring of the correct strip allocation. After the measurement is finished, save your measurement data with "File Ü Save As...". It is best to give your measurement file the name you intend to give the ICC profile 50 Color Care Setup - Profiling Averaging several targets (Example: average value from 4x IT874) First of all, measure the individual targets one after the other. You then have the measurements 001-004 in your job folder. Then click on "New Measurement" to create a new empty measurement 005. Now click on "Load" Mark in the "Select Measurement" window the 4 measurements (Shift key or CTRL/ -key). As soon as more than one measurement is marked, the "Average" button is active. Now click on "Average". The 005 measurement now contains the average value from measurements 001, 002, 003 and 004. The status bar shows "data average from 4 data sets". You will receive this status report as confirmation of the averaging. If you would like to designate the measurement file as an average value file, please include an appropriate commentary in the "Comments" field. After the measurement is finished, save your measurement data with "File Ü Save As...". It is best to give your measurement file the name you intend to give the ICC profile 51 Color Care Setup - Profiling Calculation of ICC profile Start the Color Care profiler and drag the measurement file of the color management target onto the printer symbol. Now give the ICC profile a name. The program takes over the measurement file name as a suggestion. After confirming the file name, the calculation starts. To conclude, the storage location of the ICC profile is displayed. With MAC OS X, you can select in the presettings whether it should be saved in the system or user folder. There will also be a choice of ICC profile format (v2.1 or v4). With Windows XP and Windows Vista, the ICC profile is saved in the respective OS standard folder. This folder is often used by other software to access ICC profiles, e.g. for a profile download to a RIP. Now select this profile as a printer profile in your RIP. In doing so, you are taking over the linearization which you used for printing the profiling targets. Information regarding your RIP settings can be found in the corresponding Color Care Setup Guide included with your hardware. 52 Color Care, Setup - Final acceptance System setup - Final acceptance The digital printing places particular requirements on a test wedge for system monitoring during installation and in the daily production. The widely spread Media Wedge is only sometimes suitable here. In particular, in the mixed color area of medium brightness and saturation, there are no test fields in the Media Wedge. However, these colors are, statistically, found very often in images. Furthermore, precisely in this area there is a difference between the black generation of the original data and the separation from the digital print. The restriction on the gamut and gray axis monitoring, under the assumption that the system works linearly in between, is no longer a successful approach in digital printing. It must also be noted under practical conditions that the full gamut of the standardized offset print cannot be achieved on all paper and printing systems. Therefore a scalable, yet ISO-compliant quality assurance system is required. The color test wedge of the Color Care target ( 3) Offset simulation - Color profile ) was designed with regard to these requirements. It contains all 46 fields of Media Wedge 2.0 so that a pure Media Wedge evaluation is possible. There are an additional 17 new fields which incorporate the particular requirements of digital printing. Firstly, all gamut fields of the Media Wedge, incl. paper white and maximum K and color black, have been combined in one strip. This gamut strip is split into three and contains a 100%, 95% and a 90% section. This allows the system to undertake an ISO-compliant print quality assurance which the full gamut would not achieve with Fogra39/ISOcoated_v2. For digital printing systems, the quarter and light tonal area reacts very sensitively to environmental influences. Therefore, the quarter tones of the primary and secondary colors have been complemented. These fields monitor the medium tonal area. They are positioned around the center between the gamut and the gray in the color space. Furthermore, a dark tertiary color has been added to serve as a further skin tone monitoring field. Now print the Color Care target for a third time. At the same time, activate the linearization and color management. Use ISOcoated_v2_bas.icc (or ISOcoated_v2_eci.icc) as a reference profile and print colorimetrically. For paper with a matching white dot, a relatively colorimetric print is also possible. Information regarding your RIP settings can be found in the corresponding Color Care Setup Guide included with your hardware. 53 Color Care, Setup - Final acceptance Final Check 100 Connect the measuring instrument to your computer. Open Color Care catch. In Job Manager, select "Konica Minolta Color Care" as a job template on the left and on the right, the job "3 - Final Check 100". Click "OK". The measurement window will open and request the calibration of your measuring instrument. Place your ES-1000 / Eye One Pro on the calibration tile and follow the software instructions. Please ensure that the calibration tile is clean, dust free and, above all, free from dark fluff. The software will notify you when the calibration is finished. Do not remove the device from the reference tile before the calibration is finished. Measure the strips A100, B and C at "3) Offset simulation - Color profile" using the Color Care target. The measured color values appear on the right, the left side displays the reference values. Color deviations which exceed the tolerance limits are already marked in the measurement window by red and yellow warning triangles. 54 Color Care, Setup - Final acceptance After the measurement, the analysis window opens automatically. The window displays an evaluation in accordance with ISO-/Fogra guidelines. The individual criteria are symbolized with a red, yellow or green button. If all criteria are met, the overall status on the right will display a green check. If there are tolerance deviations, a red 'x' will appear. In the PDF report and 3D diagram, the measurement results can be analyzed in detail. If there is a label printer connected, you can print a label directly from the analysis window with a short evaluation. Alternatively, a short summary can be found on page 1 of the PDF report. The 3D diagram has the following elements: Grid lines: reference gamut Large dots: reference dots n Small dots: measurement n Line between large and small dot: Error vector Color depending on measurement and tolerance value: gray no evaluation green OK yellow optional tolerance exceeded red standard tolerance exceeded n n Operation: Click + drag: Turn and tilt the pigment n Shift + click + drag: Scroll up and down n /Ctrl + click + drag: Zoom n Click on the measurement dot: Measurement, reference and ∆E value displayed (below left) n View presets: predefined views n Select components: Activation and deactivation of measurement dots, gamut lines and error vectors n 55 Color Care, Setup - Final acceptance Final Check 95 / 90 The workflow for Final Check 95 /90 is the same as with Final Check 100. The only difference is that instead of 100% strips, 95% or 90% strips are measured. In the test report, it will be accordingly acknowledged that the printing system operates up to 95% or 90% of the ISOcoated_v2 gamut within the ISO tolerances. In this way, there is a comparable quality assurance for paper / printing systems with full and restricted gamut. Within the printable area, consistent results can thus be achieved. 56 Color Care Production Control Production control The system setup forms the basis and starting point for quality assurance in daily practice. Depending on customer requirements, this takes place using the Color Care target or Ugra/Fogra Media Wedge. Standard control - Color Care target As the Color Care target is specifically adjusted to digital printing, it is brilliantly suited to daily quality control. The work routine corresponds exactly to the final acceptance of the system per Final Check 100 / 95 /90. Media Wedge Evaluation(v2 0 / v3 0) Although the Media Wedges are not specifically designed for digital printing, they are widely used here. Therefore, there are also measurement routines for Media Wedge 2.0 and 3.0 available in Color Care catch that can be used for your quality assurance. 57 Color Care Profile Adjustment Profile adjustment Color Care match patch can be used for both the optimization of spot colors and the balance of light system drifts. No more than 100 colors should be selected for optimization in a target. The selected colors require a color spacing of at least 10 ∆E so that Color Care match patch can generate soft blending. Creation of measurement and reference files If you carry out a Final Check 100 measurement in a Color Care target and find deviations which exceed the tolerance limits, you can use this measurement for patching of the profile. You do not require any new printout or any new measurement. Save your measurement file with "File Ü Save As..." e.g. as "Error.cie". Now you will need a "target file" which will contain the required target values of the measurement fields and is formatted in the same way as your measurement file "Error.cie". Click on "New Measurement" and import a reference measurement file as described on page 28. For ISOcoated_v2, it is the corresponding reference file "Fogra39L.txt". You will find this file in the subfolder "Reference Files" in your jobs folder (see page 27). When you have imported the reference values, save a second measurement file as, for example, "Reference.cie". Profile adjustment Start Color Care match patch and load your current printer profile with which the error-prone printout has been created. Now load the reference file "Reference.cie", as well as the measurement file "Error.cie". 58 Color Care Profile Adjustment Color Care match patch will now calculate the current color deviations and shows the reference and measurement value, as well as the ∆E values, in a table. In this table, mark the fields which you would like to optimize. If you use Final Check 100 of the Color Care target, you can use almost all fields together. The color distances usually suffice. Only the colored gray axis and the K-gray axis do not lie too closely together. Only use one of these field groups for optimization. The black-gray fields are found in B17-B21; the corresponding colored gray fields are in C17-C21. If only a few color fields show larger deviations, you should restrict the optimization of these fields as much as possible. Click on "Start Optimization". Color Care match patch will now modify the ICC profile tables in order to undertake the required patching. After calculation, new ∆E values are displayed which are achievable mathematically under ideal conditions (mistake-free printout, no print fluctuations, no measurement fluctuation,...). In practice, the actual feasible improvements lie somewhere in the middle between the original deviation and the approximation mathematically achievable under ideal conditions. An optimization run processes the marked measurement values sequentially in accordance with the sequence in the table. If the adjustment of the table points is to be carried out in a different sequence, select the appropriate fields in succession and start an optimization for each respectively. If you are satisfied with the result, save the new ICC profile, link it to your RIP and check the result with a new printout of the Color Care target. 59 Konica Minolta Color Care 2 Display User Manual Colour management Color Care display Index Color Care display index 1. Installation and licensing . . . 3 3. Advanced . . . . . . . . . . . . 18 1.1. Minimum system requirements . . . . . . . . . . . 3 1.2. Installation . . . . . . . . . . . . . . . . . . . . . . 4 1.3. Product registration and licensing . . . . . . . . . . 5 3.1 Preferences . . . . . . . . . . . . . . . . . . . . . 18 3.1.1 General Preferences . . . . . . . . . . . . . . 18 3.1.2 Profile Creation . . . . . . . . . . . . . . . . 18 3.2 Select system profile . . . . . . . . . . . . . . . . 18 3.3 Chromaticity and gamut/Spectral distribution . . . . 19 3.4 Calibration methods (detailed) . . . . . . . . . . . . 19 3.4.1 Hardware & combined HW/SW calibration . . . 19 3.4.2 Software calibration (video LUTs) . . . . . . . 21 3.4.3 No calibration (profile only) . . . . . . . . . . 22 3.5 Custom settings . . . . . . . . . . . . . . . . . . . 22 3.5.1 Colour temperature . . . . . . . . . . . . . . 22 3.5.2 Tonal response curve . . . . . . . . . . . . . 23 3.5.3 Luminance/contrast ratio . . . . . . . . . . . 25 3.6 Profile (settings) . . . . . . . . . . . . . . . . . . . 26 3.6.1 Profile type . . . . . . . . . . . . . . . . . . 26 3.6.2 Chromatic adaptation . . . . . . . . . . . . . 27 3.6.3 ICC v4 profile . . . . . . . . . . . . . . . . . 28 3.7 Review . . . . . . . . . . . . . . . . . . . . . . . 28 3.7.1 Validation . . . . . . . . . . . . . . . . . . . 28 3.7.2 Ambient light . . . . . . . . . . . . . . . . . 29 3.7.3 Check viewing booth . . . . . . . . . . . . . 29 3.7.4 Adjust JUST viewing booth . . . . . . . . . . 30 3.7.5 Edit calibration . . . . . . . . . . . . . . . . 31 2. Quick start . . . . . . . . . . . 7 2.1 The user interface . . . . . . . . . . . . . . . . . . 7 2.2 Selecting a measurement device . . . . . . . . . . . 9 2.3 Presets for calibration and profiling . . . . . . . . . 10 2.3.1 Display type . . . . . . . . . . . . . . . . . . 11 2.3.2 Calibration method . . . . . . . . . . . . . . 11 2.3.3 Calibration settings . . . . . . . . . . . . . . 12 2.3.4 Profiling settings . . . . . . . . . . . . . . . 13 2.4 Presetting the monitor hardware . . . . . . . . 14 2.4.1 Brightness (CRTs only) . . . . . . . . . . . . 14 2.4.2 Contrast (CRTs only) . . . . . . . . . . . . . . 14 2.4.3 Colour temperature (LCDs and CRTs) . . . . . 14 2.5 Calibration and profiling . . . . . . . . . . . . . . . 16 2.5.1 Measuring colour characteristic . . . . . . . . 16 2.5.2 Setting white point . . . . . . . . . . . . . . 16 2.5.3 Iterating gray balance . . . . . . . . . . . . . 16 2.5.4 Measuring for profiling . . . . . . . . . . . . 16 2.6 Results . . . . . . . . . . . . . . . . . . . . . . . 17 2.7 Review . . . . . . . . . . . . . . . . . . . . . . . 17 2 Color Care display Installation and licensing Chapter 1 Installation and licensing 1. Installation and licensing 1.1. Minimum system requirements Apple Computer nApple Computer with Intel processor nMac OS X 10.5.8 or higher n512 MB available system memory (RAM) Windows Computer nIntel Pentium 3 or 4 processor nWindows XP with SP3 n512 MB available system memory (RAM) All Systems n500 MB available harddiskdrive memory (HDD) nDVD/CD-ROM optical disk drive nColourmonitor with 1280x800 Pixel minimum resolution and 24 bit (16,7 million colours) colourdepth nInternetaccess for software activation Measureing device (not included) Knowledge requirements: These instructions assume familiarity with the basic operation of the Mac OS X and/or Windows operating systems. Documentation: This document describes the application of Color Care display for both Mac OS X and Windows. Any differences in operation or special instructions that apply to either system will be indicated. Before beginning the installation process, please make sure that your measurement device is not connected to the computer. Connect it after the software has been successfully installed. Supported measurement devices n n n n n n n n n n n basICColor SQUID basICColor SQUID2 basICColor RAY Colorvision Spyder 2 Gretag Macbeth EyeOne Gretag Macbeth EyeOne Gretag Macbeth EyeOne Gretag Macbeth EyeOne Gretag Macbeth EyeOne Monaco OPTIXXR X-Rite DTP94 USB Display Display LT Display 2 Monitor Pro 3 Color Care display Installation and licensing 1.2. Installation Once you installed and licensed Color Care 2 Suite on your computer, there is no need to run the Color Care Display installer separately. Please proceed with Chapter 2. 1. Turn on the computer on which you wish to install and use the software. 2. Insert the Color Care CD-ROM into your drive. n Mac: The Color Care CD-ROM folder will appear on your screen. Click on it to access to the Color Care installer or open the downloaded installer. We recommend a download as it ensures you have the latest version. n Windows: If the Color Care CD-ROM does not appear automatically go to “My Computer” and select the CD-ROM drive. 3. Begin installation by selecting the Color Care installer. Follow the instructions on the screen. 4. Once Color Care display 4.1 has been successfully installed, you can begin calibrating and profiling your monitor. You may now connect the measurement sensor to the computer. Note - Licensing Each computer has a unique machine ID which will be used to generate your individual license key. You can find the machine ID in the „Licensing“ window of the software in the upper left corner. It is possible that the Windows operating system may not recognize the measurement sensor driver after a restart. In this case the hardware manager will flag the driver with an exclamation mark or question mark. The “hardware assistant“ window will pop up to assist you with manual installation of the sensor driver. Follow the instructions for manual installation. The Color Care CD includes a folder with all the sensor drivers for the Windows® operating system. 5. To start Color Care display 4.1, double click the program icon. Windows hardware assistant: Insert the Color Care program CD into the CD-ROM drive of you computer and start the automatic hardware detection. The driver should be found automatically. If the measurement device has not been detected correctly you need to reinstall the driver manually. 4 Color Care display Installation and licensing 1.3. Product registration and licensing Licensing and release of Color Care display 4.1 software is linked to an individual computer. You will receive an individual license file (.lic-file) that allows you to “unlock” and use the software on the computer on which it was initially installed. The first time you start Color Care display 4.1, the “Licensing” window will pop up. You have the option of testing the fully functional software without any obligation for 14 days or immediately requesting your permanent license file if you have purchased Color Care display 4.1. a. If your computer is directly connected to the Internet, simply click the “License...” button. b. If your computer is not connected directly to the Internet, use another computer to access www.color-solutions.de and click on “Licensing”. Follow the instructions on the screen. c. If you do not have an Internet connection, click on the “Fax Form...” button to open a PDF document. Fill it out and fax it to the fax number you find on the form. Machine-ID: Each computer has a unique machine ID which will be used to generate your individual license key. You will find this machine ID in the „Licensing“ window of the software in the upper left corner. If you have never registered on the Color Care website, you will need to complete the registration information in order to open your personal Color Care account. Your registered e-mail address and password will allow you to log on to the Color Care website to request license files and to download Color Care display 4.1 software updates. Once you have logged on you still have the option of selecting either the 14-days demo license file or the permanent software license file. Before making your selection please take note of the following: n TAN: (TransActionNumber) There should be a sticker on the Color Care CD-ROM cover with a TAN number or you will get a TAN from your reseller. Once you have entered this number in the corresponding field and submitted the online form, you will be automatically directed to the area of the website where you can download your individual license file. If your Color Care CD-ROM cover does not have a TAN number or if you don‘t have a CD or don‘t have a TAN, then go to the <licensing without a TAN> section on the licensing website. Your licensing request will be processed and after all technical and commercial requirements have 5 On the inside of the CD-ROM box you will find the TAN-Number. Color Care display Installation and licensing been met, you will get access to your individual license file. Machine ID: The number entered in this field must be the same as the number displayed in the Color Care display “Licensing” window since this is the number that will be used in generating your individual license file. n n Product: Please select Color Care display 4.1 from the pull-down menu if it should not be selected already. Fill out all the required information (indicated with an *) and submit the form. You will either be linked directly to the website where you can immediately download your individual license file, or you will receive a message indicating that your request requires further verification and that you will receive an e-mail notification when your individual license file is available. For licensing Color Care display you need the machine-ID of your computer and the TAN which you can find on the inside of the CD-ROM box. IMPORTANT: Store your license file carefully! It is your key to unlock the Color Care display 4.1 software. You will also need this file for future software updates. This security method replaces the need for a hardware dongle. If you should lose it, you can retrieve it from the licensing server at any time by logging in to our web-site from within the application and going to the <My Licences> section. As soon as you receive your license file (Color_Care_2.lic) click on the button “Load License...” and install the license file to the application. Now the application is unlock and ready to use. Once you have received your license file (Color_Care_2.lic) it is valid for all software updates and reinstallation of Color Care display 4.1 on that particular computer. If you wish to install Color Care display 4.1 on additional computers, you need to obtain a new individual license file for each one. Additional licenses can be purchased from your Konica Minolta partner. You can check the status of your license in the Color Care display 4.1 “Licensing” window. The “License...” menu opens the “Licensing” window and shows the status of your license in the top left corner. In our example the license is permanent. 6 Click on the “Install License File...”-button to load the license file to the application. Color Care display Quick start Chapter 2 Quick start 2. Quick start 2.1 The user interface After launching Color Care display the main window will show up on all connected monitors. Through the main window you can calibrate and profile each monitor separately. This option is only available on Apple Macintosh systems. Because the colour management system of Windows doesn’t support profiles for more than one display connected to one graphics card without additional utilities. Measurement device: In this area of the main window the selected instrument will be depicted. Control panel: The actual calibration and profiling settings will be shown in this area. Also changes to the settings can be made here. Main area: The detailed feature settings of Color Care display will be shown in this area. The main window is clearly structured and easy to handle. So you can achieve a proper calibration and profile for your monitor very quickly and easily. All important information will be shown in the main window and you will get a quick overview about the present status. 7 Color Care display Quick start Measurement device After the first start of Color Care display you need to select your measurement device first. For this purpose, please select your measurement device under „Instrument“ in the menu bar or click onto the empty icon in the main window of Color Care display. In order to use Color Care display, you need a supported measurement device. Tip: Graphic cards (Windows) To use the multiple display sup port on one graphic card with the Windows operating system you will need additional third com pany tools (e.g. Microsoft colour control panel) or a special graphic card (e.g. Matrox Parhelia APVe). The main area In the main area of the main window you can setup all parameters for calibration and profiling. Otherwise the Windows operating system cannot handle multiple ICC-profiles on one graphic card. Presets Via the settings tab you have direct access to the presets of Color Care display. If you would like to use other settings than those defined in the presets, you can enter them in the following windows by clicking <Next>. You will be guided through the process step by step by Color Care display. Express calibration and profiling When you press the <Express> button the calibration and profiling of your monitor will start immediately with the settings that are shown in the main window of Color Care display. You can also start the express calibration and profiling process at any time during setting individual parameters in the sub menus of the control panel of Color Care display. For detailed information please contact our basICCare team (sup [email protected]). Tip: Screen saver During the calibration and pro filing of your monitors, please deactivate all screen savers and the power management of your operating system. Otherwise incorrect measure ments will occur. Tip: user permissions Please check your user permis sion before you start Color Care display. Only system Administrators have the permission to write to the system folder of an operating system where all the ICC-profiles are stored. Mac users with limited user per mission can store ICC-profiles in the user folder. Windows users do need adminis trator permission during the use of Color Care display. Otherwise the generated profile cannot be stored in the system folder. If you do not have adequate user permissions Color Care display will display an error message after the profiling measurements. 8 Color Care display Quick start 2.2 Selecting a measurement device After the first start of Color Care display 4.1 you need to select a measurement device first. This can be done via the “File” menu under “Select measurement device...” or with a click on the instrument icon in the main window of Color Care display 4.1. You can change the instrument at any time. Some measurement devices contain different calibration information for different monitor technologies. If you have a CRT display, please select the “CRT” mode and if you have an LCD flat screen please select “LCD”. This selection is very important for the measurements. A wrong mode can result in a colour cast. In this area of the main window of Color Care display FE you can see which measurement device is selected. Spectrophotometers do not require different calibration modes. “Spectral” is a universal mode for CRT and LCD displays. You can use these devices for CRT and LCD displays. After selecting the device it needs to be connected and calibrated before you can use it. For the connection and calibration please click <Connect> and follow the instructions for the calibration. After selecting and calibrating the measurement device you can leave the dialog by a click on the <OK> button. Calibration position for Eye-One Pro/Monitor Calibration position for the basICColor SQUID2 (without the translucent base!!) 9 The pop up window for selecting, connecting and calibrating the measurement device. Color Care display Quick start The following measurement devices are supported by Color Care display 4.1: n n n n n n n n n n n basICColor SQUID (Intel-Macs are not supported) basICColor SQUID 2 basICColor RAY (Please select the device: X-Rite DTP 94 USB) Colorvision SPYDER2 Gretag Macbeth EyeOne display Gretag Macbeth EyeOne display LT Gretag Macbeth EyeOne display 2 Gretag Macbeth EyeOne Monitor Gretag Macbeth EyeOne pro Monaco OPTIXXR X-Rite DTP 94 USB After selecting a measurement device an icon of the device will be displayed in the main window of Color Care display 4.1. You don’t have to select a measurement device when you start Color Care display FE the next time. The measurement device will be pre-selected. You will only be asked to calibrate the measurement device before you start the calibration and profiling process the next time. basICColor SQUID* basICColor SQUID2 Colorvision SPYDER2 GretagMacbeth EyeOne display GretagMacbeth EyeOne display LT GretagMacbeth EyeOne display 2 GretagMacbeth EyeOne Monitor GretagMacbeth EyeOne pro XR Monaco OPTIX 2.3 Presets for calibration and profiling After the setup of the measurement device Color Care display is ready to calibrate and profile your monitor automatically or semi automatically. But before you start the process, please check some essentials in order to get the best quality out of your monitor. Cleanliness of the screen Please check if the screen is clean, free of dust, fingerprints etc. Colour Solutions recommends to clean the monitor each time before profiling. Reflections/stray light Turn the monitor off and check if you can see any reflections of light sources on the screen. If so, you need to change the monitor position and/or to shield the monitor with an ambient light hood. basICColorRAY X-Rite DTP 94 USB * starting with version 4.1.1; Intel-Macs are not supported Icons for the supported measurement devices. Tip: Calibration of the measurement device It is advisable to calibrate the mea surement device directly before the measurement. Otherwise the device could be read justed when starting the measurement and the result will not be adequate. Ambient Light The ambient light in your working environment should comply with the relevant standards. For measuring the ambient light, please refer to chapter 3.7.2 Ambient light. Monitor warm up The colours of a monitor are becoming stable after a certain time. For this reason please turn on the monitor at least 30 to 60 minutes before measuring. This allows the monitor to stabilize the colour output. 10 LCD-flat screen with ambient light hood and Eye-One Pro spectrophotometer. Color Care display Quick start Driver for the graphics card Please check if your graphics card uses the latest driver. Color Care display requires a driver which allows writing a video-LUT into the graphics card. Otherwise an error message will pop up in Color Care display during the profiling process. Screen saver/power saving mode During the warm up, calibration and profiling of your monitors, please deactivate all screen savers and the power management of your operating system. Otherwise incorrect measurements can occur during the calibration and profiling process. Position of the measurement device Please check if the measurement device is positioned flat on the screen surface. Otherwise ambient light can enter the sensor, resulting in mismeasurements. For an easy and quick setup of Color Care display parameters, click on <Settings> in the control panel. In the main area a list of options will show up. Otherwise click the “Presets” radio button in the control panel to activate this. In the main area you will see four menu options that allow you to select the presets for calibration and profiling: - Display type Calibration method Calibration settings Profiling settings The different settings will be explained in more detail in the following part of this chapter: 2.3.1 Display type Under this point you need to select your display type first. After the first start Color Care display has no information on the kind of display connected to your computer. The preset for this option is <Please select>. Select the display type (LCD or CRT) before you continue with the next option. 2.3.2 Calibration method Color Care display can use four different methods to calibrate your monitor. You will find detailed information on the different methods in the extended part of this manual (chapter 4). 11 LCD-monitor CRT-monitor Color Care display Quick start Hardware calibration (monitor LUTs) Color Care display can hardware calibrate some monitors (see HW_Support_List.txt in the program folder). If such a monitor is connected to your computer, this option will show up in Color Care display and will be selected automatically. If you connect a monitor to your system which doesn’t support hardware calibration, this option is greyed out and not available. Combined hard- and software calibration Color Care display can parentely hardware calibrate some (so called) prosumer monitors (see HW_Support_List.txt in the program folder) by setting up the brightness, colour temperature, etc. in the monitors OSM (On-Screen-Menu). If such a monitor is connected to your computer, this option will show up in Color Care display 4.1 and will be selected automatically. If you connect a monitor to your system which doesn’t support hardware calibration, this option is greyed out and not available. Software calibration (video LUTs) Monitors without hardware calibration should be prepared via the OSD (On-Screen-Display) of the monitor. After manual preparation of the hardware (adjusting the display‘s buttons to control the OSD, as guided by Color Care display) Color Care display will calibrate these monitors via a video-LUT (Look-Up-Table) correction on the graphics card. No calibration (profile only) Some graphic cards do not support video-LUTs. A software calibration will fail on these systems. But you can use this option to create an ICC-profile for these systems. You can also use this option if you want to just profile the monitor using the present video-LUT in your graphics card. Color Care display will use the video-LUT for the profiling process and will write this video-LUT into the ICC-profile. 2.3.3 Calibration settings Under this section Color Care display offers you some standard calibration presets for the most common workflows. When selecting a calibration preset, all the necessary settings will be done automatically by Color Care display. You don’t have to select all the calibration options like “Colour temperature”, “Tonal response curve” etc. separately. Using this option speeds up the calibration and profiling process and makes working with Color Care display much easier. You can even make your own presets. Please find a detailed explanation in the extended part of the manual (chapter 4). If you like one of the presets, or if you made your own preset then just select the set which you like to use for calibrating and profiling your monitor and go on with the next step. You can select one of the following presets: 12 Video-LUT of a monitor with a full hardware calibration Result: All RGB-colours can be used for the output on the monitor. Video-LUT of an automatic/ manually combined hardware/software calibrated monitor. Result: Almost all RGBcolours can be used for the output on the monitor. Video-LUT of a noncalibratable monitor (e.g. a notebook) Result: A lot of RGB-colours are getting lost for the monitor output. Color Care display Quick start Office – This set will adjust your monitor hardware for office use. PrePress – This set will optimize your monitor for use in a prepress environment. Photography – This set includes the right setting for a photographic workflow. ISO 3664 and ISO 12646 – This set prepares your monitor hardware for standardised prepress workflow. Laptop – Use this preset to use the maximum luminance of your laptop. Video – This set will optimize your monitor hardware for a video workflow. Webdesign – Use this set to prepare your monitor hardware for web design. 2.3.4 Profiling settings As for calibration Color Care display offers you some presets for profiling as well. You can select the base on which Color Care display will create and calculate the ICC-profile for your monitor. The selected profiling set will set all the parameters in the control panel “Settings” menu “Profile”. How to create your own preset, including all the options, will be explained in the extended part of this manual (chapter 3). You can choose between the following default presets: 16-bit LUT based - This is the most precise and accurate type of ICC-profile. Most of the common applications (e.g. Adobe Photoshop) support this type of profile. Matrix-based - This is a simple type of profile. Smaller than the LUT based profile, but not as accurate. If an application cannot handle LUT-based profiles, please use this type of profile. Now you have done all the presettings for monitor calibration and profiling. The next step is to optimize the monitor hardware according to your settings. Since you have selected presets, you can skip the options “Colour temperature”, Tonal response curve”, “Luminance / contrast” and “Profile” in the control panel. If you want to deviate from the default settings, you can change these settings to individual values. Please find a detailed explanation in the extended part of this manual (chapter 4). 13 Color Care display Quick start If you have a monitor which supports automatic hardware calibration (e.g. EIZO ColorEdge CG 210), you can skip the next part of the manual. Please proceed to section 3.5 Calibration and profiling. 2.4 Presetting the monitor hardware This section explains how to prepare the monitor hardware manually. Depending on the type of monitor (LCD or CRT), the process differ. Because flat screens (LCDs) are using a different technology it’s not necessary or possible to set up the same parameters for LCDs as for CRTs. You can skip some of the steps necessary to prepare a CRT’s hardware. Click <Next> to go on with the next step. Tip: Notebook LCD’s Most Notebook LCD’s just offer an adjustment of the luminance. In order to obtain the best results, set lumi nance to maximum and proceed to section 2.5 Calibration and profiling 2.4.1 Brightness (CRTs only) Click <Measure> to adjust the brightness of your monitor. A new window with a black measurement patch will pop up. Before you start to measure, please set the contrast of the monitor to maximum (100%) via the OSD of your monitor. Brightness should be set to minimum (0%) or to a level that allows you to see something on your screen. If the black measurement patch looks gray, then brightness is too high. After this rough pre adjustment, position the measurement device on the monitor and start the measurement by clicking <Measure>. Color Care display now measures a few patches in a loop. While measuring, please adjust the brightness of your monitor in the OSD until the indicators on the right side of the window are within the green area of the diagram. After a few rounds of measurements the process will stop automatically. Restart the measurement if you are not satisfied with the final result. Otherwise click <Close> and you will be guided back to the main window. 2.4.2 Contrast (CRTs only) Open the measurement dialog by clicking <Measure>. The contrast of your monitor should initially be set to maximum. Position the instrument on the measurement patch and start the measurement by clicking <Measure>. Please adjust the contrast via the OSD until the indicator is in the centre of the diagram. When you are finished, click <Done> and <Close> to go back to the main window. 2.4.3 Colour temperature (LCDs and CRTs) Most of the monitor OSDs offer various possibilities to set the colour temperature. If possible select a mode that allows you to adjust each channel (R, G and B) separately. This is the most precise method to preset your monitor to the desired colour temperature. 14 Check if the indicators are in the green area of the diagram. Through this adjustment you will get good reproduction of the black tints on your monitor. Color Care display Quick start If this option is not available, please select a specific colour temperature (in Kelvin) from the OSD. If the measured colour temperature should not match, preferably select one that is too high than too low. After clicking <Measure> the measurement window will show up. Position the instrument on the screen and start the measurement by clicking the <Measure> button. First a few colour patches will be measured. Do not adjust anything in the OSD during this process. Then (after a few measurements) the software will toggle between two white patches (RGB = 255 and RGB = 242). Now you can adjust the colour temperature via the OSD until the correct colour temperature has been achieved. All the indicators in the diagram on the right have to be on the same level in the green area of the diagram. The measurement value has to be as close as possible to the desired value. If this is not possible, set the colour temperature to a value which is slightly higher than the desired value (about 50 - 500 K). This measurement will not stop until you cancel it manually by clicking the <Done> button. Before you do this, please check, if the luminance is set to the desired value. Colour temperature of a LCD. This monitor needs some corrections on the brightness via the monitors OSD. Measurement window for presetting the colour temperature and the luminance of the monitor. 15 Color Care display Quick start Luminance After setting the colour temperature the next step is to adjust the luminance of your monitor. This can be also done via the OSD of your monitor. If you cannot exactly preset the colour temperature (e.g. notebooks), the luminance should be set slightly higher (about 10 to 30 cd/m2) than the desired luminance, because it will be reduced during software calibration (video LUTs). After setting up the colour temperature and the luminance of your monitor, stop the measurement loop by clicking <Done> and <Close>. This will take you back to the main window of Color Care display. Now your monitor is prepared for software calibration and pro filing. Do not change the monitor settings in the OSD between calibrations. These setting are the basis for your ICC-profile. When you change them, the profile does not describe your monitor correctly any more. 2.5 Calibration and profiling Before starting the calibration and profiling process, you need to enter a profile name. Color Care display is pre-configured to suggest the monitor’s name as the profile name. If you change the name, the new name will become the default. Refer to the advanced part of the manual for changing the default name. Clicking the <Start> button will open a new measurement window. Position the instrument in the measurement area of this window. On the right side of the window you can see the measurement values during the calibration and profiling process (delayed by one patch). Click the <Measure> button to start the calibration and profiling process. The measurement process can be divided into four sections: Video-LUT of a monitor with internal hardware calibration. There are no corrections of the Video-LUTs in the graphics card. Video-LUT of a notebook LCD. The colour temperature couldn’t be preset exactly. So the colour temperature will be optimised by a correction curve in the graphics card. Reducing channels will also reduce the overall luminance of the display. 2.5.1 Measuring colour characteristic... The first step of the calibration is to gather the actual colour properties of the monitor. This is required to determine the parameters for calibration and profiling. 2.5.2 Setting white point... This step sets the colour temperature in the monitor hardware or via video-LUTs in the graphics card. 2.5.3 Iterating gray balance... Color Care display fine tunes the tonal response curve to the selected tonal response curve (L*, Gamma or sRGB) and optimizes the gray balance in an iterative process. 2.5.4 Measuring for profiling... After calibrating the monitor Color Care display measures the colour characteristic of the monitor again to create the ICC-profile. 16 As the final setting before starting the calibration and profiling process a name for the ICC-profile has to be entered. Color Care display Quick start 2.6 Results After all the measurements have been processed Color Care display will show you the results of the calibration and profiling process. The measurement window will close automatically, the ICC-profile will be saved to the defined folder and the new ICCprofile will be activated. So you don’t have to select and activate the profile manually. In the main window you can see a summary of the results of calibration and profiling and the location, where the ICC-profile has been was saved. At this point the calibration and profiling of your display is finished and you can close Color Care display or continue with validating the calibration. Summary of the results of calibration and profiling process. 2.7 Review After the calibration and profiling Color Care display shows a short summary of the results. Now you can run a more detailed validation. Validation By using this option in the review menu of the control panel, you can gather more details about the quality of the calibration of the display. You should use this option once in a while to validate the calibration of your monitor. Over time the state of a monitor may change (aging, changing parameters in the OSD, etc.) and the monitor may not display correct colours any more. Clicking <Validate> will open the well known measurement window. Position the instrument on the measurement area and click <Measure> to start the validation process. Validation is good when most of the measurement values are in the green area (dE <=1). Depending on the quality of your monitor, some values might be in the yellow area, but this is still acceptable. Due to their simplicity, matrix-based profiles are not as accurate as LUT-based profiles. For a more detailed explanation, refer to the extended part of the manual (chapter 4). Congratulations. You can close Color Care display now. The calibration and profiling of your monitor is done. 17 Sample of an excellent validation result. Color Care display Advanced Chapter 3 Advanced 3. Advanced This part of the manual contains additional information and explanations related to the settings and functions of Color Care display. 3.1 Preferences Use the menu bar or the shortcut [Apfeltaste], to go to the settings menu of Color Care display. Some of the changes you make here will only become effective after relaunching the application. 3.1.1 General Preferences Here you select the language for Color Care display User Interface. Additionally you can define if you want a click tone with every measurement. 3.1.2 Profile Creation This dialog allows you to specify the folder for storing the ICCprofiles you create. (For the System profiles folder you will need administrator rights, for the user profiles folder, standard user permissions are sufficient). By checking one or more check boxes you can define the default profile name. 3.2 Select system profile... At start up time your computer system loads the active system profile. Under Mac OS X the video-LUT that stores the monitor calibration information will be downloaded into the video card. A Windows-PC needs a separate video-LUT loader for this task. This application is being installed to the Start up Programs folder when you install Color Care display. If you use a hardware calibratable monitor, neither of the operating systems provides a mechanism to download LUTs into the monitor. Normally this information is stored in the monitor at calibration time and stays there permanently. If you change profiles (e.g. for different workflows - photo and video), you need to reload the appropriate video-LUTs. Color Care display lets you perform these tasks with one click. Go to the „File“ menu „Select system profile...“ and navigate to the desired ICC-profile. 18 General preferences window Tip: Profile names You can select an individual profile name. It will appear automatically after relaunching the app. If you delete it completely from the name field, it will be replaced by a name generated automatically based on the rules you selected in the „Profile creation“ dialog under „Profile name default“. Color Care display Advanced 3.3 Chromaticity and gamut/Spectral distribution In the menu „Window -> Chromaticity and gamut“ or with the shortcut [Apfeltaste]2 you open an additional window that shows the actual measurement in an x-y diagram. On the left you see the measured X-, Y- and Z- values as well as L*, a* and b*. On the right you see the corresponding RGB-values. Once measured, the primaries Red, Green and Blue define a colour triangle, the gamut of your monitor, in the x-y diagram. In the menu „Window -> Spectral distribution“ or with the shortcut [Apfeltaste]1 you open an additional window that shows the spectrum of the actual measurement. This option is only available if the measurement instrument used is a spectrophotometer. Presently the only spectrophotometers available are Gretag Macbeth EyeOne Pro and Eye-One Monitor. XY-graph of a measurement value in the Chromaticity and Gamut window Click on the <Save> button to store the spectrum in an ISO-12642 compliant text file. 3.4 Calibration methods (detailed) A correct calibration of your monitor is the basis for a good profile. The better you pre-adjust the monitor hardware to the desired display characteristics, the better the quality of the resulting profile. By calibrating the monitor you will improve the representation of all colours because the profile conversion will have to correct for less and smaller differences. Color Care display offers 3 different calibration methods. At first launch it will automatically select the highest level method available for your monitor/video card combination. When you quit the application, the calibration method you may have selected manually, will be stored and recalled next time you use Color Care display. 3.4.1 Hardware & combined HW/SW calibration Hardware calibratable monitors are connected to the computer via a digital data connection. This could be a DDC/CI video cable or a separate USB or serial cable. Color Care display uses this connection to directly control the monitor and to calibrate it automatically, based on the results of your measurements. This functionality is only available for selected, hardware calibratable monitors (see „HW_Support_List.txt“ in the Color Care display program folder). Spectral distribution for the same measurement Uncalibrated monitor: The tonal distribution is irregular and the greys show a colour cast. Software-calibrated monitor: The tonal distribution is regular the greys are neutral Hardware-calibrated monitor: Perfect distribution of tone values all steps are distinguishable Software-calibrated monitor: Depending on the quality of the monitor, not all steps may be distinguishable, especially in highlights and/or shadows 19 Color Care display Advanced LCD flat screens LCD monitors normally use a backlight with defined lighting characteristics. Colours are generated by filtering this light source with liquid crystal filters. Simple LCD monitors work with internal signal processing with 8bit accuracy (256 steps per primary colour). Depending on the desired white point (e.g. D50) the intensity of one or more channels must be reduced considerably. This results in a loss of a considerable amount of steps in the colours that have been reduced and thus in a loss of display quality. The result is banding. Highlights and shadows can also be affected. Hardware calibratable LCD monitors work with signal processing of 10 or more bits per channel (e.g. 10 bits = 1,024 steps). If one channel should be reduced to 50% there will be enough remaining data to describe the 256 steps of the colour signal sent to the monitor. This means that there is differentiation between all the colours, they do not get clogged up. This alone does not make a monitor hardware calibratable. The monitor needs to be able to communicate with the calibration software. Besides the white point (colour temperature) and luminance, some hardware calibratable monitors allow for controlling gradation curves so that no correction needs to be done in 8 bits on the video card (e.g. the EIZO CG series). CRT monitors Hardware calibratable CRTs need to be connected to the computer via a digital data connection. That way colour temperature, brightness and contrast can be controlled. CRTs do not have any means to control the gradation curves. The correction of the monitor gradation needs to be done with video-LUTs in the video card. These are stored in 8 bit accuracy in the ICC-profile. Hardware calibratable CRTs are not supported by Color Care display. All the parameters a hardware calibration would set automatically can be set manually, but instrumented with the help of „Hardware setup“ in Color Care display. For optimal calibration and profiling results for soft proofing and high-end image retouching, Colour Solutions Software recommends the use of hardware calibratable LCD monitors. 20 Color Care display Advanced 3.4.2 Software calibration (video LUTs) The monitor hardware needs to be set manually by the user, using monitor controls or the on-screen-display (OSD). Color Care display assists you in setting these parameters with measurements from your monitor instrument. Like in CRTs, the gradation settings are not accurate and need to be corrected via video-LUTs. These are stored in the ICC-profile and downloaded to the video card on system start-up. LCD flat panels Some LCD monitors offer near to none of these control options (e.g. notebook monitors). Some of them have a brightness control only, which dims the backlight (not to be confused with CRT’s brightness control which sets the luminance of the black point). Due to the necessary correction, these monitors are not suited for colour critical work or for soft proofing. LCD monitors with an analogue connector only will yield inferior calibration quality altogether. Higher quality LCD monitors (like the NEC MultiSync family of monitors) offer 10 or more bit data processing. Only this type of monitors satisfies higher quality demands. These monitors offer settings for black and white luminance and white point. CRT monitors In CRTs the intensity of the 3 phosphors is controlled by an analogue signal that can be modulated nearly infinitely variable. Since the intensity of each channel can be controlled individually (gain), the colour temperature can be set very exactly. Gradation curves in a CRT cannot be influenced; each monitor has its more or less fixed gamma. That’s why a CRT cannot be fully hardware calibratable. Mac OS The colour management framework of OS X (ColorSync) automatically detects the presence of calibration curves in an ICCprofile and downloads them into the video card at system start-up or when allocating a different ICC-profile using the monitors control panel. Windows The Windows colour management framework (ICM) does not support this functionality; a separate LUT-loader is required. Color Care display contains such a LUT-loader which is installed automatically into the start-up programs folder when installing Color Care display. At Windows start-up the LUT-loader downloads the calibration curves into the video card. When changing the monitor profile, the LUT-loader must be launched manually in order to download the correct LUT. The downside of a software calibration, compared to hardware calibration is the reduction of tonal values by using 8 bit LUTs in the video card. Depending from the extent of the correction, banding and reduced definition in highlights and shadows can be then consequence. This effect is annoying in technical vignettes, but it’s not so visible in photos. 21 Tip: LUT-Loader Make sure that the „Color Care dis play 4 VideoLUT Loader“ is the only LUT-loader in the Windows start-up programs folder. There will be a LUT conflict, resulting in a wrong calibration, if other LUTloaders such as Adobe Gamma are launched at system start-up. Color Care display Advanced 3.4.3 No calibration (profile only) In the worst case the graphic card does not support video LUT download (some PC graphic cards). The monitor must then be characterised in its present state. Corrections for colour temperature and tone curve are not available in this mode. Also, adjustment of luminance and contrast can only be done manually. Color Care display supports you with measurement values in setting these parameters. Should the graphic card contain a LUT when launching Color Care display it will be taken over and saved in the ICC-profile. It is understandable that the results achieved with this method are far from being optimal. 3.5 Custom settings One of the key improvements of Color Care display 4 is the option to save and load custom calibration settings. Such a set of calibration parameters contains the settings for „Colour temperature“, „Tonal response curve“ and „Luminance/contrast ratio“. By selecting a complete set under Settings/Presets, there is no need to select these parameters separately. The ease of use of Color Care display has been enhanced considerably. There are several sets of „Calibration settings“ that come with Color Care display. They cover the most important workflow conditions and have been compiled with the utmost care. In case you should not find suitable settings for your needs, change the parameters in the „Settings“ tab and save your custom settings under „File -> Save calibration settings...“. Here is an in depth explanation of the parameters: 3.5.1 Colour temperature If you heat up a black body you will see that it radiates light. The spectral distribution of the emitted light can be correlated with the temperature of the black body. Any light‘s colour temperature is the temperature in Kelvin (K) at which the heated black-body radiator matches the hue of the light. The lower the colour temperature, the more yellowish/reddish the emitted light (e.g. incandescent lamp -> approximately 2800 K). The higher the colour temperature, the more bluish the emitted light (e.g. uncalibrated CRT monitor -> approx. 9300 K). Colour temperature only describes a certain colour sensation, not a specific spectral distribution. So, it’s unknown, how the measured x and y values are composed spectrally. The CIE (Commission Internationale de l‘Eclairage) have defined spectral distributions of standard lighting situations, the most important of which is the D-series (D = Daylight). 22 Color Care display Advanced D50 For the graphic arts industry, D50 is the standard for viewing and comparing colour. Also the colour systems L*a*b* and XYZ as we use them in graphic arts, are based on this illuminant. These are the reasons why a computer monitor in an ICC-compliant working environment needs to be calibrated to D50. D65 This is the standard illuminant for the manufacturing industries (automotive, textile etc.), office and video production. If you are in one of these trades, you should calibrate your monitor to D65. „D50“ spectral distribution curve „D50“ spectral distribution curve of a CRT monitor Other D(aylight white point) For specific purposes it may be advisable to calibrate to a different daylight white point. Enter the full correlated colour temperature here (e.g. 7500) Monitor’s native Each monitor has its own, typical white point that is displayed when all 3 channels, R, G and B (Gains) are set to max. With this setting the luminance and gamut of the monitor are at their maximum. „Monitor’s native“ is not recommended for colour critical work in an ICC workflow. This setting may be useful for laptop monitors if their luminance is inadequate after calibrating them to D50. Blackbody temperature As described earlier, an illuminant can be characterised with its correlated colour temperature. D50 for example has an approximate colour temperature of 5000K, but the blackbody radiator has a different spectral distribution at 5000K. Monitors show a different, characteristic spectral distribution, their white point can only be approximated. 3.5.2 Tonal response curve Shades of gray from black to white will be reproduced in a specific way, depending on the individual monitor. CRTs and LCDs are very different in their native characteristics. In order to normalize the response character monitor calibration corrects the tonal response curves to a defined function. L* (recommended) Theoretically, the ideal colour system for cross media publishing is L*a*b*. It equals the characteristics of human colour perception. So, it is logical to combine the advantages of the L*a*b* with the representation of tone values on a monitor. The L* method calibrates your monitor in such a way that greyscales appear visually equidistant. If you increase the R, G and B signals by the factor 2, the displayed colour will be doubled in brightness. This way the RGB monitor space is optimally adapted to the human visual sensation. 23 „D65“ Color Care display Advanced Since ICC profiles are based on L*a*b* as well, the conversion losses are minimised when converting colour to the monitor gamut. If you calibrate your monitor to L*, your RGB working space should have an L* tonal response curve also. You can download such a working space from www.lstarrgb.com or make your own with basICCoolTool SpaceLab from Colour Solutions. Gamma The Gamma function is based on the native behaviour of CRT monitors. In CRTs, an electron beam excites red green and blue phosphors on the tube’s surface. Depending from the intensity of the electron beam, the phosphors glow more or less bright. Yet the intensity is not directly proportional to the voltage that controls the exciting electron beam. The ratio equals a gamma function. This gamma function can easily be modified into a different gamma behaviour. In the early days of monitor calibration, it seemed a good idea to calibrate a monitor to a gamma that is similar to the tonal response of printed matter, to be precise, gamma 1,8 was the characteristic of an Apple LaserWriter. Thus gamma 1.8 became the typical Apple monitor gamma. On a PC, where you normally did your bookkeeping, wrote letters and prepared presentations, a more contrasty characteristic was desirable. Thus gamma 2.2 became the typical PC gamma. In a colour managed environment these historic gammas do not make sense any more. For one, because LCD monitors show a completely different native tonal response, on the other hand the monitor profile compensates for different tonal curves anyway. So it makes more sense to calibrate your monitor to a tonal response curve that affects the data you want to display the least: L*. The only use of a gamma calibration is a workflow with data which need to be displayed with a certain gamma or other tonal response curve (e.g. video or web design = sRGB) outside a colour managed environment. In all other cases, L* calibration is the better choice. sRGB IEC61966-2.1 sRGB is a working space for monitor output only. You find it mainly in the areas of Internet, multimedia video and office applications. The tonal response curve cannot be described with a gamma function (although Photoshop, for example, reports a gamma value of 2.2). In the shadows, it resemble more an L* curve, in the midtones and highlights it follows the gamma 2.2 curve. In order to exactly match sRGB data, Color Care display is the only monitor calibration application that offers a sRGB calibration curve for these applications. 24 Color Care display Advanced CIECAM02 How the effective contrast ratio will be reproduced in a workflow doesn’t depend on the monitor alone. Also the lightning conditions of the room are having a lot of influence on the effective contrast ratio of the monitor. In a very bright enlightened room the effective contrast of the monitor will not be the same like using the same monitor in the same room, but without any additional light sources and closed curtains (e.g. dark room). One part of CIE Colour Appearance Model 02 (CIECAM02) is to take care about the luminance of the ambient light of the room. The monitors gradation curve can be optimised to the luminance of the rooms ambient light to optimize the effective contrast ratio (combination monitor and ambient light) by choosing one of the CIECAM02 setting. Colour Solution recommends using one of the following settings depending on luminance of the ambient light of the room: 0 - 32Lux: CIECAM02 - dunkel 32 - 64Lux: CIECAM02 - gedimmt >= Lux: CIECAM02 - hell The luminance and the white point of the ambient light of the room can be measured with a measurement device which supports ambient light measurements (e.g. basICColor SQUID 2 or X-Rite Eye-One pro). 3.5.3 Luminance/contrast ratio Here you can define parameters that are important in different ways. If you should use several monitors in your environment, it makes sense to harmonize them to the same visual appearance. These settings allow you to do so in different ways. White luminance The addition of all 3 RGB primaries results in white light of the highest possible quantity of light. That makes white the brightest colour a monitor can show. If you reduce the brightness of an LCD monitor or the contrast of a CRT, the quantity of light and thus the white luminance will be reduced. All monitors have a different native white luminance. In order to be visually equal, they need to be calibrated to the same maximum luminance. The reference is always the monitor with the least brightness. All other monitors must be adjusted to the darkest one. In order to determine the max. luminance for a given white point, you need to calibrate the monitor with the „maximum“ radio button checked. In order to determine the luminance of a second monitor, create a white desktop on that monitor, click the „Measure“ button and follow the instructions on the screen. 25 Color Care display Advanced Black luminance For the visual appearance of a monitor, not only the tonal response curve and the white luminance are of importance, but also the black luminance. Color Care display allows you to calibrate monitors to a defined black luminance. Here the highest black luminance is the reference for harmonizing multiple monitors. In order to determine the min. black luminance for your monitor, you need to calibrate the monitor with the „Minimum“ radio button checked. In order to determine the black luminance of a second monitor, create a black desktop on that monitor, click the „Measure“ button and follow the instructions on the screen. Tip: Contrast control in LCDs The contrast control (OSD) of an LCD monitor works completely differently from CRTs. Contrast The ratio between brightest and darkest value of a monitor is called contrast ratio. The higher the contrast ratio, the better is the differentiation of tonal values. In most cases, there is no need to change the contrast settings. Please reset contrast to factory settings before attempting to calibrate an LCD monitor. If white luminance and black luminance of two monitors are equal, the contrast ratio is the same. So, it is irrelevant if you calibrate to the same white and black luminance or the same luminance and contrast ratios. Specify Here you select the two parameters you intend to use for the calibration; the third one will be greyed out and will be calculated automatically. 3.6 Profile (settings) Like for the calibration settings, Color Care display allows you to save and load profiling settings (Menu „File/Save profiling settings...). 3.6.1 Profile type The function of an ICC profile is to describe the colour characteristics of your devices in a device independent colour model (e.g. CIELab). It doesn’t make sense to describe all 16.7 million colours in a profile; this would result in a huge file. So, only a certain number of colour combinations will be described in a profile, the others will be interpolated mathematically. Matrix based The simplest way to describe the colour properties of a device is a colour matrix. It contains the 3 primaries red, green and blue and a function that describes the tonal response curves for the 3 channels. The main advantage of this profile type is its small size (4 -8 KBytes, depending from the way, your hard drive has been formatted). Matrix profiles are thus best suited for applications where size matters, e.g. the internet. The downside is that a not so perfect device cannot be described accurately. 26 Color Care display Advanced 16-bit LUT based In this profile type, the gamut of a device will be described in a table of a defined number of points. All other colour values will be interpolated. This allows describing non-linear behaviour of a device. The size of a LOUT profile can be somewhere between 200 KB and more than 2 MB. With 16 bit encoding, the accuracy of a LUT profile will be increased dramatically (256 times more accurate), while the size only doubles. That’s why Color Care display offers 16 bit LUT profiles only. 3.6.2 Chromatic adaptation Chromatic adaptation is the ability of the human visual system to discount the colour of the illumination and to preserve the appearance of an object. Chromatic adaptation can be observed by examining a white object under different types of illumination, such as daylight (bluish) and incandescent (yellowish). The white object retains its white appearance under both light sources, as soon as the viewer is adapted to the light source (discounting the illuminant). Within the ICC colour management system, D50 is the reference illuminant. Should a monitor be calibrated to a different white point (e.g. D65), all colours displayed on this monitor need to be converted so that they appear like they were being viewed under D50 lighting. Such transformations are called Chromatic Adaptation Transforms (CATs). There has been a significant amount of research in determining CATs that are able to accurately predict colour appearance across different illuminants. The transforms currently in use are based on minimizing perceptual error of experimental corresponding colour data sets. None is not really no CAT, it rather means: No other than the preferred ICC chromatic adaptation method. von Kries The von Kries CAT assumes that chromatic adaptation is indeed an independent gain control of the cone responses of the human visual system, and that the scaling is based on the ratio of the cone responses of the illuminants. Visual result: On a monitor calibrated to a higher colour temperature, all colours appear (compared to CAT „None“) a bit warmer and more saturated. The opposite is the case for monitors calibrated to a lower colour temperature than D50. Linear Bradford A widely used newer chromatic adaptation transform is the Bradford transform. It was empirically derived by Lam from a set of corresponding colours as determined from 58 dyed wool samples with varying colour constancy, evaluated under illuminants A and D65. The original Bradford chromatic adaptation transform contains a non-linear correction in the blue region. In many applications, as in Color Care display, this non-linearity is neglected. Changes appear less intensive than in the „von Kries“ method. 27 Color Care display Advanced CAT0 (von CIECAM0) This is the latest development in CATs, its effect is close to that in the „linear Bradford“ method. Color Care display uses CAT02 as a default. 3.6.3 ICC v4 profile If you check „ICC v4 profile“ Color Care display will create ICC profiles according to the latest specification (including the correct chromatic adaptation tag). Under windows, v4 profiles do not make sense since the Windows colour management system ICM is not capable of utilizing these profiles (ACE, the CMM built into Adobe products can handle v4 profiles). 3.7 Review Under this tab you will find some useful quality assurance and editing tools. 3.7.1 Validation This tool allows you to check the quality of any profile and calibration, not only those created with Color Care display. After measuring the validation patches you see the „Validation Results“ window. The measured values are compared with the reference values calculated from the ICC profile. For each patch you will find a DeltaE information along with Deltas for L, a and b separately. display CIELAB This check box lets you switch between Lab and XYZ values, it is checked by default. Tolerancing model With the radio buttons in the upper right corner of the window, you can switch tolerancing models from DetaE 94 (default) to DeltaE (Lab). The latter is still the standard method for determining the distance between 2 colours, while the first is more accurately adapted to the human visual system. 28 Color Care display Advanced 3.7.2 Ambient light This does not influence the results of calibration and profiling, it is for your reference only. On the other hand, you can find essential information that help you set up your working environment. Presently 2 of the supported instruments allow for ambient light measurements: basICColor SQUID/ GretagMacbeth Eye-One Display In order to measure ambient light, you have to attach the ambient light head. GretagMacbeth Eye-One Pro Not all Eye-One spectrophotometers support ambient light measurements, you need one that came with the „Ambient Light Head“. Mounting the ambient light head on a GretagMacbeth Eye-One Pro For ambient light measurement, Color Care display offers reference data for 3 different situations. Check the radio button that represents the desired situation. In order to measure ambient light, click <Measure>. Positioning of the GretagMacbeth Eye-One Pro for ambient light measurement 3.7.3 Check viewing booth In order to be able to judge colours accurately on a monitor, you need a controlled environment as described in ISO 3664 and ISO 12646. These standards demand for a dimmed surrounding with a not more than 32 lux and a colour temperature close to D50. Attach the ambient light head to the instrument and hold the instrument in front of your monitor with the ambient light head facing the room, not the monitor. Viewing booth and monitor comparison For a comparison of a proof and a soft proof, the viewing booth should have an illuminance value of 500 ± 125 lux and a colour temperature of D50. Again, attach the ambient light head to the instrument and hold the instrument towards the back wall of your viewing booth. Make sure the background is a neutral gray. In doubt use a gray card that has no metameric failure, like the basICColor gray card. Mounting the ambient light head on a basICColor SQUID2 In the measure window, you’ll see the measurement values updated with each measurement. Thus you can adjust your ambient light or viewing booth until the required values have been reached. Click <Done> and then <Close> when you want to stop measuring. The achieved values will be displayed next to the reference values so that you can compare the results. Positioning basICColor SQUID2 for ambient light measurement. 29 Color Care display Advanced Viewing booth for hardcopy comparison only A viewing booth that is being used for comparing print and proof, is supposed to show an illuminance value of 2000 lux ± 500 lux and a colour temperature close to D50. Attach the ambient light head to the instrument and hold the instrument towards the back wall of your viewing booth. Make sure the background is a neutral gray. When in doubt, use a gray card that has no metameric failure, like the basICColor gray card. 3.7.4 Adjust JUST viewing booth One essential feature in a professional image reproduction workflow is to adjust the monitor and the viewing booth at the workstation to each other. Some of the JUST viewing booths are offering an USB-interface which Color Care display can use to communicate with the viewing booth. Via the USB-interface Color Care display can control the luminance of the viewing booth based on measurements (measurement device with ambient light head required). Viewing booth and monitor comparison Using this setting will adjust the light booth’s brightness to the brightness of the monitor. Only then it will be possible to compare a photographic print, proof or any other artwork with the display on the monitor. Color Care display communicates with the light booth and will automatically adjust its brightness to the monitor’s brightness. Please take notice that the monitors brightness should be set to a standardised value. The ISO 3664 requires a luminance of 500 +/- 125 lux. Other settings are also possible but then they are not standardised and other users may not have the same exposure at their facilities. Viewing boot for hardcopy comparison only By using this setting the light booth will be automatically adjusted to a luminance of 2000 lux. This is the standardised luminance to compare artwork, photos and/or press prints to proofs. This setting should not be used to compare (e.g. a proof) with the display on the monitor. Other value/other value (emission) To be not bound only to standard settings, it is possible to adjust the light booth’s luminance to a custom value. The values can be entered in the measuring units Lux (lx) or candela per square meter (cd/m2). 30 Color Care display Advanced 3.7.5 Edit calibration In principle there should be no need to edit the calibration performed by Color Care display. There are rare occasions when the monitor still shows a colour cast after calibration (depending from the filter set in the instrument and the phosphor or LCD filter set of the monitor). In these cases you can edit the calibration curves manually. Color Care display offers 2 edit modes: White point In this mode you can influence the brightness in all 3 channels or in 1 selected channel without affecting the shape of the calibration curve. If you click and drag the white point, you reduce or increase white luminance in the selected channel. Once you have reached 100% and continue dragging, contrast, but not the intensity will be increased, but you will lose definition in the highlights. If you click and drag the black point, you can increase black luminance in the selected channel, which affects the contrast ratio as well. White point edit: On the left, the white point was raised. You can see how many colours turn to white. On the right, luminance and contrast have been reduced If you edit R, G and B separately, you will change the colour cast in white or black. Curves This option allows you to change the shape of the tonal response curves with 3 additional handles. Edit curve(s) Here you select, which curve(s) you want to edit. All - All Curves are affected in the same manner. Red - Only the tonal response curve of the red channel will be affected. Blue and green channels remain unaffected. Green - Only the tonal response curve of the green channel will be affected. Red and blue channels remain unaffected. Blue - Only the tonal response curve of the blue channel will be affected. Red and green channels remain unaffected. Undo - Undo the last change. Reset - Revert curves to the LUTs stored in the profile. Save - Write curves into the active profile. 31 Black point edit: On the left, the black point was reduced. You can see how many colours turn to black. On the right, luminance was raised which results in a reduced contrast Konica Minolta Business Solutions Europe GmbH Europaallee 17 30855 Langenhagen • Germany Tel.: +49 (0) 511 74 04-0 Fax: +49 (0) 511 74 10 50 www.konicaminolta.eu