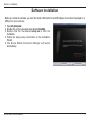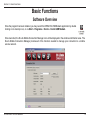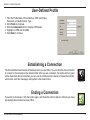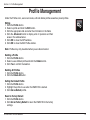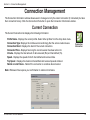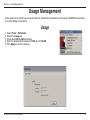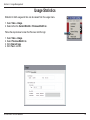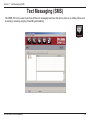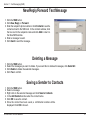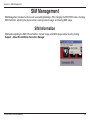
1
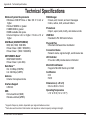
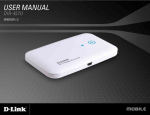
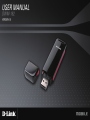
Preface D-Link reserves the right to revise this publication and to make changes in the content hereof without obligation to notify any person or organization of such revisions or changes. Manual Revisions Revision Date 1.0 April 29, 2009 Description DWM-152 Revision A1 with firmware version 1.00 Trademarks D-Link and the D-Link logo are trademarks or registered trademarks of D-Link Corporation or its subsidiaries in the United States or other countries. All other company or product names mentioned herein are trademarks or registered trademarks of their respective companies. Copyright © 2009 by D-Link Systems, Inc. All rights reserved. This publication may not be reproduced, in whole or in part, without prior expressed written permission from D-Link Systems, Inc. D-Link DWM-152 User Manual 2 Table of Contents Preface.......................................................................... 2 Manual Revisions..................................................... 2 Trademarks.............................................................. 2 Introduction............................................................... 5 Features................................................................... 5 Product Overview......................................................... 6 Package Contents.................................................... 6 System Requirements.............................................. 6 Hardware Overview.................................................. 7 LED Indicator Information......................................... 8 Installation..................................................................... 9 SIM Card Installation................................................ 9 MicroSD Card Installation....................................... 10 Software Installation............................................... 11 Basic Functions.......................................................... 12 Software Overview................................................. 12 New Profile............................................................. 13 Use Default Profile (Preset).................................... 13 User-Defined Profile............................................... 14 Establishing a Connection...................................... 14 Ending a Connection.............................................. 14 Profile Management................................................... 15 D-Link DWM-152 User Manual Connection Management........................................... 16 Current Connection................................................ 16 Connection History................................................. 17 Usage Management.................................................... 18 Usage..................................................................... 18 Usage Statistics...................................................... 19 Text Messaging (SMS)............................................... 20 New/Reply/Forward Text Message........................ 21 Deleting a Message................................................ 21 Saving a Sender to Contacts.................................. 21 SMS Settings.......................................................... 22 Contact Management................................................. 23 Adding Contacts..................................................... 23 Editing Contacts..................................................... 23 Deleting Contacts................................................... 23 Importing vCards to Contacts................................. 24 Exporting Contacts to vCards................................. 24 SIM Management........................................................ 25 SIM Information...................................................... 25 Enabling or Disabling a PIN Code.......................... 26 Changing a PIN Code............................................. 27 Unlocking a PIN Code............................................ 27 3 Profile Settings........................................................... 28 Band Settings......................................................... 28 Network Selection................................................... 29 Call Settings........................................................... 30 Missed Calls........................................................... 30 Startup Options.......................................................... 31 Version Information.................................................... 31 Troubleshooting......................................................... 32 Glossary...................................................................... 33 Technical Specifications........................................... 36 D-Link DWM-152 User Manual 4 Section 1 - Product Overview Introduction The 3.5G HSDPA USB Adapter allows users with a computer to connect to mobile broadband networks (HSDPA/ UMTS/GPRS/GSM/EDGE). While connected, users can transfer data, stream media, and send SMS messages. The adapter uses a standard USB interface for fast and simple installation. Features • • • • • • • • • • Compact and sleek mobile adapter easily fits in your pocket Provides HSDPA/UMTS/GPRS/GSM/EDGE network support GSM circuit-switched (CSD) data transfer for multimedia Plug-and-Play: No CD-ROM required Connection software launches quickly and automatically Convenient USB connector requires no additional cables MicroSD card reader slot for optional removable storage Send group SMS messages to up to 25 contacts simultaneously Store up to 1000 outgoing SMS (depending on SIM card capacity) Control incoming calls with forwarding, busy tone, or continuous ringing D-Link DWM-152 User Manual 5 Section 1 - Product Overview Product Overview Package Contents D-Link DWM-152 - 3.5G HSDPA USB Adapter System Requirements •Windows 2000/XP/VISTA or Mac OS X 10.4.0+ •Pentium III or greater •128MB RAM or greater •50MB available disk space •Internet Explorer v6.0+ / Firefox v1.5+ •A computer with an available USB 2.0 port D-Link DWM-152 User Manual 6 Section 1 - Product Overview Hardware Overview Status Indicator A multi-colored LED indicates connection status information. MicroSD Card Slot Accepts a MicroSD card (up to 8GB). SIM Card Slot Accepts a standard SIM Card. USB Port Connects the DWM-152 to a computer. D-Link DWM-152 User Manual 7 Section 1 - Product Overview LED Indicator Information Color Service Blinking Solid Yellow System – Device Initializing / No Signal Red SIM Card Service Searching Error (No SIM / Invalid SIM) Green WCDMA Registered Connected Blue HSDPA – Connected Purple GPRS/ EDGE Registered Connected D-Link DWM-152 User Manual 8 Section 2 - Installation Installation SIM Card Installation Follow the steps below to install a SIM card: 1. Remove the cover from the end of the adapter. Figure 1 2. Pull out the SIM card tray. (Figure 1) 3. Insert the SIM card with the gold contacts facing down. (Figure 2) 4. Push the SIM card tray back into the adapter. (Figure 3) 5. Connect the adapter to a USB port on your computer. (Figure 4) Figure 2 Figure 3 Note: To remove an installed SIM card, pull out the SIM card tray and gently lift the card. Figure 4 D-Link DWM-152 User Manual 9 Section 2 - Installation MicroSD Card Installation The DWM-152 has a slot which can read MicroSD cards with capacities of up to 8GB. Follow the steps below to install a MicroSD card: 1. Unplug the DWM-152 USB adapter from the computer. 2. Gently lift the upper left corner of the MicroSD card slot cover. (Figure A) 3. Insert the MicroSD card with the gold contacts facing towards the top of the adapter. (Figure B) Figure A 4. Close the MicroSD card slot cover. (Figure C) 5. Plug the DWM-152 into a USB port on your computer. 6. The computer may take a moment to recognize the device. 7. A new removable disk will appear in your computer’s list of storage drives. Note: To remove a MicroSD card, unplug the device from the computer. Open the card slot cover and gently push the card in to eject it. Figure B Figure C D-Link DWM-152 User Manual 10 Section 2 - Installation Software Installation Before you install the software, you must first install a SIM card into the USB adapter and connect the adapter to a USB port on your computer. 1. Open My Computer. 2. Double click on the removable drive labeled ConnMgr. 3. Double click the file labeled setup.exe to start the installation. 4. Follow the step-by-step instructions on the Installation Wizard. 5. The D-Link Mobile Connection Manager will launch automatically. D-Link DWM-152 User Manual 11 Section 3 - Basic Functions Basic Functions Software Overview Once the program has been installed, you may launch the DWM-152 USB Modem application by double clicking on its desktop icon, or via Start > Programs > D-Link > D-Link USB Modem. Once launched, the D-Link Mobile Connection Manager icon will be displayed in the windows notification area. The D-Link Mobile Connection Manager provides all of the functions needed to manage your connection to a mobile service network. D-Link DWM-152 User Manual 12 Section 3 - Basic Functions New Profile Before starting, if the mobile service provider associated with your SIM card is listed in the preset profile list, you can directly connect to the desired network using its pre-defined profile. You also can create your own profile by following the steps below: 1. Click the Profile button. 2. Click the New button to activate the wizard which will help you create a new profile. 3. Select the profile type, Preconfigured Profile or User Defined Profile. Click Next to continue. Use Default Profile (Preset) 1. Select a Profile Name from the drop-down menu. Most of the required information will be populated into the fields automatically. 2. If needed, fill in the Phone Number, APN (Access Point Network), User Name, and Password. 3. If desired, click the check box to set this as the default profile. 4. Click Next to continue. D-Link DWM-152 User Manual 13 Section 3 - Basic Functions User-Defined Profile 1. Fill in the Profile Name, Phone Number, APN, User Name, Password, and Authorization Type. 2. Click Finish to complete. 3. Click the Advanced button to display APN details. 4. Highlight an APN and click OK. 5. Click Next to continue. Establishing a Connection The Connect/Disconnect button will be black when you are offline. You can click the Connect button to connect to the network via the default profile. After you are connected, the button will turn green with a checkmark. Once connected, you can use the mobile service network to browse the Internet, send e-mail, send text messages, and perform other tasks online. Connect Ending a Connection If you wish to disconnect, click the button again, and the button will turn black to indicate you have successfully disconnected and are offline. Disconnect D-Link DWM-152 User Manual 14 Section 4 - Profile Management Profile Management Under the Profiles icon, users can create, edit and delete profiles as well as preset profiles. Editing 1. Click the Profile button. 2. Select a profile and click the Edit button. 3. Click the appropriate tab and enter the information in the fields. 4. Click the Advanced button to display a list of operators and their areas in the window below. 5. Click OK to close the APN window. 6. Click OK to close the Edit Profile window. Profile Note: Profiles may only be edited when you are disconnected. Deleting a Profile 1. Click the Profile button. 2. Select a user-defined profile and click the Delete button. 3. Click Yes to confirm the deletion. Deleting All Profiles 1. Click the Profile button. 2. Click the Delete All button. Setting the Default Profile 1. Click the Profile button. 2. Highlight the profile to use when the DWM-152 is started. 3. Click Set as Default profile. Reset to Factory Default 1. Click the Profile button. 2. Click Set as Factory Default to return the DWM-152 to the factory settings. D-Link DWM-152 User Manual 15 Section 5 - Connection Management Connection Management The Connection Information window allows users to manage not only the current connection (if connected), but also their connection history. Click the Connection Info button to open the Connection Information window. Current Connection The Current Connection tab displays the following information: Profile Name - Displays the current profile. Select other profiles from the drop down menu. Connection Type: Displays the mobile service technology that the service network uses. Connection Band - Displays the band of the current connection. Connected Time - Displays how long the current session has been active for. Volume - Displays the total amount of data received (Rx) and transmitted (Tx). Speed - Displays the speeds for both transmitted and received data. Top Speed - Displays the maximum transmitted and received speeds attained. Redial on Link Failure - Redial if the connection is somehow disconnected. Connection Information Note: Windows Vista requires your confirmation to redial on link failure. D-Link DWM-152 User Manual 16 Section 5 - Connection Management Connection History The History Connection tab displays the following information: Type - The type of connections made. Profile - The names of the profiles used. Date & Time - The date and time of the connection. Duration - The duration of the connection in hours, minutes, and seconds. Volume - The total amount of data transmitted and received. Tx - The total number of bytes transmitted. Rx - The total number of bytes received. Follow the steps below to clear the Connection History: 1. Click Clear All Logs to clear the logs. 2. Click Yes to confirm. D-Link DWM-152 User Manual 17 Section 6 - Usage Management Usage Management Limits can be set on how long a connection will last. These limits can either be set by usage (3G/GPRS connections) or by time (Dialup connections). Usage 1. Select Tools > Preference. 2. Select the Usage tab. 3. Check the Limit by Data checkbox. 4. Enter the desired value between 100MB and 10,000MB. 5. Click Apply to save the settings. D-Link DWM-152 User Manual 18 Section 6 - Usage Management Usage Statistics Statistics for both usage and time can be viewed from the usage menu. 1. Select View > Usage. 2. Select either the Current Month or Previous Month tab. Follow the steps below to clear the Previous month’s logs: 1. Select View > Usage. 2. Select Previous Month tab. 3. Click Clear all logs. 4. Click Yes to confirm. D-Link DWM-152 User Manual 19 Section 7 - Text Messaging (SMS) Text Messaging (SMS) The DWM-152 can be used to perform all the text messaging functions that can be done on a mobile phone such as sending, receiving, replying, forwarding and deleting. SMS D-Link DWM-152 User Manual 20 Section 7 - Text Messaging (SMS) New/Reply/Forward Text Message 1. Click the SMS button. 2. Click New, Reply, or Forward. 3. Enter the recipient’s phone number or click Contacts to see the contacts stored to the SIM card. In the contacts window, click the box next to the recipients name and click Add to return to the New SMS window. 4. Enter a message to send. 5. Click Send to send the message. Deleting a Message 1. Click the SMS button. 2. Select the messages you want to delete. If you would like to delete all messages, click Select All. 3. Click Delete to delete the selected messages. 4. Click Yes to confirm. Saving a Sender to Contacts 1. Click the SMS button. 2. Select a message. 3. Right click on the selected message and click Save to Contacts. 4. In the Add Contact window enter the contact name. 5. Click OK to save the contact. 6. Once the contact has been saved, a confirmation window will be displayed. Click OK to close it. D-Link DWM-152 User Manual 21 Section 7 - Text Messaging (SMS) SMS Settings This menu allows you to change the service center number, its validity period, and whether to store outgoing messages within the DWM-152 Mobile Connection Manager. 1. Click Tools > SMS Settings. 2. If needed, enter the new Service Center number. Choose the Validity Period from the drop-down list. 3. Check the box to store outgoing messages in the application. 4. Click OK to save the details. D-Link DWM-152 User Manual 22 Section 8 - Contact Management Contact Management The DWM-152 contacts manager displays all the contacts on the SIM Card. Contacts can be added, edited, deleted and imported. Adding Contacts 1. Click the Contacts button. 2. Click the Add button. 3. In the Add Contact window, enter the contact name and telephone number. 4. Click OK to add the contact. 1. Click the Contacts button. 2. Select the contact to edit. 3. Click the Edit button. 4. Modify the contacts details. 5. Click OK to save the changes. Contacts Editing Contacts Deleting Contacts 1. Click the Contacts button. 2. Select the contact to delete. If you would like to delete all contacts, click Select All. 3. Click the Delete button. 4. Click Yes to confirm the deletion. D-Link DWM-152 User Manual 23 Section 8 - Contact Management Importing vCards to Contacts 1. Click the Contacts button. 2. Click the Import button. 3. Select the source of the vCard(s). 4. Click Open to import the card(s). 5. After the import, a message will display the import information. Click OK to close. Exporting Contacts to vCards 1. Click the Contacts button. 2. Click the Export button. 3. Select the destination to save the vCard(s). 4. Click OK to export the card(s). 5. After the export, a message will be displayed. Click OK to close. D-Link DWM-152 User Manual 24 Section 9 - SIM Management SIM Management SIM Management includes functions such as enabling/disabling a PIN, changing the PIN1/PIN2 codes, checking SIM information, adjusting the phone number, viewing contacts usage, and viewing SMS usage. SIM Information SIM details regarding the IMEI, Phone Number, Contact Usage, and SMS Usage cab be found by clicking Support > About D-Link Mobile Connection Manager. D-Link DWM-152 User Manual 25 Section 9 - SIM Management Enabling or Disabling a PIN Code Enable PIN Code To prevent unauthorized use of the SIM card a PIN code can be enabled. 1. Select Tools > Enable/Disable PIN code > Enabled. 2. Enter the correct PIN code to enable. 3. Click OK to enable PIN code protection. If a PIN number has been enabled, you will always be asked to enter it before accessing the D-Link Mobile Connection Manager software. Disable If a PIN code is no longer required, you may disable it via the following steps. 1. Click Tools > Enable/Disable PIN code > Disabled. 2. Enter the correct PIN code. 3. Click OK to disable the PIN. Note: The PIN is provided by your network service provider. Warning: The PIN code must be entered correctly within three tries. Failure to do so will cause the SIM card to become locked. D-Link DWM-152 User Manual 26 Section 9 - SIM Management Changing a PIN Code SIM cards often contain two PIN codes that can be changed. 1. Click Tools > Change PIN Code > PIN1 or PIN2. 2. Enter the details in the following fields: Current PIN Code, Enter New PIN Code and Confirm New PIN Code. 3. Click OK to change. 4. Once complete, a confirmation window will be displayed. Click OK to close the window. Warning: The PIN code must be entered correctly within three tries. Failure to do so will cause the SIM card to become locked. Note: The PIN codes cannot be changed while the DWM-152 is connected to a mobile network. Unlocking a PIN Code If the PIN code has been entered incorrectly three times and the SIM card has been locked, follow the steps below to unlock it: 1. If a PIN is blocked, the unblock window will be displayed. 2. Enter the PUK code. Enter the new PIN Code, and confirm the new code. 3. Click OK to confirm the new PIN code. Note: The PUK number is provided by your mobile service provider. D-Link DWM-152 User Manual 27 Section 10 - Profile Settings Profile Settings The Profile Settings page allows you to manually change your Band and Network setting in case your DWM-152 can not automatically connect to your network provider. Band Settings The DWM-152 supports two band selection options: Automatic - The DWM-152 automatically selects the band based on the networks available in current area and those supported by the DWM-152. 3G Only - Restricts the DWM-152 to using 3G service on WCDMA 850/1900/2100 bands. 2G Only - Restricts the DWM-152 to using 2G service on GPRS 850/900/1800/1900 bands. Note: If you accidentally configure the wrong settings, go to Tools > Reset Settings to Default Value. To adjust the band settings follow the instructions below: 1. Click the Profile button. 2. Select Band tab. 3. Select Automatic, 3G only, or 2G only. 4. Click Apply and OK. D-Link DWM-152 User Manual 28 Section 10 - Profile Settings Network Selection The current location of the DWM-152 may be covered by more than one network. The DWM-152 supports two network selection options: Automatic - By default the DWM-152 will automatically select the network based on the user’s account and network availability. Manual - Users can also use DWM-152 to get the network list, and select an available network to use. To manually set the network, follow the steps below: 1. Click the Profile button. 2. Select the Network Selection tab. 3. Select Manual. 4. Click Search to see all available networks. 5. Select a network operator and click Apply. 6. Click OK to finish. Note: When the band is set to 3G Only, manual selection will only list 3G networks. D-Link DWM-152 User Manual 29 Section 10 - Profile Settings Call Settings 1. Select Tools > Call Setting. 2. You may select from one of the following options: None - No answer. Send Busy Tone - The caller will hear a busy tone, or will be transferred to voice mail. Call Forward - The incoming call will be forwarded to the phone number you enter into the Telephone Number text box. Note: The call settings query may fail if the network is busy; in this case please try again later. Missed Calls 1. Select View > Missed Calls. 2. If the call setting is None or Send Busy Tone, D-Link Mobile Connection Manager AP will register the incoming call in the missed calls list. D-Link DWM-152 User Manual 30 Section 11 - Software Preferences Startup Options Users can specify how the application should start up. 1. Click Tools > Preferences > Startup. 2. Check the box next to the desired options. •Always ask before closing a connection. •Always ask before exiting application. •Enable Quick Start. (This mode runs a program in the background to help the D-Link Mobile Connection Manager launch quickly.) • 3. Click Apply to save the settings and finish. Note: Please reset these settings when you want to install on another PC or remove the driver. Version Information The application version, firmware version and firmware release date can be found by selecting Support > About D-Link Mobile Connection Manager. D-Link DWM-152 User Manual 31 Section 12 - Troubleshooting Troubleshooting 1. Why am I unable to connect to a mobile service network? The DWM-152 requires a SIM card registered with a compatible service network. For information about the services that your SIM card provides access to, please contact your mobile service provider. The adapter will not connect to a service network unless all relevant settings have been specified correctly. Please make sure that all connection profile settings are accurate. 2.Why is the software asking for a PIN number? For security, some SIM cards have a PIN number enabled. If the SIM was used in a previous device, the PIN will be the same as it was before. If you did not set a PIN, please contact your mobile service provider. 3. Why are the connection speed and data transfer rates slow? Please check the network signal strength. A low signal will result in poor performance. 4. Why am I unable to receive SMS messages? This may happen with the SIM card memory is full. You may need to delete some messages to free up space. 5. Why is only part of the name saved when adding a new contact? The SIM card can hold a maximum of 12 letters/characters for a contact name. 6. Why does the Windows connection icon display a speed of 115.2 Kbps? 115.2 Kbps is the data rate of the USB device, not the connection speed. Please refer to the connection statistics shown within the Mobile Connection Manager for the actual connection speed. D-Link DWM-152 User Manual Version 1.00 2009/04/29 32 Appendix A - Glossary Glossary 2G - Second-generation mobile networking technology. Represents a switchover from analog to digital; most 2G networks use GSM. 3G - Third-generation mobile networking technology that enables simultaneous transfer of voice and non-voice data; most 3G networks use WCDMA. 3.5G - A more recent standard of mobile networking technology; generally uses HSDPA. 3.75G - A more recent standard of mobile networking technology; generally uses HSUPA. APN (Access Point Name/Network) - Provides GPRS routing information. Consists of: Network ID: Identifies the external service requested by a GPRS user. Mobile network operator ID: Specifies routing information. ARFCN (Absolute Radio Frequency Channel Number) - The specific ID numbers for all radio channels used in cellular mobile communications. Bps (bits per second) - How data flow is measured. DNS (Domain Name System) - Helps route network traffic by making the addressing process more user-friendly. DHCP (Dynamic Host Configuration Protocol) - How devices obtain IP addresses from a server. DUN (Dial-Up Network) - Windows component that enables online access via a modem. EDGE (Enhanced Data GSM Environment/Enhanced Data for Global Evolution) - Advanced GPRS that delivers multimedia and other data needing greater bandwidth at up to 237 kbps. GPRS (General Packet Radio Service) - Delivers data in packets at up to 86 kbps. GSM (Global System for Mobile Communications) - The most popular cellular network, mostly operates in 850900 or 1800-1900 MHz; the primary 2G system. D-Link DWM-152 User Manual 33 Appendix A - Glossary IMEI (International Mobile Equipment Identity) - A number unique to each GSM/UMTS device that can be used block network access by a stolen mobile device. IP (Internet Protocol) - Routes packets over a network. HSDPA (High Speed Downlink Packet Access) - Advanced WCDMA that delivers bandwidth intensive data at up to 7.2Mbps; typically associated with 3.5G. HSUPA (High Speed Uplink Packet Access) - Advanced WCDMA that delivers bandwidth intensive data at up to 5.76Mbps; typically associated with 3.75G. Kbps (Kilobits per second) - A data flow measure; 1024 bits/second. LAN (Local Area Network) - A data network with limited range but good bandwidth. Mbps (Megabits per second) - A data flow measure; 1,048,576 bits/second. PPP (Point-to-Point Protocol) - An internet connection method. PIN (Personal Identity Number) - A four to eight digit security code on the SIM which permits access to a user’s mobile carrier network. PUK (Personal Unblocking Key) - A code used to unlock a blocked PIN number. Usually, if the wrong PUK is entered ten times in a row, the SIM will become permanently blocked and unrecoverable, requiring a new SIM card. Rx - Shorthand for Reception. SIM (Subscriber Identity Module) - A small card that contains key mobile device identification, subscription and contact information. SMS (Short Messaging Service) - Allows text messages of up to 160 characters. Tx - Shorthand for Transmission. D-Link DWM-152 User Manual 34 Appendix A - Glossary WCDMA (Wideband Code Division Multiple Access) - Wideband Code Division Multiple-Access (WCDMA) is one of the main technologies in the implementation of third-generation (3G) cellular systems. This product supports WCDMA up to 384kbps. D-Link DWM-152 User Manual 35 Appendix B - Technical Specifications Technical Specifications Minimum System Requirements •Windows 2000/XP/Vista or Mac OS X 10.4.0 or higher •Pentium 500MHz or greater •128MB RAM or greater •50MB available disk space •Internet Explorer v6.0 or higher / Firefox v1.5 or higher SMS Manager •Create, edit, forward, and send messages •Inbox, outbox, draft, and sent folders GSM Band (GSM/GPRS/EDGE) •850, 900, 1800, 1900 MHz •Power Class 4 (900 / 1850 MHz) •Power Class 1 (1800 / 1900 MHz) Plug and Play •Automatic software/driver installation UMTS/HSDPA Band * •850/1900/2100 MHz •Power Class 3 (+24 dBm) Data Rates ** •DL: 3.6 Mbps (HSDPA) •UL: 384 Kbps (UMTS) Antenna •Internal monopole antenna Interface Support •USB 2.0 SMS •Circuit-switched (GSM) •Packet-switched (GPRS) Phonebook •Import, export, add, modify, and delete records USIM Slot •Standard 6-Pin SIM card interface Connection Status •Network name, signal strength, send/receive rate LED Indicator •Five-color LED provides status information MicroSD Card Reader •Supports MicroSD Cards up to 8GB Certification •CE •NCC Dimensions (L x W x H) •89.4 x 26.68 x 12 mm Operating Temperature •-10˚ to 55˚C (14˚ to 131˚F) * Supported frequency band is dependant upon regional hardware version. ** Data rates are theoretical. Data transfer rate depends on network capacity and signal strength. D-Link DWM-152 User Manual 36