1
User’s manual
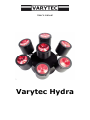
Varytec Hydra
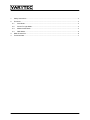
Table of content
1. Safety instructions ........................................................................................................................... 3 2. Functions ......................................................................................................................................... 4 2.1. Auto Mode ............................................................................................................................... 4 2.2. Sound To Light Mode .............................................................................................................. 4 2.3. Master Slave Mode .................................................................................................................. 4 2.4. DMX Mode ............................................................................................................................... 5 3. DMX Channel list ............................................................................................................................. 6 4. Technical Data ................................................................................................................................. 7 2/2
1. Safety instructions
FOR SAFE AND EFFICIENT OPERATION
Be careful with heat and extreme temperatureAvoid exposing it
to direct rays of the sun or near a heating appliance.
Not put it in a temperature bellow 41°F /5°C, or exceeding 95°F /35°C.
Keep away from humidity, water and dust
Do not place the set in a location with high humidity or lots of dust.
Containers with water should not be placed on the set.
Keep away from sources of hum and noise
Such as transformer motor, tuner, TV set and amplifier.
To avoid placing on un-stable location
Select a level and stable location to avoid vibration.
Do not use chemicals or volatile liquids for cleaning
Use a clean dry cloth to wipe off the dust, or a wet soft cloth for stubborn dirt.
If out of work, contact sales agency immediately
Any troubles arose, remove the power plug soon, and contact with an engineer for repairing,
do not open the cabinet by yourself, it might result a
danger of electric shock.
Take care with the power cable
Never pull the power cable to remove the plug from the receptacle, be sure
to hold the plug. When not using the player for an extended period of time
be sure to disconnect the plug from the receptacle.
3/3
2. Functions
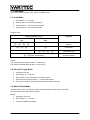
There are 3 different modes: auto, sound, and DMX mode.
2.1. Auto Mode
1. Set the dips 9 – 12 to OFF
2. Now the item runs automatic programs
3. Use the Dips 1 – 4 to choose the program
4. Use the Dips 5 – 8 to chose the speed.
Program chart
Setting (switch pin 1-4)
ON
Program
OFF
①、②、③、④
LED off
②、③、④
①
LED Strobe
①、②、③、④
Composite Fancy
① ~ ④ other combinations
Several programs
Speed:
The minimum speed setting is dips 5 – 8 stet to ON
The maximum speed setting is dips 5 – 8 set to OFF
2.2. Sound To Light Mode
1. Set the dip 9 to ON
2. Set the dips 10 – 12 to OFF
3. Now the item works in a sound controlled condition
4. Set the programs with the dips 1 – 4 as described above
5. If there is no noise for the mic the led shuts down after 6 seconds
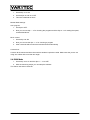
2.3. Master Slave Mode
In Master Slave mode, you define one item to be the master and the others to be slave.
The slave items follow the master functions.
Master:
1. Set the dip 12 to ON
2. Set the dips 10 – 11 to OFF
3. This item is defined as Master
4/4
Slave:
1. Set the dip 11 to ON
2. Set the dips 10 and 12 to OFF
3. This item is defined as Slave
Master Mode settings:
Auto program:
1. Set dip 9 to OFF
2. Now you can use dip 1 – 4 for choosing the programs and the dips 5 – 8 for setting the speed,
as described above.
Music control:
1. Set the dip 9 to ON
2. Now you can use the dips 1 – 4 for choosing a program
3. After 6 seconds without noise the led shuts down automatically
Connections:
Connect all the master and slave items with a standard 3 pole dmx cable. Make sure that you are not
using dmx cables with more than 5m length.
2.4. DMX Mode
1. Set the dip 10 to On and the dips 11 – 12 to OFF
2. With the remaining 9 dips you can setup the address
This fixture uses 6 dmx channels
5/5
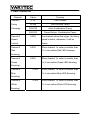
3. DMX Channel list
Channel
Value
Function
0-14
LED Closed
(Fancy
15-224
Auto-Section Fancy
Choosing)
225-239
Auto-Combination Fancy
240-255
Sound Active- Combination Fancy
0-255
The channel values the larger, the fancy
Channel 1
Channel 2
(Speed
speed is faster; otherwise, it will be
Control)
slower.
Channel 3
0-255
When channel 1’s value is smaller than
15, it can realize Red LED dimming.
(Red
Dimming)
Channel 4
0-255
(Green
When channel 1’s value is smaller than
15, it can realize Green LED dimming.
Dimming)
Channel 5
0-255
(Blue
When channel 1’s value is smaller than
15, it can realize Blue LED dimming.
Dimming)
Channel 6
(White
0-255
When channel 1’s value is smaller than
15, it can realize White LED dimming.
Dimming)
6/6
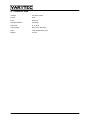
4. Technical Data
Voltage:
AC 240V / 50Hz
Power:
90W
Fuse:
250V/1A
LED specification:
(1W)LED
LED color:
R. G. B. W
LED quantity:
R(7), G(7), B(7),W(7)
Size:
L395*W395*H270 (mm)
Weight
4.0 KG
7/7
Importeur:
B & K Braun GmbH
Industriestraße 1
D-76307 Karlsbad
www.bkbraun.com
[email protected]
8/8