1
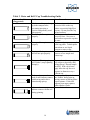
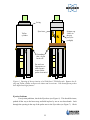
MAS Spinning Guide
v. 1.0
BRUKER BIOSPIN CORPORATION accepts no responsibility for actions taken as a result of use of this
manual. BRUKER BIOSPIN CORPORATION accepts no liability for any mistakes contained in this
manual, leading to coincidental damage, whether during or subsequent to procedures performed as
described herein. Unauthorized reproduction of manual contents, without written permission from the
publishers, or translation into another language, either in full or in part, is forbidden.
Kelly L. Moran, Ph. D.
Bruker BioSpin Corp.
Billerica, MA USA
27 Feb. 2003
Part Number B3940
2
Contents
Introduction..................................................................................................................... 5
Read the Manuals........................................................................................................ 5
MAS Spin up Procedure ................................................................................................. 6
Table 1. XWIN-NMR MAS commands .................................................................... 6
MAS Spin up Guide.................................................................................................... 7
Troubleshooting Insertion/Ejection Problems ................................................................ 8
If the spinner does not insert................................................................................... 9
If the spinner does not eject .................................................................................... 9
Troubleshooting Spinning Problems............................................................................. 11
Spinner does not start up....................................................................................... 11
Spinner starts but does not spin above 2 or 3 kHz................................................ 12
Spinner speeds up normally but then slows down and speeds up again............... 12
Spinner spins up fine but then stops suddenly ...................................................... 12
Spinner does not stop spinning in Remote mode.................................................. 13
Table 2. Rotor and Kel-F Cap Troubleshooting Guide............................................ 14
Sample Packing Techniques ......................................................................................... 15
Cap Removal Techniques ............................................................................................. 18
Cleaning Rotors and Caps............................................................................................. 20
APPENDIX................................................................................................................... 21
Advanced Troubleshooting....................................................................................... 21
Troubleshooting problems inside the probe.......................................................... 21
Ejection Problems ................................................................................................. 22
Cleaning the Stator................................................................................................ 24
Accessing a Stuck Spinner.................................................................................... 24
Coil Removal and Replacement............................................................................ 26
3
Specifications and Accessories ................................................................................. 28
Table 3. 4 mm Rotor Cap Temperature and Spin Rate Specifications ................ 28
Table 4. 4 mm Rotor Spin Rate Specifications at Ambient Temperature ........... 28
Table 5. 7 mm Rotor Cap Temperature and Spin Rate Specifications ................ 29
Table 6. 7 mm Rotor Spin Rate Specifications at Ambient Temperature ........... 29
Table 7. MAS Accessories for 4 mm Probes....................................................... 30
Table 8. MAS Accessories for 7 mm Probes....................................................... 32
Table 9. MAS Accessories for 2.5 mm Probes.................................................... 33
Who to Contact for Assistance ................................................................................. 34
4
Introduction
This guide is intended as a supplement (not a replacement) to the MAS probe
manual, the Solids User’s Manual, and for troubleshooting MAS problems. To avoid
ambiguity, the MAS sample components are described as shown in Figure 1. Except
when tabulated, all XWIN-NMR commands are indicated with bold face italics.
rotor
cap
spinner
Figure 1. For the purposes of this manual, ‘rotor’ refers to the ceramic sample holder
and ‘spinner’ is the assembled rotor and cap.
Read the Manuals
Read the probe manual for instructions on probe handling and how to spin up
samples for MAS. The Solids User’s Manual provides detailed descriptions of solids
probes and equipment, setup procedures for basic solid state NMR experiments and
troubleshooting. If you have an HRMAS probe or Standard Bore CPMAS probe, please
consult the SB/MAS Manual before using the probe. Both the Solids User’s Manual and
the SB/MAS Manual are available in the XWIN-NMR Help menu under Other Topics.
5
MAS Spin up Procedure
The Bruker MAS Pneumatic Unit (MAS PU) provides complete control of MAS
functions. The MAS PU may be operated in Local or Remote mode, for operation via the
front face panel or the XWIN-NMR software, respectively. The XWIN-NMR MAS
commands are listed in Table 1.1
The MAS PU is fitted with an EEPROM programmed for each type of Bruker
MAS probe.2 Select the appropriate spinner size, magnet bore and rotor material using
the Status button on the MAS PU front face panel or in the XWIN-NMR mas software
interface. When operated in Auto mode, either locally or remotely, the MAS PU spins up
the sample according to the parameters programmed in the EEPROM for that probe and
spinner type.
Refer to the MAS Spin up Guide on the next page for the correct
procedure.
Table 1. XWIN-NMR MAS commands
XWIN-NMR command
What it does
mas
invokes the MAS software user interface
mase
eject
masi
insert
masg
go (spin up)
mash
halt (stop spinning)
masr
rate (set mas rate)
masrmon
pop-up window to monitor spin rate, write log file
mascontrol
complete MAS control pop-up window that includes buttons
for all of the commands above
1
Press Remote on the front face panel of the MAS PU for software control of MAS functions. For more
information on these commands, including how to write them into automation programs, see the chapter
‘MAS/Solids Commands’ in the NMR Suite Acquisition Reference Manual, available under the Help menu
in XWIN-NMR.
2
The MAS PU is also fitted with ballasts for the drive and bearing supplies. In the event of a power failure
to the unit, the drive and bearing gas pressures will decrease slowly rather than abruptly.
6
MAS Spin up Guide
1. Pack the spinner. (See Sample Packing Techniques on page 15.)
2. Check the mark for the optical spin rate detector. Using a black Sharpie® fine
point pen, mark the beveled edge approximately halfway around the rotor,
as shown at right. The edges of the mark should be as straight as possible.
3. Inspect the spinner before insertion. Holding the spinner up against a bright
background, visually inspect the cap and rotor for defects. Make sure the cap fits flush
against the rotor, all the way around.
4. Wipe the spinner clean. Just before insertion into the sample transport tube or solids
sample changer, always wipe the spinner off with a lint-free cloth to remove fingerprints
or other ‘invisible’ debris, which can build up on the coil over time and cause problems.
5. Insert the spinner. Drop the spinner, finned cap end up, into the aligned transport
tube. Press Insert on the MAS PU to seat the spinner properly in the coil. For Standard
Bore MAS probes, the stator flips to the magic angle automatically at the end of the
Insert process.
6. Set the MAS PU to Auto mode. Confirm that the correct spinner size, magnet size
and rotor material are selected (Status) and select a starting spin rate such as 3 kHz for 7
mm spinners and 5 kHz for 2.5 and 4 mm spinners.
8. Press Go. The MAS PU will adjust the bearing and drive pressures according to the
probe type and the actual spin rate (Va) until the desired spin rate (Vd) is achieved.
When Va equals Vd and is stable, the Spin Lock light will come on. If Va does not
match that expected by the MAS PU EEPROM at the programmed bearing and drive
pressures, the PU will reduce the drive pressure, then the bearing pressure and attempt to
spin up again. Listen to the spin up process: the spinner should issue a clean tone,
steadily increasing in frequency. A poorly packed spinner may squawk, chirp, sputter or
generally sound like it is straining to increase in speed. If the spin up fails again, the
MAS PU will suggest a manual spin up. Please refer to Troubleshooting Spinning
Problems on page 11.
9. When the experiment is finished, press Stop. When Va = 0, press Eject.
7
Troubleshooting Insertion/Ejection Problems
When troubleshooting suspected insertion/ejection problems, put the spectrometer
in wobble mode by typing wobb in XWIN-NMR. Tune the probe such that the wobble
curve is visible on the screen. Set the MAS PU to Local mode for sample insertion and
ejection. Because the spinner has a different dielectric constant than air, the observed
wobble curve will jump between at least two unique frequencies during spinner insertion
or ejection: one when the coil is empty and one when the spinner is in the coil,3 as shown
in Figure 2. Additionally, always test more than one spinner. A suspected probe problem
may turn out to be a damaged cap instead.
a
b
Figure 2. Wobb tuning curves (a) with the spinner in the coil and (b) after ejection
(empty probe). The eject air pressure is on in (b) and coil vibrations are visible as small
‘teeth’ in the curve.
3
A third intermediate wobble frequency occasionally may be observed when the spinner is in the probe but
not entirely seated in the coil.
8
If the spinner does not insert
•
Confirm that the spinner does not insert by viewing the wobble curve during
insertion, as described on the previous page.
•
For wide bore systems: Check that the sample transport tube is properly aligned with
the probe and that the Insert and Eject airlines are connected to the corresponding
ports of the transport tube.
•
Check the spinner: make sure the cap is inserted properly. There should be no gap
between the cap and rotor.
•
Check the cap for gouges or cuts, uneven wear, or “mushrooming.” Refer to Table 2.
Replace the cap if necessary.
•
Check the rotor marks and remove any excess ink.
•
Verify that another spinner is not already in the probe (press Eject).
•
Increase the Insert pressure (back of MAS PU, turn counter-clockwise to increase
pressure). This should only be necessary with a new MAS PU or probe, or if the gas
supply has been altered.
If the spinner does not eject
•
For wide bore systems: Check that the sample transport tube is properly aligned with
the probe and that the Insert and Eject airlines are connected to the corresponding
ports of the transport tube.
•
Press Eject again. If the spinner does not eject, press Insert. When Insert is finished,
press Eject again. (Do not perform this test if a Solids Sample Changer is installed
and loaded with a spinner for insertion!)
•
Increase the Eject pressure (back of MAS PU, turn counter-clockwise to increase
pressure). This should only be necessary with a new MAS PU or probe, or if the gas
supply has been altered.
•
Disconnect the Insert gas line from the sample transport tube and try to eject again
(WB only).
9
•
Remove the Solids Sample Changer (if installed) and place the cap on the transfer
tube. While the eject pressure is on, slide the cap up to open it slightly (hold a finger
on top to keep it in place). If the spinner still does not eject, with one hand holding
the cap, use the other hand to “bump” the transfer tube: lift the tube slightly and
replace. Repeat several times until the spinner is ejected. If you are able to eject
spinners only when you "bump" the transfer tube up and down, please contact Bruker
Center.
•
If none of the above produces the spinner, remove the probe from the magnet, turn
the probe upside down and shake it. The spinner should fall out. Inspect the spinner
(see Table 2). Replace the cap if necessary.
•
If the spinner is not intact (i.e., loose powder or cap, or broken rotor pieces fall out)
the probe must be serviced to remove debris from the stator. Please see the Appendix
for advanced troubleshooting.
•
If the spinner does not come out when the probe is held upside down and shaken,
look for the spinner elsewhere. (Was it previously ejected onto the floor or top of the
magnet? Is it stuck in the transport tube? Did a coworker already remove it? Is the
sample (para)magnetic and stuck in the magnet bore?) If you are certain that a
spinner is stuck in the probe and all attempts to remove it fail, consult the Appendix
for advanced troubleshooting.
•
If the spinner is stuck in the transport tube, remove the transport tube from the
magnet, invert it and shake it until the spinner falls out the top. Inspect the spinner
and replace the cap if necessary. Before reinstalling the transport tube, test it against
several other spinners. The spinner should slide freely up and down the transport
tube without hesitation or sticking. If spinners stick and the caps pass inspection,
contact Bruker Center.
•
If the spinner falls out when the probe is turned upside down, is intact, and there is no
clear explanation of the problem, repeat the insert and eject sequence with different
rotor and cap sets. If the problem is with the probe (happens with the same frequency
with any or all spinners) see the Appendix for advanced troubleshooting techniques.
10
Troubleshooting Spinning Problems
Spinner does not start up
•
Check that the directional spin rate detector cable is plugged into the probe and the
back of the MAS PU as specified on the cable labels. Confirm that the pneumatic
hoses are connected properly to the back of the MAS PU and to the probe.
•
Check that the correct spinner details have been selected. (Status button on the MAS
PU.)
•
Press Stop on the MAS PU and wait for Bearing and Drive pressures to drop to zero
(Bp and Dp = 0). Press Insert, wait until Insert is finished, then try to spin up again.
•
Eject the spinner and eject again (was another spinner already in the probe?).
•
Eject the spinner and inspect the cap. It should fit tightly against the spinner body
with no gap. Compare the spinner with the diagrams on Table 2 and replace the cap
if necessary. Check the ink mark on the rotor bottom, remove excess ink with ethanol
and apply a new mark if necessary. Wipe the spinner clean of fingerprints with a lintfree cloth before inserting it into the probe.
•
Check the drive and bearing gas connections. Disconnect the bearing and drive
airlines from the probe. Individually check the airlines by selecting “Manual” mode
on the MAS PU and increasing the bearing and drive pressures. Confirm that there is
pressure at both airlines, then shut off the pressures before reconnecting to the probe.
•
Try to spin an empty spinner.
•
If an empty spinner spins up fine, the problem is with your sample, the cap or (least
likely) the rotor itself. If the cap passes inspection, remove it and repack your
sample. See Sample Packing Techniques.
•
If you cannot successfully spin any spinner, empty or filled, and have checked all of
the above, please contact Bruker Center for advice.
11
Spinner starts but does not spin above 2 or 3 kHz.
•
Eject the spinner and inspect the cap (see Table 2). Replace the cap if necessary.
•
Empty the spinner and inspect the rotor for cracks. Replace the cap and try to spin
the empty spinner.
•
If the empty spinner spins up fine, finely grind the sample to smaller particle size and
pack the rotor evenly and firmly. See Sample Packing Techniques.
•
If the sample is known to be ‘difficult’ (such as a loose powder), one can attempt a
manual spin up. Consult the probe manual for pressure guidelines for manual spin
up. Alternatively, after first attempting spin up in Auto mode, switch the MAS PU to
Manual mode while the drive and bearing pressures are still on. The drive pressure
will be approximately 0.3 to 0.5 bar, and the bearing pressure will be significantly
higher. Gradually reduce the bearing pressure until the spinner speeds up (‘catches’),
then increase the bearing pressure while listening for a clean sound, steadily
increasing in frequency. If the spinner squawks, chirps or sounds generally unsteady,
reduce the drive pressure to off, then the bearing pressure, eject the spinner and
repack it. Caution: Forcing an unbalanced spinner to spin can cause serious
damage to the coil, stator and/or other probehead parts.
Spinner speeds up normally but then slows down and speeds up again
•
This symptom indicates that the sample redistributes at a certain speed, destabilizing
the spinner. Regrind the sample, pack it more densely, use spacers or wait at a lower
speed before spinning up. Remember that sudden destabilization of a spinner at
speed can cause serious damage to the probe.
Spinner spins up fine but then stops suddenly
•
A crash may be caused by the cap popping off or sudden destabilization of the
spinner during MAS. Eject the spinner for inspection and replace the cap if it is too
12
loose. Repack the sample and stabilize at a low MAS rate before spinning up to top
rate.
Spinner does not stop spinning in Remote mode
•
The MAS PU can ‘hang up’ if repeated commands are sent to stop spinning (such as
typing mash multiple times).
If the MAS PU does not respond to subsequent
commands, switch to Local mode on the front face panel and press the Clear button.
13
Table 2. Rotor and Kel-F Cap Troubleshooting Guide
Spinner Condition
(exaggerated)
Problem
Cause/Prevention
‘Mushroomed’ cap can hang
up in the transport tube,
preventing insertion or
ejection, and probably won’t
spin properly.
Dented cap will not spin
properly.
Mushrooming results from
excessive force on the cap.
Reduce excessively high Eject
pressure. Do not press the cap
on hard surfaces.
Kel-F caps can be dented with
excessive force. Never use a
hard surface to press the cap into
the rotor.
Caps are cut by improper use of
metal cap puller. Consult puller
instructions or use liquid
nitrogen to remove caps.
Rotor was packed too full.
Remove excess sample and
reinsert cap.
Cut cap will not spin
properly.
Cap is not flush against rotor
and will not spin properly.
Cap pops off during spin up
and ‘crashes’ (stops spinning
abruptly).
Dark smudges or marks on
ends of rotor indicate contact
with bearing and/or drive
plates during spin up.
A line on the rotor may
indicate contact with the coil
during spinning.
14
Cap may be too loose; sample
may outgas or physically shift
during spin up. Repack sample
carefully. If the cap is loose,
apply ink to the cap sleeve to
increase its diameter or try a
different cap.
Nonsymmetrically-packed rotors
can ‘wobble’ during spin up,
causing contact at bearing plates.
Repack spinner. If this also
happens to an empty spinner,
contact Bruker Center.
Contact Bruker Center.
Sample Packing Techniques
To achieve the maximum specified probe spinning rate, the spinner must be massbalanced with lengthwise cylindrical symmetry. The sample should be packed so that the
spinner is well balanced and/or the sample can redistribute to balance itself by centrifugal
forces. The packing must be stable enough to withstand probe insertion and spin up. In
general, spin up ease increases with decreasing spinner diameter. However, smaller
diameter spinners are rated for much higher spinning speeds, at which an unbalanced
spinner can crash suddenly, causing severe damage to the coil, stator and other probehead
parts. Always spin up first to a moderate spin rate (3 kHz for 7 mm spinners and 5 kHz
for 4 and 2.5 mm spinners) and allow to stabilize for a minute or two, before increasing
the demanded spin rate in stepwise increments. Refer to the probe manual for spin up
guidelines.
Packing Procedure. In small amounts, add finely ground powder into the tared
(weighed) rotor, tamping down each increment firmly with the packing tool. Continue
until the rotor is full, leaving room for the cap. The reverse end of the packing tool (see
Figure 3) is the same depth as the standard cap sleeve. Remove sample until the guage
can be inserted flush with the top of the rotor. Weigh the packed rotor to measure the net
sample mass.
Figure 3. Rotor packing tool, showing the cap depth feeler for standar caps (3 mm
sleeve) on the right. Remove sample from the top of the rotor such that the feeler can be
inserted flush against the rotor.
Clean the top rim of the rotor carefully and insert the cap straight down into the
rotor. Never apply excessive force to a Kel-F cap (such as pressing against a hard
surface) or it will be dented and the spinner won’t spin properly. The masses of packed
spinners are rarely identical and can be used for secondary identification when necessary.
15
Powders
Sticky powders are easy to pack evenly and firmly. Pack in small increments,
tamping down after each addition.
Loose powders can be difficult to spin up because the packing is unstable. Grind
loose powders as finely as possible and pack in small increments. Try to fill the cap as
much as possible. Spin up the sample carefully and spin at 2 to 3 kHz for several minutes
to distribute the sample by centrifugal force, then gradually increase to the desired speed.
If initial spin up attempts fail, remove the spinner from the probe and repack the sample.
If you cannot spin up a full spinner, use Kel-F or Teflon rotor inserts to center your
sample in the spinner. Alternatively, a temporary ‘spacer’ can be made with thin Teflon
tape: carefully pack (with cylindrical symmetry) one piece of thin Teflon tape into the
bottom third of the rotor, then pack the sample in small increments, then top with more
Teflon tape. Using one piece of tape for the bottom facilitates removal (use the sharp
point of a broken wooden cotton swab).
Liquids and wet samples
Normal rotor caps are not designed to contain liquid samples. Never attempt to
spin a liquid in a MAS probe without secondary containment. Use Kel-F or Teflon rotor
inserts, available from Bruker, or sealable glass rotor inserts (available commercially) to
prevent liquid from centrifuging out of the spinner.
Solids that melt during high temperature runs
See under Liquids, above: use Teflon or Kel-F spacers or sealable glass rotor
inserts (available commercially) to contain the sample.
Odd shaped sample pieces
If you cannot grind the sample to a powder, pack the pieces with an inert filler,
such as Al2O3 powder.
16
Fibers
Wrap into a tight bundle4 of appropriate diameter using tweezers.
Foils and films
Cut to strips of equal width4 and roll with tweezers to the appropriate diameter.
Thin foils are easier to spin. Note that metals generally are difficult spin in a magnetic
field and may require dilution with an inert filler.
4
The internal depth of a standard 4 mm rotor is 17 mm. Subtract 3 mm for a standard cap sleeve, or 2 mm
for a ‘short’ cap sleeve, which leaves 14 or 15 mm, respectively, that will exactly fit the inside length of the
rotor.
17
Cap Removal Techniques
Use care to remove the cap from the spinner without damaging the cap fins.
Never use metal tools such as pliers to remove a cap, even if you intend to discard the
cap, because you can damage the rotor too. First try to remove the cap with finger
pressure only. Consult the probe manual or directions that came with your cap removal
tool before using it. If you have a metal cap puller, slide the cap puller over the spinner
such that its flat surface faces the rotor bottom and the beveled surface faces the cap (see
Figure 4). If you insert the cap puller the wrong way, the cap will be damaged in the
pulling process. Gently press the puller together and slowly slide it up toward the cap
until it snaps into the groove between cap and rotor. Check to be absolutely certain that
the cap puller is not pinching the rotor fins on the cap! Then firmly squeeze the cap
puller together and pull the cap off (note: cap may pop out suddenly and fly).
Bottom
surface,
faces bottom
of rotor
Top surface
faces the cap.
Figure 4. Metal cap puller. The surface with the beveled center (shown on the left) must
face the cap. Insert the spinner, close the beveled edge on the rotor gently and slowly
slide it up toward the cap until the beveled edge snaps under the cap. Check the position,
squeeze the ends together, and pull the cap off.
Another excellent method for removing caps is to take advantage of the different
thermal expansion coefficients of the rotor and cap. Dip the spinner cap-side down into
liquid nitrogen for a few moments, then pull the cap off with cloth-protected fingers.
CAUTION:
Exercise due care when working with cryogens!
18
For particularly
stubborn cases, the whole spinner can be immersed in liquid nitrogen, but be aware that
the cap may pop off and the sample could flow out into the container. This method will
not damage the cap or rotor and also can be used to fully insert new or tight-fitting caps
(but make sure the rotor is not overfull first!).
19
Cleaning Rotors and Caps
Well-packed, sticky powders can be somewhat difficult to remove from rotors.
Use a drill bit of the appropriate diameter to gently remove the powder. Exercise due
caution when using metal tools to clean or manipulate rotors: neither scratch the spinner
surface nor leave metal traces behind. With particularly stubborn cases, soak the rotor in
a suitable solvent. Caution: Never expose rotors to acids. Zirconia (ZrO2) is slightly
soluble in HCl, HNO3, slowly soluble in HF, and dissolves with heating in aqueous
H2SO4.
Some users have observed changes in the tuning characteristics of rotors
regularly sonicated in solvents. This may arise from solvent or sample retention in
etched surfaces, therefore prolonged sonication is not recommended.
Cotton swabs on wood sticks are indispensable tools in the solids NMR lab, as
shown in Figure 5. Break the stick such that it forms a sharp point and use it to scrape
rotors and the insides of caps. The cotton can be partially removed so that the swab end
fits into a 4 mm rotor for thorough scrubbing with a suitable solvent, ‘rinsing’ with water
and wiping dry. Make sure no threads are left behind, as they may later be caught
between the rotor and cap and prevent spinning.
Figure 5. Cotton swabs on wood sticks are useful cleaning tools for MAS rotors and
caps.
20
APPENDIX
Advanced Troubleshooting
Troubleshooting problems inside the probe
For suspected problems inside the probe, you may be able to service the probe
yourself, if you feel comfortable doing so. Important: Do not disassemble the probe
unnecessarily! The delicate probehead parts are precisely aligned and should not be
disturbed except when necessary to correct a problem. Please contact Bruker Center for
advice before attempting to disassemble the stator. Before opening your MAS probe for
repair or troubleshooting, keep the following very important points in mind:
•
Never use acetone to clean a MAS probe or any of its parts. Methanol is
preferred, and isopropanol or ethanol is also acceptable.
•
Never loosen or remove any screws or nuts that are painted red.
•
Keep the probe interior clean of fingerprints and other organic matter.
•
Do not break off any of the grounding tabs.
•
Never use force on the probe or any of its parts.
Remove the metal cover from the probe.5 Remove the large O-ring by rolling it
up over the top of the probe and slide the Teflon cylinder off to reveal the stator and its
environs, as shown in Figure 6. Inspect the area for loose powder or other debris and
remove with a stream of high-pressure gas. Wash, if necessary, with a cotton swab
dipped in methanol or ethanol (never use acetone on a MAS probe or any of its parts!). If
the surfaces are covered with sample dust, the inside of the stator is also likely
contaminated and requires cleaning.
5
For wide bore VTN CPMAS probes, turn the probe upside down and remove the four retaining screws
from the bottom of the probe cover using a long, flat blade screwdriver. Do not remove any screws painted
red! For other probes, loosen the screws on the top of the probe base and turn the cover to unlock it.
21
O-ring
Teflon
cylinder
Eject hose
Spinner cap
visible in
the gap
here (use
penlight)
Grounding
tabs: do not
break off!
Do not leave
fingerprints or
other organic
matter on the
probe electronics!
Figure 6. Drawing of the top interior of a Wide Bore VTN MAS probe. Remove the Oring and Teflon cylinder to inspect the stator and its environs. Note that different probes
have different design features.
Ejection Problems
For ejection problems, check the Eject hose (see Figure 6). This should be intact,
pushed all the way to the brass stop, and held in place by one or two brass bands. Look
through the opening in the top of the probe next to the Eject inlet (see Figure 7). Check
22
that the Eject hose is not kinked at any point. If a spinner is in the stator (look for the cap
in the gap where the rotor canal meets the stator) disconnect the Eject hose from the
Sample Transport Tube and place it over the Eject inlet on the top of the probe. Have an
assistant press Eject on the MAS PU. CAUTION! Wear adequate eye and face
protection! If the spinner comes out, inspect it for damage or residue. If the outside of
the spinner is contaminated with sample, the stator must be cleaned. If the spinner is
clean and intact, reassemble the probe, install it in the magnet and try to insert and eject
different spinners. If the ejection problem continues and there were no obvious air leaks
inside the probe, check the Sample Transport Tube. Remove the Transport Tube from
the magnet, place it on a cloth and drop a spinner down the top. Turn it over and drop a
spinner through the bottom. The spinner should slide freely in both directions. If the
Transport Tube is okay and the ejection problem continues, contact Bruker.
opening
Eject inlet (mates with
Sample Transport tube)
Tube to rotor canal
retaining screws
Figure 7. Top view of a Wide Bore MAS probe (7 mm or 4 mm).
23
Cleaning the Stator
To clean the stator, first attach Drive and Bearing hoses to the probe and apply
pressure to both lines to blow out residue. Caution: Wear adequate eye and face
protection! After several minutes, shut off the pressures, remove the hoses and take the
probe to a clean workspace. Using pliers and a gentle touch, carefully wiggle the brass
band(s) on the Eject hose (Fig. 6) and move them up away from the stator. Remove the
Eject hose by sliding it up and over the brass hose fitting. The other end of the Eject hose
remains attached to the top of the probe; do not remove it. On the top of the probe,
remove the three retaining screws (Fig. 7). Gently lift the top off the probe while
observing the relative position of the tube to the rotor canal. Note that this tube remains
attached to the top and rests in the rotor canal when the probe is assembled. To prevent
fraying or other damage, do not handle the Eject hose or the tube to the rotor canal. To
access the inside of the stator, continue as described in the next two sections.
Accessing a Stuck Spinner
Confirm that a spinner is stuck in the stator by checking the gap as shown in
Figure 6. To access the spinner, the rotor canal must be removed. After removing the
top of the probe as described above, remove the three long retaining bolts on the next
level down, as shown in Figure 8. Remove the top piece to expose the two gold retaining
screws on the sides of the rotor canal (Fig. 8). Before removing the two retaining screws,
draw two lines on the front where the rotor canal meets the top Vespel piece of the stator,
to guide replacement. Remove the gold retaining screws and lift the canal out of the way.
Tip the probe upside and shake it. If the spinner falls out, carefully inspect the spinner,
its cap and the rotor canal itself.
24
retaining screws
Figure 8. Top view of a widebore VTN probe, showing placement of the retaining screws
to access and remove the rotor canal.
If the rotor does not fall out, use a penlight to inspect the stator for sample debris.
Break the wooden stick of a cotton swab into a sharp point, insert it gently between the
cap fins, and try to rotate the spinner. If the spinner is stuck and will not rotate inside the
stator, call Bruker Center for advice.
If the spinner rotates freely, tip the probe again to dislodge it. If the spinner does
not come out, use long, thin needle-nosed pliers or strong forceps to grab inside the cap
fins and pull the spinner out. Do not use force! Attach the Drive and Bearing lines to the
probe again and apply pressures to blow out loose debris. CAUTION: wear adequate
eye and face protection! Inspect the spinner for damage or sample residue. Discard the
cap if it is damaged. If sample residue is present on the spinner, the stator must be
cleaned. Shut off the MAS pressures and, using a bright penlight and magnifying lens if
necessary, inspect the inside of the stator for debris. Inspect the coil for damage. If it is
damaged, the coil must be replaced (see page 26). Clean the inside of the stator carefully
with a swab moistened with methanol, ethanol or isopropanol. Do not use acetone or
water. Alternately clean, apply MAS pressure and inspect until the stator appears to be
thoroughly cleaned. Make sure there are no threads left behind from swabs.
25
Before reassembly, test several different spinners to make sure they drop fully
into the stator and freely fall out when the probe is inverted. Insert a clean spinner with a
good cap and spin it up in Auto mode, again while protecting face and eyes. If the
spinner does not spin, contact Bruker Center. If the spinner spins up fine, stop the
spinning, remove the spinner and compare it with the diagrams in Table 2. In particular,
check for marks that indicate rubbing against the bearing plates or coil.
Replace the rotor canal, using the pen marks as a guide. Test several spinners to
make sure they insert and fall out freely. Spin test a spinner at each step of reassembly.
When reattaching the top, align the hose to the rotor canal carefully, without kinking or
twisting it. Reattach the Eject hose to the back of the stator and gently reposition the
brass band(s). Perform a final spin test before installing the probe in the magnet again.
Coil Removal and Replacement
To remove and replace the coil, use the modified Allen wrench6 to loosen the top
nut of both coil leads (see Figure 9).
Remove the leads from the posts by pulling the
lead gently straight up off the post. The coil is held into the stator with one (or two)
small brass pins that project from the back of the stator. Be very careful when using tools
near the stator: BN is a very soft material and will crumble or chip easily.7 Using a pair
of pliers, gently and firmly pull the retaining pin (or pins) straight out of the stator.
Immediately inspect the pin: it is flattened on one side. The flat side must be inserted
again in the same position relative to the stator. When the pin is removed, the coil drops
down. Gently pull it straight down out of the stator and remove it for inspection. If the
coil has been damaged, check the inside of the stator for cracks or other damage.
Remove any loose debris with a stream of compressed gas.
6
Contact Bruker Center for advice before proceeding and to obtain the special wrench.
BN is also hygroscopic, so do not use water to clean the stator. To dry the stator after contact with
alcohol, after it’s been thoroughly air-dried and reassembled, perform a VT MAS experiment at gradually
increasing temperature.
7
26
Rotor canal
Coil base plate
Stator
Thermocouple
Brass pin
Spin
detector
Coil leads
Figure 9. Front and rear views of a Wide Bore VTN MAS probehead.
Before installing the replacement coil, insert a spinner, attach the MAS lines and
spin up.8 CAUTION! Wear adequate eye and face protection! If the spinner does not
spin at this point, contact Bruker Center for advice. If the spinner spins okay, remove it
and insert the new coil. While holding the coil base into the stator (gently) reinsert the
brass pin(s) through the back of the stator. Be sure to position the pin with the flat side in
its original orientation. Insert a clean spinner again and spin up. If the spin up fails,
remove the spinner, then the coil and attempt to realign it. If the spinner spins up okay,
stop the spinning, remove the spinner and inspect it for any new marks. Refer to Table 2
for troubleshooting information. Attach the Bearing and Drive lines and apply pressures
to clear out bits of dust in the stator. Reassemble the probe, spin-testing at each step, and
make certain no tubes are kinked or twisted in the process.
8
For Auto control of the spin up (recommended) also connect the spin rate detector cable to the probe.
27
Specifications and Accessories
Table 3. 4 mm Rotor Cap Temperature and Spin Rate Specifications9
Cap
Material
Kel-F
Specified
Temp Range
(ºC)
full range
VT10
full range
VT10
full range
VT10
-30 to +50
Vespel
-30 to +70
BN
Macor
ZrO2
Comments
Soft, chalky material: caps are single-use! MAS rate
maximum is 10 kHz (due to mechanical stress limits).
MAS rate maximum is 10 kHz (due to mechanical stress
limits).
Maximum spin rate 15 kHz. With due care in handling,
caps are reusable.
Maximum spin rate 15 kHz at ambient temp.
Chlorofluoropolymer; contains no 1H.
Maximum spin rate 20 kHz with high speed rotor, 15 kHz
with normal rotor. Polyimide, contains no 19F.
Table 4. 4 mm Rotor Spin Rate Specifications at Ambient Temperature9
Rotor
Material
Cap
Standard ZrO2
Kel-F
Maximum
Spin Rate
(kHz)
15
Si3N4
Kel-F
17
High Speed11
(thick-walled)
ZrO2
Vespel
18
Sapphire
--
10
Comments
Specified maximum at ambient temperature
only.
Specified maximum at ambient temperature
only.
Specified maximum at ambient temperature
only. Smaller rotor volume than standard
rotors, requires smaller caps (Vespel caps
supplied) and packing tool.
Specified maximum at ambient temperature
only. Optically transparent.
9
In all cases, the maximum spin rates will be lower at the extremes of the rated
temperature range (usually at least 2 kHz lower).
10
Cap is rated for the full VT range of the MAS probe.
11
Maximum operating bearing pressure is 3000 mbar for normal rotors and 4000 mbar for
high-speed rotors. If using high-speed rotors, it may be necessary to increase the main
pressure input to the MAS PU. Additionally the pressure limits must be configured
within the XWIN-NMR software via cfmas. Please speak with an Applications Scientist
for details.
28
Table 5. 7 mm Rotor Cap Temperature and Spin Rate Specifications12
Cap
Material
BN
Specified
Temp Range
(ºC)
full range VT13
Macor
full range VT13
ZrO2
full range VT13
Kel-F
-30 to +50
Vespel
-30 to +70
Comments
Soft, chalky material: caps are single-use! MAS rate
maximum is 5 kHz (due to mechanical stress limits).
MAS rate maximum is 5 kHz (due to mechanical stress
limits).
Maximum spin rate 7 kHz. With due care in handling, caps
are reusable.
Maximum spin rate 7 kHz at ambient temp.
Chlorofluoropolymer; contains no 1H.
Maximum spin rate 10 kHz with high speed rotor, 7 kHz
with standard rotor. Polyimide, contains no 19F.
Table 6. 7 mm Rotor Spin Rate Specifications at Ambient Temperature12
Rotor
Material
Cap
Standard ZrO2
Kel-F
Maximum
Spin Rate
(kHz)
7
Si3N4
Kel-F
8
High Speed14
(thick-walled)
ZrO2
Vespel
9
Sapphire
--
4
Comments
Specified maximum at ambient temperature
only.
Specified maximum at ambient temperature
only.
Specified maximum at ambient temperature
only. Smaller rotor volume than standard
rotors, requires smaller caps (Vespel caps
supplied) and packing tool.
Specified maximum at ambient temperature
only. Optically transparent.
12
In all cases, the maximum spin rates will be lower at the extremes of the rated
temperature range (usually at least 2 kHz lower).
13
Cap is rated for the full VT range of the MAS probe.
14
Maximum operating bearing pressure is 3000 mbar for normal rotors and 4000 mbar for
high-speed rotors. If using high-speed rotors, it may be necessary to increase the main
pressure input to the MAS PU. Additionally the pressure limits must be configured
within the XWIN-NMR software via cfmas. Please speak with an Applications Scientist
for details.
29
Table 7. MAS Accessories for 4 mm Probes
Part Number
Description and Comments
B200147
4 mm ZrO2 rotor and one Kel-F cap
B200153
4 mm ZrO2 rotor and one ZrO2 cap (for VT work)
B0660
4 mm individually numbered ZrO2 rotor (laser-etched)
B200154
4 mm ZrO2 cap (for Variable Temperature work)
B200155
4 mm Kel-F cap with 3 mm sleeve (standard cap)
H6304
4 mm Kel-F cap with 2 mm sleeve (“short” cap)
B1865
4 mm Vespel cap (for 19F work)
B1544
4 mm Kel-F cap without flutes
K1910
4 mm ZrO2 rotor with 2 Kel-F caps and 1 BN cap
K1914
4 mm ZrO2 rotor with 1 Kel-F cap and 1 Macor cap
K1911
4 mm Si3N4 rotor with 2 Kel-F caps and 1 BN cap
H7615
4 mm ZrO2 High Speed (thick walled) rotor and 3 Vespel caps.
Requires packer HZ03405.
B2950
4 mm rotor insert tool kit
B3830
4 mm ZrO2 rotor partially drilled out. With Teflon top seal, forms 50
µL sample volume at the center of the rotor. For wet samples and
CRAMPS.
B3829
4 mm ZrO2 rotor partially drilled out. With Kel-F top seal, forms 50
µL sample volume at the center of the rotor. For wet samples and
CRAMPS.
B3799
4 mm ZrO2 rotor partially drilled out. With Teflon top seal, forms 12
µL sample volume at rotor center. For wet samples and CRAMPS
B3798
4 mm ZrO2 rotor partially drilled out. With Kel-F top seal, forms 12
µL sample volume at the center of the rotor. For wet samples and
CRAMPS.
B3731
4 mm Sample Box (holds 20 rotors)
30
4 mm MAS Accessories, continued.
B0930001
Black Fine Sharpie® Marker
HZ05754
4 mm Cap removal tool (flat metal, BL4A)
HZ3329
4 mm Rotor Filling Tool (filling funnel only) for BL4/18 standard
rotors.
K8111001
4 mm Rotor Packer (packing rod only) for BL4/18 standard rotors.
HZ3326
Rotor Filling tool (funnel) for High Speed 4 mm rotors. Optional for
High Speed rotors.
HZ03405
Rotor Packer (packing rod) for High Speed 4 mm rotors only.
Required for High Speed rotors.
31
Table 8. MAS Accessories for 7 mm Probes
Part Number
Description
B200156
7 mm ZrO2 rotor and one Kel-F cap
B200157
7 mm ZrO2 rotor and one ZrO2 cap (for VT work)
B0662
7 mm ZrO2 rotor, individually numbered
K1912
7 mm ZrO2 rotor with one Macor cap and one Kel-F cap
K1921
7 mm ZrO2 rotor with one BN and 2 Kel-F caps.
K1922
7 mm Si3N4 rotor
H8912
7 mm sapphire rotor with two Kel-F caps
HZ1662
7 mm Kel-F cap
H6244
7 mm Kel-F cap with center hole
HZ1874
7 mm Vespel cap
K1931
7 mm Macor cap
HZ1651
7 mm BN cap with center hole
K1932
7 mm ZrO2 cap
HZ05755
Metal cap puller for 7 mm rotors
K6011001
Packing rod only for 7 mm rotors
HZ3328
7 mm filling funnel only
H8221
Packing rod and filling funnel for 7 mm rotors
H7464
7 mm High Speed (thick-walled) ZrO2 rotor, supplied with 3 Vespel caps
HZ03404
Rotor packing rod for High Speed (thick-walled) 7 mm rotors
HZ3327
7 mm filling funnel for High Speed (thick-walled) rotors
K1921CR
7 mm ZrO2 rotor with Kel-F insert for CRAMPS and Kel-F cap.
H8195
7 mm ZrO2 rotor with Teflon insert for CRAMPS and Kel-F cap.
H8196
7 mm ZrO2 rotor with PE insert for CRAMPS and Kel-F cap.
B0930001
Black Fine Sharpie® Marker
32
Table 9. MAS Accessories for 2.5 mm Probes
Part Number
Description and Comments
B2628
Starter kit for 2.5 mm MAS probe, includes one ZrO2 rotor with two
sets of Vespel caps, packing tool and filling funnel, marking pen and
metal cap puller.
H8416
2.5 mm ZrO2 rotor and two pairs of Vespel caps
HZ05165
2.5 mm ZrO2 rotor only
HZ07583
2.5 mm Sapphire rotor only
H12050
2.5 mm Sapphire rotor with two pairs of Vespel caps
HZ05269
2.5 mm Vespel top cap only
HZ05276
2.5 mm Vespel bottom cap only
HZ05526
2.5 mm rotor filling funnel
HZ05528
2.5 mm rotor packing tool complete with drill bit
H8429
2.5 mm rotor packing tool and filling funnel
H8435
Metal cap puller for 2.5 mm rotors
B0930001
Black Fine Sharpie® Marker
H8471
2.5 mm rotor catcher for top of the sample transport tube
H11100
Probe user’s manual for 2.5 mm MAS
33
Who to Contact for Assistance
For general applications assistance, please contact the NMR Applications Hotline:
Phone: 978-667-9580 ext. 444 (Mon – Fri, 9 to 5:30 ET)
Email: [email protected]
Fax: 978-667-2955
For assistance with hardware, please contact Bruker Center:
WEBSITE assistance request form:
http://www.bruker-biospin.com/nmr/techsupport/sys_tsup.html
Email: [email protected]
Phone: 978-667-9580; dial 5 for NMR then 2 for Bruker Center.
(You will be asked to enter your System ID Number (BH######).)
Fax: 978-667-6168
34