1
MySQL Utilities
MySQL Utilities
Abstract
This is the MySQL™ Utilities Reference Manual. It documents both the GPL and commercial editions of the MySQL
Utilities 1.4 release series through 1.4.4.
If you have not yet installed MySQL Utilities please download your free copy from the download site. MySQL Utilities
is available for Windows, Mac OS X, and Linux variants.
For notes detailing the changes in each release, see the MySQL Utilities Release Notes.
For legal information, see the Legal Notices.
Document generated on: 2014-12-18 (revision: 41049)
Table of Contents
Preface ............................................................................................................................................. vii
1 How to Install MySQL Utilities .......................................................................................................... 1
1.1 Prerequisites ........................................................................................................................ 1
1.2 Source Code ........................................................................................................................ 1
1.3 Oracle and Red Hat Linux 6 ................................................................................................. 1
1.4 Debian Linux ........................................................................................................................ 2
1.5 Microsoft Windows ................................................................................................................ 2
1.6 Mac OS X ............................................................................................................................ 2
2 Introduction ..................................................................................................................................... 3
2.1 Introduction to MySQL Utilities .............................................................................................. 3
2.2 Connecting to MySQL Servers .............................................................................................. 4
2.2.1 Connection Parameters .............................................................................................. 4
2.2.2 Specifying Connections in Python Library .................................................................... 7
3 MySQL Utilities Administrative Tasks ............................................................................................... 9
3.1 Database Operations ............................................................................................................ 9
3.1.1 How Do I Provision a Slave? .................................................................................... 10
3.1.2 How Do I Make a Copy of a Database on the Same Server? ...................................... 11
3.1.3 How Can I Make a Copy of a Database and Change the Storage Engine? ................... 12
3.1.4 How Can I Tell If a Table on Server X has the same Structure as the Same Table on
Server Y? ......................................................................................................................... 14
3.1.5 How Can I Synchronize a Table on Two Servers Where Neither is Up-to-date? ............ 15
3.2 General Operations ............................................................................................................. 16
3.2.1 How Can I Find Out How Much Space My Data Uses? .............................................. 16
3.2.2 My Server Crashed! I Need to Know the Structure of a Table. How Can I Do That? ...... 18
3.2.3 Creating a New User With The Same Privileges as Another User ............................... 19
3.2.4 What Options Are Used With Each Utility? ................................................................ 20
3.2.5 I've Got Too Many Indexes! How Do I Know Which Ones to Drop? ............................. 23
3.2.6 I Need to Find an Object on My Server But All I Have is a Partial Name. How Do I
Find All Objects with That Name Prefix? ........................................................................... 25
3.3 How Can I Run a Process Every Night To Kill Certain Connections? ..................................... 27
3.3.1 Objectives ................................................................................................................ 27
3.3.2 Example Execution .................................................................................................. 27
3.3.3 Discussion ............................................................................................................... 27
3.3.4 Permissions Required .............................................................................................. 28
3.3.5 Tips and Tricks ........................................................................................................ 28
3.4 High Availability Operations ................................................................................................. 28
3.4.1 How Can I Use Replication? .................................................................................... 28
3.4.2 How Do I Add New Servers to My Topology and Change Master Role ........................ 30
3.4.3 Setup Automatic Failover ......................................................................................... 32
3.4.4 Restore the Previous Master After Failover ............................................................... 35
3.4.5 How Can I Find All of the Slaves Attached to My Master Server? ................................ 38
3.4.6 How To Check If Data Is Correctly Replicated? ......................................................... 39
3.5 Server Operations ............................................................................................................... 41
3.5.1 How Do I Make A Temporary Copy of My Server For Testing? ................................... 41
3.5.2 How Can I Find What MySQL Servers Are Running? ................................................. 43
3.6 Specialized Operations ....................................................................................................... 45
3.6.1 How Do I Record Only Login Events? ....................................................................... 45
3.6.2 How Do I Copy/Move The Audit Log? ....................................................................... 46
3.6.3 How Do I Show All INSERT and UPDATE Queries That Failed? ................................. 47
3.6.4 How Do I Display Connections by the User 'root' and Show the Result in CSV
Format? ............................................................................................................................ 49
iii
MySQL Utilities
4 Overview of MySQL Utilities ........................................................................................................... 51
4.1 Database Operations .......................................................................................................... 51
4.2 General Operations ............................................................................................................. 52
4.3 High Availability Operations ................................................................................................. 53
4.4 Server Operations ............................................................................................................... 53
4.5 Specialized Operations ....................................................................................................... 54
5 Manual Pages ............................................................................................................................... 55
5.1 mysqlauditadmin — Allows users to perform maintenance action on the audit log .............. 55
5.2 mysqlauditgrep — Allows users to search the current or an archived audit log ................... 60
5.3 mysqldbcompare — Compare Two Databases and Identify Differences ............................... 68
5.4 mysqldbcopy — Copy Database Objects Between Servers ................................................. 77
5.5 mysqldbexport — Export Object Definitions or Data from a Database ................................ 83
5.6 mysqldbimport — Import Object Definitions or Data into a Database .................................. 91
5.7 mysqldiff — Identify Differences Among Database Objects ............................................... 96
5.8 mysqldiskusage — Show Database Disk Usage ............................................................. 101
5.9 mysqlfailover — Automatic replication health monitoring and failover ............................. 105
5.10 mysqlfrm — File reader for .frm files. ............................................................................. 115
5.11 mysqlindexcheck — Identify Potentially Redundant Table Indexes ................................. 119
5.12 mysqlmetagrep — Search Database Object Definitions .................................................. 122
5.13 mysqlprocgrep — Search Server Process Lists ............................................................ 127
5.14 mysqlreplicate — Set Up and Start Replication Between Two Servers ......................... 130
5.15 mysqlrplms — Set Up and Start Replication Among a Slave and Multiple Masters ............ 135
5.16 mysqlrpladmin — Administration utility for MySQL replication ........................................ 140
5.17 mysqlrplcheck — Check Replication Prerequisites ....................................................... 150
5.18 mysqlrplshow — Show Slaves for Master Server .......................................................... 154
5.19 mysqlrplsync — Replication synchronization checker .................................................... 158
5.20 mysqlserverclone — Clone Existing Server to Create New Server ................................ 165
5.21 mysqlserverinfo — Display Common Diagnostic Information from a Server .................. 167
5.22 mysqluc — Command line client for running MySQL Utilities ............................................ 170
5.23 mysqluserclone — Clone Existing User to Create New User ......................................... 174
6 Extending MySQL Utilities ............................................................................................................ 179
6.1 Introduction to extending the MySQL Utilities ..................................................................... 179
6.2 MySQL Utilities copy_server.py sample .............................................................................. 185
6.3 Specialized Operations ...................................................................................................... 188
6.3.1 mysql.utilities.command.grep — Search Databases for Objects .................... 188
6.3.2 mysql.utilities.command.proc — Search Processes on Servers .................... 189
6.4 Parsers ............................................................................................................................. 190
6.4.1 mysql.utilities.parser — Parse MySQL Log Files ...................................................... 190
7 MySQL Utilities Testing (MUT) ..................................................................................................... 193
7.1 mut — MySQL Utilities Testing ......................................................................................... 193
8 MySQL Fabric ............................................................................................................................. 197
8.1 Introduction to Fabric ........................................................................................................ 198
8.1.1 Fabric Prerequisites ............................................................................................... 198
8.1.2 Fabric Concepts ..................................................................................................... 199
8.2 Installing and Configuring MySQL Fabric ........................................................................... 199
8.2.1 Downloading MySQL Fabric ................................................................................... 199
8.2.2 Installing MySQL Fabric ......................................................................................... 200
8.2.3 Configuring MySQL Fabric ...................................................................................... 200
8.2.4 Starting and Stopping MySQL Fabric Nodes ............................................................ 201
8.3 Quick Start ....................................................................................................................... 202
8.3.1 Example: Fabric and Replication ............................................................................. 202
8.3.2 Example: Fabric and Sharding ................................................................................ 206
8.4 The mysqlfabric Utility .................................................................................................. 211
8.4.1 Getting Help .......................................................................................................... 211
iv
MySQL Utilities
8.4.2 Group Commands .................................................................................................. 211
8.4.3 Manage Commands ............................................................................................... 212
8.4.4 Server Commands ................................................................................................. 212
8.4.5 Sharding Commands .............................................................................................. 212
8.4.6 Event Commands ................................................................................................... 213
8.4.7 Dump Commands .................................................................................................. 213
8.5 Backing Store ................................................................................................................... 214
8.5.1 Backing Store Tables ............................................................................................. 214
8.5.2 Protecting the Backing Store .................................................................................. 217
8.6 Configuring MySQL Fabric ................................................................................................ 217
8.6.1 MySQL Fabric configuration file location .................................................................. 218
8.6.2 Section DEFAULT .................................................................................................. 218
8.6.3 Section storage ...................................................................................................... 218
8.6.4 Section servers ...................................................................................................... 219
8.6.5 Section protocol.xmlrpc .......................................................................................... 219
8.6.6 Section executor .................................................................................................... 220
8.6.7 Section logging ...................................................................................................... 220
8.6.8 Section sharding .................................................................................................... 220
8.6.9 Section statistics .................................................................................................... 220
8.6.10 Section failure_tracking ......................................................................................... 221
8.6.11 Section connector ................................................................................................. 222
8.6.12 Section client ....................................................................................................... 222
8.7 MySQL Fabric Frequently Asked Questions ....................................................................... 222
8.8 Using Connector/Python with MySQL Fabric ...................................................................... 228
8.8.1 Installing Connector/Python with MySQL Fabric Support .......................................... 229
8.8.2 Requesting a Fabric Connection ............................................................................. 230
8.8.3 Providing Information to Choose a MySQL Server ................................................... 232
8.9 Using Connector/J with MySQL Fabric ............................................................................... 234
8.9.1 Installing Connector/J with MySQL Fabric Support ................................................... 234
8.9.2 Loading the Driver and Requesting a Fabric Connection .......................................... 234
8.9.3 Providing Information to Choose a MySQL Server ................................................... 235
8.9.4 MySQL Fabric Configuration for Running Samples ................................................... 236
8.9.5 Running Tests ........................................................................................................ 238
8.9.6 Running Demonstration Programs ........................................................................... 238
8.9.7 A Complete Example: Working with Employee Data ................................................. 239
8.9.8 How Connector/J Chooses a MySQL Server ........................................................... 241
8.9.9 Using Hibernate with MySQL Fabric ........................................................................ 241
8.9.10 Connector/J Fabric Support Reference .................................................................. 245
9 Appendix ..................................................................................................................................... 247
9.1 MySQL Utilities Frequently Asked Questions ...................................................................... 247
9.2 MySQL Utilities Change History ......................................................................................... 249
9.3 Third Party Licenses ......................................................................................................... 249
9.3.1 Doctrine DBAL 2.3.4 .............................................................................................. 249
v
vi
Preface
This is the User Manual for the MySQL Utilities.
MySQL Utilities is both a set of command-line utilities as well as a Python library for making the common
tasks easy to accomplish. The library is written entirely in Python, meaning that it is not necessary to have
any other tools or libraries installed to make it work. It is currently designed to work with Python v2.6 or
later and there is no support (yet) for Python v3.1.
Layout
This manual is arranged in an order designed to provide a quick reference for how to use MySQL Utilities.
It begins with a brief introduction of MySQL Utilities then presents a list of common administration tasks
with examples of how utilities can be used to perform the tasks. From there, the manual begins a deeper
dive into the utilities starting with overviews of each utility leading to a detailed description of each via a
manual page format. Thus, the manual provides a documentation solution for several needs.
How to Use This Manual
You can use this manual to get a quick solution to an administrative task complete with explanation of
how to run the utilities involved and the options and parameters needed. See the tasks chapter for this
information.
You can use the manual to learn what utilities exist and how each fits into your own administrative needs.
See the utility overview chapter for this information.
You can also use the manual to get more information about each utility and what each option and
parameter does via the manuals section.
The manual concludes with a look at extending the MySQL Utilities library, a look at the developer testing
environment, and a list of frequently asked questions.
Legal Notices
Copyright © 2006, 2014, Oracle and/or its affiliates. All rights reserved.
This software and related documentation are provided under a license agreement containing restrictions
on use and disclosure and are protected by intellectual property laws. Except as expressly permitted
in your license agreement or allowed by law, you may not use, copy, reproduce, translate, broadcast,
modify, license, transmit, distribute, exhibit, perform, publish, or display any part, in any form, or by any
means. Reverse engineering, disassembly, or decompilation of this software, unless required by law for
interoperability, is prohibited.
The information contained herein is subject to change without notice and is not warranted to be error-free.
If you find any errors, please report them to us in writing.
If this software or related documentation is delivered to the U.S. Government or anyone licensing it on
behalf of the U.S. Government, the following notice is applicable:
U.S. GOVERNMENT RIGHTS Programs, software, databases, and related documentation and
technical data delivered to U.S. Government customers are "commercial computer software" or
"commercial technical data" pursuant to the applicable Federal Acquisition Regulation and agency-specific
supplemental regulations. As such, the use, duplication, disclosure, modification, and adaptation shall be
subject to the restrictions and license terms set forth in the applicable Government contract, and, to the
vii
Legal Notices
extent applicable by the terms of the Government contract, the additional rights set forth in FAR 52.227-19,
Commercial Computer Software License (December 2007). Oracle USA, Inc., 500 Oracle Parkway,
Redwood City, CA 94065.
This software is developed for general use in a variety of information management applications. It is not
developed or intended for use in any inherently dangerous applications, including applications which
may create a risk of personal injury. If you use this software in dangerous applications, then you shall be
responsible to take all appropriate fail-safe, backup, redundancy, and other measures to ensure the safe
use of this software. Oracle Corporation and its affiliates disclaim any liability for any damages caused by
use of this software in dangerous applications.
Oracle is a registered trademark of Oracle Corporation and/or its affiliates. MySQL is a trademark of Oracle
Corporation and/or its affiliates, and shall not be used without Oracle's express written authorization. Other
names may be trademarks of their respective owners.
This software and documentation may provide access to or information on content, products, and services
from third parties. Oracle Corporation and its affiliates are not responsible for and expressly disclaim all
warranties of any kind with respect to third-party content, products, and services. Oracle Corporation and
its affiliates will not be responsible for any loss, costs, or damages incurred due to your access to or use of
third-party content, products, or services.
This document in any form, software or printed matter, contains proprietary information that is the exclusive
property of Oracle. Your access to and use of this material is subject to the terms and conditions of your
Oracle Software License and Service Agreement, which has been executed and with which you agree
to comply. This document and information contained herein may not be disclosed, copied, reproduced,
or distributed to anyone outside Oracle without prior written consent of Oracle or as specifically provided
below. This document is not part of your license agreement nor can it be incorporated into any contractual
agreement with Oracle or its subsidiaries or affiliates.
This documentation is NOT distributed under a GPL license. Use of this documentation is subject to the
following terms:
You may create a printed copy of this documentation solely for your own personal use. Conversion to other
formats is allowed as long as the actual content is not altered or edited in any way. You shall not publish
or distribute this documentation in any form or on any media, except if you distribute the documentation in
a manner similar to how Oracle disseminates it (that is, electronically for download on a Web site with the
software) or on a CD-ROM or similar medium, provided however that the documentation is disseminated
together with the software on the same medium. Any other use, such as any dissemination of printed
copies or use of this documentation, in whole or in part, in another publication, requires the prior written
consent from an authorized representative of Oracle. Oracle and/or its affiliates reserve any and all rights
to this documentation not expressly granted above.
For more information on the terms of this license, or for details on how the MySQL documentation is built
and produced, please visit MySQL Contact & Questions.
For help with using MySQL, please visit either the MySQL Forums or MySQL Mailing Lists where you can
discuss your issues with other MySQL users.
For additional documentation on MySQL products, including translations of the documentation into other
languages, and downloadable versions in variety of formats, including HTML and PDF formats, see the
MySQL Documentation Library.
viii
Chapter 1 How to Install MySQL Utilities
Table of Contents
1.1
1.2
1.3
1.4
1.5
1.6
Prerequisites ................................................................................................................................
Source Code ................................................................................................................................
Oracle and Red Hat Linux 6 .........................................................................................................
Debian Linux ................................................................................................................................
Microsoft Windows ........................................................................................................................
Mac OS X ....................................................................................................................................
1
1
1
2
2
2
MySQL Utilities is available in a number of repository formats. Although you may not see your specific
operating system or platform listed, we provide general repository formats for most platforms. If none of the
available repositories are applicable to your platform, you can use the source code repository and install
MySQL Utilities from the command line.
The latest MySQL Utilities downloads are available at http://dev.mysql.com/downloads/tools/
utilities/1.4.html. The following sections discuss each repository.
For information specific to Fabric, see Section 8.2, “Installing and Configuring MySQL Fabric”.
1.1 Prerequisites
MySQL Utilities requires Python 2.6. All of the Python code is written to conform to this version of Python.
MySQL Utilities requires MySQL Connector/Python GA release (version >= 1.2.1) for connecting to
MySQL. If you do not have Connector/Python installed, see the download section for Connector/Python to
download the appropriate repository.
1.2 Source Code
This repository is the bundled source code for MySQL Utilities. It includes all of the utility code as well
as the MySQL Utilities library and manual pages. It is available as either a single Windows (Architecture
Independent), ZIP or Generic Linux (Architecture Independent), Compressed TAR archive.
You can use this repository to install on any platform that has Python 2.6 installed. For example, you can
use the .tar version of this repository to install MySQL Utilities on Mac OS X or Ubuntu.
Once you download and unzip or untar the file, open a terminal and navigate to the directory containing the
file. Then unpack the file and install MySQL Utilities using the setup.py script as shown below.
shell>
shell>
shell>
shell>
unzip mysql-utilities-1.4.4.zip
cd mysql-utilities-1.4.4
python ./setup.py build
sudo python ./setup.py install
Note
Using this repository requires that you have Connector/Python installed or install it
separately.
1.3 Oracle and Red Hat Linux 6
This repository is available as a architecture independent .rpm repository.
1
Debian Linux
Once you download the file, you can install it using the following command or similar depending on your
platform configuration.
shell> sudo rpm -i mysql-utilities-1.4.4-el6.noarch.rpm
You can also use the RPM package manager that is part of your base operating system. See your
operating system documentation for more details.
1.4 Debian Linux
The .deb repository is built for Debian 6 and is architecture independent. Although built expressly for
Debian 6, it can be installed on various ports such as amd64, i386, etc.
Note
The repository does not work for Debian 7 because MySQL Utilities requires Python
2.6 and Debian 7 currently ships with Python 2.7. For Debian 7, use the source
code repository to install MySQL Utilities.
Once you download the file, you can install it using the following command or similar depending on your
specific release or version of Debian.
shell> sudo dpkg -i mysql-utilities-1.4.4-debian6.0_all.deb
1.5 Microsoft Windows
Either install MySQL Utilities using the MySQL Installer for Windows (a system that manages installations
and updates for all MySQL products on Windows), or download and execute the standalone file. The
download links are as follows:
• MySQL Installer: Download and execute the MySQL Installer MSI file. Select the MySQL Utilities
product and then proceed with the installation. See the MySQL Installer manual for additional details.
This is the recommended approach.
• Standalone: Download and execute the MySQL Utilities standalone MSI file.
Note
The .msi available for Microsoft Windows is built for the x86 32-bit platform, but can
be installed on the 64-bit platform.
1.6 Mac OS X
The .dmg file available for Mac OS X is built for x84-64 bit platforms, and supports OS X version 10.6
(Snow Leopard) and OS X version 10.7 (Lion), although it should also work with newer OS X versions.
Once you download the .dmg file you can install MySQL Utilities by opening it and double clicking the .pkg
file.
Note
MySQL Utilities depends on Connector/Python, which is also available as a .dmg
file. For additional information, see Installing Connector/Python from a Binary
Distribution.
2
Chapter 2 Introduction
Table of Contents
2.1 Introduction to MySQL Utilities ......................................................................................................
2.2 Connecting to MySQL Servers ......................................................................................................
2.2.1 Connection Parameters ......................................................................................................
2.2.2 Specifying Connections in Python Library ...........................................................................
3
4
4
7
This chapter introduces MySQL Utilities and presents information on how to access and download MySQL
Utilities. It also includes the basics of how to use the account login option common to all utilities.
2.1 Introduction to MySQL Utilities
What are the MySQL Utilities?
It is a package of utilities that are used for maintenance and administration of MySQL servers. These
utilities encapsulate a set of primitive commands, and bundles them so they can be used to perform macro
operations with a single command. They can be installed via MySQL Workbench, or as a standalone
package.
The utilities are written in Python, available under the GPLv2 license, and are extendable using the
supplied library. They are designed to work with Python versions 2.6 or later and there is no support (yet)
for Python v3.1.
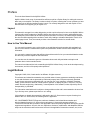
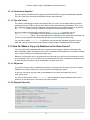
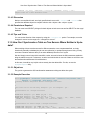
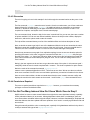
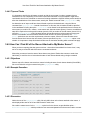
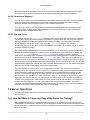
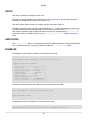
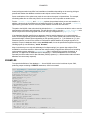
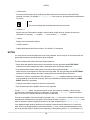
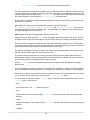
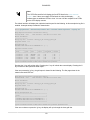
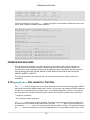
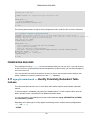
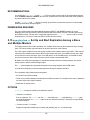
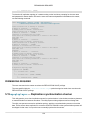
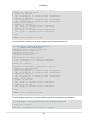
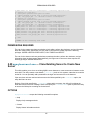
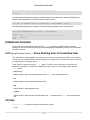
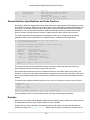
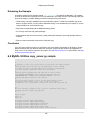
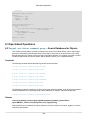
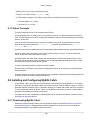
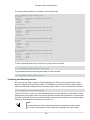
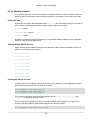
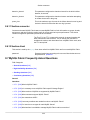
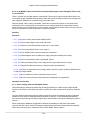
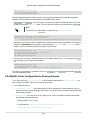
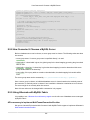
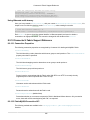
How do we access the MySQL Utilities?
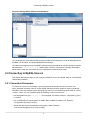
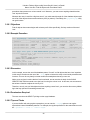
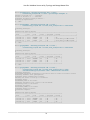
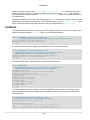
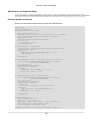
There are two ways to access the utilities from within the MySQL Workbench. Either use Tools, Start Shell
for MySQL Utilities from the main Workbench toolbar, or click the MySQL Utilities icon from the Workbench
home page. Both methods will open a terminal/shell window in the mysqluc utility shell. Type "help" to list
the available commands.
3
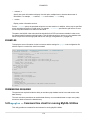
Connecting to MySQL Servers
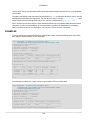
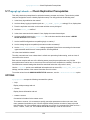
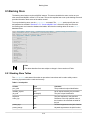
Figure 2.1 Starting MySQL Utilities from Workbench
You can launch any of the utilities listed by typing the name of the command. To find out what options are
available, use the option, or read the appropriate manual page.
The utilities are designed to work on MySQL systems with grants enabled but can also operate on servers
started with the --skip-grant-tables startup option. However, this practice is strongly discouraged
and should be used only in situations where it is appropriate or deemed a last resort.
2.2 Connecting to MySQL Servers
This section describes the ways you can connect to a MySQL server via a MySQL Utility or via the MySQL
Utilities library methods.
2.2.1 Connection Parameters
To connect to a server, it is necessary to specify connection parameters such as user name, host
name, password, and either a port or socket. MySQL Utilities provides a number of ways to provide this
information. All of the methods require specifying your choice via a command-line option such as --server,
--master, --slave, etc. The methods include the following in order of most secure.
• Use login-paths from your .mylogin.cnf file (encrypted, not visible). Example : <login-path>[:<port>]
[:<socket>]
• Use a configuration file (unencrypted, not visible) Note: available in release-1.5.0. Example :
<configuration-file-path>[:<section>]
• Specify the data on the command-line (unencrypted, visible). Example :
<user>[:<passwd>]@<host>[:<port>][:<socket>]
4
Connection Parameters
2.2.1.1 Use login-paths (.mylogin.cnf)
The best way to specify server connection information is with your .mylogin.cnf file. Not only is this file
encrypted, but any logging of the utility execution will not expose the connection information. Thus, no user
names, passwords, ports, etc. are visible in the log. This is the preferred method for using MySQL Utilities
to connect to servers.
Note: MySQL Utilities version 1.2.1 and later support login-paths.
Utilities support the use of login-paths in the connection string provided they use the following format
login-path-name[:port][:socket] where the port and socket parameters are optional. If used,
these optional parameters override the respective options from the specified login-path.
When using login-paths, there are no default values except on Posix systems when specifying a socket. In
this case, the host option defaults to localhost. This means that combining the values specified in the loginpath with the two optional values port and socket, one needs to specify at least a user, a hostname and a
port or socket.
Use the mysql_config_editor tool (http://dev.mysql.com/doc/en/mysql-config-editor.html) to add the
connection information as follows.
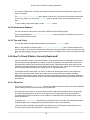
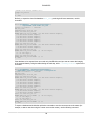
shell> mysql_config_editor set --login-path=instance_13001 --host=localhost --user=root --port=13001 --pass
Enter password: <Password is prompted to be inserted in a more secure way>
Next, use the following command to confirm that the login-path data was correctly added to
.mylogin.cnf (the encrypted file):
shell> mysql_config_editor print --login-path=instance_13001
[instance_13001]
user = root
password = *****
host = localhost
port = 13001
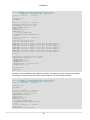
Once your .mylogin.cnf file is configured, you need only specify the section of the .mylogin.cnf file
for the server connection. For example, the section created in the previous example is 'instance_13001'.
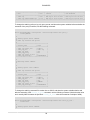
Thus, we use --server=instance_13001. The following shows the execution of a utility specifying the loginpath section.
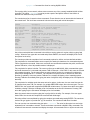
shell> mysqlserverinfo --server=instance_13001 --format=vertical
# Source on localhost: ... connected.
*************************
1. row *************************
server: localhost:13001
config_file: /etc/my.cnf, /etc/mysql/my.cnf
binary_log: clone-bin.000001
binary_log_pos: 341
relay_log:
relay_log_pos:
version: 5.6.17-log
datadir: /Volumes/Source/source/temp_13001/
basedir: /Volumes/Source/source/bzr/mysql-5.6
plugin_dir: /Volumes/Source/source/bzr/mysql-5.6/lib/plugin/
general_log: OFF
general_log_file:
general_log_file_size:
log_error:
log_error_file_size:
slow_query_log: OFF
slow_query_log_file:
5
Connection Parameters
slow_query_log_file_size:
1 row.
#...done.
See the online MySQL Reference Manual for more information about login-paths, the .mylogin.cnf file,
and the mysql_config_editor client.
2.2.1.2 Use a Configuration File
MySQL Utilities can also accept a configuration path and section for the server connection data. This
allows you to store one or more sections with connection information. Saving the data in configuration files
is more secure than specifying the data on the command-line but since the file is text, the data can still be
read by anyone who can access the file.
To reference the configuration file, specify the path and file name followed by a section name in square
brackets. The path is optional. If you do not specify it, the utility will attempt to use your local my.cnf if
available.
For example, if you wanted to create a configuration file in /dev/env/test1/my.cnf and you created a section
named server1, you would specify it as --server=/dev/env/test1/my.cnf[server1]. The corresponding section
in the file may look like the following.
[server1]
port=3308
user=root
password=other-pass
host=localhost
The following shows the execution of a utility using a configuration file.
shell> mysqlserverinfo.py --server=/dev/env/test1/my.cnf[server1] --format=vertical
# Source on localhost: ... connected.
*************************
1. row *************************
server: localhost:13001
config_file: /etc/my.cnf, /etc/mysql/my.cnf
binary_log: clone-bin.000001
binary_log_pos: 341
relay_log:
relay_log_pos:
version: 5.6.17-log
datadir: /Volumes/Source/source/temp_13001/
basedir: /Volumes/Source/source/bzr/mysql-5.6
plugin_dir: /Volumes/Source/source/bzr/mysql-5.6/lib/plugin/
general_log: OFF
general_log_file:
general_log_file_size:
log_error:
log_error_file_size:
slow_query_log: OFF
slow_query_log_file:
slow_query_log_file_size:
1 row.
#...done.
2.2.1.3 Command-line Options
The least secure way to provide connection information for MySQL servers is to specify the data on the
command-line option. This is least secure because the data is visible on the command-line and will also be
visible in any log or redirection of the execution.
6
Specifying Connections in Python Library
In this case, we specify the data in the following order: <user>[:<passwd>]@<host>[:<port>][:<socket>]
where the passwd, port, and socket are optional. Each item is described in more detail below.
• user
The name of the user to connect.
• passwd
The password to use when connecting. The default if no password is supplied is the empty password.
• host
The domain name of the host or the IP address. This field accepts host names, and IPv4 and IPv6
addresses. It also accepts quoted values which are not validated and passed directly to the calling
methods. This enables users to specify host names and IP addresses that are outside of the supported
validation mechanisms.
• port
The port to use when connecting to the server. The default if no port is supplied is 3306 (which is the
default port for the MySQL server as well).
• unix_socket
The socket to connect to (instead of using the host and port parameters).
The following demonstrates executing a utility using command-line options for connecting to a server.
shell> mysqlserverinfo.py --server=root:other-pass@localhost:3308 --format=vertical
# Source on localhost: ... connected.
*************************
1. row *************************
server: localhost:13001
config_file: /etc/my.cnf, /etc/mysql/my.cnf
binary_log: clone-bin.000001
binary_log_pos: 341
relay_log:
relay_log_pos:
version: 5.6.17-log
datadir: /Volumes/Source/source/temp_13001/
basedir: /Volumes/Source/source/bzr/mysql-5.6
plugin_dir: /Volumes/Source/source/bzr/mysql-5.6/lib/plugin/
general_log: OFF
general_log_file:
general_log_file_size:
log_error:
log_error_file_size:
slow_query_log: OFF
slow_query_log_file:
slow_query_log_file_size:
1 row.
#...done.
Note: starting with release-1.4.4, MySQL Utilities will issue a warning if you use this connection method.
2.2.2 Specifying Connections in Python Library
If you build your own utilities using the MySQL Utilities library, you will encounter various methods for
connecting to MySQL servers. Methods that deal with connecting to servers can accept the following
mechanisms for supplying the data.
• As a Python dictionary containing the connection parameters.
7
Specifying Connections in Python Library
• As a connection specification string containing the connection parameters.
• As a Server instance.
The dictionary lists the values by name as described above. For example, you would create code like the
following.
# Set connection values
dest_values = {
"user" : "root",
"passwd" : "secret",
"host" : "localhost",
"port" : 3308,
"unix_socket" : None,
}
The connection specification is a string the form <user>[:<passwd>]@<host>[:<port>][:<socket>] where the
passwd, port, and socket are optional. This string is parsed using the options.parse_connection function.
You can also specify an existing instance of the Server class. In this case, the new class will copy the
connection information.
8
Chapter 3 MySQL Utilities Administrative Tasks
Table of Contents
3.1 Database Operations .................................................................................................................... 9
3.1.1 How Do I Provision a Slave? ............................................................................................ 10
3.1.2 How Do I Make a Copy of a Database on the Same Server? ............................................. 11
3.1.3 How Can I Make a Copy of a Database and Change the Storage Engine? .......................... 12
3.1.4 How Can I Tell If a Table on Server X has the same Structure as the Same Table on
Server Y? ................................................................................................................................. 14
3.1.5 How Can I Synchronize a Table on Two Servers Where Neither is Up-to-date? ................... 15
3.2 General Operations ..................................................................................................................... 16
3.2.1 How Can I Find Out How Much Space My Data Uses? ...................................................... 16
3.2.2 My Server Crashed! I Need to Know the Structure of a Table. How Can I Do That? .............. 18
3.2.3 Creating a New User With The Same Privileges as Another User ....................................... 19
3.2.4 What Options Are Used With Each Utility? ........................................................................ 20
3.2.5 I've Got Too Many Indexes! How Do I Know Which Ones to Drop? ..................................... 23
3.2.6 I Need to Find an Object on My Server But All I Have is a Partial Name. How Do I Find All
Objects with That Name Prefix? ................................................................................................ 25
3.3 How Can I Run a Process Every Night To Kill Certain Connections? ............................................. 27
3.3.1 Objectives ........................................................................................................................ 27
3.3.2 Example Execution .......................................................................................................... 27
3.3.3 Discussion ....................................................................................................................... 27
3.3.4 Permissions Required ...................................................................................................... 28
3.3.5 Tips and Tricks ................................................................................................................ 28
3.4 High Availability Operations ......................................................................................................... 28
3.4.1 How Can I Use Replication? ............................................................................................ 28
3.4.2 How Do I Add New Servers to My Topology and Change Master Role ................................ 30
3.4.3 Setup Automatic Failover ................................................................................................. 32
3.4.4 Restore the Previous Master After Failover ....................................................................... 35
3.4.5 How Can I Find All of the Slaves Attached to My Master Server? ....................................... 38
3.4.6 How To Check If Data Is Correctly Replicated? ................................................................. 39
3.5 Server Operations ....................................................................................................................... 41
3.5.1 How Do I Make A Temporary Copy of My Server For Testing? ........................................... 41
3.5.2 How Can I Find What MySQL Servers Are Running? ......................................................... 43
3.6 Specialized Operations ............................................................................................................... 45
3.6.1 How Do I Record Only Login Events? ............................................................................... 45
3.6.2 How Do I Copy/Move The Audit Log? ............................................................................... 46
3.6.3 How Do I Show All INSERT and UPDATE Queries That Failed? ........................................ 47
3.6.4 How Do I Display Connections by the User 'root' and Show the Result in CSV Format? ........ 49
MySQL Utilities provides a command-line set of tools for working with MySQL Servers and databases.
MySQL Utilities fully supports MySQL Server versions 5.1 and above. It is also compatible with MySQL
Server 5.0, but not every feature of 5.0 may be supported. It does not support MySQL Server versions 4.x.
In this section, we present a number of example administrative tasks. Included in each is a description of
the need, goals, example execution, and a discussion about the specific options and techniques illustrated.
Also included is a description of the specific permissions required to execute the utilities demonstrated.
3.1 Database Operations
The tasks described in this section relate to those that are performed on or with one or more databases.
9
How Do I Provision a Slave?
3.1.1 How Do I Provision a Slave?
When working with replication, one of the common tasks is adding a new slave for scale out. Although
adding a new slave has been simplified with utilities like mysqlreplicate, provisioning the slave
(copying data and getting replication started properly) can be a challenge if done manually.
Fortunately, we have two utilities - mysqldbexport and mysqldbimport - that have been designed to
work with replication so that when the export is generated, you can include the proper replication control
statements in the output stream.
3.1.1.1 Objectives
Perform slave provisioning using mysqldbexport and mysqldbimport.
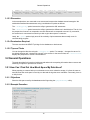
3.1.1.2 Example Execution
shell> mysqldbexport --server=root:root@localhost:13001 --all --export=both --rpl=master --rpl-user=rpl:rpl > d
shell> mysqldbimport --server=root:root@localhost:13002 data.sql
# Source on localhost: ... connected.
# Importing definitions from data.sql.
ERROR: The import operation contains GTID statements that require the global gtid_executed
system variable on the target to be empty (no value). The gtid_executed value must be reset
by issuing a RESET MASTER command on the target prior to attempting the import operation.
Once the global gtid_executed value is cleared, you may retry the import.
shell> mysql -uroot -proot -h 127.0.0.1 --port=13002 -e "RESET MASTER"
shell> mysqldbimport --server=root:root@localhost:13002 data.sql
# Source on localhost: ... connected.
# Importing definitions from data.sql.
CAUTION: The following 1 warning messages were included in the import file:
# WARNING: A partial export from a server that has GTIDs enabled will by default include
the GTIDs of all transactions, even those that changed suppressed parts of the database.
If you don't want to generate the GTID statement, use the --skip-gtid option. To export all
databases, use the --all and --export=both options.
#...done.
3.1.1.3 Discussion
There are several operations listed here. The first one we see is the execution of the mysqldbexport
utility to create a file that includes an export of all databases as designated with the --all option. We add
the '--export=both' option to ensure we include the definitions as well as the data.
We also add the --rpl=master option which instructs mysqldbexport to generate the replication
commands with respect to the source server being the master. Lastly, we include the replication user and
password to be included in the CHANGE MASTER command.
Next, we see an attempt to run the import using mysqldbimport but we see there is an error. The reason
for the error is the mysqldbimport utility detected a possible problem on the slave whereby there were
global transaction identifiers (GTIDs) recorded from the master. You can see this situation if you setup
replication prior to running the import. The way to resolve the problem is to run the RESET MASTER
command on the slave as shown in the next operation.
The next operation is a rerun of the import and in this case it succeeds. We see a warning that is issued
any time there are replication commands detected in the input stream whenever GTIDs are enabled.
10
How Do I Make a Copy of a Database on the Same Server?
3.1.1.4 Permissions Required
The user used to read data from the master must have the SELECT privilege on all databases exported.
The user on the slave must have the SUPER privilege to start replication.
3.1.1.5 Tips and Tricks
The warning issued during the import concerning GTIDs is to ensure you are aware that the process for
gathering the proper GTIDs to execute on the slave include transactions from all databases. Thus, if you
ran a partial export that includes the replication commands and you have GTIDs enabled, you should use
the --skip-rpl option to skip the replication commands and restart replication manually.
Should your data be large enough to make the use of mysqldbexport impractical, you can
use mysqldbexport to generate the correct replication commands anyway by using the -export=definitions option. This will generate the SQL statements for the objects but not the data. You
can then use the replication commands generated with your own backup and restore tools.
You can use the option --rpl=slave to generate a output stream that considers the source server a
slave and uses the source servers master settings for generating the CHANGE MASTER command.
3.1.2 How Do I Make a Copy of a Database on the Same Server?
If you are working with a database and want to experiment with changes to objects or data either from
direct manipulation (SQL commands) or as a result of interaction with an application, it is prudent to always
have a copy to fall back to if something should go wrong.
Naturally, a full backup is key for any production server but what if you just want to do something as a test
or as a prototype? Sure, you can restore from your backup when the test is complete but who has the time
for that? Why not just make a copy of the database in question and use it?
3.1.2.1 Objectives
The goal is to make a copy of a database and rename it to another name. We want to do this on a single
database server without resorting to messy file copies and/or stopping the server.
In this case, we want to copy the world_innodb database in its entirety and rename the copy to
word_innodb_clone.
The utility of choice here is named mysqldbcopy and it is capable of copying databases from server to
another or on the same server. Lets have a look at the execution.
3.1.2.2 Example Execution
shell> mysqldbcopy --source=root:root@localhost \
--destination=root:root@localhost world_innodb:world_innodb_clone
# Source on localhost: ... connected.
# Destination on localhost: ... connected.
# Copying database world_innodb renamed as world_innodb_clone
# Copying TABLE world_innodb.City
# Copying TABLE world_innodb.Country
# Copying TABLE world_innodb.CountryLanguage
# Copying data for TABLE world_innodb.City
# Copying data for TABLE world_innodb.Country
# Copying data for TABLE world_innodb.CountryLanguage
#...done.
shell> mysql -uroot -proot -e "SHOW DATABASES"
+--------------------+
11
How Can I Make a Copy of a Database and Change the Storage Engine?
| Database
|
+--------------------+
| information_schema |
| employees
|
| mysql
|
| world_innodb
|
| world_innodb_clone |
+--------------------+
3.1.2.3 Discussion
Notice we specified the source of the database we wanted to copy as well as the destination. In this case,
they are the same server. You must specify it this way so that it is clear we are operating on the same
server.
Notice how we specified the new name. We used the <old_name>:<new_name> syntax. You can do this
for as many databases as you want to copy. That's right - you can copy multiple databases with a single
command renaming each along the way.
To copy a database without renaming it (if the destination is a different server), you can omit
the :<new_name> portion.
3.1.2.4 Permissions Required
The user must have SELECT privileges for the database(s) on the source server and have CREATE,
INSERT, UPDATE on the destination server.
3.1.2.5 Tips and Tricks
You can copy all of the databases on a source server to the destination by using the --all option. Note
that this does not permit rename. To rename, you must specify the databases one at a time.
You can specify certain objects to exclude (skip) in the copy. Use the --skip option to omit the type of
objects. For example, you may want to exclude copying of triggers, procedures, and functions. In this case,
use the option '--skip=TRIGGERS,PROCEDURES,FUNCTIONS'. Note that case is not important but is
used for emphasis only.
The copy is replication and GTID aware and will take actions to preserve the binary log events during the
copy.
You can set the locking type with the --locking option. Possible values include: no-locks = do not use
any table locks, lock-all = use table locks but no transaction and no consistent read, snapshot (default):
consistent read using a single transaction.
3.1.2.6 Risks
Should the copy fail in the middle, the destination databases may be incomplete or inconsistent. Should
this occur, drop the destination database in question, repair the cause of the failure, and restart the copy.
3.1.3 How Can I Make a Copy of a Database and Change the Storage Engine?
Sometimes you may have need to create a copy of a database but change the storage engine of all tables
to another engine.
For example, if you are migrating your database to InnoDB (a wise choice), you can copy the database
to a new database on a new server and change the storage engine to InnoDB. For this, we can use the
mysqldbcopy utility.
12
How Can I Make a Copy of a Database and Change the Storage Engine?
3.1.3.1 Objectives
In this example, we want to make a copy of the world_innodb database but change the storage engine to
MyISAM and rename the database accordingly.
You can cause all tables in the destination databases to use a different storage engine with the --newstorage-engine option.
3.1.3.2 Example Execution
shell> mysqldbcopy --source=root:root@localhost:3306 \
--destination=root:root@localhost:3307 --new-storage-engine=myisam \
world_innodb:world_myisam
# Source on localhost: ... connected.
# Destination on localhost: ... connected.
# Copying database world_innodb renamed as world_myisam
# Replacing ENGINE=InnoDB with ENGINE=myisam for table `world_myisam`.City.
# Copying TABLE world_innodb.City
# WARNING: FOREIGN KEY constraints for table world_myisam.City are missing because the new
# storage engine for the table is not InnoDB
# Replacing ENGINE=InnoDB with ENGINE=myisam for table `world_myisam`.Country.
# Copying TABLE world_innodb.Country
# Replacing ENGINE=InnoDB with ENGINE=myisam for table `world_myisam`.CountryLanguage.
# Copying TABLE world_innodb.CountryLanguage
# WARNING: FOREIGN KEY constraints for table world_myisam.CountryLanguage are missing because
# the new storage engine for the table is not InnoDB
# Copying data for TABLE world_innodb.City
# Copying data for TABLE world_innodb.Country
# Copying data for TABLE world_innodb.CountryLanguage
#...done.
shell> mysql -uroot -proot -h 127.0.0.1 --port=3307 -e "SHOW DATABASES"
+--------------------+
| Database
|
+--------------------+
| information_schema |
| mysql
|
| sakila
|
| world
|
| world_myisam
|
+--------------------+
shell> mysql -uroot -proot -h 127.0.0.1 --port=3307 -e "SHOW CREATE TABLE world_myisam.countrylanguage\G"
*************************** 1. row ***************************
Table: countrylanguage
Create Table: CREATE TABLE `countrylanguage` (
`CountryCode` char(3) NOT NULL DEFAULT '',
`Language` char(30) NOT NULL DEFAULT '',
`IsOfficial` enum('T','F') NOT NULL DEFAULT 'F',
`Percentage` float(4,1) NOT NULL DEFAULT '0.0',
PRIMARY KEY (`CountryCode`,`Language`),
KEY `CountryCode` (`CountryCode`)
) ENGINE=MyISAM DEFAULT CHARSET=latin1
3.1.3.3 Discussion
Notice here we created a copy of the database and changed all tables in the destination database to use
the InnoDB storage engine with the --new-storage-engine option.
We show proof of the change by displaying the CREATE statement for one of the tables on the destination
server.
13
How Can I Tell If a Table on Server X has the same Structure as the Same Table on Server Y?
Notice we also renamed the database by using the <old_name>:<new_name> syntax.
3.1.3.4 Permissions Required
The user must have SELECT privileges for the database(s) on the source server and have CREATE,
INSERT, UPDATE on the destination server.
3.1.3.5 Tips and Tricks
You can exclude specific options by using the --exclude option specifying a SQL pattern expression. For
example, to exclude objects that start with xy, use '--exclude=xy%'.
You can use REGEXP patterns in the --exclude option by specifying --regexp in addition to the -exclude option.
3.1.3.6 Risks
Should the copy fail in the middle, the destination databases may be incomplete or inconsistent. Should
this occur, drop the destination database in question, repair the cause of the failure, and restart the copy.
3.1.4 How Can I Tell If a Table on Server X has the same Structure as the Same
Table on Server Y?
Multiple database servers that are kept synchronized manually or are compartmentalized for security
purposes but are by practice kept up-to-date manually are prone to unintentional (and sometimes
intentional) divergence.
For example, you may maintain a production server and a development server. The development server
may have the same databases and the same structures as the production server (but maybe not the same
data). However, the natural course of administrative tasks and maintenance can sometimes leave the
development server behind.
When this happens, you need to have a way to quickly check the schema for a table on the production
server to see if the development server has the same structure. The utility of choice for this operation is
mysqldiff.
3.1.4.1 Objectives
The goal is to compare a table schema on one machine to another and show they differ.
3.1.4.2 Example Execution
shell> mysqldiff --server1=root:root@localhost \
--server2=root:root@localhost:3307 world.city:world.city --changes-for=server2
# server1 on localhost: ... connected.
# server2 on localhost: ... connected.
# Comparing world.city to world.city
[FAIL]
# Object definitions differ. (--changes-for=server2)
#
--- world.city
+++ world.city
@@ -4,6 +4,7 @@
`CountryCode` char(3) NOT NULL DEFAULT '',
`District` char(20) NOT NULL DEFAULT '',
`Population` int(11) NOT NULL DEFAULT '0',
+ `Climate` enum('tropical','dry','mild','continental','polar') DEFAULT NULL,
PRIMARY KEY (`ID`),
KEY `CountryCode` (`CountryCode`),
14
How Can I Synchronize a Table on Two Servers Where Neither is Up-to-date?
CONSTRAINT `city_ibfk_1` FOREIGN KEY (`CountryCode`) REFERENCES `Country` (`Code`)
Compare failed. One or more differences found.
3.1.4.3 Discussion
Notice to accomplish this task, we simply specified each server with --server1 and --server2 then
specified the database objects to compare with the <db>.<object>:<db>.<object> syntax.
3.1.4.4 Permissions Required
The user must have SELECT privileges for both objects on both servers as well as SELECT on the mysql
database.
3.1.4.5 Tips and Tricks
You can set the direction of the compare by using the --changes-for option. For example, to see the
changes for server1 as the target, use '--changes-for=server1'.
3.1.5 How Can I Synchronize a Table on Two Servers Where Neither is Up-todate?
When working with servers that are used in different networks or are compartmentalized, or simply
intentionally manually redundant (they do not use replication), or perhaps through some crisis, you may
encounter a situation where a table (or an entire database) becomes out of synch.
We don't simply want to know which rows differ, rather, we need to know the SQL statements needed to
bring the tables into synch. Furthermore, we aren't sure which table is most out of date so we'd like to see
the transformation statements for both directions.
In this case, it would be very helpful to know exactly how the tables differ. For this, we use the
mysqldbcompare utility.
3.1.5.1 Objectives
The goal is to generate the SQL transformation statements to bring two tables into synch.
3.1.5.2 Example Execution
shell> mysqldbcompare --server1=root:root@localhost:13001 --server2=root:root@localhost:13002 \
menagerie -a --difftype=SQL --show-reverse --quiet
# Checking databases menagerie on server1 and menagerie on server2
#
#
# Row counts are not the same among `menagerie`.`pet` and `menagerie`.`pet`.
#
# Transformation for --changes-for=server1:
#
DELETE FROM `menagerie`.`pet` WHERE `pet_num` = '10';
DELETE FROM `menagerie`.`pet` WHERE `pet_num` = '12';
INSERT INTO `menagerie`.`pet` (`pet_num`, `name`, `owner`, `species`, `sex`, `birth`, `death`)
VALUES('11', 'Violet', 'Annette', 'dog', 'f', '2010-10-20', NULL);
#
# Transformation for reverse changes (--changes-for=server2):
#
# DELETE FROM `menagerie`.`pet` WHERE `pet_num` = '11';
# INSERT INTO `menagerie`.`pet` (`pet_num`, `name`, `owner`, `species`, `sex`, `birth`, `death`)
15
General Operations
#
VALUES('10', 'JonJon', 'Annette', 'dog', 'm', '2010-10-20', '2012-07-01');
# INSERT INTO `menagerie`.`pet` (`pet_num`, `name`, `owner`, `species`, `sex`, `birth`, `death`)
#
VALUES('12', 'Charlie', 'Annette', 'dog', 'f', '2010-10-20', NULL);
#
3.1.5.3 Discussion
In the example above, we connected to two servers and compare the database named menagerie. We
enabled the transformation statements using a combination of options as follows.
The --difftype=SQL option instructs the utility to generate the SQL statements.
The --show-reverse option instructs the utility to generate the differences in both direction. That is, from
the perspective of server1 as compared to server2 and server2 as compared to server1. By convention,
the second set is commented out should you wish to pipe the output to a consumer.
Lastly, the --quiet option simply turns off the verbosity of print statements that normally occur for
communicating progress.
3.1.5.4 Permissions Required
The user must have the SELECT privilege for the databases on both servers.
3.1.5.5 Tips and Tricks
You can change the direction using the --changes-for option. For example, '--changes-for=server1' is
the default direction and '--changes-for=server2' is the reverse. In the second case, the --show-reverse
displays the perspective of server1 commented out.
3.2 General Operations
The tasks described in this section include general tasks such as reporting information about a server and
searching for objects or processes on a server.
3.2.1 How Can I Find Out How Much Space My Data Uses?
When preparing to create a backup or maintenance on a server related to storage, it is often the case we
need to know how much space is used by our data and the logs the server maintains. Fortunately, there is
a utility for that.
3.2.1.1 Objectives
Show the disk space used by the databases and all logs using the mysqldiskusage utility.
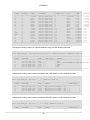
3.2.1.2 Example Execution
shell> sudo env PYTHONPATH=$PYTHONPATH mysqldiskusage \
--server=root:root@localhost --all
# Source on localhost: ... connected.
# Database totals:
+-----------------+--------------+
| db_name
|
total |
+-----------------+--------------+
| oltp2
| 829,669
|
| bvm
| 15,129
|
| db1
| 9,895
|
| db2
| 11,035
|
| employees
| 206,117,692 |
| griots
| 14,415
|
| mysql
| 995,722
|
16
How Can I Find Out How Much Space My Data Uses?
| oltp1
| 177,393
|
| room_temp
| 9,847
|
| sakila
| 791,727
|
| test
| 647,911
|
| test_arduino
| 9,999
|
| welford_kindle | 72,032
|
| world
| 472,785
|
| world_innodb
| 829,669
|
+-----------------+--------------+
Total database disk usage = 210,175,251 bytes or 200.44 MB
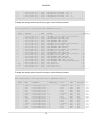
# Log information.
+--------------------+--------------+
| log_name
|
size |
+--------------------+--------------+
| host123.log
| 957,282,265 |
| host123-slow.log
|
123,647 |
| host123.local.err | 321,772,803 |
+--------------------+--------------+
Total size of logs = 1,279,178,715 bytes or 1.19 GB
# Binary log information:
Current binary log file = my_log.000287
+----------------+---------+
| log_file
| size
|
+----------------+---------+
| my_log.000285 | 252208 |
| my_log.000286 | 256
|
| my_log.000287 | 3063
|
| my_log.index
| 48
|
+----------------+---------+
Total size of binary logs = 255,575 bytes or 249.58 KB
# Server is not an active slave - no relay log information.
# InnoDB tablespace information:
+--------------+--------------+
| innodb_file |
size |
+--------------+--------------+
| ib_logfile0 |
5,242,880 |
| ib_logfile1 |
5,242,880 |
| ibdata1
| 815,792,128 |
| ibdata2
| 52,428,800 |
+--------------+--------------+
Total size of InnoDB files = 889,192,448 bytes or 848.00 MB
InnoDB freespace = 635,437,056 bytes or 606.00 MB
3.2.1.3 Discussion
To see all of the logs, we use the --all option which shows all logs and the InnoDB disk usage.
Notice we used elevated privileges to allow for reading of all of the files and databases in the data
directory. In this case, the data directory is owned by the mysql user and a normal user account does not
have read access.
The --all option instructs the utility to list all databases even if they contain no data.
3.2.1.4 Permissions Required
The user must have permissions to read the data directory or use an administrator or super user (sudo)
account as shown in the example.
17
My Server Crashed! I Need to Know the Structure of a Table. How Can I Do That?
3.2.1.5 Tips and Tricks
You can run mysqldiskusage without privileges to read the data directory but in this case you will see an
estimate of the disk usage rather than actual bytes used. You may also not be able to see a list of the logs.
3.2.2 My Server Crashed! I Need to Know the Structure of a Table. How Can I
Do That?
When things go wrong badly enough that your server is down, but you can still access the disks, you may
find yourself faced with a number of complex recovery tasks.
One of those is the need to discover the structure of a particular table or set tables. Perhaps this is
needed for an emergency recovery, a redeployment, or setup for a forensic investigation. Whatever the
case, without a running MySQL server it is not possible to know the structure of a table unless you keep
meticulous notes and/or use some form of high availability (redundancy).
Fortunately, there is a utility for situations like this. The mysqlfrm utility can be used to discover the
structure of a table.
3.2.2.1 Objectives
With a downed or offline server, discover the structure of a table. More specifically, generate the CREATE
TABLE SQL command.
3.2.2.2 Example Execution
shell> sudo env PYTHONPATH=$PYTHONPATH mysqlfrm --basedir=/usr/local/mysql \
--port=3333 --user=<user> /usr/local/mysql/data/welford_kindle/books.frm
#
#
#
#
#
#
#
#
Spawning server with --user=<user>.
Starting the spawned server on port 3333 ... done.
Reading .frm files
Reading the books.frm file.
CREATE statement for /usr/local/mysql/data/kindle/books.frm:
CREATE TABLE `welford_kindle`.`books` (
`ISBN` char(32) NOT NULL PRIMARY KEY,
`title` char(128) DEFAULT NULL,
`purchase_date` date DEFAULT NULL,
`cost` float(10,2) DEFAULT NULL
) ENGINE=MyISAM DEFAULT CHARSET=latin1
#...done.
3.2.2.3 Discussion
For this example, we used three required parameters; the base directory for the offline server (basedir), a
new port to use for the spawned server (port), and a user name to use to run the spawned server (port).
The later is necessary since we must launch the mysqlfrm utility as root (sudo) in order to be able to read
(copy) files from the protected data directory of the host server.
The --port option is always required for running the utility in default mode (it is not needed for diagnostic
mode). You must supply a valid unused port. The utility will check to see if the port is in use and if so will
produce an error.
18
Creating a New User With The Same Privileges as Another User
We use the --basedir option instead of the --server option because we were faced with a situation
where the original server was offline (down). Note that you can use the --basedir option for a running
server if you do not want the utility to connect to the original server in any way.
3.2.2.4 Permissions Required
The permissions for using mysqlfrm will vary and depend entirely on how you use it. If you use the utility
to read .frm files in a protected folder like the example above (in either mode), you must have the ability to
run the server as root.
If you use the utility with a server connection, the user you use to connect must have the ability to read
system variables at a minimum (read access to the mysql database).
3.2.2.5 Tips and Tricks
The utility is designed to work on the host where the .frm files reside. It does not permit connecting to a
remote host to read .frm files.
If something goes wrong during the spawning of the server, use the verbosity option three times (-vvv) to
turn on maximum depth debug statements. This will ensure you will see all of the messages from the start
of the spawned server from bootstrap onward. Look for errors in these statements as to why the spawned
server will not start.
3.2.2.6 Risks
The utility performs a best effort approximation of the CREATE statement when run in diagnostic mode.
As such, if you read a .frm file that uses character sets or collations other than the default and you do not
use a --server option to connect to a server to read the character sets, this can result in miscalculated
column sizes.
For example, suppose your default character set is latin1 which uses 1 byte per character. Lets also
suppose you are attempting to read a .frm file that uses a character set that uses 3 bytes per character.
Furthermore, we have no server to connect. In this case, the column sizes may be off by a factor of 3. A
case in point would be a field such as col_a char(3) would appear in the output of the mysqlfrm utility as
col_a char(9).
To mitigate risks such as this and to produce the most accurate CREATE statement in diagnostic mode,
always use the --server option.
3.2.3 Creating a New User With The Same Privileges as Another User
The MySQL privilege system permits you to create a set of permissions for each user. Sometimes the set
of permissions are complex and may require multiple GRANT statements to effect. Other times, the user
may acquire privileges over time.
Regardless of how it came about, you may find yourself needing to create a new user that has the same
privileges as another user.
3.2.3.1 Objectives
The goal is to create one or more users whose permissions are identical to an original user on a single
server.
Rather than discover what those privileges are with a SHOW GRANTS FOR statement and copy them into
a script, modify it, copy and paste again for each user, etc., etc., we can use a single command to copy
one user to a list of new users. We can even set different passwords for each user as we go.
19
What Options Are Used With Each Utility?
Let's assume we have a user, joe@localhost, who has a long list of permissions. We need to create
a clone of his user account for two new users, sally and john. Each of these users will require a new
password.
3.2.3.2 Example Execution
shell> mysqluserclone --source=root@localhost \
--destination=root@localhost \
joe@localhost sally:secret1@localhost john:secret2@localhost
# Source on localhost: ... connected.
# Destination on localhost: ... connected.
# Cloning 2 users...
# Cloning joe@localhost to user sally:secret1@localhost
# Cloning joe@localhost to user john:secret2@localhost
# ...done.
3.2.3.3 Discussion
In the above example, we see the use of the mysqluserclone utility to clone the joe user to two new
user accounts.
Notice we used the --source option to connect to the original server and --destination for the same
server.
After that, we simply list the user we want to clone and the new users we want to create. In this case we
use the format username:password@host to specify the user account name, password (optional), and
host.
When the utility finishes, you will have two new user accounts that have the same privileges as the original
user, joe@localhost.
3.2.3.4 Permissions Required
On the source server, the user must have the SELECT privilege for the mysql database.
On the destination server, the user must have the global CREATE USER privilege or the INSERT privilege
for the mysql database as well as the GRANT OPTION privilege, and the privileges that the original user
has (you grant a privilege you do not have yourself).
3.2.3.5 Tips and Tricks
You can use --destination option to specify a different server to copy a user account to another server.
Use the --dump option with only the --source option to see all user accounts.
Use the --include-global-privileges option to include GRANT statements that the user@host
combination matches. This is useful for copying user accounts from one server to another where there are
global privileges in effect.
3.2.4 What Options Are Used With Each Utility?
There are many utilities and it is not always easy to remember all of the options and parameters associated
with each. Sometimes we need to run several utilities using nearly the same options. For example,
you may want to run several utilities logging into a particular server. Rather than retype the connection
information each time, you would like to save the option value some way and reuse it.
Fortunately, the mysqluc utility does this and more. It is named the MySQL Users' Console and provides
type completion for options, utility names, and even user-defined variables for working with common option
values. Not only that, it also provides the ability to get help for any utility supported.
20
What Options Are Used With Each Utility?
3.2.4.1 Objectives
Discover what utilities exist and find the options for certain utilities.
Run several utilities with the same server using the type completion feature to make using the suite of
utilities easier.
3.2.4.2 Example Execution
Note
In the example below, keystrokes are represented using square brackets. For
example, [TAB] indicates the tab key was pressed. Similarly, portions in the
commands specific with angle brackets are values you would replace with actual
values. For example, <user> indicates you would place the user's login name here.
shell> mysqluc
Launching console ...
Welcome to the MySQL Utilities Client (mysqluc) version 1.4.2
Copyright (c) 2010, 2014 Oracle and/or its affiliates. All rights reserved.
This is a release of dual licensed MySQL Utilities. For the avoidance of
doubt, this particular copy of the software is released
under the version 2 of the GNU General Public License.
MySQL Utilities is brought to you by Oracle.
Type 'help' for a list of commands or press TAB twice for list of utilities.
mysqluc> help
Command
---------------------help utilities
help <utility>
show errors
clear errors
show last error
help | help commands
exit | quit
set <variable>=<value>
show options
show variables
<ENTER>
<ESCAPE>
<DOWN>
<UP>
<TAB>
<TAB><TAB>
Description
--------------------------------------------------Display list of all utilities supported.
Display help for a specific utility.
Display errors captured during the execution of the
utilities.
clear captured errors.
Display the last error captured during the
execution of the utilities
Show this list.
Exit the console.
Store a variable for recall in commands.
Display list of options specified by the user on
launch.
Display list of variables.
Press ENTER to execute command.
Press ESCAPE to clear the command entry.
Press DOWN to retrieve the previous command.
Press UP to retrieve the next command in history.
Press TAB for type completion of utility, option,
or variable names.
Press TAB twice for list of matching type
completion (context sensitive).
mysqluc> help utilities
Utility
Description
---------------- --------------------------------------------------------mysqlauditadmin
audit log maintenance utility
mysqlauditgrep
audit log search utility
mysqldbcompare
compare databases for consistency
mysqldbcopy
copy databases from one server to another
mysqldbexport
export metadata and data from databases
mysqldbimport
import metadata and data from files
mysqldiff
compare object definitions among objects where the
21
What Options Are Used With Each Utility?
mysqldiskusage
mysqlfailover
mysqlfrm
mysqlindexcheck
mysqlmetagrep
mysqlprocgrep
mysqlreplicate
mysqlrpladmin
mysqlrplcheck
mysqlrplms
mysqlrplshow
mysqlrplsync
mysqlserverclone
mysqlserverinfo
mysqluserclone
difference is how db1.obj1 differs from db2.obj2
show disk usage for databases
automatic replication health monitoring and failover
show CREATE TABLE from .frm files
check for duplicate or redundant indexes
search metadata
search process information
establish replication with a master
administration utility for MySQL replication
check replication
establish multi-source replication
show slaves attached to a master
replication synchronization checker utility
start another instance of a running server
show server information
clone a MySQL user account to one or more new users
mysqluc> help mysqldb[TAB][TAB]
Utility
Description
-------------- ----------------------------------------------------------mysqldbcompare compare databases for consistency
mysqldbcopy
copy databases from one server to another
mysqldbexport
export metadata and data from databases
mysqldbimport
import metadata and data from files
mysqluc> mysqlrplshow --m[TAB][TAB]
Option
----------------------master=MASTER
--max-depth=MAX_DEPTH
Description
---------------------------------------------------connection information for master server in the
form: <user>[:<password>]@<host>[:<port>][:<socket>]
or <login-path>[:<port>][:<socket>].
limit the traversal to this depth. Valid only with
the --recurse option. Valid values are non-negative
integers.
mysqluc> mysqlrplshow --mast[TAB]er=<user>:<password>@localhost:13001
The console has detected that the utility 'mysqlrplshow' ended with an error code.
You can get more information about the error by running the console command 'show last error'.
mysqluc> show last error
Execution of utility: mysqlrplshow --master=<user>:<password>@localhost:13001
returned errorcode: 2 with error message:
Usage: mysqlrplshow.py --master=root@localhost:3306
mysqlrplshow.py: error: The --discover-slaves-login is required to test slave connectivity.
mysqluc> mysqlrplshow --master=<user>:<password>@localhost:13001 \
--discover-slaves-login=<user>:<password>
# master on localhost: ... connected.
# Finding slaves for master: localhost:13001
# Replication Topology Graph
localhost:13001 (MASTER)
|
+--- localhost:13002 - (SLAVE)
|
+--- localhost:13003 - (SLAVE)
|
+--- localhost:13004 - (SLAVE)
|
+--- localhost:13005 - (SLAVE)
22
I've Got Too Many Indexes! How Do I Know Which Ones to Drop?
mysqluc>
3.2.4.3 Discussion
There is a lot going on here in this example! Let's look through the command entries as they occur in the
text.
The first command, mysqluc, starts the users' console. Once the console starts, you will see a welcome
banner followed by a simple prompt, mysqluc>. No additional options or parameters are necessary.
However, it should be noted that you can pass commands to the console to execute on start. For a
complete list of options, see MySQL Users' Console manual page.
The next command, help, shows the help for the users' console itself. As you can see, there are a number
of options available. You can set user defined variables, discover the help for other utilities, display the
latest error, and see the options used to start the console.
The help utilities command shows you a list of the available utilities and a short description of each.
Next, we decide we want to get help for one of the database utilities but we do not remember the name.
We know it starts with mysqldb but we are not sure of the rest. In this case, if we type mysqldb then hit
TAB twice, the users' console will show us a list of all of the utilities that begin with mysqldb.
Now let's say we want to see a graph of our replication topology but we are not sure what the option for
specifying the master. In this case, we type the command to launch the mysqlrplshow utility and type
the start of the option, '--m', then press TAB twice. What we see is there are two options that match that
prefix. Notice we also see a short description (help) for each. This is a real time saving feature for the
users' console.
Notice in the next segment we do not have to type the entire name of the option. In this case we typed '-mast[TAB]' which the users' console completed with '--master='. This is tab completion for option names.
Notice the result of the command we entered, mysqlrplshow '-master=<user>:<password>@localhost:13001'. There was an error here. We can see the error with the
show errors command. We see in the error we failed to provide any connection information for the slaves.
Once we correct that omission, the last command shows how the users' console executes a utility and
displays the results in the same stream as the console - much like the mysql client command-line tool.
3.2.4.4 Permissions Required
There are no special permissions required to run mysqluc however, you must have the necessary
privileges to execute the desired utilities.
3.2.5 I've Got Too Many Indexes! How Do I Know Which Ones to Drop?
MySQL allows its users to create several indexes that might be the same (duplicate indexes) or partially
similar (redundant indexes) in its structure. Although duplicate indexes have no advantages, there are
some cases where redundant indexes might be helpful. However, both have disadvantages. Duplicate and
redundant indexes slow down update and insert operations. As a result it is usually a good idea to find and
remove them.
Doing this manually would be a time consuming task, especially for big databases and that is why there is
a utility to automate this type of task: mysqlindexcheck.
23
I've Got Too Many Indexes! How Do I Know Which Ones to Drop?
3.2.5.1 Objectives
Our goal is to use the mysqlindexcheck utility to help us find duplicate and redundant indexes. For that
we are going to use the following table as an example:
CREATE TABLE `test_db`.`indexcheck_test`(
`emp_id` INT(11) NOT NULL,
`fiscal_number` int(11) NOT NULL,
`name` VARCHAR(50) NOT NULL,
`surname` VARCHAR (50) NOT NULL,
`job_title` VARCHAR (20),
`hire_date` DATE default NULL,
`birthday` DATE default NULL,
PRIMARY KEY (`emp_id`),
KEY `idx_fnumber`(`fiscal_number`),
UNIQUE KEY `idx_unifnumber` (`fiscal_number`),
UNIQUE KEY `idx_uemp_id` (`emp_id`),
KEY `idx_full_name` (`name`, `surname`),
KEY `idx_full_name_dup` (`name`, `surname`),
KEY `idx_name` (`name`),
KEY `idx_surname` (`surname`),
KEY `idx_reverse_name` (`surname`,`name`),
KEY `ìdx_id_name` (`emp_id`, `name`),
KEY `idx_id_hdate` (`emp_id`, `hire_date`),
KEY `idx_id_bday` (`emp_id`, `birthday`)
) ENGINE=InnoDB DEFAULT CHARSET=utf8
3.2.5.2 Example Execution
shell> mysqlindexcheck --server=test_user@localhost:13010 test_db.indexcheck_test
# Source on localhost: ... connected.
# The following indexes are duplicates or redundant for table test_db.indexcheck_test:
#
CREATE INDEX `idx_uemp_id` ON `test_db`.`indexcheck_test` (`emp_id`) USING BTREE
#
may be redundant or duplicate of:
ALTER TABLE `test_db`.`indexcheck_test` ADD PRIMARY KEY (`emp_id`)
#
CREATE INDEX `idx_fnumber` ON `test_db`.`indexcheck_test` (`fiscal_number`) USING BTREE
#
may be redundant or duplicate of:
CREATE INDEX `idx_unifnumber` ON `test_db`.`indexcheck_test` (`fiscal_number`) USING BTREE
#
CREATE INDEX `idx_full_name_dup` ON `test_db`.`indexcheck_test` (`name`, `surname`) USING BTREE
#
may be redundant or duplicate of:
CREATE INDEX `idx_full_name` ON `test_db`.`indexcheck_test` (`name`, `surname`) USING BTREE
#
CREATE INDEX `idx_name` ON `test_db`.`indexcheck_test` (`name`) USING BTREE
#
may be redundant or duplicate of:
CREATE INDEX `idx_full_name` ON `test_db`.`indexcheck_test` (`name`, `surname`) USING BTREE
#
CREATE INDEX `idx_surname` ON `test_db`.`indexcheck_test` (`surname`) USING BTREE
#
may be redundant or duplicate of:
CREATE INDEX `idx_reverse_name` ON `test_db`.`indexcheck_test` (`surname`, `name`) USING BTREE
#
ALTER TABLE `test_db`.`indexcheck_test` ADD PRIMARY KEY (`emp_id`)
#
may be redundant or duplicate of:
CREATE INDEX `ìdx_id_name` ON `test_db`.`indexcheck_test` (`emp_id`, `name`) USING BTREE
#
CREATE INDEX `idx_id_hdate` ON `test_db`.`indexcheck_test` (`emp_id`, `hire_date`) USING BTREE
#
may be redundant or duplicate of:
CREATE INDEX `ìdx_id_name` ON `test_db`.`indexcheck_test` (`emp_id`, `name`) USING BTREE
#
CREATE INDEX `idx_id_bday` ON `test_db`.`indexcheck_test` (`emp_id`, `birthday`) USING BTREE
#
may be redundant or duplicate of:
24
I Need to Find an Object on My Server But All I Have is a Partial
Name. How Do I Find All Objects with That Name Prefix?
CREATE INDEX `ìdx_id_name` ON `test_db`.`indexcheck_test` (`emp_id`, `name`) USING BTREE
# The following indexes for table test_db.indexcheck_test contain the clustered index and
# might be redundant:
#
CREATE INDEX `idx_uemp_id` ON `test_db`.`indexcheck_test` (`emp_id`) USING BTREE
#
CREATE INDEX `ìdx_id_name` ON `test_db`.`indexcheck_test` (`emp_id`, `name`) USING BTREE
#
CREATE INDEX `idx_id_hdate` ON `test_db`.`indexcheck_test` (`emp_id`, `hire_date`) USING BTREE
#
CREATE INDEX `idx_id_bday` ON `test_db`.`indexcheck_test` (`emp_id`, `birthday`) USING BTREE
3.2.5.3 Discussion
As we can see, the utility first points out that neither the idx_uemp_id index nor the idx_fnumber are
necessary and it points out why. The first, idx_uemp_id, is redundant because the primary key already
ensures that emp_id values have to be unique. As for idx_fnumber, it is also redundant because
of idx_ufnumber, a UNIQUE type index which also works as a regular index. Then it points out that
idx_full_name_dup is also not necessary. In this case it is a duplicate of the idx_full_name index since it
contains the exact same columns on the same order.
Notice that it also indicates that idx_name, idx_surname and even the PRIMARY INDEX on emp_id might
be redundant. This happens because we are dealing with BTREE type indexes and for this type of indexes
an index X is redundant to an index Y if and only if the first n columns in X also appear in Y.
Given that we are using InnoDB engine, it also warns us that `idx_uemp_id`, `ìdx_id_name`, `idx_id_hdate`
and `idx_id_bday` might not be needed. This happens because, in InnoDB, secondary indexes contain the
primary key columns for the row that are not in the secondary index.
It must be noted however that these are just indications, they must not be followed blindly because
redundant indexes can be useful depending on how you use (query) your tables.
3.2.5.4 Permissions Required
Regarding the privileges needed to run this utility, the test_user needs SELECT privilege on the mysql
database as well as for the databases which tables are being checked.
3.2.5.5 Tips and Tricks
You can use the -d option to generate the SQL drop statements needed to remove the indexes.
The --stats option can be used alone or together with either --best or --worst to show statistics
about the indexes.
Use the --show-indexes option to show each table together with its indexes.
3.2.6 I Need to Find an Object on My Server But All I Have is a Partial Name.
How Do I Find All Objects with That Name Prefix?
One of the challenges for database administrators who manage servers with thousands of objects is the
task of finding an object by name. Sometimes all you have to go on is the name of a table or perhaps an
obscure reference to a partial name. This can come about through a diagnosis of a problem connection,
application, or via an incomplete description from a defect report.
It is also possible you need to simply check to see if certain things exist. For example, suppose among
your databases are parts or inventory data and you want to check to see if there are any functions or
25
I Need to Find an Object on My Server But All I Have is a Partial
Name. How Do I Find All Objects with That Name Prefix?
procedures that operate on a column named 'cost'. Moreover, you want to see anything related that has
'cost' as part of its name.
Whatever the case, it would be a big time saver if you could search through all of the database objects and
see a list of the objects whose name matches a prefix (or pattern). Fortunately, the mysqlmetagrep utility
can get this done.
3.2.6.1 Objectives
Find all objects whose name begins with a known prefix. More specifically, find any mention of the word
'cost'.
3.2.6.2 Example Execution
shell> mysqlmetagrep --server=root:root@localhost --body --pattern='%cost%'
+------------------------+--------------+--------------+----------+-------------+------------------+
| Connection
| Object Type | Object Name | Database | Field Type | Matches
|
+------------------------+--------------+--------------+----------+-------------+------------------+
| root:*@localhost:3306 | FUNCTION
| adjust_cost | griots
| ROUTINE
| adjust_cost
|
| root:*@localhost:3306 | TABLE
| supplies
| griots
| COLUMN
| cost
|
| root:*@localhost:3306 | TABLE
| film
| sakila
| COLUMN
| replacement_cost |
+------------------------+--------------+--------------+-----------------+-------------+-------------+
shell> mysql -uroot -proot -e "SHOW CREATE FUNCTION griots.adjust_cost \G"
*************************** 1. row ***************************
Function: adjust_cost
sql_mode:
Create Function: CREATE DEFINER=`root`@`localhost` FUNCTION `adjust_cost`(cost double)
RETURNS double DETERMINISTIC
return cost * 1.10
character_set_client: latin1
collation_connection: latin1_swedish_ci
Database Collation: latin1_swedish_ci
3.2.6.3 Discussion
In this example, we see the use of the database pattern '%cost%' to find objects that have 'cost' anywhere
in their name. We also see the use of the --body option to instruct the utility to look inside procedures and
functions. This can be very handy to locate routines that manipulate data as you can see.
Notice once we found a routine that had 'cost' mentioned, we can examine its body via the SHOW
CREATE FUNCTION command to see just how it is using the column 'cost'. In this case, we see someone
has written a function to adjust the cost by 10%'.
Therefore, not only can you find objects that have anything named 'cost', you can also discover any hidden
logic that may operate on something named 'cost'.
3.2.6.4 Permissions Required
The user must have the SELECT privilege on the mysql database.
3.2.6.5 Tips and Tricks
If you are familiar with using regular expressions, you can use the --regexp option to use regular
expressions instead of database patterns. For example, the regular expression for the search above would
be --pattern='^.*cost.*' --basic-regex.
26
How Can I Run a Process Every Night To Kill Certain Connections?
3.3 How Can I Run a Process Every Night To Kill Certain
Connections?
Some database administrators use nightly routines to perform maintenance on their databases or servers.
Sometimes these routines can be blocked by long running queries or applications that hang onto locks for
longer than expected.
Naturally, priority is given to the application and maintenance routines are often cancelled rather than
interfere with an application. Should it happen that you subscribe to this notion and you have a routine
that is still being blocked or for some reason hasn't completed by a certain time, you need a quick way to
generate an event to kill the connection involved. This is where the mysqlprocgrep utility can help.
3.3.1 Objectives
The objective is to generate an event that will kill all connections based on a user login ('msaladin') but only
if that connection is trying to run a custom administration script named 'my_admin_thingy'.
3.3.2 Example Execution
shell> mysqlprocgrep --sql-body \
--match-command='my_admin_thingy%' --match-user='msaladin%'
DECLARE kill_done INT;
DECLARE kill_cursor CURSOR FOR
SELECT
Id, User, Host, Db, Command, Time, State, Info
FROM
INFORMATION_SCHEMA.PROCESSLIST
WHERE
COMMAND LIKE 'my_admin_thingy%'
AND
USER LIKE 'msaladin%'
OPEN kill_cursor;
BEGIN
DECLARE id BIGINT;
DECLARE EXIT HANDLER FOR NOT FOUND SET kill_done = 1;
kill_loop: LOOP
FETCH kill_cursor INTO id;
KILL CONNECTION id;
END LOOP kill_loop;
END;
CLOSE kill_cursor;
--kill-connection
3.3.3 Discussion
Notice in the example above, we did not connect to any server to get this information. That is one of the
great things about this utility - you can generate all manner of SQL commands for finding processes and try
them out on a test system before incorporating them into your events, triggers, and routines.
We specified the user with the --match-user option using a wildcard in case the user is logged in from
a different system. We also specified the name of the maintenance routine in the same manner in case it
gets renamed with a version number or some such.
The output of this utility then is the SQL statement we need to use to find and kill the connections that meet
these criteria. Armed with this, we can make a procedure we can call from an event and execute the SQL
at a precise time every day.
27
Permissions Required
3.3.4 Permissions Required
The user must have the SELECT permission on the mysql database.
3.3.5 Tips and Tricks
If you are familiar with using regular expressions, you can use the --regexp option to use regular
expressions instead of database patterns.
3.4 High Availability Operations
The tasks described in this section include those for replication and general to specific high availability
tasks such as automatic failover.
3.4.1 How Can I Use Replication?
MySQL has built-in support for several types of replication. Replication is usually employed with the
purpose of increasing the performance and/or the fault-tolerance of a service. However, setting up
replication can be a somewhat complicated and error prone process. But fear not, MySQL Utilities has
tools that can help simplify and even automate several replication related tasks.
Lets see a possible scenario where replication is used to obtain scalability, i.e. to increase the performance
of a service. Lets imagine an online shopping service. The shop started out small so a single server was
enough to handle all the requests, however now it has become quite popular and as a result that single
server is no longer able to handle all the requests. Being an online store, most of the operations are read
operations (checking existing products, reviews, stock availability, etc).
3.4.1.1 Objectives
Our goal is to use replication in order to improve the throughput of the service by adding more servers
which will become replicas of the already existing server. These replicas will allow scaling out of the
service by taking up all the read requests, leaving the old server (now called the master) only in charge of
the writes. Rather than doing everything "by hand" with the mysql command line, we are going to setup this
replication scenario using a single script, mysqlreplicate which will do most of the hard work for us. We
then check the result using the mysqlrpladmin utility.
Lets assume the existing server, Server1, is running on port 13001 on the local machine with IP
192.168.1.1 and that we want to add 2 new servers, Server2 running on 192.168.1.2:13001 and Server3
running on 192.168.1.3:3306.
3.4.1.2 Example Execution
shell> mysqlreplicate [email protected]:13001 \
[email protected]:13001 --rpl-user=repl:slavepass -b
# master on 192.168.1.1: ... connected.
# slave on 192.168.1.2: ... connected.
# Checking for binary logging on master...
# Setting up replication...
# ...done.
shell> mysqlreplicate [email protected]:13001 \
[email protected]:3306 --rpl-user=repl:slavepass -b
# master on 192.168.1.1: ... connected.
# slave on 192.168.1.3: ... connected.
# Checking for binary logging on master...
# Setting up replication...
# ...done.
28
How Can I Use Replication?
shell> mysqlrplcheck [email protected]:13001 \
[email protected]:13001
# master on 192.168.1.1: ... connected.
# slave on 192.168.1.2: ... connected.
Test Description
Status
--------------------------------------------------------------------------Checking for binary logging on master
[pass]
Are there binlog exceptions?
[pass]
Replication user exists?
[pass]
Checking server_id values
[pass]
Checking server_uuid values
[pass]
Is slave connected to master?
[pass]
Check master information file
[pass]
Checking InnoDB compatibility
[pass]
Checking storage engines compatibility
[pass]
Checking lower_case_table_names settings
[pass]
Checking slave delay (seconds behind master)
[FAIL]
Slave is NNN seconds behind master.
# ...done.
shell> mysqlrplcheck [email protected]:13001 \
[email protected]:3306
# master on 192.168.1.1: ... connected.
# slave on 192.168.1.3: ... connected.
Test Description
Status
--------------------------------------------------------------------------Checking for binary logging on master
[pass]
Are there binlog exceptions?
[pass]
Replication user exists?
[pass]
Checking server_id values
[pass]
Checking server_uuid values
[pass]
Is slave connected to master?
[pass]
Check master information file
[pass]
Checking InnoDB compatibility
[pass]
Checking storage engines compatibility
[pass]
Checking lower_case_table_names settings
[pass]
Checking slave delay (seconds behind master)
[FAIL]
Slave is N seconds behind master.
# ...done.
3.4.1.3 Discussion
In the above example we made use of the mysqlreplicate utility to setup a two layer replication
topology, where the existing server is now the master for the two new servers which will act as slaves.
Notice how we used the address of the old existing server in the --master option and in the --slave
option we used the addresses of the new servers. Also notice the use of the -b flag, this makes replication
start from the first event recorded in the master's binary log.
Also notice how we used the mysqlrplcheck utility to check the health of the replication. In this case,
the failing test "Check slave delay" is expected, since the slaves are catching up with the master. When
the slaves have read and applied all the transactions from the master's binary log the "Check slave delay"
test will pass. Also, in case the slave wasn't properly configured and pointing to the master specified the "Is
slave connect to master" test would notify us of that with a FAIL or WARN status.
3.4.1.4 Permissions Required
As for the required privileges to run these utilities:
29
How Do I Add New Servers to My Topology and Change Master Role
The m_account user needs the following privileges for the mysqlreplicate: SELECT and INSERT
privileges on mysql database, REPLICATION SLAVE, REPLICATION CLIENT and GRANT OPTION.
As for the slave_acc users, they need the SUPER privilege. The repl user, used as the argument for the
--rpl-user option, is either created automatically or if it exists, it needs the REPLICATION SLAVE
privilege.
Also, when using GTIDs, the slave_acc users must also have SELECT privilege over the mysql database
in order to run the mysqlrplcheck utility successfully.
3.4.1.5 Tips and Tricks
In the mysqlreplicate utility we could have also used the --test-db option which creates a dummy
database to test the replication setup. However, the mysqlrplcheck provides more detailed information
in that regard.
As previously stated, the -b option tells the utility to start replication from the first event recorded in the
master's binary log. Omitting this flag, in turn, makes the slaves replicate only what is stored in the master's
binary log from the present moment onward.
Furthermore, using the --master-log-file and --master-log-pos options it is possible to specify
respectively the master log file and the master log position from which the slave will start its replication
process.
The -p flag can be used to ensure that the replication setup is only executed in case the storage engines
match in both the master and the slave.
Regarding the mysqlrplcheck utility, we can use the -s option to check the output of the show slave
status command. This can be useful for instance to check what might be causing the "Is slave connected"
test to fail. We can also use the --master-log-file option to specify the name of the master
information file to read.
Lastly, we can use the --verbose option in order to get more information about what is happening "under
the hood".
3.4.2 How Do I Add New Servers to My Topology and Change Master Role
We will examine a scenario similar to the previous one where we want to make one of the two new servers
added the master server (perhaps because it has better specs and is faster).
3.4.2.1 Objectives
Our goal in this example it create replication configuration with 3 servers, two new ones and an existing
one, and we want to replicate all the information, but make one of the new servers the master server.
Like the previous example, lets assume that the existing server, Server1, is running on port 13001 on the
local machine with IP 192.168.1.1 that the two new machines with mysql server instances are Server2
running on 192.168.1.2:13001 and Server3 running on 192.168.1.3:3306. We want to make Server2 the
new master.
3.4.2.2 Example Execution
shell> mysqlreplicate [email protected]:13001 \
[email protected]:13001 --rpl-user=repl:slavepass -b
# master on 192.168.1.1: ... connected.
# slave on 192.168.1.2: ... connected.
# Checking for binary logging on master...
# Setting up replication...
# ...done.
30
How Do I Add New Servers to My Topology and Change Master Role
shell> mysqlreplicate [email protected]:13001 \
[email protected]:3306 --rpl-user=repl:slavepass -b
# master on 192.168.1.1: ... connected.
# slave on 192.168.1.3: ... connected.
# Checking for binary logging on master...
# Setting up replication...
# ...done.
shell> mysqlrpladmin [email protected]:13001 \
[email protected]:13001,[email protected]:3306 health
# Checking privileges.
#
# Replication Topology Health:
+--------------+--------+---------+--------+------------+------------------------------+
| host
| port
| role
| state | gtid_mode | health
|
+--------------+--------+---------+--------+------------+------------------------------+
| 192.168.1.1 | 13001 | MASTER | UP
| ON
| OK
|
| 192.168.1.2 | 13001 | SLAVE
| UP
| ON
| Slave delay is NNN seconds
|
| 192.168.1.3 | 3306
| SLAVE
| UP
| ON
| Slave delay is NNN seconds
|
+--------------+--------+---------+--------+------------+------------------------------+
# ...done.
shell> mysqlrpladmin [email protected]:13001 \
[email protected]:13001,[email protected]:3306 health
# Checking privileges.
#
# Replication Topology Health:
+--------------+--------+---------+--------+------------+---------+
| host
| port
| role
| state | gtid_mode | health |
+--------------+--------+---------+--------+------------+---------+
| 192.168.1.1 | 13001 | MASTER | UP
| ON
| OK
|
| 192.168.1.2 | 13001 | SLAVE
| UP
| ON
| OK
|
| 192.168.1.3 | 3306
| SLAVE
| UP
| ON
| OK
|
+--------------+--------+---------+--------+------------+---------+
# ...done.
shell> mysqlrpladmin [email protected]:13001 \
[email protected]:13001,[email protected]:3306 \
--new-master=slave_acc1@localhost:13002 --demote-master switchover
# Checking privileges.
# Performing switchover from master at 192.168.1.1:13001 to slave at 192.168.1.2:13001.
# Checking candidate slave prerequisites.
# Checking slaves configuration to master.
# Waiting for slaves to catch up to old master.
# Stopping slaves.
# Performing STOP on all slaves.
# Demoting old master to be a slave to the new master.
# Switching slaves to new master.
# Starting all slaves.
# Performing START on all slaves.
# Checking slaves for errors.
# Switchover complete.
#
# Replication Topology Health:
+--------------+--------+---------+--------+------------+---------+
| host
| port
| role
| state | gtid_mode | health |
+--------------+--------+---------+--------+------------+---------+
| 192.168.1.2 | 13001 | MASTER | UP
| ON
| OK
|
| 192.168.1.1 | 13001 | SLAVE
| UP
| ON
| OK
|
| 192.168.1.3 | 3306
| SLAVE
| UP
| ON
| OK
|
+--------------+--------+---------+--------+------------+---------+
31
Setup Automatic Failover
3.4.2.3 Discussion
As with our previous scenario we used the mysqlreplicate utility to set up a replication topology
between the existing server and the two new servers. Notice the use of the -b flag which this replication
start from the first event recorded in the master's binary log.
After setting our replication topology we made use of the mysqlrpladmin utility specifying both the
master and slave servers and using the health command to check the status of the replication. Since our
master server had lots of information, it is normal for the new slaves to take some time to catch up, thus
the slave delay message on the health column of the output.
However, if all goes well, after some time the slaves will eventually catch up, and when that happens, the
health column will show an OK status.
When this happened, we used the mysqlrpladmin utility yet again, this time with switchover command.
Using the --new-master option we specify the server that will become the new master. We can not forget
the --demote-master option which turns the old master into a slave, otherwise it would still behave as a
master just without any slaves, Server3 will become a slave of Server2.
After the switchover, Server2 becomes the master server for both Server1 and Server3 which are now the
slaves.
3.4.2.4 Permissions Required
The m_account user needs the following privileges for the mysqlreplicate: SELECT and INSERT
privileges on mysql database, REPLICATION SLAVE, REPLICATION CLIENT and GRANT OPTION.
As for the slave_acc users, they need the SUPER privilege. The repl user, used as the argument for the
--rpl-user option, is either created automatically or if it exists, it needs the REPLICATION SLAVE
privilege.
To run the mysqlrpladmin utility with the health command, the m_account used on the master needs an
extra SUPER privilege.
As for the switchover command all the users need the following privileges: SUPER, GRANT OPTION,
SELECT, RELOAD, DROP, CREATE and REPLICATION SLAVE
3.4.2.5 Tips and Tricks
We can use the --discover-slaves-login option for mysqlrpladmin in order to detect the slaves
automatically instead of manually specifying the slaves.
The mysqlrpladmin utility allows users to specify a script to execute before and after the failover and
switchover operations using the --exec-before and --exec-after options respectively. Note that the
script specified using the exec-after option only runs in case the switchover/failover executes successfully.
We can use the mysqlrpladmin utility to start and stop all the slaves with the start/stop commands.
Using the stop command only stops servers that are actually slaves of the specified master thus preventing
us from stopping unwanted servers.
3.4.3 Setup Automatic Failover
Once your replication topology is setup, it is important to consider the possible occurrences of failures in
order to maintain the high availability level of your system. Several failures independently from their cause
(network connection issue, hard drive crash, cosmic lightning, etc.) can stop the replication process by
making the master no longer accessible by its slaves.
In this type of situation, it is desirable to promote one of the slaves to master while the problem with the old
master is being solve as it can take some considerable time. It will be even better to have an application
32
Setup Automatic Failover
to monitor the replicate topology and automatically perform failover, minimizing downtime and keeping
replication running.
3.4.3.1 Objectives
The goal is to start the mysqlfailover utility to monitor a replication topology and perform failover
automatically when required.
When the current master fails, manually promoting a slave to the new master can be a very tedious and
error prone task, as all the remaining slave have to point out to the new master and the new master needs
to catch up with all the slaves to make sure that no transactions is lost.
Fortunately, the mysqlfailover utility is capable of executing this full process automatically and in a
optimized way.
Let's assume that a replication topology with one master (server1:3311) and four slaves (server2:3312,
server3:3313, server4:3314, server:3315) was previously setup.
3.4.3.2 Example Execution
Start the mysqlfailover utility (in console mode - default):
shell> mysqlfailover --master=root@server1:3311 \
--slaves=root@server2:3312,root@server3:3313,root@server4:3314,root@server5:3315 \
--log=log.txt --rpl-user=rpl:rpl
NOTE: Log file 'log.txt' does not exist. Will be created.
# Checking privileges.
MySQL Replication Failover Utility
Failover Mode = auto
Next Interval = Fri Jul 26 10:17:52 2013
Master Information
-----------------Binary Log File
Position
master-bin.000001 151
Binlog_Do_DB
Binlog_Ignore_DB
GTID Executed Set
None
Replication Health Status
+----------+-------+---------+--------+------------+---------+
| host
| port | role
| state | gtid_mode | health |
+----------+-------+---------+--------+------------+---------+
| server1 | 3311 | MASTER | UP
| ON
| OK
|
| server2 | 3312 | SLAVE
| UP
| ON
| OK
|
| server3 | 3313 | SLAVE
| UP
| ON
| OK
|
| server4 | 3314 | SLAVE
| UP
| ON
| OK
|
| server5 | 3315 | SLAVE
| UP
| ON
| OK
|
+----------+-------+---------+--------+------------+---------+
Q-quit R-refresh H-health G-GTID Lists U-UUIDs L-log entries
Now imagine that the master crashed or is no longer reachable, then after a predefined time interval (by
default 15 seconds) we can observe that the failover process will start automatically:
Failover starting in 'auto' mode...
# Candidate slave server2:3312 will become the new master.
# Checking slaves status (before failover).
# Preparing candidate for failover.
# Creating replication user if it does not exist.
# Stopping slaves.
# Performing STOP on all slaves.
33
Setup Automatic Failover
#
#
#
#
#
#
Switching slaves to new master.
Disconnecting new master as slave.
Starting slaves.
Performing START on all slaves.
Checking slaves for errors.
Failover complete.
Failover console will restart in 5 seconds.
[...]
MySQL Replication Failover Utility
Failover Mode = auto
Next Interval = Fri Jul 26 10:25:17 2013
Master Information
-----------------Binary Log File
Position
master-bin.000001 151
Binlog_Do_DB
Binlog_Ignore_DB
GTID Executed Set
None
Replication Health Status
+----------+-------+---------+--------+------------+---------+
| host
| port | role
| state | gtid_mode | health |
+----------+-------+---------+--------+------------+---------+
| server2 | 3312 | MASTER | UP
| ON
| OK
|
| server3 | 3313 | SLAVE
| UP
| ON
| OK
|
| server4 | 3314 | SLAVE
| UP
| ON
| OK
|
| server5 | 3315 | SLAVE
| UP
| ON
| OK
|
+----------+-------+---------+--------+------------+---------+
Q-quit R-refresh H-health G-GTID Lists U-UUIDs L-log entries
3.4.3.3 Discussion
The above example illustrates how to start the mysqlfailover utility to check the health of the replication
topology and shows the displayed output when failover occurs.
Basically, we simply need to specify the master's connection with the --master option, the list of slaves
with the --slaves option and the replication user (login and password) using the --rpl-user options. In
alternative to the --slaves options, one can use the --discover-slaves-login specifying a user
and password (or login-path) to connect to the slaves and the utility will attempt to discover all the slaves
connected with the master using the specified login. For the above example, '--discover-slaves-login=root'
could be used.
The --discover-slaves-login can be very handy especially if there is a huge number of slaves in
the topology, but bear in mind that the explicit specification of slaves is safer and that discovery can fail to
find some servers. In particular, it is important to note that in order for slaves to be discovered, they must
be started with the '--report-host' and '--report-port' options with a appropriate values and they must be
correctly connected to the master (I/O thread running) otherwise discovery will fail.
It is also recommended to use the --log options to specify a file to register all events, warning and errors.
This is useful to keep a record of what happened, for example to later determine when failover occurred
and if the process occurred without any errors.
An important matter to discuss is the order in which the server are select as candidates for failover. No
distinction is made in terms of the number of transaction to select the most up-to-date slave to become
the new master. The reason is very simple, this criteria is non-deterministic as many circumstances (i.e.,
network load, server maintenance operations) can temporarily influence the performance of a slave and
could lead to an incorrect selection of the most appropriate candidate. For example, the slave with the
34
Restore the Previous Master After Failover
best hardware should be in the long run the most appropriate candidate to become the new master, but
for some unanticipated reason it might actually had less transactions than other servers when the master
crashed. Therefore, a more deterministic criteria based on the order in which the servers are specified
is used, allowing the user to control the order in which the candidates are selected. The first server that
will meet the required election criteria, consisting on simple sanity checks (server reachable and running
with the required options: GTID ON and binary logging enabled), will be chosen. More specifically, the
section of the new master will follow this order: first, sequentially check the list of servers specified by the
--candidates option, then the servers listed in the --slaves option, finally check any discovered slave
in an unordered way.
3.4.3.4 Permissions Required
The user must have permissions to configure replication.
3.4.3.5 Tips and Tricks
In the above example the mysqlfailover utility was started in the default console mode, but it can also
be executed as a daemon. For that purpose, the --daemon option needs to be used, more specifically
simply add '--daemon=start' to the command line. When mysqlfailover is executed as a daemon,
no output is displayed and all the information is logged to file specified for the --log option which is
mandatory in this case. To stop the execution of the mysqlfailover daemon simply invoke the utility
using the option '--daemon=stop'. No other options is required to stop the daemon, unless a specific pidfile
(to store the process PID) was specified with the --pidfile option to start the daemon and in this case
the same option value is also required to stop it.
Another useful feature is the possibility to run external script along the execution of the utility to perform
customized actions. The following options can be used to execute different scripts at distinct moments
of the mysqlfailover execution: --exec-fail-check to specify a script to run periodically at each
predefined interval instead of the default check (i.e., master is reachable and alive) to detect the need
to failover, --exec-before to specify a script to execute before starting failover, --exec-after to
execute a script at the end of failover process, --exec-post-failover to run a script after completing
the failover process (before displaying the health report).
3.4.4 Restore the Previous Master After Failover
After a successful failover it is sometime required to restore the initial topology and promote the crashed
server to master again (or even a new server with distinctive hardware characteristics). Sometimes failover
can be triggered by simple network issue (not affecting the health of the initial master server) and after
being resolved it might be desirable to put the old master back in the replication topology.
3.4.4.1 Objectives
The goal of this task is simply to replace the new master of a replication topology with the previous one
that might have been demoted as result of successful automatic failover execution due to some failure. It is
assumed that the server to be restored as master is healthy and any previous issue (that triggered failover)
have been resolved.
Let's consider the previous topology after failover, now with a new master (server2:3312) and three slaves
(server3:3313, server4:3314, server:3315) and that we want to promote the initial server (server1:3311) to
master again.
Perform this task manually can be delicate as one wrong or missing step can lead to errors and incorrect
replication topology or even to the lost of some transaction. Once more MySQL Utilities can provide a
precious assistance to perform this task, in this case requiring the user to follow three simple steps to
restore the initial topology as showed bellow.
35
Restore the Previous Master After Failover
3.4.4.2 Example Execution
There are several steps involved in solving this problem. We walk through each in turn.
You must first stop running the mysqlfailover utility instance and start the (old) master to be restored,
i.e. server1:3311.
Next, set the old master (server1:3311) as a slave of the current new master (server2:3312):
shell> mysqlreplicate --master=root@server2:3312 --slave=root@server1:3311 -rpl-user=rpl:rpl
# master on localhost: ... connected.
# slave on localhost: ... connected.
# Checking for binary logging on master...
# Setting up replication...
# ...done.
Next, switchover to the previous master to restore the initial replication topology:
shell> mysqlrpladmin --master=root@server2:3312 \
--slaves=root@server2:3313,root@server4:3314,root@server5:3315 \
--rpl-user=rpl:rpl --new-master=root@server1:3311 --demote-master switchover
# Checking privileges.
# Performing switchover from master at server2:3312 to slave at server1:3311.
# Checking candidate slave prerequisites.
# Checking slaves configuration to master.
# Waiting for slaves to catch up to old master.
# Stopping slaves.
# Performing STOP on all slaves.
# Demoting old master to be a slave to the new master.
# Switching slaves to new master.
# Starting all slaves.
# Performing START on all slaves.
# Checking slaves for errors.
# Switchover complete.
#
# Replication Topology Health:
+----------+-------+---------+--------+------------+---------+
| host
| port | role
| state | gtid_mode | health |
+----------+-------+---------+--------+------------+---------+
| server1 | 3311 | MASTER | UP
| ON
| OK
|
| server2 | 3312 | SLAVE
| UP
| ON
| OK
|
| server3 | 3313 | SLAVE
| UP
| ON
| OK
|
| server4 | 3314 | SLAVE
| UP
| ON
| OK
|
| server5 | 3315 | SLAVE
| UP
| ON
| OK
|
+----------+-------+---------+--------+------------+---------+
# ...done.
The initial replication topology is now restored and mysqlfailover can be restarted (but using --force) as
initially:
shell> mysqlfailover --master=root@server1:3311 \
--slaves=root@server2:3312,root@server3:3313,root@server4:3314,server5:3315 \
--log=log.txt --rpl-user=rpl:rpl --force
# Checking privileges.
MySQL Replication Failover Utility
Failover Mode = auto
Next Interval = Sat Jul 27 02:17:12 2013
Master Information
------------------
36
Restore the Previous Master After Failover
Binary Log File
master-bin.000002
Position
151
Binlog_Do_DB
Binlog_Ignore_DB
GTID Executed Set
None
Replication Health Status
+----------+-------+---------+--------+------------+---------+
| host
| port | role
| state | gtid_mode | health |
+----------+-------+---------+--------+------------+---------+
| server1 | 3311 | MASTER | UP
| ON
| OK
|
| server2 | 3312 | SLAVE
| UP
| ON
| OK
|
| server3 | 3313 | SLAVE
| UP
| ON
| OK
|
| server4 | 3314 | SLAVE
| UP
| ON
| OK
|
| server5 | 3315 | SLAVE
| UP
| ON
| OK
|
+----------+-------+---------+--------+------------+---------+
Q-quit R-refresh H-health G-GTID Lists U-UUIDs L-log entries
3.4.4.3 Discussion
In reality, the main and most important step is the execution of the switchover command with the
mysqlrpladmin utility. The previous steps can be seen as a preparation for switchover. The first step
simply makes sure that the server is running and that there is no mysqlfailover instance still running
that could affect the correct execution of switchover. The second step sets the old master as a slave
of the new master, because the switchover command can only be performed with slaves. This step will
also allows the old master to catch up with the new master. If many transaction have been performed on
the new master it is recommended to wait a while here to let the old master catch up before switchover,
otherwise the switchover command might take too much time.
As expected, the execution of the switchover command requires the specification of the current and new
master with the --master and --new-master options, as well as the list of slaves in the topology using
the --slaves option (without need to list the new master). The replication user is specified with the -rpl-user option. In this specific example, the use of the option --demote-master is important, because
without it the current master (server2:3312) will not be demoted and set as a slave of the new master
(server1:3311).
The mysqlrpladmin utility will execute and display information about all required action to perform
switchover. After completing the switchover process, an health report is displayed where it is possible to
confirm the successful execution of the command and verify that the topology has changed as expected.
After completing these simple steps, the replication topology is back to its initial structure (before failover)
with its old master. Therefore, mysqlfailover is ready to be executed again to monitor the topology and
enable automatic failover. Note that in this particular situation, the use of the --force option might be
required because it is likely that some registration data from the previous failover instance execution might
have be left on the recovered master (due to its previous crash).
The mysqlfailover utility registers its execution on the servers in order to avoid concurrent executions
of the utility which will likely lead to errors and inconsistent state during failover. If the utility detects that
another instance might be running, it will be started in "fail" mode (not taking any action when it detects
that the master failed). The mysqlfailover instance registration is cleared when the utility exits, and it is
expected that unregistration fails on crashed or not accessible servers. The --force option overwrite the
instance execution check allowing to surpass unregistration failure on (crashed) old masters, allowing the
mysqlfailover utility to start in 'auto' mode.
3.4.4.4 Permissions Required
The user have permissions to configure replication.
37
How Can I Find All of the Slaves Attached to My Master Server?
3.4.4.5 Tips and Tricks
It is important to wait for the old master to catch up with the new master in order to guaranty that no
transactions are lost. Depending on the time the old master was down or not accessible it might take a
considerable time for the old master to execute all missing transactions. MySQL Utilities provide tools that
allow the visualizations of the slaves status, namely the 'health' command of the mysqlrpladmin utility.
An alternative set of steps could have been followed to perform the desired task, using the failover
command from mysqlrpladmin instead of switchover. In this case, the old master should be specified
in the candidates list using the option --candidates to be chosen as the preferred slave to become the
new master (no need for the --master, --new-master and --demote-master options). However, an additional
step will be required to set the previous master (server2:3312) as a slave of the old master (server1:3311)
using the mysqlreplicate utility, because failover will not demote the previous master as it assumes
that it is not available. Notice that unlike switchover that will fail if the server specified by the --newmaster option does not meet the requirements to become master, failover will chose another server
from the slaves list to become the new master if the one specified in by the --candidates option is not
suitable. It is important to keep this behavior differences in mind when deciding which command to apply.
3.4.5 How Can I Find All of the Slaves Attached to My Master Server?
When you have a topology that has grown over time - slaves have been added from time-to-time, it may
not be so easy to remember which servers are connected as slaves.
Most often you want to know the state of those slaves at-a-glance. Rather than connect to each slave
individually, it would be nice to know what the state of each slaves threads using a single command.
3.4.5.1 Objectives
Show a map of the slaves connected to a master including the state of each slaves threads (IO and SQL).
We can do this with a single command using the mysqlrplshow utility.
3.4.5.2 Example Execution
shell> mysqlrplshow --master=root:root@localhost:13001 \
--disco=root:root --verbosity
# master on localhost: ... connected.
# Finding slaves for master: localhost:13001
# Replication Topology Graph
localhost:13001 (MASTER)
|
+--- localhost:13002 [IO:
|
+--- localhost:13003 [IO:
|
+--- localhost:13004 [IO:
|
+--- localhost:13005 [IO:
Yes, SQL: Yes] - (SLAVE)
Yes, SQL: Yes] - (SLAVE)
Yes, SQL: Yes] - (SLAVE)
Yes, SQL: Yes] - (SLAVE)
3.4.5.3 Discussion
Notice the use of the mysqlrplshow utility. Not only did it show us the slaves attached to the master, it
also displayed the state of the IO and SQL thread for each slave.
We used the master server for the --master option but for the slaves, we provided the option -discover-slaves-login which provides the user name and password for the account used to connect
38
How To Check If Data Is Correctly Replicated?
to each slave. Without this, we would not be able to determine if the slave is attached (currently) or the
state of its threads.
The --discover-slaves-login option applies to all slaves. If you do not have the same user defined
on all of your slaves, you can use the --prompt option to prompt for the user and password for each
slave.
To get the state of the slave threads, use the --verbose option.
3.4.5.4 Permissions Required
The user connected to the master must have the REPLICATION SLAVE privilege.
The user specified with the --discover-slaves-login option that logs into each slave must have the
REPLICATION CLIENT privilege.
3.4.5.5 Tips and Tricks
You can also display multiple tiered topologies by providing the --recurse option.
Notice in the example we used the option --discover-slaves-login. This is a shortcut feature built
into every utility. If you type the first N letters of a utility that uniquely identifies it among the options for said
utility, the utility accepts it as if you typed the entire string. For example, the full name of the option we used
is --discover-slaves-login.
3.4.6 How To Check If Data Is Correctly Replicated?
Once the replication system is setup and running, it is not uncommon that one might want to verify if the
data is being correctly replicated on the slaves. In normal circumstances, the same data is expected on
the master and its slaves (excluding the use of filtering rules). Nevertheless, faults at the data level can
introduce inconsistent changes on servers without raising any kind of error. These data inconsistencies can
result from bugs, hardware malfunction, human errors, or unauthorized access.
It is desirable to detect these issues, in order to fix them and ultimately prevent them from happening
again. Determining the cause of such issue might not be an easy task since it might be caused by
byzantine failures at distinct levels. However, the first big step toward a solution to this kind of problem is
being able to detect data consistency issues and make sure that the data among the replication servers is
synchronized.
3.4.6.1 Objectives
The goal is to execute the mysqlrplsync utility to detect data consistency issues on an active replication
system making sure that master and slaves are synchronized.
Executing this task manually on an active system is difficult and sometimes tedious since changes may
be continuously happening on all servers (in an asynchronous way) and the same data needs to be
compared between servers. Moreover, it can introduce an undesirable and uncontrolled impact on the
system performance.
Fortunately, the mysqlrplsync utility allows us to perform this task in an easy and optimized way with a
controlled impact on the running system (limiting the execution time of all operations).
Let's assume that a replication topology with one master (server1:3310) and two slaves (server2:3311,
server3:3312) was previously setup and it is running without errors.
39
How To Check If Data Is Correctly Replicated?
3.4.6.2 Example Execution
Start the mysqlrplsync utility, specifying the servers you want to check.
shell> mysqlrplsync --master=user:pass@localhost:3310 \
--slaves=rpl:pass@localhost:3311,rpl:pass@localhost:3312
#
# GTID differences between Master and Slaves:
# - Slave 'localhost@3311' is 15 transactions behind Master.
# - Slave 'localhost@3312' is 12 transactions behind Master.
#
# Checking data consistency.
#
# Using Master 'localhost@3310' as base server for comparison.
# Checking 'test_rplsync_db' database...
# - Checking 't0' table data...
#
[OK] `test_rplsync_db`.`t0` checksum for server 'localhost@3311'.
#
[OK] `test_rplsync_db`.`t0` checksum for server 'localhost@3312'.
# - Checking 't1' table data...
#
[OK] `test_rplsync_db`.`t1` checksum for server 'localhost@3311'.
#
[OK] `test_rplsync_db`.`t1` checksum for server 'localhost@3312'.
# Checking 'test_db' database...
# - Checking 't0' table data...
#
[OK] `test_db`.`t0` checksum for server 'localhost@3311'.
#
[OK] `test_db`.`t0` checksum for server 'localhost@3312'.
# - Checking 't1' table data...
#
[OK] `test_db`.`t1` checksum for server 'localhost@3311'.
#
[OK] `test_db`.`t1` checksum for server 'localhost@3312'.
#
#...done.
#
# SUMMARY: No data consistency issue found.
#
3.4.6.3 Discussion
The above example illustrates how to start the mysqlrplsync utility to check if all data on the specified
replication topology is synchronized.
To do this, we simply need to specify the master's connection with the --master [160] option, and the
list of slaves with the --slaves [160] option. As an alternative to the --slaves [160] option, one can
use the --discover-slaves-login [159] specifying a user and password (or login-path) to connect
to the slaves and the utility will attempt to discover all the slaves connected with the master using the
specified login. For example, '--discover-slaves-login=root:secret' is used to discover all of the slaves and
login to each using the 'root' user id and the password 'secret'.
The --discover-slaves-login [159] can be very handy especially if there is a huge number of
slaves in the topology, but bear in mind that the explicit specification of slaves is safer and that discovery
can fail to find some servers. In particular, it is important to note that in order for slaves to be discovered,
they must be started with the '--report-host' and '--report-port' options with appropriate values and they
must be correctly connected to the master (IO thread running) otherwise discovery may fail to identify the
slave.
In the above example, no data consistency issues were found. In case any data difference are found,
each is clearly identified by the '[DIFF]' prefix followed by concise information of where and what is the
difference. Additionally, at the end the utility displays a summary of the number of issues found.
The utility also allows users to check slaves without specifying the master. However, be advised that only
checking the slaves will not guarantee that there is no data consistency issue between the master and
the slaves. Also keep in mind that the results provided by the utility are valid at the time the checks are
40
Server Operations
actually performed for each table. This is because in an active system with data continuously changing,
inconstancy issues might be introduced in the immediate instance after the check is completed.
3.4.6.4 Permissions Required
The user for the master must have permissions to lock tables, perform the checksum, and get information
about the master status. Specifically, the user used to connect to the master requires the following
privileges: SUPER or REPLICATION CLIENT, LOCK TABLES and SELECT.
The user for the slaves must have permissions to start/stop the slave, perform the checksum, and get
information about the slave status. More specifically, the login user to connect to slaves requires the
following privileges: SUPER and SELECT.
3.4.6.5 Tips and Tricks
In the above example, the mysqlrplsync utility was used to check all the data on the servers. However,
it is possible to check only specific databases and tables. For that purpose, the user only need to specify
the target database and tables as arguments when invoking the utility. It is also possible to exclude
specific database and tables from the check using the --exclude [159] option. For example, '-exclude=test_rplsync_db,test_db.t0' excludes the database 'test_rplsync_db' and table 'test_db.t0' from the
check performed by the utility.
The utility provides important options to control the execution time of the checksum queries performed
on each table and the waiting time for slaves to reach an established synchronization point, namely: the
--checksum-timeout [159] and --rpl-timeout [160] options. A polling process is applied on
each slave to periodically check if replication caught up with the defined sync point. The periodic interval to
perform this check can be adjusted with the --interval [160] option. These option are fundamental to
control the impact of the execution of the utility on the replication system, limiting the execution time of the
checksum queries for large tables and the time slaves wait for replication to catch up. In case, the timeouts
defined by those options are reached, the check is skipped. Nevertheless, the user can always execute the
utility later only for the skipped tables using higher timeout values.
The utility provides the flexibility to be executed separately for different set of servers, only affecting
different parts of the replication system at each time. For example, considering an heterogeneous system
(where slaves have a different performances), composed by one master 'M' and three slaves 'S1', 'S2'
and 'S3'. To minimize the impact on the master, the user can run the utility first for the master 'M' and
the fastest slave 'S1', and then run it again only for the slaves 'S1', 'S2' and 'S3'. If no consistency issues
are found in the first execution (M = S1) nor in the second execution (S1 = S2 = S3), then by transitivity
and due to the inclusion of the same server 'S1' in both checks it can be said that there is no consistency
issues in the all topology (M = S1 = S2 = S3) at the time the first check was completed. This kind of
execution must be performed sequentially and not concurrently, otherwise the synchronization process of
each instance will likely affect the other and it will not work properly.
3.5 Server Operations
The tasks described in this section are those used to perform server-wide operations such as cloning a
server instance.
3.5.1 How Do I Make A Temporary Copy of My Server For Testing?
When diagnosing a problem or needing to experiment with a server for developing new features or test
modifications, you often need a duplicate of your running server so that you can ensure your solution works
for the actual server. It would be really convenient if we had a process to make a copy of a running server
for such processes.
41
How Do I Make A Temporary Copy of My Server For Testing?
Although it is possible and indeed popular to use replication to replicate all of your data to multiple slaves
and use one of the slaves for these purposes, cases where you are working with a particular server or if
replication is not in use you will need some way to duplicate not only the data but also the server and its
startup parameters.
3.5.1.1 Objectives
Create a new instance of a running server complete with the same options and the same data.
3.5.1.2 Example Execution
To meet this objective, we need to use several utilities. But before we get started, we need to know what
specific options the host server is using. To do this, we use the mysqlserverinfo utility to discover the
configuration file and the my_print_defaults tool to print the defaults. We can also show the process id to
see what command-line options are being used. We get this from using the --show-servers option with
mysqlserverinfo. On POSIX systems, we can use the ps command to find the command line options.
shell> mysqlserverinfo --server=root:root@localhost \
--format=vertical --show-servers
#
# The following MySQL servers are active on this host:
# Process id:
2377, Data path: /usr/local/mysql/data
# Process id:
2478, Data path: /Volumes/Source/source/temp_13001
# Process id:
2487, Data path: /Volumes/Source/source/temp_13002
#
# Source on localhost: ... connected.
*************************
1. row *************************
server: localhost:3306
version: 5.1.50-log
datadir: /usr/local/mysql/data/
basedir: /usr/local/mysql-5.1.50-osx10.6-x86_64/
plugin_dir: /usr/local/mysql-5.1.50-osx10.6-x86_64/lib/plugin
config_file: /etc/my.cnf
binary_log: my_log.000287
binary_log_pos: 106
relay_log: None
relay_log_pos: None
1 row.
#...done.
shell> my_print_defaults mysqld /etc/my.cnf
--port=3306
--basedir=/usr/local/mysql
--datadir=/usr/local/mysql/data
--server_id=5
--log-bin=my_log
--general_log
--slow_query_log
--innodb_data_file_path=ibdata1:778M;ibdata2:50M:autoextend
shell> ps -f 2377
UID
PID PPID
74 2377 2300
C STIME
TTY
0 10:56AM ??
TIME CMD
0:02.04 /usr/local/mysql/bin/mysqld --basedir=/usr/local/mysql \
--datadir=/usr/local/mysql/data --user=mysql \
--log-error=/logs/me.local.err --pid-file=/logs/me.local.pid \
--port=3306
Notice we now have all of the options from the configuration file as well as the startup options. We can
now construct the proper options for creating a clone of this server using the mysqlserverclone utility.
Specifically, we can set the following options using the --mysqld option:
• --log-bin=my_log
42
How Can I Find What MySQL Servers Are Running?
• --general_log
• --slow_query_log
• --user=mysql
• --log-error=<path>
Using these options and choosing a new data directory, we can create a new instance of the host server
using the following command.
shell> mysqlserverclone --server=root:root@localhost \
--new-data=/source/temp_clone --new-port=3307 --root=root --delete \
--new-id=123 --mysqld="--log-bin=my_log --general-log --slow-query-log \
--user=mysql --log-error=/source/temp_clone"
# Cloning the MySQL server running on localhost.
# Creating new data directory...
# Configuring new instance...
# Locating mysql tools...
# Setting up empty database and mysql tables...
# Starting new instance of the server...
# Testing connection to new instance...
# Success!
# Setting the root password...
# Connection Information:
# -uroot -proot --socket=/source/temp_clone/mysql.sock
#...done.
Now that we have a running instance, we can export all of the data from the host to the clone.
shell> mysqldbexport --server=root:root@localhost:3306 --export=both --all > data.sql
shell> mysqldbimport --server=root:root@localhost:3307 --import=both data.sql
# Source on localhost: ... connected.
# Importing definitions and data from data.sql.
#...done.
3.5.1.3 Discussion
As you can see, this is a multiple step process. We saw examples of using the mysqlserverinfo,
mysqlserverclone, mysqldbexport, and mysqldbimport utilities.
Notice in the example we used port 3307 for the clone which is reflected in the mysqldbimport utility -server option.
3.5.1.4 Permissions Required
The user must have permission to read all databases. Since we are using the root account for these
examples (and you typically would), permissions are not generally a problem.
You also need permissions to create the new data directory and write data to it.
3.5.1.5 Tips and Tricks
If you want to copy all of the users and their permissions, check out the mysqluserclone utility.
3.5.2 How Can I Find What MySQL Servers Are Running?
One of the challenges for a database administrator or database developer when working with a
development server that has multiple instances of MySQL running is knowing exactly how many are
running.
43
How Can I Find What MySQL Servers Are Running?
In some cases, this may have come about by accident but mostly having multiple instances of MySQL
running is intentional. Whichever the case, it would be nice to be able to use a single command to find all
of the MySQL processes.
3.5.2.1 Objectives
Use the mysqlserverinfo utility to locate all of the MySQL processes running on a host.
3.5.2.2 Example Execution
shell> mysqlserverinfo --show-servers --server=root:root@localhost \
--format=vertical
#
# The following MySQL servers are active on this host:
# Process id:
3007, Data path: /usr/local/mysql/data
# Process id:
8191, Data path: /Volumes/Source/source/temp_13001
# Process id:
8196, Data path: /Volumes/Source/source/temp_13002
# Process id:
8201, Data path: /Volumes/Source/source/temp_13003
# Process id:
8207, Data path: /Volumes/Source/source/temp_13004
# Process id:
8212, Data path: /Volumes/Source/source/temp_13005
#
# Source on localhost: ... connected.
*************************
1. row *************************
server: localhost:3306
version: 5.1.50-log
datadir: /usr/local/mysql/data/
basedir: /usr/local/mysql-5.1.50-osx10.6-x86_64/
plugin_dir: /usr/local/mysql-5.1.50-osx10.6-x86_64/lib/plugin
config_file: /etc/my.cnf
binary_log: my_log.000286
binary_log_pos: 237
relay_log: None
relay_log_pos: None
1 row.
#...done.
3.5.2.3 Discussion
The mysqlserverinfo utility is normally used to find information about a particular server. We can see
such results in the example above.
However, the utility also has an option, --show-servers that displays a list of all of the MySQL server
process ids that are executing on the host. This quick glance can help diagnose problems with multiple
instances on the same machine.
3.5.2.4 Permissions Required
The permissions required include the ability to read the mysql database and to have read access to the
data directory.
3.5.2.5 Tips and Tricks
Notice the output shows the data directory for each server. You can use this information to examine the
files in that folder to discern more information such as what databases exist and find and examine the
binary log, etc.
On POSIX systems, you can discover the command-line arguments such as the port number the server is
using with the "ps -f PID" command. For example, to discover the complete information for PID 2487, you
can do the following.
44
Specialized Operations
shell> ps -f 2487
UID
PID PPID
501 2487
1
C STIME
TTY
0 10:58AM ttys001
TIME CMD
0:00.41 /source/mysql-5.6/sql/mysqld --no-defaults \
--datadir=/source/temp_13002 --tmpdir=/source/temp_13002 \
--pid-file=/source/temp_13002/clone.pid --port=13002 \
--server-id=102 --basedir=/source/mysql-5.6 \
--socket=/source/temp_13002/mysql.sock --log-slave-updates
--gtid-mode=on --enforce-gtid-consistency --log-bin \
--master-info-repository=TABLE --report-port=13002 \
--report-host=localhost
3.6 Specialized Operations
The tasks described in this section relate to specific situations or configurations and may not apply in
the general case. For example, some tasks require a specific commercial plugin. More specifically, the
following tasks are those for use with the Audit Log Plugin.
3.6.1 How Do I Record Only Login Events?
The audit log plugin records MySQL servers activity. By default, it is set to write all auditable events to
the log file which can represent a considerable amount of information. Fortunately, it is possible to control
the type of information that is written to the audit log file, changing the audit log plugin's policy. The policy
should be set to log only the events of interest, avoiding wasting resources to log unnecessary events.
In particular, if the audit log plugin is only used to monitor access to the database server (for security
purposes) then only the login events need to be recorded. The mysqlauditadmin utility allows us to
perform such change in a simple way (as well as changes other settings).
3.6.1.1 Objectives
The goal is to set the audit log plugin to only write the login events to the log file. It is assumed that the
audit log plugin is enabled and running with the default settings (logging all auditable events) on the
localhost and default port (3306).
3.6.1.2 Example Execution
shell> mysqlauditadmin --server=root@localhost:3306 policy --value=LOGINS \
--show-options
#
# Showing options before command.
#
# Audit Log Variables and Options
#
+---------------------------+---------------+
| Variable_name
| Value
|
+---------------------------+---------------+
| audit_log_buffer_size
| 1048576
|
| audit_log_file
| audit.log
|
| audit_log_flush
| OFF
|
| audit_log_policy
| ALL
|
| audit_log_rotate_on_size | 0
|
| audit_log_strategy
| ASYNCHRONOUS |
+---------------------------+---------------+
#
# Executing POLICY command.
#
#
# Showing options after command.
#
45
How Do I Copy/Move The Audit Log?
# Audit Log Variables and Options
#
+---------------------------+---------------+
| Variable_name
| Value
|
+---------------------------+---------------+
| audit_log_buffer_size
| 1048576
|
| audit_log_file
| audit.log
|
| audit_log_flush
| OFF
|
| audit_log_policy
| LOGINS
|
| audit_log_rotate_on_size | 0
|
| audit_log_strategy
| ASYNCHRONOUS |
+---------------------------+---------------+
3.6.1.3 Discussion
In order to change the type of events recorded to the audit log file, the policy settings must be changed.
This is done with the mysqlauditadmin utility using the command 'policy' and specifying the desired
policy value with the --value option. As expected the specification of the target server is also required
using the --server option.
In the above example, the policy value was set to LOGINS to write only login events to the log file.
Nevertheless, other values are also permitted to control the information written to the log file: ALL (write all
events), QUERIES (write only query event), NONE (disable logging), DEFAULT (use the default policy).
3.6.1.4 Permissions Required
User must have the SELECT privilege for the mysql database. To view the log file, the user must have
read access to the audit log file on the server.
3.6.1.5 Tips and Tricks
The policy value was specified using uppercase in this example, however upper and lower cases can
be mixed to specify the policy value (such as "LoGiNs"). The values for this command will still be read
correctly independently of the used cases (case insensitive), but if an unsupported value is specified an
error will be issued.
In the above example the --show-options option was additionally used, but it is not required. This
option simply displays the audit log settings (variables). However, when this option is combined with a
command that changes one of the audit log variables it display the audit log settings before and after the
execution of the command which can be very handy to confirm that the desired change was performed as
expected.
3.6.2 How Do I Copy/Move The Audit Log?
The audit log information can grow quickly and considerably depending on the type of information written to
the audit log files and the activity of the MySQL server. Therefore, it might be a good idea to copy the audit
log files to a different location and free some storage on the server.
The mysqlauditadmin utility also provides this useful functionality.
3.6.2.1 Objectives
The goal of this task is to copy an existing audit log file to a different location using the mysqlauditadmin
utility.
It is assumed that the utility is executed on the destination host which must be a non-Windows system
with the scp (Secure CoPy) command line program, and that must have access to the MySQL remote
server and its data directory with the provided credentials (user and password). It is also assumed that the
specified audit log file exists and user has write privileges on the target directory.
46
How Do I Show All INSERT and UPDATE Queries That Failed?
3.6.2.2 Example Execution
shell> mysqlauditadmin --audit-log-name=/MySQL/SERVER/data/audit.log.13753706179878237 \
copy --copy-to=/ARCHIVE/Audit_Logs --remote-login=user1:server1
# Copying file from server1:/MySQL/SERVER/data/audit.log.13753706179878237 to /ARCHIVE/Audit_Logs:
user1@server1's password:
audit.log.13753706179878237
100% 4716
4.6KB/s
00:01
3.6.2.3 Discussion
The copy operation can be performed with the mysqlauditadmin utility using the 'copy' command and
requiring the following options: the --audit-log-name option to specify the path and filename of the
audit log file to copy, the --copy-to option to indicate the destination folder, and in this example the -remote-login option to specify the user and remote host where the file is located (the user password will
be prompted).
The --remote-login option is not required if the source and destination location are on the same server
where the utility is executed. Moreover, this option is not supported in Windows system where UNC paths
should be used instead.
3.6.2.4 Permissions Required
The user must have permissions to read the audit log on disk and write the file to the remove location.
3.6.2.5 Tips and Tricks
The name of the audit log file (audit.log, by default) is defined by the audit_log_file variable
displayed by mysqlauditadmin when using the --show-options option. Existing audit log files have
a timestamp extension except the one that is currently in use. That being said, it might be useful to know
that it is possible to get information about the existing audit log files using mysqlrpladmin, for instance
to determine which files need to be copied. To get this information use the --file-stats option and the
--audit-log-name option specifying the full path of the current audit log file (i.e., without the timestamp
extension). For example:
shell> mysqlauditadmin --file-stats --audit-log-name=/MySQL/SERVER/data/audit.log
+------------------------------+------------+---------------------------+---------------------------+
| File
| Size
| Created
| Last Modified
|
+------------------------------+------------+---------------------------+---------------------------+
| audit.log.13753706179878237 | 4716
| Thu Aug 1 16:23:37 2013 | Thu Aug 1 16:23:37 2013 |
| audit.log
| 6062
| Thu Aug 1 16:24:26 2013 | Thu Aug 1 16:24:26 2013 |
| audit.log.13753705495049727 | 335142503 | Thu Aug 1 16:22:29 2013 | Thu Aug 1 16:22:29 2013 |
+------------------------------+------------+---------------------------+---------------------------+
Note that if the a audit log file with the timestamp extension is specified instead in this example for the
--audit-log-name option, only the information of the specified file will be displayed and not the file
statistics of all existing ones.
3.6.3 How Do I Show All INSERT and UPDATE Queries That Failed?
Useful information can be recorded in the audit log files and also a considerable amount of it. However,
how can someone easily filter this information and search for specific events, for instance in order to
determine the possible cause of a problem.
For example, suppose that someone reported that some data changes are missing (INSERT or UPDATE
queries failed) and you want to determine what might be the cause of those transaction failures. All queries
47
How Do I Show All INSERT and UPDATE Queries That Failed?
are recorded to the audit log file, so you just need to get retrieve all queries of a given type that failed (with
a MySQL Error) and analyze them.
This can be achieved using common 'grep' command line tools, but likely involves the use of very complex
regular expression to filter the desired data. Fortunately, the mysqlauditgrep utility allows to perform
this kind of task in a much easier and simple way, taking advantage of the knowledge of the structure and
semantics of the audit log files.
3.6.3.1 Objectives
The goal is display all INSERT and UPDATE queries that failed (independently of error) from the current
audit log file.
It is assumed that the audit.log file exists and is located in the directory /MySQL/SERVER/data/. The
below example show how easy it is to perform the desired search with the mysqlauditgrep utility.
3.6.3.2 Example Execution
shell> mysqlauditgrep --query-type=INSERT,UPDATE --status=1-9999 /MySQL/SERVER/data/audit.log
+--------+---------------------+-------+-------------------------------------------------------+-------------| STATUS | TIMESTAMP
| NAME | SQLTEXT
| CONNECTION_ID
+--------+---------------------+-------+-------------------------------------------------------+-------------| 1046
| 2013-08-01T18:20:46 | Query | INSERT INTO tbl_not_exist (a,b,c) VALUES(1,2,3)
| 37
| 1146
| 2013-08-01T18:21:03 | Query | INSERT INTO mysql.tbl_not_exist (a,b,c) VALUES(1,2,3) | 37
| 1054
| 2013-08-01T18:23:10 | Query | INSERT INTO test.t1 (a,b,not_col) VALUES(1,2,3)
| 37
| 1146
| 2013-08-01T18:26:14 | Query | UPDATE tbl_not_exist SET a = 1
| 37
| 1054
| 2013-08-01T18:26:53 | Query | UPDATE test.t1 SET not_col = 1
| 37
+--------+---------------------+-------+-------------------------------------------------------+--------------
3.6.3.3 Discussion
As expected, the use of the mysqlauditgrep utility requires the specification of the target audit log file
to search and a few options corresponding to the needed search criteria. In this case, the --querytype option was used to restrict the displayed results to specific types of queries (i.e., only INSERT and
UPDATE), and the --status option was used to specify the considered MySQL error codes (i.e., all
ranging from 1 to 9999).
The --query-type option allows the specification of a comma separated list of different SQL commands.
Apart from INSERT and UPDATE the list of supported values for this option also includes: CREATE,
ALTER, DROP, TRUNCATE, RENAME, GRANT, REVOKE, SELECT, DELETE, COMMIT, SHOW, SET,
CALL, PREPARE, EXECUTE, DEALLOCATE
The --status option accepts a comma-separated list of non-negative integers (corresponding to MySQL
error codes) or intervals marked with a dash. For example: 1051,1100-1199,1146. In this particular
case, the range value 1-9999 was used to include all MySQL error codes and display all unsuccessful
commands. To retrieve only successful command (no errors) simply use the value 0 for the --status
option.
3.6.3.4 Permissions Required
The user must have permissions to read the audit log on disk.
3.6.3.5 Tips and Tricks
The value specified for the --query-type option are case insensitive, therefore you can mix lower and
upper case to specify the list of query types. For example, 'insert,Update' will produce the same result as
using 'INSERT,UPDATE'. Of course the use of non-supported values will raise an appropriate error.
48
How Do I Display Connections by the User 'root' and Show the Result in CSV Format?
Many other options and search criteria are provided by the mysqlauditgrep utility, check them in order
to use the more appropriate one to meet your needs. Note that the utility provides the --pattern option
to search entries in the audit log file using regular expressions, like common grep tools. By default, this
option will use standard SQL pattern matching (used by 'LIKE' comparison operator), unless the --regexp
option is used to allow more powerful standard regular expressions (POSIX extended).
3.6.4 How Do I Display Connections by the User 'root' and Show the Result in
CSV Format?
The audit log plugin can be used to record information about different type of events which one might need
to monitor or keep a record in a different format. For example, a security record with the list of all logins
performed to the database serve might need to be kept to later track the responsible for some change.
Moreover, the retrieved information might need to be converted to a specific format (such as CSV) to feed
another application.
3.6.4.1 Objectives
The goal of this task is to retrieve from the audit log the information of all the connections established by
the root user to the MySQL Server, and display the resulting information in the comma-separated-value
(CSV) format.
Besides the search/filter functionalities using different criteria, the mysqlauditgrep utility also provides a
feature to display the resulting information in different formats (including CSV). This allows this task to be
performed easily with in a single step.
It is assumed that the audit.log file exists and is located in the directory /MySQL/SERVER/data/.
3.6.4.2 Example Execution
shell> mysqlauditgrep --user=root --event-type=Connect \
--format=CSV /MySQL/SERVER/data/audit.log
STATUS,NAME,TIMESTAMP,CONNECTION_ID,HOST,USER,PRIV_USER,IP
0,Connect,2013-08-01T15:24:26,33,localhost,root,root,127.0.0.1
0,Connect,2013-08-01T15:24:26,34,localhost,root,root,127.0.0.1
0,Connect,2013-08-01T15:24:26,35,localhost,root,root,127.0.0.1
0,Connect,2013-08-01T15:24:26,36,localhost,root,root,127.0.0.1
0,Connect,2013-08-01T18:18:43,37,localhost,root,root,127.0.0.1
0,Connect,2013-08-01T18:49:46,38,,root,root,192.168.1.104
1045,Connect,2013-08-01T19:18:08,39,localhost,root,,127.0.0.1
3.6.4.3 Discussion
To perform this operation the mysqlauditgrep utility requires the indication of the target audit log file as
expected, two criteria search options, and one formatting option to convert the output to the desired format.
In this case, the --users option was applied to search the records for the specified user (i.e., "root") and
the --event-type option to retrieve only event of a specific type (i.e., "connect"). The --format option
is the one used to define the output format of the obtained search results.
In this example, only the "Connect" value was used for the --event-type option which correspond to
the logging in event (when a client connects). Nevertheless, this option accepts a comma separated list
of event types with the following supported values (beside "Connect"): Audit, Binlog Dump, Change user,
Close stmt, Out, Connect, Create DB, Daemon, Debug, Delayed, insert, Drop DB, Execute, Fetch, Field
List, Init DB, Kill, Long Data, NoAudit, Ping, Prepare, Processlist, Query, Quit, Refresh, Register Slave,
Reset stmt, Set option, Shutdown, Sleep, Statistics, Table Dump, Time.
49
How Do I Display Connections by the User 'root' and Show the Result in CSV Format?
In terms of output formats the following are supported beside CSV: GRID (used by default), TAB,
VERTICAL and RAW (corresponding to the original XML format of the audit log file).
3.6.4.4 Permissions Required
The user must have permissions to read the audit log on disk.
3.6.4.5 Tips and Tricks
The values for the --event-type and --format options are case insensitive, therefore lower and upper
cases can be mixed to specify these values as long as a supported event type name or format is used.
Unlike them, the value specified for the --users option is case sensitive, so be careful not to mix upper
and lower cases here.
It is possible to find some event type values with a space in the middle, for example like "Binlog Dump"
or "Init DB". If one of such values needs to be specified for the --event-type option then it must be
surrounded by double (") or single (') quotes depending on the operating system.
50
Chapter 4 Overview of MySQL Utilities
Table of Contents
4.1
4.2
4.3
4.4
4.5
Database Operations ..................................................................................................................
General Operations .....................................................................................................................
High Availability Operations .........................................................................................................
Server Operations .......................................................................................................................
Specialized Operations ...............................................................................................................
This chapter presents an brief overview of each of the available utilities. The utilities are grouped into
sections based on the type of administrative function that they perform.
4.1 Database Operations
hese utilities are those designed to work at the database-level. They include utilities that can used to
adminster databases on one or more servers.
• mysqldbcompare
• Compare databases on two servers or the same server
• Compare definitions and data
• Generate a difference report
• Generate SQL transformation statements
• mysqldbcopy
• Copy databases between servers
• Clone databases on the same server
• Supports rename
• mysqldbexport
• Export metadata and/or data from one or more databases
• Formats: SQL, CSV, TAB, Grid, Vertical
• mysqldbimport
• Import metadata and data from one or more files
• Reads all formats from mysqldbexport
• mysqldiff
• Compare object definitions
• Generate a difference report
51
51
52
53
53
54
General Operations
4.2 General Operations
These utilities are those designed to perform general operations such as reporting and searching.
• mysqldiskusage
• Show disk usage for databases
• Generate reports in SQL, CSV, TAB, Grid, Vertical
• mysqlfrm
• Reads .frm files, optionally in byte-by-byte diagnostic mode
• Generates CREATE statements from table definition data
• mysqlindexcheck
• Read indexes for one or more tables
• Check for redundant and duplicate indexes
• Generate reports in SQL, CSV, TAB, Grid, Vertical
• mysqlmetagrep
• Search metadata
• Regexp, database search
• Generate SQL statement for search query
• mysqlprocgrep
• Search process information
• Generate SQL statement for search
• Kill processes that match query
• mysqluserclone
• Clone a user account, to the same or different server
• Show user grants
• mysqluc
• Command line client for running MySQL Utilities
• Allows a persistent connection to a MySQL Server
• Tab completion for utility names and options
• Allows calling the commands with shorter names, such as using "serverinfo" instead of
mysqlserverinfo
52
High Availability Operations
4.3 High Availability Operations
These utilities are those designed to support replication and high availability operations for MySQL servers.
• mysqlfailover
• Provides automatic failover on a replication topology
• Uses Global Transaction Identifiers (GTID, MySQL Server 5.6.5+)
• mysqlreplicate
• Setup replication
• Start from beginning, current, specific binlog, pos
• mysqlrplms
• Provides round-robin multi-source replication (a slave server continually cycles through multiple
masters in order to store a consolidated data set)
• Uses Global Transaction Identifiers (GTID, MySQL Server 5.6.9+)
• mysqlrpladmin
• Administers the replication topology
• Allows recovery of the master
• Commands include elect, failover, gtid, health, start, stop, and switchover
• mysqlrplcheck
• Check replication configuration
• Tests binary logging on master
• mysqlrplshow
• Show slaves attached to master
• Can search recursively
• Show the replication topology as a graph or list
• mysqlrplsync
• Check data consistency between servers in a replicated setup
• Uses Global Transaction Identifiers (GTID)
• Requires MySQL Server 5.6.14 and higher
4.4 Server Operations
These utilities are used to perform server-wide operations.
• mysqlserverclone
53
Specialized Operations
• Start a new instance of a running server
• mysqlserverinfo
• Show server information
• Can search for running servers on a host
• Access online or offline servers
4.5 Specialized Operations
These utilities are designed to be used with a specific commercial extension. In this case, these utilities
require the Audit Log Plugin.
• mysqlauditadmin
• Monitor the audit log
• Copy, rotate, and configure the audit log
• mysqlauditgrep
• Search the audit log
• Output results to different formats
54
Chapter 5 Manual Pages
Table of Contents
5.1 mysqlauditadmin — Allows users to perform maintenance action on the audit log ...................... 55
5.2 mysqlauditgrep — Allows users to search the current or an archived audit log .......................... 60
5.3 mysqldbcompare — Compare Two Databases and Identify Differences ....................................... 68
5.4 mysqldbcopy — Copy Database Objects Between Servers ......................................................... 77
5.5 mysqldbexport — Export Object Definitions or Data from a Database ........................................ 83
5.6 mysqldbimport — Import Object Definitions or Data into a Database ......................................... 91
5.7 mysqldiff — Identify Differences Among Database Objects ....................................................... 96
5.8 mysqldiskusage — Show Database Disk Usage ..................................................................... 101
5.9 mysqlfailover — Automatic replication health monitoring and failover ..................................... 105
5.10 mysqlfrm — File reader for .frm files. ..................................................................................... 115
5.11 mysqlindexcheck — Identify Potentially Redundant Table Indexes ......................................... 119
5.12 mysqlmetagrep — Search Database Object Definitions .......................................................... 122
5.13 mysqlprocgrep — Search Server Process Lists .................................................................... 127
5.14 mysqlreplicate — Set Up and Start Replication Between Two Servers ................................. 130
5.15 mysqlrplms — Set Up and Start Replication Among a Slave and Multiple Masters .................... 135
5.16 mysqlrpladmin — Administration utility for MySQL replication ................................................ 140
5.17 mysqlrplcheck — Check Replication Prerequisites ............................................................... 150
5.18 mysqlrplshow — Show Slaves for Master Server .................................................................. 154
5.19 mysqlrplsync — Replication synchronization checker ........................................................... 158
5.20 mysqlserverclone — Clone Existing Server to Create New Server ....................................... 165
5.21 mysqlserverinfo — Display Common Diagnostic Information from a Server .......................... 167
5.22 mysqluc — Command line client for running MySQL Utilities ................................................... 170
5.23 mysqluserclone — Clone Existing User to Create New User ................................................. 174
This chapter includes the manual pages for each of the utilities. Each manual page is formatted similar to a
typical Unix man page.
5.1 mysqlauditadmin — Allows users to perform maintenance
action on the audit log
This utility allow you to maintain the audit log, allowing you to monitor the audit log file growth and control
its rotation. Rotation refers to the action of replacing the current audit log file by a new one for continuous
use, renaming (with a timestamp extension) and copying the previously used audit log file to a defined
location.
This utility allows you to view and modify a subset of audit log control variables, display the audit log file
status, perform on-demand rotation of the log file, and copy files to other locations. These features enable
you to easily monitor the audit log file growth and control its rotation (automatically based on the defined
file size threshold, or manually by a on-demand command).
The available actions include the following:
• copy
This command copies the audit log specified by --audit-log-name to the destination path specified
by --copy-to. The --remote-login option can be used to copy log files from a remote location.
Note: the destination path must be locally accessible by the current user.
• policy
55
OPTIONS
The policy command is used to change the audit logging policy. The accepted values are the following,
which are set using the --value option.
Note
The --server option is also required to execute this command.
• ALL: log all events
• NONE: log nothing
• LOGINS: only log login events
• QUERIES: only log query events
• DEFAULT: sets the default log policy
• rotate_on_size
This command sets the file size threshold for automatic rotation of the audit log (the
audit_log_rotate_on_size variable). The value is set using the --value option, and must be in
the range (0, 4294967295). This command also requires the --server option to be specified. Note: if
the variable is set with a value that is not a multiple of 4096, then it is truncated to the nearest multiple.
• rotate
This command is used to perform an on-demand audit log rotation, and only requires the --server
option to be passed. Note: this command has no effect if the audit log file size is smaller than 4096,
which is the minimum value allowed that is greater than 0 for the audit_log_rotate_on_size
variable).
OPTIONS
mysqlauditadmin accepts the following command-line options:
• --audit-log-name=<AUDIT_LOG_FILE>
Full path and file name for the audit log file. Used by the --file-stats option, and the copy
command.
• --copy-to=<COPY_DESTINATION>
The location to copy the specified audit log file. The path must be locally accessible for the current user.
• --file-stats
Display the audit log file statistics.
• --help
Display a help message and exit.
• --license
Display license information and exit.
• --remote-login=<REMOTE_LOGIN>
56
OPTIONS
User name and host to be used for the remote login, for copying log files. It is defined using the following
format: <user>:<host or IP>. Usage will prompt for the password.
• --server=<SERVER>
Connection information for the server.
To connect to a server, it is necessary to specify connection parameters such as user name, host
name, password, and either a port or socket. MySQL Utilities provides a number of ways to provide
this information. All of the methods require specifying your choice via a command-line option such as -server, --master, --slave, etc. The methods include the following in order of most secure.
• Use login-paths from your .mylogin.cnf file (encrypted, not visible). Example : <login-path>[:<port>]
[:<socket>]
• Use a configuration file (unencrypted, not visible) Note: available in release-1.5.0. Example :
<configuration-file-path>[:<section>]
• Specify the data on the command-line (unencrypted, visible). Example :
<user>[:<passwd>]@<host>[:<port>][:<socket>]
• --show-options
Display the audit log system variables.
• --value=<VALUE>
Value used to set variables based on the specified commands, such as policy and rotate_on_size.
• --server1=<source>
Connection information for the first server.
To connect to a server, it is necessary to specify connection parameters such as user name, host
name, password, and either a port or socket. MySQL Utilities provides a number of ways to provide
this information. All of the methods require specifying your choice via a command-line option such as -server, --master, --slave, etc. The methods include the following in order of most secure.
• Use login-paths from your .mylogin.cnf file (encrypted, not visible). Example : <login-path>[:<port>]
[:<socket>]
• Use a configuration file (unencrypted, not visible) Note: available in release-1.5.0. Example :
<configuration-file-path>[:<section>]
• Specify the data on the command-line (unencrypted, visible). Example :
<user>[:<passwd>]@<host>[:<port>][:<socket>]
• --verbose, -v
Specify how much information to display. Use this option multiple times to increase the amount of
information. For example, -v = verbose, -vv = more verbose, -vvv = debug.
• --version
Display version information and exit.
57
NOTES
NOTES
This utility is available as of MySQL Utilities 1.2.0.
This utility can only be applied to servers with the audit log plugin enabled. And the audit log plugin is
available as of MySQL Server versions 5.5.28 and 5.6.10.
This utility requires Python version 2.6 or higher, but does not support Python 3.
The path to the MySQL client tools should be included in the PATH environment variable in order to use
the authentication mechanism with login-paths. This will allow the utility to use the my_print_defaults
tools, which is required to read the login-path values from the login configuration file (.mylogin.cnf).
This feature exists as of MySQL Server 5.6.6, see mysql_config_editor — MySQL Configuration
Utility.
LIMITATIONS
The --remote-login option is not supported on Microsoft Windows platforms. For Microsoft Windows,
use UNC paths and perform a local copy operation, omitting the --remote-login option.
EXAMPLES
To display the audit log system variables, run the following command:
shell> mysqlauditadmin --show-options --server=root@localhost:3310
#
# Audit Log Variables and Options
#
+---------------------------+---------------+
| Variable_name
| Value
|
+---------------------------+---------------+
| audit_log_buffer_size
| 1048576
|
| audit_log_file
| audit.log
|
| audit_log_flush
| OFF
|
| audit_log_policy
| ALL
|
| audit_log_rotate_on_size | 0
|
| audit_log_strategy
| ASYNCHRONOUS |
+---------------------------+---------------+
To perform a (manual) rotation of the audit log file, use the following command:
shell> mysqlauditadmin --server=root@localhost:3310 rotate
#
# Executing ROTATE command.
#
To display the audit log file statistics, run the following command:
shell> mysqlauditadmin --file-stats --audit-log-name=../SERVER/data/audit.log
58
EXAMPLES
+------------------------------+--------+---------------------------+---------------------------+
| File
| Size
| Created
| Last Modified
|
+------------------------------+--------+---------------------------+---------------------------+
| audit.log
| 3258
| Wed Sep 26 11:07:43 2012 | Wed Sep 26 11:07:43 2012 |
| audit.log.13486539046497235 | 47317 | Wed Sep 26 11:05:04 2012 | Wed Sep 26 11:05:04 2012 |
+------------------------------+--------+---------------------------+---------------------------+
To change the audit log policy to log only query events, and show the system variables before and after the
execution of the policy command, use the following command:
shell> mysqlauditadmin --show-options --server=root@localhost:3310 policy \
--value=QUERIES
#
# Showing options before command.
#
# Audit Log Variables and Options
#
+---------------------------+---------------+
| Variable_name
| Value
|
+---------------------------+---------------+
| audit_log_buffer_size
| 1048576
|
| audit_log_file
| audit.log
|
| audit_log_flush
| OFF
|
| audit_log_policy
| ALL
|
| audit_log_rotate_on_size | 0
|
| audit_log_strategy
| ASYNCHRONOUS |
+---------------------------+---------------+
#
# Executing POLICY command.
#
#
# Showing options after command.
#
# Audit Log Variables and Options
#
+---------------------------+---------------+
| Variable_name
| Value
|
+---------------------------+---------------+
| audit_log_buffer_size
| 1048576
|
| audit_log_file
| audit.log
|
| audit_log_flush
| OFF
|
| audit_log_policy
| QUERIES
|
| audit_log_rotate_on_size | 0
|
| audit_log_strategy
| ASYNCHRONOUS |
+---------------------------+---------------+
To change the audit log automatic file rotation size to 32535, and show the system variables before and
after the execution of the rotate_on_size command, use the following command. (Notice that the value
set is actually 28672 because the specified rotate_on_size value is truncated to a multiple of 4096):
shell> mysqlauditadmin --show-options --server=root@localhost:3310 rotate_on_size \
--value=32535
#
# Showing options before command.
#
59
PERMISSIONS REQUIRED
# Audit Log Variables and Options
#
+---------------------------+---------------+
| Variable_name
| Value
|
+---------------------------+---------------+
| audit_log_buffer_size
| 1048576
|
| audit_log_file
| audit.log
|
| audit_log_flush
| OFF
|
| audit_log_policy
| ALL
|
| audit_log_rotate_on_size | 0
|
| audit_log_strategy
| ASYNCHRONOUS |
+---------------------------+---------------+
#
# Executing ROTATE_ON_SIZE command.
#
#
# Showing options after command.
#
# Audit Log Variables and Options
#
+---------------------------+---------------+
| Variable_name
| Value
|
+---------------------------+---------------+
| audit_log_buffer_size
| 1048576
|
| audit_log_file
| audit.log
|
| audit_log_flush
| OFF
|
| audit_log_policy
| ALL
|
| audit_log_rotate_on_size | 28672
|
| audit_log_strategy
| ASYNCHRONOUS |
+---------------------------+---------------+
To perform a copy of a audit log file to another location, use the following command:
shell> mysqlauditadmin --audit-log-name=../SERVER/data/audit.log.13486539046497235 \
copy --copy-to=/BACKUP/Audit_Logs
To copy a audit log file from a remote server/location to the current location (user password will be
prompted), use the following command:
shell> mysqlauditadmin --audit-log-name=audit.log.13486539046497235 \
copy --remote-login=user:host --copy-to=.
PERMISSIONS REQUIRED
The user must have permissions to read the audit log on disk and write the file to the remove location.
5.2 mysqlauditgrep — Allows users to search the current or an
archived audit log
This utility allows you to search the current or archived audit logs, allowing you to display data from the
audit log file according to the defined search criterion. It also allows you to output the results in different
formats, namely GRID (default), TAB, CSV, VERTICAL, and RAW (the original XML format).
60
Standard SQL Pattern Matching
This utility allows you to search and filter the returned audit log records by: users (--users), date and time
ranges (--start-date and --end-date), SQL query types (--query-type), logged event and record
types (--event-type), status (--status), and matching patterns (--pattern). Any of these search
options can be combined and used together, with the retrieved records resulting from all passed in options
being true.
The --pattern supports two types of pattern matching: standard SQL, used with the SQL LIKE operator
(SQL patterns), and standard REGEXP (POSIX regular expression patterns).
This utility always requires an audit log file to be passed in, so the AUDIT_LOG_FILE argument is
searched as a full path and file name for the audit log file. If not specified, a notification concerning this
requirement will be printed. And if --format is passed in without search parameters, then all the records
of the audit log are displayed in the specified format.
The --file-stats option is not considered a search criteria, and is used to display the file statistics of a
specified audit log. Other search options will be ignored when the --file-stats option is used, except
the --format option will continue to format the results accordingly.
To specify the format of the generated results, use one of the following values with the --format option:
• GRID (default)
Display output in grid or table format like that of the mysql client command-line tool.
• CSV
Display output in comma-separated values format.
• VERTICAL
Display output in single-column format like that of the \G command for the mysql client command-line
tool.
• RAW
Display output results in the original raw format of the audit log records, which is written in XML.
Standard SQL Pattern Matching
The simple patterns defined by the SQL standard enables users to use two characters with special
meanings: “%” (percent) matches zero or more characters, and “_” (underscore) matches exactly one
arbitrary character. In standard SQL, these types of patterns are used with the LIKE comparison operator,
and they are case-insensitive by default. This utility assumes that they are case-insensitive.
For example:
• "audit%"
Match any string that starts with "audit".
• "%log%"
Match any string containing the word "log".
• "%_"
Match any string consisting of one or more characters.
61
REGEXP Pattern Matching (POSIX)
For documentation about the standard SQL pattern matching syntax, see Pattern Matching.
REGEXP Pattern Matching (POSIX)
Standard REGEXP patterns are more powerful than the simple patterns defined in the SQL standard. A
regular expression is a string of ordinary and special characters specified to match other strings. Unlike
SQL Patterns, REGEXP patterns are case-sensitive. The REGEXP syntax defines the following characters
with special meaning:
• .
Match any character.
• ^
Match the beginning of a string.
• $
Match the end of a string.
• \
Match zero or more repetitions of the preceding regular expression.
• +
Match one or more repetitions of the preceding regular expression.
• ?
Match zero or one repetition of the preceding regular expression.
• |
Match either the regular expressions from the left or right of |.
• []
Indicates a set of characters to match. Note that, special characters lose their special meaning inside
sets. In particular, ^ acquires a different meaning if it is the first character of the set, matching the
complementary set (i.e., all the characters that are not in the set will be matched).
• {m}
Match m repetitions of the preceding regular expression.
• {m,n}
Match from m to n repetitions of the preceding regular expression.
• ()
Define a matching group, and matches the regular expression inside the parentheses.
For example:
• "a\*"
62
OPTIONS
Match a sequence of zero or more a.
• "a+"
Match a sequence of one or more a.
• "a?"
Match zero or one a.
• "ab|cd"
Match ab or cd.
• "[axy]"
Match a, x or y.
• "[a-f]"
Match any character in the range a to f (that is, a, b, c, d, e, or f).
• "[^axy]"
Match any character except a, x or y.
• "a{5}"
Match exactly five copies of a.
• "a{2,5}"
Match from two to five copies of a.
• "(abc)+"
Match one or more repetitions of abc.
This is a brief overview of regular expressions that can be used to define this type of patterns. The full
syntax is described in the Python "re" module docs, supporting the definition of much more complex pattern
matching expression.
OPTIONS
mysqlauditgrep accepts the following command-line options:
• --end-date=<END_DATE>
End date/time to retrieve log entries until the specified date/time range. If not specified or the value is 0,
all entries to the end of the log are displayed. Accepted formats: "yyyy-mm-ddThh:mm:ss" or "yyyy-mmdd".
• --event-type=<EVENT_TYPE>
Comma-separated list of event types to search in all audit log records matching the specified types.
Supported values are: Audit, Binlog Dump, Change user, Close stmt, Connect Out, Connect, Create DB,
Daemon, Debug, Delayed insert, Drop DB, Execute, Fetch, Field List, Init DB, Kill, Long Data, NoAudit,
63
OPTIONS
Ping, Prepare, Processlist, Query, Quit, Refresh, Register Slave, Reset stmt, Set option, Shutdown,
Sleep, Statistics, Table Dump, Time.
• --file-stats
Display the audit log file statistics.
• --format=FORMAT, -f FORMAT
Output format to display the resulting data. Supported format values: GRID (default), TAB, CSV,
VERTICAL and RAW.
• --help
Display a help message and exit.
• --license
Display license information and exit.
• --pattern=<PATTERN>, -e <PATTERN>
Search pattern to retrieve all entries with at least one attribute value matching the specified pattern.
By default the standard SQL LIKE patterns are used for matching. If the --regexp option is set, then
REGEXP patterns must be specified for matching.
• --query-type=<QUERY_TYPE>
Comma-separated list of SQL statements/commands to search for and match. Supported values:
CREATE, ALTER, DROP, TRUNCATE, RENAME, GRANT, REVOKE, SELECT, INSERT, UPDATE,
DELETE, COMMIT, SHOW, SET, CALL, PREPARE, EXECUTE, DEALLOCATE.
• --regexp, --basic-regexp, -G
Indicates that pattern matching will be performed using a regular expression REGEXP (from the Python
re module). By default, the simple standard SQL LIKE patterns are used for matching. This affects how
the value specified by the --pattern option is interpreted.
• --start-date=<START_DATE>
Starting date/time to retrieve log entries from the specified date/time range. If not specified or the value
is 0, all entries from the start of the log are displayed. Accepted formats: yyyy-mm-ddThh:mm:ss or yyyymm-dd.
• --status=<STATUS>
Comma-separated list of status values or intervals to search for all audit log records with a matching
status. Status values are non-negative integers (corresponding to MySQL error codes). Status intervals
are closed (i.e., include both endpoints) and defined simply using a dash between its endpoints. For
Example: 1051,1068-1075,1109,1146.
The --status option is available as of MySQL Utilities 1.2.4 / 1.3.3.
• --users=<USERS>, -u <USERS>
Comma-separated list of user names, to search for their associated log entries. For example:
"dan,jon,john,paul,philip,stefan".
• --verbose, -v
64
NOTES
Specify how much information to display. Use this option multiple times to increase the amount of
information. For example, -v = verbose, -vv = more verbose, -vvv = debug.
• --version
Display version information and exit.
NOTES
This utility is available as of MySQL Utilities 1.2.0.
This utility can only be applied to servers with the audit log plugin enabled. And the audit log plugin is
available as of MySQL Server versions 5.5.28 and 5.6.10.
This utility support both of the existing audit log file formats (old and new). The new audit log format is
supported as of MySQL Utilities 1.4.3. See The Audit Log File, for more information about available file
formats.
This utility requires the use of Python version 2.6 or higher, but does not support Python 3.
Single or double quote characters (respectively, ' or ") can be used around option values. In fact, quotes
are required to set some options values correctly, such as values with whitespace. For example, to specify
the event types Create DB and Drop DB for the --event-type option, the following syntax must be
used: --event-type='Create DB,Drop DB' or --event-type="Create DB,Drop DB".
EXAMPLES
To display the audit log file statistics and output the results in CSV format, run the following command:
shell> mysqlauditgrep --file-stats --format=CSV /SERVER/data/audit.log
#
# Audit Log File Statistics:
#
File,Size,Created,Last Modified
audit.log,9101,Thu Sep 27 13:33:11 2012,Thu Oct 11 17:40:35 2012
#
# Audit Log Startup Entries:
#
SERVER_ID,STARTUP_OPTIONS,NAME,TIMESTAMP,MYSQL_VERSION,OS_VERSION,VERSION
1,/SERVER/sql/mysqld --defaults-file=/SERVER/my.cnf,Audit,2012-09-27T13:33:11,5.5.29-log,x86_64-Linux,1
To display the audit log entries of specific users, use the following command:
shell> mysqlauditgrep --users=tester1,tester2 /SERVER/data/audit.log
To display the audit log file statistics, run the following command:
shell> mysqlauditgrep --users=tester1,tester2 /SERVER/data/audit.log
65
EXAMPLES
+---------+------------+----------+----------------------+----------------+------------+----------+--------| STATUS | SERVER_ID | NAME
| TIMESTAMP
| CONNECTION_ID | HOST
| USER
| PRIV_USE
+---------+------------+----------+----------------------+----------------+------------+----------+--------| 0
| 1
| Connect | 2012-09-28T11:26:50 | 9
| localhost | root
| tester1
| 0
| 1
| Query
| 2012-09-28T11:26:50 | 9
| None
| root
| tester1
| 0
| 1
| Ping
| 2012-09-28T11:26:50 | 9
| None
| root
| tester1
| 0
| 1
| Query
| 2012-09-28T11:26:50 | 9
| None
| root
| tester1
| 0
| 1
| Query
| 2012-09-28T11:26:50 | 9
| None
| root
| tester1
| 0
| 1
| Ping
| 2012-09-28T11:26:50 | 9
| None
| root
| tester1
| 0
| 1
| Query
| 2012-09-28T11:26:50 | 9
| None
| root
| tester1
| 0
| 1
| Quit
| 2012-09-28T11:26:50 | 9
| None
| root
| tester1
| 0
| 1
| Connect | 2012-10-10T15:55:55 | 11
| localhost | tester2 | root
| 0
| 1
| Query
| 2012-10-10T15:55:55 | 11
| None
| tester2 | root
| 0
| 1
| Query
| 2012-10-10T15:56:10 | 11
| None
| tester2 | root
| 1046
| 1
| Query
| 2012-10-10T15:57:26 | 11
| None
| tester2 | root
| 1046
| 1
| Query
| 2012-10-10T15:57:36 | 11
| None
| tester2 | root
| 0
| 1
| Query
| 2012-10-10T15:57:51 | 11
| None
| tester2 | root
| 0
| 1
| Quit
| 2012-10-10T15:57:59 | 11
| None
| tester2 | root
| 0
| 1
| Connect | 2012-10-10T17:35:42 | 12
| localhost | tester2 | root
| 0
| 1
| Query
| 2012-10-10T17:35:42 | 12
| None
| tester2 | root
| 0
| 1
| Quit
| 2012-10-10T17:47:22 | 12
| None
| tester2 | root
+---------+------------+----------+----------------------+----------------+------------+----------+---------
To display the audit log entries for a specific date/time range, use the following command:
shell> mysqlauditgrep --start-date=2012-09-27T13:33:47 --end-date=2012-09-28 /SERVER/data/audit.log
+---------+----------------------+--------+----------------+-----------------------------------------------| STATUS | TIMESTAMP
| NAME
| CONNECTION_ID | SQLTEXT
+---------+----------------------+--------+----------------+-----------------------------------------------| 0
| 2012-09-27T13:33:47 | Ping
| 7
| None
| 0
| 2012-09-27T13:33:47 | Query | 7
| SELECT * FROM INFORMATION_SCHEMA.PLUGINS WHERE
| 0
| 2012-09-27T13:33:47 | Query | 7
| COMMIT
| 0
| 2012-09-27T13:34:48 | Quit
| 7
| None
| 0
| 2012-09-27T13:34:48 | Quit
| 8
| None
+---------+----------------------+--------+----------------+------------------------------------------------
To display the audit log entries matching a specific SQL LIKE pattern, use the following command:
shell> mysqlauditgrep --pattern="% = ___"; /SERVER/data/audit.log
+---------+----------------------+--------+---------------------------------+----------------+
| STATUS | TIMESTAMP
| NAME
| SQLTEXT
| CONNECTION_ID |
+---------+----------------------+--------+---------------------------------+----------------+
| 0
| 2012-09-27T13:33:39 | Query | SET @@session.autocommit = OFF | 7
|
| 0
| 2012-09-27T13:33:39 | Query | SET @@session.autocommit = OFF | 8
|
| 0
| 2012-09-28T11:26:50 | Query | SET @@session.autocommit = OFF | 9
|
| 0
| 2012-09-28T11:26:50 | Query | SET @@session.autocommit = OFF | 10
|
+---------+----------------------+--------+---------------------------------+----------------+
To display the audit log entries matching a specific REGEXP pattern, use the following command:
shell> mysqlauditgrep --pattern=".* = ..." --regexp /SERVER/data/audit.log
+---------+----------------------+--------+---------------------------------+----------------+
| STATUS | TIMESTAMP
| NAME
| SQLTEXT
| CONNECTION_ID |
66
EXAMPLES
+---------+----------------------+--------+---------------------------------+----------------+
| 0
| 2012-09-27T13:33:39 | Query | SET @@session.autocommit = OFF | 7
|
| 0
| 2012-09-27T13:33:39 | Query | SET @@session.autocommit = OFF | 8
|
| 0
| 2012-09-28T11:26:50 | Query | SET @@session.autocommit = OFF | 9
|
| 0
| 2012-09-28T11:26:50 | Query | SET @@session.autocommit = OFF | 10
|
+---------+----------------------+--------+---------------------------------+----------------+
To display the audit log entries of specific query types, use the following command:
shell> mysqlauditgrep --query-type=show,SET /SERVER/data/audit.log
+---------+----------------------+--------+-------------------------------------------------+-----------| STATUS | TIMESTAMP
| NAME
| SQLTEXT
| CONNECTION_
+---------+----------------------+--------+-------------------------------------------------+-----------| 0
| 2012-09-27T13:33:39 | Query | SET NAMES 'latin1' COLLATE 'latin1_swedish_ci' | 7
| 0
| 2012-09-27T13:33:39 | Query | SET @@session.autocommit = OFF
| 7
| 0
| 2012-09-27T13:33:39 | Query | SHOW VARIABLES LIKE 'READ_ONLY'
| 7
| 0
| 2012-09-27T13:33:39 | Query | SHOW VARIABLES LIKE 'datadir'
| 7
| 0
| 2012-09-27T13:33:39 | Query | SHOW VARIABLES LIKE 'basedir'
| 7
| 0
| 2012-09-27T13:33:39 | Query | SET NAMES 'latin1' COLLATE 'latin1_swedish_ci' | 8
| 0
| 2012-09-27T13:33:39 | Query | SET @@session.autocommit = OFF
| 8
| 0
| 2012-09-27T13:33:39 | Query | SHOW VARIABLES LIKE 'READ_ONLY'
| 8
| 0
| 2012-09-27T13:33:39 | Query | SHOW VARIABLES LIKE 'basedir'
| 8
| 0
| 2012-09-28T11:26:50 | Query | SET NAMES 'latin1' COLLATE 'latin1_swedish_ci' | 9
| 0
| 2012-09-28T11:26:50 | Query | SET @@session.autocommit = OFF
| 9
| 0
| 2012-09-28T11:26:50 | Query | SHOW VARIABLES LIKE 'READ_ONLY'
| 9
| 0
| 2012-09-28T11:26:50 | Query | SET NAMES 'latin1' COLLATE 'latin1_swedish_ci' | 10
| 0
| 2012-09-28T11:26:50 | Query | SET @@session.autocommit = OFF
| 10
| 0
| 2012-09-28T11:26:50 | Query | SHOW VARIABLES LIKE 'READ_ONLY'
| 10
| 0
| 2012-09-28T11:26:50 | Query | SET @@GLOBAL.audit_log_flush = ON
| 10
| 0
| 2012-09-28T11:26:50 | Query | SHOW VARIABLES LIKE 'audit_log_policy'
| 10
| 0
| 2012-09-28T11:26:50 | Query | SHOW VARIABLES LIKE 'audit_log_rotate_on_size' | 10
| 0
| 2012-10-10T15:56:10 | Query | show databases
| 11
| 1046
| 2012-10-10T15:57:26 | Query | show tables test
| 11
| 1046
| 2012-10-10T15:57:36 | Query | show tables test
| 11
| 0
| 2012-10-10T15:57:51 | Query | show tables in test
| 11
+---------+----------------------+--------+-------------------------------------------------+------------
To display the audit log entries of specific event types, use the following command:
shell> mysqlauditgrep --event-type="Ping,Connect" /SERVER/data/audit.log
+---------+----------+----------------------+----------------+------------+---------+------------+------| STATUS | NAME
| TIMESTAMP
| CONNECTION_ID | HOST
| USER
| PRIV_USER | IP
+---------+----------+----------------------+----------------+------------+---------+------------+------| 0
| Connect | 2012-09-27T13:33:39 | 7
| localhost | root
| root
| 127.0.
| 0
| Ping
| 2012-09-27T13:33:39 | 7
| None
| None
| None
| None
| 0
| Ping
| 2012-09-27T13:33:39 | 7
| None
| None
| None
| None
| 0
| Ping
| 2012-09-27T13:33:39 | 7
| None
| None
| None
| None
| 0
| Ping
| 2012-09-27T13:33:39 | 7
| None
| None
| None
| None
| 0
| Connect | 2012-09-27T13:33:39 | 8
| localhost | root
| root
| 127.0.
| 0
| Ping
| 2012-09-27T13:33:39 | 8
| None
| None
| None
| None
| 0
| Ping
| 2012-09-27T13:33:39 | 8
| None
| None
| None
| None
| 0
| Ping
| 2012-09-27T13:33:47 | 7
| None
| None
| None
| None
| 0
| Connect | 2012-09-28T11:26:50 | 9
| localhost | root
| tester
| 127.0.
| 0
| Ping
| 2012-09-28T11:26:50 | 9
| None
| None
| None
| None
| 0
| Ping
| 2012-09-28T11:26:50 | 9
| None
| None
| None
| None
| 0
| Connect | 2012-09-28T11:26:50 | 10
| localhost | root
| root
| 127.0.
| 0
| Ping
| 2012-09-28T11:26:50 | 10
| None
| None
| None
| None
| 0
| Ping
| 2012-09-28T11:26:50 | 10
| None
| None
| None
| None
| 0
| Ping
| 2012-09-28T11:26:50 | 10
| None
| None
| None
| None
67
PERMISSIONS REQUIRED
| 0
| Ping
| 2012-09-28T11:26:50 | 10
| None
| None
| None
| None
| 0
| Ping
| 2012-09-28T11:26:50 | 10
| None
| None
| None
| None
| 0
| Connect | 2012-10-10T15:55:55 | 11
| localhost | tester | root
| 127.0.0.1
| 0
| Connect | 2012-10-10T17:35:42 | 12
| localhost | tester | root
| 127.0.0.1
+---------+----------+----------------------+----------------+------------+---------+------------+----------
To display the audit log entries with a specific status, use the following command:
shell> mysqlauditgrep --status=1100-1199,1046 /SERVER/data/audit.log
+---------+----------------------+--------+----------------------------------------------------------------| STATUS | TIMESTAMP
| NAME
| SQLTEXT
+---------+----------------------+--------+----------------------------------------------------------------| 1046
| 2012-10-10T15:57:26 | Query | show tables test
| 1046
| 2012-10-10T15:57:36 | Query | show tables test
| 1146
| 2012-10-10T17:44:55 | Query | select * from teste.employees where salary > 500 and salary < 10
| 1046
| 2012-10-10T17:47:17 | Query | select * from test_encoding where value = '<>"&'
+---------+----------------------+--------+-----------------------------------------------------------------
Note: You can view all successful commands with --status=0 and all unsuccessful ones with -status=1-9999.
To display the audit log entries matching several search criteria, use the following command:
shell> mysqlauditgrep --users=root --start-date=0 --end-date=2012-10-10 --event-type=Query \
--query-type=SET --status=0 --pattern="%audit_log%" /SERVER/data/audit.log
+---------+------------+--------+----------------------+----------------+-------+------------+-------------| STATUS | SERVER_ID | NAME
| TIMESTAMP
| CONNECTION_ID | USER | PRIV_USER | SQLTEXT
+---------+------------+--------+----------------------+----------------+-------+------------+-------------| 0
| 1
| Query | 2012-09-28T11:26:50 | 10
| root | root
| SET @@GLOBAL.
+---------+------------+--------+----------------------+----------------+-------+------------+--------------
PERMISSIONS REQUIRED
The user must have permissions to read the audit log on disk.
5.3 mysqldbcompare — Compare Two Databases and Identify
Differences
This utility compares the objects and data from two databases to find differences. It identifies objects
having different definitions in the two databases and presents them in a diff-style format of choice.
Differences in the data are shown using a similar diff-style format. Changed or missing rows are shown in a
standard format of GRID, CSV, TAB, or VERTICAL.
Use the notation db1:db2 to name two databases to compare, or, alternatively just db1 to compare two
databases with the same name. The latter case is a convenience notation for comparing same-named
databases on different servers.
The comparison may be run against two databases of different names on a single server by specifying only
the --server1 option. The user can also connect to another server by specifying the --server2 option.
In this case, db1 is taken from server1 and db2 from server2.
68
mysqldbcompare — Compare Two Databases and Identify Differences
Those objects considered in the database include tables, views, triggers, procedures, functions, and
events. A count for each object type can be shown with the -vv option.
The check is performed using a series of steps called tests. By default, the utility stops on the first failed
test, but you can specify the --run-all-tests option to cause the utility to run all tests regardless of
their end state.
Note: Using --run-all-tests may produce expected cascade failures. For example, if the row counts
differ among two tables being compared, the data consistency will also fail.
The tests include the following:
1. Check database definitions
A database existence precondition check ensures that both databases exist. If they do not, no further
processing is possible and the --run-all-tests option is ignored.
2. Check existence of objects in both databases
The test for objects in both databases identifies those objects missing from one or another database.
The remaining tests apply only to those objects that appear in both databases. To skip this test, use the
--skip-object-compare option. That can be useful when there are known missing objects among
the databases.
3. Compare object definitions
The definitions (the CREATE statements) are compared and differences are presented. To skip this
test, use the --skip-diff option. That can be useful when there are object name differences only
that you want to ignore.
4. Check table row counts
This check ensures that both tables have the same number of rows. This does not ensure that the table
data is consistent. It is merely a cursory check to indicate possible missing rows in one table or the
other. The data consistency check identifies the missing rows. To skip this test, use the --skip-rowcount option.
5. Check table data consistency
This check identifies both changed rows as well as missing rows from one or another of the tables in
the databases. Changed rows are displayed as a diff-style report with the format chosen (GRID by
default) and missing rows are also displayed using the format chosen. This check is divided in two
steps: first the full table checksum is compared between the tables, then if this step fails (or is skipped)
the algorithm to find rows differences is executed. To skip the preliminary checksum table step in this
test, use the --skip-checksum-table option. To skip this full test, use the --skip-data-check
option.
You may want to use the --skip-xxx options to run only one of the tests. This might be helpful when
working to bring two databases into synchronization, to avoid running all of the tests repeatedly during the
process.
Each test completes with one of the following states:
• pass
The test succeeded.
• FAIL
69
mysqldbcompare — Compare Two Databases and Identify Differences
The test failed. Errors are displayed following the test state line.
• SKIP
The test was skipped due to a missing prerequisite or a skip option.
• WARN
The test encountered an unusual but not fatal error.
• The test is not applicable to this object.
To specify how to display diff-style output, use one of the following values with the --difftype option:
• unified (default)
Display unified format output.
• context
Display context format output.
• differ
Display differ-style format output.
• sql
Display SQL transformation statement output.
To specify how to display output for changed or missing rows, use one of the following values with the -format option:
• grid (default)
Display output in grid or table format like that of the mysql client command-line tool.
• csv
Display output in comma-separated values format.
• tab
Display output in tab-separated format.
• vertical
Display output in single-column format like that of the \G command for the mysql client command-line
tool.
The --changes-for option controls the direction of the difference (by specifying the object to be
transformed) in either the difference report (default) or the transformation report (designated with the -difftype=sql option). Consider the following command:
shell> mysqldbcompare --server1=root@host1 --server2=root@host2 --difftype=sql db1:dbx
70
OPTIONS
The leftmost database (db1) exists on the server designated by the --server1 option (host1). The
rightmost database (dbx) exists on the server designated by the --server2 option (host2).
• --changes-for=server1: Produce output that shows how to make the definitions of objects on
server1 like the definitions of the corresponding objects on server2.
• --changes-for=server2: Produce output that shows how to make the definitions of objects on
server2 like the definitions of the corresponding objects on server1.
The default direction is server1.
You must provide connection parameters (user, host, password, and so forth) for an account that has the
appropriate privileges to access all objects in the operation.
If the utility is to be run on a server that has binary logging enabled, and you do not want the comparison
steps logged, use the --disable-binary-logging option.
OPTIONS
mysqldbcompare accepts the following command-line options:
• --all, -a
Include all databases. Added in release-1.3.5.
• --help
Display a help message and exit.
• --license
Display license information and exit.
• --changes-for=<direction>
Specify the server to show transformations to match the other server. For example, to see the
transformation for transforming object definitions on server1 to match the corresponding definitions on
server2, use --changes-for=server1. Permitted values are server1 and server2. The default is
server1.
• --character-set=<charset>
Sets the client character set. The default is retrieved from the server variable
character_set_client.
• --difftype=<difftype>, -d<difftype>
Specify the difference display format. Permitted format values are unified, context, differ, and sql. The
default is unified.
• --disable-binary-logging
If binary logging is enabled, disable it during the operation to prevent comparison operations from being
written to the binary log. Note: Disabling binary logging requires the SUPER privilege.
• --exclude=<exclude>, -x<exclude>
Exclude one or more databases from the operation using either a specific name such as db1 or a search
pattern. Use this option multiple times to specify multiple exclusions. By default, patterns use database
71
OPTIONS
patterns such as LIKE. With the --regexp option, patterns use regular expressions for matching
names.
• --format=<format>, -f<format>
Specify the display format for changed or missing rows. Permitted format values are grid, csv, tab, and
vertical. The default is grid.
• --compact
Compacts the output by reducing the number of control lines that are displayed in the diff results. This
option should be used together with one of the following difference types: unified or context. It is most
effective when used with the unified difference type and the grid format.
• --quiet, -q
Do not print anything. Return only an exit code of success or failure.
• --regexp, --basic-regexp, -G
Perform pattern matches using the REGEXP operator. The default is to use LIKE for matching.
• --run-all-tests, -t
Do not halt at the first difference found. Process all objects.
• --server1=<source>
Connection information for the first server.
To connect to a server, it is necessary to specify connection parameters such as user name, host
name, password, and either a port or socket. MySQL Utilities provides a number of ways to provide
this information. All of the methods require specifying your choice via a command-line option such as -server, --master, --slave, etc. The methods include the following in order of most secure.
• Use login-paths from your .mylogin.cnf file (encrypted, not visible). Example : <login-path>[:<port>]
[:<socket>]
• Use a configuration file (unencrypted, not visible) Note: available in release-1.5.0. Example :
<configuration-file-path>[:<section>]
• Specify the data on the command-line (unencrypted, visible). Example :
<user>[:<passwd>]@<host>[:<port>][:<socket>]
• --server2=<source>
Connection information for the second server.
To connect to a server, it is necessary to specify connection parameters such as user name, host
name, password, and either a port or socket. MySQL Utilities provides a number of ways to provide
this information. All of the methods require specifying your choice via a command-line option such as -server, --master, --slave, etc. The methods include the following in order of most secure.
• Use login-paths from your .mylogin.cnf file (encrypted, not visible). Example : <login-path>[:<port>]
[:<socket>]
• Use a configuration file (unencrypted, not visible) Note: available in release-1.5.0. Example :
<configuration-file-path>[:<section>]
72
NOTES
• Specify the data on the command-line (unencrypted, visible). Example :
<user>[:<passwd>]@<host>[:<port>][:<socket>]
• --show-reverse
Produce a transformation report containing the SQL statements to conform the object definitions
specified in reverse. For example, if --changes-for is set to server1, also generate the transformation for
server2. Note: The reverse changes are annotated and marked as comments.
• --skip-checksum-table
Skip the CHECKSUM TABLE step in the data consistency check. Added in release-1.4.3.
• --skip-data-check
Skip the data consistency check.
• --skip-diff
Skip the object definition difference check.
• --skip-object-compare
Skip the object comparison check.
• --skip-row-count
Skip the row count check.
• --span-key-size=<number of bytes to use for key>
Change the size of the key used for compare table contents. A higher value can help to get more
accurate results comparing large databases, but may slow the algorithm.
Default value is 8.
• --verbose, -v
Specify how much information to display. Use this option multiple times to increase the amount of
information. For example, -v = verbose, -vv = more verbose, -vvv = debug.
• --version
Display version information and exit.
• --use-indexes
List the index to use. Use this option to select the index to use if the table has no primary key
or it has more than one unique index without null columns. Use this option in the format: --useindexes="<table1>.<indexA>[;<table2>.<indexB>;]"
• --width=<number>
Change the display width of the test report. The default is 75 characters.
NOTES
The login user must have the appropriate permissions to read all databases and tables listed.
73
EXAMPLES
For the --difftype option, the permitted values are not case sensitive. In addition, values may be
specified as any unambiguous prefix of a valid value. For example, --difftype=d specifies the differ
type. An error occurs if a prefix matches more than one valid value.
The path to the MySQL client tools should be included in the PATH environment variable in order to use the
authentication mechanism with login-paths. This will allow the utility to use the my_print_defaults tools
which is required to read the login-path values from the login configuration file (.mylogin.cnf).
If any database identifier specified as an argument contains special characters or is a reserved
word, then it must be appropriately quoted with backticks (`). In turn, names quoted with backticks
must also be quoted with single or double quotes depending on the operating system, i.e. (") in
Windows or (') in non-Windows systems, in order for the utilities to read backtick quoted identifiers
as a single argument. For example, to compare a database with the name weird`db.name with
other:weird`db.name, the database pair must be specified using the following syntax (in non-Windows):
'`weird``db.name`:`other:weird``db.name`'.
EXAMPLES
Use the following command to compare the emp1 and emp2 databases on the local server, and run all
tests even if earlier tests fail:
shell> mysqldbcompare --server1=root@localhost emp1:emp2 --run-all-tests
# server1 on localhost: ... connected.
# Checking databases emp1 on server1 and emp2 on server2
#
# WARNING: Objects in server2:emp2 but not in server1:emp1:
#
TRIGGER: trg
# PROCEDURE: p1
#
TABLE: t1
#
VIEW: v1
#
#
Defn
Row
Data
# Type
Object Name
Diff
Count
Check
# --------------------------------------------------------------------------# FUNCTION f1
pass
# TABLE
departments
pass
pass
#
- Compare table checksum
FAIL
#
- Find row differences
FAIL
#
# Data differences found among rows:
--- emp1.departments
+++ emp2.departments
@@ -1,4 +1,4 @@
*************************
1. row *************************
dept_no: d002
- dept_name: dunno
+ dept_name: Finance
1 rows.
# Rows in emp1.departments not in emp2.departments
*************************
1. row *************************
dept_no: d008
dept_name: Research
1 rows.
# Rows in emp2.departments not in emp1.departments
*************************
1. row *************************
dept_no: d100
dept_name: stupid
1 rows.
# TABLE
dept_manager
pass
74
pass
-
EXAMPLES
#
- Compare table checksum
pass
# Database consistency check failed.
#
# ...done
Given: two databases with the same table layout. Data for each table contains:
mysql> select * from db1.t1;
+---+---------------+
| a | b
|
+---+---------------+
| 1 | Test 789
|
| 2 | Test 456
|
| 3 | Test 123
|
| 4 | New row - db1 |
+---+---------------+
4 rows in set (0.00 sec)
mysql> select * from db2.t1;
+---+---------------+
| a | b
|
+---+---------------+
| 1 | Test 123
|
| 2 | Test 456
|
| 3 | Test 789
|
| 5 | New row - db2 |
+---+---------------+
4 rows in set (0.00 sec)
To generate the SQL statements for data transformations to make db1.t1 the same as db2.t1, use
the --changes-for=server1 option. We must also include the -a option to ensure that the data
consistency test is run. The following command illustrates the options used and an excerpt from the results
generated:
shell> mysqldbcompare --server1=root:root@localhost \
--server2=root:root@localhost db1:db2 --changes-for=server1 -a \/
--difftype=sql
[...]
#
Defn
Row
Data
# Type
Object Name
Diff
Count
Check
#------------------------------------------------------------------------# TABLE
t1
pass
pass
#
- Compare table checksum
FAIL
#
- Find row differences
FAIL
#
# Transformation for --changes-for=server1:
#
# Data
UPDATE
UPDATE
DELETE
INSERT
differences found among rows:
db1.t1 SET b = 'Test 123' WHERE a = '1';
db1.t1 SET b = 'Test 789' WHERE a = '3';
FROM db1.t1 WHERE a = '4';
INTO db1.t1 (a, b) VALUES('5', 'New row - db2');
# Database consistency check failed.
#
# ...done
Similarly, when the same command is run with --changes-for=server2 and --difftype=sql, the
following report is generated:
75
EXAMPLES
shell> mysqldbcompare --server1=root:root@localhost \
--server2=root:root@localhost db1:db2 --changes-for=server2 -a \
--difftype=sql
[...]
#
Defn
Row
Data
# Type
Object Name
Diff
Count
Check
#------------------------------------------------------------------------# TABLE
t1
pass
pass
#
- Compare table checksum
FAIL
#
- Find row differences
FAIL
#
# Transformation for --changes-for=server2:
#
# Data
UPDATE
UPDATE
DELETE
INSERT
differences found among rows:
db2.t1 SET b = 'Test 789' WHERE a = '1';
db2.t1 SET b = 'Test 123' WHERE a = '3';
FROM db2.t1 WHERE a = '5';
INTO db2.t1 (a, b) VALUES('4', 'New row - db1');
# Database consistency check failed.
#
# ...done
With the --difftype=sql SQL generation option set, --show-reverse shows the object
transformations in both directions. Here is an excerpt of the results:
shell> mysqldbcompare --server1=root:root@localhost \
--server2=root:root@localhost db1:db2 --changes-for=server1 \
--show-reverse -a --difftype=sql
[...]
#
#
#
#
#
#
#
#
#
Defn
Row
Data
Type
Object Name
Diff
Count
Check
------------------------------------------------------------------------TABLE
t1
pass
pass
- Compare table checksum
FAIL
- Find row differences
FAIL
Transformation for --changes-for=server1:
# Data
UPDATE
UPDATE
DELETE
INSERT
#
#
#
#
#
#
#
#
differences found among rows:
db1.t1 SET b = 'Test 123' WHERE a = '1';
db1.t1 SET b = 'Test 789' WHERE a = '3';
FROM db1.t1 WHERE a = '4';
INTO db1.t1 (a, b) VALUES('5', 'New row - db2');
Transformation for reverse changes (--changes-for=server2):
# Data
UPDATE
UPDATE
DELETE
INSERT
differences found among rows:
db2.t1 SET b = 'Test 789' WHERE a = '1';
db2.t1 SET b = 'Test 123' WHERE a = '3';
FROM db2.t1 WHERE a = '5';
INTO db2.t1 (a, b) VALUES('4', 'New row - db1');
# Database consistency check failed.
#
# ...done
76
PERMISSIONS REQUIRED
PERMISSIONS REQUIRED
The user must have the SELECT privilege for the databases on both servers.
5.4 mysqldbcopy — Copy Database Objects Between Servers
This utility copies a database on a source server to a database on a destination server. If the source and
destination servers are different, the database names can be the same or different. If the source and
destination servers are the same, the database names must be different.
The utility accepts one or more database pairs on the command line. To name a database pair, use
db_name:new_db_name syntax to specify the source and destination names explicitly. If the source and
destination database names are the same, db_name can be used as shorthand for db_name:db_name.
By default, the operation copies all objects (tables, views, triggers, events, procedures, functions, and
database-level grants) and data to the destination server. There are options to turn off copying any or all of
the objects as well as not copying the data.
To exclude specific objects by name, use the --exclude option with a name in db.*obj* format, or you
can supply a search pattern. For example, --exclude=db1.trig1 excludes the single trigger and -exclude=trig_ excludes all objects from all databases having a name that begins with trig and has a
following character.
By default, the utility creates each table on the destination server using the same storage engine as
the original table. To override this and specify the storage engine to use for all tables created on the
destination server, use the --new-storage-engine option. If the destination server supports the new
engine, all tables use that engine.
To specify the storage engine to use for tables for which the destination server does not support the
original storage engine on the source server, use the --default-storage-engine option.
The --new-storage-engine option takes precedence over --default-storage-engine if both are
given.
If the --new-storage-engine or --default-storage-engine option is given and the destination
server does not support the specified storage engine, a warning is issued and the server's default storage
engine setting is used instead.
By default, the operation uses a consistent snapshot to read the source databases. To change the locking
mode, use the --locking option with a locking type value. Use a value of no-locks to turn off locking
altogether or lock-all to use only table locks. The default value is snapshot. Additionally, the utility uses
WRITE locks to lock the destination tables during the copy.
You can include replication statements for copying data among a master and slave or between slaves. The
--rpl option permits you to select from the following replication statements to include in the export.
• master
Create and execute a CHANGE MASTER statement to make the destination server a slave of the server
specified in the --source option. This executes the appropriate STOP and START slave statements.
The STOP SLAVE statement is executed at the start of the copy and the CHANGE MASTER followed
by the START SLAVE statements are executed after the copy.
• slave
77
OPTIONS
Create and execute a CHANGE MASTER statement to make the destination server a slave connected
to the same master as the server specified in the --source option. This executes the appropriate STOP
and START slave statements. The STOP SLAVE statement is executed at the start of the copy and the
CHANGE MASTER followed by the START SLAVE statements after the copy.
To include the replication user in the CHANGE MASTER statement, use the --rpl-user option to
specify the user and password. If this option is omitted, the utility attempts to identify the replication user. In
the event that there are multiple candidates or the user requires a password, the utility aborts with an error.
If you attempt to copy databases on a server with GTIDs enabled (GTID_MODE = ON), a warning will
be generated if the copy does not include all databases. This is because the GTID statements generated
include the GTIDs for all databases and not only those databases in the export.
The utility will also generate a warning if you copy databases on a GTID enabled server but use the -skip-gtid option.
To make the most use of GTIDs, you should copy all of the databases on the server with the --all option.
OPTIONS
mysqldbcopy accepts the following command-line options:
• --help
Display a help message and exit.
• --license
Display license information and exit.
• --character-set=<charset>
Sets the client character set. The default is retrieved from the server variable
character_set_client.
• --default-storage-engine=<def_engine>
The engine to use for tables if the destination server does not support the original storage engine on the
source server.
• --destination=<destination>
Connection information for the destination server.
To connect to a server, it is necessary to specify connection parameters such as user name, host
name, password, and either a port or socket. MySQL Utilities provides a number of ways to provide
this information. All of the methods require specifying your choice via a command-line option such as -server, --master, --slave, etc. The methods include the following in order of most secure.
• Use login-paths from your .mylogin.cnf file (encrypted, not visible). Example : <login-path>[:<port>]
[:<socket>]
• Use a configuration file (unencrypted, not visible) Note: available in release-1.5.0. Example :
<configuration-file-path>[:<section>]
• Specify the data on the command-line (unencrypted, visible). Example :
<user>[:<passwd>]@<host>[:<port>][:<socket>]
78
OPTIONS
• --exclude=<exclude>, -x<exclude>
Exclude one or more objects from the operation using either a specific name such as db1.t1 or a search
pattern. Use this option multiple times to specify multiple exclusions. By default, patterns use LIKE
matching. With the --regexp option, patterns use REGEXP matching.
This option does not apply to grants.
• --drop-first
Drop each database to be copied if exists before copying anything into it. Without this option, an error
occurs if you attempt to copy objects into an existing database.
Note
Before MySQL Utilities 1.4.2, this option was named --force.
• --locking=<locking>
Choose the lock type for the operation. Permitted lock values are no-locks (do not use any table locks),
lock-all (use table locks but no transaction and no consistent read), and snapshot (consistent read
using a single transaction). The default is snapshot.
• --multiprocess
Specify the number of processes to concurrently copy the specified databases. Special values: 0
(number of processes equal to the number of detected CPUs) and 1 (default - no concurrency).
Multiprocessing works at the database level for Windows and at the table level for Non-Windows
(POSIX) systems.
• --new-storage-engine=<new_engine>
The engine to use for all tables created on the destination server.
• --quiet, -q
Turn off all messages for quiet execution.
• --regexp, --basic-regexp, -G
Perform pattern matches using the REGEXP operator. The default is to use LIKE for matching.
• --rpl=<dump_option>, --replication=<dump_option>
Include replication information. Permitted values are master (make destination a slave of the source
server) and slave (make destination a slave of the same master as the source - only works if the source
server is a slave).
• --rpl-user=<replication_user>
The user and password for the replication user requirement in the form: <user>[:<password>] or <loginpath>. E.g. rpl:passwd Default = None.
• l --skip-gtid
Skip creation and execution of GTID statements during the copy operation.
• --all
79
NOTES
Copy all of the databases on the server.
• --skip=<objects>
Specify objects to skip in the operation as a comma-separated list (no spaces). Permitted values are
CREATE_DB, DATA, EVENTS, FUNCTIONS, GRANTS, PROCEDURES, TABLES, TRIGGERS, and
VIEWS.
• --source=<source>
Connection information for the source server.
To connect to a server, it is necessary to specify connection parameters such as user name, host
name, password, and either a port or socket. MySQL Utilities provides a number of ways to provide
this information. All of the methods require specifying your choice via a command-line option such as -server, --master, --slave, etc. The methods include the following in order of most secure.
• Use login-paths from your .mylogin.cnf file (encrypted, not visible). Example : <login-path>[:<port>]
[:<socket>]
• Use a configuration file (unencrypted, not visible) Note: available in release-1.5.0. Example :
<configuration-file-path>[:<section>]
• Specify the data on the command-line (unencrypted, visible). Example :
<user>[:<passwd>]@<host>[:<port>][:<socket>]
• --verbose, -v
Specify how much information to display. Use this option multiple times to increase the amount of
information. For example, -v = verbose, -vv = more verbose, -vvv = debug.
• --version
Display version information and exit.
NOTES
You must provide connection parameters (user, host, password, and so forth) for an account that has the
appropriate privileges to access all objects in the operation.
On the source to copy all objects from the database, the user must have these privileges: SELECT for
tables, SHOW VIEW for views, EVENT for events and TRIGGER for triggers. Additionally, the SELECT
privilege is also required for the mysql database.
On the destination to copy all objects, the user must have these privileges: CREATE, ALTER, SELECT,
INSERT, UPDATE, LOCK TABLES, DROP if --drop-first option is used, SUPER when binary logging
is enabled, CREATE VIEW for views, CREATE ROUTINE, EXECUTE for procedures and functions,
EVENT for events, TRIGGER for triggers and GRANT OPTION to copy grants. The SUPER privilege might
also be required for some objects (views, procedures, functions, events and triggers), depending on their
DEFINER value.
Actual privileges required may differ from installation to installation depending on the security privileges
present and whether the database contains certain objects such as views or events and whether binary
logging is enabled.
The --new-storage-engine and --default-storage-engine options apply to all destination tables
in the operation.
80
EXAMPLES
Some option combinations may result in errors during the operation. For example, eliminating tables but
not views may result in an error a the view is copied.
The --rpl option is not valid for copying databases on the same server. An error will be generated.
When copying data and including the GTID commands, you may encounter an error similar to
"GTID_PURGED can only be set when GTID_EXECUTED is empty". This occurs because the destination
server is not in a clean replication state. To aleviate this problem, you can issue a "RESET MASTER"
command on the destination prior to executing the copy.
Cloning databases that contain foreign key constraints does not change the constraint in the cloned table.
For example, if table db1.t1 has a foreign key constraint on table db1.t2, when db1 is cloned to db2, table
db2.t1 will have a foreign key constraint on db1.t2.
The path to the MySQL client tools should be included in the PATH environment variable in order to use the
authentication mechanism with login-paths. This will allow the utility to use the my_print_defaults tools
which is required to read the login-path values from the login configuration file (.mylogin.cnf).
If any database identifier specified as an argument contains special characters or is a reserved
word, then it must be appropriately quoted with backticks (`). In turn, names quoted with backticks
must also be quoted with single or double quotes depending on the operating system, i.e. (") in
Windows or (') in non-Windows systems, in order for the utilities to read backtick quoted identifiers
as a single argument. For example, to copy a database with the name weird`db.name with
other:weird`db.name, the database pair must be specified using the following syntax (in non-Windows):
'`weird``db.name`:`other:weird``db.name`'.
Keep in mind that you can only take advantage of multiprocessing if your system has multiple CPUs
available for concurrent execution. Also note that multiprocessing is applied at a different level according
to the operating system where the mysqldbcopy utility is executed (due to python limitations). In particular,
it is applied at the database level for Windows (i.e., different databases are concurrently copied) and at
the table level for Non-Windows (POSIX) systems (i.e., different tables within the same database are
concurrently copied).
EXAMPLES
The following example demonstrates how to use the utility to copy a database named util_test to a
new database named util_test_copy on the same server:
shell> mysqldbcopy \
--source=root:pass@localhost:3310:/test123/mysql.sock \
--destination=root:pass@localhost:3310:/test123/mysql.sock \
util_test:util_test_copy
# Source on localhost: ... connected.
# Destination on localhost: ... connected.
# Copying database util_test renamed as util_test_copy
# Copying TABLE util_test.t1
# Copying table data.
# Copying TABLE util_test.t2
# Copying table data.
# Copying TABLE util_test.t3
# Copying table data.
# Copying TABLE util_test.t4
# Copying table data.
# Copying VIEW util_test.v1
# Copying TRIGGER util_test.trg
# Copying PROCEDURE util_test.p1
# Copying FUNCTION util_test.f1
# Copying EVENT util_test.e1
# Copying GRANTS from util_test
81
EXAMPLES
#...done.
If the database to be copied does not contain only InnoDB tables and you want to ensure data integrity
of the copied data by locking the tables during the read step, add a --locking=lock-all option to the
command:
shell> mysqldbcopy \
--source=root:pass@localhost:3310:/test123/mysql.sock \
--destination=root:pass@localhost:3310:/test123/mysql.sock \
util_test:util_test_copy --locking=lock-all
# Source on localhost: ... connected.
# Destination on localhost: ... connected.
# Copying database util_test renamed as util_test_copy
# Copying TABLE util_test.t1
# Copying table data.
# Copying TABLE util_test.t2
# Copying table data.
# Copying TABLE util_test.t3
# Copying table data.
# Copying TABLE util_test.t4
# Copying table data.
# Copying VIEW util_test.v1
# Copying TRIGGER util_test.trg
# Copying PROCEDURE util_test.p1
# Copying FUNCTION util_test.f1
# Copying EVENT util_test.e1
# Copying GRANTS from util_test
#...done.
To copy one or more databases from a master to a slave, you can use the following command to copy the
databases. Use the master as the source and the slave as the destination:
shell> mysqldbcopy --source=root@localhost:3310 \
--destination=root@localhost:3311 test123 --rpl=master \
--rpl-user=rpl
# Source on localhost: ... connected.
# Destination on localhost: ... connected.
# Source on localhost: ... connected.
# Stopping slave
# Copying database test123
# Copying TABLE test123.t1
# Copying data for TABLE test123.t1
# Connecting to the current server as master
# Starting slave
#...done.
To copy a database from one slave to another attached to the same master, you can use the following
command using the slave with the database to be copied as the source and the slave where the database
needs to copied to as the destination:
shell> mysqldbcopy --source=root@localhost:3311 \
--destination=root@localhost:3312 test123 --rpl=slave \
--rpl-user=rpl
#
#
#
#
#
#
#
#
Source on localhost: ... connected.
Destination on localhost: ... connected.
Source on localhost: ... connected.
Stopping slave
Copying database test123
Copying TABLE test123.t1
Copying data for TABLE test123.t1
Connecting to the current server's master
82
PERMISSIONS REQUIRED
# Starting slave
#...done.
PERMISSIONS REQUIRED
The user must have SELECT, SHOW VIEW, EVENT and TRIGGER privileges for the database(s) on
the source server. On the destination server, the user must have the following privileges for the copied
database(s): CREATE, ALTER, SELECT, INSERT, UPDATE, LOCK TABLES, DROP if --drop-first
option is used, and SUPER depending on the objects DEFINER value.
5.5 mysqldbexport — Export Object Definitions or Data from a
Database
This utility exports metadata (object definitions) or data or both from one or more databases. By default,
the export includes only definitions.
mysqldbexport differs from mysqldump in that it can produce output in a variety of formats to make your
data extraction/transport much easier. It permits you to export your data in the format most suitable to an
external tool, another MySQL server, or other use without the need to reformat the data.
To exclude specific objects by name, use the --exclude option with a name in db.*obj* format, or you
can supply a search pattern. For example, --exclude=db1.trig1 excludes the single trigger and -exclude=trig_ excludes all objects from all databases having a name that begins with trig and has a
following character.
To skip objects by type, use the --skip option with a list of the objects to skip. This enables you to extract
a particular set of objects, say, for exporting only events (by excluding all other types). Similarly, to skip
creation of UPDATE statements for BLOB data, specify the --skip-blobs option.
To specify how to display output, use one of the following values with the --format option:
• sql (default)
Display output using SQL statements. For definitions, this consists of the appropriate CREATE and
GRANT statements. For data, this is an INSERT statement (or bulk insert if the --bulk-insert option
is specified).
• grid
Display output in grid or table format like that of the mysql client command-line tool.
• csv
Display output in comma-separated values format.
• tab
Display output in tab-separated format.
• vertical
Display output in single-column format like that of the \G command for the mysql client command-line
tool.
To specify how much data to display, use one of the following values with the --display option:
• brief
83
mysqldbexport — Export Object Definitions or Data from a Database
Display only the minimal columns for recreating the objects.
• full
Display the complete column list for recreating the objects.
• names
Display only the object names.
Note: For SQL-format output, the --display option is ignored.
To turn off the headers for csv or tab display format, specify the --no-headers option.
To turn off all feedback information, specify the --quiet option.
To write the data for individual tables to separate files, use the --file-per-table option. The name
of each file is composed of the database and table names followed by the file format. For example, the
following command produces files named db1.*table_name*.csv:
mysqldbexport --server=root@server1:3306 --format=csv db1 --export=data
By default, the operation uses a consistent snapshot to read the source databases. To change the locking
mode, use the --locking option with a locking type value. Use a value of no-locks to turn off locking
altogether or lock-all to use only table locks. The default value is snapshot. Additionally, the utility uses
WRITE locks to lock the destination tables during the copy.
You can include replication statements for exporting data among a master and slave or between slaves.
The --rpl option permits you to select from the following replication statements to include in the export.
• master
Include the CHANGE MASTER statement to make the destination server a slave of the server specified
in the --server option. This places the appropriate STOP and START slave statements in the export
whereby the STOP SLAVE statement is placed at the start of the export and the CHANGE MASTER
followed by the START SLAVE statements are placed after the export stream.
• slave
Include the CHANGE MASTER statement to make the destination server a slave connected to the same
master as the server specified in the --server option. It only works if the current server is a slave. This
places the appropriate STOP and START slave statements in the export whereby the STOP SLAVE
statement is placed at the start of the export and the CHANGE MASTER followed by the START SLAVE
statements are placed after the export stream.
• both
Include both the 'master' and 'slave' information for CHANGE MASTER statements for either spawning
a new slave with the current server's master or using the current server as the master. All statements
generated are labeled and commented to enable the user to choose which to include when imported.
To include the replication user in the CHANGE MASTER statement, use the --rpl-user option to
specify the user and password. If this option is omitted, the utility attempts to identify the replication user. In
the event that there are multiple candidates or the user requires a password, these statements are placed
inside comments for the CHANGE MASTER statement.
You can also use the --comment-rpl option to place the replication statements inside comments for later
examination.
84
OPTIONS
If you specify the --rpl-file option, the utility writes the replication statements to the file specified
instead of including them in the export stream.
If you attempt to export databases on a server with GTIDs enabled (GTID_MODE = ON), a warning will
be generated if the export does not include all databases. This is because the GTID statements generated
include the GTIDs for all databases and not only those databases in the export.
The utility will also generate a warning if you export databases on a GTID enabled server but use the -skip-gtid option.
To make the most use of GTIDs and export/import, you should export all of the databases on the server
with the --all option. This will generate an export file with all of the databases and the GTIDs executed to
that point.
Importing this file on another server will ensure that server has all of the data as well as all of the GTIDs
recorded correctly in its logs.
OPTIONS
mysqldbexport accepts the following command-line options:
• --help
Display a help message and exit.
• --license
Display license information and exit.
• --bulk-insert, -b
Use bulk insert statements for data.
• --character-set=<charset>
Sets the client character set. The default is retrieved from the server variable
character_set_client.
• --comment-rpl
Place the replication statements in comment statements. Valid only with the --rpl option.
• --display=<display>, -d<display>
Control the number of columns shown. Permitted display values are brief (minimal columns for object
creation), full* (all columns), and **names (only object names; not valid for --format=sql). The
default is brief.
• --exclude=<exclude>, -x<exclude>
Exclude one or more objects from the operation using either a specific name such as db1.t1 or a
search pattern. Use this option multiple times to specify multiple exclusions. By default, patterns use
LIKE matching. With the --regexp option, patterns use REGEXP matching.
This option does not apply to grants.
• --export=<export>, -e<export>
85
OPTIONS
Specify the export format. Permitted format values are definitions = export only the definitions
(metadata) for the objects in the database list, data = export only the table data for the tables in the
database list, and both = export the definitions and the data. The default is definitions.
• --file-per-table
Write table data to separate files. This is Valid only if the export output includes data (that
is, if --export=data or --export=both are given). This option produces files named
db_name.*tbl_name*.*format*. For example, a csv export of two tables named t1 and t2 in database
d1, results in files named db1.t1.csv and db1.t2.csv. If table definitions are included in the export,
they are written to stdout as usual.
• --format=<format>, -f<format>
Specify the output display format. Permitted format values are sql, grid, tab, csv, and vertical. The
default is sql.
• --locking=<locking>
Choose the lock type for the operation. Permitted lock values are no-locks (do not use any table locks),
lock-all (use table locks but no transaction and no consistent read), and snapshot (consistent read
using a single transaction). The default is snapshot.
• --multiprocess
Specify the number of processes to concurrently export the specified databases. Special values:
0 (number of processes equal to the number of detected CPUs) and 1 (default - no concurrency).
Multiprocessing works at the database level for Windows and at the table level for Non-Windows
(POSIX) systems.
• --no-headers, -h
Do not display column headers. This option applies only for csv and tab output.
• --output-file
Specify the path and file name to store the generated export output. By default the standard output is
used (no file).
• --quiet, -q
Turn off all messages for quiet execution.
• --regexp, --basic-regexp, -G
Perform pattern matches using the REGEXP operator. The default is to use LIKE for matching.
• --rpl=<rpl_mode>, --replication=<rpl_mode>
Include replication information. Permitted values are master (make destination a slave of the source
server), slave (make destination a slave of the same master as the source - only works if the source
server is a slave), and both (include the master and slave options where applicable).
• --rpl-file=RPL_FILE, --replication-file=RPL_FILE
The path and file name where the generated replication information should be written. Valid only with the
--rpl option.
86
NOTES
• --rpl-user=<replication_user>
The user and password for the replication user requirement, in the format: <user>[:<password>] or
<login-path>. For example, rpl:passwd. The default is None.
• --server=<server>
Connection information for the server.
To connect to a server, it is necessary to specify connection parameters such as user name, host
name, password, and either a port or socket. MySQL Utilities provides a number of ways to provide
this information. All of the methods require specifying your choice via a command-line option such as -server, --master, --slave, etc. The methods include the following in order of most secure.
• Use login-paths from your .mylogin.cnf file (encrypted, not visible). Example : <login-path>[:<port>]
[:<socket>]
• Use a configuration file (unencrypted, not visible) Note: available in release-1.5.0. Example :
<configuration-file-path>[:<section>]
• Specify the data on the command-line (unencrypted, visible). Example :
<user>[:<passwd>]@<host>[:<port>][:<socket>]
• --skip=<skip-objects>
Specify objects to skip in the operation as a comma-separated list (no spaces). Permitted values are
CREATE_DB, DATA, EVENTS, FUNCTIONS, GRANTS, PROCEDURES, TABLES, TRIGGERS, and
VIEWS.
• --skip-blobs
Do not export BLOB data.
• --skip-gtid
Skip creation of GTID_PURGED statements.
• --all
Generate an export file with all of the databases and the GTIDs executed to that point.
• --verbose, -v
Specify how much information to display. Use this option multiple times to increase the amount of
information. For example, -v = verbose, -vv = more verbose, -vvv = debug.
• --version
Display version information and exit.
NOTES
You must provide connection parameters (user, host, password, and so forth) for an account that has the
appropriate privileges to access all objects in the operation.
To export all objects from a source database, the user must have these privileges: SELECT and SHOW
VIEW on the database as well as SELECT on the mysql database.
87
EXAMPLES
Actual privileges needed may differ from installation to installation depending on the security privileges
present and whether the database contains certain objects such as views or events.
Some combinations of the options may result in errors when the export is imported later. For example,
eliminating tables but not views may result in an error when a view is imported on another server.
For the --format, --export, and --display options, the permitted values are not case sensitive. In
addition, values may be specified as any unambiguous prefix of a valid value. For example, --format=g
specifies the grid format. An error occurs if a prefix matches more than one valid value.
The path to the MySQL client tools should be included in the PATH environment variable in order to use the
authentication mechanism with login-paths. This will allow the utility to use the my_print_defaults tools
which is required to read the login-path values from the login configuration file (.mylogin.cnf).
If any database identifier specified as an argument contains special characters or is a reserved word,
then it must be appropriately quoted with backticks (`). In turn, names quoted with backticks must also be
quoted with single or double quotes depending on the operating system, i.e. (") in Windows or (') in nonWindows systems, in order for the utilities to read backtick quoted identifiers as a single argument. For
example, to export a database with the name weird`db.name, it must be specified as argument using the
following syntax (in non-Windows): '`weird``db.name`'.
Keep in mind that you can only take advantage of multiprocessing if your system has multiple CPUs
available for concurrent execution. Also note that multiprocessing is applied at a different level according
to the operating system where the mysqldbexport utility is executed (due to python limitations). In
particular, it is applied at the database level for Windows (i.e., different databases are concurrently
exported) and at the table level for Non-Windows (POSIX) systems (i.e., different tables within the same
database are concurrently exported).
EXAMPLES
To export the definitions of the database dev from a MySQL server on the local host via port 3306,
producing output consisting of CREATE statements, use this command:
shell> mysqldbexport --server=root:pass@localhost \
--skip=GRANTS --export=DEFINITIONS util_test
# Source on localhost: ... connected.
# Exporting metadata from util_test
DROP DATABASE IF EXISTS util_test;
CREATE DATABASE util_test;
USE util_test;
# TABLE: util_test.t1
CREATE TABLE `t1` (
`a` char(30) DEFAULT NULL
) ENGINE=MEMORY DEFAULT CHARSET=latin1;
# TABLE: util_test.t2
CREATE TABLE `t2` (
`a` char(30) DEFAULT NULL
) ENGINE=MyISAM DEFAULT CHARSET=latin1;
# TABLE: util_test.t3
CREATE TABLE `t3` (
`a` int(11) NOT NULL AUTO_INCREMENT,
`b` char(30) DEFAULT NULL,
PRIMARY KEY (`a`)
) ENGINE=InnoDB AUTO_INCREMENT=4 DEFAULT CHARSET=latin1;
# TABLE: util_test.t4
CREATE TABLE `t4` (
`c` int(11) NOT NULL,
`d` int(11) NOT NULL,
KEY `ref_t3` (`c`),
CONSTRAINT `ref_t3` FOREIGN KEY (`c`) REFERENCES `t3` (`a`)
88
EXAMPLES
) ENGINE=InnoDB DEFAULT CHARSET=latin1;
# VIEW: util_test.v1
[...]
#...done.
Similarly, to export the data of the database util_test, producing bulk insert statements, use this
command:
shell> mysqldbexport --server=root:pass@localhost \
--export=DATA --bulk-insert util_test
# Source on localhost: ... connected.
USE util_test;
# Exporting data from util_test
# Data for table util_test.t1:
INSERT INTO util_test.t1 VALUES ('01 Test Basic database example'),
('02 Test Basic database example'),
('03 Test Basic database example'),
('04 Test Basic database example'),
('05 Test Basic database example'),
('06 Test Basic database example'),
('07 Test Basic database example');
# Data for table util_test.t2:
INSERT INTO util_test.t2 VALUES ('11 Test Basic database example'),
('12 Test Basic database example'),
('13 Test Basic database example');
# Data for table util_test.t3:
INSERT INTO util_test.t3 VALUES (1, '14 test fkeys'),
(2, '15 test fkeys'),
(3, '16 test fkeys');
# Data for table util_test.t4:
INSERT INTO util_test.t4 VALUES (3, 2);
#...done.
If the database to be exported does not contain only InnoDB tables and you want to ensure data integrity
of the exported data by locking the tables during the read step, add a --locking=lock-all option to the
command:
shell> mysqldbexport --server=root:pass@localhost \
--export=DATA --bulk-insert util_test --locking=lock-all
# Source on localhost: ... connected.
USE util_test;
# Exporting data from util_test
# Data for table util_test.t1:
INSERT INTO util_test.t1 VALUES ('01 Test Basic database example'),
('02 Test Basic database example'),
('03 Test Basic database example'),
('04 Test Basic database example'),
('05 Test Basic database example'),
('06 Test Basic database example'),
('07 Test Basic database example');
# Data for table util_test.t2:
INSERT INTO util_test.t2 VALUES ('11 Test Basic database example'),
('12 Test Basic database example'),
('13 Test Basic database example');
# Data for table util_test.t3:
INSERT INTO util_test.t3 VALUES (1, '14 test fkeys'),
(2, '15 test fkeys'),
(3, '16 test fkeys');
# Data for table util_test.t4:
INSERT INTO util_test.t4 VALUES (3, 2);
#...done.
To export a database and include the replication commands to use the current server as the master (for
example, to start a new slave using the current server as the master), use the following command:
89
EXAMPLES
shell> mysqldbexport --server=root@localhost:3311 util_test \
--export=both --rpl-user=rpl:rpl --rpl=master -v
# Source on localhost: ... connected.
#
# Stopping slave
STOP SLAVE;
#
# Source on localhost: ... connected.
# Exporting metadata from util_test
DROP DATABASE IF EXISTS util_test;
CREATE DATABASE util_test;
USE util_test;
# TABLE: util_test.t1
CREATE TABLE `t1` (
`a` char(30) DEFAULT NULL
) ENGINE=MEMORY DEFAULT CHARSET=latin1;
#...done.
# Source on localhost: ... connected.
USE util_test;
# Exporting data from util_test
# Data for table util_test.t1:
INSERT INTO util_test.t1 VALUES ('01 Test Basic database example');
INSERT INTO util_test.t1 VALUES ('02 Test Basic database example');
INSERT INTO util_test.t1 VALUES ('03 Test Basic database example');
INSERT INTO util_test.t1 VALUES ('04 Test Basic database example');
INSERT INTO util_test.t1 VALUES ('05 Test Basic database example');
INSERT INTO util_test.t1 VALUES ('06 Test Basic database example');
INSERT INTO util_test.t1 VALUES ('07 Test Basic database example');
#...done.
#
# Connecting to the current server as master
CHANGE MASTER TO MASTER_HOST = 'localhost',
MASTER_USER = 'rpl',
MASTER_PASSWORD = 'rpl',
MASTER_PORT = 3311,
MASTER_LOG_FILE = 'clone-bin.000001' ,
MASTER_LOG_POS = 106;
#
# Starting slave
START SLAVE;
#
Similarly, to export a database and include the replication commands to use the current server's master
(for example, to start a new slave using the same the master), use the following command:
shell> mysqldbexport --server=root@localhost:3311 util_test \
--export=both --rpl-user=rpl:rpl --rpl=slave -v
# Source on localhost: ... connected.
#
# Stopping slave
STOP SLAVE;
#
# Source on localhost: ... connected.
# Exporting metadata from util_test
DROP DATABASE IF EXISTS util_test;
CREATE DATABASE util_test;
USE util_test;
# TABLE: util_test.t1
CREATE TABLE `t1` (
`a` char(30) DEFAULT NULL
) ENGINE=MEMORY DEFAULT CHARSET=latin1;
#...done.
# Source on localhost: ... connected.
USE util_test;
# Exporting data from util_test
90
PERMISSIONS REQUIRED
# Data for table util_test.t1:
INSERT INTO util_test.t1 VALUES ('01 Test Basic
INSERT INTO util_test.t1 VALUES ('02 Test Basic
INSERT INTO util_test.t1 VALUES ('03 Test Basic
INSERT INTO util_test.t1 VALUES ('04 Test Basic
INSERT INTO util_test.t1 VALUES ('05 Test Basic
INSERT INTO util_test.t1 VALUES ('06 Test Basic
INSERT INTO util_test.t1 VALUES ('07 Test Basic
#...done.
#
# Connecting to the current server's master
CHANGE MASTER TO MASTER_HOST = 'localhost',
MASTER_USER = 'rpl',
MASTER_PASSWORD = 'rpl',
MASTER_PORT = 3310,
MASTER_LOG_FILE = 'clone-bin.000001' ,
MASTER_LOG_POS = 1739;
#
# Starting slave
START SLAVE;
#
database
database
database
database
database
database
database
example');
example');
example');
example');
example');
example');
example');
PERMISSIONS REQUIRED
The user must have permission to read all databases. Since we are using the root account for these
examples (and you typically would), permissions are not generally a problem.
5.6 mysqldbimport — Import Object Definitions or Data into a
Database
This utility imports metadata (object definitions) or data or both for one or more databases from one or
more files.
If an object exists on the destination server with the same name as an imported object, it is dropped first
before importing the new object.
To skip objects by type, use the --skip option with a list of the objects to skip. This enables you to extract
a particular set of objects, say, for importing only events (by excluding all other types). Similarly, to skip
creation of UPDATE statements for BLOB data, specify the --skip-blobs option.
To specify the input format, use one of the following values with the --format option. These correspond
to the output formats of the mysqldbexport utility:
• sql (default)
Input consists of SQL statements. For definitions, this consists of the appropriate CREATE and GRANT
statements. For data, this is an INSERT statement (or bulk insert if the --bulk-insert option is
specified).
• grid
Display output in grid or table format like that of the mysql client command-line tool.
• csv
Input is formatted in comma-separated values format.
• raw_csv
91
OPTIONS
Input is a simple CSV file containing uniform rows with values separated with commas. The file can
contain a header (the first row) that lists the table columns. The option --table is required to use this
format.
• tab
Input is formatted in tab-separated format.
• vertical
Display output in single-column format like that of the \G command for the mysql client command-line
tool.
To indicate that input in csv or tab format does not contain column headers, specify the --no-headers
option.
To turn off all feedback information, specify the --quiet option.
By default, the utility creates each table on the destination server using the same storage engine as
the original table. To override this and specify the storage engine to use for all tables created on the
destination server, use the --new-storage-engine option. If the destination server supports the new
engine, all tables use that engine.
To specify the storage engine to use for tables for which the destination server does not support the
original storage engine on the source server, use the --default-storage-engine option.
The --new-storage-engine option takes precedence over --default-storage-engine if both are
given.
If the --new-storage-engine or --default-storage-engine option is given and the destination
server does not support the specified storage engine, a warning is issued and the server's default storage
engine setting is used instead.
You must provide connection parameters (user, host, password, and so forth) for an account that has the
appropriate privileges to access all objects in the operation. For details, see NOTES.
If you attempt to import databases on a server with GTIDs enabled (GTID_MODE = ON), a warning will be
generated if the import file did not include the GTID statements generated by mysqldbexport.
The utility will also generate a warning if you import databases on a server without GTIDs enabled
and there are GTID statements present in the file. Use the --skip-gtid option to ignore the GTID
statements.
To make the most use of GTIDs and export/import, you should export all of the databases on the server
with the --all option. This will generate an export file with all of the databases and the GTIDs executed
to that point. Importing this file on another server will ensure that server has all of the data as well as all of
the GTIDs recorded correctly in its logs.
OPTIONS
mysqldbimport accepts the following command-line options:
• --help
Display a help message and exit.
• --license
92
OPTIONS
Display license information and exit.
• --autocommit
Enable autocommit for data import. By default, autocommit is off and data changes are only committed
once at the end of each imported file.
• --bulk-insert, -b
Use bulk insert statements for data.
• --character-set=<charset>
Sets the client character set. The default is retrieved from the server variable
character_set_client.
• --default-storage-engine=<def_engine>
The engine to use for tables if the destination server does not support the original storage engine on the
source server.
• --drop-first, -d
Drop each database to be imported if exists before importing anything into it.
• --dryrun
Import the files and generate the statements but do not execute them. This is useful for testing input file
validity.
• --format=<format>, -f<format>
Specify the input format. Permitted format values are sql (default), grid, tab, csv, raw_csv, and
vertical.
• --import=<import_type>, -i<import_type>
Specify the import format. Permitted format values are:
Table 5.1 mysqldbimport Import Types
Import Type
Definition
definitions (default)
Only import the definitions (metadata) for the objects in the database list
data
Only import the table data for the tables in the database list
both
Import both the definitions (metadata) and data
If you attempt to import objects into an existing database, the result depends on the import format. If
the format is definitions or both, an error occurs unless --drop-first is given. If the format is data,
imported table data is added to existing table data.
• --max-bulk-insert
Specify the maximum number of INSERT statements to bulk, by default 30000. This option is only used
with --bulk-insert.
• --multiprocess
93
OPTIONS
Specify the number of processes to concurrently import the specified files. Special values: 0 (number
of processes equal to the number of detected CPUs) and 1 (default - no concurrency). Multiprocessing
works at the files level for any operating systems.
• --new-storage-engine=<new_engine>
The engine to use for all tables created on the destination MySQL server.
• --no-headers, -h
Input does not contain column headers. This option only applies to the csv and tab file formats.
• --quiet, -q
Turn off all messages for quiet execution.
• --server=<server>
Connection information for the server.
To connect to a server, it is necessary to specify connection parameters such as user name, host
name, password, and either a port or socket. MySQL Utilities provides a number of ways to provide
this information. All of the methods require specifying your choice via a command-line option such as -server, --master, --slave, etc. The methods include the following in order of most secure.
• Use login-paths from your .mylogin.cnf file (encrypted, not visible). Example : <login-path>[:<port>]
[:<socket>]
• Use a configuration file (unencrypted, not visible) Note: available in release-1.5.0. Example :
<configuration-file-path>[:<section>]
• Specify the data on the command-line (unencrypted, visible). Example :
<user>[:<passwd>]@<host>[:<port>][:<socket>]
• --skip=<skip_objects>
Specify objects to skip in the operation as a comma-separated list (no spaces). Permitted values for
this list are; CREATE_DB, DATA, EVENTS, FUNCTIONS, GRANTS, PROCEDURES, TABLES,
TRIGGERS, and VIEWS.
• --skip-blobs
Do not import BLOB data.
• --skip-gtid
Skip execution of GTID_PURGED statements.
• --skip-rpl
Do not execute replication commands.
• --table=<db>,<table>
Specify the table for importing. This option is required while using --format=raw_csv.
• --verbose, -v
94
NOTES
Specify how much information to display. Use this option multiple times to increase the amount of
information. For example, -v = verbose, -vv = more verbose, -vvv = debug.
• --version
Display version information and exit.
NOTES
The login user must have the appropriate permissions to create new objects, access (read) the mysql
database, and grant privileges. If a database to be imported already exists, the user must have read
permission for it, which is needed to check the existence of objects in the database.
Actual privileges needed may differ from installation to installation depending on the security privileges
present and whether the database contains certain objects such as views or events and whether binary
logging is enabled.
Some combinations of the options may result in errors during the operation. For example, excluding tables
but not views may result in an error when a view is imported.
The --new-storage-engine and --default-storage-engine options apply to all destination tables
in the operation.
For the --format and --import options, the permitted values are not case sensitive. In addition, values
may be specified as any unambiguous prefix of a valid value. For example, --format=g specifies the grid
format. An error occurs if a prefix matches more than one valid value.
When importing data and including the GTID commands, you may encounter an error similar to
"GTID_PURGED can only be set when GTID_EXECUTED is empty". This occurs because the destination
server is not in a clean replication state. To solve this problem, you can issue a "RESET MASTER"
command on the destination prior to executing the import.
The path to the MySQL client tools should be included in the PATH environment variable in order to use the
authentication mechanism with login-paths. This will allow the utility to use the my_print_defaults tools
which is required to read the login-path values from the login configuration file (.mylogin.cnf).
Keep in mind that you can only take advantage of multiprocessing if your system has multiple CPUs
available for concurrent execution. Also note that multiprocessing is applied at the file level for the
mysqldbimport utility, which means that only different files can be concurrently imported.
EXAMPLES
To import the metadata from the util_test database to the server on the local host using a file in CSV
format, use this command:
shell> mysqldbimport --server=root@localhost --import=definitions \
--format=csv data.csv
# Source on localhost: ... connected.
# Importing definitions from data.csv.
#...done.
Similarly, to import the data from the util_test database to the server on the local host, importing the
data using bulk insert statements, use this command:
95
PERMISSIONS REQUIRED
shell> mysqldbimport --server=root@localhost --import=data \
--bulk-insert --format=csv data.csv
# Source on localhost: ... connected.
# Importing data from data.csv.
#...done.
To import both data and definitions from the util_test database, importing the data using bulk insert
statements from a file that contains SQL statements, use this command:
shell> mysqldbimport --server=root@localhost --import=both --bulk-insert --format=sql data.sql
# Source on localhost: ... connected.
# Importing definitions and data from data.sql.
#...done.
PERMISSIONS REQUIRED
You also need permissions to create the new data directory and write data to it.
5.7 mysqldiff — Identify Differences Among Database Objects
This utility reads the definitions of objects and compares them using a diff-like method to determine
whether they are the same. The utility displays the differences for objects that are not the same.
Use the notation db1:db2 to name two databases to compare, or, alternatively just db1 to compare two
databases with the same name. The latter case is a convenience notation for comparing same-named
databases on different servers.
The comparison may be executed against two databases of different names on a single server by
specifying only the --server1 option. The user can also connect to another server by specifying the -server2 option. In this case, db1 is taken from server1 and db2 from server2.
When a database pair is specified, all objects in one database are compared to the corresponding objects
in the other. Objects not appearing in either database produce an error.
To compare a specific pair of objects, add an object name to each database name using the db.obj
format. For example, use the db1.obj1:db2.obj2 format to compare two named objects, or db1.obj1 to
compare an object with the same name in databases with the same name. It is not legal to mix a database
name with an object name. For example, db1.obj1:db2 and db1:db2.obj2 are illegal formats.
The comparison may be run against a single server for comparing two databases of different names on
the same server by specifying only the --server1 option. Alternatively, you can also connect to another
server by specifying the --server2 option. In this case, the first object to compare is taken from server1
and the second from server2.
By default, the utility generates object differences as a difference report. However, you can generate
a transformation report containing SQL statements for transforming the objects for conformity instead.
Use the 'sql' value for the --difftype option to produce a listing that contains the appropriate ALTER
commands to conform the object definitions for the object pairs specified. If a transformation cannot be
formed, the utility reports the diff of the object along with a warning statement. See important limitations in
the NOTES section.
To specify how to display the diff styled output, use one of the following values with the --difftype
option:
• unified (default)
96
OPTIONS
Display unified format output.
• context
Display context format output.
• differ
Display differ-style format output.
• sql
Display SQL transformation statement output.
The --changes-for option controls the direction of the difference (by specifying the object to be
transformed) in either the difference report (default) or the transformation report (designated with the -difftype=sql option). Consider the following command:
shell> mysqldiff --server1=root@host1 --server2=root@host2 --difftype=sql \
db1.table1:dbx.table3
The leftmost database (db1) exists on the server designated by the --server1 option (host1). The
rightmost database (dbx) exists on the server designated by the --server2 option (host2).
• --changes-for=server1: Produces output that shows how to make the definitions of objects on
server1 like the definitions of the corresponding objects on server2.
• --changes-for=server2: Produces output that shows how to make the definitions of objects on
server2 like the definitions of the corresponding objects on server1.
The default direction is server1.
For the sql difference format, you can also see the reverse transformation by specifying the --showreverse option.
The utility stops at the first occurrence of missing objects or when an object does not match. To override
this behavior, specify the --force option to cause the utility to attempt to compare all objects listed as
arguments.
OPTIONS
mysqldiff accepts the following command-line options:
• --help
Display a help message and exit.
• --license
Display license information and exit.
• --changes-for=<direction>
Specify the server to show transformations to match the other server. For example, to see the
transformation for transforming object definitions on server1 to match the corresponding definitions on
server2, use --changes-for=server1. Permitted values are server1 and server2. The default is
server1.
97
OPTIONS
• --character-set=<charset>
Sets the client character set. The default is retrieved from the server variable
character_set_client.
• --difftype=<difftype>, -d<difftype>
Specify the difference display format. Permitted format values are unified (default), context, differ, and
sql.
• --compact
Compacts the output by reducing the control lines that are displayed in the diff results. This option should
be used together with one of the following difference types: unified or context.
• --force
Do not halt at the first difference found. Process all objects to find all differences.
• --quiet, -q
Do not print anything. Return only an exit code of success or failure.
• --server1=<source>
Connection information for the first server.
To connect to a server, it is necessary to specify connection parameters such as user name, host
name, password, and either a port or socket. MySQL Utilities provides a number of ways to provide
this information. All of the methods require specifying your choice via a command-line option such as -server, --master, --slave, etc. The methods include the following in order of most secure.
• Use login-paths from your .mylogin.cnf file (encrypted, not visible). Example : <login-path>[:<port>]
[:<socket>]
• Use a configuration file (unencrypted, not visible) Note: available in release-1.5.0. Example :
<configuration-file-path>[:<section>]
• Specify the data on the command-line (unencrypted, visible). Example :
<user>[:<passwd>]@<host>[:<port>][:<socket>]
• --server2=<source>
Connection information for the second server.
To connect to a server, it is necessary to specify connection parameters such as user name, host
name, password, and either a port or socket. MySQL Utilities provides a number of ways to provide
this information. All of the methods require specifying your choice via a command-line option such as -server, --master, --slave, etc. The methods include the following in order of most secure.
• Use login-paths from your .mylogin.cnf file (encrypted, not visible). Example : <login-path>[:<port>]
[:<socket>]
• Use a configuration file (unencrypted, not visible) Note: available in release-1.5.0. Example :
<configuration-file-path>[:<section>]
• Specify the data on the command-line (unencrypted, visible). Example :
<user>[:<passwd>]@<host>[:<port>][:<socket>]
98
NOTES
• --show-reverse
Produce a transformation report containing the SQL statements to conform the object definitions
specified in reverse. For example, if --changes-for is set to server1, also generate the transformation
for server2.
Note
The reverse changes are annotated and marked as comments.
• --verbose, -v
Specify how much information to display. Use this option multiple times to increase the amount of
information. For example, -v = verbose, -vv = more verbose, -vvv = debug.
• --version
Display version information and exit.
• --width=<number>
Change the display width of the test report. The default is 75 characters.
NOTES
You must provide connection parameters (user, host, password, and so forth) for an account that has the
appropriate privileges to access all objects to be compared.
The SQL transformation feature has these known limitations:
• When tables with partition differences are encountered, the utility generates the ALTER TABLE
statement for all other changes but prints a warning and omits the partition differences.
• If the transformation detects table options in the source table (specified with the --changes-for
option) that are not changed or do not exist in the target table, the utility generates the ALTER TABLE
statement for all other changes but prints a warning and omits the table option differences.
• Rename for events is not supported. This is because mysqldiff compares objects by name. In this
case, depending on the direction of the diff, the event is identified as needing to be added or a DROP
EVENT statement is generated.
• Changes in the definer clause for events are not supported.
• SQL extensions specific to MySQL Cluster are not supported.
For the --difftype option, the permitted values are not case sensitive. In addition, values may be
specified as any unambiguous prefix of a valid value. For example, --difftype=d specifies the differ
type. An error occurs if a prefix matches more than one valid value.
The path to the MySQL client tools should be included in the PATH environment variable in order to use the
authentication mechanism with login-paths. This will allow the utility to use the my_print_defaults tools
which is required to read the login-path values from the login configuration file (.mylogin.cnf).
If any database object identifier specified as an argument contains special characters or is a reserved
word, then it must be appropriately quoted with backticks (`). In turn, names quoted with backticks must
also be quoted with single or double quotes depending on the operating system, i.e. (") in Windows or (')
99
EXAMPLES
in non-Windows systems, in order for the utilities to read backtick quoted identifiers as a single argument.
For example, to show the difference between table weird`table1 from database weird`db.name and table
weird`table2 from database other:weird`db.name, the objects pair must be specified using the following
syntax (in non-Windows): '`weird``db.name`.`weird``table1`:`other:weird``db.name`.`weird``table2`'.
EXAMPLES
To compare the employees and emp databases on the local server, use this command:
shell> mysqldiff --server1=root@localhost employees:emp1
# server1 on localhost: ... connected.
WARNING: Objects in server1:employees but not in server2:emp1:
EVENT: e1
Compare failed. One or more differences found.
shell> mysqldiff --server1=root@localhost \
employees.t1:emp1.t1 employees.t3:emp1.t3
# server1 on localhost: ... connected.
# Comparing employees.t1 to emp1.t1
# server1 on localhost: ... connected.
# Comparing employees.t3 to emp1.t3
Success. All objects are the same.
[PASS]
[PASS]
shell> mysqldiff --server1=root@localhost \
employees.salaries:emp1.salaries --differ
# server1 on localhost: ... connected.
# Comparing employees.salaries to emp1.salaries
# Object definitions are not the same:
CREATE TABLE `salaries` (
`emp_no` int(11) NOT NULL,
`salary` int(11) NOT NULL,
`from_date` date NOT NULL,
`to_date` date NOT NULL,
PRIMARY KEY (`emp_no`,`from_date`),
KEY `emp_no` (`emp_no`)
- ) ENGINE=InnoDB DEFAULT CHARSET=latin1
?
^^^^^
+ ) ENGINE=MyISAM DEFAULT CHARSET=latin1
?
++ ^^^
Compare failed. One or more differences found.
[FAIL]
The following examples show how to generate a transformation report. Assume the following object
definitions:
Host1:
CREATE TABLE db1.table1 (num int, misc char(30));
Host2:
CREATE TABLE dbx.table3 (num int, notes char(30), misc char(55));
To generate a set of SQL statements that transform the definition of db1.table1 to dbx.table3, use
this command:
shell> mysqldiff --server1=root@host1 --server2=root@host2 \
--changes-for=server1 --difftype=sql \
100
PERMISSIONS REQUIRED
db1.table1:dbx.table3
#
#
#
#
server1 on host1: ... connected.
server2 on host2: ... connected.
Comparing db1.table1 to dbx.table3
Transformation statements:
[FAIL]
ALTER TABLE db1.table1
ADD COLUMN notes char(30) AFTER a,
CHANGE COLUMN misc misc char(55);
Compare failed. One or more differences found.
To generate a set of SQL statements that transform the definition of dbx.table3 to db1.table1, use
this command:
shell> mysqldiff --server1=root@host1 --server2=root@host2 \
--changes-for=server2 --difftype=sql \
db1.table1:dbx.table3
#
#
#
#
server1 on host1: ... connected.
server2 on host2: ... connected.
Comparing db1.table1 to dbx.table3
Transformation statements:
[FAIL]
ALTER TABLE dbx.table3
DROP COLUMN notes,
CHANGE COLUMN misc misc char(30);
Compare failed. One or more differences found.
To generate a set of SQL statements that transform the definitions of dbx.table3 and db1.table1 in
both directions, use this command:
shell> mysqldiff --server1=root@host1 --server2=root@host2 \
--show-reverse --difftype=sql \
db1.table1:dbx.table3
#
#
#
#
server1 on host1: ... connected.
server2 on host2: ... connected.
Comparing db1.table1 to dbx.table3
Transformation statements:
[FAIL]
# --destination=server1:
ALTER TABLE db1.table1
ADD COLUMN notes char(30) AFTER a,
CHANGE COLUMN misc misc char(55);
# --destination=server2:
# ALTER TABLE dbx.table3
#
DROP COLUMN notes,
#
CHANGE COLUMN misc misc char(30);
Compare failed. One or more differences found.
PERMISSIONS REQUIRED
The user must have SELECT privileges for both objects on both servers as well as SELECT on the mysql
database.
5.8 mysqldiskusage — Show Database Disk Usage
101
OPTIONS
This utility displays disk space usage for one or more databases. The utility optionally displays disk usage
for the binary log, slow query log, error log, general query log, relay log, and InnoDB tablespaces. The
default is to only show database disk usage.
If the command-line lists no databases, the utility shows the disk space usage for all databases.
Sizes displayed without a unit indicator (such as MB) are in bytes.
The utility determines the location of the data directory by requesting it from the server. For a local server,
the utility obtains size information directly from files in the data directory and InnoDB home directory. In this
case, you must have file system access to read those directories. Disk space usage shown includes the
sum of all storage engine- specific files such as the .MYI and .MYD files for MyISAM and the tablespace
files for InnoDB.
If the file system read fails, or if the server is not local, the utility cannot determine exact file sizes. It is
limited to information that can be obtained from the system tables, which therefore should be considered
an estimate. For information read from the server, the account used to connect to the server must have the
appropriate permissions to read any objects accessed during the operation.
If information requested requires file system access but is not available that way, the utility prints a
message that the information is not accessible. This occurs, for example, if you request log usage but the
server is not local and the log files cannot be examined directly.
To specify how to display output, use one of the following values with the --format option:
• grid (default)
Display output in grid or table format like that of the mysql client command-line tool.
• csv
Display output in comma-separated values format.
• tab
Display output in tab-separated format.
• vertical
Display output in single-column format like that of the \G command for the mysql client command-line
tool.
To turn off the headers for grid, csv, or tab display format, specify the --no-headers option.
OPTIONS
mysqldiskusage accepts the following command-line options:
• --help
Display a help message and exit.
• --license
Display license information and exit.
• --all, -a
Display all disk usage. This includes usage for databases, logs, and InnoDB tablespaces.
102
OPTIONS
• --binlog, -b
Display binary log usage.
• --empty, -m
Include empty databases.
• --format=<format>, -f<format>
Specify the output display format. Permitted format values are grid, csv, tab, and vertical. The default is
grid.
• --innodb, -i
Display InnoDB tablespace usage. This includes information about the shared InnoDB tablespace as
well as .idb files for InnoDB tables with their own tablespace.
• --logs, -l
Display general query log, error log, and slow query log usage.
• --no-headers, -h
Do not display column headers. This option applies only for grid, csv, and tab output.
• --quiet, -q
Suppress informational messages.
• --relaylog, -r
Display relay log usage.
• --server=<server>
Connection information for the server.
To connect to a server, it is necessary to specify connection parameters such as user name, host
name, password, and either a port or socket. MySQL Utilities provides a number of ways to provide
this information. All of the methods require specifying your choice via a command-line option such as -server, --master, --slave, etc. The methods include the following in order of most secure.
• Use login-paths from your .mylogin.cnf file (encrypted, not visible). Example : <login-path>[:<port>]
[:<socket>]
• Use a configuration file (unencrypted, not visible) Note: available in release-1.5.0. Example :
<configuration-file-path>[:<section>]
• Specify the data on the command-line (unencrypted, visible). Example :
<user>[:<passwd>]@<host>[:<port>][:<socket>]
• --verbose, -v
Specify how much information to display. Use this option multiple times to increase the amount of
information. For example, -v = verbose, -vv = more verbose, -vvv = debug.
• --version
103
NOTES
Display version information and exit.
For the --format option, the permitted values are not case sensitive. In addition, values may be specified
as any unambiguous prefix of a valid value. For example, --format=g specifies the grid format. An error
occurs if a prefix matches more than one valid value.
NOTES
You must provide connection parameters (user, host, password, and so forth) for an account that has the
appropriate privileges for all objects accessed during the operation.
The path to the MySQL client tools should be included in the PATH environment variable in order to use the
authentication mechanism with login-paths. This will allow the utility to use the my_print_defaults tools
which is required to read the login-path values from the login configuration file (.mylogin.cnf).
EXAMPLES
To show only the disk space usage for the employees and test databases in grid format (the default),
use this command:
shell> mysqldiskusage --server=root@localhost employees test
# Source on localhost: ... connected.
# Database totals:
+------------+--------------+
| db_name
|
total |
+------------+--------------+
| employees | 205,979,648 |
| test
|
4,096 |
+------------+--------------+
Total database disk usage = 205,983,744 bytes or 196.00 MB
#...done.
To see all disk usage for the server in CSV format, use this command:
shell> mysqldiskusage --server=root@localhost --format=csv -a -vv
# Source on localhost: ... connected.
# Database totals:
db_name,db_dir_size,data_size,misc_files,total
test1,0,0,0,0
db3,0,0,0,0
db2,0,0,0,0
db1,0,0,0,0
backup_test,19410,1117,18293,19410
employees,242519463,205979648,242519463,448499111
mysql,867211,657669,191720,849389
t1,9849,1024,8825,9849
test,56162,4096,52066,56162
util_test_a,19625,2048,17577,19625
util_test_b,17347,0,17347,17347
util_test_c,19623,2048,17575,19623
Total database disk usage = 449,490,516 bytes or 428.00 MB
# Log information.
# The general_log is turned off on the server.
# The slow_query_log is turned off on the server.
# binary log information:
104
PERMISSIONS REQUIRED
Current binary log file = ./mysql-bin.000076
log_file,size
/data/mysql-bin.000076,125
/data/mysql-bin.000077,125
/data/mysql-bin.000078,556
/data/mysql-bin.000079,168398223
/data/mysql-bin.index,76
Total size of binary logs = 168,399,105 bytes or 160.00 MB
# Server is not an active slave - no relay log information.
# InnoDB tablespace information:
InnoDB_file,size,type,specification
/data/ib_logfile0,5242880,log file,
/data/ib_logfile1,5242880,log file,
/data/ibdata1,220200960,shared tablespace,ibdata1:210M
/data/ibdata2,10485760,shared tablespace,ibdata2:10M:autoextend
/data/employees/departments.ibd,114688,file tablespace,
/data/employees/dept_emp.ibd,30408704,file tablespace,
/data/employees/dept_manager.ibd,131072,file tablespace,
/data/employees/employees.ibd,23068672,file tablespace,
/data/employees/salaries.ibd,146800640,file tablespace,
/data/employees/titles.ibd,41943040,file tablespace,
Total size of InnoDB files = 494,125,056 bytes or 471.00 MB
#...done.
PERMISSIONS REQUIRED
The user must have permissions to read the data directory or use an administrator or super user (sudo)
account to obtain access to the data directory.
5.9 mysqlfailover — Automatic replication health monitoring and
failover
This utility permits users to perform replication health monitoring and automatic failover on a replication
topology consisting of a master and its slaves. The utility is designed to run interactively or continuously
refreshing the health information at periodic intervals. Its primary mission is to monitor the master for failure
and when a failure occurs, execute failover to the best slave available. The utility accepts a list of slaves to
be considered the candidate slave.
This utility is designed to work exclusively for servers that support global transaction identifiers (GTIDs)
and have gtid_mode=ON. MySQL Server versions 5.6.5 and higher support GTIDs. See Replication with
Global Transaction Identifiers, for more information.
The user can specify the interval in seconds to use for detecting the master status and generating the
health report using the --interval option. At each interval, the utility will check to see if the server is
alive via a ping operation followed by a check of the connector to detect if the server is still reachable. The
ping operation can be controlled with the --ping option (see below).
If the master is found to be offline or unreachable, the utility will execute one of the following actions based
on the value of the --failover-mode option.
auto Execute automatic failover to the list of candidates first and if no slaves are viable, continue to locate
a viable candidate from the list of slaves. If no slaves are found to be a viable candidate, the utility will
generate and error and exit.
Once a candidate is found, the utility will conduct failover to the best slave. The command will test each
candidate slave listed for the prerequisites. Once a candidate slave is elected, it is made a slave of each of
105
mysqlfailover — Automatic replication health monitoring and failover
the other slaves thereby collecting any transactions executed on other slaves but not the candidate. In this
way, the candidate becomes the most up-to-date slave.
elect This mode is the same as auto except if no candidates specified in the list of candidate slaves are
viable, it does not check the remaining slaves and generates and error and exits.
fail This mode produces an error and does not failover when the master is downed. This mode is used to
provide periodic health monitoring without the failover action taken.
For all options that permit specifying multiple servers, the options require a comma-separated list of
connection parameters in the following form (where the password, port, and socket are optional).:
<*user*>[:<*passwd*>]@<*host*>[:<*port*>][:<*socket*>] or
<*login-path*>[:<*port*>][:<*socket*>]
The utility permits users to discover slaves connected to the master. In order to use the discover slaves
feature, all slaves must use the --report-host and --report-port startup variables to specify the correct
hostname and ip port of the slave. If these are missing or report the incorrect information, the slaves health
may not be reported correctly or the slave may not be listed at all. The discover slaves feature ignores any
slaves it cannot connect to.
The discover slaves feature is run automatically on each interval.
The utility permits the user to specify an external script to execute before and after the switchover and
failover commands. The user can specify these with the --exec-before and --exec-after options.
The return code of the script is used to determine success thus each script must report 0 (success) to
be considered successful. If a script returns a value other than 0, the result code is presented in an error
message.
The utility also permits the user to specify a script to be used for detecting a downed master or an
application-level event to trigger failover. This can be specified using the --exec-fail-check option.
The return code for the script is used to invoke failover. A return code of 0 indicates failover should not take
place. A return code other than 0 indicates failover should take place. This is checked at the start of each
interval if a script is supplied. The timeout option is not used in this case and the script is run once at the
start of each interval.
The utility permits the user to log all actions taken during the commands. The --log option requires a
valid path and file name of the file to use for logging operations. The log is active only when this option is
specified. The option --log-age specifies the age in days that log entries are kept. The default is seven
(7) days. Older entries are automatically deleted from the log file (but only if the --log option is specified).
The format of the log file includes the date and time of the event, the level of the event (informational INFO, warning - WARN, error - ERROR, critical failure - CRITICAL), and the message reported by the
utility.
The interface provides the user with a number of options for displaying additional information. The user can
choose to see the replication health report (default), or choose to see the list of GTIDs in use, the UUIDs in
use, and if logging is enabled the contents of the log file. Each of these reports is described below.
health Display the replication health of the topology. This report is the default view for the interface. By
default, this includes the host name, port, role (MASTER or SLAVE) of the server, state of the server
(UP = is connected, WARN = not connected but can ping, DOWN = not connected and cannot ping), the
GTID_MODE, and health state.
The master health state is based on the following; if GTID_MODE=ON, the server must have binary log
enabled, and there must exist a user with the REPLICATE SLAVE privilege.
106
mysqlfailover — Automatic replication health monitoring and failover
The slave health state is based on the following; the IO_THREAD and SQL_THREADS must be running, it
must be connected to the master, there are no errors, the slave delay for non-gtid enabled scenarios is not
more than the threshold provided by the --max-position and the slave is reading the correct master log
file, and slave delay is not more than the --seconds-behind threshold option.
At each interval, if the discover slaves option was specified at startup and new slaves are discovered, the
health report is refreshed.
gtid: Display the master's list of executed GTIDs, contents of the GTID variables;
@@GLOBAL.GTID_EXECUTED, @@GLOBAL.GTID_PURGED, and @@GLOBAL.GTID_OWNED. Thus, the user
can toggle through four screens by pressing the 'G' key repeatedly. The display will cycle through all four
screens restarting after the fourth screen.
UUID: Display universally unique identifiers (UUIDs) for all servers.
Log: This option is visible only if the --log option is specified. Show the contents of the log file. This can
be helpful to see at a later time when failover occurred and the actions or messages recorded at the time.
The user interface is designed to match the size of the terminal window in which it is run. A refresh option
is provided to permit users to resize their terminal windows or refresh the display at any time. However, the
interface will automatically resize to the terminal window on each interval.
The interface will display the name of the utility, the master's status including binary log file, position, and
filters as well as the date and time of the next interval event.
The interface will also permit the user to scroll up or down through a list longer than what the terminal
window permits. When a long list is presented, the scroll options become enabled. The user can scroll the
list up with the up arrow key and down with the down arrow key.
Use the --verbose option to see additional information in the health report and additional messages
during failover.
The utility supports two modes of operation. The default mode, running as a console, works as described
above. An additional mode that permits you to run the utility as a daemon is provided for POSIX platforms.
When run as a daemon, the utility does not have interactivity. However, all events are written to the log file.
You can control what is written to the log by using the --report-values option.
To run the utility as a daemon, use the --daemon option. There are three commands that can by used in
--daemon option. These include:
• start
Starts the daemon. The --log option is required.
• stop
Stops the daemon. If you used the option --pidfile, the value must be the same when starting the
daemon.
• restart
Restarts the daemon. If you used the option --pidfile, the value must be the same when starting the
daemon.
• nodetach
107
OPTIONS
Starts the daemon, but it will not detach the process from the console. The --log option is required.
OPTIONS
mysqlfailover accepts the following command-line options:
• --help
Display a help message and exit.
• --license
Display license information and exit.
• --candidates=<candidate slave connections>
Connection information for candidate slave servers. Valid only with failover command. List multiple
slaves in comma-separated list.
To connect to a server, it is necessary to specify connection parameters such as user name, host
name, password, and either a port or socket. MySQL Utilities provides a number of ways to provide
this information. All of the methods require specifying your choice via a command-line option such as -server, --master, --slave, etc. The methods include the following in order of most secure.
• Use login-paths from your .mylogin.cnf file (encrypted, not visible). Example : <login-path>[:<port>]
[:<socket>]
• Use a configuration file (unencrypted, not visible) Note: available in release-1.5.0. Example :
<configuration-file-path>[:<section>]
• Specify the data on the command-line (unencrypted, visible). Example :
<user>[:<passwd>]@<host>[:<port>][:<socket>]
• --daemon=<command>
Run as a daemon. The command can be start (start daemon), stop (stop daemon), restart (stop
then start the daemon) or nodetach (start but do not detach the process). This option is only available
for POSIX systems.
• --discover-slaves-login=<user:password>
At startup, query master for all registered slaves and use the user name and password specified to
connect. Supply the user and password in the form <user>[:<passwd>] or <login-path>. For example, -discover=joe:secret will use 'joe' as the user and 'secret' as the password for each discovered slave.
• --exec-after=<script>
Name of script to execute after failover or switchover. Script name may include the path.
• --exec-before=<script>
Name of script to execute before failover or switchover. Script name may include the path.
• --exec-fail-check=<script>
Name of script to execute on each interval to invoke failover.
• --exec-post-failover=<script>
108
OPTIONS
Name of script to execute after failover is complete and the utility has refreshed the health report.
• --failover-mode=<mode>, -f <mode>
Action to take when the master fails. 'auto' = automatically fail to best slave, 'elect' = fail to candidate list
or if no candidate meets criteria fail, 'fail' = take no action and stop when master fails. Default = 'auto'.
• --force
Override the registration check on master for multiple instances of the console monitoring the same
master. See notes.
• --interval=<seconds>, -i <seconds>
Interval in seconds for polling the master for failure and reporting health. Default = 15 seconds. Minimum
is 5 seconds.
• --log=<log_file>
Specify a log file to use for logging messages
• --log-age=<days>
Specify maximum age of log entries in days. Entries older than this will be purged on startup. Default = 7
days.
• --master=<connection>
Connection information for the master server.
To connect to a server, it is necessary to specify connection parameters such as user name, host
name, password, and either a port or socket. MySQL Utilities provides a number of ways to provide
this information. All of the methods require specifying your choice via a command-line option such as -server, --master, --slave, etc. The methods include the following in order of most secure.
• Use login-paths from your .mylogin.cnf file (encrypted, not visible). Example : <login-path>[:<port>]
[:<socket>]
• Use a configuration file (unencrypted, not visible) Note: available in release-1.5.0. Example :
<configuration-file-path>[:<section>]
• Specify the data on the command-line (unencrypted, visible). Example :
<user>[:<passwd>]@<host>[:<port>][:<socket>]
• --max-position=<position>
Used to detect slave delay. The maximum difference between the master's log position and the slave's
reported read position of the master. A value greater than this means the slave is too far behind the
master. Default = 0.
• --pedantic, -p
Used to stop failover if some inconsistencies are found (e.g. errant transactions on slaves or SQL thread
errors) during servers checks. By default, the utility will only issue warnings if issues are found when
checking slaves status during failover and will continue its execution unless this option is specified.
• --pidfile=<pidfile>
109
OPTIONS
Pidfile for running mysqlfailover as a daemon. This file contains the PID (process identifier), that uniquely
identify a process. It is needed to identify and control the process forked by mysqlfailover.
• --ping=<number>
Number of ping attempts for detecting downed server. Note: on some platforms this is the same as
number of seconds to wait for ping to return. Default is 3 seconds.
• --report-values=<report_values>
Report values used in mysqlfailover running as a daemon. It can be health, gtid or uuid. Multiple values
can be used separated by commas.
• health
Display the replication health of the topology.
• gtid
Display the master's list of executed GTIDs, contents of the GTID variables;
@@GLOBAL.GTID_EXECUTED, @@GLOBAL.GTID_PURGED and @@GLOBAL.GTID_OWNED.
• uuid
Display universally unique identifiers (UUIDs) for all servers.
Default = health.
• --rpl-user=:<replication_user>
The user and password for the replication user requirement , in the form: <user>[:<password>] or <loginpath>. E.g. rpl:passwd
Default = None.
• --script-threshold=<return_code>
Value for external scripts to trigger aborting the operation if result is greater than or equal to the
threshold.
Default = None (no threshold checking).
• --seconds-behind=<seconds>
Used to detect slave delay. The maximum number of seconds behind the master permitted before slave
is considered behind the master. Default = 0.
• --slaves=<slave connections>
Connection information for slave servers. List multiple slaves in comma-separated list. The list will be
evaluated literally whereby each server is considered a slave to the master listed regardless if they are a
slave of the master.
To connect to a server, it is necessary to specify connection parameters such as user name, host
name, password, and either a port or socket. MySQL Utilities provides a number of ways to provide
this information. All of the methods require specifying your choice via a command-line option such as -server, --master, --slave, etc. The methods include the following in order of most secure.
110
NOTES
• Use login-paths from your .mylogin.cnf file (encrypted, not visible). Example : <login-path>[:<port>]
[:<socket>]
• Use a configuration file (unencrypted, not visible) Note: available in release-1.5.0. Example :
<configuration-file-path>[:<section>]
• Specify the data on the command-line (unencrypted, visible). Example :
<user>[:<passwd>]@<host>[:<port>][:<socket>]
• --timeout=<seconds>
Maximum timeout in seconds to wait for each replication command to complete. For example, timeout for
slave waiting to catch up to master.
Default = 3.
• --verbose, -v
Specify how much information to display. Use this option multiple times to increase the amount of
information. For example, -v = verbose, -vv = more verbose, -vvv = debug.
• --version
Display version information and exit.
NOTES
The login user must have the appropriate permissions for the utility to check servers and monitor
their status (e.g., SHOW SLAVE STATUS, SHOW MASTER STATUS). The user must also
have permissions to execute the failover procedure (e.g., STOP SLAVE, START SLAVE,
WAIT_UNTIL_SQL_THREAD_AFTER_GTIDS, CHANGE MASTER TO ...). Lastly, the user must have the
REPLICATE SLAVE privilege for slaves to connect to their master. The same permissions are required
by the failover utility for master and slaves in order to run successfully. In particular, users connected to
slaves, candidates and master require SUPER, GRANT OPTION, REPLICATION SLAVE, RELOAD,
DROP, CREATE, INSERT and SELECT privileges.
The DROP, CREATE, INSERT and SELECT privileges are required to register the failover instance on
the initial master or the new master (after a successful failover). Therefore, since any slave can become
the new master, slaves and candidates also require those privileges. The utility checks permissions for the
master, slaves, and candidates at startup.
At startup, the console will attempt to register itself with the master. If another console is already
registered, and the failover mode is auto or elect, the console will be blocked from running failover. When
a console quits, it unregisters itself from the master. If this process is broken, the user may override the
registration check by using the --force option.
Mixing IP and hostnames is not recommended. The replication-specific utilities will attempt to compare
hostnames and IP addresses as aliases for checking slave connectivity to the master. However, if your
installation does not support reverse name lookup, the comparison could fail. Without the ability to do a
reverse name lookup, the replication utilities could report a false negative that the slave is (not) connected
to the master.
For example, if you setup replication using MASTER_HOST=ubuntu.net on the slave and later connect
to the slave with mysqlrplcheck and have the master specified as --master=192.168.0.6 using the valid
IP address for ubuntu.net, you must have the ability to do a reverse name lookup to compare the IP
(192.168.0.6) and the hostname (ubuntu.net) to determine if they are the same machine.
111
EXAMPLES
Similarly, in order to avoid issues mixing local IP '127.0.0.1' with 'localhost', all the addresses '127.0.0.1'
will be internally converted to 'localhost' by the utility. Nevertheless, It is best to use the actual hostname of
the master when connecting or setting up replication.
The utility will check to see if the slaves are using the option --master-info-repository=TABLE. If they are
not, the utility will stop with an error.
The path to the MySQL client tools should be included in the PATH environment variable in order to use
the authentication mechanism with login-paths. This will allow the utility to use the my_print_defaults tools
which is required to read the login-path values from the login configuration file (.mylogin.cnf).
The console creates a special table in the mysql database that is used to keep track of which instance is
communicating with the master. If you use the --force option, the console will remove the rows in this
table. The table is constructed with:
CREATE TABLE IF NOT EXISTS mysql.failover_console (host char(30), port char(10))
When the console starts, a row is inserted containing the hostname and port of the master. On startup, if a
row matches these values, the console will not start. If you use the --force option, the row is deleted.
When running the utility using the --daemon=nodetach option, the --pidfile option can be omitted. It
will be ignored if used.
When using the external scripts, the following parameters are passed in the order shown.
For example, suppose you have a script named 'run_before.sh' and you specify that you want it executing
before the failover is performed (using the --exec-before option). Further, let us assume the master
MySQL Server is using port 3306 on the host ‘host1’ and the MySQL Server that will become the new
master is using port 3308 on host 'can_host2'. The script would therefore be invoked in the following
manner.
% run_before.sh host1 3306 can_host2 3308
Table 5.2 External Script Parameters
MySQL Failover Option
Parameters Passed to External Script
--exec-before
master host, master port, candidate host, candidate port
--exec-after
new master host, new master port
--exec-fail-check
master host, master port
--exec-post-failover (no old master host, old master port, new master host, new master port
errors during failover)
--exec-post-failover
(errors during failover)
old master host, old master port
EXAMPLES
To launch the utility, you must specify at a minimum the --master option and either the --discoverslaves-login option or the --slaves option. The option: option can be used in conjunction with the
--slaves option to specify a list of known slaves (or slaves that do not report their host and ip) and to
discover any other slaves connected to the master.
An example of the user interface and some of the report views are shown in the following examples.
112
EXAMPLES
Note
The "GTID Executed Set" will display the first GTID listed in the SHOW MASTER
STATUS view. If there are multiple GTIDs listed, the utility shall display [...] to
indicate there are additional GTIDs to view. You can view the complete list of GTIDs
on the GTID display screens.
The default interface will display the replication health report like the following. In this example the log file is
enabled. A sample startup command is shown below:
shell> mysqlfailover --master=root@localhost:3331 --discover-slaves-login=root --log=log.txt
MySQL Replication Monitor and Failover Utility
Failover Mode = auto
Next Interval = Mon Mar 19 15:56:03 2012
Master Information
-----------------Binary Log File
Position
mysql-bin.000001 571
Binlog_Do_DB
Binlog_Ignore_DB
GTID Executed Set
2A67DE00-2DA1-11E2-A711-00764F2BE90F:1-7 [...]
Replication Health Status
+------------+-------+---------+--------+------------+---------+
| host
| port | role
| state | gtid_mode | health |
+------------+-------+---------+--------+------------+---------+
| localhost | 3331 | MASTER | UP
| ON
| OK
|
| localhost | 3332 | SLAVE
| UP
| ON
| OK
|
| localhost | 3333 | SLAVE
| UP
| ON
| OK
|
| localhost | 3334 | SLAVE
| UP
| ON
| OK
|
+------------+-------+---------+--------+------------+---------+
Q-quit R-refresh H-health G-GTID Lists U-UUIDs L-log entries
Pressing the 'q' key will exit the utility. Pressing the 'r' key will refresh the current display. Pressing the 'h'
key will return to the replication health report.
If the user presses the 'g' key, the gtid report is shown like the following. The first page shown is the
master's executed GTID set:
MySQL Replication Monitor and Failover Utility
Failover Mode = auto
Next Interval = Mon Mar 19 15:59:33 2012
Master Information
-----------------Binary Log File
Position
mysql-bin.000001 571
Binlog_Do_DB
Binlog_Ignore_DB
GTID Executed Set
2A67DE00-2DA1-11E2-A711-00764F2BE90F:1-7 [...]
Master GTID Executed Set
+-------------------------------------------+
| gtid
|
+-------------------------------------------+
| 2A67DE00-2DA1-11E2-A711-00764F2BE90F:1-7 |
| 5503D37E-2DB2-11E2-A781-8077D4C14B33:1-3 |
+-------------------------------------------+
Q-quit R-refresh H-health G-GTID Lists U-UUIDs L-log entries Up|Down-scroll
If the user continues to press the 'g' key, the display will cycle through the three gtid lists.
113
EXAMPLES
If the list is longer than the screen permits as shown in the example above, the scroll up and down help is
also shown. In this case, if the user presses the down arrow, the list will scroll down.
If the user presses the 'u' key, the list of UUIDs used in the topology are shown.:
MySQL Replication Monitor and Failover Utility
Failover Mode = auto
Next Interval = Mon Mar 19 16:02:34 2012
Master Information
-----------------Binary Log File
Position
mysql-bin.000001 571
Binlog_Do_DB
Binlog_Ignore_DB
GTID Executed Set
2A67DE00-2DA1-11E2-A711-00764F2BE90F:1-7 [...]
UUIDs
+------------+-------+---------+---------------------------------------+
| host
| port | role
| uuid
|
+------------+-------+---------+---------------------------------------+
| localhost | 3331 | MASTER | 55c65a00-71fd-11e1-9f80-ac64ef85c961 |
| localhost | 3332 | SLAVE
| 5dd30888-71fd-11e1-9f80-dc242138b7ec |
| localhost | 3333 | SLAVE
| 65ccbb38-71fd-11e1-9f80-bda8146bdb0a |
| localhost | 3334 | SLAVE
| 6dd6abf4-71fd-11e1-9f80-d406a0117519 |
+------------+-------+---------+---------------------------------------+
Q-quit R-refresh H-health G-GTID Lists U-UUIDs L-log entries
If, once the master is detected as down and failover mode is auto or elect and there are viable candidate
slaves, the failover feature will engage automatically and the user will see the failover messages appear.
When failover is complete, the interface returns to monitoring replication health after 5 seconds. The
following shows an example of failover occurring.:
Failover starting...
# Candidate slave localhost:3332 will become the new master.
# Preparing candidate for failover.
# Creating replication user if it does not exist.
# Stopping slaves.
# Performing STOP on all slaves.
# Switching slaves to new master.
# Starting slaves.
# Performing START on all slaves.
# Checking slaves for errors.
# Failover complete.
# Discovering slaves for master at localhost:3332
Failover console will restart in 5 seconds.
After the failover event, the new topology is shown in the replication health report.:
MySQL Replication Monitor and Failover Utility
Failover Mode = auto
Next Interval = Mon Mar 19 16:05:12 2012
Master Information
-----------------Binary Log File
Position
mysql-bin.000001 1117
Binlog_Do_DB
Binlog_Ignore_DB
GTID Executed Set
2A67DE00-2DA1-11E2-A711-00764F2BE90F:1-7 [...]
UUIDs
+------------+-------+---------+--------+------------+---------+
| host
| port | role
| state | gtid_mode | health |
114
PERMISSIONS REQUIRED
+------------+-------+---------+--------+------------+---------+
| localhost | 3332 | MASTER | UP
| ON
| OK
|
| localhost | 3333 | SLAVE
| UP
| ON
| OK
|
| localhost | 3334 | SLAVE
| UP
| ON
| OK
|
+------------+-------+---------+--------+------------+---------+
Q-quit R-refresh H-health G-GTID Lists U-UUIDs L-log entries
If the user presses the L key and the --log option was specified, the interface will show the entries in the
log file. Note: example truncated for space allowance.:
MySQL Replication Monitor and Failover Utility
Failover Mode = auto
Next Interval = Mon Mar 19 16:06:13 2012
Master Information
-----------------Binary Log File
Position
mysql-bin.000001 1117
Binlog_Do_DB
Binlog_Ignore_DB
GTID Executed Set
2A67DE00-2DA1-11E2-A711-00764F2BE90F:1-7 [...]
Log File
+-------------------------+----------------------------------------- ... --+
| Date
| Entry
...
|
+-------------------------+----------------------------------------- ... --+
| 2012-03-19 15:55:33 PM | INFO Failover console started.
...
|
| 2012-03-19 15:55:33 PM | INFO Failover mode = auto.
...
|
| 2012-03-19 15:55:33 PM | INFO Getting health for master: localhos ...
|
| 2012-03-19 15:55:33 PM | INFO Master status: binlog: mysql-bin.00 ...
|
+-------------------------+----------------------------------------- ... --+
Q-quit R-refresh H-health G-GTID Lists U-UUIDs L-log entries Up|Down-scroll\
PERMISSIONS REQUIRED
The user must have permissions to monitor the servers on the topology and configure replication to
successfully perform the failover operation. Additional permissions are also required to register and
unregister the running mysqlfailover instance on the master and slaves. Specifically, the login user must
have the following privileges: SUPER, GRANT OPTION, REPLICATION SLAVE, RELOAD, DROP,
CREATE, INSERT, and SELECT.
The referred permissions are required for the login users used for all servers (master, slaves and
candidates).
5.10 mysqlfrm — File reader for .frm files.
The mysqlfrm utility is designed as a recovery tool that reads .frm files and produces equivalent CREATE
statements from the table definition data found in the file. In most cases, the generated CREATE statement
is usable for recreating the table on another server, or for extended diagnostics. However, some features
are not saved in the .frm files and therefore will be omitted. The exclusions include but are not limited to:
• foreign key constraints
• auto increment number sequences
The mysqlfrm utility has two modes of operation. The default mode is designed to spawn an instance of
an installed server by referencing the base directory using the --basedir option, or by connecting to the
server with the --server option. The process will not alter the original .frm file(s). This mode also requires
the --port option to specify a port to use for the spawned server. It must be different than the port for the
115
OPTIONS
installed server and no other server must be using the port. The spawned server will be shutdown and all
temporary files removed after the .frm files are read.
A diagnostic mode is available by using the --diagnostic option. This switches the utility to read
the .frm files byte-by-byte to recover as much information as possible. The diagnostic mode has additional
limitations in that it cannot decipher character set or collation values without using an existing server
installation specified with either the --server or --basedir option. This can also affect the size of the
columns if the table uses multibyte characters. Use this mode when the default mode cannot read the file,
or if a MySQL server is not installed on the host.
To read .frm files, list each file as a separate argument for the utility as shown in the following examples.
You will need to specify the path for each .frm file you want to read or supply a path to a directory and all of
the .frm files in that directory will be read.
You can specify the database name to be used in the resulting CREATE statement by prepending the .frm
file with the name of the database followed by a colon. For example, oltp:t1.frm will use 'oltp' for the
database name in the CREATE statement. The optional database name can also be used with paths. For
example, /home/me/oltp:t1.frm will use 'oltp' as the database name. If you leave off the optional database
name and include a path, the last folder will be the database name. For example /home/me/data1/t1.frm
will use 'data1' as the database name. If you do not want to use the last folder as the database name,
simply specify the colon like this: /home/me/data1/:t1.frm. In this case, the database will be omitted from
the CREATE statement.
OPTIONS
• --help
show the program's help page
• --license
Display license information and exit.
• --basedir=<basedir>
The base directory for the server installed. Use this or --server for the default mode.
• --diagnostic
Turn on diagnostic mode to read .frm files byte-by-byte and generate best-effort CREATE statement.
• --new-storage-engine=<engine>
Set the ENGINE= option for all .frm files read.
• --port=<port>
The port to use for the spawned server in the default mode. Must be a free port. Required for default
mode.
• --server=<server>
Connection information for a server. Use this option or --basedir for the default mode. If provided
with the diagnostic mode, the storage engine and character set information will be validated against this
server.
To connect to a server, it is necessary to specify connection parameters such as user name, host
name, password, and either a port or socket. MySQL Utilities provides a number of ways to provide
116
NOTES
this information. All of the methods require specifying your choice via a command-line option such as -server, --master, --slave, etc. The methods include the following in order of most secure.
• Use login-paths from your .mylogin.cnf file (encrypted, not visible). Example : <login-path>[:<port>]
[:<socket>]
• Use a configuration file (unencrypted, not visible) Note: available in release-1.5.0. Example :
<configuration-file-path>[:<section>]
• Specify the data on the command-line (unencrypted, visible). Example :
<user>[:<passwd>]@<host>[:<port>][:<socket>]
• --show-stats, -s
Show file statistics and general table information for each .frm file read.
• --start-timeout=<timeout_in_seconds>
Number of seconds to wait for spawned server to start. The default is 10 seconds.
• --user
Execute the spawned server using this user account. Permits the execution of the utility as one user but
the spawned server as another. Required if running the utility as the root user (e.g. su or sudo).
• --quiet
Turn off all messages for quiet execution except CREATE statements and errors.
• --verbose, -v
Control how much information is displayed. For example, -v = verbose, -vv = more verbose, -vvv =
debug
• --version
Show program's version number and exit
NOTES
Tables with certain storage engines cannot be read in the default mode. These include PARTITION,
PERFORMANCE_SCHEMA. You must read these with the --diagnostic mode.
Use the --diagnostic mode for tables that fail to open correctly in the default mode or if there is no
server installed on the host.
To change the storage engine in the CREATE statement generated for all .frm files read, use the --newstorage-engine option
To turn off all messages except the CREATE statement and warnings or errors, use the --quiet option.
Use the --show-stats option to see file statistics for each .frm file.
If you need to run the utility with elevated privileges, use the --user option to execute the spawned server
using a normal user account.
If you encounter connection or similar errors when running in default mode, re-run the command with
the --verbose option and view the output from the spawned server and repair any errors in launching
117
EXAMPLES
the server. If mysqlfrm fails in the middle, you may need to manually shutdown the server on the port
specified with --port.
EXAMPLES
The following example will read a single .frm file in the default mode from the current working directory
using the server installed in /usr/local/bin/mysql and port 3333 for the spawned server. Notice the
use of the db:table.frm format for specifying the database name for the table. The database name appears
to the left of ':' and the .frm name to the right. In this case, we have database = test1 and table = city, so
the CREATE statement reads CREATE TABLE test1.city.
shell> mysqlfrm --basedir=/usr/local/bin/mysql test1:city.frm --port=3333
# Starting the spawned server on port 3333 ... done.
# Reading .frm files
#
# Reading the city.frm file.
#
# CREATE statement for city.frm:
#
CREATE TABLE `test1`.`city` (
`city_id` smallint(5) unsigned NOT NULL AUTO_INCREMENT,
`city` varchar(50) NOT NULL,
`country_id` smallint(5) unsigned NOT NULL,
`last_update` timestamp NOT NULL DEFAULT CURRENT_TIMESTAMP ON UPDATE CURRENT_TIMESTAMP,
PRIMARY KEY (`city_id`),
KEY `idx_fk_country_id` (`country_id`)
) ENGINE=InnoDB DEFAULT CHARSET=utf8
#...done.
The following demonstrates reading multiple .frm files in the default mode using a running server. The .frm
files are located in different folders. Notice the use of the database name option for each of the files. The
t1 file was given the database name temp1 since that is the folder in which it resides, t2 was given db1
since that was specified in the path, and t3 was not given a database name since we used the ':' without
providing a database name.
shell> mysqlfrm --server=root:pass@localhost:3306 /mysql/data/temp1/t1.frm \
/mysql/data/temp2/db1:t2.frm --port=3310
# Starting the spawned server on port 3333 ... done.
# Reading .frm files
#
#
# Reading the t1.frm file.
#
# CREATE statement for ./mysql-test/std_data/frm_files/t1.frm:
#
CREATE TABLE `temp1`.`t1` (
`a` int(11) DEFAULT NULL
) ENGINE=MyISAM DEFAULT CHARSET=latin1
# Reading the t2.frm file.
#
# CREATE statement for ./mysql-test/std_data/frm_files/t2.frm:
#
CREATE TABLE `db1`.`t2` (
`a` int(11) DEFAULT NULL
) ENGINE=MyISAM DEFAULT CHARSET=latin1
118
PERMISSIONS REQUIRED
#
# Reading the t3.frm file.
#
# CREATE statement for ./mysql-test/std_data/frm_files/t3.frm:
#
CREATE TABLE `t3` (
`a` int(11) DEFAULT NULL
) ENGINE=MyISAM DEFAULT CHARSET=latin1
#...done.
The following demonstrates running the utility in diagnostic mode to read all of the .frm files in a directory.
shell> mysqlfrm --diagnostic /mysql/data/sakila
# WARNING: Cannot generate character set or collation names without the --server option.
# CAUTION: The diagnostic mode is a best-effort parse of the .frm file. As such, it may not identify all of
# Reading .frm file for /mysql/data/sakila/city.frm:
# The .frm file is a TABLE.
# CREATE TABLE Statement:
CREATE TABLE `city` (
`city_id` smallint(5) unsigned NOT NULL AUTO_INCREMENT,
`city` varchar(150) NOT NULL,
`country_id` smallint(5) unsigned NOT NULL,
`last_update` timestamp NOT NULL DEFAULT CURRENT_TIMESTAMP ON UPDATE CURRENT_TIMESTAMP,
PRIMARY KEY `PRIMARY` (`city_id`),
KEY `idx_fk_country_id` (`country_id`)
) ENGINE=InnoDB;
#...done.
PERMISSIONS REQUIRED
The permissions for using mysqlfrm will vary and depend entirely on how you use it. If you use the utility
to read .frm files in a protected folder like the example above (in either mode), you must have the ability to
run the server as root.
If you use the utility with a server connection, the user you use to connect must have the ability to read
system variables at a minimum (read access to the mysql database).
5.11 mysqlindexcheck — Identify Potentially Redundant Table
Indexes
This utility reads the indexes for one or more tables and identifies duplicate and potentially redundant
indexes.
To check all tables in a database, only specify the database name. To check a specific table, name the
table in db.table format. It is possible to mix database and table names.
You can scan tables in any database except the internal databases mysql, INFORMATION_SCHEMA,
and performance_schema.
Depending on the index type, the utility applies the following rules to compare indexes (designated as
idx_a and idx_b):
• BTREE
119
OPTIONS
idx_b is redundant to idx_a if and only if the first n columns in idx_b also appear in idx_a. Order
and uniqueness count.
• HASH
idx_a and idx_b are duplicates if and only if they contain the same columns in the same order.
Uniqueness counts.
• SPATIAL
idx_a and idx_b are duplicates if and only if they contain the same column (only one column is
permitted).
• FULLTEXT
idx_b is redundant to idx_a if and only if all columns in idx_b are included in idx_a. Order counts.
To see DROP statements drop redundant indexes, specify the --show-drops option. To examine the
existing indexes, use the --verbose option, which prints the equivalent CREATE INDEX (or ALTER
TABLE) for primary keys.
To display the best or worst non-primary key indexes for each table, use the --best or --worst option.
This causes the output to show the best or worst indexes from tables with 10 or more rows. By default,
each option shows five indexes. To override that, provide an integer value for the option.
To change the format of the index lists displayed for the --show-indexes, --best, and --worst
options, use one of the following values with the --format option:
• grid (default)
Display output in grid or table format like that of the mysql client command-line tool.
• csv
Display output in comma-separated values format.
• tab
Display output in tab-separated format.
• sql
Print SQL statements rather than a list.
• vertical
Display output in single-column format like that of the \G command for the mysql client command-line
tool.
Note
The --best and --worst lists cannot be printed as SQL statements.
OPTIONS
mysqlindexcheck accepts the following command-line options:
120
OPTIONS
• --help
Display a help message and exit.
• --license
Display license information and exit.
• --best[=<N>]
If --stats is given, limit index statistics to the best N indexes. The default value of N is 5 if omitted.
• --format=<index_format>, -f<index_format>
Specify the index list display format for output produced by --stats. Permitted format values are grid,
csv, tab, sql, and vertical. The default is grid.
• --report-indexes, -r
Reports if a table has neither UNIQUE indexes nor a PRIMARY key.
• --server=<source>
Connection information for the server.
To connect to a server, it is necessary to specify connection parameters such as user name, host
name, password, and either a port or socket. MySQL Utilities provides a number of ways to provide
this information. All of the methods require specifying your choice via a command-line option such as -server, --master, --slave, etc. The methods include the following in order of most secure.
• Use login-paths from your .mylogin.cnf file (encrypted, not visible). Example : <login-path>[:<port>]
[:<socket>]
• Use a configuration file (unencrypted, not visible) Note: available in release-1.5.0. Example :
<configuration-file-path>[:<section>]
• Specify the data on the command-line (unencrypted, visible). Example :
<user>[:<passwd>]@<host>[:<port>][:<socket>]
• --show-drops, -d
Display DROP statements for dropping indexes.
• --show-indexes, -i
Display indexes for each table.
• --skip, -s
Skip tables that do not exist.
• --stats
Show index performance statistics.
• --verbose, -v
Specify how much information to display. Use this option multiple times to increase the amount of
information. For example, -v = verbose, -vv = more verbose, -vvv = debug.
121
NOTES
• --version
Display version information and exit.
• --worst[=<N>]
If --stats is also passed in, limit index statistics to the worst N indexes. The default value of N is 5, if
omitted.
NOTES
You must provide connection parameters (user, host, password, and so forth) for an account that has the
appropriate privileges to read all objects accessed during the operation.
For the --format option, the permitted values are not case sensitive. In addition, values may be specified
as any unambiguous prefix of a valid value. For example, --format=g specifies the grid format. An error
occurs if a prefix matches more than one valid value.
The path to the MySQL client tools should be included in the PATH environment variable in order to use the
authentication mechanism with login-paths. This will allow the utility to use the my_print_defaults tools
which is required to read the login-path values from the login configuration file (.mylogin.cnf).
EXAMPLES
To check all tables in the employees database on the local server to see the possible redundant and
duplicate indexes, use this command:
shell> mysqlindexcheck --server=root@localhost employees
# Source on localhost: ... connected.
# The following indexes are duplicates or redundant \
for table employees.dept_emp:
#
CREATE INDEX emp_no ON employees.dept_emp (emp_no) USING BTREE
#
may be redundant or duplicate of:
ALTER TABLE employees.dept_emp ADD PRIMARY KEY (emp_no, dept_no)
# The following indexes are duplicates or redundant \
for table employees.dept_manager:
#
CREATE INDEX emp_no ON employees.dept_manager (emp_no) USING BTREE
#
may be redundant or duplicate of:
ALTER TABLE employees.dept_manager ADD PRIMARY KEY (emp_no, dept_no)
# The following indexes are duplicates or redundant \
for table employees.salaries:
#
CREATE INDEX emp_no ON employees.salaries (emp_no) USING BTREE
#
may be redundant or duplicate of:
ALTER TABLE employees.salaries ADD PRIMARY KEY (emp_no, from_date)
# The following indexes are duplicates or redundant \
for table employees.titles:
#
CREATE INDEX emp_no ON employees.titles (emp_no) USING BTREE
#
may be redundant or duplicate of:
ALTER TABLE employees.titles ADD PRIMARY KEY (emp_no, title, from_date)
PERMISSIONS REQUIRED
Regarding the privileges needed to run this utility, the user needs SELECT privilege on the mysql database
as well as for the databases which tables are being checked.
5.12 mysqlmetagrep — Search Database Object Definitions
122
SQL Simple Patterns
This utility searches for objects matching a given pattern on all the servers specified using instances of the
--server option. It produces output that displays the matching objects. By default, the first non-option
argument is taken to be the pattern unless the --pattern option is given. If the --pattern option is
given, then all non-option arguments are treated as connection specifications.
Internally, the utility generates an SQL statement for searching the necessary tables in the
INFORMATION_SCHEMA database on the designated servers, and then executes it before collecting the
result and printing it as a table. Use the --sql option to have mysqlmetagrep display the statement,
rather than execute it. This can be useful if you want to feed the output of the statement to another
application, such as the mysql client command-line tool.
The MySQL server supports two forms of patterns when matching strings: SQL Simple Patterns (used with
the LIKE operator) and POSIX Regular Expressions (used with the REGEXP operator).
By default, the utility uses the LIKE operator to match the name (and optionally, the body) of objects. To
use the REGEXP operator instead, use the --regexp option.
Note that since the REGEXP operator does substring searching, it is necessary to anchor the expression
to the beginning of the string if you want to match the beginning of the string.
To specify how to display output, use one of the following values with the --format option:
• grid (default)
Display output in grid or table format like that of the mysql client command-line tool.
• csv
Display output in comma-separated values format.
• tab
Display output in tab-separated format.
• vertical
Display output in single-column format like that of the \G command for the mysql client command-line
tool.
SQL Simple Patterns
The simple patterns defined by the SQL standard consist of a string of characters with two characters that
have special meaning: % (percent) matches zero or more characters, and _ (underscore) matches exactly
one character.
For example:
• 'john%'
Match any string that starts with 'john'.
• '%doe%'
Match any string containing the word 'doe'.
• '%_'
Match any string consisting of one or more characters.
123
POSIX Regular Expressions
POSIX Regular Expressions
POSIX regular expressions are more powerful than the simple patterns defined in the SQL standard. A
regular expression is a string of characters, optionally containing characters with special meaning.
Documenting these regular expressions goes beyond the scope of this manual, but the full syntax is
described in the MySQL manual and other locations, such as executing 'man regex' in your terminal.
• .
Match any character.
• ^
Match the beginning of a string.
• $
Match the end of a string.
• [axy]
Match a, x, or y.
• [a-f]
Match any character in the range a to f (that is, a, b, c, d, e, or f).
• [^axy]
Match any character except a, x, or y.
• a*
Match a sequence of zero or more a.
• a+
Match a sequence of one or more a.
• a?
Match zero or one a.
• ab|cd
Match ab or cd.
• a{5}
Match five instances of a.
• a{2,5}
Match from two to five instances of a.
• (abc)+
Match one or more repetitions of abc.
124
OPTIONS
OPTIONS
mysqlmetagrep accepts the following command-line options:
• --help
Display a help message and exit.
• --license
Display license information and exit.
• --body, -b
Search the body of stored programs (procedures, functions, triggers, and events). The default is to
match only the name.
• --character-set=<charset>
Sets the client character set. The default is retrieved from the server variable
character_set_client.
• --database=<pattern>
Look only in databases matching this pattern.
• --format=<format>, -f<format>
Specify the output display format. Permitted format values are grid (default), csv, tab, and vertical.
• --object-types=<types>, --search-objects=<types>
Search only the object types named in types, which is a comma-separated list of one or more of the
values database, trigger, user, routine, column, table, partition, event and view.
The default is to search in objects of all types.
• --pattern=<pattern>, -e=<pattern>
The pattern to use when matching. This is required when the first non-option argument looks like a
connection specification rather than a pattern.
If the --pattern option is given, the first non-option argument is treated as a connection specifier, not
as a pattern.
• --regexp, --basic-regexp, -G
Perform pattern matches using the REGEXP operator. The default is to use LIKE for matching. This
affects the --database and --pattern options.
• --server=<source>
Connection information for a server. Use this option multiple times to search multiple servers.
To connect to a server, it is necessary to specify connection parameters such as user name, host
name, password, and either a port or socket. MySQL Utilities provides a number of ways to provide
this information. All of the methods require specifying your choice via a command-line option such as -server, --master, --slave, etc. The methods include the following in order of most secure.
125
NOTES
• Use login-paths from your .mylogin.cnf file (encrypted, not visible). Example : <login-path>[:<port>]
[:<socket>]
• Use a configuration file (unencrypted, not visible) Note: available in release-1.5.0. Example :
<configuration-file-path>[:<section>]
• Specify the data on the command-line (unencrypted, visible). Example :
<user>[:<passwd>]@<host>[:<port>][:<socket>]
• --sql, --print-sql, -p
Print rather than executing the SQL code that would be executed to find all matching objects. This can
be useful to save the statement for later execution or to use it as input for other programs.
• --version
Display version information and exit.
NOTES
For the --format option, the permitted values are not case sensitive. In addition, values may be specified
as any unambiguous prefix of a valid value. For example, --format=g specifies the grid format. An error
occurs if a prefix matches more than one valid value.
The path to the MySQL client tools should be included in the PATH environment variable in order to use the
authentication mechanism with login-paths. This will allow the utility to use the my_print_defaults tools
which is required to read the login-path values from the login configuration file (.mylogin.cnf).
EXAMPLES
Find all objects with a name that matches the pattern 't_' (the letter t followed by any single character):
shell> mysqlmetagrep --pattern="t_" --server=john@localhost
+------------------------+--------------+--------------+-----------+
| Connection
| Object Type | Object Name | Database |
+------------------------+--------------+--------------+-----------+
| john:*@localhost:3306 | TABLE
| t1
| test
|
| john:*@localhost:3306 | TABLE
| t2
| test
|
| john:*@localhost:3306 | TABLE
| tm
| test
|
+------------------------+--------------+--------------+-----------+
To find all object that contain 't2' in the name or the body (for routines, triggers, and events):
shell> mysqlmetagrep -b --pattern="%t2%" --server=john@localhost:3306
+------------------------+--------------+--------------+-----------+
| Connection
| Object Type | Object Name | Database |
+------------------------+--------------+--------------+-----------+
| john:*@localhost:3306 | TRIGGER
| tr_foo
| test
|
| john:*@localhost:3306 | TABLE
| t2
| test
|
+------------------------+--------------+--------------+-----------+
In the preceding output, the trigger name does not match the pattern, but is displayed because its body
does.
This is the same as the previous example, but using the REGEXP operator. Note that in the pattern it is not
necessary to add wildcards before or after t2:
126
PERMISSIONS REQUIRED
shell> mysqlmetagrep -Gb --pattern="t2" --server=john@localhost
+------------------------+--------------+--------------+-----------+
| Connection
| Object Type | Object Name | Database |
+------------------------+--------------+--------------+-----------+
| root:*@localhost:3306 | TRIGGER
| tr_foo
| test
|
| root:*@localhost:3306 | TABLE
| t2
| test
|
+------------------------+--------------+--------------+-----------+
PERMISSIONS REQUIRED
The user must have the SELECT privilege on the mysql database.
5.13 mysqlprocgrep — Search Server Process Lists
This utility scans the process lists for the servers specified using instances of the --server option and
selects those that match the conditions specified using the --age and --match-xxx options. For a
process to match, all conditions given must match. The utility then either prints the selected processes (the
default) or executes certain actions on them.
If no --age or --match-xxx options are given, the utility selects all processes.
The --match-xxx options correspond to the columns in the INFORMATION_SCHEMA.PROCESSLIST
table. For example, --match-command specifies a matching condition for PROCESSLIST.COMMAND
column values. There is no --match-time option. To specify a condition based on process time, use -age.
Processes that can be seen and killed are subject to whether the account used to connect to the server
has the PROCESS and SUPER privileges. Without PROCESS, the account cannot see processes
belonging to other accounts Without SUPER, the account cannot kill processes belonging to other
accounts
To specify how to display output, use one of the following values with the --format option:
• grid (default)
Display output in grid or table format like that of the mysql client command-line tool.
• csv
Display output in comma-separated values format.
• tab
Display output in tab-separated format.
• vertical
Display output in single-column format like that of the \G command for the mysql client command-line
tool.
Options
mysqlprocgrep accepts the following command-line options:
• --help
127
Options
Display a help message and exit.
• --license
Display license information and exit.
• --age=<time>
Select only processes that have been in the current state more than a given time. The time value can
be specified in two formats: either using the hh:mm:ss format, with hours and minutes optional, or as a
sequence of numbers with a suffix giving the period size.
The permitted suffixes are s (second), m (minute), h (hour), d (day), and w (week). For example, 4h15m
represents 4 hours and 15 minutes.
For both formats, the specification can optionally be preceded by + or -, where + means older than the
given time, and - means younger than the given time.
• --character-set=<charset>
Sets the client character set. The default is retrieved from the server variable
character_set_client.
• --format=<format>, -f<format>
Specify the output display format. Permitted format values are grid (default), csv, tab, and vertical.
• --kill-connection
Kill the connection for all matching processes (like the KILL CONNECTION statement).
• --kill-query
Kill the query for all matching processes (like the KILL QUERY statement).
• --match-command=<pattern>
Match all processes where the Command field matches the pattern.
• --match-db=<pattern>
Match all processes where the Db field matches the pattern.
• --match-host=<pattern>
Match all processes where the Host field matches the pattern.
• --match-id=<pattern>
Match all processes where the ID field matches the pattern.
• --match-info=<pattern>
Match all processes where the Info field matches the pattern.
• --match-state=<pattern>
Match all processes where the State field matches the pattern.
128
Options
• --match-user=<pattern>
Match all processes where the User field matches the pattern.
• --print
Print information about the matching processes. This is the default if no --kill-connection or -kill-query option is given. If a kill option is given, --print prints information about the processes
before killing them.
• --regexp, --basic-regexp, -G
Perform pattern matches using the REGEXP operator. The default is to use LIKE for matching. This
affects the --match-xxx options.
• --server=<source>
Connection information for a server. Use this option multiple times to search multiple servers.
To connect to a server, it is necessary to specify connection parameters such as user name, host
name, password, and either a port or socket. MySQL Utilities provides a number of ways to provide
this information. All of the methods require specifying your choice via a command-line option such as -server, --master, --slave, etc. The methods include the following in order of most secure.
• Use login-paths from your .mylogin.cnf file (encrypted, not visible). Example : <login-path>[:<port>]
[:<socket>]
• Use a configuration file (unencrypted, not visible) Note: available in release-1.5.0. Example :
<configuration-file-path>[:<section>]
• Specify the data on the command-line (unencrypted, visible). Example :
<user>[:<passwd>]@<host>[:<port>][:<socket>]
• --sql, --print-sql, -Q
Instead of displaying the selected processes, emit the SELECT statement that retrieves information
about them. If the --kill-connection or --kill-query option is given, the utility generates a
stored procedure named kill_processes() for killing the queries rather than a SELECT statement.
• --sql-body
Like --sql, but produces the output as the body of a stored procedure without the CREATE
PROCEDURE part of the definition. This could be used, for example, to generate an event for the server
Event Manager.
When used with a kill option, code for killing the matching queries is generated. Note that it is not
possible to execute the emitted code unless it is put in a stored routine, event, or trigger. For example,
the following code could be generated to kill all idle connections for user www-data:
shell> mysqlprocgrep --kill-connection --sql-body \
--match-user=www-data --match-state=sleep
DECLARE kill_done INT;
DECLARE kill_cursor CURSOR FOR
SELECT
Id, User, Host, Db, Command, Time, State, Info
FROM
INFORMATION_SCHEMA.PROCESSLIST
129
NOTES
WHERE
user LIKE 'www-data'
AND
State LIKE 'sleep'
OPEN kill_cursor;
BEGIN
DECLARE id BIGINT;
DECLARE EXIT HANDLER FOR NOT FOUND SET kill_done = 1;
kill_loop: LOOP
FETCH kill_cursor INTO id;
KILL CONNECTION id;
END LOOP kill_loop;
END;
CLOSE kill_cursor;
• --verbose, -v
Specify how much information to display. Use this option multiple times to increase the amount of
information. For example, -v = verbose, -vv = more verbose, -vvv = debug.
• --version
Display version information and exit.
NOTES
For the --format option, the permitted values are not case sensitive. In addition, values may be specified
as any unambiguous prefix of a valid value. For example, --format=g specifies the grid format. An error
occurs if a prefix matches more than one valid value.
The path to the MySQL client tools should be included in the PATH environment variable in order to use the
authentication mechanism with login-paths. This will allow the utility to use the my_print_defaults tools
which is required to read the login-path values from the login configuration file (.mylogin.cnf).
EXAMPLES
For each example, assume that the root user on localhost has sufficient privileges to kill queries and
connections.
Kill all queries created by user john that are less than 1 minute:
shell> mysqlprocgrep --server=root@localhost \
--match-user=john --age=-1m --kill-query
Kill all connections that have been idle for more than 1 hour:
shell> mysqlprocgrep --server=root@localhost \
--match-command=sleep --age=1h --kill-connection
PERMISSIONS REQUIRED
The user must have the SELECT privilege on the mysql database.
5.14 mysqlreplicate — Set Up and Start Replication Between Two
Servers
130
OPTIONS
This utility permits an administrator to start replication from one server (the master) to another (the slave).
The user provides login information for the slave and connection information for connecting to the master.
It is also possible to specify a database to be used to test replication.
The utility reports conditions where the storage engines on the master and the slave differ. It also reports
a warning if the InnoDB storage engine differs on the master and slave. For InnoDB to be the same, both
servers must be running the same "type" of InnoDB (built-in or the InnoDB Plugin), and InnoDB on both
servers must have the same major and minor version numbers and enabled state.
By default, the utility issues warnings for mismatches between the sets of storage engines, the default
storage engine, and the InnoDB storage engine. To produce errors instead, use the --pedantic option,
which requires storage engines to be the same on the master and slave.
The -vv option displays any discrepancies between the storage engines and InnoDB values, with or
without the --pedantic option.
Replication can be started using one of the following strategies.
• Start from the current position (default)
Start replication from the current master binary log file and position. The utility uses the SHOW MASTER
STATUS statement to retrieve this information.
• Start from the beginning
Start replication from the first event recorded in the master binary log. To do this, use the --startfrom-beginning option.
• Start from a binary log file
Start replication from the first event in a specific master binary log file. To do this, use the --masterlog-file option.
• Start from a specific event
Start replication from specific event coordinates (specific binary log file and position). To do this, use the
--master-log-file and --master-log-pos options.
OPTIONS
mysqlreplicate accepts the following command-line options:
• --help
Display a help message and exit.
• --license
Display license information and exit.
• --master=<master>
Connection information for the master server.
To connect to a server, it is necessary to specify connection parameters such as user name, host
name, password, and either a port or socket. MySQL Utilities provides a number of ways to provide
131
OPTIONS
this information. All of the methods require specifying your choice via a command-line option such as -server, --master, --slave, etc. The methods include the following in order of most secure.
• Use login-paths from your .mylogin.cnf file (encrypted, not visible). Example : <login-path>[:<port>]
[:<socket>]
• Use a configuration file (unencrypted, not visible) Note: available in release-1.5.0. Example :
<configuration-file-path>[:<section>]
• Specify the data on the command-line (unencrypted, visible). Example :
<user>[:<passwd>]@<host>[:<port>][:<socket>]
• login-path (.mylogin.cnf) : <login-path>[:<port>][:<socket>]
• Configuration file : <configuration-file-path>[:<section>]
• Command-line : <user>[:<passwd>]@<host>[:<port>][:<socket>]
• --master-log-file=<master_log_file>
Begin replication from the beginning of this master log file.
• --master-log-pos=<master_log_pos>
Begin replication from this position in the master log file. This option is not valid unless --master-logfile is given.
• --pedantic, -p
Fail if both servers do not have the same set of storage engines, the same default storage engine, and
the same InnoDB storage engine.
• --rpl-user=<replication_user>
The user and password for the replication user, in the format: <user>[:<password>] or <login-path>.
• --slave=<slave>
Connection information for the slave server.
To connect to a server, it is necessary to specify connection parameters such as user name, host
name, password, and either a port or socket. MySQL Utilities provides a number of ways to provide
this information. All of the methods require specifying your choice via a command-line option such as -server, --master, --slave, etc. The methods include the following in order of most secure.
• Use login-paths from your .mylogin.cnf file (encrypted, not visible). Example : <login-path>[:<port>]
[:<socket>]
• Use a configuration file (unencrypted, not visible) Note: available in release-1.5.0. Example :
<configuration-file-path>[:<section>]
• Specify the data on the command-line (unencrypted, visible). Example :
<user>[:<passwd>]@<host>[:<port>][:<socket>]
• --start-from-beginning, -b
Start replication at the beginning of events logged in the master binary log. This option is not valid unless
both --master-log-file and --master-log-pos are given.
132
NOTES
• --test-db=<test_database>
The database name to use for testing the replication setup. If this option is not given, no testing is done,
only error checking.
• --verbose, -v
Specify how much information to display. Use this option multiple times to increase the amount of
information. For example, -v = verbose, -vv = more verbose, -vvv = debug.
• --version
Display version information and exit.
NOTES
The login user for the master server must have the appropriate permissions to grant access to all
databases, and have the ability to create user accounts. For example, the user account used to connect to
the master must have the WITH GRANT OPTION privilege.
The server IDs on the master and slave must be nonzero and unique. The utility reports an error if the
server ID is 0 on either server or the same on the master and slave. Set these values before starting this
utility.
Mixing IP and hostnames is not recommended. The replication-specific utilities will attempt to compare
hostnames and IP addresses as aliases for checking slave connectivity to the master. However, if your
installation does not support reverse name lookup, the comparison could fail. Without the ability to do a
reverse name lookup, the replication utilities could report a false negative that the slave is (not) connected
to the master.
For example, if you setup replication using "MASTER_HOST=ubuntu.net" on the slave and later connect
to the slave with mysqlrplcheck and have the master specified as "--master=192.168.0.6" using the
valid IP address for "ubuntu.net", you must have the ability to do a reverse name lookup to compare the IP
(192.168.0.6) and the hostname (ubuntu.net) to determine if they are the same machine.
The path to the MySQL client tools should be included in the PATH environment variable in order to use the
authentication mechanism with login-paths. This will allow the utility to use the my_print_defaults tools
which is required to read the login-path values from the login configuration file (.mylogin.cnf).
EXAMPLES
To set up replication between two MySQL instances running on different ports of the same host using the
default settings, use this command:
shell> mysqlreplicate --master=root@localhost:3306 \
--slave=root@localhost:3307 --rpl-user=rpl:rpl
# master on localhost: ... connected.
# slave on localhost: ... connected.
# Checking for binary logging on master...
# Setting up replication...
# ...done.
The following command uses --pedantic to ensure that replication between the master and slave is
successful if and only if both servers have the same storage engines available, the same default storage
engine, and the same InnoDB storage engine:
133
EXAMPLES
shell> mysqlreplicate --master=root@localhost:3306 \
--slave=root@localhost:3307 --rpl-user=rpl:rpl -vv --pedantic
# master on localhost: ... connected.
# slave on localhost: ... connected.
# master id = 2
# slave id = 99
# Checking InnoDB statistics for type and version conflicts.
# Checking storage engines...
# Checking for binary logging on master...
# Setting up replication...
# Flushing tables on master with read lock...
# Connecting slave to master...
# CHANGE MASTER TO MASTER_HOST = [...omitted...]
# Starting slave...
# status: Waiting for master to send event
# error: 0:
# Unlocking tables on master...
# ...done.
The following command starts replication from the current position of the master (which is the default):
shell> mysqlreplicate --master=root@localhost:3306 \
--slave=root@localhost:3307 --rpl-user=rpl:rpl
# master on localhost: ... connected.
# slave on localhost: ... connected.
# Checking for binary logging on master...
# Setting up replication...
# ...done.
The following command starts replication from the beginning of recorded events on the master:
shell> mysqlreplicate --master=root@localhost:3306 \
--slave=root@localhost:3307 --rpl-user=rpl:rpl \
--start-from-beginning
# master on localhost: ... connected.
# slave on localhost: ... connected.
# Checking for binary logging on master...
# Setting up replication...
# ...done.
The following command starts replication from the beginning of a specific master binary log file:
shell> mysqlreplicate --master=root@localhost:3306 \
--slave=root@localhost:3307 --rpl-user=rpl:rpl \
--master-log-file=my_log.000003
# master on localhost: ... connected.
# slave on localhost: ... connected.
# Checking for binary logging on master...
# Setting up replication...
# ...done.
The following command starts replication from specific master binary log coordinates (specific log file and
position):
shell> mysqlreplicate --master=root@localhost:3306 \
--slave=root@localhost:3307 --rpl-user=rpl:rpl \
--master-log-file=my_log.000001 --master-log-pos=96
# master on localhost: ... connected.
# slave on localhost: ... connected.
# Checking for binary logging on master...
# Setting up replication...
# ...done.
134
RECOMMENDATIONS
RECOMMENDATIONS
You should set read_only=1 in the my.cnf file for the slave to ensure that no accidental data changes,
such as INSERT, DELETE, UPDATE, and so forth, are permitted on the slave other than those produced
by events read from the master.
Use the --pedantic and -vv options for setting up replication on production servers to avoid possible
problems with differing storage engines.
PERMISSIONS REQUIRED
The users on the master need the following privileges: SELECT and INSERT privileges on mysql
database, REPLICATION SLAVE, REPLICATION CLIENT and GRANT OPTION. The slave users need
the SUPER privilege. The repl user, used as the argument for the --rpl-user option, is either created
automatically or if it exists, it needs the REPLICATION SLAVE privilege.
5.15 mysqlrplms — Set Up and Start Replication Among a Slave
and Multiple Masters
This utility permits a user to start replication from multiple master servers (also called sources) to a single
slave. The user provides login information for the slave and each of the masters.
The utility reports conditions where the storage engines on the masters and the slave differ. It also reports
a warning if the InnoDB storage engine differs on the master and slave. For InnoDB to be the same, both
servers must be running the same "type" of InnoDB (built-in or the InnoDB Plugin), and InnoDB on both
servers must have the same major and minor version numbers and enabled state.
By default, the utility issues warnings for mismatches between the sets of storage engines, the default
storage engine, and the InnoDB storage engine.
The -vv option displays any discrepancies between the storage engines and InnoDB values.
A round-robin scheduling is used to setup replication among the masters and slave.
The mysqlrplms utility follows these assumptions:
• All servers have GTIDs enabled.
• There are no conflicts between transactions from different masters. For example, there are no updates to
the same object from multiple masters.
• Replication is asynchronous.
OPTIONS
mysqlrplms accepts the following command-line options:
• --daemon=<command>
Run as a daemon. The command can be start (start daemon), stop (stop daemon), restart (stop
then start the daemon) or nodetach (start but do not detach the process). This option is only available
for POSIX systems.
• --format=<format>, -f <format>
Display the replication health output in either grid (default), tab, csv, or vertical format.
135
OPTIONS
• --help
Display a help message and exit.
• --interval=<seconds>, -i <seconds>
Interval in seconds for reporting health. Default = 15 seconds. Minimum is 5 seconds.
• --license
Display license information and exit.
• --log=<log_file>
Specify a log file to use for logging messages
• --log-age=<days>
Specify maximum age of log entries in days. Entries older than this will be purged on startup. Default = 7
days.
• --masters=<master connections>
Connection information for master servers. List multiple masters in comma-separated list.
To connect to a server, it is necessary to specify connection parameters such as user name, host
name, password, and either a port or socket. MySQL Utilities provides a number of ways to provide
this information. All of the methods require specifying your choice via a command-line option such as -server, --master, --slave, etc. The methods include the following in order of most secure.
• Use login-paths from your .mylogin.cnf file (encrypted, not visible). Example : <login-path>[:<port>]
[:<socket>]
• Use a configuration file (unencrypted, not visible) Note: available in release-1.5.0. Example :
<configuration-file-path>[:<section>]
• Specify the data on the command-line (unencrypted, visible). Example :
<user>[:<passwd>]@<host>[:<port>][:<socket>]
• --report-values=<report_values>
Report values used in mysqlrplms. It can be health, gtid or uuid. Multiple values can be used separated
by commas.
• health
Display the replication health of the topology.
• gtid
Display the master's list of executed GTIDs, contents of the GTID variables;
@@GLOBAL.GTID_EXECUTED, @@GLOBAL.GTID_PURGED and @@GLOBAL.GTID_OWNED.
• uuid
Display universally unique identifiers (UUIDs) for all servers.
Default = health.
136
NOTES
• --rpl-user=<replication_user>
The user and password for the replication user, in the format: <user>[:<password>] or <login-path>.
• --slave=<slave>
Connection information for the slave server.
To connect to a server, it is necessary to specify connection parameters such as user name, host
name, password, and either a port or socket. MySQL Utilities provides a number of ways to provide
this information. All of the methods require specifying your choice via a command-line option such as -server, --master, --slave, etc. The methods include the following in order of most secure.
• Use login-paths from your .mylogin.cnf file (encrypted, not visible). Example : <login-path>[:<port>]
[:<socket>]
• Use a configuration file (unencrypted, not visible) Note: available in release-1.5.0. Example :
<configuration-file-path>[:<section>]
• Specify the data on the command-line (unencrypted, visible). Example :
<user>[:<passwd>]@<host>[:<port>][:<socket>]
• --start-from-beginning, -b
Start replication at the beginning of events logged in the master binary log.
• --switchover-interval=<seconds>
Interval in seconds for switching masters. Default = 60 seconds. Minimum is 30 seconds.
• --pidfile=<pidfile>
Pidfile for running mysqlrplms as a daemon. This file contains the PID (process identifier), that uniquely
identify a process. It is needed to identify and control the process forked by mysqlrplms.
• --verbose, -v
Specify how much information to display. Use this option multiple times to increase the amount of
information. For example, -v = verbose, -vv = more verbose, -vvv = debug.
• --version
Display version information and exit.
NOTES
The login user for the master servers must have the appropriate permissions to grant access to all
databases, and have the ability to create user accounts. For example, the user accounts used to connect
to each of the masters must have the WITH GRANT OPTION privilege.
The server IDs on the masters and slave must be nonzero and unique. The utility reports an error if the
server ID is 0 on either server or the same on the masters and slave. Set these values before starting this
utility.
Mixing IP and hostnames is not recommended. The replication-specific utilities will attempt to compare
hostnames and IP addresses as aliases for checking slave connectivity to the master. However, if your
installation does not support reverse name lookup, the comparison could fail. Without the ability to do a
137
EXAMPLES
reverse name lookup, the replication utilities could report a false negative that the slave is (not) connected
to the master.
The path to the MySQL client tools should be included in the PATH environment variable in order to use the
authentication mechanism with login-paths. This will allow the utility to use the my_print_defaults tools
which is required to read the login-path values from the login configuration file (.mylogin.cnf).
Due to a known server issue, there are some limitations with the use of temporary tables with multi-source
replication. In order to avoid problems, we recommend the execution of all statements for a temporary
table in a single transaction. See Replication and Temporary Tables, for more information.
EXAMPLES
To set up multi-source replication among two masters and a slave, running on different ports of the same
host using the default settings, use this command:
shell> mysqlrplms --slave=root:root@localhost:3306 \
--masters=root:root@localhost:3307,root:root@localhost:3308
# Starting multi-source replication...
# Press CTRL+C to quit.
# Switching to master 'localhost:3307'.
# master on localhost: ... connected.
# slave on localhost: ... connected.
#
# Current Master Information:
+-------------------+-----------+---------------+-------------------+
| Binary Log File
| Position | Binlog_Do_DB | Binlog_Ignore_DB |
+-------------------+-----------+---------------+-------------------+
| clone-bin.000001 | 594
| N/A
| N/A
|
+-------------------+-----------+---------------+-------------------+
# GTID Executed Set: 00a4e027-a83a-11e3-8bd6-28d244017f26:1-2
#
# Health Status:
+------------+-------+---------+--------+------------+---------+
| host
| port | role
| state | gtid_mode | health |
+------------+-------+---------+--------+------------+---------+
| localhost | 3307 | MASTER | UP
| ON
| OK
|
| localhost | 3306 | SLAVE
| UP
| ON
| OK
|
| localhost | 3308 | MASTER | UP
| ON
| OK
|
+------------+-------+---------+--------+------------+---------+
#
(...)
The following command uses --report-values to report health, GTID and UUID status:
shell> mysqlrplms --slave=root:root@localhost:3306 \
--masters=root:root@localhost:3307,root:root@localhost:3308\n
--report-values=health,gtid,uuid
# Starting multi-source replication...
# Press CTRL+C to quit.
# Switching to master 'localhost:3307'.
# master on localhost: ... connected.
# slave on localhost: ... connected.
#
# Current Master Information:
+-------------------+-----------+---------------+-------------------+
| Binary Log File
| Position | Binlog_Do_DB | Binlog_Ignore_DB |
+-------------------+-----------+---------------+-------------------+
| clone-bin.000001 | 594
| N/A
| N/A
|
+-------------------+-----------+---------------+-------------------+
# GTID Executed Set: 00a4e027-a83a-11e3-8bd6-28d244017f26:1-2
138
RECOMMENDATIONS
#
# Health Status:
+------------+-------+---------+--------+------------+---------+
| host
| port | role
| state | gtid_mode | health |
+------------+-------+---------+--------+------------+---------+
| localhost | 3307 | MASTER | UP
| ON
| OK
|
| localhost | 3306 | SLAVE
| UP
| ON
| OK
|
| localhost | 3308 | MASTER | UP
| ON
| OK
|
+------------+-------+---------+--------+------------+---------+
#
# GTID Status - Transactions executed on the servers:
+------------+-------+---------+-------------------------------------------+
| host
| port | role
| gtid
|
+------------+-------+---------+-------------------------------------------+
| localhost | 3307 | MASTER | 00a4e027-a83a-11e3-8bd6-28d244017f26:1-2 |
| localhost | 3306 | SLAVE
| 00a4e027-a83a-11e3-8bd6-28d244017f26:1-2 |
| localhost | 3306 | SLAVE
| faf0874f-a839-11e3-8bd6-28d244017f26:1
|
+------------+-------+---------+-------------------------------------------+
#
# UUID Status:
+------------+-------+---------+---------------------------------------+
| host
| port | role
| uuid
|
+------------+-------+---------+---------------------------------------+
| localhost | 3307 | MASTER | 00a4e027-a83a-11e3-8bd6-28d244017f26 |
| localhost | 3306 | SLAVE
| faf0874f-a839-11e3-8bd6-28d244017f26 |
+------------+-------+---------+---------------------------------------+
#
(...)
Start multi-source replication running as a daemon (POSIX only):
shell> mysqlrplms --slave=root:root@localhost:3306 \
--masters=root:root@localhost:3307,root:root@localhost:3308 \
--log=rplms_daemon.log --pidfile=rplms_daemon.pid --daemon=start
Restart multi-source replication running as a daemon:
shell> mysqlrplms --slave=root:root@localhost:3306 \
--masters=root:root@localhost:3307,root:root@localhost:3308 \
--log=rplms_daemon.log --pidfile=rplms_daemon.pid --daemon=restart
Stop multi-source replication running as a daemon:
shell> mysqlrplms --slave=root:root@localhost:3306 \
--masters=root:root@localhost:3307,root:root@localhost:3308 \
--log=rplms_daemon.log --pidfile=rplms_daemon.pid --daemon=stop
RECOMMENDATIONS
You should set read_only=1 in the my.cnf file for the slave to ensure that no accidental data changes,
such as INSERT, DELETE, UPDATE, and so forth, are permitted on the slave other than those produced
by events read from the master.
PERMISSIONS REQUIRED
The users on the masters need the following privileges: SELECT and INSERT privileges on mysql
database, REPLICATION SLAVE, REPLICATION CLIENT and GRANT OPTION. The slave users need
the SUPER privilege. The rpl user, used as the argument for the --rpl-user [137] option, is either
created automatically or if it exists, it needs the REPLICATION SLAVE privilege.
139
mysqlrpladmin — Administration utility for MySQL replication
5.16 mysqlrpladmin — Administration utility for MySQL replication
This utility permits users to perform administrative actions on a replication topology consisting of a master
and its slaves. The utility is designed to make it easy to recover from planned maintenance of the master,
or from an event that takes the master offline unexpectedly.
The act of taking the master offline intentionally and switching control to another slave is called switchover.
In this case, there is no loss of transactions as the master is locked and all slaves are allowed to catch up
to the master. Once the slaves have read all events from the master, the master is shutdown and control
switched to a slave (in this case called a candidate slave).
Recovering from the loss of a downed master is more traumatic and since there is no way to know what
transactions the master may have failed to send, the new master (called a candidate slave) must be the
slave that is most up-to-date. How this is determined depends on the version of the server (see below).
However, it can result in the loss of some transactions that were executed on the downed master but not
sent. The utility accepts a list of slaves to be considered the candidate slave. If no slave is found to meet
the requirements, the operation will search the list of known slaves.
The utility also provides a number of useful commands for managing a replication topology including the
following.
elect This command is available to only those servers supporting global transaction identifiers (GTIDs),
perform best slave election and report best slave to use in the event a switchover or failover is required.
Best slave election is simply the first slave to meet the prerequisites. GTIDs are supported in version
5.6.5 and higher. This command requires the options --master and either --slaves or --discoverslaves-login.
failover This command is available to only those servers supporting GTIDs. Conduct failover to the best
slave. The command will test each candidate slave listed for the prerequisites. Once a candidate slave
is elected, it is made a slave of each of the other slaves thereby collecting any transactions executed
on other slaves but not the candidate. In this way, the candidate becomes the most up-to-date slave.
This command requires the --slaves option. The --discover-slaves-login option is not allowed
because, for failover, the master is presumed to be offline or otherwise unreachable (so there is no way to
discover the slaves). The --master option is ignored for this command.
gtid This command is available to only those servers supporting GTIDs. It displays the contents
of the GTID variables, @@GLOBAL.GTID_EXECUTED, @@GLOBAL.GTID_PURGED, and
@@GLOBAL.GTID_OWNED. The command also displays universally unique identifiers (UUIDs) for all
servers. This command requires one of the following combinations: --master and --slaves, or -master and --discover-slaves-login.
health Display the replication health of the topology. By default, this includes the host name, port, role
(MASTER or SLAVE) of the server, state of the server (UP = is connected, WARN = not connected but
can ping, DOWN = not connected and cannot ping), the GTID_MODE, and health state. This command
requires one of the following combinations:
• --master and --slaves
• --master and --discover-slaves-login
The master health state is based on the following; if GTID_MODE=ON, the server must have binary log
enabled, and there must exist a user with the REPLICATE SLAVE privilege.
The slave health state is based on the following; the IO_THREAD and SQL_THREADS must be running, it
must be connected to the master, there are no errors, the slave delay for non-gtid enabled scenarios is not
140
mysqlrpladmin — Administration utility for MySQL replication
more than the threshold provided by the --max-position and the slave is reading the correct master log
file, and slave delay is not more than the --seconds-behind threshold option.
reset Execute the STOP SLAVE and RESET SLAVE commands on all slaves. This command requires the
--slaves option. The --discover-slaves-login option is not allowed because it might not provide
the expected result, excluding slaves with the IO thread stopped. Optionally, the --master option can
also be used and in this case the utility will perform an additional check to verify if the specified slaves are
associated (replication is configured) to the given master.
start Execute the START SLAVE command on all slaves. This command requires the --slaves option.
The --discover-slaves-login option is not allowed because it might not provide the expected result,
excluding slaves with the IO thread stopped. Optionally, the --master option can also be used and in this
case the utility will perform an additional check to verify if the specified slaves are associated (replication is
configured) to the given master.
stop Execute the STOP SLAVE command on all slaves. This command requires the --slaves option.
The --discover-slaves-login option is not allowed because it might not provide the expected result,
excluding slaves with the IO thread stopped. Optionally, the --master option can also be used and in this
case the utility will perform an additional check to verify if the specified slaves are associated (replication is
configured) to the given master.
switchover Perform slave promotion to a specified candidate slave as designated by the --new-master
option. This command is available for both gtid-enabled servers and non-gtid-enabled scenarios. This
command requires one of the following combinations:
• --master, --new-master and --slaves
• --master, --new-master and --discover-slaves-login
Detection of a downed master is performed as follows. If the connection to the master is lost, wait -ping seconds and check again. If the master connection is lost and the master cannot be pinged or
reconnected, the failover event occurs.
For all commands that require specifying multiple servers, the options require a comma-separated list of
connection parameters in the following form (where the password, port, and socket are optional).:
<*user*>[:<*passwd*>]@<*host*>[:<*port*>][:<*socket*>] or
<*login-path*>[:<*port*>][:<*socket*>]
The utility permits users to discover slaves connected to the master. In order to use the discover slaves
feature, all slaves must use the --report-host and --report-port startup variables to specify the
correct hostname and ip port of the slave. If these are missing or report the incorrect information, the
slaves health may not be reported correctly or the slave may not be listed at all. The 'discover slaves'
feature ignores any slaves it cannot connect to, or if the IO thread stopped (it is not connected to the
master).
The utility permits the user to demote a master to a slave during the switchover operation. The --demotemaster option tells the utility to, once the new master is established, make the old master a slave of the
new master. This permits rotation of the master role among a set of servers.
The utility permits the user to specify an external script to execute before and after the switchover and
failover commands. The user can specify these with the --exec-before and --exec-after options.
The return code of the script is used to determine success thus each script must report 0 (success) to
be considered successful. If a script returns a value other than 0, the result code is presented in an error
message.
The utility permits the user to log all actions taken during the commands. The --log option requires a
valid path and file name of the file to use for logging operations. The log is active only when this option is
141
OPTIONS
specified. The option --log-age specifies the age in days that log entries are kept. The default is seven
(7) days. Older entries are automatically deleted from the log file (but only if the --log option is specified).
The format of the log file includes the date and time of the event, the level of the event (informational INFO, warning - WARN, error - ERROR, critical failure - CRITICAL), and the message reported by the
utility.
The utility has a number of options each explained in more detail below. Some of the options are specific
to certain commands. Warning messages are issued whenever an option is used that does not apply to
the command requested. A brief overview of each command and its options is presented in the following
paragraphs.
The start, stop, and reset commands require the --slaves option to list all of the slaves in the topology.
Optionally, the --master option can be specified for the utility to check if the specified slaves are
associated to the given master before executing the command, making sure that the command is only
applied to slaves connected to the right replication master.
The options required for the elect, health and gtid commands include the --master option to specify
the existing master, and either the --slaves option to list all of the slaves in the topology or the -discover-slaves-login option to provide the user name and password to discover any slaves in the
topology that are registered and connected to the master.
The options required for switchover include the --master option to specify the existing master, the -new-master option to specify the candidate slave (the slave to become the new master), and either the
--slaves option to list the considered slaves in the topology or the --discover-slaves-login option
to provide the user name and password to discover any slaves in the topology that are registered and
connected to the master.
The failover command requires only the --slaves option to explicitly list all of the slaves in the topology
because it is expected that the master is down when this command is used.
Use the --verbose option to see additional information in the health report and additional messages
during switchover or failover.
OPTIONS
mysqlrpladmin accepts the following command-line options:
• --help
Display a help message and exit.
• --license
Display license information and exit.
• --candidates=<candidate slave connections>
Connection information for candidate slave servers for failover. Valid only with failover command. List
multiple slaves in comma-separated list.
To connect to a server, it is necessary to specify connection parameters such as user name, host
name, password, and either a port or socket. MySQL Utilities provides a number of ways to provide
this information. All of the methods require specifying your choice via a command-line option such as -server, --master, --slave, etc. The methods include the following in order of most secure.
• Use login-paths from your .mylogin.cnf file (encrypted, not visible). Example : <login-path>[:<port>]
[:<socket>]
142
OPTIONS
• Use a configuration file (unencrypted, not visible) Note: available in release-1.5.0. Example :
<configuration-file-path>[:<section>]
• Specify the data on the command-line (unencrypted, visible). Example :
<user>[:<passwd>]@<host>[:<port>][:<socket>]
• --demote-master
Make master a slave after switchover.
• --discover-slaves-login=<slave_login>
At startup, query master for all registered slaves and use the user name and password specified to
connect. Supply the user and password in the form <user>[:<passwd>] or <login-path>. For example, -discover=joe:secret will use 'joe' as the user and 'secret' as the password for each discovered slave.
• --exec-after=<script>
Name of script to execute after failover or switchover. Script name may include the path.
• --exec-before=<script>
Name of script to execute before failover or switchover. Script name may include the path.
• --force
Ignore prerequisite checks or any inconsistencies found, such as errant transactions on the slaves or
SQL thread errors, thus forcing the execution of the specified command. This option need to be used
carefully as it will not solve any detected issue, but only ignores them and displays a warning message.
• --format=<format>, -f <format>
Display the replication health output in either grid (default), tab, csv, or vertical format.
• --log=<log_file>
Specify a log file to use for logging messages
• --log-age=<days>
Specify maximum age of log entries in days. Entries older than this will be purged on startup. Default = 7
days.
• --master=<connection>
Connection information for the master server.
To connect to a server, it is necessary to specify connection parameters such as user name, host
name, password, and either a port or socket. MySQL Utilities provides a number of ways to provide
this information. All of the methods require specifying your choice via a command-line option such as -server, --master, --slave, etc. The methods include the following in order of most secure.
• Use login-paths from your .mylogin.cnf file (encrypted, not visible). Example : <login-path>[:<port>]
[:<socket>]
• Use a configuration file (unencrypted, not visible) Note: available in release-1.5.0. Example :
<configuration-file-path>[:<section>]
143
OPTIONS
• Specify the data on the command-line (unencrypted, visible). Example :
<user>[:<passwd>]@<host>[:<port>][:<socket>]
• --max-position=<position>
Used to detect slave delay. The maximum difference between the master's log position and the slave's
reported read position of the master. A value greater than this means the slave is too far behind the
master. Default = 0.
• --new-master=<connection>
Connection information for the slave to be used to replace the master for switchover. Valid only with
switchover command.
To connect to a server, it is necessary to specify connection parameters such as user name, host
name, password, and either a port or socket. MySQL Utilities provides a number of ways to provide
this information. All of the methods require specifying your choice via a command-line option such as -server, --master, --slave, etc. The methods include the following in order of most secure.
• Use login-paths from your .mylogin.cnf file (encrypted, not visible). Example : <login-path>[:<port>]
[:<socket>]
• Use a configuration file (unencrypted, not visible) Note: available in release-1.5.0. Example :
<configuration-file-path>[:<section>]
• Specify the data on the command-line (unencrypted, visible). Example :
<user>[:<passwd>]@<host>[:<port>][:<socket>]
• --no-health
Turn off health report after switchover or failover.
• --ping=<number>
Number of ping attempts for detecting downed server. Note: on some platforms this is the same as
number of seconds to wait for ping to return. This value is also used to check down status of master.
Failover will wait ping seconds to check master response. If no response, failover event occurs.
• --quiet, -q
Turn off all messages for quiet execution.
• --rpl-user=<replication_user>
The user and password for the replication user requirement, in the format: <user>[:<password>] or
<login-path>. E.g. rpl:passwd Default = None.
• --script-threshold=<return_code>
Value for external scripts to trigger aborting the operation if result is greater than or equal to the
threshold.
Default = None (no threshold checking).
• --seconds-behind=<seconds>
Used to detect slave delay. The maximum number of seconds behind the master permitted before slave
is considered behind the master. Default = 0.
144
NOTES
• --slaves=<slave connections>
Connection information for slave servers. List multiple slaves in comma-separated list. The list will be
evaluated literally whereby each server is considered a slave to the master listed regardless if they are a
slave of the master.
To connect to a server, it is necessary to specify connection parameters such as user name, host
name, password, and either a port or socket. MySQL Utilities provides a number of ways to provide
this information. All of the methods require specifying your choice via a command-line option such as -server, --master, --slave, etc. The methods include the following in order of most secure.
• Use login-paths from your .mylogin.cnf file (encrypted, not visible). Example : <login-path>[:<port>]
[:<socket>]
• Use a configuration file (unencrypted, not visible) Note: available in release-1.5.0. Example :
<configuration-file-path>[:<section>]
• Specify the data on the command-line (unencrypted, visible). Example :
<user>[:<passwd>]@<host>[:<port>][:<socket>]
• --timeout=<seconds>
Maximum timeout in seconds to wait for each replication command to complete. For example, timeout for
slave waiting to catch up to master. Default = 300 seconds.
• --verbose, -v
Specify how much information to display. Use this option multiple times to increase the amount of
information. For example, -v = verbose, -vv = more verbose, -vvv = debug.
• --version
Display version information and exit.
NOTES
The login user must have the appropriate permissions to execute SHOW SLAVE STATUS, SHOW
MASTER STATUS, and SHOW VARIABLES on the appropriate servers as well as grant the REPLICATE
SLAVE privilege. The utility checks permissions for the master, slaves, and candidates at startup.
Mixing IP and hostnames is not recommended. The replication-specific utilities will attempt to compare
hostnames and IP addresses as aliases for checking slave connectivity to the master. However, if your
installation does not support reverse name lookup, the comparison could fail. Without the ability to do a
reverse name lookup, the replication utilities could report a false negative that the slave is (not) connected
to the master.
For example, if you setup replication using "MASTER_HOST=ubuntu.net" on the slave and later connect
to the slave with mysqlrplcheck and have the master specified as "--master=192.168.0.6" using the
valid IP address for "ubuntu.net", you must have the ability to do a reverse name lookup to compare the IP
(192.168.0.6) and the hostname (ubuntu.net) to determine if they are the same machine.
Similarly, if you use localhost to connect to the master, the health report may not show all of the slaves. It
is best to use the actual hostname of the master when connecting or setting up replication.
If the user does not specify the --rpl-user and the user has specified the switchover or failover
command, the utility will check to see if the slaves are using --master-info-repository=TABLE. If
they are not, the utility will stop with an error.
145
EXAMPLES
All the commands require either the --slaves or --discover-slaves-login option but both cannot
be used at the same time. In fact, some commands only allow the use of the --slaves option which is
safer to specify the list slaves, because --discover-slaves-login might not provide an up to date list
of available slaves.
The path to the MySQL client tools should be included in the PATH environment variable in order to use the
authentication mechanism with login-paths. This will allow the utility to use the my_print_defaults tools
which is required to read the login-path values from the login configuration file (.mylogin.cnf).
EXAMPLES
To perform best slave election for a topology with GTID_MODE=ON (server version 5.6.5 or higher) where
all slaves are specified with the --slaves option, run the following command.:
shell> mysqlrpladmin --master=root@localhost:3331 \
--slaves=root@localhost:3332,root@localhost:3333,root@localhost:3334 elect
# Electing candidate slave from known slaves.
# Best slave found is located on localhost:3332.
# ...done.
To perform best slave election supplying a candidate list, use the following command.:
shell> mysqlrpladmin --master=root@localhost:3331 \
--slaves=root@localhost:3332,root@localhost:3333,root@localhost:3334 \
--candidates=root@localhost:3333,root@localhost:3334 elect
# Electing candidate slave from candidate list then slaves list.
# Best slave found is located on localhost:3332.
# ...done.
To perform failover after a master has failed, use the following command.:
shell> mysqlrpladmin \
--slaves=root@localhost:3332,root@localhost:3333,root@localhost:3334 \
--candidates=root@localhost:3333,root@localhost:3334 failover
# Performing failover.
# Candidate slave localhost:3333 will become the new master.
# Preparing candidate for failover.
# Creating replication user if it does not exist.
# Stopping slaves.
# Performing STOP on all slaves.
# Switching slaves to new master.
# Starting slaves.
# Performing START on all slaves.
# Checking slaves for errors.
# Failover complete.
# ...done.
To see the replication health of a topology with GTID_MODE=ON (server version 5.6.5 or higher) and
discover all slaves attached to the master, run the following command. We use the result of the failover
command above.:
shell> mysqlrpladmin --master=root@localhost:3333 \
--slaves=root@localhost:3332,root@localhost:3334 health
# Getting health for master: localhost:3333.
#
# Replication Topology Health:
+------------+-------+---------+--------+------------+---------+
| host
| port | role
| state | gtid_mode | health |
+------------+-------+---------+--------+------------+---------+
146
EXAMPLES
| localhost | 3333 | MASTER | UP
| ON
| OK
|
| localhost | 3332 | SLAVE
| UP
| ON
| OK
|
| localhost | 3334 | SLAVE
| UP
| ON
| OK
|
+------------+-------+---------+--------+------------+---------+
# ...done.
To view a detailed replication health report but with all of the replication health checks revealed, use the -verbose option as shown below. In this example, we use vertical format to make viewing easier.:
shell> mysqlrpladmin --master=root@localhost:3331 \
--slaves=root@localhost:3332,root@localhost:3333,root@localhost:3334 \
--verbose health
# Getting health for master: localhost:3331.
# Attempting to contact localhost ... Success
# Attempting to contact localhost ... Success
# Attempting to contact localhost ... Success
# Attempting to contact localhost ... Success
#
# Replication Topology Health:
*************************
1. row *************************
host: localhost
port: 3331
role: MASTER
state: UP
gtid_mode: ON
health: OK
version: 5.6.5-m8-debug-log
master_log_file: mysql-bin.000001
master_log_pos: 571
IO_Thread:
SQL_Thread:
Secs_Behind:
Remaining_Delay:
IO_Error_Num:
IO_Error:
*************************
2. row *************************
host: localhost
port: 3332
role: SLAVE
state: UP
gtid_mode: ON
health: OK
version: 5.6.5-m8-debug-log
master_log_file: mysql-bin.000001
master_log_pos: 571
IO_Thread: Yes
SQL_Thread: Yes
Secs_Behind: 0
Remaining_Delay: No
IO_Error_Num: 0
IO_Error:
*************************
3. row *************************
host: localhost
port: 3333
role: SLAVE
state: UP
gtid_mode: ON
health: OK
version: 5.6.5-m8-debug-log
master_log_file: mysql-bin.000001
master_log_pos: 571
IO_Thread: Yes
SQL_Thread: Yes
Secs_Behind: 0
Remaining_Delay: No
IO_Error_Num: 0
147
EXAMPLES
IO_Error:
*************************
4. row *************************
host: localhost
port: 3334
role: SLAVE
state: UP
gtid_mode: ON
health: OK
version: 5.6.5-m8-debug-log
master_log_file: mysql-bin.000001
master_log_pos: 571
IO_Thread: Yes
SQL_Thread: Yes
Secs_Behind: 0
Remaining_Delay: No
IO_Error_Num: 0
IO_Error:
4 rows.
# ...done.
To run the same failover command above, but specify a log file, use the following command.:
shell> mysqlrpladmin \
--slaves=root@localhost:3332,root@localhost:3333,root@localhost:3334 \
--candidates=root@localhost:3333,root@localhost:3334 \
--log=test_log.txt failover
# Performing failover.
# Candidate slave localhost:3333 will become the new master.
# Preparing candidate for failover.
# Creating replication user if it does not exist.
# Stopping slaves.
# Performing STOP on all slaves.
# Switching slaves to new master.
# Starting slaves.
# Performing START on all slaves.
# Checking slaves for errors.
# Failover complete.
# ...done.
After this command, the log file will contain entries like the following:
2012-03-19
2012-03-19
2012-03-19
2012-03-19
2012-03-19
2012-03-19
2012-03-19
2012-03-19
2012-03-19
2012-03-19
2012-03-19
2012-03-19
2012-03-19
14:44:17
14:44:17
14:44:17
14:44:17
14:44:19
14:44:19
14:44:19
14:44:19
14:44:20
14:44:20
14:44:20
14:44:21
14:44:21
PM
PM
PM
PM
PM
PM
PM
PM
PM
PM
PM
PM
PM
INFO
INFO
INFO
INFO
INFO
INFO
INFO
INFO
INFO
INFO
INFO
INFO
INFO
Executing failover command...
Performing failover.
Candidate slave localhost:3333 will become the new master.
Preparing candidate for failover.
Creating replication user if it does not exist.
Stopping slaves.
Performing STOP on all slaves.
Switching slaves to new master.
Starting slaves.
Performing START on all slaves.
Checking slaves for errors.
Failover complete.
...done.
To perform switchover and demote the current master to a slave, use the following command.:
shell> mysqlrpladmin --master=root@localhost:3331 \
--slaves=root@localhost:3332,root@localhost:3333,root@localhost:3334 \
--new-master=root@localhost:3332 --demote-master switchover
# Performing switchover from master at localhost:3331 to slave at localhost:3332.
# Checking candidate slave prerequisites.
# Waiting for slaves to catch up to old master.
148
PERMISSIONS REQUIRED
#
#
#
#
#
#
#
#
#
Stopping slaves.
Performing STOP on all slaves.
Demoting old master to be a slave to the new master.
Switching slaves to new master.
Starting all slaves.
Performing START on all slaves.
Checking slaves for errors.
Switchover complete.
...done.
If the replication health report is generated on the topology following the above command, it will display the
old master as a slave as shown below.:
# Replication Topology Health:
+------------+-------+---------+--------+------------+---------+
| host
| port | role
| state | gtid_mode | health |
+------------+-------+---------+--------+------------+---------+
| localhost | 3332 | MASTER | UP
| ON
| OK
|
| localhost | 3331 | SLAVE
| UP
| ON
| OK
|
| localhost | 3333 | SLAVE
| UP
| ON
| OK
|
| localhost | 3334 | SLAVE
| UP
| ON
| OK
|
+------------+-------+---------+--------+------------+---------+
You can use the discover slaves feature, if and only if all slaves report their host and port to the master.
A sample command to generate a replication health report with discovery is shown below. Note that the
option --discover-slaves-login cannot be used in conjunction with the --slaves option.:
shell> mysqlrpladmin --master=root@localhost:3332 --discover-slaves-login=root
health
# Discovering slaves for master at localhost:3332
# Discovering slave at localhost:3331
# Found slave: localhost:3331
# Discovering slave at localhost:3333
# Found slave: localhost:3333
# Discovering slave at localhost:3334
# Found slave: localhost:3334
# Checking privileges.
#
# Replication Topology Health:
+------------+-------+---------+--------+------------+---------+
| host
| port | role
| state | gtid_mode | health |
+------------+-------+---------+--------+------------+---------+
| localhost | 3332 | MASTER | UP
| ON
| OK
|
| localhost | 3331 | SLAVE
| UP
| ON
| OK
|
| localhost | 3333 | SLAVE
| UP
| ON
| OK
|
| localhost | 3334 | SLAVE
| UP
| ON
| OK
|
+------------+-------+---------+--------+------------+---------+
# ...done.
PERMISSIONS REQUIRED
The users on the master need the following privileges: SELECT and INSERT privileges on mysql
database, REPLICATION SLAVE, REPLICATION CLIENT and GRANT OPTION. The slave users need
the SUPER privilege. The repl user, used as the argument for the --rpl-user option, is either created
automatically or if it exists, it needs the REPLICATION SLAVE privilege.
To run the mysqlrpladmin utility with the health command, the account used on the master needs an
extra SUPER privilege.
As for the switchover command all the users need the following privileges: SUPER, GRANT OPTION,
SELECT, RELOAD, DROP, CREATE and REPLICATION SLAVE
149
mysqlrplcheck — Check Replication Prerequisites
5.17 mysqlrplcheck — Check Replication Prerequisites
This utility checks the prerequisites for replication between a master and a slave. These checks (called
tests) are designed to ensure a healthy replication setup. The utility performs the following tests:
1. Is the binary log enabled on the master?
2. Are there binary logging exceptions (such as *_do_db or *_ignore_db settings)? If so, display them.
3. Does the replication user exist on the master with the correct privileges?
4. Are there server_id conflicts?
5. Is the slave connected to this master? If not, display the master host and port.
6. Are there conflicts between the master.info file on the slave and the values shown in SHOW
SLAVE STATUS on the master?
7. Are the InnoDB configurations compatible (plugin vs. native)?
8. Are the storage engines compatible (have same on slave as master)?
9. Are the lower_case_tables_names settings compatible? Warn if there are settings for lowercase/
uppercase table names that can cause problems. See Bug #59240.
10. Is the slave behind the master?
The utility runs each test in turn unless there is a fatal error preventing further testing, such as a loss of
connection to the servers.
Each test can complete with one of the following states: pass (the prerequisites are met), fail (the
prerequisites were met but one or more errors occurred or there are exceptions to consider), or warn (the
test found some unusual settings that should be examined further but may not be in error).
Use the --verbose option to see additional information such as server IDs, lower_case_table_name
settings, and the contents of the master information file on the slave.
To see the values from the SHOW SLAVE STATUS statement, use the --show-slave-status option.
OPTIONS
mysqlrplcheck accepts the following command-line options:
• --help
Display a help message and exit.
• --license
Display license information and exit.
• --master=<source>
Connection information for the master server.
To connect to a server, it is necessary to specify connection parameters such as user name, host
name, password, and either a port or socket. MySQL Utilities provides a number of ways to provide
this information. All of the methods require specifying your choice via a command-line option such as -server, --master, --slave, etc. The methods include the following in order of most secure.
150
OPTIONS
• Use login-paths from your .mylogin.cnf file (encrypted, not visible). Example : <login-path>[:<port>]
[:<socket>]
• Use a configuration file (unencrypted, not visible) Note: available in release-1.5.0. Example :
<configuration-file-path>[:<section>]
• Specify the data on the command-line (unencrypted, visible). Example :
<user>[:<passwd>]@<host>[:<port>][:<socket>]
• --master-info-file=<file>
The name of the master information file on the slave. The default is master.info read from the data
directory. Note: This option requires that you run the utility on the slave and that you have appropriate
read access for the file.
• --quiet, -q
Turn off all messages for quiet execution. Note: Errors and warnings are not suppressed.
• --show-slave-status, -s
Display the values from SHOW SLAVE STATUS on the master.
• --slave=<source>
Connection information for the slave server.
To connect to a server, it is necessary to specify connection parameters such as user name, host
name, password, and either a port or socket. MySQL Utilities provides a number of ways to provide
this information. All of the methods require specifying your choice via a command-line option such as -server, --master, --slave, etc. The methods include the following in order of most secure.
• Use login-paths from your .mylogin.cnf file (encrypted, not visible). Example : <login-path>[:<port>]
[:<socket>]
• Use a configuration file (unencrypted, not visible) Note: available in release-1.5.0. Example :
<configuration-file-path>[:<section>]
• Specify the data on the command-line (unencrypted, visible). Example :
<user>[:<passwd>]@<host>[:<port>][:<socket>]
• --suppress
Suppress warning messages.
• --verbose, -v
Specify how much information to display. Use this option multiple times to increase the amount of
information. For example, -v = verbose, -vv = more verbose, -vvv = debug.
• --version
Display version information and exit.
• --width=<number>
Change the display width of the test report. The default is 75 characters.
151
NOTES
NOTES
The login user must have the appropriate permissions to execute SHOW SLAVE STATUS, SHOW
MASTER STATUS, and SHOW VARIABLES on the appropriate servers.
Mixing IP and hostnames is not recommended. The replication-specific utilities will attempt to compare
hostnames and IP addresses as aliases for checking slave connectivity to the master. However, if your
installation does not support reverse name lookup, the comparison could fail. Without the ability to do a
reverse name lookup, the replication utilities could report a false negative that the slave is (not) connected
to the master.
For example, if you setup replication using MASTER_HOST=ubuntu.net on the slave and later connect
to the slave with mysqlrplcheck and have the master specified as --master=192.168.0.6 using the valid
IP address for ubuntu.net, you must have the ability to do a reverse name lookup to compare the IP
(192.168.0.6) and the hostname (ubuntu.net) to determine if they are the same machine.
The path to the MySQL client tools should be included in the PATH environment variable in order to use
the authentication mechanism with login-paths. This will allow the utility to use the my_print_defaults tools
which is required to read the login-path values from the login configuration file (.mylogin.cnf).
EXAMPLES
To check the prerequisites of a master and slave that currently are actively performing replication, use the
following command:
shell> mysqlrplcheck --master=root@host1:3310 --slave=root@host2:3311
# master on host1: ... connected.
# slave on host2: ... connected.
Test Description
Status
-----------------------------------------------------------------------Checking for binary logging on master
[pass]
Are there binlog exceptions?
[pass]
Replication user exists?
[pass]
Checking server_id values
[pass]
Is slave connected to master?
[pass]
Check master information file
[pass]
Checking InnoDB compatibility
[pass]
Checking storage engines compatibility
[pass]
Checking lower_case_table_names settings
[pass]
Checking slave delay (seconds behind master)
[pass]
# ...done.
As shown in the example, you must provide valid login information for both the master and the slave.
To perform the same command but also display the contents of the master information file on the slave and
the values of SHOW SLAVE STATUS as well as additional details, use this command:
shell> mysqlrplcheck --master=root@host1:3310 --slave=root@host2:3311 \
--show-slave-status -vv
# master on host1: ... connected.
# slave on host2: ... connected.
Test Description
Status
-----------------------------------------------------------------------Checking for binary logging on master
[pass]
Are there binlog exceptions?
[pass]
Replication user exists?
[pass]
Checking server_id values
[pass]
master id = 10
slave id = 11
152
EXAMPLES
Is slave connected to master?
Check master information file
#
# Master information file:
#
Master_Log_File
Read_Master_Log_Pos
Master_Host
Master_User
Master_Password
Master_Port
Connect_Retry
Master_SSL_Allowed
Master_SSL_CA_File
Master_SSL_CA_Path
Master_SSL_Cert
Master_SSL_Cipher
Master_SSL_Key
Master_SSL_Verify_Server_Cert
[pass]
[pass]
:
:
:
:
:
:
:
:
:
:
:
:
:
:
clone-bin.000001
482
host1
rpl
XXXX
3310
60
0
0
Checking InnoDB compatibility
Checking storage engines compatibility
Checking lower_case_table_names settings
[pass]
[pass]
[pass]
Master lower_case_table_names: 2
Slave lower_case_table_names: 2
Checking slave delay (seconds behind master)
#
# Slave status:
#
Slave_IO_State
Master_Host
Master_User
Master_Port
Connect_Retry
Master_Log_File
Read_Master_Log_Pos
Relay_Log_File
Relay_Log_Pos
Relay_Master_Log_File
Slave_IO_Running
Slave_SQL_Running
Replicate_Do_DB
Replicate_Ignore_DB
Replicate_Do_Table
Replicate_Ignore_Table
Replicate_Wild_Do_Table
Replicate_Wild_Ignore_Table
Last_Errno
Last_Error
Skip_Counter
Exec_Master_Log_Pos
Relay_Log_Space
Until_Condition
Until_Log_File
Until_Log_Pos
Master_SSL_Allowed
Master_SSL_CA_File
Master_SSL_CA_Path
Master_SSL_Cert
Master_SSL_Cipher
Master_SSL_Key
Seconds_Behind_Master
:
:
:
:
:
:
:
:
:
:
:
:
:
:
:
:
:
:
:
:
:
:
:
:
:
:
:
:
:
:
:
:
:
Waiting for master to send event
host1
rpl
3310
60
clone-bin.000001
482
clone-relay-bin.000006
251
clone-bin.000001
Yes
Yes
0
0
482
551
None
0
No
0
153
[pass]
PERMISSIONS REQUIRED
Master_SSL_Verify_Server_Cert
Last_IO_Errno
Last_IO_Error
Last_SQL_Errno
Last_SQL_Error
# ...done.
: No
: 0
:
: 0
:
PERMISSIONS REQUIRED
The users on the master need the following privileges: SELECT and INSERT privileges on mysql
database, REPLICATION SLAVE, REPLICATION CLIENT and GRANT OPTION. The slave users need
the SUPER privilege.
Also, when using GTIDs, the slave users must also have SELECT privilege over the mysql database.
5.18 mysqlrplshow — Show Slaves for Master Server
This utility shows the replication slaves for a master. It prints a graph of the master and its slaves labeling
each with the host name and port number.
You must specify the --discover-slaves-login option to provide the user name and password to
discover any slaves in the topology.
To explore the slaves for each client, use the --recurse option. This causes the utility to connect to each
slave found and attempt to determine whether it has any slaves. If slaves are found, the process continues
until the slave is found in the list of servers serving as masters (a circular topology). The graph displays the
topology with successive indents. A notation is made for circular topologies.
If you use the --recurse option, the utility attempts to connect to the slaves using the user name and
password provided for the master. By default, if the connection attempt fails, the utility throws an error and
stops. To change this behavior, use the --prompt option, which permits the utility to prompt for the user
name and password for each slave that fails to connect. You can also use the --num-retries=n option
to reattempt a failed connection 'n' times before the utility fails.
An example graph for a typical topology with relay slaves is shown here:
# Replication Topology Graph::
localhost:3311 (MASTER)
|
+--- localhost:3310 - (SLAVE)
|
+--- localhost:3312 - (SLAVE + MASTER)
|
+--- localhost:3313 - (SLAVE)
MASTER, SLAVE, and SLAVE+MASTER indicate that a server is a master only, slave only, and both slave
and master, respectively.
A circular replication topology is shown like this, where <--> indicates circularity:
# Replication Topology Graph
localhost:3311 (MASTER)
|
+--- localhost:3312 - (SLAVE + MASTER)
|
+--- localhost:3313 - (SLAVE + MASTER)
|
154
OPTIONS
+--- localhost:3311 <--> (SLAVE)
To produce a column list in addition to the graph, specify the --show-list option. In this case, to specify
how to display the list, use one of the following values with the --format option:
• grid (default)
Display output in grid or table format like that of the mysql client command-line tool.
• csv
Display output in comma-separated values format.
• tab
Display output in tab-separated format.
• vertical
Display output in single-column format like that of the \G command for the mysql client command-line
tool.
The utility uses of the SHOW SLAVE HOSTS statement to determine which slaves the master has. If
you want to use the --recurse option, slaves should have been started with the --report-host and
--report-port options set to their actual host name and port number or the utility may not be able to
connect to the slaves to determine their own slaves.
OPTIONS
mysqlrplshow accepts the following command-line options:
• --help
Display a help message and exit.
• --license
Display license information and exit.
• --discover-slaves-login=<slave-login>
Supply the user and password in the form <user>[:<passwd>] or <login-path> for discovering slaves and
relay slaves in the topology. For example, --discover=joe:secret will use 'joe' as the user and 'secret' as
the password for each discovered slave.
• --format=<format>, -f<format>
Specify the display format for column list output. Permitted format values are grid, csv, tab, and
vertical. The default is grid. This option applies only if --show-list is given.
• --master=<source>
Connection information for the master server.
To connect to a server, it is necessary to specify connection parameters such as user name, host
name, password, and either a port or socket. MySQL Utilities provides a number of ways to provide
this information. All of the methods require specifying your choice via a command-line option such as -server, --master, --slave, etc. The methods include the following in order of most secure.
155
NOTES
• Use login-paths from your .mylogin.cnf file (encrypted, not visible). Example : <login-path>[:<port>]
[:<socket>]
• Use a configuration file (unencrypted, not visible) Note: available in release-1.5.0. Example :
<configuration-file-path>[:<section>]
• Specify the data on the command-line (unencrypted, visible). Example :
<user>[:<passwd>]@<host>[:<port>][:<socket>]
• --max-depth=<N>
The maximum recursion depth. This option is valid only if --recurse is given.
• --num-retries=<num_retries>, -n<num_retries>
The number of retries permitted for failed slave login attempts. This option is valid only if --prompt is
given.
• --prompt, -p
Prompt for the slave user and password if different from the master user and password.
If you give this option, the utility sets --num-retries to 1 if that option is not set explicitly. This ensures
at least one attempt to retry and prompt for the user name and password should a connection fail.
• --quiet, -q
Turn off all messages for quiet execution. This option does not suppress errors or warnings.
• --recurse, -r
Traverse the list of slaves to find additional master/slave connections. User this option to map a
replication topology.
• --show-list, -l
Display a column list of the topology.
• --verbose, -v
Specify how much information to display. If this option is used, the IO thread status of each slave is
also displayed. Use this option multiple times to increase the amount of information. For example, -v =
verbose, -vv = more verbose, -vvv = debug. If you use -vvv, the output will contain the state of the IO
and SQL threads for each slave.
• --version
Display version information and exit.
NOTES
The login user must have the REPLICATE SLAVE and REPLICATE CLIENT privileges to successfully
execute this utility. Specifically, the login user must have appropriate permissions to execute SHOW
SLAVE STATUS, SHOW MASTER STATUS, and SHOW SLAVE HOSTS.
For the --format option, the permitted values are not case sensitive. In addition, values may be specified
as any unambiguous prefix of a valid value. For example, --format=g specifies the grid format. An error
occurs if a prefix matches more than one valid value.
156
EXAMPLES
Mixing IP and hostnames is not recommended. The replication-specific utilities will attempt to compare
hostnames and IP addresses as aliases for checking slave connectivity to the master. However, if your
installation does not support reverse name lookup, the comparison could fail. Without the ability to do a
reverse name lookup, the replication utilities could report a false negative that the slave is (not) connected
to the master.
For example, if you setup replication using MASTER_HOST=ubuntu.net on the slave and later connect
to the slave with mysqlrplcheck and have the master specified as --master=192.168.0.6 using the valid
IP address for ubuntu.net, you must have the ability to do a reverse name lookup to compare the IP
(192.168.0.6) and the hostname (ubuntu.net) to determine if they are the same machine.
The path to the MySQL client tools should be included in the PATH environment variable in order to use
the authentication mechanism with login-paths. This will allow the utility to use the my_print_defaults tools
which is required to read the login-path values from the login configuration file (.mylogin.cnf).
EXAMPLES
To show the slaves for a master running on port 3311 on the local host, use the following command:
shell> mysqlrplshow --master=root@localhost:3311 --discover-slaves-login=root
# master on localhost: ... connected.
# Finding slaves for master: localhost:3311
# Replication Topology Graph
localhost:3311 (MASTER)
|
+--- localhost:3310 - (SLAVE)
|
+--- localhost:3312 - (SLAVE)
As shown in the example, you must provide valid login information for the master.
To show additional information about the IO thread status (to confirm if the slaves are really connected to
the master) use the option --verbose:
shell> mysqlrplshow --master=root@localhost:3311 --discover-slaves-login=root --verbose
# master on localhost: ... connected.
# Finding slaves for master: localhost:3311
# Replication Topology Graph
localhost:3311 (MASTER)
|
+--- localhost:3310 [IO: Yes, SQL: Yes] - (SLAVE)
|
+--- localhost:3312 [IO: Yes, SQL: Yes] - (SLAVE)
To show the full replication topology of a master running on the local host, use the following command:
shell> mysqlrplshow --master=root@localhost:3311 --recurse --discover-slaves-login=root
# master on localhost: ... connected.
# Finding slaves for master: localhost:3311
# Replication Topology Graph
localhost:3311 (MASTER)
|
+--- localhost:3310 - (SLAVE)
|
+--- localhost:3312 - (SLAVE + MASTER)
|
157
PERMISSIONS REQUIRED
+--- localhost:3313 - (SLAVE)
To show the full replication topology of a master running on the local host, prompting for the user name
and password for slaves that do not have the same user name and password credentials as the master,
use the following command:
shell> mysqlrplshow --recurse --prompt --num-retries=1 \
--master=root@localhost:3331 --discover-slaves-login=root
Server localhost:3331 is running on localhost.
# master on localhost: ... connected.
# Finding slaves for master: localhost:3331
Server localhost:3332 is running on localhost.
# master on localhost: ... FAILED.
Connection to localhost:3332 has failed.
Please enter the following information to connect to this server.
User name: root
Password:
# master on localhost: ... connected.
# Finding slaves for master: localhost:3332
Server localhost:3333 is running on localhost.
# master on localhost: ... FAILED.
Connection to localhost:3333 has failed.
Please enter the following information to connect to this server.
User name: root
Password:
# master on localhost: ... connected.
# Finding slaves for master: localhost:3333
Server localhost:3334 is running on localhost.
# master on localhost: ... FAILED.
Connection to localhost:3334 has failed.
Please enter the following information to connect to this server.
User name: root
Password:
# master on localhost: ... connected.
# Finding slaves for master: localhost:3334
# Replication Topology Graph
localhost:3331 (MASTER)
|
+--- localhost:3332 - (SLAVE)
|
+--- localhost:3333 - (SLAVE + MASTER)
|
+--- localhost:3334 - (SLAVE)
PERMISSIONS REQUIRED
The user connected to the master must have the REPLICATION SLAVE privilege.
The user specified with the --discover-slaves-login option that logs into each slave must have the
REPLICATION CLIENT privilege.
5.19 mysqlrplsync — Replication synchronization checker
This utility permits you to check replication servers for synchronization. It checks data consistency between
a master and slaves or between two slaves. The utility reports missing objects as well as missing data.
The utility can operate on an active replication topology, applying a synchronization process to check the
data. Those servers where replication is not active can still be checked but the synchronization process will
be skipped. In that case, it is up to the user to manually synchronize the servers.
158
OPTIONS
The user must provide connection parameters for the servers. That is, the utility requires the master and
slaves using the --master [160] and --slaves [160] options. To compare only slaves, the user need
only provide the --slaves [160] option.
The utility also provides a feature to discover slaves connected to the master using the --discoverslaves-login [159] and --master [160] options. To use the discover slaves feature, all slaves must
use the following startup options; --report-host and --report-port to specify the correct hostname and port
of the server. If these are missing or report the incorrect information, the slave may not be discovered and
therefore not included in the synchronization check. The discover slaves feature ignores slaves that cannot
be reached.
By default, all data is included in the comparison. To check specific databases or tables, list each element
as a separated argument for the utility using fully qualified names. The user can also choose to exclude
some databases or tables from the check using the --exclude [159] option.
The utility also provides some important features that allow users to adjust the execution of the
consistency check to their system. For example, the user may wish the utility to minimize execution of the
synchronization process. To do so, the user uses the --rpl-timeout [160] to define the maximum
time for each slave to synchronize. More specifically, allow slaves to catch up with the master in order
to compare the data. During this waiting step, the slaves status is periodically polled according to a
predefined time interval. This polling interval to verify if the slaves are synced can be adjusted with the
--interval [160] option. A checksum query is used to compare the data of each table between
servers. The checksum calculation step is skipped if its execution exceeds a predefined time, avoiding
undesirable performance impacts on the target system if it takes too long to execute. The user can change
the checksum timeout using the --checksum-timeout [159] option.
Users can also use the --verbose [160] option to see additional information when the utility executes.
This utility is designed to work exclusively for servers that support global transaction identifiers (GTIDs)
and have gtid_mode=ON. Servers with GTID disabled will be skipped by the utility. See Replication with
Global Transaction Identifiers, for more information about GTID.
The utility takes into consideration the use of replication filtering rules on the servers skipping the check for
filtered databases and tables according to the defined options. Nevertheless, the use of replication filters
can still lead to data consistency issues depending on how statements are evaluated. See How Servers
Evaluate Replication Filtering Rules, for more information.
OPTIONS
mysqlrplsync accepts the following command-line options:
• --checksum-timeout=<checksum_timeout_in_seconds>
Maximum timeout in seconds to wait for the checksum query to complete.
Default = 3 seconds.
• --discover-slaves-login=<user_login>
Detect registered slaves at startup and use the user name and password specified to connect in the
format: <user> [:<password>] or <login-path>. For example, --discover-slaves-login=joe:secret will use
'joe' as the user and 'secret' as the password for each discovered slave.
• --exclude=<databases_tables_to_exclude>
Fully qualified name for the databases or tables to exclude: <db_name> [.<tbl_name>]. List multiple data
objects in a comma-separated list.
159
OPTIONS
• --help
Display a help message and exit.
• --interval=<interval_in_seconds>, -i <interval_in_seconds>
Interval in seconds for periodically polling the slaves sync status to verify if the sync point was reached.
Default = 3 seconds.
• --license
Display license information and exit.
• --master=<master_connection>
Connection information for the master server.
To connect to a server, it is necessary to specify connection parameters such as user name, host
name, password, and either a port or socket. MySQL Utilities provides a number of ways to provide
this information. All of the methods require specifying your choice via a command-line option such as -server, --master, --slave, etc. The methods include the following in order of most secure.
• Use login-paths from your .mylogin.cnf file (encrypted, not visible). Example : <login-path>[:<port>]
[:<socket>]
• Use a configuration file (unencrypted, not visible) Note: available in release-1.5.0. Example :
<configuration-file-path>[:<section>]
• Specify the data on the command-line (unencrypted, visible). Example :
<user>[:<passwd>]@<host>[:<port>][:<socket>]
• --rpl-timeout=<rpl_timeout_in_seconds>
Maximum timeout in seconds to wait for synchronization. More precisely, the time to wait for the
replication process on a slave to reach a sync point (GTID set).
Default = 300 seconds.
• --slaves=<slaves_connections>
Connection information for slave servers . List multiple slaves in comma-separated list.
To connect to a server, it is necessary to specify connection parameters such as user name, host
name, password, and either a port or socket. MySQL Utilities provides a number of ways to provide
this information. All of the methods require specifying your choice via a command-line option such as -server, --master, --slave, etc. The methods include the following in order of most secure.
• Use login-paths from your .mylogin.cnf file (encrypted, not visible). Example : <login-path>[:<port>]
[:<socket>]
• Use a configuration file (unencrypted, not visible) Note: available in release-1.5.0. Example :
<configuration-file-path>[:<section>]
• Specify the data on the command-line (unencrypted, visible). Example :
<user>[:<passwd>]@<host>[:<port>][:<socket>]
• --verbose, -v
160
NOTES
Specify how much information to display. Use this option multiple times to increase the amount of
information. For example, -v = verbose, -vv = more verbose, -vvv = debug.
• --version
Display version information and exit.
NOTES
The data consistency check is performed per table using a checksum table. If the calculated checksum
differs, it indicates the tables are not synchronized. Nevertheless, since the checksum operation is not
collision free, there is a very small probability that two different tables can produce the same checksum.
Mixing IP and hostnames is not recommended. The replication-specific utilities will attempt to compare
hostnames and IP addresses as aliases for checking slave connectivity to the master. However, if your
installation does not support reverse name lookup, the comparison could fail. Without the ability to do a
reverse name lookup, the replication utilities could report a false negative that the slave is (not) connected
to the master.
For example, if you setup replication using MASTER_HOST=ubuntu.net on the slave and later connect
to the slave with mysqlrplcheck and have the master specified as --master=192.168.0.6 using the valid
IP address for ubuntu.net, you must have the ability to do a reverse name lookup to compare the IP
(192.168.0.6) and the hostname (ubuntu.net) to determine if they are the same machine.
Similarly, in order to avoid issues mixing local IP '127.0.0.1' with 'localhost', all the addresses '127.0.0.1'
will be internally converted to 'localhost' by the utility.
The path to the MySQL client tools should be included in the PATH environment variable in order to use
the authentication mechanism with login-paths. This will allow the utility to use the my_print_defaults tools
which is required to read the login-path values from the login configuration file (.mylogin.cnf).
LIMITATIONS
This utility is designed to work exclusively for servers that support global transaction identifiers
(GTIDs) and have gtid_mode=ON. Due to known server issues with some operations required for the
synchronization process, only MySQL Server versions 5.6.14 and higher are supported by this utility.
Some replication filtering options are not supported by this utility due to known issues on the server side,
namely: replicate_do_db, replicate_ignore_db, and replicate_wild_do_table. In case a non supported
replication filtering option is detected on a server, the utility issues an appropriate error and exits. This
check is performed at the beginning when the utility starts.
EXAMPLES
To check the data consistency on an active replication system explicitly specifying the master and slaves:
shell> mysqlrplsync --master=user:pass@localhost:3310 \
--slaves=rpl:pass@localhost:3311,rpl:pass@localhost:3312
#
# GTID differences between Master and Slaves:
# - Slave 'localhost@3311' is 15 transactions behind Master.
# - Slave 'localhost@3312' is 12 transactions behind Master.
#
# Checking data consistency.
#
161
EXAMPLES
# Using Master 'localhost@3310' as base server for comparison.
# Checking 'test_rplsync_db' database...
# - Checking 't0' table data...
#
[OK] `test_rplsync_db`.`t0` checksum for server 'localhost@3311'.
#
[OK] `test_rplsync_db`.`t0` checksum for server 'localhost@3312'.
# - Checking 't1' table data...
#
[OK] `test_rplsync_db`.`t1` checksum for server 'localhost@3311'.
#
[OK] `test_rplsync_db`.`t1` checksum for server 'localhost@3312'.
# Checking 'test_db' database...
# - Checking 't0' table data...
#
[OK] `test_db`.`t0` checksum for server 'localhost@3311'.
#
[OK] `test_db`.`t0` checksum for server 'localhost@3312'.
# - Checking 't1' table data...
#
[OK] `test_db`.`t1` checksum for server 'localhost@3311'.
#
[OK] `test_db`.`t1` checksum for server 'localhost@3312'.
#
#...done.
#
# SUMMARY: No data consistency issue found.
#
To check the data consistency on an active replication system using slave discovery:
shell> mysqlrplsync --master=user:pass@localhost:3310 \
--discover-slaves-login=rpl:pass
# Discovering slaves for master at localhost:3310
# Discovering slave at localhost:3311
# Found slave: localhost:3311
# Discovering slave at localhost:3312
# Found slave: localhost:3312
#
# GTID differences between Master and Slaves:
# - Slave 'localhost@3311' is 15 transactions behind Master.
# - Slave 'localhost@3312' is 15 transactions behind Master.
#
# Checking data consistency.
#
# Using Master 'localhost@3310' as base server for comparison.
# Checking 'test_rplsync_db' database...
# - Checking 't0' table data...
#
[OK] `test_rplsync_db`.`t0` checksum for server 'localhost@3311'.
#
[OK] `test_rplsync_db`.`t0` checksum for server 'localhost@3312'.
# - Checking 't1' table data...
#
[OK] `test_rplsync_db`.`t1` checksum for server 'localhost@3311'.
#
[OK] `test_rplsync_db`.`t1` checksum for server 'localhost@3312'.
# Checking 'test_db' database...
# - Checking 't0' table data...
#
[OK] `test_db`.`t0` checksum for server 'localhost@3311'.
#
[OK] `test_db`.`t0` checksum for server 'localhost@3312'.
# - Checking 't1' table data...
#
[OK] `test_db`.`t1` checksum for server 'localhost@3311'.
#
[OK] `test_db`.`t1` checksum for server 'localhost@3312'.
#
#...done.
#
# SUMMARY: No data consistency issue found.
#
To check the data consistency on an active replication system, but only between specific slaves:
shell> mysqlrplsync --slaves=rpl:pass@localhost:3311,rpl:pass@localhost:3312
#
# Checking data consistency.
#
# Using Slave 'localhost@3311' as base server for comparison.
162
EXAMPLES
# Checking 'test_rplsync_db' database...
# - Checking 't0' table data...
#
[OK] `test_rplsync_db`.`t0` checksum for server 'localhost@3312'.
# - Checking 't1' table data...
#
[OK] `test_rplsync_db`.`t1` checksum for server 'localhost@3312'.
# Checking 'test_db' database...
# - Checking 't0' table data...
#
[OK] `test_db`.`t0` checksum for server 'localhost@3312'.
# - Checking 't1' table data...
#
[OK] `test_db`.`t1` checksum for server 'localhost@3312'.
#
#...done.
#
# SUMMARY: No data consistency issue found.
#
To check the data consistency of a specific database and table on an active replication system:
shell> mysqlrplsync --master=user:pass@localhost:3310 \
--slaves=rpl:pass@localhost:3311,rpl:pass@localhost:3312 \
test_rplsync_db test_db.t1
#
# GTID differences between Master and Slaves:
# - Slave 'localhost@3311' is 15 transactions behind Master.
# - Slave 'localhost@3312' is 12 transactions behind Master.
#
# Checking data consistency.
#
# Using Master 'localhost@3310' as base server for comparison.
# Checking 'test_rplsync_db' database...
# - Checking 't0' table data...
#
[OK] `test_rplsync_db`.`t0` checksum for server 'localhost@3311'.
#
[OK] `test_rplsync_db`.`t0` checksum for server 'localhost@3312'.
# - Checking 't1' table data...
#
[OK] `test_rplsync_db`.`t1` checksum for server 'localhost@3311'.
#
[OK] `test_rplsync_db`.`t1` checksum for server 'localhost@3312'.
# Checking 'test_db' database...
# - Checking 't1' table data...
#
[OK] `test_db`.`t1` checksum for server 'localhost@3311'.
#
[OK] `test_db`.`t1` checksum for server 'localhost@3312'.
#
#...done.
#
# SUMMARY: No data consistency issue found.
#
To check the data consistency on an active replication system excluding a specific database and table:
shell> mysqlrplsync --master=user:pass@localhost:3310 \
--slaves=rpl:pass@localhost:3311,rpl:pass@localhost:3312 \
--exclude=test_rplsync_db,test_db.t1
#
# GTID differences between Master and Slaves:
# - Slave 'localhost@3311' is 15 transactions behind Master.
# - Slave 'localhost@3312' is 12 transactions behind Master.
#
# Checking data consistency.
#
# Using Master 'localhost@3310' as base server for comparison.
# Checking 'test_db' database...
# - Checking 't0' table data...
#
[OK] `test_db`.`t0` checksum for server 'localhost@3311'.
#
[OK] `test_db`.`t0` checksum for server 'localhost@3312'.
#
#...done.
163
EXAMPLES
#
# SUMMARY: No data consistency issue found.
#
The following is an example of a replication check that has data inconsistencies:
shell> mysqlrplsync --master=user:pass@localhost:3310 \
--slaves=rpl:pass@localhost:3311,rpl:pass@localhost:3312
#
# GTID differences between Master and Slaves:
# - Slave 'localhost@3311' is up-to-date.
# - Slave 'localhost@3312' is up-to-date.
#
# Checking data consistency.
#
# Using Master 'localhost@3310' as base server for comparison.
# [DIFF] Database NOT on base server but found on 'localhost@3311': only_on_slave_db
# Checking 'test_rplsync_db' database...
#
[DIFF] Table NOT on base server but found on 'localhost@3311': t3
#
[DIFF] Table NOT on base server but found on 'localhost@3312': t3
#
[DIFF] Table 'test_rplsync_db.t0' NOT on server 'localhost@3311'.
# - Checking 't0' table data...
#
[DIFF] `test_rplsync_db`.`t0` checksum for server 'localhost@3312'.
# - Checking 't1' table data...
#
WARNING: Slave not active 'localhost@3311' - Sync skipped.
#
[DIFF] `test_rplsync_db`.`t1` checksum for server 'localhost@3311'.
#
[OK] `test_rplsync_db`.`t1` checksum for server 'localhost@3312'.
# - Checking 't2' table data...
#
WARNING: Slave not active 'localhost@3311' - Sync skipped.
#
[OK] `test_rplsync_db`.`t2` checksum for server 'localhost@3311'.
#
[OK] `test_rplsync_db`.`t2` checksum for server 'localhost@3312'.
# Checking 'only_on_master_db' database...
#
[DIFF] Database 'only_on_master_db' NOT on server 'localhost@3311'.
#
[DIFF] Database 'only_on_master_db' NOT on server 'localhost@3312'.
#
#...done.
#
# SUMMARY: 8 data consistency issues found.
#
Check a replication topology with filtering:
shell> mysqlrplsync --master=user:pass@localhost:3310 \
--slaves=rpl:pass@localhost:3311,rpl:pass@localhost:3312 \
--verbose
# Checking users permission to perform consistency check.
#
# WARNING: Replication filters found on checked servers. This can lead data consistency issues depending on ho
# More information: http://dev.mysql.com/doc/en/replication-rules.html
# Master 'localhost@3310':
#
- binlog_do_db: test_rplsync_db1
# Slave 'localhost@3311':
#
- replicate_do_table: test_rplsync_db1.t1
# Slave 'localhost@3312':
#
- replicate_ignore_table: test_rplsync_db1.t2
#
- replicate_wild_ignore_table: test\_rplsync\_db1.%3
#
# GTID differences between Master and Slaves:
# - Slave 'localhost@3311' is up-to-date.
# - Slave 'localhost@3312' is up-to-date.
#
# Checking data consistency.
#
# Using Master 'localhost@3310' as base server for comparison.
# Checking 'test_rplsync_db1' database...
164
PERMISSIONS REQUIRED
# [SKIP] Table 't0' check for 'localhost@3311' - filtered by replication rule.
# - Checking 't0' table data...
#
Setting data synchronization point for slaves.
#
Compute checksum on slaves (wait to catch up and resume replication).
#
[OK] `test_rplsync_db1`.`t0` checksum for server 'localhost@3312'.
# - Checking 't1' table data...
#
Setting data synchronization point for slaves.
#
Compute checksum on slaves (wait to catch up and resume replication).
#
[OK] `test_rplsync_db1`.`t1` checksum for server 'localhost@3311'.
#
[OK] `test_rplsync_db1`.`t1` checksum for server 'localhost@3312'.
# [SKIP] Table 't2' check for 'localhost@3311' - filtered by replication rule.
# [SKIP] Table 't2' check for 'localhost@3312' - filtered by replication rule.
# [SKIP] Table 't3' check for 'localhost@3311' - filtered by replication rule.
# [SKIP] Table 't3' check for 'localhost@3312' - filtered by replication rule.
# [SKIP] Database 'test_rplsync_db0' check - filtered by replication rule.
# [SKIP] Database 'test_rplsync_db2' check - filtered by replication rule.
# [SKIP] Database 'test_rplsync_db3' check - filtered by replication rule.
#
#...done.
#
# SUMMARY: No data consistency issue found.
#
PERMISSIONS REQUIRED
The user for the master must have permissions to lock tables, perform the checksum, and get information
about the master status. Specifically, the user used to connect to the master requires the following
privileges: SUPER or REPLICATION CLIENT, LOCK TABLES and SELECT.
The user for the slaves must have permissions to start/stop the slave, perform the checksum, and get
information about the slave status. More specifically, the login user to connect to slaves requires the
following privileges: SUPER and SELECT.
5.20 mysqlserverclone — Clone Existing Server to Create New
Server
This utility enables you to clone an existing MySQL server instance to create a new server instance on the
same host. The utility creates a new datadir (--new-data), and, on Unix systems, starts the server with a
socket file. You can optionally add a password for the login user account on the new instance.
If the user does not have read and write access to the folder specified by the --new-data option, the
utility shall issue an error.
Similarly, if the folder specified by --new-data exists and is not empty, the utility will not delete the
folder and will issue an error message. Users must specify the --delete-data option to permit the utility
to remove the folder prior to starting the cloned server.
OPTIONS
mysqlserverclone accepts the following command-line options:
• --help
Display a help message and exit.
• --license
Display license information and exit.
165
OPTIONS
• --delete-data
Delete the folder specified by --new-data if it exists and is not empty.
• --force
Ignore the maximum path length check for the --new-data option.
• --mysqld=<options>
Additional options for mysqld. To specify multiple options, separate them by spaces. Use appropriate
quoting as necessary. For example, to specify --log-bin=binlog and --general-logfile="mylogfile", use:
--mysqld="--log-bin=binlog --general-log-file='my log file'"
• --new-data=<path_to_new_datadir>
The full path to the location of the data directory for the new instance. The path size must be 200
characters or less.
• --new-id=<server_id>
The server_id value for the new server instance. The default is 2.
• --new-port=<port>
The port number for the new server instance. The default is 3307.
• --quiet, -q
Turn off all messages for quiet execution.
• --root-password=<password>
The password for the root user of the new server instance.
• --server=<source>
Connection information for the server to be cloned.
To connect to a server, it is necessary to specify connection parameters such as user name, host
name, password, and either a port or socket. MySQL Utilities provides a number of ways to provide
this information. All of the methods require specifying your choice via a command-line option such as -server, --master, --slave, etc. The methods include the following in order of most secure.
• Use login-paths from your .mylogin.cnf file (encrypted, not visible). Example : <login-path>[:<port>]
[:<socket>]
• Use a configuration file (unencrypted, not visible) Note: available in release-1.5.0. Example :
<configuration-file-path>[:<section>]
• Specify the data on the command-line (unencrypted, visible). Example :
<user>[:<passwd>]@<host>[:<port>][:<socket>]
• --start-timeout=<timeout_in_seconds>
Number of seconds to wait for server to start. Default = 10 seconds.
166
EXAMPLES
• --verbose, -v
Specify how much information to display. Use this option multiple times to increase the amount of
information. For example, -v = verbose, -vv = more verbose, -vvv = debug.
• --version
Display version information and exit.
• --write-command=<file_name>, -w<file_name>
Path name of file in which to write the command used to launch the new server instance.
EXAMPLES
The following command demonstrates how to create a new instance of a running server, set the root user
password and enable binary logging:
shell> mkdir /source/test123
shell> mysqlserverclone --server=root:pass@localhost \
--new-data=/Users/cbell/source/test123 --new-port=3310 \
--root-password=pass --mysqld=--log-bin=mysql-bin
# Cloning the MySQL server running on localhost.
# Creating new data directory...
# Configuring new instance...
# Locating mysql tools...
# Setting up empty database and mysql tables...
# Starting new instance of the server...
# Testing connection to new instance...
# Success!
# Setting the root password...
# ...done.
PERMISSIONS REQUIRED
The user must have permission to read all databases. Since we are using the root account for these
examples (and you typically would), permissions are not generally a problem.
You also need permissions to create the new data directory and write data to it.
5.21 mysqlserverinfo — Display Common Diagnostic Information
from a Server
This utility displays critical information about a server for use in diagnosing problems. The information
displayed includes the following:
• Server connection information
• Server version number
• Data directory path name
• Base directory path name
• Plugin directory path name
• Configuration file location and name
• Current binary log coordinates (file name and position)
167
OPTIONS
• Current relay log coordinates (file name and position)
This utility can be used to see the diagnostic information for servers that are running or offline. If you want
to see information about an offline server, the utility starts the server in read-only mode. In this case, you
must specify the --basedir, --datadir, and --start options to prevent the utility from starting an
offline server accidentally. Note: Be sure to consider the ramifications of starting an offline server on the
error and similar logs. It is best to save this information prior to running this utility.
To specify how to display output, use one of the following values with the --format option:
• grid (default)
Display output in grid or table format like that of the mysql client command-line tool.
• csv
Display output in comma-separated values format.
• tab
Display output in tab-separated format.
• vertical
Display output in single-column format like that of the \G command for the mysql client command-line
tool.
To turn off the headers for grid, csv, or tab display format, specify the --no-headers option.
To see the common default settings for the local server's configuration file, use the --show-defaults
option. This option reads the configuration file on the machine where the utility is run, not the machine for
the host that the --server option specifies.
To run the utility against several servers, specify the --server option multiple times. In this case, the
utility attempts to connect to each server and read the information.
To see the MySQL servers running on the local machine, use the --show-servers option. This shows all
the servers with their process ID and data directory. On Windows, the utility shows only the process ID and
port.
OPTIONS
mysqlserverinfo accepts the following command-line options:
• --help
Display a help message and exit.
• --license
Display license information and exit.
• --basedir=<basedir>
The base directory for the server. This option is required for starting an offline server.
Is also used to access server tools, such as my_print_defaults that is required to read the login-path
values from the login configuration file (.mylogin.cnf).
168
OPTIONS
• --datadir=<datadir>
The data directory for the server. This option is required for starting an offline server.
• --format=<format>, -f<format>
Specify the output display format. Permitted format values are grid, csv, tab, and vertical. The default is
grid.
• --no-headers, -h
Do not display column headers. This option applies only for grid, csv, and tab output.
• --port-range=<start:end>
The port range to check for finding running servers. This option applies only to Windows and is ignored
unless --show-servers is given. The default range is 3306:3333.
• --server=<server>
Connection information for a server. Use this option multiple times to see information for multiple
servers.
To connect to a server, it is necessary to specify connection parameters such as user name, host
name, password, and either a port or socket. MySQL Utilities provides a number of ways to provide
this information. All of the methods require specifying your choice via a command-line option such as -server, --master, --slave, etc. The methods include the following in order of most secure.
• Use login-paths from your .mylogin.cnf file (encrypted, not visible). Example : <login-path>[:<port>]
[:<socket>]
• Use a configuration file (unencrypted, not visible) Note: available in release-1.5.0. Example :
<configuration-file-path>[:<section>]
• Specify the data on the command-line (unencrypted, visible). Example :
<user>[:<passwd>]@<host>[:<port>][:<socket>]
• --show-defaults, -d
Display default settings for mysqld from the local configuration file. It uses my_print_defaults to
obtain the options.
• --show-servers
Display information about servers running on the local host. The utility examines the host process list to
determine which servers are running.
• --start, -s
Start the server in read-only mode if it is offline. With this option, you must also give the --basedir and
--datadir options.
• --start-timeout
Number of seconds to wait for the server to be online when started in read-only mode using the -start option. The default value is 10 seconds.
The --start-timeout option is available as of MySQL Utilities 1.2.4 / 1.3.3.
169
EXAMPLES
• --verbose, -v
Specify how much information to display. Use this option multiple times to increase the amount of
information. For example, -v = verbose, -vv = more verbose, -vvv = debug.
• --version
Display version information and exit.
For the --format option, the permitted values are not case sensitive. In addition, values may be specified
as any unambiguous prefix of a valid value. For example, --format=g specifies the grid format. An error
occurs if a prefix matches more than one valid value.
The path to the MySQL client tools should be included in the PATH environment variable in order to use
the authentication mechanism with login-paths. This will allow the utility to use the my_print_defaults tools
which is required to read the login-path values from the login configuration file (.mylogin.cnf).
EXAMPLES
To display the server information for the local server and the settings for mysqld in the configuration file
with the output in a vertical list, use this command:
shell> mysqlserverinfo --server=root:pass@localhost -d --format=vertical
# Source on localhost: ... connected.
*************************
1. row *************************
server: localhost:3306
version: 5.1.50-log
datadir: /usr/local/mysql/data/
basedir: /usr/local/mysql-5.1.50-osx10.6-x86_64/
plugin_dir: /usr/local/mysql-5.1.50-osx10.6-x86_64/lib/plugin
config_file: /etc/my.cnf
binary_log: my_log.000068
binary_log_pos: 212383
relay_log: None
relay_log_pos: None
1 rows.
Defaults for server localhost:3306
--port=3306
--basedir=/usr/local/mysql
--datadir=/usr/local/mysql/data
--server_id=5
--log-bin=my_log
--general_log
--slow_query_log
--innodb_data_file_path=ibdata1:778M;ibdata2:50M:autoextend
#...done.
PERMISSIONS REQUIRED
The permissions required include the ability to read the mysql database and to have read access to the
data directory.
The user must have permissions to read the data directory or use an administrator or super user (sudo)
account to obtain access to the data directory.
5.22 mysqluc — Command line client for running MySQL Utilities
This utility provides a command line environment for running MySQL Utilities.
170
mysqluc — Command line client for running MySQL Utilities
The mysqluc utility, hence console, allows users to execute any of the currently installed MySQL Utilities
command. The option --utildir is used to provide a path to the MySQL Utilities if the location is
different from when the utility is executed.
The console has a list of console or base commands. These allow the user to interact with the features of
the console itself. The list of base commands is shown below along with a brief description.:
Command
---------------------help utilities
help <utility>
help | help commands
exit | quit
set <variable>=<value>
show options
show variables
<ENTER>
<ESCAPE>
<DOWN>
<UP>
<TAB>
<TAB><TAB>
Description
--------------------------------------------------Display list of all utilities supported.
Display help for a specific utility.
Show this list.
Exit the console.
Store a variable for recall in commands.
Display list of options specified by the user on
launch.
Display list of variables.
Press ENTER to execute command.
Press ESCAPE to clear the command entry.
Press DOWN to retrieve the previous command.
Press UP to retrieve the next command in history.
Press TAB for type completion of utility, option,
or variable names.
Press TAB twice for list of matching type
completion (context sensitive).
One of the most helpful base commands is the ability to see the options for a given utility by typing 'help
<utility>'. When the user types this command and presses ENTER, the console will display a list of all of
the options for the utility.
The console provides tab completion for all commands, options for utilities, and user-defined variables.
Tab completion for commands allows users to specify the starting N characters of a command and press
TAB to complete the command. If there are more than one command that matches the prefix, and the user
presses TAB twice, a list of all possible matches is displayed.
Tab completion for options is similar. The user must first type a valid MySQL Utility command then types
the first N characters of a command and presses TAB, for example –-verb<TAB>. In this case, the console
will complete the option. For the cases where an option requires a value, the console will complete the
option name and append the '=' character. Tab completion for options works for both the full name and
the alias (if available). If the user presses TAB twice, the console will display a list of matching options.
Pressing TAB twice immediately after typing the name of a MySQL Utility will display a list of all options for
that utility.
Tab completion for variables works the same as that for options. In this case, the user must first type the
'$' character then press TAB. For example, if a variable $SERVER1 exists, when the user types –-server=
$SER<TAB>, the console will complete the $SERVER variable name. For cases where there are multiple
variables, pressing TAB twice will display a list of all matches to the first $+N characters. Pressing TAB
twice after typing only the $ character will display a list of all variables.
Note: the console does not require typing the 'mysql' prefix for the utility. For example, if the user types
'disku<TAB>' the console will complete the command with 'diskusage '.
Executing utilities is accomplished by typing the complete command and pressing ENTER. The user does
not have to type 'python' or provide the '.py' file extension. The console will add these if needed.
The user can also run commands using the option --execute. The value for this option is a semi-colon
separated list of commands to execute. These can be base commands or MySQL Utility commands. The
console will execute each command and display the output. All commands to be run by the console must
171
OPTIONS
appear inside a quoted string and separated by semi-colons. Commands outside of the quoted string will
be treated as arguments for the mysqluc utility itself and thus ignored for execution.
Note: if there is an error in the console or related code, the console will stop executing commands
at the point of failure. Commands may also be piped into the console using a mechanism like 'echo
“<commands>” | mysqluc”.
The console also allows users to set user-defined variables for commonly used values in options. The
syntax is simply 'set VARNAME=VALUE'. The user can see a list of all variables by entering the 'show
variables' command. To use the values of these variables in utility commands, the user must prefix the
value with a '$'. For example, --server=$SERVER1 will substitute the value of the SERVER1 user-defined
variable when the utility is executed.
Note: user-defined variables have a session lifetime. They are not saved from one execution to another of
the users console.
User-defined variables may also be set by passing them as arguments to the mysqluc command. For
example, to set the SERVER1 variable and launch the console, the user can launch the console using this
command.:
shell> mysqluc SERVER1=root@localhost
The user can provide any number of user-defined variables but they must contain a value and no spaces
around the '=' character. Once the console is launched, the user can see all variables using the 'show
variables' command.
OPTIONS
• --version
show program's version number and exit
• --help
show the program's help page
• --license
Display license information and exit.
• --verbose, -v
control how much information is displayed. For example, -v = verbose, -vv = more verbose, -vvv =
debug
• --quiet
suppress all informational messages
• --execute <commands>, -e <commands>
Execute commands and exit. Multiple commands are separated with semi-colons. Note: some platforms
may require double quotes around command list.
• --utildir <path>
location of utilities
172
NOTES
• --width <number>
Display width
NOTES
Using the --execute option or piping commands to the console may require quotes or double quotes (for
example, on Windows).
EXAMPLES
To launch the console, use this command:
shell> mysqluc
The following demonstrates launching the console and running the console command 'help utilities' to see
a list of all utilities supported. The console will execute the command then exit.:
shell> mysqluc -e "help utilities"
Utility
---------------mysqlindexcheck
mysqlrplcheck
mysqluserclone
mysqldbcompare
mysqldiff
mysqldbcopy
mysqlreplicate
mysqldbexport
mysqldbimport
mysqlmetagrep
mysqlprocgrep
mysqldiskusage
mysqlserverinfo
mysqlserverclone
Description
--------------------------------------------------------check for duplicate or redundant indexes
check replication
clone a MySQL user account to one or more new users
compare databases for consistency
compare object definitions among objects where the
difference is how db1.obj1 differs from db2.obj2
copy databases from one server to another
establish replication with a master
export metadata and data from databases
import metadata and data from files
search metadata
search process information
show disk usage for databases
show server information
start another instance of a running server
The following demonstrates launching the console to run several commands using the --execute option to
including setting a variable for a server connection and executing a utility using variable substitution. Note:
it may be necessary to escape the '$' on some platforms (for example, Linux). Output below is an excerpt
and is representational only.:
shell> mysqluc -e "set SERVER=root@host123; mysqldiskusage --server=\$SERVER"
# Source on host123: ... connected.
NOTICE: Your user account does not have read access to the datadir. Data
sizes will be calculated and actual file sizes may be omitted. Some features
may be unavailable.
# Database totals:
+--------------------+--------------+
| db_name
|
total |
+--------------------+--------------+
...
| world
|
0 |
...
+--------------------+--------------+
173
PERMISSIONS REQUIRED
Total database disk usage = 1,072,359,052 bytes or 1022.00 MB
#...done.
The following demonstrates launching the console using the commands shown above but piped into the
console on the command line. The results are the same as above.:
shell> echo "set SERVER=root@host123; mysqldiskusage --server=\$SERVER" | mysqluc
The following demonstrates launching the console and setting variables via the command line.:
shell> mysqluc SERVER=root@host123 VAR_A=57 -e "show variables"
Variable
-------SERVER
VAR_A
Value
----------------------------------------------------------------root@host123
57
PERMISSIONS REQUIRED
There are no special permissions required to run mysqluc however, you must have the necessary
privileges to execute the desired utilities. See the PERMISSIONS REQUIRED section for each command
you wish to execute.
5.23 mysqluserclone — Clone Existing User to Create New User
This utility uses an existing MySQL user account on one server as a template, and clones it to create one
or more new user accounts with the same privileges as the original user. The new users can be created on
the original server or a different server.
To list users for a server, specify the --list option. This prints a list of the users on the source (no
destination is needed). To control how to display list output, use one of the following values with the -format option:
• grid (default)
Display output in grid or table format like that of the mysql client command-line tool.
• csv
Display output in comma-separated values format.
• tab
Display output in tab-separated format.
• vertical
Display output in single-column format like that of the \G command for the mysql client command-line
tool.
OPTIONS
mysqluserclone accepts the following command-line options:
• --help
174
OPTIONS
Display a help message and exit.
• --license
Display license information and exit.
• --destination=<destination>
Connection information for the destination server.
To connect to a server, it is necessary to specify connection parameters such as user name, host
name, password, and either a port or socket. MySQL Utilities provides a number of ways to provide
this information. All of the methods require specifying your choice via a command-line option such as -server, --master, --slave, etc. The methods include the following in order of most secure.
• Use login-paths from your .mylogin.cnf file (encrypted, not visible). Example : <login-path>[:<port>]
[:<socket>]
• Use a configuration file (unencrypted, not visible) Note: available in release-1.5.0. Example :
<configuration-file-path>[:<section>]
• Specify the data on the command-line (unencrypted, visible). Example :
<user>[:<passwd>]@<host>[:<port>][:<socket>]
• --dump, -d
Display the GRANT statements to create the account rather than executing them. In this case, the utility
does not connect to the destination server and no --destination option is needed.
• --format=<list_format>, -f<list_format>
Specify the user display format. Permitted format values are grid, csv, tab, and vertical. The default is
grid. This option is valid only if --list is given.
• --force
Drop the new user account if it exists before creating the new account. Without this option, it is an error
to try to create an account that already exists.
• --include-global-privileges
Include privileges that match base_user@% as well as base_user@host.
• --list
List all users on the source server. With this option, a destination server need not be specified.
• --quiet, -q
Turn off all messages for quiet execution.
• --source=<source>
Connection information for the source server.
To connect to a server, it is necessary to specify connection parameters such as user name, host
name, password, and either a port or socket. MySQL Utilities provides a number of ways to provide
175
NOTES
this information. All of the methods require specifying your choice via a command-line option such as -server, --master, --slave, etc. The methods include the following in order of most secure.
• Use login-paths from your .mylogin.cnf file (encrypted, not visible). Example : <login-path>[:<port>]
[:<socket>]
• Use a configuration file (unencrypted, not visible) Note: available in release-1.5.0. Example :
<configuration-file-path>[:<section>]
• Specify the data on the command-line (unencrypted, visible). Example :
<user>[:<passwd>]@<host>[:<port>][:<socket>]
• --verbose, -v
Specify how much information to display. Use this option multiple times to increase the amount of
information. For example, -v = verbose, -vv = more verbose, -vvv = debug.
• --version
Display version information and exit.
NOTES
You must provide connection parameters (user, host, password, and so forth) for an account that has the
appropriate privileges to access all objects in the operation.
The account used to connect to the source server must have privileges to read the mysql database.
The account used to connect to the destination server must have privileges to execute CREATE USER
(and DROP USER if the --force option is given), and privileges to execute GRANT for all privileges to be
granted to the new accounts.
For the --format option, the permitted values are not case sensitive. In addition, values may be specified
as any unambiguous prefix of a valid value. For example, --format=g specifies the grid format. An error
occurs if a prefix matches more than one valid value.
The path to the MySQL client tools should be included in the PATH environment variable in order to use
the authentication mechanism with login-paths. This will allow the utility to use the my_print_defaults tools
which is required to read the login-path values from the login configuration file (.mylogin.cnf).
EXAMPLES
To clone joe as sam and sally with passwords and logging in as root on the local machine, use this
command:
shell> mysqluserclone --source=root@localhost \
--destination=root@localhost \
joe@localhost sam:secret1@localhost sally:secret2@localhost
# Source on localhost: ... connected.
# Destination on localhost: ... connected.
# Cloning 2 users...
# Cloning joe@localhost to user sam:secret1@localhost
# Cloning joe@localhost to user sally:secret2@localhost
# ...done.
The following command shows all users on the local server in the most verbose output in CSV format:
176
PERMISSIONS REQUIRED
shell> mysqluserclone --source=root@localhost --list --format=csv -vvv
# Source on localhost: ... connected.
user,host,database
joe,localhost,util_test
rpl,localhost,
sally,localhost,util_test
sam,localhost,util_test
joe,user,util_test
PERMISSIONS REQUIRED
The permissions required include the ability to read the mysql database and to have read access to the
data directory.
177
178
Chapter 6 Extending MySQL Utilities
Table of Contents
6.1 Introduction to extending the MySQL Utilities ............................................................................. 179
6.2 MySQL Utilities copy_server.py sample ...................................................................................... 185
6.3 Specialized Operations .............................................................................................................. 188
6.3.1 mysql.utilities.command.grep — Search Databases for Objects ............................ 188
6.3.2 mysql.utilities.command.proc — Search Processes on Servers ............................ 189
6.4 Parsers ..................................................................................................................................... 190
6.4.1 mysql.utilities.parser — Parse MySQL Log Files .............................................................. 190
This chapter introduces the architecture for the MySQL Utilities library and demonstrates how to get started
building your own utilities.
6.1 Introduction to extending the MySQL Utilities
Administration and maintenance on the MySQL server can at times be complicated. Sometimes tasks
require tedious or even repetitive operations that can be time consuming to type and re-type. For these
reasons and more, the MySQL Utilities were created to help both beginners and experienced database
administrators perform common tasks.
What are the internals of the MySQL Utilities?
MySQL Utilities are designed as a collection of easy to use Python scripts that can be combined to provide
more powerful features. Internally, the scripts use the mysql.utilities module library to perform its various
tasks. Since a library of common functions is available, it is easy for a database administrator to create
scripts for common tasks. These utilities are located in the /scripts folder of the installation or source
tree.
If you have a task that is not met by these utilities or one that can be met by combining one or more of
the utilities or even parts of the utilities, you can easily form your own custom solution. The following
sections present an example of a custom utility, discussing first the anatomy of a utility and then what the
mysql.utilities module library has available.
Anatomy of a MySQL Utility
MySQL Utilities use a three-tier module organization. At the top is the command script, which resides in the
/scripts folder of the installation or source tree. Included in the script is a command module designed to
encapsulate and isolate the bulk of the work performed by the utility. The command module resides in the
/mysql/utilities/command folder of the source tree. Command modules have names similar to the
script. A command module includes classes and methods from one or more common modules where the
abstract objects and method groups are kept. The common modules reside in the /mysql/utilities/
common folder of the source tree. The following illustrates this arrangement using the mysqlserverinfo
utility:
/scripts/mysqlserverinfo.py
|
+--- /mysql/utilities/command/serverinfo.py
|
+--- /mysql/utilities/common/options.py
|
+--- /mysql/utilities/common/server.py
|
+--- /mysql/utilities/common/tools.py
179
The MySQL Utilities Library
|
+--- /mysql/utilities/common/format.py
Each utility script is designed to process the user input and option settings and pass them on to the
command module. Thus, the script contains only such logic for managing and validating options. The work
of the operation resides in the command module.
Command modules are designed to be used from other Python applications. For example, one could
call the methods in the serverinfo.py module from another Python script. This enables developers to
create their own interfaces to the utilities. It also permits developers to combine several utilities to form a
macro-level utility tailored to a specified need. For example, if there is a need to gather server information
as well as disk usage, it is possible to import the serverinfo.py and diskusage.py modules and
create a new utility that performs both operations.
Common modules are the heart of the MySQL Utilities library. These modules contain classes that abstract
MySQL objects, devices, and mechanisms. For example, there is a server class that contains operations to
be performed on servers, such as connecting (logging in) and running queries.
The MySQL Utilities Library
Although the library is growing, the following lists the current common modules and the major classes and
methods as of the 1.0.1 release:
Module
---------database
dbcompare
format
options
rpl
server
table
tools
Class/Method
------------------------Database
get_create_object
diff_objects
check_consistency
format_tabular_list
Description
---------------------------------------Perform database-level operations
Retrieve object create statement
Diff definitions of two objects
Check data consistency of two tables
Format list in either GRID or
delimited format to a file
format_vertical_list
Format list in a vertical format to
a file
print_list
Print list based on format (CSV,
GRID, TAB, or VERTICAL)
setup_common_options
Set up option parser and options common
to all MySQL Utilities
add_skip_options
Add common --skip options
check_skip_options
Check skip options for validity
check_format_option
Check format option for validity
add_verbosity
Add verbosity and quiet options
check_verbosity
Check whether both verbosity and quiet
options are being used
add_difftype
Add difftype option
add_engines
Add engine, default-storage-engine
options
check_engine_options
Check whether storage engines listed
in options exist
parse_connection
Parse connection values
Replication
Establish replication connection
between a master and a slave
get_replication_tests
Return list of replication test function
pointers
get_connection_dictionary Get connection dictionary
find_running_servers
Check whether any servers are
running on the local host
connect_servers
Connect to source and destination server
Server
Connect to running MySQL server
and perform server-level operations
Index
Encapsulate index for a given table
as defined by SHOW INDEXES
Table
Encapsulate table for given database
to perform table-level operations
get_tool_path
Search for MySQL tool and return its
180
General Interface Specifications and Code Practices
user
delete_directory
parse_user_host
User
full path
Remove directory (folder) and contents
Parse user, passwd, host, port from
user:passwd@host
Clone user and its grants to another
user and perform user-level operations
General Interface Specifications and Code Practices
The MySQL Utilities are designed and coded using mainstream coding practices and techniques common
to the Python community. Effort has been made to adhere to the most widely accepted specifications and
techniques. This includes limiting the choice of libraries used to the default libraries found in the Python
distributions. This ensures easier installation, enhanced portability, and fewer problems with missing
libraries. Similarly, external libraries that resort to platform-specific native code are also not used.
The class method and function signatures are designed to make use of a small number of required
parameters and all optional parameters as a single dictionary. Consider the following method:
def do_something_wonderful(position, obj1, obj2, options={}):
"""Does something wonderful
A fictional method that does something to object 2 based on the
location of something in object 1.
position[in]
obj1[in]
obj2[in]
options[in]
width
iter
ok_to_fail
Position in obj1
First object to manipulate
Second object to manipulate
Option dictionary
width of printout (default 75)
max iterations (default 2)
if True, do not throw exception
(default True)
Returns bool - True = success, Fail = failed
"""
This example is typical of the methods and classes in the library. Notice that this method has three
required parameters and a dictionary of options that may exist.
Each method and function that uses this mechanism defines its own default values for the items in the
dictionary. A quick look at the method documentation shows the key names for the dictionary. This can be
seen in the preceding example where the dictionary contains three keys and the documentation lists their
defaults.
To call this method and pass different values for one or more of the options, the code may look like this:
opt_dictionary = {
'width'
: 100,
'iter'
: 10,
'ok_to_fail' : False,
}
result = do_something_wonderful(1, obj_1, obj_2, opt_dictionary)
The documentation block for the preceding method is the style used throughout the library.
Example
Now that you are familiar with the MySQL utilities and the supporting library modules, let us take a look at
an example that combines some of these modules to solve a problem.
Suppose that you want to develop a new database solution and need to use real world data and user
accounts for testing. The mysqlserverclone MySQL utility looks like a possibility but it makes only an
181
Example
instance of a running server. It does not copy data. However, mysqldbcopy makes a copy of the data
and mysqluserclone clones the users. You could run each of these utilities in sequence, and that would
work, but we are lazy at heart and want something that not only copies everything but also finds it for us.
That is, we want a one-command solution.
The good news is that this is indeed possible and very easy to do. Let us start by breaking the problem
down into its smaller components. In a nutshell, we must perform these tasks:
• Connect to the original server
• Find all of the databases
• Find all of the users
• Make a clone of the original server
• Copy all of the databases
• Copy all of the users
If you look at the utilities and the modules just listed, you see that we have solutions and primitives for each
of these operations. So you need not even call the MySQL utilities directly (although you could). Now let us
dive into the code for this example.
The first task is to connect to the original server. We use the same connection mechanism as the other
MySQL utilities by specifying a --server option like this:
parser.add_option("--server", action="store", dest="server",
type="string", default="root@localhost:3306",
help="connection information for original server in " + \
"the form: <user>:<password>@<host>:<port>:<socket>")
Once we process the options and arguments, connecting to the server is easy: Use the
parse_connection method to take the server option values and get a dictionary with the connection
values. All of the heavy diagnosis and error handling is done for us, so we just need to check for
exceptions:
from mysql.utilities.common.options import parse_connection
try:
conn = parse_connection(opt.server)
except:
parser.error("Server connection values invalid or cannot be parsed.")
Now that we have the connection parameters, we create a class instance of the server using the Server
class from the server module and then connect. Once again, we check for exceptions:
from mysql.utilities.common.server import Server
server_options = {
'conn_info' : conn,
'role'
: "source",
}
server1 = Server(server_options)
try:
server1.connect()
except UtilError, e:
print "ERROR:", e.errmsg
The next item is to get a list of all of the databases on the server. We use the new server class instance to
retrieve all of the databases on the server:
db_list = []
182
Example
for db in server1.get_all_databases():
db_list.append((db[0], None))
If you wanted to supply your own list of databases, you could use an option like the following. You could
also add an else clause which would enable you to either get all of the databases by omitting the -databases option or supply your own list of databases (for example, --databases=db1,db2,db3):
parser.add_option("-d", "--databases", action="store", dest="dbs_to_copy",
type="string", help="comma-separated list of databases "
"to include in the copy (omit for all databases)",
default=None)
if opt.dbs_to_copy is None:
for db in server1.get_all_databases():
db_list.append((db[0], None))
else:
for db in opt.dbs_to_copy.split(","):
db_list.append((db, None))
Notice we are creating a list of tuples. This is because the dbcopy module uses a list of tuples in the form
(old_db, new_db) to enable you to copy a database to a new name. For our purposes, we do not want a
rename so we leave the new name value set to None.
Next, we want a list of all of the users. Once again, you could construct the new solution to be flexible by
permitting the user to specify the users to copy. We leave this as an exercise.
In this case, we do not have a primitive for getting all users created on a server. But we do have the ability
to run a query and process the results. Fortunately, there is a simple SQL statement that can retrieve all of
the users on a server. For our purposes, we get all of the users except the root and anonymous users, then
add each to a list for processing later:
users = server1.exec_query("SELECT user, host "
"FROM mysql.user "
"WHERE user != 'root' and user != ''")
for user in users:
user_list.append(user[0]+'@'+user[1])
Now we must clone the original server and create a viable running instance. When you examine
the mysqlserverclone utility code, you see that it calls another module located in the /mysql/
utilities/command sub folder. These modules are where all of the work done by the utilities take place.
This enables you to create new combinations of the utilities by calling the actual operations directly. Let's
do that now to clone the server.
The first thing you notice in examining the serverclone module is that it takes a number of parameters
for the new server instance. We supply those in a similar way as options:
parser.add_option("--new-data", action="store", dest="new_data",
type="string", help="the full path to the location "
"of the data directory for the new instance")
parser.add_option("--new-port", action="store", dest="new_port",
type="string", default="3307", help="the new port "
"for the new instance - default=%default")
parser.add_option("--new-id", action="store", dest="new_id",
type="string", default="2", help="the server_id for "
"the new instance - default=%default")
from mysql.utilities.command import serverclone
try:
res = serverclone.clone_server(conn, opt.new_data, opt.new_port,
opt.new_id, "root", None, False, True)
except exception.UtilError, e:
print "ERROR:", e.errmsg
sys.exit()
183
Example
As you can see, the operation is very simple. We just added a few options we needed like --new-data,
--new-port, and --new-id (much like mysqlserverclone) and supplied some default values for the
other parameters.
Next, we need to copy the databases. Once again, we use the command module for mysqldbcopy to do
all of the work for us. First, we need the connection parameters for the new instance. This is provided in
the form of a dictionary. We know the instance is a clone, so some of the values are going to be the same
and we use a default root password, so that is also known. Likewise, we specified the data directory and,
since we are running on a Linux machine, we know what the socket path is. (For Windows machines, you
can leave the socket value None.) We pass this dictionary to the copy method:
dest_values = {
"user"
: conn.get("user"),
"passwd" : "root",
"host"
: conn.get("host"),
"port"
: opt.new_port,
"unix_socket" : os.path.join(opt.new_data, "mysql.sock")
}
In this case, a number of options are needed to control how the copy works (for example, if any objects are
skipped). For our purposes, we want all objects to be copied so we supply only the minimal settings and let
the library use the defaults. This example shows how you can 'fine tune' the scripts to meet your specific
needs without having to specify a lot of additional options in your script. We enable the quiet option on so
as not to clutter the screen with messages, and tell the copy to skip databases that do not exist (in case we
supply the --databases option and provide a database that does not exist):
options = {
"quiet" : True,
"force" : True
}
The actual copy of the databases is easy. Just call the method and supply the list of databases:
from mysql.utilities.command import dbcopy
try:
dbcopy.copy_db(conn, dest_values, db_list, options)
except exception.UtilError, e:
print "ERROR:", e.errmsg
sys.exit()
Lastly, we copy the user accounts. Once again, we must provide a dictionary of options and call the
command module directly. In this case, the userclone module provides a method that clones one user to
one or more users so we must loop through the users and clone them one at a time:
from mysql.utilities.command import userclone
options = {
"overwrite" : True,
"quiet"
: True,
"globals"
: True
}
for user in user_list:
try:
res = userclone.clone_user(conn, dest_values, user,
(user,), options)
except exception.UtilError, e:
print "ERROR:", e.errmsg
sys.exit()
We are done. As you can see, constructing new solutions from the MySQL utility command and common
modules is easy and is limited only by your imagination.
184
Enhancing the Example
Enhancing the Example
A complete solution for the example named copy_server.py is located in the appendix. It is complete
in so far as this document explains, but it can be enhanced in a number of ways. The following briefly lists
some of the things to consider adding to make this example utility more robust.
• Table locking: Currently, databases are not locked when copied. To achieve a consistent copy of the
data on an active server, you may want to add table locking or use transactions (for example, if you are
using InnoDB) for a more consistent copy.
• Skip users not associated with the databases being copied.
• Do not copy users with only global privileges.
• Start replication after all of the users are copied (makes this example a clone and replicate scale out
solution).
• Stop new client connections to the server during the copy.
Conclusion
If you find some primitives missing or would like to see more specific functionality in the library or scripts,
please contact us with your ideas or better still, write them yourselves! We welcome all suggestions in
code or text. To file a feature request or bug report, visit http://bugs.mysql.com. For discussions, visit http://
forums.mysql.com/list.php?155.
6.2 MySQL Utilities copy_server.py sample
#
#
#
#
#
#
#
#
#
#
#
#
#
#
#
#
Copyright (c) 2010, 2013, Oracle and/or its affiliates. All rights reserved.
This program is free software; you can redistribute it and/or modify
it under the terms of the GNU General Public License as published by
the Free Software Foundation; version 2 of the License.
This program is distributed in the hope that it will be useful,
but WITHOUT ANY WARRANTY; without even the implied warranty of
MERCHANTABILITY or FITNESS FOR A PARTICULAR PURPOSE. See the
GNU General Public License for more details.
You should have received a copy of the GNU General Public License
along with this program; if not, write to the Free Software
Foundation, Inc., 51 Franklin St, Fifth Floor, Boston, MA 02110-1301 USA
"""
This file contains an example of how to build a customized utility using
the MySQL Utilities scripts and libraries.
"""
import optparse
import os
import sys
from
from
from
from
from
from
mysql.utilities import VERSION_FRM
mysql.utilities.command import dbcopy
mysql.utilities.command import serverclone
mysql.utilities.command import userclone
mysql.utilities.common.server import Server
mysql.utilities.common.options import parse_connection
185
MySQL Utilities copy_server.py sample
from mysql.utilities.exception import UtilError
# Constants
NAME = "example - copy_server "
DESCRIPTION = "copy_server - copy an existing server"
USAGE = "%prog --server=user:pass@host:port:socket " \
"--new-dir=<path> --new-id=<server_id> " \
"--new-port=<port> --databases=<db list> " \
"--users=<user list>"
# Setup the command parser
parser = optparse.OptionParser(
version=VERSION_FRM.format(program=os.path.basename(sys.argv[0])),
description=DESCRIPTION,
usage=USAGE,
add_help_option=False)
parser.add_option("--help", action="help")
# Setup utility-specific options:
# Connection information for the source server
parser.add_option("--server", action="store", dest="server",
type="string", default="root@localhost:3306",
help="connection information for original server in " + \
"the form: <user>:<password>@<host>:<port>:<socket>")
# Data directory for new instance
parser.add_option("--new-data", action="store", dest="new_data",
type="string", help="the full path to the location "
"of the data directory for the new instance")
# Port for the new instance
parser.add_option("--new-port", action="store", dest="new_port",
type="string", default="3307", help="the new port "
"for the new instance - default=%default")
# Server id for the new instance
parser.add_option("--new-id", action="store", dest="new_id",
type="string", default="2", help="the server_id for "
"the new instance - default=%default")
# List of databases
parser.add_option("-d", "--databases", action="store", dest="dbs_to_copy",
type="string", help="comma-separated list of databases "
"to include in the copy (omit for all databases)",
default=None)
# List of users
parser.add_option("-u", "--users", action="store", dest="users_to_copy",
type="string", help="comma-separated list of users "
"to include in the copy (omit for all users)",
default=None)
# Now we process the rest of the arguments.
opt, args = parser.parse_args()
# Parse source connection values
try:
conn = parse_connection(opt.server)
except:
parser.error("Server connection values invalid or cannot be parsed.")
# Get a server class instance
print "# Connecting to server..."
server_options = {
'conn_info' : conn,
'role'
: "source",
186
MySQL Utilities copy_server.py sample
}
server1 = Server(server_options)
try:
server1.connect()
except UtilError, e:
print "ERROR:", e.errmsg
# Get list of databases from the server if not specified in options
print "# Getting databases..."
db_list = []
if opt.dbs_to_copy is None:
for db in server1.get_all_databases():
db_list.append((db[0], None))
else:
for db in opt.dbs_to_copy.split(","):
db_list.append((db, None))
# Get list of all users from the server
print "# Getting users..."
user_list=[]
if opt.users_to_copy is None:
users = server1.exec_query("SELECT user, host "
"FROM mysql.user "
"WHERE user != 'root' and user != ''")
for user in users:
user_list.append(user[0]+'@'+user[1])
else:
for user in opt.users_to_copy.split(","):
user_list.append(user)
# Build options
options = {
'new_data'
'new_port'
'new_id'
'root_pass'
'mysqld_options'
}
:
:
:
:
:
opt.new_data,
opt.new_port,
opt.new_id,
'root',
'--report-host=localhost --report-port=%s' % opt.new_port,
# Clone the server
print "# Cloning server instance..."
try:
res = serverclone.clone_server(conn, options)
except UtilError, e:
print "ERROR:", e.errmsg
sys.exit()
# Set connection values
dest_values = {
"user"
: conn.get("user"),
"passwd" : "root",
"host"
: conn.get("host"),
"port"
: opt.new_port,
"unix_socket" : os.path.join(opt.new_data, "mysql.sock")
}
# Build dictionary of options
options = {
"quiet" : True,
"force" : True
}
print "# Copying databases..."
try:
dbcopy.copy_db(conn, dest_values, db_list, options)
except UtilError, e:
print "ERROR:", e.errmsg
187
Specialized Operations
sys.exit()
# Build dictionary of options
options = {
"overwrite" : True,
"quiet"
: True,
"globals"
: True
}
print "# Cloning the users..."
for user in user_list:
try:
res = userclone.clone_user(conn, dest_values, user,
(user,), options)
except UtilError, e:
print "ERROR:", e.errmsg
sys.exit()
print "# ...done."
6.3 Specialized Operations
6.3.1 mysql.utilities.command.grep — Search Databases for Objects
This module provides utilities to search for objects on a server. The module defines a set of object types
that can be searched by searching the fields of each object. The notion of an object field is very loosely
defined and means any names occurring as part of the object definition. For example, the fields of a table
include the table name, the column names, and the partition names (if it is a partitioned table).
Constants
The following constants denote the object types that can be searched.
• mysql.utilities.command.grep.ROUTINE
• mysql.utilities.command.grep.EVENT
• mysql.utilities.command.grep.TRIGGER
• mysql.utilities.command.grep.TABLE
• mysql.utilities.command.grep.DATABASE
• mysql.utilities.command.grep.VIEW
• mysql.utilities.command.grep.USER
The following constant is a sequence of all the object types that are available. It can be used to generate a
version-independent list of object types that can be searched; for example, options and help texts.
• mysql.utilities.command.grep.OBJECT_TYPES
Classes
class mysql.utilities.command.grep.ObjectGrep(pattern[, database_pattern=None,
types=OBJECT_TYPES, check_body=False, use_regexp=False])
Search MySQL server instances for objects where the name (or content, for routines, triggers, or events)
matches a given pattern.
188
mysql.utilities.command.proc — Search Processes on Servers
sql() - string
Return the SQL code for executing the search in the form of a SELECT statement.
Returns:
SQL code for executing the operation specified by the options.
Return type:
string
execute(connections[, output=sys.output, connector=mysql.connector])
Execute the search on each of the connections in turn and print an aggregate of the result as a grid table.
Parameters:
• connections Sequence of connection specifiers to send the query to
• output File object to use for writing the result
• connector Connector to use for connecting to the servers
6.3.2 mysql.utilities.command.proc — Search Processes on Servers
This module searches processes on a server and optionally kills either the query or the connection for all
matching processes.
Processes are matched by searching the fields of the INFORMATION_SCHEMA.PROCESSLIST table
(which is available only for servers from MySQL 5.1.7 and later). Internally, the module operates by
constructing a SELECT statement for finding matching processes, and then sending it to the server. Instead
of performing the search, the module can return the SQL code that performs the query. This can be useful
if you want to execute the query later or feed it to some other program that processes SQL queries further.
Constants
The following constants correspond to columns in the INFORMATION_SCHEMA.PROCESSLIST table. They
indicate which columns to examine when searching for processes matching the search conditions.
• mysql.utilities.command.proc.ID
• mysql.utilities.command.proc.USER
• mysql.utilities.command.proc.HOST
• mysql.utilities.command.proc.DB
• mysql.utilities.command.proc.COMMAND
• mysql.utilities.command.proc.TIME
• mysql.utilities.command.proc.STATE
• mysql.utilities.command.proc.INFO
The following constants indicate actions to perform on processes that match the search conditions.
• mysql.utilities.command.proc.KILL_QUERY
Kill the process query
• mysql.utilities.command.proc.KILL_CONNECTION
Kill the process connection
189
Parsers
• mysql.utilities.command.proc.PRINT_PROCESS
Print the processes
Classes
class mysql.utilities.command.proc.ProcessGrep(matches, actions=[], use_regexp=False)
This class searches the INFORMATION_SCHEMA.PROCESSLIST table for processes on MySQL servers
and optionally kills them. It can both be used to actually perform the search or kill operation, or to generate
the SQL statement for doing the job.
To kill all queries with user 'mats', the following code can be used:
>>> from mysql.utilities.command.proc import *
>>> grep = ProcessGrep(matches=[(USER, "mats")], actions=[KILL_QUERY])
>>> grep.execute("[email protected]", "[email protected]")
Parameters:
• matches (List of (var, pat) pairs) Sequence of field comparison conditions. In each
condition, var is one of the constants listed earlier that specify PROCESSLIST
table fields and pat is a pattern. For a process to match, all field conditions must
match.
sql([only_body=False])
Return the SQL code for executing the search (and optionally, the kill).
If only_body is True, only the body of the function is shown. This is useful if the SQL code is to be used
with other utilities that generate the routine declaration. If only_body is False, a complete procedure will
be generated if there is any kill action supplied, and just a select statement if it is a plain search.
Parameters:
• only_body (boolean) Show only the body of the procedure. If this is False, a
complete procedure is returned.
Returns:
SQL code for executing the operation specified by the options.
Return type:
string
execute(connections, ...[, output=sys.stdout, connector=mysql.connector])
Execute the search on each of the connections supplied. If output is not None, the value is treated as a
file object and the result of the execution is printed on that stream. Note that the output and connector
arguments must be supplied as keyword arguments. All other arguments are treated as connection
specifiers.
Parameters:
• connections Sequence of connection specifiers to send the search to
• output File object to use for writing the result
• connector Connector to use for connecting to the servers
6.4 Parsers
6.4.1 mysql.utilities.parser — Parse MySQL Log Files
This module provides classes for parsing MySQL log files. Currently, Slow Query Log and General Query
Log are supported.
190
mysql.utilities.parser — Parse MySQL Log Files
Classes
class mysql.utilities.parser.GeneralQueryLog(stream)
This class parses the MySQL General Query Log. Instances are iterable, but the class does not provide
multiple independent iterators.
For example, to read the log and print the entries:
>>> general_log = open("/var/lib/mysql/mysql.log")
>>> log = GeneralQueryLog(general_log)
>>> for entry in log:
...
print entry
Parameters:
• stream (file type) – a valid file type; for example, the result of the built-in Python
function open()
version
Returns:
Version of the MySQL server that produced the log
Return type:
tuple
program
Returns:
Full path of the MySQL server executable
Return type:
str
port
Returns:
TCP/IP port on which the MySQL server was listening
Return type:
int
socket
Returns:
Full path of the MySQL server Unix socket
Return type:
str
start_datetime
Returns:
Date and time of the first read log entry
Return type:
datetime.datetime
lastseen_datetime
Returns:
Date and time of the last read log entry
Return type:
datetime.datetime
class mysql.utilities.parser.SlowQueryLog(stream)
This class parses the MySQL Slow Query Log. Instances are iterable, but the class does not provide
multiple independent iterators.
For example, to read the log and print the entries:
191
mysql.utilities.parser — Parse MySQL Log Files
>>> slow_log = open("/var/lib/mysql/mysql-slow.log")
>>> log = SlowQueryLog(slow_log)
>>> for entry in log:
...
print entry
Parameters:
• stream (file type) – a valid file type; for example, the result of the built-in Python
function open()
version
Returns:
Version of the MySQL server that produced the log
Return type:
tuple
program
Returns:
Full path of the MySQL server executable
Return type:
str
port
Returns:
TCP/IP port on which the MySQL server was listening
Return type:
int
socket
Returns:
Full path of the MySQL server Unix socket
Return type:
str
start_datetime
Returns:
Date and time of the first read log entry
Return type:
datetime.datetime
lastseen_datetime
Returns:
Date and time of the last read log entry
Return type:
datetime.datetime
192
Chapter 7 MySQL Utilities Testing (MUT)
Table of Contents
7.1 mut — MySQL Utilities Testing ................................................................................................. 193
7.1 mut — MySQL Utilities Testing
This utility executes predefined tests to test the MySQL Utilities. The tests are located under the /mysqltest directory and divided into suites (stored as folders). By default, all tests located in the /t folder are
considered the 'main' suite.
You can select any number of tests to run, select one or more suites to restrict the tests, exclude suites
and tests, and specify the location of the utilities and tests.
The utility requires the existence of at least one server to clone for testing purposes. You must specify at
least one server, but you may specify multiple servers for tests designed to use additional servers.
The utility has a special test suite named 'performance' where performance-related tests are placed. This
suite is not included by default and must be specified with the --suite option to execute the performance
tests.
OPTIONS
mut accepts the following command-line options:
• --help
Display a help message and exit.
• --do-tests=<prefix>
Execute all tests that begin with prefix.
• --force
Do not abort when a test fails.
• --record
Record the output of the specified test if successful. With this option, you must specify exactly one test to
run.
• --server=<server>
Connection information for the server to use in the tests. Use this option multiple times to specify multiple
servers.
To connect to a server, it is necessary to specify connection parameters such as user name, host
name, password, and either a port or socket. MySQL Utilities provides a number of ways to provide
this information. All of the methods require specifying your choice via a command-line option such as -server, --master, --slave, etc. The methods include the following in order of most secure.
• Use login-paths from your .mylogin.cnf file (encrypted, not visible). Example : <login-path>[:<port>]
[:<socket>]
193
OPTIONS
• Use a configuration file (unencrypted, not visible) Note: available in release-1.5.0. Example :
<configuration-file-path>[:<section>]
• Specify the data on the command-line (unencrypted, visible). Example :
<user>[:<passwd>]@<host>[:<port>][:<socket>]
• --skip-long
Exclude tests that require greater resources or take a long time to run.
• --skip-suite=<name>
Exclude the named test suite. Use this option multiple times to specify multiple suites.
• --skip-test=<name>
Exclude the named test. Use this option multiple times to specify multiple tests.
• --skip-tests=<prefix>
Exclude all tests that begin with prefix.
• --sort
Execute tests sorted by suite.name either ascending (asc) or descending (desc). Default is ascending
(asc).
• --start-port=<port>
The first port to use for spawned servers. If you run the entire test suite, you may see up to 12 new
instances created. The default is to use ports 3310 to 3321.
• --start-test=<prefix>
Start executing tests that begin with prefix.
• --stop-test=<prefix>
Stop executing tests at the first test that begins with prefix.
• --suite=<name>
Execute the named test suite. Use this option multiple times to specify multiple suites.
• --testdir=<path>
The path to the test directory.
• --utildir=<path>
The location of the utilities.
• --verbose, -v
Specify how much information to display. Use this option multiple times to increase the amount of
information. For example, -v = verbose, -vv = more verbose, -vvv = debug. To diagnose test
execution problems, use -vvv to display the actual results of test cases and ignore result processing.
• --version
194
NOTES
Display version information and exit.
• --width=<number>
Specify the display width. The default is 75 characters.
NOTES
The connection specifier must name a valid account for the server.
Any test named ???_template.py is skipped. This enables the developer to create a base class to import
for a collection of tests based on a common code base.
EXAMPLES
The following example demonstrates how to invoke mut to execute a subset of the tests using an existing
server which is cloned. The example displays the test name, status, and relative time:
shell> mut --server=root@localhost --do-tests=clone_user --width=70
MySQL Utilities Testing - MUT
Parameters used:
Display Width
Sorted
Force
Test directory
Utilities directory
Starting port
Test wildcard
=
=
=
=
=
=
=
70
True
False
'./t'
'../scripts'
3310
'clone_user%'
Servers:
Connecting to localhost as user root on port 3306: CONNECTED
---------------------------------------------------------------------TEST NAME
STATUS
TIME
======================================================================
main.clone_user
[pass]
54
main.clone_user_errors
[pass]
27
main.clone_user_parameters
[pass]
17
---------------------------------------------------------------------Testing completed: Friday 03 December 2010 09:50:06
All 3 tests passed.
PERMISSIONS REQUIRED
There are no special permissions required to run mysqluc however, you must have the necessary
privileges to execute the desired utilities in the tests. Generally, MUT is run with a root user.
195
196
Chapter 8 MySQL Fabric
Table of Contents
8.1 Introduction to Fabric ................................................................................................................ 198
8.1.1 Fabric Prerequisites ....................................................................................................... 198
8.1.2 Fabric Concepts ............................................................................................................. 199
8.2 Installing and Configuring MySQL Fabric ................................................................................... 199
8.2.1 Downloading MySQL Fabric ........................................................................................... 199
8.2.2 Installing MySQL Fabric ................................................................................................. 200
8.2.3 Configuring MySQL Fabric .............................................................................................. 200
8.2.4 Starting and Stopping MySQL Fabric Nodes .................................................................... 201
8.3 Quick Start ............................................................................................................................... 202
8.3.1 Example: Fabric and Replication ..................................................................................... 202
8.3.2 Example: Fabric and Sharding ........................................................................................ 206
8.4 The mysqlfabric Utility .......................................................................................................... 211
8.4.1 Getting Help .................................................................................................................. 211
8.4.2 Group Commands .......................................................................................................... 211
8.4.3 Manage Commands ....................................................................................................... 212
8.4.4 Server Commands ......................................................................................................... 212
8.4.5 Sharding Commands ...................................................................................................... 212
8.4.6 Event Commands ........................................................................................................... 213
8.4.7 Dump Commands .......................................................................................................... 213
8.5 Backing Store ........................................................................................................................... 214
8.5.1 Backing Store Tables ..................................................................................................... 214
8.5.2 Protecting the Backing Store .......................................................................................... 217
8.6 Configuring MySQL Fabric ........................................................................................................ 217
8.6.1 MySQL Fabric configuration file location .......................................................................... 218
8.6.2 Section DEFAULT .......................................................................................................... 218
8.6.3 Section storage .............................................................................................................. 218
8.6.4 Section servers .............................................................................................................. 219
8.6.5 Section protocol.xmlrpc .................................................................................................. 219
8.6.6 Section executor ............................................................................................................ 220
8.6.7 Section logging .............................................................................................................. 220
8.6.8 Section sharding ............................................................................................................ 220
8.6.9 Section statistics ............................................................................................................ 220
8.6.10 Section failure_tracking ................................................................................................. 221
8.6.11 Section connector ......................................................................................................... 222
8.6.12 Section client ............................................................................................................... 222
8.7 MySQL Fabric Frequently Asked Questions ............................................................................... 222
8.8 Using Connector/Python with MySQL Fabric .............................................................................. 228
8.8.1 Installing Connector/Python with MySQL Fabric Support .................................................. 229
8.8.2 Requesting a Fabric Connection ..................................................................................... 230
8.8.3 Providing Information to Choose a MySQL Server ........................................................... 232
8.9 Using Connector/J with MySQL Fabric ....................................................................................... 234
8.9.1 Installing Connector/J with MySQL Fabric Support ........................................................... 234
8.9.2 Loading the Driver and Requesting a Fabric Connection .................................................. 234
8.9.3 Providing Information to Choose a MySQL Server ........................................................... 235
8.9.4 MySQL Fabric Configuration for Running Samples ........................................................... 236
8.9.5 Running Tests ................................................................................................................ 238
8.9.6 Running Demonstration Programs ................................................................................... 238
8.9.7 A Complete Example: Working with Employee Data ......................................................... 239
197
Introduction to Fabric
8.9.8 How Connector/J Chooses a MySQL Server ................................................................... 241
8.9.9 Using Hibernate with MySQL Fabric ............................................................................... 241
8.9.10 Connector/J Fabric Support Reference .......................................................................... 245
MySQL Fabric is a system for managing a farm of MySQL servers. MySQL Fabric provides an extensible
and easy to use system for managing a MySQL deployment for sharding and high-availability.
This document describes MySQL Fabric, beginning with a short introduction, providing instructions on how
to download and install MySQL Fabric, and a quick-start guide to help you begin using and experimenting
with MySQL Fabric. Later sections provide details for MySQL Fabric-aware connectors.
8.1 Introduction to Fabric
To take advantage of Fabric, an application requires an augmented version of a MySQL connector which
accesses Fabric using the XML-RPC protocol. Currently, Connector/Python and Connector/J are Fabricaware.
Fabric manages sets of MySQL servers that have Global Transaction Identifiers (GTIDs) enabled to check
and maintain consistency among servers. Sets of servers are called high-availability groups. Information
about all of the servers and groups is managed by a separate MySQL instance, which cannot be a member
of the Fabric high-availability groups. This server instance is called the backing store.
Fabric organizes servers in high-availability groups for managing different shards. For example, if standard
asynchronous replication is in use, Fabric may be configured to automatically monitor the status of servers
in a group. If the current master in a group fails, it elects a new one if a server in the group can become a
master.
Besides the high-availability operations such as failover and switchover, Fabric also permits shard
operations such as shard creation and removal.
Fabric is written in Python and includes a special library that implements all of the functionality provided.
To interact with Fabric, a special utility named mysqlfabric provides a set of commands you can use to
create and manage groups, define and manipulate sharding, and much more.
8.1.1 Fabric Prerequisites
Fabric is designed to work with MySQL servers version 5.6.10 and later. The mysqlfabric utility requires
Python 2 (2.6 or later) and Connector/Python 1.2.1 or later.
You must have a MySQL instance available to install the backing store. This server must not be a member
of a Fabric group.
Note
The backing store must be a MySQL server 5.6 or later.
To utilize Fabric in your applications, you must have a Fabric-aware connector installed on the system
where the application is running. For more information about using a connector with Fabric, see the
appropriate connector-specific section (Section 8.8, “Using Connector/Python with MySQL Fabric”,
Section 8.9, “Using Connector/J with MySQL Fabric”).
In summary, the following items indicate the prerequisites for using MySQL Fabric:
• MySQL server 5.6.10 or later for Fabric MySQL servers.
198
Fabric Concepts
• MySQL server 5.6.x or later for the backing store.
• Python 2 (2.6 or later) for the mysqlfabric utility.
• A Fabric-aware connector to use Fabric in applications. Permitted connectors and versions are:
• Connector/Python 1.2.1 or later
• Connector/J 5.1.27 or later
8.1.2 Fabric Concepts
This section describes some of the concepts used in Fabric.
A high-availability group, or simply group, is a collection of servers. It is used to associate the servers in
a set. This association may be a set of replication-enabled servers, the servers participating in a sharding
solution, and so forth.
A group identifier is the name we give a group or members of the group. A group identifier is a name
that matches the regular expression [a-zA-Z0-9_-]+. Examples of legal identifiers are my_group,
employees, and shard1.
A global group stores all updates that must be propogated to all shards that are part of a sharding scheme.
A node or fabric node is an instance of the Fabric system running on a server. To use the features of
Fabric, at least one Fabric node must be running.
Sharding refers to the Fabric feature that permits the distribution of data across several servers. There
are many uses of sharding but the most effective use of sharding enables distributing the work of writing
across several servers for improved write speeds.
A shard is a horizontal partition or segment of data in a table.
Primary refers to a member of a group that is designated as master in the sense that it can accept readwrite transactions.
Secondary refers to a member of a group that can be a candidate to replace the master during switchover
or failover and that can accept read-only transactions.
8.2 Installing and Configuring MySQL Fabric
To use MySQL Fabric, you must have a set of MySQL server instances running MySQL 5.6.10 or higher.
One server is required for the backing store and at least one server must be added to a group. To use the
replication features of MySQL Fabric, a replication topology of a master and at least one slave is required.
To use the sharding features of MySQL Fabric, you should have the number of servers corresponding to
the depth of the shards (the number of segments).
For instructions on how to download and install MySQL server, see the online MySQL reference manual
(Installing and Upgrading MySQL).
8.2.1 Downloading MySQL Fabric
Download a version of MySQL Fabric from the MySQL Developer Zone website (http://dev.mysql.com/
downloads/tools/utilities/). Packaged downloads are available for a variety of servers. Download the
package that matches your platform and extract the files.
199
Installing MySQL Fabric
The above website also provides the MySQL Fabric-aware connectors. Download the connector you want
to use with a MySQL Fabric application. For more information about how to install and get started using
MySQL Fabric in your applications, see the appropriate connector-specific section (Section 8.8, “Using
Connector/Python with MySQL Fabric”, Section 8.9, “Using Connector/J with MySQL Fabric”).
8.2.2 Installing MySQL Fabric
To install MySQL Fabric, install MySQL Utilities 1.4.4. For more information, see Chapter 1, How to Install
MySQL Utilities.
8.2.3 Configuring MySQL Fabric
Configuring MySQL Fabric requires creating a MySQL user to access the backing store, and editing the
configuration file with the MySQL user details. This section assumes you have already set up the backing
store. See Section 8.5, “Backing Store” for more information.
8.2.3.1 Create a MySQL User
The first thing you must have is a user account on the MySQL server that you plan to use for your backing
store. The user account information is stored in the configuration file.
The user account must have full privileges for the database named fabric. To create the user and grant
the privileges needed, use the following statements:
CREATE USER 'fabric'@'localhost' IDENTIFIED BY 'secret';
GRANT ALL ON fabric.* TO 'fabric'@'localhost';
In the preceding example, substitute a password of your choice (replace 'secret'). Also, if you are going
to run MySQL Fabric on a host other than where the backing store resides, substitute the 'localhost'
for the host name.
MySQL Fabric uses the same user account, who must have all privileges on all databases, to access all
MySQL Servers that it will manage. The user and password are defined in the configuration file as we
shall see. To create this user and grant all the necessary privileges, execute the following command on all
MySQL servers:
CREATE USER 'fabric'@'localhost' IDENTIFIED BY 'secret';
GRANT ALL ON *.* TO 'fabric'@'localhost';
In the preceding example, substitute a password of your choice (replace 'secret'). Also, if you are
going to run MySQL Fabric on a host other than where the managed MySQL servers reside, substitute the
'localhost' for the Fabric's host name.
8.2.3.2 Configuration File
The next step is to modify the configuration file with the user and password we defined in the previous
step (Section 8.2.3.1, “Create a MySQL User”). Open the configuration file located in /usr/local/etc/
mysql/fabric.cfg on Unix and Linux systems.
The following shows the content of the configuration file and the modifications necessary. In the
[storage] section, store the user and password of the user created in the previous step.
[DEFAULT]
prefix = /usr/local
sysconfdir = /usr/local/etc
logdir = /var/log
200
Starting and Stopping MySQL Fabric Nodes
[storage]
address = localhost:3306
user = fabric
password = secret
database = fabric
auth_plugin = mysql_native_password
connection_timeout = 6
connection_attempts = 6
connection_delay = 1
[servers]
user = fabric
password =
[protocol.xmlrpc]
address = localhost:32274
threads = 5
user = admin
password =
disable_authentication = no
realm = MySQL Fabric
ssl_ca =
ssl_cert =
ssl_key =
[executor]
executors = 5
[logging]
level = INFO
url = file:///var/log/fabric.log
[sharding]
mysqldump_program = /usr/bin/mysqldump
mysqlclient_program = /usr/bin/mysql
[statistics]
prune_time = 3600
[failure_tracking]
notifications = 300
notification_clients = 50
notification_interval = 60
failover_interval = 0
detections = 3
detection_interval = 6
detection_timeout = 1
prune_time = 3600
[connector]
ttl = 1
[client]
password =
Each section has one or more variables defined that provide key information to the MySQL Fabric system
libraries. You should not have to change any of these variables other than the user and password for
the backing store (in the storage section). For more information on the sections and variables in the
configuration file, see Section 8.6, “Configuring MySQL Fabric”.
8.2.4 Starting and Stopping MySQL Fabric Nodes
To start or stop MySQL Fabric nodes, use the mysqlfabric command (see Section 8.4, “The
mysqlfabric Utility”). This command requires that MySQL Fabric and Connector/Python be installed, and
assumes that you have set up the backing store.
201
Quick Start
The following command starts a MySQL Fabric node and should be run on one of the servers listed in the
[protocol.xmlrpc] section in the configuration file.
shell> mysqlfabric manage start
This command starts a MySQL Fabric node on the machine where it is executed and prints the log to
standard output. Thus, this is the machine where you installed the MySQL Fabric and Connector/Python
software and is also the machine listed in the configuration file [protocol.xmlrpc] section. To follow
the examples in the quick-start section, you must use localhost for the host name.
To put the MySQL Fabric node in the background, add the --daemonize option. However, this will divert
the log to the syslog file. While experimenting with MySQL Fabric, you may find it more convenient not to
use --daemonize so that the log is written to your terminal.
Use this command to stop a MySQL Fabric node:
shell> mysqlfabric manage stop
This command contacts the MySQL Fabric server running at the address mentioned in the
[protocol.xmlrpc] section and instructs it to stop.
8.3 Quick Start
This section demonstrates how to get started using MySQL Fabric. Two examples are included in this
section: one for using MySQL Fabric with replication to demonstrate how Fabric reduces the overhead of
directing reads and writes from applications, and another showing how Fabric makes using sharding much
easier.
If you have not installed and configured Fabric, please refer to the previous sections before proceeding
with the examples.
8.3.1 Example: Fabric and Replication
This section presents a quick start for using MySQL replication features in Fabric. To run this example, you
should have four server instances (running MySQL version 5.6.10 or later). The commands in this example
are executed on the same server host as the backing store (which happens to be the same host where
Fabric was installed). You must also have a Fabric node started on that host.
The replication features in Fabric focus on providing high availability. While these features continue to
evolve, the most unique feature of Fabric replication is the ability to use a Fabric-aware connector to
seamlessly direct reads and writes to the appropriate servers.
This redirection is achieved through the use of one of the central concepts in Fabric: a high-availability
group that uses a high-availability solution for providing resilience to failures. Currently, only asynchronous
primary backup replication is supported. As long as the primary is alive and running, it handles all write
operations. Secondaries replicate everything from the primary to stay up to date and might be used to
scale out read operations.
Creating a High-Availability Group
The first step consists of creating a group, here designated my_group. After doing so, you can add
servers to the group. In this case, we add three servers, localhost:13001, localhost:13002, and
localhost:13003.
Fabric accesses each added server using the user and password provided in the configuration file to
guarantee that they are alive and accessible. If these requirements are not fulfilled, the operation fails and
the server is not added to the group.
202
Example: Fabric and Replication
The following demonstrates the commands to execute these steps.
shell> mysqlfabric group create my_group
Procedure :
{ uuid
= d4e60ed4-fd36-4df6-8004-d034202c3698,
finished
= True,
success
= True,
return
= True,
activities =
}
shell> mysqlfabric group add my_group localhost:13001
Procedure :
{ uuid
= 6a33ed29-ccf8-437f-b436-daf07db7a1fc,
finished
= True,
success
= True,
return
= True,
activities =
}
shell> mysqlfabric group add my_group localhost:13002
Procedure :
{ uuid
= 6892bc49-3ab7-4bc2-891d-57c4a1577081,
finished
= True,
success
= True,
return
= True,
activities =
}
shell> mysqlfabric group add my_group localhost:13003
Procedure :
{ uuid
= 7943b27f-2da5-4dcf-a1a4-24aed8066bb4,
finished
= True,
success
= True,
return
= True,
activities =
}
To show information about the set of servers in a group, use this command:
shell> mysqlfabric group lookup_servers my_group
To get detailed information about the group health, use this command:
shell> mysqlfabric group health my_group
Promoting and Demoting Servers
After executing the steps in setting up a high-availability group, Fabric does not become aware of any
replication topology that was already in place. It is necessary to promote one of them to primary (that is,
master) and make the remaining servers secondaries (that is, slaves). To do so, execute this command:
shell> mysqlfabric group promote my_group
If there is a primary in a group, any server added subsequently is automatically set as secondary. Setting
a different server as primary can be done through the same command, which demotes the current primary
and elects a new one. If the current primary has failed, the same command (which can be triggered either
manually or automatically) can be used to elect a new one.
Note
A server marked as "faulty" cannot be promoted to a secondary or primary status
in one step. The faulty server status must first be changed to the "spare" status.
203
Example: Fabric and Replication
For example, use mysqlfabric server set_status <server-address>
spare.
Activating or Deactivating a Failure Detector
If the primary fails, you may want to automatically promote one of the secondaries as primary and redirect
the remaining secondaries to the new primary. To do this, execute the following command:
shell> mysqlfabric group activate my_group
If the failure detector discovers that a primary has crashed, it marks it as faulty and triggers a failover
routine. This is not done automatically because there may be users who prefer to use an external failure
detector or want to do things manually. To deactivate the failure detector, execute the following command:
shell> mysqlfabric group deactivate my_group
Executing Updates and Queries
Executing queries with a Fabric-aware connector is easy. The following example shows a section of code
designed to add employees and search for them. Notice that we simply import the fabric package from the
Connector/Python library and provide the Fabric connection parameters such as the location of the Fabric
node (as specified in the [protocol.xmlrpc] configuration file section) and user credentials.
import mysql.connector
from mysql.connector import fabric
def add_employee(conn, emp_no, first_name, last_name):
conn.set_property(group="my_group", mode=fabric.MODE_READWRITE)
cur = conn.cursor()
cur.execute("USE employees")
cur.execute(
"INSERT INTO employees VALUES (%s, %s, %s)",
(emp_no, first_name, last_name)
)
# We need to keep track of what we have executed in order to,
# at least, read our own updates from a slave.
cur.execute("SELECT @@global.gtid_executed")
for row in cur:
print "Transactions executed on the master", row[0]
return row[0]
def find_employee(conn, emp_no, gtid_executed):
conn.set_property(group="my_group", mode=fabric.MODE_READONLY)
cur = conn.cursor()
# Guarantee that a slave has applied our own updates before
# reading anything.
cur.execute(
"SELECT WAIT_UNTIL_SQL_THREAD_AFTER_GTIDS('%s', 0)" %
(gtid_executed, )
)
for row in cur:
print "Had to synchronize", row, "transactions."
cur.execute("USE employees")
cur.execute(
"SELECT first_name, last_name FROM employees "
"WHERE emp_no = %s", (emp_no, )
)
for row in cur:
print "Retrieved", row
# Address of the Fabric, not the host we are going to connect to.
204
Example: Fabric and Replication
conn = mysql.connector.connect(
fabric={"host" : "localhost", "port" : 32274,
"username": "admin", "password" : "adminpass"
},
user="webuser", password="webpass", autocommit=True
)
conn.set_property(group="my_group", mode=fabric.MODE_READWRITE)
cur = conn.cursor()
cur.execute("CREATE DATABASE IF NOT EXISTS employees")
cur.execute("USE employees")
cur.execute("DROP TABLE IF EXISTS employees")
cur.execute(
"CREATE TABLE employees ("
"
emp_no INT, "
"
first_name CHAR(40), "
"
last_name CHAR(40)"
")"
)
gtid_executed = add_employee(conn, 12, "John", "Doe")
find_employee(conn, 12, gtid_executed)
You can copy this code into a Python module named test_fabric_query.py and execute it with the
following command:
shell> python ./test_fabric_query.py
(u'John', u'Doe')
Group Maintenance
To find out which servers are in a group, use this command:
shell> mysqlfabric group lookup_servers my_group
Command :
{ success
= True
return
= [
{'status': 'PRIMARY', 'server_uuid': 'bbe6f7c1-b6c3-11e3-aaa2-58946b051f64',
'mode': 'READ_WRITE', 'weight': 1.0, 'address': 'localhost:13001'
},
{'status': 'SECONDARY', 'server_uuid': '0c9e67d0-8194-11e2-8a7c-f0def124dcc5',
'mode': 'READ_ONLY', 'weight': 1.0, 'address': 'localhost:13002'
},
{'status': 'SECONDARY', 'server_uuid': '0c67e5b1-8194-11e2-8a7c-f0def124dcc5',
'mode': 'READ_ONLY', 'weight': 1.0, 'address': 'localhost:13003'
},
]
activities =
}
In this example, there are three servers identified by their UUID values. The server running at
localhost:13001 is a primary, whereas the other servers are secondaries.
It is sometimes necessary to take secondaries offline for maintenance. However, before stopping a server,
it is important to remove it from the group to avoid having the Fabric failure detector trigger any action. This
can be done through the following commands. server_uuid should be replaced with a server UUID value
(a value of the form d2369bc9-2009-11e3-93c6-f0def14a00f4).
shell> mysqlfabric group remove my_group server_uuid
A primary cannot be removed from a group. To disable any primary in a group, execute this command:
205
Example: Fabric and Sharding
shell> mysqlfabric group demote my_group
If a group contains no servers, it is empty and can be destroyed (removed) with this command:
shell> mysqlfabric group destroy my_group
It is also possible to force removal of a nonempty group by specifying the parameter --force. This
command removes all servers from my_group and removes the group.
shell> mysqlfabric group destroy my_group --force
8.3.2 Example: Fabric and Sharding
This example explores sharding. The essence of a sharding solution that uses MySQL involves partitioning
the data into independent sets (independent MySQL Servers) and directing each client to the partition
(MySQL Server) that has the data the client wants to modify.
This architecture scales the write operations for a given dataset since resource demands are distributed
across the partitions (MySQL Servers) of the data set. Each partition is referred to as a shard.
8.3.2.1 Introduction to Sharding
The Fabric sharding implementation requires you to provide the sharding key explicitly while executing
a query. To define sharding over a set of tables using the sharding mechanism built into Fabric, it is
important to understand two concepts and how they relate.
Shard Mapping
A shard mapping serves to bring a database object (a database table) into the Fabric sharding system. The
mapping is a way of informing Fabric that we want a particular sharding scheme (range, hash, list, and so
forth.) to be used on a database table, using a value in a particular column. Create a shard mapping as
follows:
1. Define a shard mapping, to tell Fabric the kind of sharding mechanism to use.
2. Add a relation between the mapping and a database object, to register the database table and a
column in the table with the shard mapping.
Once these operations have been completed, we can describe how the shard mapping should split the
tables. This is done while creating the shards.
Shards
These are the partitions on the table. Since sharding is done on a database table, using an attribute
(column) in the table, the values in the column influence how the shards are created. To explain this
further, assume that we have two tables we wish to shard.
• employees
• Salary
Assume further that both tables are to be sharded by the employee ID that is part of their columns. Where
a row is placed is based on the value in the employee ID column. Hence, in a range-based sharding
scheme, a shard is nothing but a range of employee ID values.
206
Example: Fabric and Sharding
8.3.2.2 Sharding Scenario
In the sections that follow, we take the example of a employee table that must be sharded across three
MySQL groups. The following procedure lists the sequence of commands to run to perform each step.
Unsharded Data
Assume that we have an unsharded table named employees that contains Employee IDs, on which we
want to create the following shards. Each of these ranges is placed in one shard:
• 1-99999: shard-1
• 100000-199999: shard-2
• 200000-: shard-3
In addition to creating the ranges themselves (in a range based sharding scheme) we also must define
where this range of values should reside.
Starting Multiple MySQL Servers
MySQL Servers must be started on the directories that were copied. Assume that MySQL servers are
started on the following hosts and ports:
• localhost:13001
• localhost:13002
• localhost:13003
• localhost:13004
• localhost:13005
• localhost:13006
• localhost:13007
• localhost:13008
Creating the Groups in Fabric
A logical group in Fabric maps to a shard. So as a first step to sharding we must implement the Fabric
groups that store the shards. This can be done as follows:
shell> mysqlfabric group create group_id-1
shell> mysqlfabric group create group_id-2
shell> mysqlfabric group create group_id-3
The preceding commands create three high-availability groups: group_id-1, group_id-2, and
group_id-3. Each group will store a shard.
Then we must define a global group which is used to propagate schema updates to all tables in the
sharding setup and updates to global tables throughout the sharding scheme.
shell> mysqlfabric group create group_id-global
207
Example: Fabric and Sharding
Registering the Servers
The MySQL servers must be registered with the groups. Each group contains two servers.
13001, 13002 belong to group_id-1
shell> mysqlfabric group add group_id-1 localhost:13001
shell> mysqlfabric group add group_id-1 localhost:13002
13003, 13004 belong to group_id-2
shell> mysqlfabric group add group_id-2 localhost:13003
shell> mysqlfabric group add group_id-2 localhost:13004
13005, 13006 belong to group_id-3
shell> mysqlfabric group add group_id-3 localhost:13005
shell> mysqlfabric group add group_id-3 localhost:13006
13007, 13008 belong to group_id-global
shell> mysqlfabric group add group_id-global localhost:13007
shell> mysqlfabric group add group_id-global localhost:13008
Then promote one server to master in each group:
shell>
shell>
shell>
shell>
mysqlfabric
mysqlfabric
mysqlfabric
mysqlfabric
group
group
group
group
promote
promote
promote
promote
group_id-global
group_id-1
group_id-2
group_id-3
Define a Shard Mapping
When we define a shard mapping, we basically do three things:
1. Define the type of sharding scheme we want to use (RANGE, HASH, LIST, and so forth).
2. Define a global group that stores all the updates that must be propogated to all the shards that are part
of this sharding scheme.
3. We generate a unique shard mapping id to which we can later associate database objects (tables).
shell> mysqlfabric sharding create_definition RANGE group_id-global
Procedure:
{ uuid
= 195bca1e-c552-464b-b4e3-1fa15e9b49d5,
finished
= True,
success
= True,
return
= 1,
activities =
}
Add Tables to Defined Shard Mappings
Add the database table to the shard mapping defined previously.
shell> mysqlfabric sharding add_table 1 employees.employees emp_no
208
Example: Fabric and Sharding
Add Shards for the Registered Tables
shell> mysqlfabric sharding add_shard 1 "group_id-1/1, group_id-2/100000, group_id-2/200000" --state=ENABLE
Executing Updates and Queries
Now you can write some example code for querying the sharded system.
import random
import mysql.connector
from mysql.connector import fabric
def prepare_synchronization(cur):
# We need to keep track of what we have executed so far to guarantee
# that the employees.employees table exists at all shards.
gtid_executed = None
cur.execute("SELECT @@global.gtid_executed")
for row in cur:
gtid_executed = row[0]
return gtid_executed
def synchronize(cur, gtid_executed):
# Guarantee that a slave has created the employees.employees table
# before reading anything.
cur.execute(
"SELECT WAIT_UNTIL_SQL_THREAD_AFTER_GTIDS('%s', 0)" %
(gtid_executed, )
)
cur.fetchall()
def add_employee(conn, emp_no, first_name, last_name, gtid_executed):
conn.set_property(tables=["employees.employees"], key=emp_no,
mode=fabric.MODE_READWRITE)
cur = conn.cursor()
synchronize(cur, gtid_executed)
cur.execute("USE employees")
cur.execute(
"INSERT INTO employees VALUES (%s, %s, %s)",
(emp_no, first_name, last_name)
)
def find_employee(conn, emp_no, gtid_executed):
conn.set_property(tables=["employees.employees"], key=emp_no,
mode=fabric.MODE_READONLY)
cur = conn.cursor()
synchronize(cur, gtid_executed)
cur.execute("USE employees")
for row in cur:
print "Had to synchronize", row, "transactions."
cur.execute(
"SELECT first_name, last_name FROM employees "
"WHERE emp_no = %s", (emp_no, )
)
for row in cur:
print row
def pick_shard_key():
shard = random.randint(0, 2)
shard_range = shard * 100000
shard_range = shard_range if shard != 0 else shard_range + 1
shift_within_shard = random.randint(0, 99999)
return shard_range + shift_within_shard
# Address of the Fabric, not the host we are going to connect to.
209
Example: Fabric and Sharding
conn = mysql.connector.connect(
fabric={"host" : "localhost", "port" : 32274,
"username": "admin", "password" : "adminpass"
},
user="webuser", password="webpass", autocommit=True
)
conn.set_property(tables=["employees.employees"], scope=fabric.SCOPE_GLOBAL,
mode=fabric.MODE_READWRITE)
cur = conn.cursor()
cur.execute("CREATE DATABASE IF NOT EXISTS employees")
cur.execute("USE employees")
cur.execute("DROP TABLE IF EXISTS employees")
cur.execute(
"CREATE TABLE employees ("
"
emp_no INT, "
"
first_name CHAR(40), "
"
last_name CHAR(40)"
")"
)
gtid_executed = prepare_synchronization(cur)
conn.set_property(scope=fabric.SCOPE_LOCAL)
first_names = ["John", "Buffalo", "Michael", "Kate", "Deep", "Genesis"]
last_names = ["Doe", "Bill", "Jackson", "Bush", "Purple"]
list_emp_no = []
for count in range(10):
emp_no = pick_shard_key()
list_emp_no.append(emp_no)
add_employee(conn, emp_no,
first_names[emp_no % len(first_names)],
last_names[emp_no % len(last_names)],
gtid_executed
)
for emp_no in list_emp_no:
find_employee(conn, emp_no, gtid_executed)
Shard Move
If the current set of servers for a shard is not powerful enough, we can move the shard to a more powerful
server set.
The shard-move functionality can be used to move a shard from one group to another. These are the steps
necessary to move a shard.
1. Set up the required group or groups.
shell>
shell>
shell>
shell>
mysqlfabric
mysqlfabric
mysqlfabric
mysqlfabric
group
group
group
group
create group_id-MOVE
add group_id-MOVE localhost:13009
add group_id-MOVE localhost:13010
promote group_id-MOVE
2. Execute the shard move.
shell> mysqlfabric sharding move_shard 1 group_id-MOVE
3. Verify that the move has happened.
shell> mysqlfabric sharding lookup_servers employees.employees 4
210
The mysqlfabric Utility
Shard Split
If the shard becomes overloaded, we may need to split the shard into another group. The shard-split
feature can be used to split the data in a given shard into another shard. The following demonstrates how
to do this.
1. Set up the required group or groups.
shell>
shell>
shell>
shell>
mysqlfabric
mysqlfabric
mysqlfabric
mysqlfabric
group
group
group
group
create group_id-SPLIT
add group_id-SPLIT localhost:13011
add group_id-SPLIT localhost:13012
promote group_id-SPLIT
2. Execute the shard split.
shell> mysqlfabric sharding split_shard 2 group_id-SPLIT --split_value=150
3. Verify that the shard Split happened.
shell> mysqlfabric sharding lookup_servers employees.employees 152
shell> mysqlfabric sharding lookup_servers employees.employees 103
8.4 The mysqlfabric Utility
This section describes the mysqlfabric utility including examples of all commands.
Fabric commands are organized in categories that include group, dump, manage, server, role, user, threat,
sharding, and event. We explain each group and its associated commands.
8.4.1 Getting Help
• mysqlfabric help: Show syntax information and the help commands.
• mysqlfabric help commands: List the available commands and their description.
• mysqlfabric help groups: List the available groups.
• mysqlfabric help [group] [command]: Provide detailed information on a command.
shell> mysqlfabric help group create
group create group_id [--description=NONE] [--synchronous]
Create a group.
8.4.2 Group Commands
The group commands are used to define, modify, and control groups.
• group activate: Activate failure detector for server(s) in a group. By default the failure detector is
deactivated.
• group deactivate: Deactivate the failure detector for server(s) in a group.
• group create: Create a group.
211
Manage Commands
• group remove: Remove a server from a group.
• group add: Add a server to a group.
• group lookup_servers: Return information on existing servers in a group.
• group health: Check whether any server within a group has failed and report health information.
• group destroy: Remove a group.
• group demote: Demote the current master if there is one.
• group promote: Promote a server to master.
• group lookup_groups: Return information on existing groups.
• group description: Update a group description.
8.4.3 Manage Commands
The manage commands are used to control Fabric nodes.
• manage teardown: Tear down Fabric Storage System.
• manage stop: Stop the Fabric server.
• manage setup: Set up Fabric Storage System.
• manage ping: Check whether Fabric server is running.
• manage start: Start the Fabric server.
• manage logging_level: Set the logging level for module. This is only mainly for debugging.
8.4.4 Server Commands
The server commands are used to get information about servers and set their properties, namely status,
mode and weight.
• server set_weight: Set a server's weight, which determines its likelihood of being chosen to process
requests or replace a failed master. The value must be greater than 0.0 and lower or equal to 1.0.
• server lookup_uuid: Return a server's UUID value.
• server set_mode: Set a server's mode, which determines whether it can process read_only,
read_write, or both transaction types. It can also be set to offline meaning that the server will not process
any kind of user's request.
• server set_status: Set a server's status, which determines whether it is primary, secondary, spare,
or faulty.
8.4.5 Sharding Commands
The sharding commands are used to define, modify, and control sharding.
• sharding move_shard: Move the shard represented by the shard_id to the destination group.
• sharding lookup_servers: Lookup a shard based on the give sharding key.
212
Event Commands
• sharding disable_shard: Disable a shard.
• sharding remove_definition: Remove the shard mapping definition.
• sharding list_tables: Return all the shard mapping definitions of a particular sharding type.
• sharding add_table: Add a table to a shard mapping definition.
• sharding add_shard: Add a shard.
• sharding list_definitions: Lists all the shard mapping definitions.
• sharding enable_shard: Enable a shard.
• sharding remove_shard: Remove a shard.
• sharding prune_shard: Given the table name, prune the table according to the defined sharding
specification for the table.
• sharding lookup_table: Fetch the shard specification mapping for the given table.
• sharding split_shard: Split the shard represented by the shard_id into the destination group.
• sharding create_definition: Create a shard mapping definition.
• sharding remove_table: Remove table from the shard mapping definition.
8.4.6 Event Commands
The event commands are used to define events for tailoring the Fabric system to your needs for controlling
applications.
• event trigger: Trigger an event.
• event wait_for_procedures: Wait until procedures finish executing. Procedures are identified
through their UUID in a list and separated by comma.
8.4.7 Dump Commands
The dump commands are designed to be used by the connectors to retrieve information on shards, highavailability groups and their servers.
• dump shard_maps: Return information about all shard mappings matching any of the provided
patterns.
• dump shard_index: Return information about the index for all mappings matching any of the patterns
provided.
• dump servers: Return information about all servers.
• dump sharding_information: Return all the sharding information about the tables passed as
patterns.
• dump shard_tables: Return information about all tables belonging to mappings matching any of the
provided patterns.
• dump fabric_nodes: Return a list of Fabric nodes.
213
Backing Store
8.5 Backing Store
The backing store feature requires a MySQL instance. This server should be the same version as your
other servers and MySQL version 5.6.10 or later. This section explains how to set up the backing store and
provides information about some of the tables created.
To set up the backing store, use the mysqlfabric command. The --param options specify the user
and password we created in Section 8.2.3.1, “Create a MySQL User” so that the utility can connect to
the backing store and create the database and tables. We show the resulting tables in the new fabric
database below.
shell> mysqlfabric manage setup --param=storage.user=fabric --param=storage.password=secret
[INFO] 1379444563.457977 - MainThread - Initializing persister:
user (fabric), server (localhost:3306), database (fabric).
shell> mysqlshow -ufabric -psecret fabric
+-------------------+
|
Tables
|
+-------------------+
| checkpoints
|
| error_log
|
| group_replication |
| groups
|
| permissions
|
| role_permissions |
| roles
|
| servers
|
| shard_maps
|
| shard_ranges
|
| shard_tables
|
| shards
|
| user_roles
|
| users
|
+-------------------+
Note
The tables described here are subject to change in future versions of Fabric.
8.5.1 Backing Store Tables
The checkpoints table stores information on procedures' executions and is used to safely resume
executing a procedure after a crash and recovery:
Table 8.1 checkpoints
Column
Type
Comment
proc_uuid
varchar(40)
The procedure's unique identification
lockable_objects
blob
Set of objects locked by the procedure
job_uuid
varchar(60)
The job's unique identification
sequence
int(11)
The job's sequence in the execution
action_fqn
text
Reference to the fully qualified name of
the function to be executed on behalf of
the job
param_args
blob
Positional arguments to the job's function
param_kwargs
blob
Keyword arguments to the job's function
214
Backing Store Tables
Column
Type
Comment
started
double(16,6)
When the job started
finished
double(16,6)
When the job finished
The error_log table contains information on servers' errors reported.
Table 8.2 error_log
Column
Type
Comment
server_uuid
varchar(40)
The server_uuid value from the server
that has raised an error
reported
timestamp(6)
When the error was reported
reporter
varchar(64)
Who reported the error: IP address, host
name
error
text
Error message or code reported
The group_replication table defines replication among global groups and groups used in shards.
They are used primarily for shard splitting, moving, and global updates.
Table 8.3 group_replication
Column
Type
master_group_id
varchar(64)
slave_group_id
varchar(64)
The groups table contains information about the groups being managed.
Table 8.4 groups
Column
Type
Comment
group_id
varchar(64)
The identifier for the group
description
varchar(256)
A description of the group
master_uuid
varchar(40)
The server_uuid value from the
master server
master_defined
timestamp(6)
When the current master was defined.
status
bit(1)
1 if the group is being monitored, 0
otherwise
The permissions table contains information on rights to access the different sub-systems in Fabric.
Currently, a core sub-system is formally defined:
Table 8.5 permissions
Column
Type
Comment
permission_id
int(10) unsigned
Permission's ID
subsystem
varchar(60)
Sub-system identification
component
varchar(60)
Sub-system component
function
varchar(60)
Sub-system function. Currently, this is not
used
description
varchar(1000)
Description
215
Backing Store Tables
The roles table contains information on possible roles a user may have and by consequence his/her
permissions:
Table 8.6 roles
Column
Type
Comment
role_id
int(10) unsigned
Roles' ID
name
varchar(80)
Role's name
description
varchar(1000)
Role's description
The role_permissions table associates roles and permissions:
Table 8.7 role_permissions
Column
Type
Comment
role_id
int(10) unsigned
Roles' ID
permission_id
int(10) unsigned
Permission's ID
The servers table contains a list of all servers managed by Fabric.
Table 8.8 servers
Column
Type
Comment
server_uuid
varchar(40)
UUID of the server
server_address
varchar(128)
Address of the server
mode
int(11)
Mode of the server (OFFLINE,
READ_ONLY, WRITE_ONLY,
READ_WRITE)
status
int(11)
Status of the server (FAULTY, SPARE,
SECONDARY, PRIMARY)
weight
float
Likelihood of receiving a request
group_id
varchar(64)
Group the server belongs to
The shard_maps table contains the names and properties of the shard maps.
Table 8.9 shard_maps
Column
Type
Comment
shard_mapping_id
int(11)
Shard map identifier
type_name
enum('RANGE','HASH')
Shard map type
global_group
varchar(64)
Name of the global group (likely to go
away in the next revision)
The shard_ranges table is the sharding index and is used to map a sharding key to a shard.
Table 8.10 shard_ranges
Column
Type
Comment
shard_mapping_id
int(11)
Shard map identifier
216
Protecting the Backing Store
Column
Type
Comment
lower_bound
varbinary(16)
Lower bound for the range encoded as a
binary string
shard_id
int(11)
Shard identifier (a number)
The shard_tables table lists all tables that are sharded and what sharding map each belongs to. It also
names the column by which it is sharded.
Table 8.11 shard_tables
Column
Type
Comment
shard_mapping_id
int(11)
Shard map identifier
table_name
varchar(64)
Fully qualified table name
column_name
varchar(64)
Column name that is the sharding key
The shards table names the groups where each shard identifier is stored.
Table 8.12 shards
Column
Type
Comment
shard_id
int(11)
Shard identifier
group_id
varchar(64)
Group identifier (a dotted-name)
state
enum('DISABLED','ENABLED') Status of the shard; DISABLED means
that it is not available for use
The users table identifies the users that might have permission to access the functions in the different
sub-systems:
Table 8.13 users
Column
Type
Comment
user_id
int(10) unsigned
User's internal ID
username
varchar(100)
User's name
protocol
varchar(200)
Protocol that the user is allowed to use to
access Fabric and its sub-systems
password
varchar(128)
Hashed user's password
8.5.2 Protecting the Backing Store
The backing store is very important to Fabric. You should take steps to ensure the database is backed up
and the server where it resides is stable and well maintained. For the purposes of backup, it is sufficient to
make periodic backups using either the mysqldump client or mysqldbexport utility in MySQL Utilities.
8.6 Configuring MySQL Fabric
The MySQL Fabric configuration file contains all the information necessary to run the MySQL Fabric utility.
In addition, it serves as a configuration file for the utilities from within MySQL Fabric. For example, the
[client] section is used to pass the password to the mysql client.
Each section has one or more variables defined that provide key information to the MySQL Fabric system
libraries.
217
MySQL Fabric configuration file location
8.6.1 MySQL Fabric configuration file location
The location of the MySQL Fabric configuration file varies depending on the operating system it is installed
on and how you installed it. If you are using the pre-built packages from http://dev.mysql.com/downloads/
tools/utilities/ the default configuration file locations are as follows:
Table 8.14 MySQL Fabric configuration file location
Platform
Package
Location
Microsoft Windows
mysql-utilities-1.4.4-win32.msi
Ubuntu Linux 12.04
mysql/etc/mysql/fabric.cfg
utilities_1.4.4-1ubuntu12.04_all.deb
Debian Linux 6.0
mysqlutilities_1.4.4-1debian6.0_all.deb
/etc/mysql/fabric.cfg
Red Hat Enterprise Linux 6 /
Oracle Linux 6
mysqlutilities-1.4.3-1.el6.noarch.rpm
/etc/mysql/fabric.cfg
8.6.2 Section DEFAULT
The DEFAULT section contains information on the installation paths for MySQL Fabric. This section is
generated as part of the installation and should normally not be modified.
prefix
The installation prefix used when installing the mysql.fabric package
and the binaries.
sysconfdir
The location of the system configuration files. Normally located in
the etc directory under the directory given in prefix, but in some
situations this might be different.
logdir
Configures the directory where log files are located by default. Normally,
the logging URL contains the absolute path, but in the event that the
path is relative, it is relative to this directory.
8.6.3 Section storage
This section contains information that the MySQL Fabric node uses for the connection to the backing store.
For more information on the backing store, see Section 8.5, “Backing Store”.
address
This is the address of the backing store in the form host:port. The
port is optional and if not provided, defaults to 3306.
user
User name to use when connecting to the backing store.
password
The password to use when connecting to the backing store. If no
password option is in the configuration file, a password is required
on the terminal when the MySQL Fabric node is started. Although it
is possible to set an empty password by not providing a value to the
option, it is not recommended.
database
The database where the tables containing information about the MySQL
Fabric farm is stored, typically fabric.
auth_plugin
The authentication plugin to use when connecting to the backing store.
This option is passed to the connector when connecting to the backing
218
Section servers
store. For more information on authentication plugins, see Connector/
Python Connection Arguments.
connection_timeout
Timeout for the connection to the backing store, in seconds. This option
is passed to the connector when connecting to the backing store. This
is the maximum amount of time that MySQL Fabric waits for access to
the backing store to complete before aborting. For more information on
authentication plugins, see Connector/Python Connection Arguments.
connection_attempts
The number of attempts to reconnect to the backing store before giving
up. This is the maximum number of times MySQL Fabric attempts to
create a connection to the backing store before aborting. The default is
0 retries.
connection_delay
The delay between attempts to connect to the backing store in seconds.
The default is 0 seconds.
8.6.4 Section servers
This section contains information that MySQL Fabric uses to connect to the servers being managed.
user
User name to use when connecting to the managed server.
password
Password to use when connecting to the managed servers.
8.6.5 Section protocol.xmlrpc
This section contains information about how the client connects to a MySQL Fabric node and configuration
parameters for the XML-RPC protocol on the server.
address
Host and port of XML-RPC server. The host is only used by the client
when connecting to the MySQL Fabric node, but the port is used by the
server when starting the protocol server and by the client when reading
how to connect to the XML-RPC server. The port number is typically
32274, and the host is typically localhost.
threads
Number of threads that the XML-RPC server uses for processing
requests. This determines the number of concurrent requests that
MySQL Fabric accepts.
user
User that the client uses to connect to the XML-RPC server.
password
Password used when the client connects to the server. If no password is
provided, the client requests a password on the command-line.
disable_authentication
Whether to disable authentication or not. Disabling authentication
can be useful when experimenting in a closed environment, it is not
recommended for normal usage. Alternatives are yes or no and are
case-insensitive.
realm
The realm (as defined in RFC 2617) the XML-RPC server identifies as
when authenticating.
ssl_ca
Path to a file containing a list of trusted SSL certification authorities
(CAs).
ssl_cert
The name of the SSL certificate file to use for establishing a secure
connection.
219
Section executor
ssl_key
The name of the SSL key file to use for establishing a secure
connection.
8.6.6 Section executor
This section contains parameters to configure the executor. The executor executes procedures in a serial
order, which guarantees that requests do not conflict. The requests received are mapped to procedures
which can be executed directly or scheduled through the executor. Procedures scheduled through the
executor are processed within the context of threads spawned by the executor. Usually, read operations
are immediately executed by the XML-RPC session thread and write operations are scheduled and
executed through the executor.
executors
The number of executor threads that the executor uses when
processing requests.
8.6.7 Section logging
MySQL Fabric logs information about its activities to the standard output when started as a regular
process. However, when started as a daemon, it writes information to a file configured by the the option url
.
level
The log level to use when generating the log. Acceptable values are
CRITICAL, ERROR, WARNING, INFO, and DEBUG. The default is INFO.
url
The URL to use for logging. Supported protocols are currently file and
syslog. The file protocol creates a rotating file handler, while the
syslog protocol logs messages using the system logger syslogd .
The file handler accepts either a relative path or an absolute path. If a
relative path is provided, it is relative to logdir .
The syslog handler accepts either a path (for example syslog:///
dev/log) or a hostname and an optional port (for example,
syslog://localhost:555, and syslog://my.example.com). If
no port is provided, it defaults to 541, which is the default port for the
syslog daemon.
8.6.8 Section sharding
To perform operations such as moving and splitting shards, MySQL Fabric relies on the mysqldump and
mysql client programs. These programs can be installed in different locations and if they are not in the
path for the MySQL Fabric node, this section configures where they can be found.
mysqldump_program
Path to the mysqldump program.
mysqlclient_program
Path to the mysql program.
8.6.9 Section statistics
Connectors and other external entities log any errors while accessing servers so that MySQL Fabric can
monitor server health and act accordingly. For example, MySQL Fabric promotes a new master after
receiving notifications from the number of clients configured in notification_clients) within
the time interval configured in notification_interval. If a server is considered unstable but it is not
a master, it is simply marked as faulty. To avoid making the system unstable, a new master can only be
automatically promoted after the failover_interval has been elapsed since the last promotion. In
220
Section failure_tracking
order to ease the adoption of MySQL Fabric, a built-in failure detector is provided. If the failure detector
is enabled to monitor a group, a new master is promoted after 3 failed successive attempts to access the
current master within the time interval configured in failover_interval. The failure detection routine
tries to connect to servers in a group and uses the value configured in detection_timeout as timeout.
prune_time
How often the internal event log is pruned, in seconds and also the age
of events in the event log that is used to present statistics.
notifications
Number of issues before the server is considered unstable.
notification_clients
Number of different sources that should report issues on a server before
it is considered unstable.
notification_interval
Amount of time in seconds that is used when deciding if a server is
unstable. Issues older than this are not considered when deciding.
failover_interval
Minimum time in seconds between subsequent automatic promotions.
This parameter is used to prevent the system entering a sequence of
promotions that could disable the system.
detections
Number of successive failed attempts to contact the server after which
the built-in failure detector considers the server unstable.
detection_timeout
Timeout in seconds used when contacting the server. If the server does
not respond within this time period, it is recorded as a failed attempt to
contact the server.
prune_time
Maximum age in seconds for reported issues in the error log. Issues
older than this are removed from the error log.
8.6.10 Section failure_tracking
This section contains parameters for the failure management system.
notifications
The notification threshold. If more than this number of notifications
arrive in the notification interval and the number of distinct notification
clients are over the notification client threshold, the server is considered
dead and failover is triggered.
notification_clients
The number of distinct notification clients that need to report. If more
than this number of distinct notification clients are over the notification
client threshold and the number of notifications above the notification
threshold arrive in the notification interval, the server is considered dead
and failover is triggered.
notification_interval
The notification interval in seconds. Only notifications arriving within this
time frame can trigger a failover.
failover_interval
The minimum interval between failover operations in seconds. In
order to avoid making the system unstable, failover operations are
not triggered unless at least this much time has expired since the last
failover.
detections
This parameter is for the built-in failure detector. If more than this
number of failures to contact the server occurs during the detection
interval, the server is considered unstable and a failover is triggered.
221
Section connector
detection_interval
This parameter configures the detection interval for the built-in failure
detector, in seconds.
detection_timeout
This parameter configures the detection timeout used when attempting
to contact the servers in the group.
prune_time
This is the maximum age of events in the failure detector's error log and
is also the interval for how often the error log is pruned.
8.6.11 Section connector
Connectors that are MySQL Fabric-aware contact MySQL Fabric to fetch information on groups, shards,
and servers, and then cache the results locally for a time period to improve performance. This section
contains configuration parameters passed to the connectors.
ttl
The Time To Live (TTL), measured in seconds, is passed together with
other information to the connector. This is used by the connector to
invalidate the caches, and reload them from a MySQL Fabric node, after
the TTL has expired.
8.6.12 Section client
This section is used by the mysql client when called from MySQL Fabric and is not used MySQL Fabric.
password
Password used when connecting to the servers. Must be the same as
the password in password .
8.7 MySQL Fabric Frequently Asked Questions
FAQ Categories
• General Questions [222]
• High-Availability Questions [224]
• Sharding Questions [226]
• Consistency Questions [228]
General
Questions
• 8.7.1: [223] What is MySQL Fabric?
• 8.7.2: [223] Is it necessary to use a MySQL Fabric-specific Storage Engine?
• 8.7.3: [223] What versions of MySQL are supported by MySQL Fabric?
• 8.7.4: [223] What connectors support MySQL Fabric?
• 8.7.5: [223] Are transactions ACID?
• 8.7.6: [223] How many machines are needed in order to use MySQL Fabric?
• 8.7.7: [223] Do I need to run an agent for each MySQL Server?
• 8.7.8: [223] What interface is available to manage MySQL Fabric and its server farm?
222
MySQL Fabric Frequently Asked Questions
• 8.7.9: [224] How does MySQL Fabric Compare with MySQL Cluster?
• 8.7.10: [224] How is MySQL Fabric licensed?
• 8.7.11: [224] What if MySQL Fabric doesn't do what I need it to?
Questions and Answers
8.7.1: What is MySQL Fabric?
MySQL is a framework for managing groups of MySQL Servers and using those servers to provide
services. It is designed to be extensible so that over time many different services can be added. In the
current version the services provided are High Availability (built on top of MySQL Replication) and scaleout (by sharding the data).
MySQL Fabric is implemented as a MySQL Fabric node/process (which performs management functions)
and Fabric-aware connectors that are able to route queries and transactions directly to the most
appropriate MySQL Server. The MySQL Fabric node stores state and routing information in its State Store
(which is a MySQL database).
8.7.2: Is it necessary to use a MySQL Fabric-specific Storage Engine?
No. The MySQL Servers that are being managed by MySQL Fabric continue to use InnoDB (and in the
future NDB/MySQL Cluster may also be supported).
8.7.3: What versions of MySQL are supported by MySQL Fabric?
Currently MySQL 5.6. New MySQL releases will be fully supported as they reach General Availability
status.
8.7.4: What connectors support MySQL Fabric?
Currently PHP, Python & Java. In addition the Hibernate and Doctrine Object-Relational Mappings
frameworks are also supported. New connectors will be added over time.
8.7.5: Are transactions ACID?
Yes. Because each transaction is local to a single MySQL Server, all of the ACID behavior of the InnoDB
storage engine is experienced.
8.7.6: How many machines are needed in order to use MySQL Fabric?
For development, the MySQL Fabric node and all of the managed MySQL Servers can be hosted on a
single machine.
For deployment, the minimal HA configuration would need 3 or more machines:
• 2 to host MySQL Servers
• 1 to host the MySQL Fabric process (that machine could also be running application code).
8.7.7: Do I need to run an agent for each MySQL Server?
No. The MySQL Fabric node is the only additional process and does not need to be co-located with any of
the MySQL Servers that are being managed.
8.7.8: What interface is available to manage MySQL Fabric and its server farm?
223
MySQL Fabric Frequently Asked Questions
A Command Line Interface (CLI) is provided as well as an XML/RPC API that can be used by connectors
and/or applications to make management changes or retrieve the routing information - in this way, an
application could use MySQL Fabric without a Fabric-aware connector.
8.7.9: How does MySQL Fabric Compare with MySQL Cluster?
MySQL Cluster is a mature, well proven solution for providing very high levels of availability and scaling out
of both reads and writes. Some of the main extra capabilities that MySQL Cluster has over MySQL Fabric
are:
• Synchronous replication
• Faster (automated) fail-over (resulting in higher availability)
• Transparent sharding
• Cross-shard joins and Foreign Keys
• In-memory, real-time performance
MySQL Fabric on the other hand, allows the application to stick with the InnoDB storage engine which is
better suited to many applications.
8.7.10: How is MySQL Fabric licensed?
MySQL Fabric is available for use under the GPL v2 Open Source license or it can be commercially
licensed as part of MySQL Enterprise Edition or MySQL Cluster Carrier Grade Edition.
8.7.11: What if MySQL Fabric doesn't do what I need it to?
There are a number of options:
• Raise feature requests or bug reports
• Modify the code to customize the current services. MySQL Fabric is written in Python and is designed to
be easy to extend.
• Implement new modules that bind into the MySQL Fabric framework to implement new services.
High-Availability
Questions
• 8.7.1: [225] How is High Availability achieved with MySQL Fabric?
• 8.7.2: [225] How are MySQL Server failures detected?
• 8.7.3: [225] What happens when the primary (master) MySQL Server fails?
• 8.7.4: [225] Does my application need to do anything as part of the failover?
• 8.7.5: [225] Is a recovered MySQL Server automatically put back into service?
• 8.7.6: [225] Does MySQL Fabric work with semisynchronous replication?
• 8.7.7: [225] Do I have to use MySQL Replication for implementing HA?
• 8.7.8: [226] Is the MySQL Fabric node itself fault tolerant? What happens when the MySQL Fabric
node is not available?
224
MySQL Fabric Frequently Asked Questions
Questions and Answers
8.7.1: How is High Availability achieved with MySQL Fabric?
MySQL Fabric manages one or more HA-Groups where each HA-Group contains one or more MySQL
Servers. For High Availability, a HA Group contains a Primary and one or more Secondary MySQL
Servers. The Primary is currently a MySQL Replication master which replicates to each of the secondaries
(MySQL Replication slaves) within the group.
By default, the Fabric-aware connectors route writes to the Primary and load balance reads across the
available secondaries.
Should the Primary fail, MySQL Fabric will promote one of the Secondaries to be the new Primary
(automatically promoting the MySQL Server to be the replication Master and updating the routing
performed by the Fabric-aware connectors).
8.7.2: How are MySQL Server failures detected?
The MySQL Fabric node has a built-in monitoring function that checks on the status of the master. In
addition, the Fabric-aware connectors report to MySQL Fabric when the Primary becomes unavailable
to them. The administrator can configure how many problems need to be reported (and over what time
period) before the failover is initiated.
8.7.3: What happens when the primary (master) MySQL Server fails?
The MySQL Fabric node will orchestrate the promotion of one of the Secondaries to be the new Primary.
This involves two main actions:
• Promoting the Secondary to be the replication master (and any other surviving Secondaries will become
slaves to the new master)
• Updating the routing information such that Fabric-aware connectors will no longer send any queries or
transactions to the failed Primary and instead send all writes to the new Primary.
8.7.4: Does my application need to do anything as part of the failover?
No. The failover is transparent to the application as the Fabric-aware connectors will automatically start
routing transactions and queries based on the new server topology. The application does need to handle
the failure of a number of transactions when the Primary has failed but before the new Primary is in place
but this should be considered part of normal MySQL error handling.
8.7.5: Is a recovered MySQL Server automatically put back into service?
No, the user must explicitly invoke MySQL Fabric to return a recovered MySQL Server to a HA Group. This
is intentional so that the user can ensure that the server really is ready to take on an active role again.
8.7.6: Does MySQL Fabric work with semisynchronous replication?
In this version, MySQL Fabric sets up the HA Group to use asynchronous replication. If the user prefers
to use semisynchronous replication then they can activate it manually after MySQL Fabric has created the
replication relationships.
8.7.7: Do I have to use MySQL Replication for implementing HA?
At present, HA Groups are formed using MySQL Replication; future releases may offer further options such
as MySQL Cluster or DRBD.
225
MySQL Fabric Frequently Asked Questions
8.7.8: Is the MySQL Fabric node itself fault tolerant? What happens when the MySQL Fabric node
is not available?
There is currently only a single instance of the MySQL Fabric node. If that process should fail then it can
be restarted on that or another machine and the state and routing information read from the existing state
store (a MySQL database) or a replicated copy of the state store.
While the MySQL Fabric node is unavailable, Fabric-aware connectors continue to route queries and
transactions to the correct MySQL Servers based on their cached copies of the routing data. However,
should a Primary fail, automated failover will not happen until the MySQL Fabric node is returned to service
and so it's important to recover the process as quickly as possible.
Sharding
Questions
• 8.7.1: [226] How is scaling achieved with MySQL Fabric?
• 8.7.2: [227] Does scaling apply to both reads and writes?
• 8.7.3: [227] What if I have table data that needs to be in every shard?
• 8.7.4: [227] How many MySQL Servers can I scale to?
• 8.7.5: [227] Can MySQL Fabric introduce contention or deadlock?
• 8.7.6: [227] What happens when my data set or usage grows and a shard grows too big?
• 8.7.7: [227] Is there extra latency when using MySQL Fabric?
• 8.7.8: [227] Why does MySQL Fabric route using connector logic rather than via a proxy?
• 8.7.9: [227] What is the difference between a shard key and a shard identifier?
• 8.7.10: [228] Does my application need to change when a shard is moved to a different MySQL Server
or split into multiple shards?
• 8.7.11: [228] Is it possible to perform cross-shard unions or joins?
• 8.7.12: [228] Is the routing of queries and transactions transparent to my application?
Questions and Answers
8.7.1: How is scaling achieved with MySQL Fabric?
Horizontal scaling is achieved by partitioning (sharding) the data from a table across multiple MySQL
Servers or HA Groups. In that way, each server or group will contain a subset of the rows from a specific
table.
The user specifies what column from the table(s) should be used as the shard key as well as indicating
whether to use a HASH or RANGE partitioning scheme for that key; if using RANGE based sharding
then the user should also specify which ranges map to which shards. Currently the sharding key must be
numeric.
When accessing the database, the application specifies the sharding key which the Fabric-aware
connector will then map to a shard ID (using the mapping data it has retrieved and cached from MySQL
Fabric) and route the query or transaction to the correct MySQL Server instance.
226
MySQL Fabric Frequently Asked Questions
Within a HA group, the Fabric-aware connector is able to direct writes to the Primary and then spread the
read queries across all available Secondaries (and optionally the Primary).
8.7.2: Does scaling apply to both reads and writes?
Yes. Both reads and writes scale linearly as more HA groups are added. Reads can also be scaled
independently by adding more Secondary servers to a HA Group.
8.7.3: What if I have table data that needs to be in every shard?
A special group can be created called the Global Group which holds the Global Tables. Any table whose
data should appear in its entirety in all HA Groups should be handled as a Global Table. For a Global
Table, all writes are sent to the Global Group and then replicated to all of the HA Groups. An example
might be the department table from an employee database - the contents of the department table being
small enough to be stored in every server and where that data could be referenced by any record from one
of the sharded employee tables.
Similarly, any schema changes would be sent to the Global Group where they can be replicated to all of
the HA Groups.
8.7.4: How many MySQL Servers can I scale to?
There is no limit—either to the number of HA Groups or the number of servers within a HA group.
8.7.5: Can MySQL Fabric introduce contention or deadlock?
No. A single transaction can only access data from a single shard (+ Global Table data) and all writes are
sent to the Primary server within that shard's HA Group. In other words, all writes to a specific row will be
handled by the same MySQL Server and so InnoDB's row-based locking will work as normal.
8.7.6: What happens when my data set or usage grows and a shard grows too big?
MySQL Fabric provides the ability to either:
• Move a shard to a new HA group containing larger or more powerful servers
• Split an existing shard into two shards where the new shard will be stored in a new HA Group. In the
future, different levels of granularity may be supported for shard splitting.
8.7.7: Is there extra latency when using MySQL Fabric?
No. Because the routing is handled within the connector there is no need for any extra "hops" to route the
request via a proxy process.
8.7.8: Why does MySQL Fabric route using connector logic rather than via a proxy?
One reason is to reduce complexity; rather than having a pool of proxy processes (a single proxy would
represent a single point of failure) the logic is just part of each connector instance. The second reason is
to avoid the latency involved in all operations being diverted via a proxy process (which is likely to be an a
different machine).
8.7.9: What is the difference between a shard key and a shard identifier?
The shard key is simply the value of a column from one or more tables. The shard key does not change if a
row is migrated from one shard or server to another. The shard key is mapped to a shard id (using either a
HASH or RANGE based mapping scheme); the shard id represents the shard itself.
227
Using Connector/Python with MySQL Fabric
As an example, if an existing shard were split in two then some of the rows would map to one shard's
shard id and the rest to the other's; any given row's shard key would *not* change as part of that split.
Very importantly, shard keys are known to the application while shard ids are not and so any changes to
the topology of the collection of servers is completely transparent to the application.
8.7.10: Does my application need to change when a shard is moved to a different MySQL Server or
split into multiple shards?
No. Because the application deals in shard keys and shard keys do not change during shard moves or
splits.
8.7.11: Is it possible to perform cross-shard unions or joins?
Not at present; all queries are limited to the data within a single shard + the Global Table data. If data from
multiple shards is required then it is currently the application's responsibility to collect and aggregate the
data.
8.7.12: Is the routing of queries and transactions transparent to my application?
Partially.
For HA, the application simply needs to specify whether the operations are read-only or involve writes (or
consistent reads).
For sharding, the application must specify the sharding key (a column from one or more tables) *but* this
is independent of the topology of the MySQL Servers and where the data is held and it is unaffected when
data is moved from one server to another.
Consistency
Questions
• 8.7.1: [228] What do I do if I need immediately-consistent reads?
Questions and Answers
8.7.1: What do I do if I need immediately-consistent reads?
Because replication from the Primary (master) to the Secondaries (slaves) is not synchronous, you cannot
guarantee that you will retrieve the most current data when reading from a secondary. To force a read to
be sent to the Primary, the application may set the *mode* property for the connection to read/write rather
than read.
8.8 Using Connector/Python with MySQL Fabric
MySQL Fabric provides data distribution and high-availability features for a set of MySQL database
servers.
Developers using Connector/Python can take advantage of its features to work with a set of servers
managed by MySQL Fabric. Connector/Python supports the following MySQL Fabric capabilities:
• Automatic node selection based on application-provided shard information (tables and key)
• Read/write splitting within a MySQL Fabric high-availability group
228
Installing Connector/Python with MySQL Fabric Support
More specifically, Connector/Python Fabric support provides these features:
• Requesting a connection to a MySQL server managed by Fabric is as transparent as possible to users
already familiar with Connector/Python.
• Connector/Python is able to get a MySQL server connection given a high-availability group and a mode
specifying whether the connection is read-only or also permits updates (read-write).
• Connector/Python supports sharding and is able to find the correct MySQL server for a given table or
tables and key based on scope (local or global) and mode (read-only or read-write). RANGE and HASH
mechanisms are supported transparently to the user.
• Among secondary MySQL servers in the same group, read-only connections are load balanced. Load
balancing is based on a weight set for each MySQL server, using a Weighted Round-Robin algorithm.
• Faulty MySQL servers are reported to Fabric, and failover is supported when failure occurs for a server
in a group.
• To speed up operations, Connector/Python caches information obtained from Fabric, such as group
and sharding information. Each time Connector/Python looks up data, it first checks its cache. When
information in the cache is too old, it is invalidated. By default, the time-to-live (TTL) for cached
information is 1 minute. However, Fabric itself can provide this TTL for its clients and this value is used
instead if greater than zero.
Cache information is also invalidated when failures occur, such as when a connection to a MySQL
server fails (invalidation applies to the group to which the server belongs).
• Fabric support applies to versions of Python supported by Connector/Python itself (see Connector/
Python Versions). In particular, you can use Connector/Python with Python 3.1 and later to establish
Fabric connections, even though Fabric does not support Python 3.
Connector/Python support for Fabric comprises the following module and classes:
• Module mysql.connector.fabric: All classes, functions, and constants related to MySQL Fabric.
• Class fabric.MySQLFabricConnection: Similar to MySQLConnection, it creates a connection to
the MySQL server based on application-provided information.
• Class fabric.Fabric: Manages the connection with a MySQL Fabric node; used by
MySQLFabricConnection.
• Other helper classes for caching information.
8.8.1 Installing Connector/Python with MySQL Fabric Support
Fabric support in Connector/Python requires version 1.2.0 or greater. Downloads are available at http://
dev.mysql.com/downloads/connector/python/ in various packages such as TAR/ZIP archives, RPM,
Debian packages and Windows Intaller.
Using the TAR/ZIP package, you can install MySQL Connector/Python as follows:
shell> tar xzf mysql-connector-python-1.2.3.tar.gz
shell> cd mysql-connector-python-1.2.3
shell> python setup.py install
For more information, see Connector/Python Installation.
229
Requesting a Fabric Connection
8.8.2 Requesting a Fabric Connection
The modules related to Fabric are under mysql.connector.fabric. Importing fabric provides access
to everything needed to use Fabric:
import mysql.connector
from mysql.connector import fabric
Traditionally, a MySQL connection is set up using the mysql.connector.connect() method using
the connection arguments described at Connector/Python Connection Arguments, and the connection is
established immediately.
A request for a Fabric connection, by contrast, does not immediately connect. Instead, pass a fabric
argument to the connect() call. This argument must be a dictionary. When Fabric connects to the
MySQL server that it provides, it uses the connection arguments other than the fabric argument (except
that the unix_socket connection argument is not supported).
To prepare a connection with Fabric, do this:
fabric_config = {
'host': 'fabric.example.com',
}
fcnx = mysql.connector.connect(fabric=fabric_config, user='webuser',
password='webpass', database='employees')
If you prefer to pass a dictionary to connect(), do this:
config = {
'fabric': {
'host': 'fabric.example.com',
},
'user': 'webuser',
'password': 'webpass',
'database': 'employees',
}
fcnx = mysql.connector.connect(**config)
The fabric dictionary argument permits these values:
• host: The host to connect to (required).
• port: The TCP/IP port number to connect to on the specified host (optional; default 32274).
• username: The user name of the account to use (optional).
• password: The password of the account to use (optional).
• connect_attempts: The number of connection attempts to make before giving up (optional; default 3).
• connect_delay: The delay in seconds between attempts (optional; default 1).
• report_errors: Whether to report errors to Fabric while accessing a MySQL instance. (optional;
default False).
• ssl_ca: The file containing the SSL certificate authority (optional).
• ssl_cert: The file containing the SSL certificate file (optional).
• ssl_key: The file containing the SSL key (optional).
230
Requesting a Fabric Connection
The username, password, report_errors, ssl_ca, ssl_cert and ssl_key options were added in
Connector/Python 1.2.1. It is possible to establish an SSL connection using only the ssl_ca argument.
The ssl_key and ssl_cert arguments are optional. However, when either is given, both must be given
or an AttributeError is raised.
It is also possible to pass a Fabric() object instance as the fabric argument:
fabric_config = {
'host': 'fabric.example.com',
}
fabinst = Fabric(**fabric_config)
fcnx = mysql.connector.connect(fabric=fabinst, user='webuser',
password='webpass', database='employees')
Or:
fabric_config = {
'host': 'fabric.example.com',
}
fabinst = Fabric(**fabric_config)
config = {
'fabric': fabinst,
'user': 'webuser',
'password': 'webpass',
'database': 'employees',
}
fcnx = mysql.connector.connect(**config)
Once a Fabric() object is used, it is cached and reused.
Another (less preferred) way to establish a Fabric connection is pass configuration information to the
MySQLFabricConnection class to create a connection with a Fabric node. This is similar to using the
mysql.connector.connect() method or MySQLConnection() class with the addition of the required
fabric argument:
config = {
'fabric': {
'host': 'fabric.example.com',
},
'user': 'webuser',
'password': 'webpass',
}
fcnx = fabric.MySQLFabricConnection(**config)
Error Reporting
Connector/Python can report errors to Fabric that occur while accessing a MySQL instance. The
information can be used to update the backing store and trigger a failover operation, provided that the
instance is a primary server and Fabric has received a sufficient number of problem reports from different
connectors.
• The fabric dictionary argument to the connect() method accepts a report_errors value. Its
default value is False; pass a value of True to enable error reporting to Fabric.
• To define which errors to report, use the extra_failure_report() function:
from mysql.connector.fabric import extra_failure_report
231
Providing Information to Choose a MySQL Server
extra_failure_report([error_code_0, error_code_1, ...])
8.8.3 Providing Information to Choose a MySQL Server
If you create a Fabric connection without providing any information about which data to access, the
connection cannot function. To access a database, you must provide the driver with either of these types of
information:
• The name of a high-availability group known by the MySQL Fabric instance to which you've connected.
In such a group, one server is the master (the primary) and the others are slaves (secondaries).
• A shard table, and optionally a shard key, to guide Connector/Python in selecting a high-availability
group.
The following discussion describes both ways of providing information. You do this by setting one or more
properties of the Fabric connection object using its set_property() method, so the discussion begins
by setting forth the sharding-related properties.. In the examples, fcnx represents the Fabric connection
object, created as shown in Section 8.8.2, “Requesting a Fabric Connection”.
Note
set_property() does not connect. The connection is opened when a cursor
is requested from the Fabric connection object or when its cmd_query() or
cmd_query_iter() method is invoked.
These set_property() arguments are shard-related:
• group: A high-availability group name
• tables: The sharding table or tables
• mode: Whether operations are read/write or read only
• scope: Whether operations are local or global
• key: The key that identifies which row to affect
group and tables are mutually exclusive, so you specify only one of them. Applicability of the remaining
arguments depends on which of group or tables you use:
If you specify group:
• mode is optional. The default is fabric.MODE_READWRITE if this property is omitted.
• scope is inapplicable. Do not specify it.
• key is inapplicable. Do not specify it.
If you specify tables:
• mode is optional. The default is fabric.MODE_READWRITE if this property is omitted.
• scope is optional. The default is fabric.SCOPE_LOCAL if this property is omitted.
• key: If scope is fabric.SCOPE_LOCAL, key is required to indicate which row to affect. If scope is
fabric.SCOPE_GLOBAL, key is inapplicable; do not specify it.
When the mode argument is applicable, these values are permitted:
232
Providing Information to Choose a MySQL Server
• fabric.MODE_READWRITE: Connect to a master server. This is the default.
• fabric.MODE_READONLY: Connect to a slave if one is available, to the master otherwise. If there are
multiple secondary MySQL servers, load balancing is used to obtain the server information.
When the scope argument is applicable, these values are permitted:
• fabric.SCOPE_LOCAL: Local operation that affects the row with a given key. This is the default.
• fabric.SCOPE_GLOBAL: Global operation that affects all rows.
Providing the name of a high-availability group specifies that we know exactly the set of database servers
that with which to interact. To do this, set the group property using the set_property() method:
fcnx.set_property(group='myGroup')
Providing shard information avoids the need to choose a high-availability group manually and permits
Connector/Python to do so based on information from the MySQL Fabric server.
Whether operations use RANGE or HASH is transparent to the user. The information is provided by Fabric
and Connector/Python uses the correct mechanism automatically.
To specify shard tables and shard keys, use the tables and key attributes of the set_property()
method.
The format of each shard table is usually given as 'db_name.tbl_name'. Because one or more tables
can be specified, the tables argument to set_property() is specified as a tuple or list:
fcnx.set_property(tables=['employees.employees'], key=40)
cur = fcnx.cursor()
# do operations for employee with emp_no 40
fcnx.close()
By default, operations occur in local scope, or the scope property can be given to specify local or global
scope explicitly. For local operations (as in the preceding example), the key argument must be specified to
indicate which row to use. For global operations, do not specify the key attribute because the operation is
performed on all rows in the table:
fcnx.set_property(tables=['employees.employees'], scope=fabric.SCOPE_GLOBAL)
cur = fcnx.cursor()
cur.execute("UPDATE employees SET last_name = UPPER(last_name)")
cnx.commit()
fcnx.close()
The default mode is read/write, so the driver connects to the master. The mode property can be given to
specify read/write or read-only mode explicitly:
fcnx.set_property(group='myGroup', mode=fabric.MODE_READWRITE)
cur = fcnx.cursor()
cur.execute("UPDATE employees SET last_name = UPPER(last_name)")
cnx.commit()
fcnx.close()
Applications for which read-only mode is sufficient can specify a mode attribute of
fabric.MODE_READONLY. In this case, a connection is established to a slave if one is available, or to the
master otherwise.
233
Using Connector/J with MySQL Fabric
8.9 Using Connector/J with MySQL Fabric
MySQL Fabric provides data distribution and high-availability features for a set of MySQL database
servers.
Developers using Connector/J can take advantage of its features to work with a set of servers managed by
MySQL Fabric. Connector/J supports the following MySQL Fabric capabilities:
• Automatic node selection based on application-provided shard information (table and key)
• Read/write splitting within a MySQL Fabric server group
• Reporting errors to the Fabric node as part of the distributed failure detector
The Fabric Client library for Java, which is included with Connector/J, is comprised of the following
packages:
• src/com/mysql/fabric/xmlrpc: Classes for core implementation of the XML-RPC protocol
• src/com/mysql/fabric: Classes for interacting with the MySQL Fabric management system using
the XML-RPC protocol
• src/com/mysql/fabric/jdbc: Classes for JDBC access to MySQL servers based on shard
information
• src/com/mysql/fabric/hibernate: FabricMultiTenantConnectionProvider.java class
enabling integration with Hibernate
• testsuite/fabric: JUnit tests
• src/demo/fabric: Usage samples
8.9.1 Installing Connector/J with MySQL Fabric Support
Fabric support is available in Connector/J 5.1.30 and later. Please refer to Connector/J documentation for
installation instructions.
8.9.2 Loading the Driver and Requesting a Fabric Connection
When using Connector/J with MySQL Fabric, you must provide the host name and port of the MySQL
Fabric server instead of the database server. The connection string must follow the same form it normally
does, with the addition of the fabric keyword, as follows:
jdbc:mysql:fabric://fabrichost:32274/database
The user name and password provided to the connection are used for authentication with the individual
database servers. Fabric authentication parameters can be given in the URL using the fabricUsername
and fabricPassword properties. e.g.
jdbc:mysql:fabric://fabrichost:32274/database?fabricUsername=admin&fabricPassword=secret
Note
If the username and password to authenticate to the Fabric node are omitted, no
authentication is used. This should only be done when authentication has been
disabled on the Fabric node.
234
Providing Information to Choose a MySQL Server
Note
If you are using Java 5, you must manually load the driver class before attempting
to connect.
Class.forName("com.mysql.fabric.jdbc.Driver");
Connection now proceeds normally.
Connection conn = DriverManager.getConnection(
"jdbc:mysql:fabric://fabrichost:32274/database",
user,
password);
To use the Connector/J APIs that support MySQL Fabric, you must cast the Connection object to the
public interface that provides the necessary methods. The interfaces are:
• com.mysql.fabric.jdbc.FabricMySQLConnection: JDBC3 interface, compatible with Java 5 and
later
• com.mysql.fabric.jdbc.JDBC4FabricMySQLConnection: JDBC4 interface, compatible with
Java 6 and later. This interface must be used to access JDBC4 APIs on the connection.
8.9.3 Providing Information to Choose a MySQL Server
If you create a Fabric connection without providing any information about which data to access, the
connection cannot function. To access a database, you must provide the driver with one of the following:
• The name of a high-availability group known by the MySQL Fabric instance to which you've connected.
In such a group, one server is the master (the primary) and the others are slaves (secondaries).
• A shard table, and optionally a shard key, to guide Connector/J in selecting a high-availability group.
• One or more query tables to guide the connector in selecting a server group. Query tables can reference
only a single shard mapping or the query is rejected. A shard mapping can include several tables but
they must be sharded on the same index.
The following discussion describes both ways of providing information. In the examples, conn represents
the Fabric connection object, created as shown in Section 8.9.2, “Loading the Driver and Requesting a
Fabric Connection”.
Providing the name of a high-availability group specifies that we know exactly the set of database servers
with which to interact. We can do this in two ways.
• The simplest method is to include the name of the server group in the connection string. This is useful if
a connection will need to access data only in that server group. It is also possible to set the name of the
server group in this way initially and to change it programatically later.
// provide the server group as a connection property
Connection conn = DriverManager.getConnection(
"jdbc:mysql:fabric://fabrichost:32274/database?fabricServerGroup=myGroup");
• If we connect without specifying a server group, or want to change it later, we can use the
JDBC4FabricMySQLConnection interface to set the server group name.
235
MySQL Fabric Configuration for Running Samples
JDBC4FabricMySQLConnection conn;
// connection initialization here
conn.setServerGroupName("myGroup");
Providing shard information avoids the need to choose a high-availability group manually and permits
Connector/J to do so based on information from the MySQL Fabric server.
• Shard tables and shard keys can also be given as connection properties if desirable. Here we say that
we want to access the employees table. The driver chooses a server group based on this shard table.
Note
The format of the shard table is usually given as db_name.tbl_name.
// provide the shard table as a connection property
Connection conn = DriverManager.getConnection(
"jdbc:mysql:fabric://fabrichost:32274/database?fabricShardTable=employees.employees");
• Alternatively, query tables can be provided to the connection before creating a statement. The following
example sets up the connection to perform a join between the employees and departments tables.
Details on how to provide the shard key are given in the next step.
JDBC4FabricMySQLConnection conn;
// provide the set of query tables to the connection
conn.addQueryTable("departments");
conn.addQueryTable("employees");
• In many cases, you want to work with different sets of data at different times. You can specify the shard
key to change the set of data to be accessible.
JDBC4FabricMySQLConnection conn;
// connection initialization here
conn.setShardKey("40"); // work with data related to shard key = 40
In summary, it is necessary to provide the name of a server group or a shard table and possibly shard key
to access a database server.
8.9.4 MySQL Fabric Configuration for Running Samples
To run JUnit tests from testsuite/fabric or demonstration examples from src/demo/fabric, you
must configure the MySQL Fabric test environment as follows.
1. Set up MySQL servers.
• mysql-fabric-config: The backing store for Fabric configuration. Used internally by Fabric to
store the server list, shard mappings, and so forth. You set up this server instance during the MySQL
Fabric setup procedure.
• mysql-global: The only server in the “global” group. Used to send DDL commands and update
any data not in the shard data set.
• Default location: 127.0.0.1:3401
• Config properties: com.mysql.fabric.testsuite.global.host,
com.mysql.fabric.testsuite.global.port
236
MySQL Fabric Configuration for Running Samples
• mysql-shard1: First shard of sharded data set
• Default location: 127.0.0.1:3402
• Config properties: com.mysql.fabric.testsuite.shard1.host,
com.mysql.fabric.testsuite.shard1.port
• mysql-shard2: Second shard of sharded data set
• Default location: 127.0.0.1:3403
• Config properties: com.mysql.fabric.testsuite.shard2.host,
com.mysql.fabric.testsuite.shard2.port
All except mysql-fabric-config should have server-id set to a distinct value and the following
entries added to my.cnf:
log-bin = mysql-bin
log-slave-updates = true
enforce-gtid-consistency = true
gtid-mode = on
2. Set up sharding. The user name and password of the account used to manage Fabric (Section 8.2.3.1,
“Create a MySQL User”) must be specified in Fabric's configuration file (Section 8.2.3.2, “Configuration
File”).
• Create the global group:
shell> mysqlfabric group create fabric_test1_global
shell> mysqlfabric group add fabric_test1_global 127.0.0.1:3401
shell> mysqlfabric group promote fabric_test1_global
• Create shard groups:
shell> mysqlfabric group create fabric_test1_shard1
shell> mysqlfabric group add fabric_test1_shard1 127.0.0.1:3402
shell> mysqlfabric group promote fabric_test1_shard1
shell> mysqlfabric group create fabric_test1_shard2
shell> mysqlfabric group add fabric_test1_shard2 127.0.0.1:3403
shell> mysqlfabric group promote fabric_test1_shard2
• Create the sharding definition:
shell> mysqlfabric sharding create_definition RANGE fabric_test1_global
Note the return value in the command output; for example, return = 1. This is the $MAPPING_ID
used in the following commands
shell> mysqlfabric sharding add_table $MAPPING_ID employees.employees emp_no
• Create the shard index:
237
Running Tests
shell> mysqlfabric sharding add_shard $MAPPING_ID \
fabric_test1_shard1/0,fabric_test1_shard2/10000 --state=ENABLED
8.9.5 Running Tests
The test-fabric target in the build.xml file runs JUnit tests on these servers. It requires only the
setup described in Section 8.9.4, “MySQL Fabric Configuration for Running Samples”. All necessary tables
and data are created during test run.
The parameters for the servers must be provided to Ant to verify that the correct information is received
from the Fabric node. This includes server host names and ports. This data can be provided on the
command line with -D arguments to Ant or in a build.properties file. This file should be placed in the
root of the source directory, where build.xml is located. Based on the information given so far, this file
would contain the following entries:
com.mysql.fabric.testsuite.hostname=localhost
com.mysql.fabric.testsuite.port=32274
com.mysql.fabric.testsuite.fabricUsername=admin
com.mysql.fabric.testsuite.fabricPassword=secret
com.mysql.fabric.testsuite.username=root
com.mysql.fabric.testsuite.password=
com.mysql.fabric.testsuite.database=employees
com.mysql.fabric.testsuite.global.host=127.0.0.1
com.mysql.fabric.testsuite.global.port=3401
com.mysql.fabric.testsuite.shard1.host=127.0.0.1
com.mysql.fabric.testsuite.shard1.port=3402
com.mysql.fabric.testsuite.shard2.host=127.0.0.1
com.mysql.fabric.testsuite.shard2.port=3403
Sample Ant calls are shown below. If the parameters are specified in your build.properties file, it is
not necessary to include them on the command line.
shell> JAVA_HOME=/opt/jdk1.5/ ant \
-Dcom.mysql.fabric.testsuite.password=pwd \
-Dcom.mysql.fabric.testsuite.global.port=3401 \
-Dcom.mysql.fabric.testsuite.shard1.port=3402 \
-Dcom.mysql.fabric.testsuite.shard2.port=3403 \
test-fabric
8.9.6 Running Demonstration Programs
To run the demo programs, you must set up the MySQL Fabric environment as described in Section 8.9.4,
“MySQL Fabric Configuration for Running Samples”. After that, you can use the demo-fabric-* Ant
targets.
shell> JAVA_HOME=/opt/jdk1.5/ ant \
-Dcom.mysql.fabric.testsuite.password=pwd \
demo-fabric
These targets invoke all demo programs except Hibernate demos. You should use the demo-fabrichibernate target instead:
shell> JAVA_HOME=/opt/jdk1.6/ ant \
-Dcom.mysql.fabric.testsuite.password=pwd \
demo-fabric-hibernate
238
A Complete Example: Working with Employee Data
Note
You need Java 6+ to use Hibernate Fabric integration. Multi-tenancy is a feature
specific to Hibernate 4 and higher which requires Java 6+. That is why we do
not provide the FabricMultiTenantConnectionProvider class or related demos
compatible with Java 5.
8.9.7 A Complete Example: Working with Employee Data
The included program shows one possible way of working with sharded data relating to employees. To run
this program, you must set up a shard mapping for the employees table in MySQL Fabric as described in
Section 8.9.4, “MySQL Fabric Configuration for Running Samples”.
This code can be found in the distribution package in src/demo/fabric/EmployeesJdbc.java.
/*
Copyright (c) 2013, 2014, Oracle and/or its affiliates. All rights reserved.
The MySQL Connector/J is licensed under the terms of the GPLv2
<http://www.gnu.org/licenses/old-licenses/gpl-2.0.html>, like most MySQL Connectors.
There are special exceptions to the terms and conditions of the GPLv2 as it is applied to
this software, see the FLOSS License Exception
<http://www.mysql.com/about/legal/licensing/foss-exception.html>.
This program is free software; you can redistribute it and/or modify it under the terms
of the GNU General Public License as published by the Free Software Foundation; version 2
of the License.
This program is distributed in the hope that it will be useful, but WITHOUT ANY WARRANTY;
without even the implied warranty of MERCHANTABILITY or FITNESS FOR A PARTICULAR PURPOSE.
See the GNU General Public License for more details.
You should have received a copy of the GNU General Public License along with this
program; if not, write to the Free Software Foundation, Inc., 51 Franklin St, Fifth
Floor, Boston, MA 02110-1301 USA
*/
package demo.fabric;
import
import
import
import
import
java.sql.Connection;
java.sql.DriverManager;
java.sql.PreparedStatement;
java.sql.Statement;
java.sql.ResultSet;
import com.mysql.fabric.jdbc.FabricMySQLConnection;
/**
* Demonstrate working with employee data in MySQL Fabric with Connector/J and the JDBC APIs.
*/
public class EmployeesJdbc {
public static void main(String args[]) throws Exception {
String
String
String
String
String
hostname = System.getProperty("com.mysql.fabric.testsuite.hostname");
port = System.getProperty("com.mysql.fabric.testsuite.port");
database = System.getProperty("com.mysql.fabric.testsuite.database");
user = System.getProperty("com.mysql.fabric.testsuite.username");
password = System.getProperty("com.mysql.fabric.testsuite.password");
String baseUrl = "jdbc:mysql:fabric://" + hostname + ":" + Integer.valueOf(port) + "/";
// Load the driver if running under Java 5
if (!com.mysql.jdbc.Util.isJdbc4()) {
239
A Complete Example: Working with Employee Data
Class.forName("com.mysql.fabric.jdbc.FabricMySQLDriver");
}
// 1. Create database and table for our demo
Connection rawConnection = DriverManager.getConnection(
baseUrl + "mysql?fabricServerGroup=fabric_test1_global",
user,
password);
Statement statement = rawConnection.createStatement();
statement.executeUpdate("create database if not exists employees");
statement.close();
rawConnection.close();
// We should connect to the global group to run DDL statements,
// they will be replicated to the server groups for all shards.
// The 1-st way is to set it's name explicitly via the
// "fabricServerGroup" connection property
rawConnection = DriverManager.getConnection(
baseUrl + database + "?fabricServerGroup=fabric_test1_global",
user,
password);
statement = rawConnection.createStatement();
statement.executeUpdate("create database if not exists employees");
statement.close();
rawConnection.close();
// The 2-nd way is to get implicitly connected to global group
// when the shard key isn't provided, ie. set "fabricShardTable"
// connection property but don't set "fabricShardKey"
rawConnection = DriverManager.getConnection(
baseUrl + "employees" + "?fabricShardTable=employees.employees",
user,
password);
// At this point, we have a connection to the global group for
// the `employees.employees' shard mapping.
statement = rawConnection.createStatement();
statement.executeUpdate("drop table if exists employees");
statement.executeUpdate("create table employees (emp_no int not null," +
"first_name varchar(50), last_name varchar(50)," +
"primary key (emp_no))");
// 2. Insert data
// Cast to a Fabric connection to have access to specific methods
FabricMySQLConnection connection = (FabricMySQLConnection)rawConnection;
// example data used to create employee records
Integer ids[] = new Integer[] {1, 2, 10001, 10002};
String firstNames[] = new String[] {"John", "Jane", "Andy", "Alice"};
String lastNames[] = new String[] {"Doe", "Doe", "Wiley", "Wein"};
// insert employee data
PreparedStatement ps = connection.prepareStatement(
"INSERT INTO employees.employees VALUES (?,?,?)");
for (int i = 0; i < 4; ++i) {
// choose the shard that handles the data we interested in
connection.setShardKey(ids[i].toString());
// perform insert in standard fashion
ps.setInt(1, ids[i]);
ps.setString(2, firstNames[i]);
ps.setString(3, lastNames[i]);
ps.executeUpdate();
}
// 3. Query the data from employees
240
How Connector/J Chooses a MySQL Server
System.out.println("Querying employees");
System.out.format("%7s | %-30s | %-30s%n", "emp_no", "first_name", "last_name");
System.out.println("--------+--------------------------------+-------------------------------");
ps = connection.prepareStatement(
"select emp_no, first_name, last_name from employees where emp_no = ?");
for (int i = 0; i < 4; ++i) {
// we need to specify the shard key before accessing the data
connection.setShardKey(ids[i].toString());
ps.setInt(1, ids[i]);
ResultSet rs = ps.executeQuery();
rs.next();
System.out.format("%7d | %-30s | %-30s%n", rs.getInt(1), rs.getString(2), rs.getString(3));
rs.close();
}
ps.close();
// 4. Connect to the global group and clean up
connection.setServerGroupName("fabric_test1_global");
statement.executeUpdate("drop table if exists employees");
statement.close();
connection.close();
}
}
8.9.8 How Connector/J Chooses a MySQL Server
Before a database server can be chosen, a server group must be chosen. The following values are taken
into account:
• server group name: If a server group name is specified directly, it is used.
• shard table: If a shard table is given, the global group for the shard mapping governing the given shard
table is used.
• shard table + shard key: If a shard key is given the shard mapping is used to determine which server
group handles data for the shard key.
• query tables: If the query table set contains a sharded table, the shard mapping for that table will be
used.
The server group name can be accessed by con.getCurrentServerGroup().getName().
Once a server group is chosen, an individual database server is chosen based on the read-only state of
the connection. A read-only server is chosen if one is available. Otherwise a read-write server is chosen.
The server weight is not currently taken into account.
None of these values can be changed while a transaction is in progress.
8.9.9 Using Hibernate with MySQL Fabric
It is possible to use Hibernate 4's multi-tenancy support to work with a set of database servers managed
by MySQL Fabric.
APIs necessary to implement MultiTenantConnectionProvider
We can use internal APIs included with Connector/J with MySQL Fabric support to implement Hibernate's
MultiTenantConnectionProvider.
241
Using Hibernate with MySQL Fabric
The following implementation is included in the package as the
com.mysql.fabric.hibernate.FabricMultiTenantConnectionProvider class. An example of
how to use it is included as the class demo.fabric.HibernateFabric.
To implement MultiTenantConnectionProvider, we use the
com.mysql.fabric.FabricConnection class. This class connects to the MySQL Fabric manager
to obtain information about servers and data sharding. This is an internal API and subject to change. The
following FabricConnection methods can be used:
• FabricConnection(String url, String username, String password) throws
FabricCommunicationException
Construct a new instance of a MySQL Fabric client and initiate the connection.
• ServerGroup getServerGroup(String serverGroupName) throws
FabricCommunicationException
Retrieve an object representing the named server group. This includes the list of servers in the group
including their mode (read-only or read-write).
• ShardMapping getShardMapping(String database, String table) throws
FabricCommunicationException
Retrieve an object represending a shard mapping for the given database and table. The ShardMapping
indicates the global group and the individual shards.
The following additional methods are used:
• Set<Server> ServerGroup.getServers()
Return the servers in this group.
• String Server.getHostname()
Return the server host name.
• int Server.getPort()
Return the server port.
Implementing MultiTenantConnectionProvider
To begin, we declare the class with members to keep necessary information for the connection and the
constructor:
public class FabricMultiTenantConnectionProvider implements MultiTenantConnectionProvider {
// a connection to the MySQL Fabric manager
private FabricConnection fabricConnection;
// the database and table of the sharded data
private String database;
private String table;
// user and password for Fabric manager and MySQL servers
private String user;
private String password;
// shard mapping for `database.table'
private ShardMapping shardMapping;
// global group for the shard mapping
private ServerGroup globalGroup;
242
Using Hibernate with MySQL Fabric
public FabricMultiTenantConnectionProvider(
String fabricUrl, String database, String table,
String user, String password) {
try {
this.fabricConnection = new FabricConnection(fabricUrl, user, password);
this.database = database;
this.table = table;
this.user = user;
this.password = password;
// eagerly retrieve the shard mapping and server group from the Fabric manager
this.shardMapping = this.fabricConnection.getShardMapping(this.database, this.table);
this.globalGroup = this.fabricConnection.
getServerGroup(this.shardMapping.getGlobalGroupName());
} catch(FabricCommunicationException ex) {
throw new RuntimeException(ex);
}
}
Next, create a method to create connections:
/**
* Find a server with mode READ_WRITE in the given server group and create a JDBC connection to it.
*
* @returns a {@link Connection} to an arbitrary MySQL server
* @throws SQLException if connection fails or a READ_WRITE server is not contained in the group
*/
private Connection getReadWriteConnectionFromServerGroup(ServerGroup serverGroup)
throws SQLException {
// iterate the list of servers in the given group until we find a r/w server
for (Server s : serverGroup.getServers()) {
if (ServerMode.READ_WRITE.equals(s.getMode())) {
// create a connection to the server using vanilla JDBC
String jdbcUrl = String.format("jdbc:mysql://%s:%s/%s",
s.getHostname(), s.getPort(), this.database);
return DriverManager.getConnection(jdbcUrl, this.user, this.password);
}
}
// throw an exception if we are unable to make the connection
throw new SQLException(
"Unable to find r/w server for chosen shard mapping in group " + serverGroup.getName());
}
To implement the interface, the following methods must be implemented:
• Connection getAnyConnection() throws SQLException
This method should obtain a connection to the global group. We can implement it like this:
/**
* Get a connection that be used to access data or metadata not specific to any shard/tenant.
* The returned connection is a READ_WRITE connection to the global group of the shard mapping
* for the database and table association with this connection provider.
*/
public Connection getAnyConnection() throws SQLException {
return getReadWriteConnectionFromServerGroup(this.globalGroup);
}
• Connection getConnection(String tenantIdentifier) throws SQLException
This method must use the tenantIdentifier to determine which server to access. We can look up
the ServerGroup from the ShardMapping like this:
/**
243
Using Hibernate with MySQL Fabric
* Get a connection to access data association with the provided `tenantIdentifier' (or shard
* key in Fabric-speak). The returned connection is a READ_WRITE connection.
*/
public Connection getConnection(String tenantIdentifier) throws SQLException {
String serverGroupName = this.shardMapping.getGroupNameForKey(tenantIdentifier);
try {
ServerGroup serverGroup = this.fabricConnection.getServerGroup(serverGroupName);
return getReadWriteConnectionFromServerGroup(serverGroup);
} catch(FabricCommunicationException ex) {
throw new RuntimeException(ex);
}
}
Finally, our trivial implementation to release connections:
/**
* Release a non-shard-specific connection.
*/
public void releaseAnyConnection(Connection connection) throws SQLException {
connection.close();
}
/**
* Release a connection specific to `tenantIdentifier'.
*/
public void releaseConnection(String tenantIdentifier, Connection connection)
throws SQLException {
releaseAnyConnection(connection);
}
/**
* We don't track connections.
* @returns false
*/
public boolean supportsAggressiveRelease() {
return false;
}
And finally to implement the Wrapped role:
public boolean isUnwrappableAs(Class unwrapType) {
return false;
}
public <T> T unwrap(Class<T> unwrapType) {
return null;
}
Using a custom MultiTenantConnectionProvider
The SessionFactory can be created like this:
// create a new instance of our custom connection provider supporting MySQL Fabric
FabricMultiTenantConnectionProvider connProvider =
new FabricMultiTenantConnectionProvider(
fabricUrl, "employees", "employees", username, password);
// create a service registry with the connection provider to construct the session factory
ServiceRegistryBuilder srb = new ServiceRegistryBuilder();
srb.addService(
org.hibernate.service.jdbc.connections.spi.MultiTenantConnectionProvider.class,
connProvider);
srb.applySetting("hibernate.dialect", "org.hibernate.dialect.MySQLInnoDBDialect");
244
Connector/J Fabric Support Reference
// create the configuration and build the session factory
Configuration config = new Configuration();
config.setProperty("hibernate.multiTenancy", "DATABASE");
config.addResource("com/mysql/fabric/demo/employee.hbm.xml");
return config.buildSessionFactory(srb.buildServiceRegistry());
Using Hibernate multi-tenancy
Once you have created a SessionFactory with your custom MultiTenantConnectionProvider, it is
simple to use. Provide the shard key to the SessionFactory when creating the session:
// access data related to shard key = 40
Session session = sessionFactory.withOptions().tenantIdentifier("40").openSession();
Each Session is given a shard key (tenant identifier in Hibernate-speak) and uses it to obtain a
connection to an appropriate server. This cannot be changed for the duration of the Session.
8.9.10 Connector/J Fabric Support Reference
8.9.10.1 Connection Properties
The following connection properties are recognized by Connector/J for dealing with MySQL Fabric:
• fabricShardKey
The initial shard key used to determine which server group to send queries to. The fabricShardTable
property must also be specified.
• fabricShardTable
The initial shard mapping used to determine a server group to send queries to.
• fabricServerGroup
The initial server group to direct queries to.
• fabricProtocol
Protocol used to communicate with the Fabric node. XML-RPC over HTTP is currently the only
supported protocol and is specified with a value of "http".
• fabricUsername
Username used to authenticate with the Fabric node.
• fabricPassword
Password used to authenticate with the Fabric node.
• fabricReportErrors (default=false)
Determines whether or not errors are reported to Fabric's distributed failure detector. Only connection
errors, those with a SQL state beginning with "08", are reported.
8.9.10.2 FabricMySQLConnection API
The following methods are available in the com.mysql.fabric.jdbc.FabricMySQLConnection
interface.
245
Connector/J Fabric Support Reference
• void clearServerSelectionCriteria()
Clear all the state that is used to determine which server to send queries to.
• void setShardKey(String shardKey) throws SQLException
Set the shard key for the data being accessed.
• String getShardKey()
Get the shard key for the data being accessed.
• void setShardTable(String shardTable) throws SQLException
Set the table being accessed. Can be a table name or a database and table name pair in the form
db_name.tbl_name. The table must be known by Fabric as a sharded table.
• String getShardTable()
Get the name of the table being accessed.
• void setServerGroupName(String serverGroupName) throws SQLException
Set the server group name to connect to. Direct server group selection is mutually exclusive of sharded
data access.
• String getServerGroupName()
Get the server group name when using direct server group selection.
• ServerGroup getCurrentServerGroup()
Get the current server group if sufficient server group selection has been provided. Otherwise null.
• void clearQueryTables() throws SQLException
Clear the list of tables for the last query. This also clears the shard mapping/table and must be given
again for the next query via setShardTable() or addQueryTable().
• void addQueryTable(String tableName) throws SQLException
Specify that the given table is intended to be used in the next query.
• Set<String> getQueryTables()
Get the list of tables intended to be used in the next query.
246
Chapter 9 Appendix
Table of Contents
9.1 MySQL Utilities Frequently Asked Questions ..............................................................................
9.2 MySQL Utilities Change History .................................................................................................
9.3 Third Party Licenses .................................................................................................................
9.3.1 Doctrine DBAL 2.3.4 ......................................................................................................
247
249
249
249
This chapter includes additional information about MySQL Utilities including a list of frequently asked
questions and the change history.
9.1 MySQL Utilities Frequently Asked Questions
FAQ Categories
• General Questions [247]
• Storage Engine Questions [247]
• The mysqlfrm Utility: .frm File Reader Questions [247]
General
Questions
• 9.1.1: [247] Are these utilities present in the community version of MySQL?
Questions and Answers
9.1.1: Are these utilities present in the community version of MySQL?
Yes, see Chapter 1, How to Install MySQL Utilities.
Storage Engines
Questions
• 9.1.1: [247] Can the utilities be used with MyISAM or CSV?
Questions and Answers
9.1.1: Can the utilities be used with MyISAM or CSV?
Yes. There are no storage engine specific limitations in using the utilities. There are some features written
specifically for InnoDB so those may not apply but in general no utility is storage engine specific. For
example, the mysqldiskusage utility shows exact sizes for MyISAM and InnoDB files but uses estimated
sizes for any other storage engine based on number of rows and row size.
The mysqlfrm Utility: .frm File Reader
Questions
• 9.1.1: [248] Can the .frm reader read a .frm file without the associated data files?
247
MySQL Utilities Frequently Asked Questions
• 9.1.2: [248] Will the .frm reader modify my original .frm file?
• 9.1.3: [248] What is diagnostic mode and why doesn't it produce the same output as the default
mode?
• 9.1.4: [248] If the diagnostic mode is only a best-effort compilation, why use it?
• 9.1.5: [248] Why does the default mode require a server?
• 9.1.6: [248] Can the .frm reader read any .frm file?
• 9.1.7: [248] My .frm files are tucked away in a restricted folder. How do I get access to them to run
the .frm reader without copying or modifying file privileges?
• 9.1.8: [248] Will the default mode display a 100% accurate CREATE statement?
Questions and Answers
9.1.1: Can the .frm reader read a .frm file without the associated data files?
Yes! The .frm reader was designed to read the contents of an .frm file without requiring the data files.
9.1.2: Will the .frm reader modify my original .frm file?
No, it does not modify the original .frm file in either default or diagnostic mode.
9.1.3: What is diagnostic mode and why doesn't it produce the same output as the default mode?
The diagnostic mode does not use a spawned server to read the .frm file. Instead, it attempts to read the
contents of the file byte-by-byte and forms a best-effort approximation of the CREATE statement. Due to
the many complexities of the server code, the diagnostic mode does not currently process all features of a
table. Future revisions will improve the accuracy of the diagnostic mode.
9.1.4: If the diagnostic mode is only a best-effort compilation, why use it?
The diagnostic mode is used to attempt to read corrupt or otherwise damaged .frm files. You would also
use it if you had no access to a server installation on the local machine.
9.1.5: Why does the default mode require a server?
The default mode uses a server to create a temporary working copy of the server instance. It does not
access the donor server in any way other than to execute the mysqld[.exe] process.
9.1.6: Can the .frm reader read any .frm file?
Although it can read most .frm files, there are known limits to which storage engines it can process
correctly. Currently, tables with storage engines partition and performance_schema cannot be read.
However, these .frm files can be read by the diagnostic mode,
9.1.7: My .frm files are tucked away in a restricted folder. How do I get access to them to run
the .frm reader without copying or modifying file privileges?
You can use elevated privileges such as su or sudo to execute the .frm reader. You must use the --user
option to specify a user to launch the spawned server, however. This will permit the .frm reader to read
the original .frm file and copy it to the spawned server and access the copy without requiring additional
privileges.
9.1.8: Will the default mode display a 100% accurate CREATE statement?
248
MySQL Utilities Change History
For most tables and all views, yes. However, there are at least two features that are not stored in the .frm
file and therefore will not be included. These are autoincrement values and foreign keys. That being said,
the CREATE statement produced will be syntactically correct.
9.2 MySQL Utilities Change History
This appendix lists the changes from version to version in the MySQL Utilities source code.
Note that we tend to update the manual at the same time we make changes to MySQL Utilities. If you
find a recent version of the MySQL Utilities listed here that you can't find on our download page (http://
dev.mysql.com/downloads/), it means that the version has not yet been released.
The date mentioned with a release version is the date of the last Bazaar ChangeSet on which the release
was based, not the date when the packages were made available. The binaries are usually made available
a few days after the date of the tagged ChangeSet, because building and testing all packages takes some
time.
The manual included in the source and binary distributions may not be fully accurate when it comes to the
release changelog entries, because the integration of the manual happens at build time. For the most upto-date release changelog, please refer to the online version instead.
Release notes for the changes in each release of MySQL Utilities are located at MySQL Utilities Release
Notes.
9.3 Third Party Licenses
This section contains specific licenses for third party software referenced or otherwise used with MySQL
Utilities and not covered by the Appendix "Third Party Licenses" for Workbench.
9.3.1 Doctrine DBAL 2.3.4
Copyright (c) 2006-2012 Doctrine Project
Permission is hereby granted, free of charge, to any person obtaining a copy of this software and
associated documentation files (the "Software"), to deal in the Software without restriction, including
without limitation the rights to use, copy, modify, merge, publish, distribute, sublicense, and/or sell copies
of the Software, and to permit persons to whom the Software is furnished to do so, subject to the following
conditions:
The above copyright notice and this permission notice shall be included in all copies or substantial portions
of the Software.
THE SOFTWARE IS PROVIDED "AS IS", WITHOUT WARRANTY OF ANY KIND, EXPRESS OR
IMPLIED, INCLUDING BUT NOT LIMITED TO THE WARRANTIES OF MERCHANTABILITY, FITNESS
FOR A PARTICULAR PURPOSE AND NONINFRINGEMENT. IN NO EVENT SHALL THE AUTHORS OR
COPYRIGHT HOLDERS BE LIABLE FOR ANY CLAIM, DAMAGES OR OTHER LIABILITY, WHETHER IN
AN ACTION OF CONTRACT, TORT OR OTHERWISE, ARISING FROM, OUT OF OR IN CONNECTION
WITH THE SOFTWARE OR THE USE OR OTHER DEALINGS IN THE SOFTWARE.
249
250