1
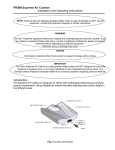
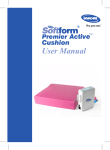
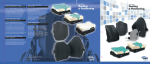
User Manual DEALER: This manual MUST be given to the user of the product. USER: BEFORE using this product, read this manual and save for future reference. Invacare® Matrx® Flovair™ Models ITFM and ITFG 1 General 1.1 Symbols Signal words are used in this manual and apply to hazards or unsafe practices which could result in personal injury or property damage. See the information below for definitions of the signal words. WARNING Warning indicates a potentially hazardous situation which, if not avoided, could result in death or serious injury. CAUTION Caution indicates a potentially hazardous situation which, if not avoided, may result in property damage or minor injury or both. Gives useful tips, recommendations and information for efficient, trouble-free use. 1.2 Overview Important Information The best way to avoid problems related to pressure sores is to understand their causes and your role in a skin management program. Your therapist and physician should be consulted if you have questions regarding individual limitations and needs. All cushions should be selected carefully. Working with your therapist and physician is the best way to assure that a cushion choice matches your individual needs. As the needs of the individual become more complex, cushion evaluation becomes more important. Matrx Flovair Cushion The Invacare Matrx Flovair Cushion is designed to provide pelvic stability, leg positioning and pressure management for individuals with postural asymmetry and skin integrity concerns. The Invacare Matrx Flovair Cushion begins with the base for comfort, stability and function. This hybrid cushion captures the stability of foam, the pressure redistribution of air and the shear management of fluid. Outer/Inner Covers The outer cover is made from a water resistant fabric to protect the foam. The top is fabricated from a stretch fabric. The bottom is fabricated from a heavyweight, non-skid fabric. A water resistant inner cover allows air circulation while providing additional protection for the foam. Part No 1167584 1 Invacare® Matrx® Flovair™ 2 Safety Check ALL parts for shipping damage. If shipping damage is noted, DO NOT use. Contact carrier/ dealer for further instruction. 2.1 Intended Use WARNING The Flovair cushion IS NOT designed for use in the treatment of pressure sores. The Flovair cushion is designed to provide pelvic stability, leg positioning and pressure management for patients with postural asymmetry and skin integrity concerns. The Flovair cushion is available in two different contours to suit the amount of positioning required by the user. 2.2 General Warnings WARNING DO NOT USE THIS PRODUCT OR ANY AVAILABLE OPTIONAL EQUIPMENT WITHOUT FIRST COMPLETELY READING AND UNDERSTANDING THESE INSTRUCTIONS AND ANY ADDITIONAL INSTRUCTIONAL MATERIAL SUCH AS OWNER’S MANUALS, SERVICE MANUALS OR INSTRUCTION SHEETS SUPPLIED WITH THIS PRODUCT OR OPTIONAL EQUIPMENT. IF YOU ARE UNABLE TO UNDERSTAND THE WARNINGS, CAUTIONS OR INSTRUCTIONS, CONTACT A HEALTHCARE PROFESSIONAL, DEALER OR TECHNICAL PERSONNEL BEFORE ATTEMPTING TO USE THIS EQUIPMENT - OTHERWISE, INJURY OR DAMAGE MAY OCCUR. ACCESSORIES WARNING Invacare products are specifically designed and manufactured for use in conjunction with Invacare accessories. Accessories designed by other manufacturers have not been tested by Invacare and are not recommended for use with Invacare products. INSTALLATION WARNING After any adjustments, repair or service and before use, make sure that all attaching component parts are secure. WARNING Skin condition should be checked very frequently after the installation of any new cushion. Your therapist and physician should be consulted if you have any questions regarding weight relief, self-examination of the skin, or individual limitations and needs. Make sure the hook and loop fastening straps are securely attached between the seating surface and cushion before using. Invacare® Matrx® Flovair™ 2 Part No 1167584 2.3 Weight Limitation and Model Numbers Refer to the chart for the model number and weight limitation. Configured model numbers are: ITFM, ITFG ITFM = Flovair Max Contour Cushion, ITFG = Flovair Gentle Contour Cushion Bold = Stock models, Grey = size not available WIDTH 15 16 17 18 19 20 DEPTH 15 16 17 18 19 20 ITFG1515 ITFM1515 ITFG1615 ITFM1615 ITFG1715 ITFM1715 ITFG1815 ITFM1815 ITFG1915 ITFM1915 ITFG2015 ITFM2015 ITFG1516 ITFM1516 ITFG66 ITFM66 ITFG1716 ITFM1716 ITFG86 ITFM86 ITFG1916 ITFM1916 ITFG06 ITFM06 ITFG2116 ITFM2116 ITFG2216 ITFM2216 ITFG2316 ITFM2316 ITFG2416 ITFM2416 ITFG1517 ITFM1517 ITFG1617 ITFM1617 ITFG1717 ITFM1717 ITFG1817 ITFM1817 ITFG1917 ITFM1917 ITFG2017 ITFM2017 ITFG2117 ITFM2117 ITFG2217 ITFM2217 ITFG2317 ITFM2317 ITFG2417 ITFM2417 ITFG1518 ITFM1518 ITFG68 ITFM68 ITFG1718 ITFM1718 ITFG88 ITFM88 ITFG1918 ITFM1918 ITFG08 ITFM08 ITFG2118 ITFM2118 ITFG2218 ITFM2218 ITFG2318 ITFM2318 ITFG2418 ITFM2418 ITFG1519 ITFM1519 ITFG1619 ITFM1619 ITFG1719 ITFM1719 ITFG1819 ITFM1819 ITFG1919 ITFM1919 ITFG2019 ITFM2019 ITFG2119 ITFM2119 ITFG2219 ITFM2219 ITFG2319 ITFM2319 ITFG2419 ITFM2419 ITFG1520 ITFM1520 ITFG1620 ITFM1620 ITFG1720 ITFM1720 ITFG1820 ITFM1820 ITFG1920 ITFM1920 ITFG2020 ITFM2020 ITFG2120 ITFM2120 ITFG2220 ITFM2220 ITFG2320 ITFM2320 ITFG2420 ITFM2420 21 22 23 24 Part No 1167584 3 21 22 WEIGHT LIMIT 300 lb (136 kg) ITFG2121 ITFM2121 ITFG2221 ITFM2221 ITFG2321 ITFM2321 ITFG2421 ITFM2421 ITFG2122 ITFM2122 ITFG2222 ITFM2222 ITFG2322 ITFM2322 ITFG2422 ITFM2422 500 lb (227 kg) Invacare® Matrx® Flovair™ 3 Usage 3.1 Attaching/Removing the Cushion To/From the Seating Surface WARNING Make sure the hook and loop fasteners are securely attached to the seating surface and to the cushion BEFORE using. If the cushion is not secured to the seating surface, use caution when transferring in and out of the wheelchair. To remove the cushion from the seating surface, reverse the following procedure. The seating surface can be one of the following: seat upholstery, drop base or seat pan. The zipper on the cushion should ALWAYS face rearward. Hook Attachment Strips/No Attachment Strips 1. 2. 3. Remove double sided hook from bottom of cushion. Align front edge of cushion with front edge of seating surface. Perform one of the following: • Hook Attachment Strips - Secure the Zipper Faces cushion to the seating surface, making Rearward sure that the strips of loop on the cushion cover are securely attached to the strips of hook on the seating Loop Portion of surface. Fastening Strap • No Attachment Strips - Place the cushion on the seating surface. Cushion (Attached to Cushion) Loop Attachment Strips 1. 2. 3. Verify the double sided hook strips are securely attached to the loop attachment strips on the bottom of the cushion. Align front edge of cushion with front edge of seating surface. Secure the cushion to the seating surface, making sure that the double sided hook is securely attached to the strips of loop on the cushion cover and the seating surface. Invacare® Matrx® Flovair™ Double Sided Hook Portion of Fastening Strap (Remove backing if necessary) 4 Seating Surface Front of cushion lines up with front edge of seating surface Part No 1167584 3.2 Removing/Installing the Cushion Covers Cover Cushion Zipper Removing the Covers WARNING The covers are designed to protect the foam from moisture and to provide fire retardency. DO NOT use the cushion without either the inner or outer cover. If the covers are torn, they MUST be replaced IMMEDIATELY. CAUTION DO NOT remove both the outer cover and inner cover at the same time, otherwise damage to the inner cover material may occur. The pelvic support layer is at the top of the inner cover. The zipper is at the rear and the stretch fabric is at the top of the outer cover. Remove the cushion from the seating surface. Refer to Attaching/Removing the Cushion To/From the Seating Surface on page 4. Unzip the outer cover. Remove cushion, still inside the inner cover, from the outer cover. If desired, unzip the inner cover and remove the cushion from the inner cover. 1. 2. 3. 4. Installing the Covers 1. If the inner cover has been removed, position the cushion with the pelvic support layer in place toward the rear of the inner cover. 2. 3. 4. 5. The back surface of the cushion is marked “REAR”. Slide the cushion into the inner cover. Zip the inner cover closed. Position the cushion with inner cover and the pelvic support layer in place toward the rear of the outer cover. Slide the cushion into the outer cover. CAUTION Use care not to snag the inner cover in the outer cover zipper, or damage to the inner cover will occur. 6. 7. Zip the outer cover closed. Reattach cushion onto seating surface. Refer to Attaching/Removing the Cushion To/From the Seating Surface on page 4. Part No 1167584 5 Invacare® Matrx® Flovair™ 3.3 Removing/Installing the Pelvic Support Layer The cushion comes with a fluid/air pelvic support layer. Pelvic Support Layer Side Strap Front Strap Cushion Foam Contour Removing the Pelvic Support Layer Installing the Pelvic Support Layer 1. 1. Remove cushion from inner and outer covers. Refer to Removing/Installing the Cushion Covers on page 5. Unfasten the front strap, the rear strap (not shown), and the two side straps. Lift the existing pelvic support layer and remove from the foam. 2. 3. 2. 3. 3.4 Center the pelvic support layer on the foam so that the side straps are centered in the contours on each side of the foam. Fasten the rear, front, and side straps together at the bottom of the foam. DO NOT over-tighten the straps. The pelvic support layer MUST be free to move with the cushion. Reinstall cushion into inner and outer covers. Refer to Removing/Installing the Cushion Covers on page 5. Removing/Installing Removable Leg Wedges This procedure provides 1-inch of lower seat to floor height on one side of the cushion. This modification allows for easier foot propelling or the accommodation of some hip flexion limitations. This modification can be done on either side of the cushion. Top of Cushion Bottom of Cushion Removable Leg Wedges 1. 2. 3. Remove the cushion from the inner and outer covers. Refer to Removing/Installing the Cushion Covers on page 5. Remove the pelvic support layer. Refer to Removing/Installing the Pelvic Support Layer on page 6. Remove the front leg wedge from the side of the cushion that requires a lower cushion to floor height. Save the leg wedge for future use. 4. 5. Hook and Loop Strips Leg wedges secure in place with hook and loop strips. Reinstall the pelvic support layer. Refer to Removing/Installing the Pelvic Support Layer on page 6. Reinstall cushion into inner and outer covers. Refer to Removing/Installing the Cushion Covers on page 5. Invacare® Matrx® Flovair™ 6 Part No 1167584 4 Care and Maintenance DO NOT use an abrasive detergent, cleaner or cloth during maintenance. 4.1 Cleaning Regular cleaning of the outer cover, inner cover and cushion is recommended. Outer Cover CAUTION DO NOT use fabric softeners or bleach. DO NOT machine dry. Air dry only. DO NOT dry in sun. Machine wash the outer cover in cold water on gentle cycle using a mild detergent. Inner Cover Hand clean the inner cover using a soft cloth, warm water and a mild soap solution. Rinse off and hang dry. Foam Wipe the foam with a damp cloth. DO NOT submerge or soak. 4.2 Inspection WARNING DO NOT continue to use this product if any of the upholstery materials, foams, and/or plastics are found to be deformed, breaking, worn, and/or compressed. Corrective maintenance can be performed at or arranged through your equipment supplier. Regular inspection of the outer cover, inner cover and cushion is recommended. 4.3 Maintenance Fluid in the pelvic pressure-relieving insert may have a tendency to migrate downward if the cushion is resting or stored in the vertical position. If this is the case, please remove the outer/inner cover to inspect the insert. If migration has occurred, gently knead the insert to ensure a uniform volume of fluid exists across the surface. 5 After Use Reuse WARNING: Risk of Injury Always have a dealer inspect the product for damage before transferring the product to a different user. If any damage is found, DO NOT use the product. Otherwise injury may occur. Part No 1167584 7 Invacare® Matrx® Flovair™ 6 Limited Warranty PLEASE NOTE: THE WARRANTY BELOW HAS BEEN DRAFTED TO COMPLY WITH FEDERAL LAW APPLICABLE TO PRODUCTS MANUFACTURED AFTER JULY 4, 1975. This warranty is extended only to the original purchaser/user of our products. This warranty gives you specific legal rights and you may also have other legal rights which vary from state to state. Invacare warrants this product to be free from defects in materials and workmanship for two years of use by original purchaser except for the cover, which is warranted for a period of 90 days of use by the original purchaser. If within such warranty period any such product shall be proven to be defective, such product shall be repaired or replaced, at Invacare's option, with refurbished or new parts. This warranty does not include any labor or shipping charges incurred in replacement part installation or repair of any such product. Product repairs shall not extend this warranty - coverage for repaired product shall end when this limited warranty terminates. Invacare's sole obligation and your exclusive remedy under this warranty shall be limited to such repair and/or replacement. For warranty service, please contact the dealer from whom you purchased your Invacare product. In the event you do not receive satisfactory warranty service, please write directly to Invacare at the address on the back cover. Provide dealer's name, address, model number, the date of purchase, indicate nature of the defect and, if the product is serialized, indicate the serial number. Invacare Corporation will issue a return authorization. The defective unit or parts must be returned for warranty inspection using the serial number, when applicable, as identification within thirty (30) days of return authorization date. DO NOT return products to our factory without our prior consent. C.O.D. shipments will be refused; please prepay shipping charges. LIMITATIONS AND EXCLUSIONS: THE WARRANTY SHALL NOT APPLY TO PROBLEMS ARISING FROM NORMAL WEAR OR FAILURE TO ADHERE TO THE ENCLOSED INSTRUCTIONS. IN ADDITION, THE FOREGOING WARRANTY SHALL NOT APPLY TO SERIAL NUMBERED PRODUCTS IF THE SERIAL NUMBER HAS BEEN REMOVED OR DEFACED; PRODUCTS SUBJECTED TO NEGLIGENCE, ACCIDENT, IMPROPER OPERATION, MAINTENANCE OR STORAGE; OR PRODUCTS MODIFIED WITHOUT INVACARE'S EXPRESS WRITTEN CONSENT INCLUDING, BUT NOT LIMITED TO: MODIFICATION THROUGH THE USE OF UNAUTHORIZED PARTS OR ATTACHMENTS: PRODUCTS DAMAGED BY REASON OF REPAIRS MADE TO ANY COMPONENT WITHOUT THE SPECIFIC CONSENT OF INVACARE; PRODUCTS DAMAGED BY CIRCUMSTANCES BEYOND INVACARE'S CONTROL; PRODUCTS REPAIRED BY ANYONE OTHER THAN AN INVACARE DEALER, SUCH EVALUATION SHALL BE SOLELY DETERMINED BY INVACARE. THE FOREGOING WARRANTY IS EXCLUSIVE AND IN LIEU OF ALL OTHER EXPRESS WARRANTIES, IF ANY, INCLUDING THE IMPLIED WARRANTIES OF MERCHANTABILITY AND FITNESS FOR A PARTICULAR PURPOSE. IT SHALL NOT EXTEND BEYOND THE DURATION OF THE EXPRESSED WARRANTY PROVIDED HEREIN AND THE REMEDY FOR VIOLATIONS OF ANY IMPLIED WARRANTY SHALL BE LIMITED TO REPAIR OR REPLACEMENT OF THE DEFECTIVE PRODUCT PURSUANT TO THE TERMS CONTAINED HEREIN. INVACARE SHALL NOT BE LIABLE FOR ANY CONSEQUENTIAL OR INCIDENTAL DAMAGES WHATSOEVER. THIS WARRANTY SHALL BE EXTENDED TO COMPLY WITH STATE/PROVINCIAL LAWS AND REQUIREMENTS. Invacare Corporation www.invacare.com USA One Invacare Way Elyria, Ohio USA 44036-2125 440-329-6000 800-333-6900 Canada 570 Matheson Blvd. E Unit 8 Mississauga Ontario L4Z 4G4 Canada 800-668-5324 © 2011 Invacare Corporation. All rights reserved. Republication, duplication or modification in whole or in part is prohibited without prior written permission from Invacare. Trademarks are identified by ™ and ®. All trademarks are owned by or licensed to Invacare Corporation or its subsidiaries unless otherwise noted. Part No 1167584 Rev A - 02/11