1
APHIS User Manual
Draft (9 May 2013)
Automatic Photo Identification Suite
Version 1.0.0
Fundació Balear d'Innovacio i Tecnologia (Govern de les Illes Balears)
Population Ecology Group - Institut Mediterrani d'Estudis Avançats (CSIC-UIB)
Disclaimer
This program is free software; you can redistribute it and/or modify it under the terms of the GNU
General Public License as published by the Free Software Foundation; either version 2 of the
License, or (at your option) any later version.
The software was developed with greatest care and tested extensively on different computer
systems. We found no errors in the released product versions. Nevertheless, there is no guarantee,
that the software will run error-free on each system. We will not take any liability for
incompatibilities with hardware-components and other software products and their components.
The software is provided "as is", without any guarantee on the suitability for a certain case of
application.
No liability whatsoever will be accepted in case of data loss caused by using the software. Using the
software is at the sole risk of the user. Fundació BIT and IMEDEA will take no liability for
damages resulting from the direct or indirect use of the software.
APHIS – Automatic Photo Identification Suite
csic.es/bc/ecopob/
Freely available at http://imedea.uib-
Project partners and acknowledgements
APHIS development has been funded by the Spanish Minister for Economy and Innovation (project
number: BFU2009-09359) and the Population Ecology Group of IMEDEA.
The development of APHIS took more than a year of programming, trials and debugging work. . In
a way it is still a working project and users are encouraged to suggest changes for further
developments and report possible bugs.
Dr. G. Tavecchia from the Population Ecology Group (G.E.P) of the IMEDEA (CSIC-UIB)
conceptualized the idea motivated by the need to find an efficient and not invasive method to
individually recognized lizards. Dr. Ó. Moya from the “Fundación BIT” (formerly Fundación iBit)
made the idea reality, reviewing the existing procedures in photo-recognition and outlining the first
structure of APHIS. He put together a team of young and passionate programmers who help to
refine the software.
The members of the G.E.P. group were involved in software requirements and functionality
definition as well as in testing phases. G.. Tavecchia and J. M. Igual conducted a sequence of
sampling campaigns on the Balearic lizard Podarcis lilfordi specifically designed to test APHIS.
Andreu Rotger Vallespir has become the most active user and reviewer of the APHIS 1.0 functional
beta version, having analysed at present more than 3000 pictures of lizards. He is currently living in
front of a screen with a lizard picture.
The Fundación BIT (formerly Fundación iBit) has been in charge of software programming. Dr.
Óscar Moya supervised the tasks of a team of developers, ensuring that APHIS functionality
fulfilled the requirements defined by the field study. Pep Lluis Mansilla and Sergio Madrazo
worked hard transforming ideas to the working piece of code now denominated APHIS and freely
available at .http://imedea.uib-csic.es/bc/ecopob/ The team made the effort of making APHIS
flexible and user friendly. As it is, it can be used in many other species. A use on the individual
recognition of Majorcan Midwife toad Alytes muletensis is currently under study. Moreover, APHIS
can be customized to meet specific needs or solve potential constraints. For example, additional
routines can be added and preliminary statistical analyses can be automatically performed from the
log files if necessary.
Finally, APHIS would not be what it is without the work and support of Jurgen den Hartog and
Renate Reijns, authors of I3S, who have kindly and rapidly responded to all our questions on I3S
code and method.
APHIS – Automatic Photo Identification Suite
csic.es/bc/ecopob/
Freely available at http://imedea.uib-
Contents
Disclaimer.............................................................................................................................................2
Project partners and acknowledgements..............................................................................................3
1. Introduction......................................................................................................................................5
2. How to begin....................................................................................................................................6
3. Image Template Matching (ITM).....................................................................................................7
4. Spots Pattern Matching (SPM).......................................................................................................12
5. Tracking the results ........................................................................................................................19
6. Update the database (for advanced and ventured users).................................................................19
7. Final remarks..................................................................................................................................19
APHIS – Automatic Photo Identification Suite
csic.es/bc/ecopob/
Freely available at http://imedea.uib-
1. Introduction
This manual guides you through the use of APHIS v.1.0. This software suite includes two photoidentification procedures:
1) a pixel-based comparison of a given region or ROI (Image template matching, ITM)
2) a comparison of user-defined spots pattern (Spots Pattern Matching, SPM).
The first procedure has been originally created for APHIS, whereas the second procedure is an
extension of the already existing procedure implemented in software I3S (see chapter 4).
The second procedure also implements a database filtering system that uses qualitative parameters
to avoid unnecessary comparisons. Both procedures share a common user interface, the
characteristic of which are described in the following sections.
The photo-identification consists in the comparison of a sample, i.e. a picture of an individual of
unknown identity, against a set of candidates, i.e. pictures of individuals of known identity present
in the database. The database, in this case is a simple file structure that uses folders to store any
images of each individual. In APHIS the database will be a folder with as many sub-folders as
individuals identified.
The software assists photo-identification by applying algorithms to calculate similarities among the
sample images and the candidates, returning a score value per comparison that will be used to order
candidates for a posterior visual inspection. During the final inspection the user decides whether
the sample is a match with a candidate or not. If the sample is a match, the image will be stored
under the existing folder of the candidate picture. Alternatively, it will be stored as a new
individual, creating a new folder in the database. Note that APHIS prompts the folder name using
successive numbers, but users can write a different one.
The photo-matching is done in three steps or phases: the pre-processing phase, the matching phase
and the visual inspection of results.
1) Pre-processing. Before comparisons, users are asked to prepare samples by selecting
reference points on each picture. This phase is different in SPM and ITM (see below).
2) Matching. During matching, the software compares the sample pre-processed images with
those already presented in the database and delivers a series of potential matches (maximum
an hundred potential matches), from the more to the less plausible.
3) Visual inspection. In this last phase, users inspect the potential matches and decide whether
a match has been found or not.
In SPM we implemented a database filtering system which allows the user to define a filter, e.g.
male of female, to reduce the set of valid candidates, avoiding unnecessary comparisons against the
whole database. Filters have been thought to describe qualitative characters or features that
distinguish unequivocally one individual from another, such as the gender or the location. User can
define as many filters as necessary that will be combined to preselect the candidates that have to be
compared to the sample. We have called this functionality multichar filtering. The use of such
filters is not necessary, but in large database can reduce considerably computing efforts and waiting
times during the analysis.
APHIS – Automatic Photo Identification Suite
csic.es/bc/ecopob/
Freely available at http://imedea.uib-
APHIS stores the results in text files. These files are formatted as comma-separated CSV to allow its
inspection on a spread-sheet. CSV files can be opened by commonly used programs as Microsoft
Office or Open Office 1 among others.
The APHIS software also includes the particular concept of project which is used to define a study
of a single species or population in determined conditions (i.e. from the same geographical location
if migration is implausible, or studied during a segment of time) or analysed with a particular
algorithm (ITM or SPM). Finally, the program offers two batch processes. The first one can be
activated to open a set of samples for pattern edition (Open Batch) and the second one to compare
among each of the previously edited samples and the candidates already in the database (Search
Batch).
2. How to begin
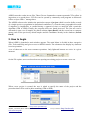
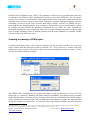
When APHIS is launched a main window appears. The main Menu is divided in three categories
(File, Tools and Help) and gives access to APHIS controls. The submenus also display key shortcuts
to most operations.
A set of short-cuts to the most common operations. Only lightened buttons are active in a given
moment.
On the File option, users can chose between opening an existing project or create a new one.
When a new project is created, the user is asked to specify the name of the project and the
procedure that will be used in photo matching (ITM or SPM).
1 It can be downloaded for free at http://www.openoffice.org/
APHIS – Automatic Photo Identification Suite
csic.es/bc/ecopob/
Freely available at http://imedea.uib-
Differences between these procedures are outlined in chapters 3 and 4. The ITM procedure is faster
but is more affected by image characteristics. It should be preferred when images are homogeneous
in terms of light and resolution and when individuals present highly defined spots or contrasted
colors. The SPM procedure is well adapted when photos are heterogeneous or when animal
characteristics are not well distinguishable, however the pre-processing phase is usually longer than
the one in the ITM procedure. Once the matching procedure has been defined, a project sub-folder
is created and stored in the directory “ProyectosFOTOID” or “ProyectosI3S”, under ITM and SPM
procedures, respectively. APHIS will create a project file with .pis extension, a database sub-folder
where the candidates will be stored, a sub-folder where edited samples will be placed since
processed and a last sub-folder that will contain the reports and logs generated during the analysis.
Project name and characteristics will appear in the information displayed on the right part of the
window.
A new project is a tabula rasa where no information has been provided to the software to perform
any analysis. As photo-identification is based on the use of a minimum repository of images to
compare your sampled individuals with, it is mandatory to create a database to proceed to the next
steps. When only one image has been taken, it is possible to create a database using the Open
function (from the File Menu, Toolbar or simply by pressing Ctrl+O). However users commonly
begin with a set of images of individuals. In this case one should use the Open Batch function (from
the File Menu, Toolbar or simply by pressing Ctrl+B). In each case, APHIS will ask to select the
folder that contains the image/s. Note that each processed image will be separated in a sub-folder
representing a single individual.
Once the first image is displayed user can control its zoom level and position either with the mouse
wheel or with the size selector of the toolbar and the scroll bars that surround the image. After these
preliminary steps, it is time to define the references for each image. Here the procedures differ and
the steps to follow will be outlined in the next chapters.
3. Image Template Matching (ITM)
Introduction
The ITM procedure implements the matchTemplate function of the Open Computer Vision
libraries2. The matchTemplate is a preprogrammed function of OpenCV that slides a template image
patch over an input image looking for matches. This method provides three different algorithms and
their normalized versions in order to calculate a matrix of likelihoods of match per comparison.
APHIS implements the normalized version of the correlation coefficient algorithm, which is the
most accurate of the three. Normalization is used to minimize the effect of lightning differences
among template while calculating matching scores.
During the ITM pre-processing step the user selects two reference points for each picture. They
should be easily recognizable parts of the animal, e.g. shoulders or eyes, or species-characteristic.
2 http://opencv.org/
APHIS – Automatic Photo Identification Suite
csic.es/bc/ecopob/
Freely available at http://imedea.uib-
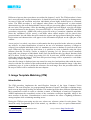
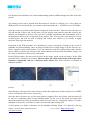
For the lizard in Photo 1, the two references were the two upper corners of the larger scales on the
first four-scale horizontal pectoral line (Photo 1.1). Depicting a reference system is necessary to
ensure accurate two dimensional comparisons of sample and candidate. The reliability of matching
scores will depend on the reproducibility of this selection across pictures.
References will be used in ITM to align the individual with the horizontal axis (Photo 1.2), crop a
region of interest which proportions will be dependent of the pixel distance among references
(Photo 1.3), resize the image to a fixed resolution being the resulting image named as pattern
(Photo 1.4) and, finally to divide the pattern in six non-overlapping contiguous templates extracted
automatically from the lower half of the pattern (Photo 1.5). Steps (2) to (5) are automatically
performed by the software and do not need supervision. The only supervised task is marking the
two reference points.
Photo 1.
The six resulting templates extracted from a single sample are individually compared with the
candidate pattern and the scores resulting from the six comparisons are added up to produce the
final sample-candidate matching score. APHIS delivers an ITM score list per comparison where
candidates are ordered, from highest to lowest, by their matching likelihood (the final score).
Individual template scores range from -1 to 1, this being the score obtained when the template is a
portion of the own input image. Therefore a value of 6 would be a perfect sample-candidate match.
Using non-overlapping templates the effect of local image defects has less impact on the final score,
enabling real matches to be well positioned in the score list ahead of random ones.
Creating a new or opening an existing ITM project
A new project can be created from the menu bar, toolbar or with the Ctrl + N key short-cut. A
window will open asking you to give a name to the project and to chose the analytical procedure to
APHIS – Automatic Photo Identification Suite
Freely available at http://imedea.uibcsic.es/bc/ecopob/
apply. In this case the Image Matching option should be selected. The ITM new project sub-folder
is placed under ProyectosFOTOID. There you will find a file with the .pis extension, a database
sub-folder where the candidates will be stored, a sub-folder where edited samples will be placed
since processed and a last sub-folder that will contain the reports and logs generated during the
analysis.
Once familiar with the analytical procedure it can be helpful to browse this folder/sub-folder
structure using the File Explorer from Windows. That can give you a better understanding on how
APHIS manages the files used in the project, thus enhancing your user experience and helping you
to use the software more efficiently.
An existing project can be opened from the menu bar, tool bar or with the Ctrl + A key short-cut.
ITM projects are stored with the .pis extension and found under the .../APHIS/ProyectosFOTOID
folder.
Once the project is opened a lateral panel is displayed in the interface. At this time, only the project
name and the procedure used for the analysis are indicated, but more valuable information and
functionality will be incorporated to this area as you progress in the analysis.
Create the project database
When creating a new project, as photo-identification is based on the use of a minimum repository of
images to compare your sampled individuals with, it is mandatory to create a database to proceed to
the next steps (see end of Chapter 2 for how to begin database).
Once an image is displayed as a single image or as the first one of a batch, it appears on the main
window. User can control its zoom level and position either with the mouse wheel or with the size
selector of the toolbar and the scroll bars that surround the image.
The next two left click of the mouse will position the references (Photo 1.1). The first reference
to set must be the left one, the second the right one. The sequence is not trivial as APHIS needs to
know which one is on the left side of the animal and which is on the right. A reference can be
deleted right clicking on it.
After setting the references, user can switch to the handy buttons from the toolbar.
At this stage, with a new project where no repository or candidate images are present, images
should be simply saved in the database. Press the Save button (with the disk image) to open one
image or the Save & Next button (the disk image with a green arrow) if you are in a batch process.
Both store the pattern and templates in the database. You can also discard an image if it does not
achieve the necessary quality to be taken into consideration for the analysis. Keep doing that with
all the images you opened. APHIS will give automatically a name to the individual you save,
however it is possible to edit this name before passing to the next image. Note that APHIS will treat
all these unmatched images as belonging to different individuals. Users should make sure that each
APHIS – Automatic Photo Identification Suite
Freely available at http://imedea.uibcsic.es/bc/ecopob/
image saved as candidate belongs to a different individual.
Warning: while creating the database using Open Batch it is required that each image belongs to a different
individual. Two photographs from the same individual would be treated as belonging to different animals because
matching algorithms have still not been applied to detect such circumstance.
Analyse of image/s
Once at least one sample is in the database it is possible to proceed to search for matching images.
There are three steps for the analysis of sample image/s: the pre-processing, the matching and the
phase of post-processing (or visual inspection).
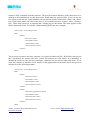
PRE-PROCESSING: First open the sample with the Open button or a set of samples with the Open
Batch button. Each image should be pre-processed by marking the references as when creating the
database. Two references are positioned by the first two left click of the mouse. Users should take
in mind that these references should be the same on every picture. The pre-processing phase can be
stopped at any time. Edited samples will be temporally stored in the project's Captures folder for
the matching processed. After the matching process these temporary files will be moved to
individual sub-folders of the database or discarded. The General Info tab has a section that lists the
samples contained temporarily in the Captures folder and a button to delete them if this is user’s
decision. It also contains an Image Information section that displays the name of the image file and
the date and time of capture and a Finger Print Information section informing of the number of
references already marked on the active sample (Photo 2).
APHIS – Automatic Photo Identification Suite
csic.es/bc/ecopob/
Freely available at http://imedea.uib-
Photo 2
MATCHING: When pre-processing is finished, the matching phase begins by pressing the Search
or Search Batch button (depending whether a single image or multiple images have been preprocessed). The software will calculate similarity indexes for each sample-candidate pair. If images
are processed by batch, results will be presented only when all samples have been analysed. The
matching phase is automatic and does not need supervision. This is true for single as well as
multiple images. APHIS will display the results for each image sequentially.
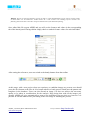
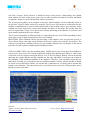
VISUAL INSPECTION: For each image, APHIS displays in the lateral panel the first fifty options
considering their likelihood values. Users can browse them from highest to lowest scores to visually
compare the sample and candidate. After the inspecting phase the image can be registered using the
Match button, if a match has been accepted, or as a new individual with the New button, if a match
has not been found. User can also discard the image using the Discard Sample button (Photo 3). A
match occurs when the sample and the selected candidate images are from the same individual. The
sample image will be stored in the subfolder of the matching candidate in the database or on a new
subfolder if it belongs to a new individual. In APHIS each subfolder represents one individual. The
visual matching task will be then repeated for each sample image.
APHIS – Automatic Photo Identification Suite
csic.es/bc/ecopob/
Freely available at http://imedea.uib-
Photo 3
4. Spots Pattern Matching (SPM)
Introduction
SPM is based on the algorithm implemented in the freely available 3 software I3S. In this case,
during the preprocessing of a sample picture the user delimits the region of interest with three
references and marks the set of spots within that will be compared during matching the defined
area. The coordinates of each spot in the space delimited by the references form a fingerprint-like
statistic.
During the analysis, the spatially-corrected cloud of spots from the sample is compared with the
fingerprints stored in a repository. This correction is the result of an affine transformation of the
sample pattern mapped onto that of the candidate one. Matching scores are calculated as the sum of
metric distances between spots from every pair created in a sample-candidate comparison divided
by the square of the total number of spot pairs. Lowest scores point to likely matches, being the
number of spot pairs used during calculation relevant to the resulting score value although it is not
yet clear to what extent. Numbers in the range of 20 to 40 spots would in general ensure enough
pairs for the matching, however we recommend you to do some preliminary testing with a reduced
set of samples to determine the number of spots that will actually require your study.
The matching algorithm used by SPM approach in APHIS was directly extracted from the I 3S
Classic source code respecting its license agreement (GNU Public License v2) and in accordance
with its developers. APHIS uses the exhaustive search version of the comparison algorithm
3 http://www.reijns.com/i3s/
APHIS – Automatic Photo Identification Suite
csic.es/bc/ecopob/
Freely available at http://imedea.uib-
described at Van Tienhoven et al. (2007)4. The exhaustive search uses every possible three spot pairs
as references for different affine transformations, and not only those defined by the user (quick
search). Score values are calculated for each transformation and a subsequent comparison with the
candidate and the lowest is kept as final result. Exhaustive searches, although computer resources
consuming, proved to be far more accurate than simple ('quick') searches. In APHIS, the preprocessing and the matching phases occur separately. This permits to process sequentially a group
of samples and then launch the matching calculations for the whole set. Once finished the
automated matching, the user is presented with a list of sample-candidate alternatives ordered from
lower to higher matching scores. If multiple pictures from the same candidate are available, APHIS
only shows this with the lowest score.
Creating or opening a SPM project
Creating and opening project can be done as explained for the previous procedure. A new project
can be created from the menu bar, toolbar or with the Ctrl + N key short-cut. A window will open
asking you to give a name to the project and to choose the analytical procedure to apply. In this
case the I3S option should be selected.
The APHIS folder containing the new project sub-folder is under the directory Proyectos I3S. The
file has the .pis extension, a database sub-folder where the candidates, spots patterns and, in contrast
to the ITM procedure, multichar filtering features will be stored, a sub-folder where edited samples
will be placed since processed and a last sub-folder that will contain the reports and logs generated
during the analysis. As stated before, it is useful to browse this folder/sub-folder structure using the
4 Van Tienhoven, A. M., J. E. Den Hartog, R. A. Reijns, and V. M. Peddemors. 2007. A computer-aided program for pattern-matching of natural
marks on the spotted raggedtooth shark Carcharias taurus. Journal of Applied Ecology 44:273 - 280.
APHIS – Automatic Photo Identification Suite
csic.es/bc/ecopob/
Freely available at http://imedea.uib-
File Explorer from Windows for a better understanding on how APHIS manages the files used in the
project.
An existing project can be opened from the menu bar, tool bar or with the Ctrl+A key short-cut.
SPM projects are stored with the .pis extension and found under the /...APHIS/Proyectos I3S folder.
Once the project is opened a lateral panel is displayed in the interface. It has two tabs, the General
Info tab and the Features tab. At this time, only the project name and the procedure used for the
analysis are indicated in General Info, but more valuable information and functionality will be
incorporated to this area as you progress in the analysis. The Features tab is also empty in a newly
created project, but will be used to display and control your choices if you decide to apply
multichar filtering to the analysis.
Equivalent to the ITM procedure, it is mandatory to create a repository of images to use as set of
candidate for photo-matching. Once an image is displayed as a single image or as the first one of a
batch, it appears on the main window. User can control its zoom level and position either with the
mouse wheel or with the size selector of the toolbar and the scroll bars that surround the image. It is
now time to define the references for each image.
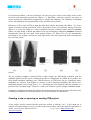
In the ITM procedure, the next two left clicks on the image would set the references. In the SPM
procedure three references are needed. The next three left click of the mouse will set the three
references sequentially and in a clockwise order (Photo 4.1). Each reference is labelled to
minimize mistakes.
Photo 4
Note that three references have been chosen to match the requirement of the study, however APHIS
can be costumized to have more, if necessary.
Once the three references are set, the spots pattern is applied. Here user selects each spot that will
be used as a matching feature in the matching phase. In the case of the lizard we marked the
intersections between scales so to define a pattern of scales used as a ‘fingerprint’ (Photo 4.2) with a
minimum of 30 points. A reference or spot can be deleted right clicking on it.
A final option is to define a character for the multichar filtering (Photo 4.3). Multichar filtering
APHIS – Automatic Photo Identification Suite
csic.es/bc/ecopob/
Freely available at http://imedea.uib-
cannot be fully controlled from the interface. The specific features and their valid values have to be
defined in the metadata.xml text file that can be found under the project folder. Users can use any
text editor to edit this file. Open metadata.xml and add any feature between the <data> and </data>
tags. Each feature name and valid values have to be inserted between a <feature> and a </feature>
tags. There must always be an opening and a closing tag per data block. The same applies for the
feature name and values. For a better a understanding follow the next example:
<?xml version='1.0' encoding='utf-8'?>
<data>
<feature>
<name>Sex</name>
<value>Male</value>
<value>Female</value>
<value>Unknown</value>
</feature>
</data>
The previous text shows the basic contents of a typical metadata.xml file. By default, each project
has a predefined Sex feature with male, female and unknown as valid values. It is mandatory to
include the unknown value because phenotypic characters are not always black and white. If you
want, for example, to introduce a new feature as skin pigmentation with values bluish and greenish
edit the file in the following manner:
<?xml version='1.0' encoding='utf-8'?>
<data>
<feature>
<name>Sex</name>
<value>Male</value>
<value>Female</value>
<value>Unknown</value>
</feature>
<feature>
<name>Skin_pigmentation</name>
<value>Bluish</value>
<value>Greenish</value>
<value>Unknown</value>
</feature>
</data>
APHIS – Automatic Photo Identification Suite
csic.es/bc/ecopob/
Freely available at http://imedea.uib-
Warning: Do not use Special symbols or spaces on name or value denominations. If you want to separate words
in those names use an underscore. Neither delete the <?xml version='1.0' encoding='utf-8'?> header. Not
following this instructions can lead to unexpected behaviours of the multichar filtering.
Once edited this file reopen APHIS and you will see the features and values in the corresponding
tab of the lateral panel. During edition simply check or uncheck feature values for each individual.
After setting the references, user can switch to the handy buttons from the toolbar.
At this stage, with a new project where no repository or candidate images are present, user should
press the Save button or the Save & Next button when in a batch process. Both store the pattern and
templates in the database. Users can also discard an image if it does not achieve the necessary
quality to be taken in consideration for the analysis. Keep doing that with all the images you
opened. APHIS will give automatically a name to the individual you save this way, however it is
possible to edit this name before proceeding to the next image or finishing the process.
APHIS – Automatic Photo Identification Suite
csic.es/bc/ecopob/
Freely available at http://imedea.uib-
Warning: while creating the database using Open Batch it is required that each image belongs to a different
individual. Two photographs from the same individual would be treated as belonging to different animals because
matching algorithms have still not been applied to detect such circumstance.
Analyse of image/s
Once a project with at least one sample in the database is open it is possible to proceed to the
matching analysis. The three phases of pre-processing, matching and visual inspection (postprocessing) are similar to the ones described for ITM. However, the supervised tasks are different.
PRE-PROCESSING: Users should first open a sample with the Open button or set of samples with
the Open Batch button (Photo 5).
Photo 5.
Three references should be marked on each image. These are positioned clockwise by the first three
APHIS – Automatic Photo Identification Suite
csic.es/bc/ecopob/
Freely available at http://imedea.uib-
left click of mouse. Each reference is labelled to help in this process. Subsequently user should
mark with the left click of the mouse spots, scars or other characteristics that are used for individual
recognition. Images are then automatically taken as repository.
The pre-processing phase can be stopped at any time. Edited samples will be temporally stored in
the project's Captures folder ready to be analysed. The General Info tab has a section that lists the
samples contained by the Captures folder and a button to delete them if this is your decision. It also
contains an Image Information section that displays the name of the image file and the date and
time of capture and a Finger Print Information section informing of the number of references and
spots already marked on the active sample.
The pre-processing phase in SPM procedure is longer than the one in the ITM, depending on how
many spots, scars or other characteristics have to be marked.
MATCHING: When finished with the preprocessing of the samples, users can press the Search or
Search Batch button (the right option depends of the Open option you used one step before). The
software will calculate similarity indexes for each sample-candidate pair and display in the lateral
panel the first fifty options considering this likelihood values.
VISUAL INSPECTION: after the matching phase, APHIS delivers the results from from highest to
lowest scores. Here users can visually compare the sample and candidate pair (Photo 6). Once taken
a decision it can be registered using the Match, New or Discard Sample buttons. Match means that
that both, the sample and the selected candidate are the same individual. It will store the sample in
the subfolder of the matching candidate in the database. Therefore, each subfolder represents one
individual. Pressing New you indicate that no candidate matches with the sample and that it should
be stored as new individual. Finally, one can discard a comparison if you don't want to include the
sample in the database. This supervised task is equivalent to the one in the ITM procedure and it
bound to last the same time.
Photo 6
APHIS – Automatic Photo Identification Suite
csic.es/bc/ecopob/
Freely available at http://imedea.uib-
5. Tracking the results
APHIS stores the results in text files. These files are formatted as comma-separated CSV to allow its
inspection on a spread-sheet. CSV files can be opened by commonly used programs as Microsoft
Office or Open Office 5 among others.
In some cases, the program will open a menu asking you to rename a file. Note that repeated file or
individual names are not allowed in APHIS to avoid confusion during results inspection.
Under the project folder you will find a results/logs subfolder containing four files, namely
Chains.csv, Dates.csv, DatesAndChains.csv and Rename.csv. Chains.csv contains a row per
individual with its name in the first column and sample names that belong to it in adjacent columns.
ChainsAndDates.csv includes also sampling dates of each sample. Dates.csv only the dates. And
Rename.csv a history of renamed samples to let you track denomination changes in filenames.
Under the results subfolder is also created a registry for each analysis run, they provide a detail of
scores obtained per sample-candidate pair displayed in the results lists.
ChainsAndDates.csv includes also sampling dates of each sample. Dates.csv only the dates. And
Rename.csv a history of renamed samples to let you track denomination changes in filenames.
6. Update the database (for advanced and ventured users)
Frequent users of APHIS might be tempted to “manage” the repository and capture folder contents.
This can be dangerous because deleting some files can corrupt the whole project.
A first GOLD RULE is to make a full copy of your project folder before doing any change to its
contents. Keep this copy in a safe place and if something goes wrong, simply substitute the
corrupted folder by this backup.
Files can be moved across subfolders if, for example, a sample was incorrectly matched with an
existing individual or one can delete a sample that is producing mess in your analysis, etc.
However, if these actions are made while APHIS is open, during pre-processing or visual
inspection, the software will not be aware of the changes and can react unexpectedly. To avoid this
one should use the Update database function in the Tools menu. Once updated, the program will
know about the changes and behave correctly.
You can also edit the metadata file contents, but we do not recommend to do that as far as it is easy
to edit them reopening the sample inside APHIS and using the interface selectors to check or
uncheck a value.
7. Final remarks
APHIS is a new, freely-available, software for individual recognition by photo-identification. The
main aspect that distinguishes APHIS from other routines is that it reduces supervised tasks to the
5 It can be downloaded for free at http://www.openoffice.org/
APHIS – Automatic Photo Identification Suite
csic.es/bc/ecopob/
Freely available at http://imedea.uib-
minimum. This makes APHIS especially suitable for the analyses of a large number of photos. Also,
it includes two different routines, the ITM and the SMP, to better meet users’ needs and a multicharacter filtering for a more efficient search in large database. In the ITM routine (Chapter 3) preprocessing phase is reduced to the setting of two references. For expert as well as new users, this
per-processing task would take 2-3 seconds per image. However the routine has some pitfalls.
Deciding two reference points that can be easily recognized in any picture is not an easy task. It is
helpful to have a little knowledge of the anatomy of the species under study and find out a reference
system unequivocally and easily recognisable in all samples. A second problem is that ITM
performance is highly affected by image quality and diligent usage. Heterogeneous sampling
conditions in luminosity, focus or other distortions as dirt over the animal, can affect the analysis.
An inconsistent setting of references has also dramatic impact on the result. Therefore ITM has to
be taken as a “rigid” procedure and cannot be considered as a definitive solution for all ecological
studies. Despite these drawbacks, when image characteristics are homogeneous across the samples
and two body references are easily recognised, ITM is a very fast an efficient method for photo
matching. The second procedure, SPM, uses the existing I3S algorithm, which is based on pairwise comparison of the distance between points defined by the user an three references points. The
pre-processing phase is about ten times longer than in the ITM and depends on user ‘s experience
and on the minimum number of points that need to be compared. On the other hand it does not rely
on photo quality or characteristics as the ITM procedure. As a rule of thumb we advice to work with
ITM only when luminosity, definition and image quality can be standardized.
APHIS – Automatic Photo Identification Suite
csic.es/bc/ecopob/
Freely available at http://imedea.uib-