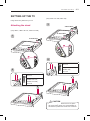
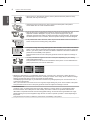
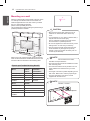
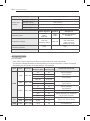
1
OWNER’S MANUAL LED TV* * LG LED TV applies LCD screen with LED backlights. Please read this manual carefully before operating your set and retain it for future reference. LB55** LB56** LB62** *MFL68003802* P/NO : MFL68003802 (1401-REV00) Printed in Korea www.lg.com A-2 TABLE OF CONTENTS TABLE OF CONTENTS A-3 SETTING UP THE TV A-3 Attaching the stand A-4 MAKING CONNECTIONS A-4 Antenna connection A-6 Satellite dish connection A-7 Euro Scart connection A-10Other connections COMMON LANGUAGE LIST English Deutsch Français Italiano Español Português Nederlands Ελληνικά Slovenščina LANGUAGE B-1 SPECIFICATIONS B-6 REGULATORY COMMON SETTING UP THE TV A-3 SETTING UP THE TV Image shown may differ from your TV. Attaching the stand (Only LB56**-ZT / ZQ, LB62**-ZE) 1 A Stand Base (Only LB55**, LB56**-ZE / ZC, LB62**-ZA / ZB) B Stand Base 1 A Stand Base B Stand Base 2 M4 x L14 2 4EA (Only 32LB56**-ZT / ZQ, 32LB62**-ZE) M4 x L20 M4 x L14 4EA (Only 32LB55**, 32LB56**-ZE / ZC, 32LB62**-ZA / ZB) M4 x L20 CAUTION yy When attaching the stand to the TV set, place the screen facing down on a cushioned table or flat surface to protect the screen from scratches. A-4 MAKING CONNECTIONS MAKING CONNECTIONS This section on MAKING CONNECTIONS mainly uses diagrams for the 47LB561V models. Antenna connection Wall Antenna Socket ANTENNA / CABLE IN Deutsch Schließen Sie das TV-Gerät mit einem HF-Kabel (75 Ω) an eine Wandantennenbuchse an. HINWEIS yy Bei Verwendung von mehr als 2 TV-Geräten verwenden Sie einen Signalsplitter. yy Ist das Bild schlecht, installieren Sie einen Signalverstärker, um die Bildqualität zu verbessern. yy Wenn die Bildqualität bei angeschlossener Antenne schlecht ist, richten Sie die Antenne richtig aus. yy Antennenkabel und Verstärker sind nicht im Lieferumfang enthalten. yy Unterstützter DTV-Ton: MPEG, Dolby Digital, Dolby Digital Plus, HE-AAC Français *Not Provided Connectez la TV à une prise d’antenne murale avec un câble RF (75 Ω). REMARQUE English Connect the TV to a wall antenna socket with an RF cable (75 Ω). NOTE yy Use a signal splitter to use more than 2 TVs. yy If the image quality is poor, install a signal amplifier properly to improve the image quality. yy If the image quality is poor with an antenna connected, try to realign the antenna in the correct direction. yy An antenna cable and converter are not supplied. yy Supported DTV Audio: MPEG, Dolby Digital, Dolby Digital Plus, HE-AAC yy Utilisez un séparateur de signaux pour utiliser plus de deux téléviseurs. yy Si la qualité d’image est mauvaise, installez correctement un amplificateur de signaux pour l’améliorer. yy Si vous utilisez une antenne et que la qualité d’image est mauvaise, essayez de réaligner l’antenne dans la bonne direction. yy Le câble et le convertisseur d’antenne ne sont pas fournis. yy Technologies audio TNT prises en charge : MPEG, Dolby Digital, Dolby Digital Plus, HE-AAC Italiano Collegare il televisore all’antenna centralizzata con un cavo RF (75 Ω). NOTA yy Utilizzare uno sdoppiatore del segnale per usare più di 2 televisori. yy Se la qualità dell’immagine è scarsa, installare correttamente un amplificatore del segnale per migliorarla. yy Se la qualità dell’immagine è scarsa con un’antenna collegata, provare a riallineare l’antenna nella direzione corretta. yy Il cavo e il convertitore dell’antenna non sono in dotazione. yy Audio DTV supportato: MPEG, Dolby Digital, Dolby Digital Plus, HE-AAC MAKING CONNECTIONS Español Conecte la TV a una toma de pared de antena con un cable RF (75 Ω). NOTA yy Emplee un divisor de señal cuando desee utilizar más de dos TV. yy Si la imagen es de poca calidad, instale un amplificador de señal correctamente para mejorar la calidad de imagen. yy Si la imagen es de poca calidad con una antena conectada, intente volver a orientar la antena en la dirección adecuada. yy No se suministran el cable de antena ni el conversor. yy Audio DTV admitido: MPEG, Dolby Digital, Dolby Digital Plus, HE-AAC Português Ligue a TV a uma tomada de antena de parede com um cabo RF (75 Ω). NOTA yy Utilize um separador de sinal se quiser utilizar mais de 2 TVs. yy Se a qualidade de imagem for fraca, instale um amplificador de sinal para melhorar a qualidade de imagem. yy Se a qualidade de imagem for fraca mesmo que tenha uma antena ligada, tente orientar a antena para a direcção correcta. yy O cabo da antena e o conversor não são fornecidos. yy Áudio DTV suportado: MPEG, Dolby Digital, Dolby Digital Plus, HE-AAC Nederlands Sluit de TV met behulp van een RF-kabel (75 Ω) aan op een antenneaansluiting op de muur. OPMERKING yy Gebruik een signaalsplitter om meer dan twee TV’s te gebruiken. yy Als de beeldkwaliteit slecht is, installeert u een signaalversterker om de beeldkwaliteit te verbeteren. yy Als de beeldkwaliteit slecht is terwijl een antenne is aangesloten, probeert u de antenne in de juiste richting te draaien. yy Antennekabel en converter worden niet meegeleverd. yy Ondersteunde DTV-audio: MPEG, Dolby Digital, Dolby Digital Plus, HE-AAC A-5 Ελληνικά Συνδέστε την τηλεόραση σε μια υποδοχή κεραίας στον τοίχο με ένα καλώδιο RF (75 Ω). ΣΗΜΕΙΩΣΗ yy Χρησιμοποιήστε ένα διαχωριστή σήματος για τη χρήση περισσότερων από 2 τηλεοράσεων. yy Αν η ποιότητα της εικόνας δεν είναι καλή, εγκαταστήστε έναν ενισχυτή σήματος για τη βελτίωση της ποιότητας εικόνας. yy Αν η ποιότητα της εικόνας δεν είναι καλή μετά τη σύνδεση της κεραίας, δοκιμάστε να αλλάξετε τον προσανατολισμό της κεραίας στη σωστή κατεύθυνση. yy Δεν παρέχεται καλώδιο κεραίας και μετατροπέας. yy Υποστηριζόμενος ήχος DTV: MPEG, Dolby Digital, Dolby Digital Plus, HE-AAC Slovenščina Televizor priključite v stensko antensko vtičnico s kablom RF (75 Ω). OPOMBA yy Če želite uporabljati več kot 2 televizorja, uporabite razcepnik za signal. yy Če je kakovost slike slaba, jo izboljšajte tako, da ustrezno namestite ojačevalnik signala. yy Če je kakovost slike slaba in uporabljate anteno, usmerite anteno v ustrezno smer. yy Kabel antene in pretvornik nista priložena. yy Podprte oblike zvoka za DTV: MPEG, Dolby Digital, Dolby Digital Plus, HE-AAC A-6 MAKING CONNECTIONS Satellite dish connection Nederlands Sluit de TV met behulp van een RF-satellietkabel (75 Ω) aan op een satellietschotel. (Only satellite models) Ελληνικά Satellite Dish Συνδέστε την τηλεόραση σε μια δορυφορική κεραία, μέσω μιας δορυφορικής υποδοχής με δορυφορικό καλώδιο (75 Ω). 13/18V 700mA Max LNB Satellite IN Slovenščina S kablom RF za satelit povežite televizor s satelitskim krožnikom prek vtičnice za satelit (75 Ω). *Not Provided English Connect the TV to a satellite dish to a satellite socket with a satellite RF cable (75 Ω). Deutsch Schließen Sie das TV-Gerät mit einem SatellitenHF-Kabel (75 Ω) an eine Satellitenschüssel und an eine Satellitenbuchse an. Français Connectez la TV à une parabole satellite ou à une prise satellite à l’aide d’un câble satellite RF (75 Ω). Italiano Collegare la TV a un’antenna satellitare e a una presa satellitare con un cavo RF satellitare (75 Ω). Español Para conectar la TV a una antena parabólica, enchufe un cable de RF de satélite a una toma de satélite (75 Ω). Português Ligue a TV a uma antena parabólica a uma tomada de satélite com um cabo RF para satélite (75 Ω). MAKING CONNECTIONS Euro Scart connection A-7 Deutsch Überträgt Video- und Audiosignale von einem externen Gerät an das TV-Gerät. Verbinden Sie das externe Gerät, wie in der folgenden Abbildung gezeigt, mithilfe des Euro-Scart-Kabels mit dem TV-Gerät. Ausgangstyp Aktueller Eingangsmodus Digital-TV AV1 (TV-Ausgang1) Digital-TV Analog-TV, AV Component Analog-TV HDMI 1 TV-Ausgang: Ausgang für analoge und digitale Fernsehsignale. *Not Provided HINWEIS yy Das Euro-Scart-Kabel muss signaltechnisch abgeschirmt sein. yy Bei digitalem Fernsehen im 3D-Modus können nur 2D-Ausgangssignale über ein SCART-Kabel ausgegeben werden. (Nur 3D-Modelle) AUDIO / VIDEO English Français Transmits the video and audio signals from an external device to the TV set. Connect the external device and the TV set with the euro scart cable as shown. Output Type Current input mode Digital TV AV1 (TV Out1) Digital TV Type de sortie Mode d'entrée actuel TV numérique AV1 (Sortie TV1) TV numérique TV analogique, AV Analogue TV, AV Component Transmet les signaux audio et vidéo d’un appareil externe au téléviseur. Raccordez l’appareil externe et le téléviseur à l’aide d’un câble péritel comme illustré ci-dessous. Analogue TV Composant TV analogique HDMI HDMI 1 TV Out : Outputs Analogue TV or Digital TV signals. NOTE yy Any Euro scart cable used must be signal shielded. yy When watching digital TV in 3D imaging mode, only 2D out signals can be output through the SCART cable. (Only 3D models) 1 Sortie TV : sortie de signaux en mode TV analogique ou en mode TV numérique. REMARQUE yy Tous les câbles Euro scart utilisés doivent être des câbles de signal blindés. yy Quand le mode 3D est sélectionné sur la TV numérique, seuls les signaux de sortie 2D peuvent être émis via le câble péritel. (modèles 3D uniquement) A-8 MAKING CONNECTIONS Italiano Português Consente la trasmissione dei segnali audio e video da un dispositivo esterno al televisore. Collegare il dispositivo esterno e il televisore con il cavo Euro Scart come mostrato nell’illustrazione di seguito. Transmite os sinais de vídeo e áudio de um dispositivo externo para a TV. Ligue o dispositivo externo à TV com o cabo Euro Scart, conforme demonstrado na ilustração seguinte. Tipo di uscita Modalità di ingresso corrente TV digitale Tipo de saída AV1 (Uscita TV1)1) TV digitale TV Digital AV1 (Saída TV1) TV Digital TV Analógica, AV TV analogica, AV Component Modo de entrada actual TV analogica Componentes TV Analógica HDMI HDMI 1 Uscita TV: uscite segnali TV analogica o TV digitale. 1 Saída TV: Sinais de Saída de TV Analógica ou Digital. NOTA yy I cavi Euro Scart devono essere schermati. yy Quando si guarda il TV digitale in modalità immagini 3D, solo i segnali di uscita 2D possono passare attraverso il cavo SCART. (Solo modelli 3D) NOTA yy Qualquer cabo Euro scart utilizado terá de ser blindado. yy Quando estiver a ver TV digital no modo de imagem em 3D, apenas os sinais de saída 2D poderão ser emitidos através do cabo SCART. (Apenas em modelos com 3D) Español Transmite las señales de audio y vídeo de un dipositivo externo a la TV. Use el cable euroconector para conectar el dispositivo externo a la TV, tal y como se muestra en la siguiente ilustración. Tipo de salida Modo de entrada TV digital AV1 (Salida de TV1) TV digital TV analógica, AV Component Nederlands U kunt de video- en audiosignalen vanaf een etern apparaat naar de TV zenden. Sluit het externe apparaat en de TV op elkaar aan met behulp van de Scart-kabel, zoals aangegeven in de volgende afbeelding. Uitvoertype Huidige invoermodus Digitale TV TV analógica HDMI NOTA yy Todo cable euroconector que se emplee deberá estar blindado. yy Cuando visualice la TV digital en modo de imagen 3D, sólo podrá utilizar el euroconector para las señales de salida 2D. (Solo para los modelos 3D) Digitale TV Analoge TV, AV Component 1 Salida de TV: salida de señales de TV analógica o digital. AV1 (TV Uit1) Analoge TV HDMI 1 TV Uit: voert analoge TV-signalen of Digitale TV-signalen uit. OPMERKING yy Voor elke Scart-kabel moet het signaal zijn afgeschermd. yy Tijdens het kijken naar digitale TV in de modus voor 3D-beelden kunnen alleen 2D-uitsignalen worden uitgevoerd via de SCART-kabel. (Alleen 3D-modellen) MAKING CONNECTIONS Ελληνικά Μεταδίδει τα σήματα εικόνας και ήχου από μια εξωτερική συσκευή στην τηλεόραση. Συνδέστε την εξωτερική συσκευή και την τηλεόραση με το καλώ- διο Euro Scart, όπως φαίνεται στην παρακάτω ει- κόνα. Τύπος εξόδου AV1 (Έξοδος TV1) Τρέχουσα λειτουργία εισόδου Ψηφιακή τηλεόραση Ψηφιακή τηλεόραση Αναλογική τηλεόραση, AV Αναλογική τηλεόραση Component HDMI 1 Έξοδος TV : Έξοδοι αναλογικού σήματος τηλεόρασης ή ψηφιακού σήματος τηλεόρασης. ΣΗΜΕΙΩΣΗ yy Κάθε καλώδιο Euro scart που χρησιμοποιείται πρέπει να διαθέτει θωράκιση σήματος. yy Όταν παρακολουθείτε ψηφιακή τηλεόραση στη λειτουργία απεικόνισης 3D, μόνο τα σήματα εξόδου 2D μεταδίδονται μέσω του καλωδίου SCART. (Μόνο σε μοντέλα 3D) Slovenščina Prenaša video in avdio signale iz zunanje naprave na televizor. Povežite zunanjo napravo in televizor z evro scart kablom, kot je prikazano na naslednji sliki. Vrsta izhoda Trenutni način vhoda Digitalna TV AV1 (TV-izhod1) Digitalna TV Analogna TV, AV Komponentni Analogna TV HDMI 1 TV-izhod : Izhod za analogne in digitalne televizijske signale. OPOMBA yy Kabel Euro Scart mora biti signalno zaščiten. yy Pri gledanju digitalne televizije v 3D-načinu je mogoče po kablu SCART oddajati le 2D-izhodne signale. (samo 3D-modeli) A-9 A-10 MAKING CONNECTIONS Other connections (Only LAN PORT models) IN HDMI 13/18V 700mA Max LNB Satellite IN OPTICAL DIGITAL AUDIO OUT ANTENNA / CABLE IN DVD/ Blu-Ray / HD Cable Box / HD STB / PC (Only Satellite models) YELLOW GREEN BLUE RED WHITE RED WHITE RED GREEN BLUE RED WHITE RED RED WHITE YELLOW OPTICAL AUDIO IN VIDEO Digital Audio System (MONO) DVD/ Blu-Ray / HD Cable Box / VCR AUDIO VIDEO DVD/ Blu-Ray / HD Cable Box MAKING CONNECTIONS A-11 USB IN PCMCIA card IN 2 (MHL) HDMI 2 port position varies by model. USB / HDD Mobile phone Headphone H/P OUT Only LB56**, LB62** series English Connect your TV to external devices. For the best picture and audio quality, connect the external device and the TV with the HDMI cable as shown. Some separate cable is not provided. Deutsch Verbinden Sie Ihr Fernsehgerät mit externen Geräten. Wenn Sie beste Bild- und Tonqualität wünschen, verbinden Sie das externe Gerät und das Fernsehgerät mit dem HDMI-Kabel wie in der Abbildung gezeigt. Es wird kein separates Kabel mitgeliefert. Français Connecter votre téléviseur à des périphériques externes. Pour une qualité d’image et de son optimale, connectez le périphérique externe et le téléviseur à l’aide du câble HDMI tel qu’indiqué. Certains câbles ne sont pas fournis. Italiano Collegare il TV ai dispositivi esterni. Per una migliore qualità audio e delle immagini, collegare il dispositivo esterno e il TV utilizzando il cavo HDMI come indicato di seguito. Alcuni cavi separati non sono forniti con il prodotto. Español Conecte la TV a los dispositivos externos. Para conseguir la mejor calidad de imagen y sonido, conecte el dispositivo externo y la TV con el cable HDMI tal como se muestra. Algunos cables no se incluyen. Português Ligue a TV a dispositivos externos. Para a melhor qualidade de imagem e áudio, ligue o dispositivo externo e a TV com o cabo HDMI, conforme indicado. Alguns cabos separados não são fornecidos. Nederlands Sluit uw TV aan op externe apparaten. Sluit het externe apparaat voor de beste beeld- en geluidskwaliteit op de TV aan met de HDMI-kabel zoals weergegeven. Bepaalde kabels worden niet als accessoire meegeleverd. Ελληνικά Συνδέστε την τηλεόρασή σας με εξωτερικές συσκευές. Για την καλύτερη δυνατή ποιότητα εικόνας και ήχου, συνδέστε την εξωτερική συσκευή και την τηλεόραση με το καλώδιο HDMI, όπως φαίνεται στην εικόνα. Δεν παρέχεται ξεχωριστό καλώδιο. Slovenščina Televizor priključite na zunanje naprave. Za najboljšo kakovost slike in zvoka zunanjo napravo in televizor povežite s kablom HDMI, kot je prikazano. Nekateri ločeni kabli niso priloženi. A-12 MAKING CONNECTIONS English Deutsch Connect various external devices to the TV and switch input modes to select an external device. For more information of external device’s connection, refer to the manual provided with each device. Available external devices are: HD receivers, DVD players, VCRs, audio systems, USB storage devices, PC, gaming devices, and other external devices. NOTE yy The external device connection may differ from the model. yy Connect external devices to the TV regardless of the order of the TV port. yy If you record a TV programme on a DVD recorder or VCR, make sure to connect the TV signal input cable to the TV through a DVD recorder or VCR. For more information of recording, refer to the manual provided with the connected device. yy Refer to the external equipment’s manual for operating instructions. yy If you connect a gaming device to the TV, use the cable supplied with the gaming device. yy In PC mode, there may be noise associated with the resolution, vertical pattern, contrast or brightness. If noise is present, change the PC output to another resolution, change the refresh rate to another rate or adjust the brightness and contrast on the PICTURE menu until the picture is clear. yy In PC mode, some resolution settings may not work properly depending on the graphics card. Verbinden Sie mehrere externe Geräte mit dem TV-Gerät, und wechseln Sie die Eingangsmodi, um ein externes Gerät auszuwählen. Weitere Informationen zum Anschluss von externen Geräten entnehmen Sie bitte dem Handbuch des jeweiligen Gerätes. Verfügbare externe Geräte sind: HD-Receiver, DVD-Player, Videorekorder, Audiosysteme, USBSpeichergeräte, PCs, Spielkonsolen und weitere externe Geräte. HINWEIS yy Der Anschluss für externe Geräte kann von Modell zu Modell unterschiedlich sein. yy Verbinden Sie externe Geräte unabhängig von der Reihenfolge der Anschlüsse mit dem TV-Gerät. yy Wenn Sie eine Fernsehsendung über DVDPlayer oder Videorekorder aufnehmen, vergewissern Sie sich, dass das TV-Gerät über das Eingangskabel für das TV-Signal mit dem DVDPlayer oder Videorekorder verbunden ist. Weitere Informationen zu Aufnahmen entnehmen Sie bitte dem Handbuch des verbundenen Gerätes. yy Anweisungen zum Betrieb finden Sie im Handbuch des externen Gerätes. yy Wenn Sie eine Spielekonsole mit dem TVGerät verbinden, verwenden Sie das mit der Konsole mitgelieferte Kabel. yy Im PC-Modus kann es hinsichtlich Auflösung, vertikalem Muster, Kontrast oder Helligkeit zu Rauschen kommen. Wenn Rauschen auftritt, stellen Sie den PC auf eine andere Auflösung ein, ändern Sie die Bildwiederholrate, oder passen Sie Helligkeit und Kontrast im Menü „BILD“ an, bis das Bild optimal ist. yy Abhängig von der Grafikkarte funktionieren im PC-Modus einige Auflösungseinstellungen möglicherweise nicht ordnungsgemäß. MAKING CONNECTIONS Français Connectez divers périphériques externes à la TV et changez de mode de source d’entrée pour sélectionner un périphérique externe. Pour en savoir plus sur le raccordement d’un périphérique externe, reportez-vous au manuel fourni avec ce dernier. Les périphériques externes disponibles sont les suivants : récepteurs HD, lecteurs DVD, VCR, systèmes audio, périphériques de stockage USB, PC, consoles de jeu et autres périphériques externes. REMARQUE yy Le raccordement du périphérique externe peut différer du modèle. yy Connectez des périphériques externes à la TV sans tenir compte de l’ordre du port TV. yy Si vous enregistrez un programme TV sur un enregistreur de DVD ou un magnétoscope, veillez à raccorder le câble de source d’entrée du signal de la TV à la TV via un enregistreur de DVD ou un magnétoscope. Pour en savoir plus sur l’enregistrement, reportez-vous au manuel fourni avec le périphérique connecté. yy Veuillez consulter le manuel de l’équipement externe contenant les instructions d’utilisation. yy Si vous connectez une console de jeu à la TV, utilisez le câble fourni avec la console de jeu. yy En mode PC, un bruit peut être associé à la résolution, au modèle vertical, au contraste ou à la luminosité. En présence de bruit, changez la résolution de la sortie PC, changez le niveau du taux de rafraîchissement ou réglez la luminosité et le contraste dans le menu IMAGE jusqu’à ce que l’image soit nette. yy En mode PC, certains réglages de la résolution peuvent ne pas fonctionner correctement en fonction de la carte graphique utilisée. A-13 Italiano Collegare diversi dispositivi esterni al televisore e modificare la modalità di ingresso per selezionare un dispositivo esterno. Per ulteriori informazioni sul collegamento di un dispositivo esterno, consultare il manuale fornito in dotazione con ciascun dispositivo. È possibile collegare i seguenti dispositivi esterni: ricevitori HD, lettori DVD, VCR, sistemi audio, periferiche di archiviazione USB, PC, console per videogiochi e altri dispositivi esterni. NOTA yy Il collegamento del dispositivo esterno può variare in base al modello. yy Collegare i dispositivi esterni al televisore a prescindere dall’ordine della porta del televisore. yy Se si registra un programma TV su un registratore DVD o VCR, accertarsi di collegare il cavo di ingresso del segnale al televisore attraverso un registratore DVD o VCR. Per ulteriori informazioni sulla registrazione, consultare il manuale fornito in dotazione con il dispositivo collegato. yy Consultare il manuale dell’apparecchiatura esterna per le istruzioni operative. yy Se si collega una console per videogiochi alla TV, utilizzare il cavo fornito con il dispositivo. yy In modalità PC, possono essere presenti interferenze relative alla risoluzione, schemi verticali, contrasto o luminosità. In caso di interferenze, modificare la modalità PC impostando un’altra risoluzione o modificando la frequenza di aggiornamento oppure regolare luminosità e contrasto sul menu IMMAGINE finché non si ottiene un’immagine nitida. yy A seconda della scheda grafica utilizzata, alcune impostazioni di risoluzione potrebbero non essere adatte alla modalità PC. A-14 MAKING CONNECTIONS Español Puede conectar varios dispositivos externos a la TV y cambiar entre los modos de entrada para seleccionar un dispositivo externo. Para obtener más información sobre la conexión de dispositivos externos, consulte el manual que se incluye con cada dispositivo. Los dispositivos externos disponibles son: receptores HD, reproductores de DVD, vídeos, sistemas de audio, dispositivos de almacenamiento USB, PC, consolas de juegos, etc. NOTA yy La conexión de dispositivos externos puede variar entre distintos modelos. yy Conecte los dispositivos externos a la TV independientemente del orden de los puertos de la TV. yy Si graba un programa de TV en un grabador de DVD o un vídeo, asegúrese de conectar el cable de entrada de señal de TV a la TV a través del grabador de DVD o del vídeo. Para obtener más información sobre la grabación, consulte el manual que se incluye con el dispositivo que se conecte. yy Consulte el manual del equipo externo para obtener las instrucciones de funcionamiento. yy Si conecta una consola de juegos a la TV, emplee el cable proporcionado con el dispositivo en cuestión. yy En el modo PC, puede que se genere ruido asociado a la resolución, al patrón vertical, al contraste o a la luminosidad. Si se produce ruido, cambie la salida PC a otra resolución, cambie la frecuencia de actualización o ajuste la luminosidad y el contraste del menú IMAGEN hasta que la imagen se muestre más clara. yy En el modo PC, puede que algunos ajustes de la resolución no funcionen correctamente en función de la tarjeta gráfica. Português Ligue vários dispositivos externos à TV e mude os modos de entrada para seleccionar um dispositivo externo. Para mais informações sobre a ligação de dispositivos externos, consulte o manual fornecido com cada dispositivo. Os dispositivos externos disponíveis são: receptores HD, leitores de DVD, videogravadores, sistemas de áudio, dispositivos de armazenamento USB, PC, dispositivos de jogos e outros dispositivos externos. NOTA yy A ligação do dispositivo externo pode ser diferente da do modelo. yy Ligue dispositivos externos à TV independentemente da ordem da porta da TV. yy Se gravar um programa de televisão num gravador de DVD ou num videogravador, não se esqueça de ligar o cabo do de entrada do sinal de TV à TV através do gravador de DVD ou do videogravador. Para mais informações sobre a gravação, consulte o manual fornecido com o dispositivo ligado. yy Consulte o manual do equipamento externo sobre instruções de funcionamento. yy Se ligar um dispositivo de jogos à TV, utilize o cabo fornecido com o dispositivo de jogos. yy No modo PC, poderá ser produzido um ruído associado à resolução, padrão vertical, contraste ou luminosidade. Se se verificar ruído, altere a saída do PC para outra resolução, altere a frequência de actualização para outra frequência ou ajuste a luminosidade e o contraste no menu IMAGEM até a imagem ficar nítida. yy No modo PC, algumas definições de resolução podem não funcionar correctamente, dependendo da placa gráfica. MAKING CONNECTIONS Nederlands U kunt diverse externe apparaten aansluiten op de TV en de invoerbron wijzigen om het externe apparaat te kiezen. Zie voor meer informatie over het aansluiten van externe apparaten de handleiding die bij elk extern apparaat is geleverd. De mogelijke externe apparaten zijn: HDontvangers, DVD-spelers, videorecorders, audiosystemen, USB-opslagapparaten, PC‘s, game-apparaten en andere externe apparaten. OPMERKING yy De aansluiting van externe apparaten kan per model verschillen. yy Sluit externe apparaten aan op de TV, ongeacht de volgorde van de TV-poort. yy Als u een TV-programma opneemt op een DVD-recorder of videorecorder, moet u ervoor zorgen dat de TV-signaalinvoerkabel via de DVD-recorder of videorecorder op de TV is aangesloten. Zie voor meer informatie over het opnemen de handleiding die bij het aangesloten apparaat is geleverd. yy Raadpleeg de handleiding bij het externe apparaat voor bedieningsinstructies. yy Als u een game-apparaat aansluit op de TV, gebruik dan de kabel die bij het gameapparaat is geleverd. yy Het is mogelijk dat in de PC-modus de resolutie, het verticale patroon, het contrast of de helderheid niet goed worden weergegeven. Wijzig in dat geval de PCuitvoer in een andere resolutie, verander de vernieuwingsfrequentie in een andere frequentie of pas de helderheid en het contrast in het menu BEELD aan tot het beeld duidelijk is. yy Afhankelijk van de grafische kaart werken bepaalde resolutie-instellingen in de PCmodus mogelijk niet juist. A-15 Ελληνικά Για να επιλέξετε μια εξωτερική συσκευή, συνδέστε διάφορες εξωτερικές συσκευές στην τηλεόραση και αλλάξτε λειτουργίες εισόδου. Για περισσότερες πληροφορίες σχετικά με τη σύνδεση εξωτερικών συσκευών, ανατρέξτε στο εγχειρίδιο που παρέχεται με κάθε συσκευή. Οι διαθέσιμες εξωτερικές συσκευές περιλαμβάνουν δέκτες HD, συσκευές αναπαραγωγής DVD, VCR, ηχοσυστήματα, συσκευές αποθήκευσης USB, υπολογιστές, παιχνιδομηχανές και άλλες εξωτερικές συσκευές. ΣΗΜΕΙΩΣΗ yy Η σύνδεση εξωτερικών συσκευών ενδέχεται να διαφέρει ανάλογα με το μοντέλο. yy Μπορείτε να συνδέσετε εξωτερικές συσκευές στην τηλεόραση, ανεξάρτητα από τη σειρά της θύρας της τηλεόρασης. yy Για να εγγράψετε ένα τηλεοπτικό πρόγραμμα σε μια συσκευή εγγραφής DVD ή VCR, βεβαιωθείτε ότι έχετε συνδέσει το καλώδιο εισόδου τηλεοπτικού σήματος στη συσκευή εγγραφής DVD ή VCR. Για περισσότερες πληροφορίες σχετικά με την εγγραφή, ανατρέξτε στο εγχειρίδιο που παρέχεται με τη συνδεδεμένη συσκευή. yy Για οδηγίες λειτουργίας, ανατρέξτε στο εγχειρίδιο του εξωτερικού εξοπλισμού. yy Για να συνδέσετε μια παιχνιδομηχανή στην τηλεόραση, χρησιμοποιήστε το καλώδιο που παρέχεται με την παιχνιδομηχανή. yy Στη λειτουργία PC, ενδέχεται να υπάρχει θόρυβος λόγω της ανάλυσης, του κάθετου πλέγματος, της αντίθεσης ή της φωτεινότητας. Εάν υπάρχει θόρυβος, αλλάξτε την ανάλυση στη λειτουργία PC ή το ρυθμό ανανέωσης ή ρυθμίστε τη φωτεινότητα και την αντίθεση στο μενού ΕΙΚΟΝΑ, μέχρι να είναι καθαρή η εικόνα. yy Σε λειτουργία PC, ορισμένες ρυθμίσεις ανάλυσης ενδεχομένως να μην λειτουργούν σωστά, ανάλογα με την κάρτα γραφικών. A-16 MAKING CONNECTIONS Slovenščina Priključite različne zunanje naprave na televizor in vklopite vhodne načine, da izberete zunanjo napravo. Za dodatne informacije o priključitvi zunanje naprave glejte navodila za uporabo, ki so priložena posamezni napravi. Zunanje naprave, ki so na voljo, so: HDsprejemniki, DVD-predvajalniki, videorekorderji, zvočni sistemi, pomnilniki USB, računalniki, igralne konzole in druge zunanje naprave. OPOMBA yy Povezava z zunanjo napravo je lahko odvisna od modela. yy Zunanje naprave priključite na priključke televizorja v poljubnem zaporedju. yy Če televizijski program snemate na DVDsnemalnik ali videorekorder, morate DVDsnemalnik ali videorekorder priključiti na televizor s signalnim vhodnim kablom za televizor. Za dodatne informacije o snemanju glejte navodila za uporabo, ki so priložena priključeni napravi. yy Navodila za uporabo si oglejte v priročniku zunanje opreme. yy Če želite na televizor priključiti igralno konzolo, uporabite kabel, ki je bil priložen igralni konzoli. yy V načinu računalnika se lahko pojavi šum, ki je povezan z ločljivostjo, navpičnim vzorcem, kontrastom ali svetlostjo. Če se pojavi šum, spremenite izhodno ločljivost računalnika, spremenite hitrost osveževanje ali v meniju SLIKA prilagodite svetlost in kontrast, dokler slika ni jasna. yy V načinu računalnika nekatere nastavitve ločljivosti morda ne bodo delovale pravilno (odvisno od grafične kartice). OWNER’S MANUAL LED TV* * LG LED TV applies LCD screen with LED backlights. Please read this manual carefully before operating your set and retain it for future reference. www.lg.com 2 LICENSES / OPEN SOURCE SOFTWARE NOTICE ENGLISH ENG LICENSES Supported licenses may differ by model. For more information about licenses, visit www.lg.com. Manufactured under license from Dolby Laboratories. “Dolby” and the double-D symbol are trademarks of Dolby Laboratories. The terms HDMI and HDMI High-Definition Multimedia Interface, and the HDMI logo are trademarks or registered trademarks of HDMI Licensing LLC in the United States and other countries. ABOUT DIVX VIDEO: DivX® is a digital video format created by DivX, LLC, a subsidiary of Rovi Corporation. This is an official DivX Certified® device that has passed rigorous testing to verify that it plays DivX video. Visit divx.com for more information and software tools to convert your files into DivX videos. ABOUT DIVX VIDEO-ON-DEMAND: This DivX Certified® device must be registered in order to play purchased DivX Video-on-Demand (VOD) movies. To obtain your registration code, locate the DivX VOD section in your device setup menu. Go to vod.divx.com for more information on how to complete your registration. “DivX Certified® to play DivX® video up to HD 1080p, including premium content.” “DivX®, DivX Certified® and associated logos are trademarks of Rovi Corporation or its subsidiaries and are used under license.” “Covered by one or more of the following U.S. patents : 7,295,673; 7,460,668; 7,515,710; 7,519,274” OPEN SOURCE SOFTWARE NOTICE To obtain the source code under GPL, LGPL, MPL and other open source licenses, that is contained in this product, please visit http://opensource.lge.com. In addition to the source code, all referred license terms, warranty disclaimers and copyright notices are available for download. LG Electronics will also provide open source code to you on CD-ROM for a charge covering the cost of performing such distribution (such as the cost of media, shipping and handling) upon email request to [email protected]. This offer is valid for three (3) years from the date on which you purchased the product. SAFETY INSTRUCTIONS Please read these safety precautions carefully before using the product. WARNING yy Do not place the TV and/or remote control in the following environments: -A location exposed to direct sunlight -An area with high humidity such as a bathroom -Near any heat source such as stoves and other devices that produce heat -Near kitchen counters or humidifiers where they can easily be exposed to steam or oil -An area exposed to rain or wind -Near containers of water such as vases Otherwise, this may result in fire, electric shock, malfunction or product deformation. yy Do not place the product where it might be exposed to dust. This may cause a fire hazard. yy Mains Plug is the TV connecting/disconnecting device to AC mains electric supply.This plug must remain readily attached and operable when TV is in use. yy Do not touch the power plug with wet hands. Additionally, if the cord pin is wet or covered with dust, dry the power plug completely or wipe dust off. You may be electrocuted due to excess moisture. yy Make sure to connect Mains cable to compliant AC mains socket with Grounded earth pin. (Except for devices which are not grounded on earth.) Otherwise possibility you may be electrocuted or injured. yy Insert power cable plug completely into wall socket otherwise if not secured completely into socket, fire ignition may break out. yy Ensure the power cord does not come into contact with hot objects such as a heater. This may cause a fire or an electric shock hazard. yy Do not place a heavy object, or the product itself, on power cables. Otherwise, this may result in fire or electric shock. yy Bend antenna cable between inside and outside building to prevent rain from flowing in. This may cause water damaged inside the Product and could give an electric shock. ENGLISH ENG SAFETY INSTRUCTIONS 3 4 SAFETY INSTRUCTIONS ENGLISH ENG yy When mounting TV onto wall make sure to neatly install and isolate cabling from rear of TV as to not create possibility of electric shock /fire hazard. yy Do not plug too many electrical devices into a single multiple electrical outlet. Otherwise, this may result in fire due to over-heating. yy Do not drop the product or let it fall over when connecting external devices. Otherwise, this may result in injury or damage to the product. yy Keep the anti-moisture packing material or vinyl packing out of the reach of children. Anti-moisture material is harmful if swallowed. If swallowed by mistake, force the patient to vomit and visit the nearest hospital. Additionally, vinyl packing can cause suffocation. Keep it out of the reach of children. yy Do not let your children climb or cling onto the TV. Otherwise, the TV may fall over, which may cause serious injury. yy Dispose of used batteries carefully to ensure that a small child does not consume them. Please seek Doctor- Medical Attention immediately if child consumes batteries. yy Do not insert any metal objects/conductors (like a metal chopstick/cutlery/screwdriver) between power cable plug and input Wall Socket while it is connected to the input terminal on the wall. Additionally, do not touch the power cable right after plugging into the wall input terminal. You may be electrocuted. (Depending on model) yy Do not put or store inflammable substances near the product. There is a danger of combustion/explosion or fire due to careless handling of the inflammable substances. yy Do not drop metallic objects such as coins, hair pins, chopsticks or wire into the product, or inflammable objects such as paper and matches. Children must pay particular attention. Electrical shock, fire or injury can occur. If a foreign object is dropped into the product, unplug the power cord and contact the service centre. yy Do not spray water on the product or scrub with an inflammable substance (thinner or benzene). Fire or electric shock accident can occur. yy Do not allow any impact, shock or any objects to fall into the unit, and do not drop anything onto the screen. You may be injured or the product can be damaged. SAFETY INSTRUCTIONS 5 yy Never touch the wall outlet when there is leakage of gas, open the windows and ventilate. It may cause a fire or a burn by a spark. yy Do not disassemble, repair or modify the product at your own discretion. Fire or electric shock accident can occur. Contact the service centre for check, calibration or repair. yy If any of the following occur, unplug the product immediately and contact your local service centre. -The product has been impacted by shock -The product has been damaged -Foreign objects have entered the product -The product produced smoke or a strange smell This may result in fire or electric shock. yy Unplug the TV from AC mains wall socket if you do not intend to use the TV for a long period of time. Accumulated dust can cause fire hazard and insulation deterioration can cause electric leakage/shock/fire. yy Apparatus shall not be exposed to dripping or splashing and no objects filled with liquids, such as vases, shall be placed on the apparatus. yy Do not install this product on a wall if it could be exposed to oil or oil mist. This may damage the product and cause it to fall. CAUTION yy Install the product where no radio wave occurs. yy There should be enough distance between an outside antenna and power lines to keep the former from touching the latter even when the antenna falls. This may cause an electric shock. yy Do not install the product on places such as unstable shelves or inclined surfaces. Also avoid places where there is vibration or where the product cannot be fully supported. Otherwise, the product may fall or flip over, which may cause injury or damage to the product. ENGLISH ENG yy Never touch this product or antenna during a thunder or lighting storm. You may be electrocuted. 6 SAFETY INSTRUCTIONS ENGLISH ENG yy If you install the TV on a stand, you need to take actions to prevent the product from overturning. Otherwise, the product may fall over, which may cause injury. yy If you intend to mount the product to a wall, attach VESA standard mounting interface (optional parts) to the back of the product. When you install the set to use the wall mounting bracket (optional parts), fix it carefully so as not to drop. yy Only use the attachments / accessories specified by the manufacturer. yy When installing the antenna, consult with a qualified service technician. If not installed by a qualified technician, this may create a fire hazard or an electric shock hazard. yy We recommend that you maintain a distance of at least 2 to 7 times the diagonal screen size when watching TV. If you watch TV for a long period of time, this may cause blurred vision. yy Only use the specified type of battery. This could cause damage to the remote control. yy Do not mix new batteries with old batteries. This may cause the batteries to overheat and leak. yy Batteries should not be exposed to excessive heat. For example, keep away from direct Sunlight , open fireplace and electric heaters . yy Do not place non-rechargeable batteries in charging device. yy Make sure there are no objects between the remote control and its sensor. yy Signal from Remote Control can be interrupted due to external/internal lighting eg Sunlight, fluorescent lighting. If this occurs turn off lighting or darken viewing area. yy When connecting external devices such as video game consoles, make sure the connecting cables are long enough. Otherwise, the product may fall over, which may cause injury or damage the product. yy Do not turn the product On/Off by plugging-in or unplugging the power plug to the wall outlet. (Do not use the power plug for switch.) It may cause mechanical failure or could give an electric shock. SAFETY INSTRUCTIONS Otherwise, this may result in fire. yy Take care not to touch the ventilation openings when watching the TV for long periods as the ventilation openings may become hot. This does not affect the operation or performance of the product. yy Periodically examine the cord of your appliance, and if its appearance indicates damage or deterioration, unplug it, discontinue use of the appliance, and have the cord replaced with an exact replacement part by an authorized servicer. yy Prevent dust collecting on the power plug pins or outlet. This may cause a fire hazard. yy Protect the power cord from physical or mechanical abuse, such as being twisted, kinked, pinched, closed in a door, or walked upon. Pay particular attention to plugs, wall outlets, and the point where the cord exits the appliance. yy Do not press strongly upon the panel with a hand or sharp object such as nail, pencil or pen, or make a scratch on it, as it may cause damage to screen. yy Avoid touching the screen or holding your finger(s) against it for long periods of time. Doing so may produce some temporary or permanent distortion/damage to screen. yy When cleaning the product and its components, unplug the power first and wipe it with a soft cloth. Applying excessive force may cause scratches or discolouration. Do not spray with water or wipe with a wet cloth. Never use glass cleaner, car or industrial shiner, abrasives or wax, benzene, alcohol etc., which can damage the product and its panel. Otherwise, this may result in fire, electric shock or product damage (deformation, corrosion or breakage). yy As long as this unit is connected to the AC wall outlet, it is not disconnected from the AC power source even if you turn off this unit by SWITCH. yy When unplugging the cable, grab the plug and unplug it, by pulling at the plug. Don’t pull at the cord to unplug the power cord from the power board, as this could be hazardous. yy When moving the product, make sure you turn the power off first. Then, unplug the power cables, antenna cables and all connecting cables. The TV set or power cord may be damaged, which may create a fire hazard or cause electric shock. ENGLISH ENG yy Please follow the installation instructions below to prevent the product from overheating. -The distance between the product and the wall should be more than 10 cm. -Do not install the product in a place with no ventilation (e.g., on a bookshelf or in a cupboard). -Do not install the product on a carpet or cushion. -Make sure the air vent is not blocked by a tablecloth or curtain. 7 8 SAFETY INSTRUCTIONS ENGLISH ENG yy When moving or unpacking the product, work in pairs because the product is heavy. Otherwise, this may result in injury. yy Contact the service centre once a year to clean the internal parts of the product. Accumulated dust can cause mechanical failure. yy Refer all servicing to qualified service personnel. Servicing is required when the apparatus has been damaged in any way, such as power supply cord or plug is damaged, liquid has been spilled or objects have fallen into the apparatus, the apparatus has been exposed to rain or moisture, does not operate normally, or has been dropped. yy If the product feels cold to the touch, there may be a small “flicker” when it is turned on. This is normal, there is nothing wrong with product. yy The panel is a high technology display product with resolution of two million to six million pixels. You may see tiny black dots and/or brightly coloured dots (red, blue or green) at a size of 1 ppm on the panel. This does not indicate a malfunction and does not affect the performance and reliability of the product. This phenomenon also occurs in third-party products and is not subject to exchange or refund. yy You may find different brightness and color of the panel depending on your viewing position(left/right/top/down). This phenomenon occurs due to the characteristic of the panel. It is not related with the product performance, and it is not malfunction. yy Displaying a still image (e.g., broadcasting channel logo, on-screen menu, scene from a video game) for a prolonged time may cause damage to the screen, resulting in retention of the image, which is known as image sticking. The warranty does not cover the product for image sticking. Avoid displaying a fixed image on your television’s screen for a prolonged period (2 or more hours for LCD, 1 or more hours for Plasma). Also, if you watch the TV at a ratio of 4:3 for a long time, image sticking may occur on the borders of the panel. This phenomenon also occurs in third-party products and is not subject to exchange or refund. yy Generated Sound “Cracking” noise: A cracking noise that occurs when watching or turning off the TV is generated by plastic thermal contraction due to tempera-ture and humidity. This noise is common for products where thermal deformation is required. Electrical circuit humming/panel buzzing: A low level noise is generated from a highspeed switching circuit, which supplies a large amount of current to operate a product. It varies depending on the product. This generated sound does not affect the performance and reliability of the product. SAFETY INSTRUCTIONS 9 WARNING Viewing Environment yy Viewing Time -When watching 3D contents, take 5 - 15 minute breaks every hour. Viewing 3D contents for a long period of time may cause headache, dizziness, fatigue or eye strain. Those that have a photosensitive seizure or chronic illness yy Some users may experience a seizure or other abnormal symptoms when they are exposed to a flashing light or particular pattern from 3D contents. yy Do not watch 3D videos if you feel nausea, are pregnant and/ or have a chronic illness such as epilepsy, cardiac disorder, or blood pressure disease, etc. yy 3D Contents are not recommended to those who suffer from stereo blindness or stereo anomaly. Double images or discomfort in viewing may be experienced. yy If you have strabismus (cross-eyed), amblyopia (weak eyesight) or astigmatism, you may have trouble sensing depth and easily feel fatigue due to double images. It is advised to take frequent breaks than the average adult. yy If your eyesight varies between your right and left eye, revise your eyesight prior to watching 3D contents. Symptoms which require discontinuation or refraining from watching 3D contents yy Do not watch 3D contents when you feel fatigue from lack of sleep, overwork or drinking. yy When these symptoms are experienced, stop using/watching 3D contents and get enough rest until the symptom subsides. -Consult your doctor when the symptoms persist. Symptoms may include headache, eyeball pain, dizziness, nausea, palpitation, blurriness, discomfort, double image, visual inconvenience or fatigue. ENGLISH ENG Viewing 3D Imaging (Only 3D models) 10 SAFETY INSTRUCTIONS ENGLISH ENG CAUTION Viewing Environment yy Viewing Distance - Maintain a distance of at least twice the screen diagonal length when watching 3D contents. If you feel discomfort in viewing 3D contents, move further away from the TV. Viewing Age yy Infants/Children -Usage/ Viewing 3D contents for children under the age of 6 are prohibited. -Children under the age of 10 may overreact and become overly excited because their vision is in development (for example: trying to touch the screen or trying to jump into it. Special monitoring and extra attention is required for children watching 3D contents. -Children have greater binocular disparity of 3D presentations than adults because the distance between the eyes is shorter than one of adults. Therefore they will perceive more stereoscopic depth compared to adults for the same 3D image. yy Teenagers -Teenagers under the age of 19 may react with sensitivity due to stimulation from light in 3D contents. Advise them to refrain from watching 3D contens for a long time when they are tired. yy Elderly -The elderly may perceive less 3D effect compared to the youth. Do not sit closer to the TV than the recommended distance. Cautions when using the 3D glasses yy Make sure to use LG 3D glasses. Otherwise, you may not be able to view 3D videos properly. yy Do not use 3D glasses instead of your normal glasses, sunglasses or protective goggles. yy Using modified 3D glasses may cause eye strain or image distortion. yy Do not keep your 3D glasses in extremely high or low temperatures. It will cause deformation. yy The 3D glasses are fragile and are easily scratched. Always use a soft, clean piece of cloth when wiping the lenses. Do not scratch the lenses of the 3D glasses with sharp objects or clean/wipe them with chemicals. ASSEMBLING AND PREPARING 11 ASSEMBLING AND PREPARING Unpacking Check your product box for the following items. If there are any missing accessories, contact the local dealer where you purchased your product. The illustrations in this manual may differ from the actual product and item. CAUTION yy Do not use any unapproved items to ensure the safety and product life span. yy Any damages or injuries by using unapproved items are not covered by the warranty. yy Some models have a thin film attached on to the screen and this must not be removed. NOTE yy The items supplied with your product may vary depending on the model. yy Product specifications or contents of this manual may be changed without prior notice due to upgrade of product functions. yy For an optimal connection, HDMI cables and USB devices should have bezels less than 10 mm thick and 18 mm width. Use an extension cable that supports USB 2.0 if the USB cable or USB memory stick does not fit into your TV’s USB port. B B A A *A < = 10 mm *B < = 18 mm ENGLISH ENG NOTE yy Image shown may differ from your TV. yy Your TV’s OSD (On Screen Display) may differ slightly from that shown in this manual. yy The available menus and options may differ from the input source or product model that you are using. yy New features may be added to this TV in the future. yy The TV can be placed in standby mode in order to reduce the power consumption. And the TV should be turned off if it will not be watched for some time, as this will reduce energy consumption. yy The energy consumed during use can be significantly reduced if the level of brightness of the picture is reduced, and this will reduce the overall running cost. 12 ASSEMBLING AND PREPARING ENGLISH ENG Remote control, batteries (AAA) Owner’s manual Power Cord Stand Base (Only LB55**, LB56**-ZE / ZC, LB62**-ZA / ZB) Stand Base (Only LB56**-ZT / ZQ, LB62**-ZE) Stand Screws 4EA, M4 x L14 (Only 42/49LB55**, 39/42/47/50/55/60LB56**, 42/49/55LB62**) Stand Screws 4EA, M4 x L20 (Only 32LB55**, 32LB56**, 32LB62**) Wall Mount Spacers 2EA (Only 42LB55**, 42LB56**, 42LB62**) Cable Managements 2EA Cable holder (Depending on model) Cinema 3D Glasses The number of 3D glasses may differ depending on the model or country. (Only LB62**) ASSEMBLING AND PREPARING Optional extras can be changed or modified for quality improvement without any notification. Contact your dealer for buying these items. These devices only work with certain models. LG Audio Device Compatibility LG Audio device AG-F*** Cinema 3D Glasses AG-F***DP Dual play glasses LB56** / LB55** LB62** • • AG-F*** Cinema 3D Glasses • AG-F***DP Dual play glasses • The model name or design may be changed due to the manufacturer’s circumstances or policies. ENGLISH ENG Separate purchase 13 14 ASSEMBLING AND PREPARING ENGLISH ENG Parts and buttons (Only LB55**, LB56**-ZE / ZC, LB62**-ZA / ZB) Screen Joystick Button (* This button is located below the TV screen.) Speakers Remote control sensor Power Indicator (Only LB56**-ZT / ZQ, LB62**-ZE) Screen Joystick Button (* This button is located below the TV screen.) Speakers Remote control sensor Power Indicator NOTE yy You can set the power indicator light to on or off by selecting OPTION in the main menus. ASSEMBLING AND PREPARING 15 Using the Joystick button Basic Functions Power On When the TV is turned off, place your finger on the joystick button and press it once and release it. Power Off When the TV is turned on, place your finger on the joystick button and press it once for a few seconds and release it. (However, if the Menu button is on the screen, pressing and holding the joystick button will let you exit the Menu.) Volume Control If you place your finger over the joystick button and move it left or right, you can adjust the volume level you want. Programmes Control If you place your finger over the joystick button and move it up or down, you can scrolls through the saved programmes you want. NOTE yy When your finger over the joystick button and push it to the up, down, left or right, be careful not to press the joystick button. If you press the joystick button first, you can not adjust the volume level and saved programmes. Adjusting the Menu When the TV is turned on, press the joystick button one time. , , ) moving the joystick button up, down, left or right. You can adjust the Menu items( , TV off Settings Close Input List Turns the power off. Accesses the main menu. Clears on-screen displays and returns to TV viewing. Changes the input source. ENGLISH ENG You can simply operate the TV functions, pressing or moving the joystick button up, down, left or right. 16 ASSEMBLING AND PREPARING ENGLISH ENG Lifting and moving the TV Please note the following advice to prevent the TV from being scratched or damaged and for safe transportation regardless of its type and size. CAUTION yy Avoid touching the screen at all times, as this may result in damage to the screen. yy It is recommended to move the TV in the box or packing material that the TV originally came in. yy Before moving or lifting the TV, disconnect the power cord and all cables. yy When holding the TV, the screen should face away from you to avoid damage. yy Hold the top and bottom of the TV frame firmly. Make sure not to hold the transparent part, speaker, or speaker grill area. yy When transporting a large TV, there should be at least 2 people. yy When transporting the TV by hand, hold the TV as shown in the following illustration. yy When transporting the TV, do not expose the TV to jolts or excessive vibration. yy When transporting the TV, keep the TV upright, never turn the TV on its side or tilt towards the left or right. yy Do not apply excessive pressure to cause flexing / bending of frame chassis as it may damage screen. ASSEMBLING AND PREPARING Mounting on a table 17 Securing the TV to a wall (This feature is not available for all models.) 10 cm 10 cm m 10 c 10 cm 2 Connect the power cord to a wall outlet. CAUTION yy Do not place the TV near or on sources of heat, as this may result in fire or other damage. 1 Insert and tighten the eye-bolts, or TV brackets and bolts on the back of the TV. -If there are bolts inserted at the eye-bolts position, remove the bolts first. 2 Mount the wall brackets with the bolts to the wall. Match the location of the wall bracket and the eyebolts on the rear of the TV. 3 Connect the eye-bolts and wall brackets tightly with a sturdy rope. Make sure to keep the rope horizontal with the flat surface. CAUTION yy Make sure that children do not climb on or hang on the TV. NOTE yy Use a platform or cabinet that is strong and large enough to support the TV securely. yy Brackets, bolts and ropes are not provided. You can obtain additional accessories from your local dealer. ENGLISH ENG 1 Lift and tilt the TV into its upright position on a table. Leave a 10 cm (minimum) space from the wall -for proper ventilation. 18 ASSEMBLING AND PREPARING ENGLISH ENG Mounting on a wall Attach an optional wall mount bracket at the rear of the TV carefully and install the wall mount bracket on a solid wall perpendicular to the floor. When you attach the TV to other building materials, please contact qualified personnel. LG recommends that wall mounting be performed by a qualified professional installer. 10 cm 10 cm 10 cm 10 cm Make sure to use screws and wall mount bracket that meet the VESA standard. Standard dimensions for the wall mount kits are described in the following table. Separate purchase(Wall Mounting Bracket) Model 32/39LB56** 42/47/50/55LB56** 32LB55** 42/49LB55** 32LB62** 42/49/55LB62** VESA (A x B) 200 x 200 400 x 400 Standard screw M6 M6 Number of screws 4 LSW240B Wall mount bracket MSW240 Model 60LB56** VESA (A x B) 400 x 400 Standard screw M6 Number of screws 4 Wall mount bracket LSW440B 4 LSW440B MSW240 A B CAUTION yy Disconnect the power first, and then move or install the TV. Otherwise electric shock may occur. yy If you install the TV on a ceiling or slanted wall, it may fall and result in severe injury. Use an authorized LG wall mount and contact the local dealer or qualified personnel. yy Do not over tighten the screws as this may cause damage to the TV and void your warranty. yy Use the screws and wall mounts that meet the VESA standard. Any damages or injuries by misuse or using an improper accessory are not covered by the warranty. NOTE yy Use the screws that are listed on the VESA standard screw specifications. yy The wall mount kit includes an installation manual and necessary parts. yy The wall mount bracket is not provided. You can obtain additional accessories from your local dealer. yy The length of screws may differ depending on the wall mount. Make sure to use the proper length. yy For more information, refer to the manual supplied with the wall mount. NOTE yy Only 42LB55**, 42LB56**, 42LB62** Wall Mount Spacers REMOTE CONTROL 19 The descriptions in this manual are based on the buttons on the remote control. Please read this manual carefully and use the TV correctly. To replace batteries, open the battery and ends to the label inside the cover, replace batteries (1.5 V AAA) matching the compartment, and close the battery cover. To remove the batteries, perform the installation actions in reverse. CAUTION yy Do not mix old and new batteries, as this may damage the remote control. Make sure to point the remote control toward the remote control sensor on the TV. (Only LB55**, LB56**) (POWER) Turns the TV on or off. TV/ RAD RATIO SUBTITLE 1 4 7 LIST INPUT AD 2 5 8 0 3 6 9 AD By pressing the AD button, audio descriptions function will be enabled. RATIO Resizes an image. INPUT Changes the input source. Number buttons Enters numbers. LIST Accesses the saved programme list. Q.VIEW Returns to the previously viewed programme. Adjusts the volume level. FAV Accesses your favourite programme list. P PAGE GUIDE Shows programme guide. MUTE INFO T.OPT Teletext buttons ( INFO Q.MENU SETTINGS Mutes all sounds. P Scrolls through the saved programmes. PAGE Moves to the previous or next screen. MUTE TEXT Selects Radio, TV and DTV programme. SUBTITLE Recalls your preferred subtitle in digital mode. Q.VIEW FAV GUIDE TV/RAD TEXT / T.OPT) These buttons are used for teletext. Views the information of the current programme and screen. SETTINGS Accesses the main menus. 1 Q.MENU Accesses the Quick menus. Navigation buttons (up/down/left/right) Scrolls through menus or options. EXIT AV MODE 1 REC/ OK Selects menus or options and confirms your input. BACK Returns to the previous level. EXIT Clears on-screen displays and returns to TV viewing. AV MODE Selects an AV mode. S tarts to record and displays record menu. (Only Time MachineReady supported model) ) Controls the MY MEDIA menus, Control buttons ( Time MachineReady control or the SIMPLINK compatible devices (USB, SIMPLINK or Time MachineReady). 1 Colour buttons T hese access special functions in some menus. : Red, : Green, : Yellow, : Blue) ( ENGLISH ENG REMOTE CONTROL 20 REMOTE CONTROL (Only LB62**) ENGLISH ENG (POWER) Turns the TV on or off. TV/ RAD INPUT SUBTITLE GUIDE AV MODE 1 4 7 LIST 2 5 8 0 3 6 9 TV/RAD GUIDE Shows programme guide. AV MODE Selects an AV mode. INPUT Changes the input source. Number buttons Enters numbers. LIST Accesses the saved programme list. Q.VIEW Returns to the previously viewed programme. Q.VIEW Adjusts the volume level. FAV Accesses your favourite programme list. FAV P PAGE Used for viewing 3D video. MUTE INFO T.OPT Q.MENU SETTINGS Mutes all sounds. P Scrolls through the saved programmes. PAGE Moves to the previous or next screen. MUTE TEXT Selects Radio, TV and DTV programme. SUBTITLE Recalls your preferred subtitle in digital mode. Teletext buttons ( INFO TEXT / T.OPT) These buttons are used for teletext. Views the information of the current programme and screen. SETTINGS Accesses the main menus. 1 Q.MENU Accesses the Quick menus. Navigation buttons (up/down/left/right) Scrolls through menus or options. EXIT AD 1 REC/ OK Selects menus or options and confirms your input. BACK Returns to the previous level. EXIT Clears on-screen displays and returns to TV viewing. AD By pressing the AD button, audio descriptions function will be enabled. S tarts to record and displays record menu. (Only Time MachineReady supported model) ) Controls the MY MEDIA menus, Control buttons ( Time MachineReady control or the SIMPLINK compatible devices (USB, SIMPLINK or Time MachineReady). 1 Colour buttons T hese access special functions in some menus. : Red, : Green, : Yellow, : Blue) ( SETTINGS Automatically Setting Up Programme SETTINGS SETUP Auto Tuning Automatically tunes the programmes. yy If Input Source is not connected properly, programme registration may not work. yy Auto Tuning only finds programmes that are currently broadcasting. yy If Lock System is turned on, a pop-up window will appear asking for password. To adjust picture with Picture Wizard SETTINGS PICTURE Picture Wizard III [Depending on model] Calibrates and adjusts for optimum picture quality using the remote control and the Picture Wizard without expensive pattern devices or help from a specialist. To select Picture Mode SETTINGS PICTURE Picture Mode Select the picture mode optimized for the viewing environment or the programme. yy Vivid : Heightens contrast, brightness and sharpness to display vivid images. yy Standard : Displays images in standard levels of contrast, brightness and sharpness. yy Eco/APS: [Depending on model] The Energy Saver feature changes settings on the TV to reduce power consumption. yy Cinema/Game: Displays the optimum picture for movie, game. yy Sports : Optimizes the video image for high and dynamic actions by emphasizing primary colours such as white, grass, or sky blue. Expert 1, 2 : Menu for adjusting picture quality yy that allows experts and amateurs to enjoy the best TV viewing. This is the adjustment menu provided for ISF-certified picture tuning professionals. (ISF logo can only be used on ISF-certified TVs.) ISFccc: Imaging Science Foundation Certified Calibration Control yy Depending on input signal, available range of picture modes may differ. Expert mode is for picture tuning professionals yy to control and fine-tune using a specific image. For normal images, the effects may not be dramatic. yy The ISF function is only available on some models. To set advanced control SETTINGS PICTURE Picture Mode Advanced Control / Expert Control Calibrates the screen for each picture mode; or adjusts picture settings for a special screen. First select a Picture Mode of your choice. yy Dynamic Contrast : Adjusts the contrast to the optimal level according to the brightness of the image. yy Dynamic Colour : Adjusts colours to make the image appear in more natural colours. yy Skin Colour : Sets Skin colour spectrum separately to implement the skin colour as defined by the user. yy Sky Colour : Sky colour is set separately. yy Grass Colour : Natural colour spectrum (meadows, hills, etc.) can be separately set. yy Gamma : Sets the gradation curve according to the output of picture signal in relation to the input signal. yy Colour Gamut : Selects the range of colours that can be expressed. yy Edge Enhancer : Shows clearer and distinctive yet natural edges of the video. yy Expert Pattern : [Depending on model] Patterns used for expert adjustment. yy Colour Filter : Filters a specific colour spectrum in RGB colours to fine-tune colour saturation and hue accurately. yy Colour Temperature : Adjusts the overall tone of the screen as desired. In Expert mode, detailed finetuning can be set via Gamma method, etc. yy Colour Management System : This is a system that experts use when they adjust colour with a test pattern. They can select from six colour areas (Red / Green / Blue / Cyan / Magenta / Yellow) without affecting other colours. For normal images, adjustments may not result in noticeable colour changes. yy Depending on input signal or other picture settings, the range of detailed items for adjustment may differ. ENGLISH ENG SETTINGS 21 22 SETTINGS To set additional picture options ENGLISH ENG SETTINGS PICTURE Picture Option Picture Mode [Depending on model] Adjusts detailed setting for images. yy Noise Reduction : Eliminates noise in the picture. yy MPEG Noise Reduction : Eliminates noise generated while creating digital picture signals. yy Black Level : Adjusts the brightness and contrast of the screen to suit the black level of the input picture by using the blackness (black level) of the screen. yy Real Cinema : Optimizes the screen for movie viewing. yy Motion Eye Care/SUPER Energy Saving : [Depending on model] Saves power consumption by adjusting the brightness corresponding to the movement of the image on the screen. yy Depending on input signal or other picture settings, the range of detailed items for adjustment may differ. To use TruMotion SETTINGS PICTURE TruMotion [Depending on model] Corrects images to display smoother motion sequences. yy Smooth : De-judder/De-blur working on higher range in auto mode. yy Clear : De-judder/De-blur working on middle range in auto mode. yy User : De-judder / De-blur can be set manually. De-judder : This function adjusts juddering of the screen. De-blur : This function adjusts and eliminates blurring of the screen. Auto means Juddering and blurring range that depend on input video status is controlled by TruMotion mode. To use Energy Saving feature SETTINGS PICTURE Energy Saving Reduces power consumption by adjusting screen brightness. yy Auto : [Depending on model] The TV sensor detects the ambient lighting and automatically adjusts the screen brightness. yy Off : Turns off the Energy Saving mode. yy Minimum / Medium / Maximum : Applies the preset Energy Saving mode. yy Screen Off : Screen is turned off and only sound is played. Press any button except Power button on the remote control to turn the screen back on. To use TV speaker SETTINGS AUDIO Sound Out TV Speaker [Depending on model] Sound is output through the TV speaker. To use External Speaker SETTINGS AUDIO Sound Out External Speaker (Optical) [Depending on model] Sound is output through the speaker connected to the optical port. yy SimpLink is supported. To use Digital Sound Out SETTINGS AUDIO Sound Out External Speaker (Optical) Digital Sound Out [Depending on model] Sets up Digital Sound Out. Item Audio Input Digital Audio Ouput Auto MPEG Dolby Digital Dolby Digital Plus HE-AAC PCM Dolby Digital Dolby Digital Dolby Digital PCM All PCM SETTINGS To connect and use LG audio device [Depending on model] logo to the optiConnect LG audio device with the cal digital audio output port. LG audio device allows you to enjoy rich powerful sound easily. To use Headphone SETTINGS AUDIO Sound Out Headphone [Depending on model] Sound is output through the headphone connected to the earphone/headphone port. To synchronize audio and video SETTINGS AUDIO AV Sync. Adjust [Depending on model] Synchronizes video and audio directly when they do not match. yy If you set AV Sync. Adjust to ON, you can adjust the sound output (TV speakers or SPDIF) to the screen image. To use SIMPLINK [Depending on model] SIMPLINK is a feature that enables you to control and manage various multimedia devices conveniently via the SIMPLINK menu. 1 Connect the TV’s HDMI IN terminal and the SIMPLINK device’s HDMI output terminal using an HDMI cable. yy [Depending on model] For home theatre units with a SIMPLINK function, connect HDMI terminals as above, and use an optical cable to connect Optical Digital Audio Out from the TV to Optical Digital Audio In of the SIMPLINK device. 2 Select INPUT(OPTION) SIMPLINK. SIMPLINK menu window appears. 3 In SIMPLINK Setting window, set SIMPLINK function to ON. 4 In SIMPLINK menu window, selects the device you want to control. yy This function is only compatible with devices with the SIMPLINK logo. yy To use the SIMPLINK function, you need to use a high-speed HDMI® cable (with CEC (Consumer Electronics Control) feature added). High-speed HDMI® cables have the No. 13 pin connected for information exchange between devices. yy If you switch to another input, the SIMPLINK device will stop. yy If a third-party device with the HDMI-CEC function is also used, the SIMPLINK device may not work normally. yy [Depending on model] If you select or play media from a the device with a home theatre function, the HT Speaker(Speaker) is automatically connected. Be sure to connect with an optical cable (sold separately) to use the HT Speaker(Speaker) function. SIMPLINK function description yy Direct Play : Plays the multimedia device on the TV instantly. yy Select multimedia device : Selects the desired device via the SIMPLINK menu to control it from the TV screen instantly. yy Disc playback : Manages the multimedia device with the TV remote control. yy Power off all devices : When you power off the TV, all connected devices are turned off. yy Sync Power on: When the equipment with SIMPLINK function connected HDMI terminal starts to play, the TV will automatically turn on. yy Speaker : [Depending on model] Select speaker either on the home theatre unit or the TV. To set password SETTINGS LOCK Set Password Sets or changes the TV password. The initial password is set to ‘0000’. When France is selected for Country, password is not ‘0000’ but ‘1234’. When France is selected for Country, password cannot be set to ‘0000’. To return Factory Reset SETTINGS OPTION Factory Reset All stored information is deleted and TV settings are reset. The TV turns itself off and back on, and all settings are reset. yy When Lock System is in place, a pop-up window appears and asks for password yy Do not turn off the power during initialization. ENGLISH ENG SETTINGS AUDIO Sound Out LG Sound Sync (Optical) 23 24 SETTINGS To remove the USB device ENGLISH ENG Q.MENU USB Device Select a USB storage device that you want to remove. When you see a message that the USB device has been removed, separate the device from the TV. yy Once a USB device has been selected for removal, it can no longer be read. Remove the USB storage device and then re-connect it. Using a USB storage device - warning yy If the USB storage device has a built-in auto recognition program or uses its own driver, it may not work. yy Some USB storage devices may not work or may work incorrectly. yy Use only USB storage devices formatted with the Windows FAT32 or NTFS File System. yy For external USB HDDs, it is recommended that you use devices with a rated voltage of less than 5 V and a rated current of less than 500 mA. yy It is recommended that you use USB memory sticks of 32 GB or less and USB HDDs of 1 TB or less. yy If a USB HDD with power-saving function does not work properly, turn the power off and on. For more information, refer to the user manual of the USB HDD. yy Data in the USB storage device can be damaged, so be sure to back up important files to other devices. Data maintenance is the user’s responsibility and the manufacturer is not responsible for data loss. My Media supporting file yy Maximum data transfer rate : 20 Mbps (Mega bit per second) yy External supported subtitle formats : *.srt (SubRip), *.smi (SAMI), *.sub (SubViewer, MicroDVD, DVDsubtitleSystem, SubIdx(Vobsub)), *.ass/*. ssa (SubStation Alpha), *.txt (TMplayer), *.psb (PowerDivX) yy Internal supported subtitle formats: XSUB (Supports internal subtitles generated from DivX6) Supported Video Formats yy Maximum: 1920 x 1080 @ 30p (only Motion JPEG 640 x 480 @ 30p) yy .asf, .wmv [Video] MPEG-2, MPEG-4 Part2, DivX3.11, DivX4, DivX5, DivX6, XViD, H.264/AVC, VC1(WMV3, WVC1), MP43 [Audio] WMA Standard, WMA9(Pro), MP3, AAC, AC3, MP3, 3D WMV Single Stream. yy divx, .avi [Video] MPEG-2, MPEG-4 Part2, DivX3.11, DivX4, DivX5, DivX6, XViD, H.264/AVC [Audio] HE-AAC, LPCM, ADPCM, MPEG- 1 Layer I, MPEG-1 Layer II, Dolby Digital, MPEG-1 Layer III (MP3), *DTS yy .ts, .trp, .tp, .mts, .m2ts [Video] H.264/AVC, MPEG-2, AVS, VC1 [Audio] MPEG-1 Layer I, MPEG-1 Layer II, MPEG1 Layer III (MP3), Dolby Digital, Dolby Digital Plus, AAC, HE-AAC, *DTS yy .vob [Video] MPEG-1, MPEG-2 [Audio] Dolby Digital, MPEG-1 Layer I, MPEG- 1 Layer II, DVD-LPCM yy .mp4, .m4v, .mov [Video] MPEG-2, MPEG-4 Part2, DivX3.11, DivX4, DivX5, DivX6, XVID, H.264/AVC [Audio] AAC, MPEG-1 Layer III (MP3), *DTS yy .mkv [Video] MPEG-2, MPEG-4 Part2, DivX3.11, DivX4, DivX5, DivX6, XVID, H.264/AVC [Audio] HE-AAC, Dolby Digital, MPEG-1 Layer III (MP3), *DTS, LPCM yy motion JPEG [Video] MJPEG [Audio] LPCM, ADPCM yy .mpg, .mpeg, .mpe [Video] MPEG-1, MPEG-2 [Audio] MPEG-1 Layer I, MPEG-1 Layer II, Dolby Digital, LPCM yy dat [Video] MPEG-1, MPEG-2 [Audio] MP2 yy flv [Video] Sorenson H.263, H.264/AVC [Audio] MP3, AAC, HE-AAC yy *rm, *rmvb [Video] RV30, RV40 [Audio] Dolby Digital, AAC, HE-AAC, RA6(Cook) yy 3gp, 3gp2 [Video] H.264/AVC, MPEG-4 Part2 [Audio] AAC, AMR(NB/WB) yy *DTS / *rm / *rmvb : Depending on model SETTINGS / TO SEE WEB MANUAL / EXTERNAL CONTROL DEVICE SETUP Supported Audio Formats Supported Photo Formats yy Category : 2D (jpeg, jpg, jpe) [Available file type] SOF0: Baseline, SOF1: Extend Sequential, SOF2: Progressive [Photo size] Minimum: 64 x 64, Maximum: Normal Type: 15360 (W) x 8640 (H), Progressive Type: 1920 (W) x 1440 (H) yy Category : BMP [Photo size] Minimum : 64 x 64, Maximum : 9600 x 6400 yy Category : PNG [Available file type] Interlace, Non-Interlace [Photo size] Minimum : 64 x 64, Maximum : Interlace : 1200 x 800, Non-Interlace : 9600 x 6400 yy BMP and PNG format files may be slower to display than JPEG. TO SEE WEB MANUAL To obtain detailed User Guide information, please visit www.lg.com. EXTERNAL CONTROL DEVICE SETUP To obtain the external control device setup information, please visit www.lg.com. ENGLISH ENG yy File type : mp3 [Bit rate] 32 Kbps - 320 Kbps [Sample freq.] 16 kHz - 48 kHz [Support] MPEG1, MPEG2, Layer2, Layer3 yy File Type : AAC [Bit rate] Free Format [Sample freq.] 8 kHz ~ 48 kHz [Support] ADIF, ADTS yy File Type : M4A [Bit rate] Free Format [Sample freq.] 8 kHz ~ 48 kHz [Support] MPEG-4 yy File Type : WMA [Bit rate] 128 Kbps ~ 320 Kbps [Sample freq.] 8 kHz ~ 48 kHz [Support] WMA7, WMA8, WMA9 Standard yy File Type : WMA [Bit rate] ~ 768 Kbps [Channel / Sample freq.] M0 : up to 2 Channel @ 48 kHz (Except LBR mode), M1 : up to 5.1 Channel @ 48 kHz, M2 : up to 5.1 Channel @ 96 kHz [Support] WMA 10 Pro yy File Type : OGG [Bit rate] Free Format [Sample freq.] 8kHz ~ 48 kHz [Support] OGG Vorvis 25 26 MAINTENANCE ENGLISH ENG MAINTENANCE Cleaning your TV Clean your TV regularly to keep the best performance and to extend the product lifespan. CAUTION yy Make sure to turn the power off and disconnect the power cord and all other cables first. yy When the TV is left unattended and unused for a long time, disconnect the power cord from the wall outlet to prevent possible damage from lightning or power surges. Screen, frame, cabinet and stand yy To remove dust or light dirt, wipe the surface with a dry, clean, and soft cloth. yy To remove major dirt, wipe the surface with a soft cloth dampened in clean water or a diluted mild detergent. Then wipe immediately with a dry cloth. CAUTION yy Avoid touching the screen at all times, as this may result in damage to the screen. yy Do not push, rub, or hit the screen surface with your fingernail or a sharp object, as this may result in scratches and image distortions. yy Do not use any chemicals as this may damage the product. yy Do not spray liquid onto the surface. If water enters the TV, it may result in fire, electric shock, or malfunction. Power cord Remove the accumulated dust or dirt on the power cord regularly. TROUBLESHOOTING 27 Problem Solution Cannot control the TV with the remote control. yy Check the remote control sensor on the product and try again. yy Check if there is any obstacle between the product and the remote control. yy Check if the batteries are still working and properly installed to , to ). ( No image display and no sound is produced. yy Check if the product is turned on. yy Check if the power cord is connected to a wall outlet. yy Check if there is a problem in the wall outlet by connecting other products. The TV turns off suddenly. yy Check the power control settings. The power supply may be interrupted. yy Check if the Automatic Standby (Depending on model) / Sleep Timer / Off Time feature is activated in the TIME settings. yy If there is no signal while the TV is on, the TV will turn off automatically after 15 minutes of inactivity. When connecting to the PC yy Turn the TV off/on using the remote control. (HDMI), ‘No signal’ or ‘Invalid yy Reconnect the HDMI cable. Format’ is displayed. yy Restart the PC with the TV on. ENGLISH ENG TROUBLESHOOTING SPECIFICATIONS B-1 SPECIFICATIONS Product specifications may be changed without prior notice due to upgrade of product functions. 32LB56** MODELS Dimensions (W x H x D) Weight 32LB5610-ZC 32LB561B-ZC 32LB561U-ZC 32LB561U-ZE 32LB561V-ZC 32LB561V-ZE 39LB56** 32LB563U-ZT 32LB563V-ZT 32LB565U-ZQ 32LB565V-ZQ With stand (mm) 732 x 481 x 207 732 x 475 x 185 885 x 567 x 218 Without stand (mm) 732 x 431 x 55.5 732 x 431 x 55.5 885 x 524 x 55.5 8.3 With stand (kg) 6.2 6.2 Without stand (kg) 6.0 6.0 8 65 W 65 W 90 W Power consumption Power requirement AC 100-240 V~ 50 / 60 Hz 42LB56** Weight 42LB563U-ZT 42LB563V-ZT 42LB565U-ZQ 42LB565V-ZQ 47LB5610-ZC 47LB561B-ZC 47LB561U-ZC 47LB561U-ZE 47LB561V-ZC 47LB561V-ZE With stand (mm) 961 x 610 x 218 961 x 613 x 193 1073 x 676 x 255 Without stand (mm) 961 x 567 x 55.5 961 x 567 x 55.5 1073 x 629 x 55.8 With stand (kg) 9.5 9.5 12.7 Without stand (kg) 9.2 9.2 12.3 100 W 100 W 110 W Power consumption Power requirement Weight AC 100-240 V~ 50 / 60 Hz 50LB56** 55LB56** 60LB56** 50LB5610-ZC 50LB561B-ZC 50LB561U-ZC 50LB561U-ZE 50LB561V-ZC 50LB561V-ZE 55LB5610-ZC 55LB561B-ZC 55LB561U-ZC 55LB561U-ZE 55LB561V-ZC 55LB561V-ZE 60LB5610-ZC 60LB561B-ZC 60LB561U-ZC 60LB561U-ZE 60LB561V-ZC 60LB561V-ZE With stand (mm) 1128 x 708 x 255 1243 x 772 x 255 1373 x 848 x 280 Without stand (mm) 1128 x 660 x 55.8 1243 x 725 x 56.8 1373 x 801 x 58.8 14.2 18.4 23.5 MODELS Dimensions (W x H x D) 47LB56** 42LB5610-ZC 42LB561B-ZC 42LB561U-ZC 42LB561U-ZE 42LB561V-ZC 42LB561V-ZE MODELS Dimensions (W x H x D) 39LB5610-ZC 39LB561B-ZC 39LB561U-ZC 39LB561U-ZE 39LB561V-ZC 39LB561V-ZE With stand (kg) Without stand (kg) Power consumption Power requirement 13.8 18 23.0 120 W 130 W 130 W AC 100-240 V~ 50 / 60 Hz B-2 SPECIFICATIONS MODELS Dimensions (W x H x D) Weight 32LB55** 42LB55** 49LB55** 32LB5500-ZA 32LB550B-ZA 32LB550U-ZA 32LB550V-ZA 32LB550V-ZA 32LB551U-ZC 32LB551V-ZC 42LB5500-ZA 42LB550B-ZA 42LB550U-ZA 42LB550V-ZA 42LB550V-ZA 42LB551U-ZC 42LB551V-ZC 49LB5500-ZA 49LB550B-ZA 49LB550U-ZA 49LB550V-ZA 49LB550V-ZA 49LB551U-ZC 49LB551V-ZC With stand (mm) 731 x 480 x 208 959 x 611 x 218 1105 x 694 x 247 Without stand (mm) 731 x 437 x 56.5 959 x 570 x 56.2 1105 x 652 x 56.5 With stand (kg) 5.9 9.5 13.6 Without stand (kg) 5.7 9.2 13.2 100 W 110 W Power consumption 65 W Power requirement AC 100-240 V~ 50 / 60 Hz 32LB62** 32LB620V-ZA 32LB628U-ZB 32LB628V-ZB 32LB6200-ZE 32LB620V-ZE With stand (mm) 731 x 480 x 208 731 x 477.6 x 184.6 Without stand (mm) 731 x 437 x 56.5 731 x 437 x 56.5 With stand (kg) 5.9 5.9 Without stand (kg) 5.7 5.7 65 W 65 W MODELS Dimensions (W x H x D) Weight Power consumption Power requirement AC 100-240 V~ 50 / 60 Hz 42LB62** 42LB620V-ZA 42LB628U-ZB 42LB628V-ZB 42LB6200-ZE 42LB620V-ZE With stand (mm) 959 x 611 x 218 959 x 609.7 x 193 Without stand (mm) 959 x 570 x 56.2 959 x 570 x 56.2 With stand (kg) 9.5 9.5 Without stand (kg) 9.2 9.2 100 W 100 W MODELS Dimensions (W x H x D) Weight Power consumption Power requirement AC 100-240 V~ 50 / 60 Hz SPECIFICATIONS 49LB62** Weight 55LB62** 49LB620V-ZA 49LB628U-ZB 49LB628V-ZB 49LB6200-ZE 49LB620V-ZE With stand (mm) 1105 x 694 x 247 1105 x 694.3 x 230 1241 x 769 x 230 Without stand (mm) 1105 x 652 x 56.5 1105 x 652 x 56.5 1241 x 724 x 57.5 With stand (kg) 13.6 13.6 18.2 Without stand (kg) 13.2 13.2 17.8 110 W 110 W 130 W MODELS Dimensions (W x H x D) B-3 Power consumption Power requirement AC 100-240 V~ 50 / 60 Hz 55LB6200-ZE 55LB620V-ZE B-4 SPECIFICATIONS CI Module Size (W x H x D) 100.0 mm x 55.0 mm x 5.0 mm Operating Temperature Environment condition 0 °C to 40 °C Operating Humidity Less than 80 % Storage Temperature -20 °C to 60 °C Storage Humidity Less than 85 % Satellite Digital TV Digital TV Analogue TV DVB-T/T2 DVB-C DVB-S/S2 DVB-T DVB-C PAL/SECAM B/G/D/K/I, SECAM L/L’ Programme coverage VHF, UHF C-Band, Ku-Band VHF, UHF VHF: E2 to E12, UHF : E21to E69, CATV: S1 to S20, HYPER: S21 to S47 Maximum number of storable programmes 6,000 Television system 1,500 External antenna impedance 75 Ω 3D supported mode (Only 3D models) yy Video, which is input as below media contents is switched into the 3D screen automatically. yy The method for 3D digital broadcast may differ depending on the signal environment. If video is not switched automatically into 3D, manually convert the settings to view 3D images. Input Signal 720p HDMI 1080i 1080p DTV USB Resolution 1280 x 720 1920 x 1080 1920 x 1080 Horizontal Vertical Frequency (kHz) Frequency (Hz) 37.5 50 45 60 75 50 89.9 / 90 59.94 / 60 28.125 50 33.7 60 Playable 3D video format Side by Side(half), Top and Bottom Frame packing Side by Side(half), Top and Bottom 27 24 33.7 30 53.95 / 54 23.98 / 24 Frame packing 56.3 50 Side by Side(half), Top and Bottom, Single frame sequential 67.5 60 720p 1280 x 720 37.5 50 1080i 1920 x 1080 28.125 50 1080p 1920 x 1080 33.75 30 Side by Side(half), Top and Bottom Side by Side, Top and Bottom Side by Side, Top and Bottom, JPS, MPO(Photo) SPECIFICATIONS Component port connecting information HDMI-DTV supported mode Resolution Horizontal Frequency (kHz) Vertical Frequency (Hz) 720 x 480 31.469 31.5 59.94 60 720 x 576 31.25 50 1280 x 720 37.5 45 44.96 50 60 59.94 1920 x 1080 28.125 33.75 33.72 56.25 67.5 67.432 27 26.973 33.75 33.716 50 60 59.94 50 60 59.94 24 23.976 30 29.97 HDMI-PC supported mode (Use HDMI IN 1 for PC mode) Resolution Horizontal Frequency (kHz) B-5 Vertical Frequency (Hz) 640 x 350 31.468 70.09 720 x 400 31.469 70.08 640 x 480 31.469 59.94 800 x 600 37.879 60.31 1024 x 768 48.363 60.00 1152 x 864 54.348 60.053 1360 x 768 47.712 60.015 1280 x 1024 63.981 60.020 1920 x 1080 67.50 60.00 (Except for 32LB55*B, 32LB55*U, 32LB56*B, 32LB56*U, 32LB62*U) Component ports on the TV Video output ports on DVD player Y PB PR Y PB PR Y B-Y R-Y Y Cb Cr Y Pb Pr Signal Component 480i / 576i O 480p / 576p O 720p / 1080i O 1080p O (50 Hz / 60 Hz only) B-6 REGULATORY REGULATORY LG Recycling Policy (Only EU) LG Electronics offers a customized e-waste take-back & recycling service that meets local needs and requirements in the countries where e-waste regulations are in place, and also provides product and packaging take-back & recycling service voluntarily in some countries. LG Electronics evaluates products’ recyclability at the design step using LG’s recyclability evaluation tool, with the goal of improving recyclability where practicable. Through these activities, LG seeks to contribute to conserving natural resources and protecting the environment. For more information about the LG Recycling Policy, please visit our global site at http://www.lg.com/global/sustainability/environment/take-back-recycling Energy Saving Energy efficiency cuts energy consumption and thus saves money by reducing electricity bills. The following indications allow to reduce power consumption when the television is not being watched: yy Turning the television off at its mains supply, or un-plugging it, will cut energy use to zero for all televisions, and is recommended when the television is not being used for a long time, e.g. when on holiday, yy Putting the television into standby mode, will reduce energy consumption, but will still draw some power, yy Reducing the brightness of the screen will reduce energy use. Disposal of waste batteries (Applicable in the European Union and other European countries with separate collection systems) This symbol on the battery or on the packaging indicates that the battery provided with this product shall not be treated as household waste. By ensuring these batteries are disposed of correctly, you will help prevent potentially negative consequences for the environment and human health which could otherwise be caused by inappropriate waste handling of the battery. The recycling of the materials will help to conserve natural resources. In case of products that for safety, performance or data integrity reasons require a permanent connection with an incorporated battery, this battery should be replaced by qualified service staff only. To ensure that the battery will be treated properly, hand over the product at end-of-life to the applicable collection point for the recycling of electrical and electronic equipment. For all other batteries, please view the section on how to remove the battery from the product safely. Hand the battery over to the applicable collection point for the recycling of waste batteries. For more detailed information about recycling of this product or battery, please contact your local authority, your household waste disposal service or the shop where you purchased the product. REGULATORY B-7 EU ecolabel (Only EU ecolabel applied model) Better for the environment... yy High Energy Efficiency yy Reduced CO2 emissions yy Designed to facilitate repair and recycling ... better for you. EU Ecolabel : PL/22/004 LGE announced the ‘LG Declaration for a Cleaner Environment ‘in 1994, and this ideal has served as a Guiding managerial principle ever since. The Declaration is a foundation that has allowed us to undertaike Environmentally friendly activities in careful consideration of economic, environmental, and social aspects. We promote activities for environmental preservation, and we specifically develop our products to embrace the Concept of environmentfriendly through whole process from getting raw materials, production, transportation, usage and end-of-life. These environmental characteristics are endorsed by the award of the European Commission as approval of the product environmental status for energy saving. Facilities for recycling and a host of other features. The full list of criteria and more information on the eco label can be found at the web-site address : http://www.ecolabel.eu Restriction of Hazardous Substances (Only Ukraine) Обмеження України на наявність небезпечних речовин yy The equipment complies with requirements of the Technical Regulation, in terms of restrictions for the use of certain dangerous substances in electrical and electronic equipment. yy Устаткування відповідає вимогам технічного регламенту щодо обмеженного використання небезпечних речовин в електричному і електронному обладнанні. Isolator (Only Sweden, Norway) yy “Equipment connected to the protective earthing of the building installation through the mains connection or through other equipment with a connection to protective earthing - and to a cable distribution system using coaxial cable, may in some circumstances create a fire hazard. Connection to a cable distribution system has therefore to be provided through a device providing electrical isolation below a certain frequency range (galvanic isolator, see EN 60728-11)” yy “Utrustning som är kopplad till skyddsjord via jordat vägguttag och/eller via annan utrustning och samtidigt är kopplad till kabel-TV nät kan i vissa fall medföra risk för brand. För att undvika detta skall vid anslutning av utrustningen till kabel-TV nät galvanisk isolator finnas mellan utrustningen och kabel-TV nätet.” yy “Utstyr som er koplet til beskyttelsesjord via nettplugg og/eller via annet jordtilkoplet utstyr - og er tilkoplet et kabel-TV nett, kan forårsake brannfare. For å unngå dette skal det ved tilkopling av utstyret til kabel-TV nettet installeres en galvanisk isolator mellom utstyret og kabel-TV nettet.” Please contact LG First. If you have any inquiries or comments, please contact LG customer information centre. Customer Information Centre Country Country Service 0 810 144 131 Record the model number and serial number of the TV. Refer to the label on the back cover and quote this information to your dealer when requiring any service. 015 200 255 800 187 40 0032 15 200255 801 54 54 54 07001 54 54 808 78 54 54 810 555 810 031 228 3542 8088 5758 0850 111 154 0800 0 54 54 3220 902 500 234 54 01806 11 54 11 (0,20€ pro Anruf aus dem Festnetz der DTAG; Mobilfunk: max. 0,60€ pro Anruf) MODEL SERIAL Latvija Service 0900 543 5454 0770 54 54 54 0848 543 543 801 11 200 900, 210 4800 564 0844 847 5454 06 40 54 54 54 800 9990 8 800 200 7676 0818 27 6955 0 800 303 000 199600099 8 820 0071 1111 8 8000 805 805, 2255(GSM) 80200201 8 800 120 2222 880008081 8 0000 710 005