1
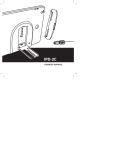
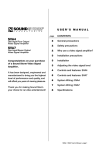
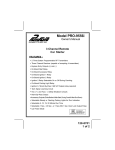
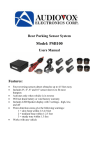
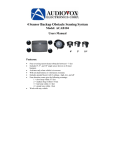
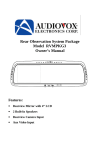
2.5” LCD Backup Monitor
Model: ACAM250
Installation/User’s Manual
Features:
•
2.5” TFT color LCD display
•
Flexible mounting pad with 3M tape monitor mounts on either
vehicle windshield or dashboard
•
Rearview camera input
•
Automatically displays backup camera image when vehicle is in
reverse
Warnings
This product is intended to assist in safe driving by signaling the driver of
obstacles behind the vehicle while the vehicle is in reverse. You, as the
driver, are solely responsible for the safe operation of your vehicle and the
safety of your passengers according to your local traffic regulations. Do
not use any features of this system to the extent it distracts you from safe
driving. Your first priority while driving should always be the safe
operation of your vehicle. Audiovox Electronics Corporation cannot accept
any responsibility whatsoever for accidents resulting from failure to
observe these precautions or safety instructions.
1. This product utilizes high voltage. Any unauthorized modifications
or damage to the product may result in electrical shock. Handle all
components with care. Inspect regularly for damage to
components and cabling.
2. You are responsible for ensuring that the installation of this
product does not void or affect the vehicle manufacturer’s
warranty. Audiovox Electronics Corporation or its subsidiaries are
not liable in full or in part for improper installation resulting in
loss or damage to your property, or for voiding all or part of the
vehicle manufacturer’s warranty.
3. Do not apply excessive force to any of the components contained
within this kit. Excessive force used before, during or after
installation that results in a damaged or non-functional part will
void all warranties.
4. Please follow the procedures in this installation manual. Improper
installation or modification of this product will void all warranties.
Warning: Backing up vehicle
Do not back up vehicle while watching the mirror/monitor screen.
Always look in the direction of vehicle motion. Use the
mirror/monitor as an aid in safety confirmation. The actual distance
is shorter than it appears in the monitor. The image range is limited.
Beware of blind spots.
1
TABLE OF CONTENTS
Warnings
1
Product description
2
Packing list
3
Installation Instructions
3
Operation
6
Maintenance
6
Troubleshooting
7
Warranty card
8
Product Description
This Rearview Mirror/Monitor, when used with a backup camera, is designed
to assist the driver by providing a clear and wide image of the area behind the
vehicle whenever the vehicle is shifted into reverse. Never rely solely on this
product to ensure the area is clear of children and/or obstructions. Use your
monitor and look both ways. This is not intended to replace existing safety
procedures, but to add an additional safety tool for your vehicle.
2
Packing List
Description
Figure
2.5” Monitor
Power Cable
Tap Connectors
Alcohol Wipe
3
Installation Instructions
Mounting the Monitor
The monitor with flexible mounting pad and 3M tape mounts on either the
vehicle windshield or dashboard.
1. Choose a monitor location in your vehicle that does not block your view
for safe driving.
2. Clean the monitor mounting area with the alcohol wipe provided.
3. Remove the protective film from the 3M flexible adhesive mounting pad
on the bottom of the monitor and carefully press into place.
Note: Once pressed into place, the pad cannot be easily moved. Be sure of
the position before mounting.
4. Connect the power cable to the Monitor cable.
5. Place (hide) the monitor cable behind the windshield trim piece and
continue along under the head liner to the rear of the vehicle and into the
truck, if applicable.
4
Wiring the Monitor
1. Wire the Power Cable to the vehicle’s reverse lamp.
a) Locate the reverse lamp in the tail light assembly. Using the tap
connector supplied, perform the following steps:
i.
Place the un-stripped positive lead wire on the run channel.
ii.
Insert the un-stripped red power wire completely.
iii.
Fold the tap connector back over the wires and make the
connection by crimping the u-contact down flush with the
plastic insulator.
iv.
Close the top hinged cover until latched.
b) Attach the black wire to the ground.
i.
Place the un-stripped ground lead wire on the
run channel.
ii.
Insert the un-stripped black ground wire completely.
iii.
Fold the tap connector back over the wires and make the
connection by crimping the u-contact down flush with the
plastic insulator.
iv.
Close the top hinged cover until latched.
c) Connect the RCA video connector from the existing camera to the
monitor cable.
d) Connect the power supply plug from the existing camera to the
monitor power DC plug (if your camera has a power plug).
Tap Connection
5
Operation
The monitor will automatically display the rear observation camera image
whenever the vehicle is engaged in reverse.
Maintenance
Though your Monitor requires little care, you can still maintain its condition
and performance following the procedures below.
•
Keep your system away from excessive moisture, extreme heat or cold
and magnetic fields.
•
Keep liquids away from the display monitor.
•
To avoid damage, do not place auxiliary devices or other objects on the
top of the monitor.
•
Occasionally clean the surface of the monitor with soft cloth moistened
with water or window cleaner.
6
Troubleshooting
Symptoms
Solutions
The ON/OFF signal light
<D> is not on after the car
is started
Ensure that the parallel red and black line from
the control box is connected properly.
No video signal appears
while reversing the car
1. Verify
that
the
LCD
Contrast
(Brightness) control knob is not set too
low
2. Check the rearview Camera lens.
3. Check the rearview Camera wiring and
connection.
4. Confirm that the cable from the monitor
is connected properly.
Video image is not sharp
enough
Clean the camera lens.
7
8
© 2008 Audiovox Electronics Corp., 150 Marcus Blvd., Hauppauge, N.Y. 11788
9