1
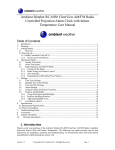
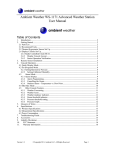
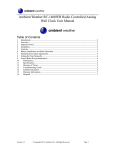
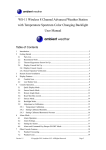
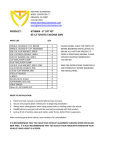
Ambient Weather WeatherMount and WeatherMount2 User Manual Table of Contents 1. 2. 3. Introduction ..................................................................................................................................... 2 Warnings and Cautions ................................................................................................................... 2 Getting Started ................................................................................................................................ 3 3.1 Parts List................................................................................................................................. 3 3.1.1 WeatherMount .................................................................................................................... 3 3.1.2 WeatherMount2 .................................................................................................................. 3 3.2 Tools and Materials Needed .......................................................................................................... 3 4. WeatherMount and WeatherMount2 Installation ............................................................................ 4 5. Troubleshooting Guide.................................................................................................................... 6 6. Accessories ..................................................................................................................................... 6 7. Liability Disclaimer ........................................................................................................................ 6 8. Warranty Information ...................................................................................................................... 6 Version 1.1 ©Copyright 2015, Ambient LLC. All Rights Reserved. Page 1 1. Introduction The Ambient Weather WeatherMount is a flexible mounting alternative to a mounting pole or tripod. The mounting plate provides a fast and easy installation, and can be mounted on a pitched surface, flat roof or vertical surface, such as a gable. The WeatherMount is constructed from powder coated steel and includes a galvanized aluminum mast. This mounting system is strong, durable and stable. The slender design is simple, unobtrusive and aesthetically pleasing. The base can be adjusted to mount on any pitched roof. Works great with any weather station. The small base footprint (6" x 3.75") allows four lag screws (included) to be easily mounted at the apex of your gable. The mount angles 11" in the horizontal direction to allow clearance of eve or roof overhangs. Includes a galvanized 1-1/4 inch (3.25 cm) O.D., 35 inch (89 cm) long steel mast with one end crimped for insertion into the WeatherMount bracket. Made of 18 gauge 1008-10 steel tubing, galvanized using the Flo-Coat (zinc-chromate-polymer) process for excellent corrosion protection. The total height of the WeatherMount and mast is approximately 52". The WeatherMount2 adds a second pole. The total height of the WeatherMount2 and mast is approximately 81”. 2. Warnings and Cautions Warning: Any metal object may attract a lightning strike, including your weather station mounting pole. Never install the weather station in a storm. Warning: Installing your weather station in a high location may result in injury or death. Only install the weather station mount and weather station on a clear, dry day. Warning: Improper installation of the WeatherMount to your roof top may result in leaks. We recommend a licensed roofing specialist for evasive installations. Warning: We recommend properly grounding the WeatherMount to avoid extensive damage to the weather station and structure. Consult a licensed electrician or local lightning detection expert prior to installing a ground wire. Version 1.1 ©Copyright 2015, Ambient LLC. All Rights Reserved. Page 2 3. Getting Started 3.1 Parts List 3.1.1 WeatherMount QTY 1 WeatherMount Base Item 1 1 4 1 Coupler Mounting Mast Lag Screws User Manual 3.1.2 WeatherMount2 QTY 1 WeatherMount Base Item 1 2 4 1 Coupler Mounting Mast Lag Screws User Manual Figure 1 3.2 Tools and Materials Needed Level or Plumb Drill Adjustable wrench Version 1.1 ©Copyright 2015, Ambient LLC. All Rights Reserved. Page 3 4. WeatherMount and WeatherMount2 Installation Reference Figure 2. There are three typical mounting configurations (1) pitched roof mount (2) flat roof mount (3) gable end mount (horizontal). Figure 2 Step 1. Place the flanged end of the plastic coupler into the WeatherMount tube as shown in Figure 3. Figure 3 Step 2. Place the crimped end (tapered end) of the mounting pole inside the other end of the coupler, as shown in Figure 4. Figure 4 Step 3. Drive the mounting pole into the coupler by hammering on the open end of the mounting pole by using a rubber mallet (preferred), hammer or using the ground as a ram, until the mounting pole is secured inside of the WeatherMount base (or about ½” of the tapered end is still exposed). Make sure the pole cannot be rotated or pulled out of the coupler. Version 1.1 ©Copyright 2015, Ambient LLC. All Rights Reserved. Page 4 If you purchased an additional pole or the WeatherMount2: Insert the swaged end of the mast extension into the mounting tripod mast and tighten so the extension does not rotate. Repeat this step for additional mast extensions (maximum two is recommended). Figure 5 Step 4. Fasten the WeatherMount or WeatherMount2 base to the building, home or structure (Figure 6). Use the enclosed lag screws to drill into the structure. Figure 6 Step 5: Rotate the base of the pole until it is vertically level. Use a level to make certain the top of the mounting pole is level and tighten the adjustable bracket. Step 6: Mount the weather station to the mounting pole. Version 1.1 ©Copyright 2015, Ambient LLC. All Rights Reserved. Page 5 5. Troubleshooting Guide If your question is not answered here, you can contact us as follows: 1. Email Support: [email protected] 2. Technical Support: 480-346-3380 (M-F 8am to 4pm Arizona Time) Problem Pole sways in heavy wind. Solution Add one or more EZ-30-12-BRACKET Horizontal Mounting Bracket(s). See Section 6. 6. Accessories Item EZ-125-35M 35” Mast Extension Image EZ-30-12-BRACKET Horizontal Mounting Bracket UBOLT-WEATHER MOUNT Ubolts for WeatherMount Weather Station Mount Description Galvanized 1-1/4 inch (3.25 cm) O.D., 35 inch (89 cm) long steel post with one end crimped for insertion into another post of the same O.D. Made of 18 gauge 1008-10 steel tubing, galvanized using the Flo-Coat (zinc-chromate-polymer) process for excellent corrosion protection. Provides horizontal support, particularly if more than one mounting pole is extended. The length is 12”. Includes two lag screws for mounting to vertical support member. Ubolt to Mount Ambient's WeatherMount or WeatherMount2 to an existing sturdy mast up to 1.5" in diameter. Includes: 2 x Ubolts 2 x Plate Washer 4 x Nuts 7. Liability Disclaimer Reading the “User manual” is highly recommended. The manufacturer and supplier cannot accept any responsibility for any incorrect readings and any consequences that occur should an inaccurate reading take place. The specifications of this product may change without prior notice. No part of this manual may be reproduced without written authorization of the manufacturer. Ambient, LLC WILL NOT ASSUME LIABILITY FOR INCIDENTAL, CONSEQUENTIAL, PUNITIVE, OR OTHER SIMILAR DAMAGES ASSOCIATED WITH THE OPERATION OR MALFUNCTION OF THIS PRODUCT. 8. Warranty Information Ambient, LLC provides a 1-year limited warranty on this product against manufacturing defects in materials and workmanship. This limited warranty begins on the original date of purchase, is valid only on products purchased and Version 1.1 ©Copyright 2015, Ambient LLC. All Rights Reserved. Page 6 only to the original purchaser of this product. To receive warranty service, the purchaser must contact Ambient, LLC for problem determination and service procedures. Warranty service can only be performed by a Ambient, LLC. The original dated bill of sale must be presented upon request as proof of purchase to Ambient, LLC. Your Ambient, LLC warranty covers all defects in material and workmanship with the following specified exceptions: (1) damage caused by accident, unreasonable use or neglect (lack of reasonable and necessary maintenance); (2) damage resulting from failure to follow instructions contained in your owner’s manual; (3) damage resulting from the performance of repairs or alterations by someone other than an authorized Ambient, LLC authorized service center; (4) units used for other than home use (5) applications and uses that this product was not intended (6) the products inability to receive a signal due to any source of interference or metal obstructions and (7) extreme acts of nature, such as lightning strikes or floods. This warranty covers only actual defects within the product itself, and does not cover the cost of installation or removal from a fixed installation, normal set-up or adjustments, claims based on misrepresentation by the seller or performance variations resulting from installation-related circumstances. Version 1.1 ©Copyright 2015, Ambient LLC. All Rights Reserved. Page 7