1
Using the VM-114H4C
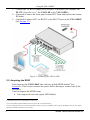
To connect to the VM-114H4C via RS-232:
• Connect the RS-232 9-pin D-sub rear panel port on the product unit via a
9-wire straight cable (only pin 2 to pin 2, pin 3 to pin 3, and pin 5 to pin 5
need to be connected) to the RS-232 9-pin D-sub port on your PC
5.4
RS-232, IR Control and Pass-through
The VM-114H4C can be controlled via RS-232 and infrared. Depending on how
the RS-232 and IR connections are configured dictates whether the device will
respond to control signals or transparently pass them through to another receiver or
transmitter. Three examples in Sections 5.4.2.1, 5.4.2.2 and 5.4.2.3 of various
configurations illustrate this functionality.
5.4.1 RS-232 Control and Pass-through Using the VM-114H4C
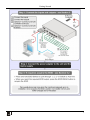
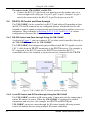
As shown in Figure 3, you can connect a PC (or other serial controller) directly to
the VM-114H4C to control the VM-114H4C.
The VM-114H4C also transparently passes bidirectional RS-232 signals over the
CAT 5 cable from the TP-573 transmitter to the TP-574 receiver. For example, a
PC connected to the RS-232 port on the TP-573 can control an RS-232controllable device (for example, a projection screen) connected to the TP-574.
Figure 4: VM-114H4C RS-232 Control and Pass-through
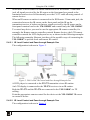
5.4.2 Local IR Control and IR Pass-through Using the VM-114H4C
The VM-114H4C provides an IR sensor and a 3.5mm mini jack for connecting a
remote IR emitter or sensor. When the VM-114H4C is connected to suitable
transmitters and receivers (for example, the TP-573 and TP-574), the
VM-114H4C can act as a pass-through for IR control signals, allowing remote
control of multiple devices using multiple IR remote controllers.
10
KRAMER: SIMPLE CREATIVE TECHNOLOGY