1
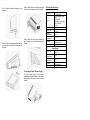
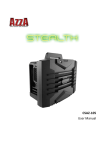
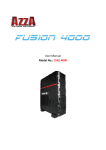
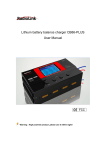
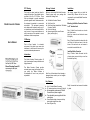
Media Converter Chassis FCC Warning Package Contents Installation This device has been tested and found to comply with limits for a Class A digital device, pursuant to Part 15 of FCC Rules. These limits are designed to provide reasonable protection against harmful interference when the equipment is operated in a commercial environment. This equipment generates and radiates radio frequency energy and, if not installed and used in accordance with the user’s manual, it may cause interference in which case users will be required to correct interference at their own expenses. Before you start to install this Media Converter Chassis, please verify your package that contains the following items: We strongly suggest that you install the chassis firstly, because this will be more convenient for you to install Media Converters into the chassis. One Media Converter Chassis One Power Cord One Power Supply Installed into This Media Converter Chassis One User’s Manual Accessories with Rack-mount Screws (8pcs) and Ears (2pcs) CE Warning User’s Manual Step 1: Attach the rack-mount ears to each side of the chassis. Apply four screws to each side and secure them tightly. Step 2: Carefully position the chassis into the rack. Align the rack-mount ears to the side holes on the rack and use rack screws to secure the chassis with the rack. This is a Class A product. In a domestic environment, this product may cause radio interference in which case the user may be required to take adequate measures. Installing Media Converter Step 1: Install a Media Converter into this chassis, please unscrew the bay cover from the desired bay firstly. Introduction This Media Converter Chassis provides 16 slots. It was designed for easy installation and high performance. This Media Converter Chassis provides redundant power supply with cooling fans for your option. Any Media Converter is hot-swappable for users’ easy and quick replacement. Mounting the Media Converter Chassis to 19” standard rack Note: If any of these items is found missing or damaged, please contact your local supplier for replacement. Key Features Up to 16 slots of Media Converters 19” standard rack-mount size and 3U height Hot-swappable replacement of Media Converters and power supplies Two redundant power supplies with two cooling fans Power isolation design to ensure each bay is electrically isolated from others Smart Plug and Play Step2: Unscrew the hand crew anti-clockwise by hand. Step 3: Carefully locate the converter in the bay cover. Step 5: Slide the bay cover with the converter into the slot of this chassis until it is fully fitted. Technical Specifications Capacity Power Cooling Dimensions Step 4: Press the converter gently and push it to the left side to make sure it is fitted into the bay cover. Step 6: Fasten the hand screw clockwise by hand to make sure it is firmly fitted into this chassis. Operating Temperature Storage Temperature Humidity Certifications 16 bays for up to 16 Media Converters One hot-swappable power supply Optional second hot-swappable power supply Input: 90~260V/AC, 50~60Hz Two internal cooling fans 440 × 300 × 130 mm (L x W x H) 0 to 55℃ -20 to 70℃ 10 to 90% RH (non-condensing) FCC Class A, CE Media Converter Chassis Power Supply Dimensions Operating Temperature Storage Temperature Humidity Certifications Connecting to Power (Power Supply) To install a power supply to this chassis, please slide the power supply to the chassis and fasten the hand screw clockwise to the chassis. 150 × 180 × 90 mm (L x W x H) 0 to 50℃ -20 to 70℃ 10 to 90% RH (non-condensing) FCC Class A, CE