1
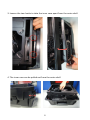
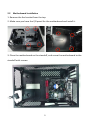
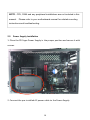
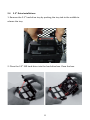
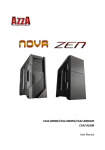
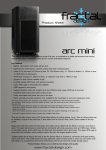
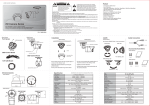
CSAZ-‐105 User Manual Contents Chapter 1 Product Introduction 1.1 Specifications …………………………………………………………………………….3-‐5 1.2 Accessories………………………………………………………………………………..….6 Chapter 2 Installation Guide 2.1 Setting up ………………………………………………………………….………….. 7-‐8 2.2 Motherboard Installation ………………………………….……………………… 9 2.3 Power Supply Installation …………………………………..…………………… 10 2.4 2.5” drives installation …………………………..….…………………….. 11-‐12 2.5 3.5” drive installation …………………………………...………………………. 13 2.6 Fan Installation……………………………………………….…………………………... 13 2 Chapter 1 Product Introduction 1.1 Specifications Model: Model Name: STEALTH Model Number: CSAZ-‐105 Spec: Type: Mini-‐ITX Color: Black/Red Material: 0.6mm SECC With Power Supply: No CPU Cooler Compatibility: up to 80mm Motherboard Compatibility: Mini ITX Power Supply Type: Regular PS2 ATX power supply Power Location: Side Expansion: Internal 3.5" Drive Bays: 1 Internal 2.5" Drive Bays 4 Expansion Slots: 2 Front Ports: 2x USB 3.0 Cooling System: 120mm Fan: 2x120mm Red LED fan 3 Physical Spec: Dimensions(HxWxD) 12.5"x16.4"x8.6"(HxWxD) Weight 8lbs 4 1. Outer Shell 3. 120mm Fan 5. Fan Bracket 7. AC Power Socket 2. Main Chassis 4. 2.5” Drive Tray 6. 120mm Fan 8. Keys 5 1.2 Contents of Accessory Bag Screw (#6*32) x 12pcs Screw (M3*4.5) x 8pcs Key x 2pcs Cable tie x 7pcs 6 Chapter 2 Installation Guide 2.1 Setting Up 1. Remove the screws from the case bottom. 2. Open the latch to open up the top cover. 7 3. Loosen the two hooks to take the inner case apart from the outer shell. 4. The inner case can be pulled out from the outer shell. 8 2.2 Motherboard Installation 1. Remove the fan bracket from the top. 2. Make sure you have the I/O panel for the motherboard and install it. 3. Place the motherboard on the standoff, and screw the motherboard to the standoff with screws. 9 NOTE : CPU, RAM and any peripheral installations are not included in this manual. Please refer to your motherboard manual for related mounting instructions and troubleshooting. 2.3 Power Supply Installation 1. Place the PS2 type Power Supply in the proper position and secure it with screws. 2. Connect the pre-‐installed AC power cable to the Power Supply. 10 2.4 2.5” Drive Installations 1. Remove the 2.5” hard drive tray by pushing the tray tab to the middle to release the tray. 2. Place the 2.5” SSD hard drive into the hard drive box. Close the box. 11 3. Slide the 2.5” SSD hard drive box into the chassis. 4. Find the 4-‐Pin Molex on the power supply and route the cable through the empty room to the case bottom, and connect it to the backplane. 5. Connect the backplane to the motherboard with SATA cables. 6. More 2.5” drives can be installed at the side of case. 12 2.5 3.5” Drive Installations 1. Mount 3.5” drive from the side of the case and fasten it with screws. 2.6 Fan Installation The unit has pre-‐installed one 120mm black fan in the back and an additional 120mm black fan in the front. 1. Find the fan bracket, and secure the 120mm (or 140mm) fan from the rear side of the bracket. 2. Fasten the fan bracket back to the case top. Option: User may use the liquid cooler on the CPU too. The fan bracket will not be necessary then. 13