1
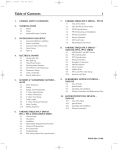
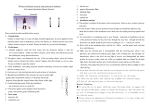
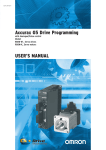
QUICK START GUIDE PPC3 Series Pump Controller About Installation The PENTEK PPC3 Pump Controller is pre-jumpered and programmed with the PENTEK Assistant, providing ease of setup for constant pressure applications. The PENTEK Assistant defaults to pre-defined parameters as described in this guide, and also prompts the user for application-specific information. This guide covers the startup of the PENTEK Assistant for constant pressure applications. For other programs, refer to the ABB manual provided. Connect Transducer Safety Hazardous voltage. Can shock, burn, or cause death. Ground pump before connecting to power supply. Disconnect power before working on system components. Wire pump motor for correct voltage. See motor nameplate. Ground motor to drive before connecting to power supply. Meet National Electrical Code, Canadian Electrical Code, and local codes for all wiring. Install the transducer where pressure is to be maintained. The PENTEK Assistant requires a 4 - 20 ma transducer (Figure 2). The transducer’s power lead should be attached to the +24 Volt connection shown below and the 4 - 20 ma output lead should be attached to terminal 5 (Figure 3). The transducer has a red power lead and a black 4 - 20 ma output lead. The jumper board eliminates the need to hand wire terminals 10 to 11, 16 to 22 and 9 to 20. Before applying power, make sure the front cover is on and the control module is in place. Note that the transducer has 4 wires. Attach the red and black leads as described above. The bare lead is cable shielding, and should be connected to terminal 1. The translucent lead is unused, and should be tied off and insulated. Startup the PENTEK Assistant Apply power to the unit, and follow the steps on Pages 2 and 3 after the controller’s screen is lit. California Proposition 65 Warning This product and related accessories contain chemicals known to the State of California to cause cancer, birth defects or other reproductive harm. Local / Remote Indicator Motor Rotation Indicator Transducer cable Controller Mode Transducer REM Left Button Function PAR EDIT 9909 MOTOR NOM POWER 3.0 hp EXIT 00:00 SAVE Left Button Scroll Buttons Local / Remote Stop PID Address andFunction Description FIGURE 2: Transducer and Cable Value Right Button Function Right Button Help Start FIGURE 1: Control Panel Button Location FIGURE 3: Transducer connection to Terminal strip 293 WRIGHT STREET, DELAVAN, WI 53115 WWW.PUMPS.COM PH: 1-866-9 PENTEK © 2013 Pentair Ltd. All Rights Reserved. PN806 (REV 02/19/13) 1 Initial Startup Panel Display Upon initial drive power-up the user will be prompted to run the PENTEK assistant. Scroll to YES and then select OK. Wait while the assistant loads. On subsequent startups, the PENTEK assistant can be found in the ASSISTANTS menu. 5 Motor Frequency Screen Enter the motor frequency (Hz) from the motor nameplate. Scroll to select the frequency and select SAVE. 9 SCROLL TO SELECT CONSTANT PRESSURE POINT Example shows 40 PSI. 13 ASSISTANT COMPLETE This ends setup of the PENTEK Assistant. The following steps complete the setup of the pump system. CHOICE REM 2 Do you want to run the Pentek assistant? Yes No EXIT 00:00 MOTOR SELECTION SCREEN Scroll to select the type installation and then press OK. OK PAR EDIT REM 6 9907 MOTOR NOM FREQ 60.0 Hz EXIT REM 00:00 Motor Speed Screen SAVE Enter the motor speed (RPM) from the motor nameplate. Scroll to select the speed and press SAVE. The sample here shows 3450 RPM. 10 PAR EDIT 4011 INTERNAL SET PNT 40 PSI EXIT 00:00 Transducer 100% Value Enter the transducer’s full range value which should be stated on the transducer body. Scroll to select the pressure and then press SAVE. The sample here shows 145 PSI. NOTE: DO NOT choose maximum pressure. SAVE 14 Pentek Assistant Complete EXIT 00:00 Please Select Mtr Type Above Ground Submersible EXIT 9908 MOTOR NOM SPEED 3450 rpm EXIT REM 00:00 SAVE PAR EDIT 4009 100% VALUE 145.0 PSI EXIT 00:00 range: 0... 10 bar / 145 psi max. pressure: 25 bar / 362.5 psi UE: 80...330 VDC OUT: 4...20mA Load <(N-8V) /0.02A LOC Press the Local/Remote DIR button to change to local control. Check aboveground motors by viewing shaft rotation. For submersible (3-phase) motors, start and check performance. Reverse any two power leads and check again. The lead arrangement with best performance is correct. 2 OK PAR EDIT REM CHECK MOTOR ROTATION OK 00:00 SAVE Use this Full Range Value Do NOT use Maximum Pressure 0.0 A 0 rpm 0.0 PSI 00:00 100 RPM MENU 3 Motor Voltage Screen The screen shows motor voltage. Scroll to select the correct voltage for your motor as stated on the motor nameplate. This sample shows 460 volts. Press SAVE. 7 Motor Horsepower Screen Enter the motor horsepower (HP) from the motor nameplate. Scroll to select the horsepower and press SAVE. The sample here shows 3.0 HP. 11 PID Sleep Level Screen REM PAR EDIT 4 9905 MOTOR NOM VOLT 460 V EXIT REM 00:00 Motor Current Screen SAVE Enter the motor current from the motor nameplate (not maximum amps). Scroll to select the current and press SAVE. 8 PAR EDIT 9909 MOTOR NOM POWER 3.0 hp EXIT REM 00:00 FOR SUBMERSIBLE PUMPS ONLY Enter the minimum speed allowed by the motor vendor (consult motor literature). This is to prevent motor bearing damage. SAVE PAR EDIT 12 4023 PID SLEEP LEVEL 0 rpm Wake up Deviation Screen Enter the PID sleep level. 00:00 EXIT SAVE This is a motor speed setting. If the motor speed falls below this RPM, the PID sleep function will be enabled. This is a controller-assigned value. For additional information, refer to the ACS350 Users Manual. Scroll to select the speed and then press SAVE. The sample here shows 0 RPM (waiting to be set). Enter the wake-up deviation. This is the amount pressure drops (PSI) below the pressure set point before the drive restarts. This sample is waiting to be set and shows 0 PSI. Burn Hazard. If the sleep level is set too low, the pump my run without flow. This can boil water inside the pump, causing dangerously high pressure and temperature. 15 CHECK FOR SYSTEM HARMONICS 16 17 STOP THE PUMP CHANGE TO REMOTE OPERATION Press the STOP button. While the pump is running, scroll motor speed up to check for harmonics. Verify that harmonics do not exist above the PID sleep level. Press the Loc / Rem button to change to remote control. 3 PAR REM EDIT 9906 MOTOR NOM CURR 3.8 A EXIT 00:00 REM PAR EDIT 2001 MIN SPEED SAVE 0 RPM EXIT REM 00:00 SAVE PAR EDIT 4025 WAKE-UP DEV 0.0 PSI EXIT 00:00 SAVE 18 Test System SETUP Press start to operate the pump. Test system to ensure proper system response and sleep function. Adjust group 40 parameters as needed. Parameters Changed Relative to PID Control Defaults Parameter Code PENTEK Code Parameter Code PENTEK Code 1002 Ext2 Commands Keypad 3201 Superv 1 Param Output Freq 1102 EXT1/EXT2 Sel EXT2 3202 SuperV 1 Lim Lo per 9907 1301 Minimum AI1 20% 3203 SuperV 1 Lim Hi per 9907 1601 Run Enable Not Sel 3401 Signal 1 Param Current 1805 DO Signal Superv1 Over 3405 Output 1 Unit A 3408 Signal 2 Param Speed 3412 Output 2 Unit RPM 3415 Signal 3 Param PID 1 FBK 3419 Output 3 Unit PSI 4001 Gain 1.0 4002 Integration Time 1.0 4006 Units PSI 4010 Set Point Sel Internal 4022 Sleep Selection Internal 4024 PID Sleep Delay 10 sec 1806 DO On Delay 10 Seconds (Above Ground) 1806 DO On Delay 60 Seconds (Submersible) 1807 DO Off Delay 2 sec 2001 Minimum Speed 0 (Above Ground) 2001 Minimum Speed User Defined (Submersible) 2002 Maximum Speed 2202 Accel Time 1 Sync 5 sec (Above Ground) 2202 Accel Time 1 1 sec (Submersible) 4027 PID Param Set DI3 3001 AI<Min Fault 4101 Gain 1.0 3003 External Fault 1 DI5 4102 Integration Time 1.0 Sec 4106 Units PSI 3006 Mot Therm Time 500 sec (Above Ground) 4109 100% value Per 4009 3006 Mot Therm Time 350 sec (Submersible) 4110 Set Point Sel Internal 3007 Mot Load Curve 4111 Internal Setpoint Per 4011 4122 Sleep Selection Internal 100% (Above Ground) 3007 Mot Load Curve 112% (Submersible) 4123 PID Sleep Level Per 4023 3013 Underload Function Fault 4124 PID Sleep Delay 10 sec 3014 Underload Time 10 sec 4125 Wake-Up Deviation Per 4025 3022 AI2 Fault Limit 10% Upon initial startup, the PENTEK Assistant runs automatically. On subsequent runs, use the steps below to run the PENTEK Assistant. 1.Use the MENU key to access the Menu List. 2.Select Assistants 3.Select PENTEK Assistant. 4.Follow the screen instructions to configure the system. NOTE: The upper left hand corner of the display shows whether the drive is in local or remote control. In LOC mode the drive holds a constant speed which can be adjusted using the up/down buttons. The speed which will be held is in the upper right hand corner. In REM mode the drives holds a constant pressure. The pressure, as a percentage of full scale is shown in the upper right hand corner. NOTE: For common parameters and menu items, use the Help key ? to display descriptions. If you encounter Alarms or Faults, use the Help key or refer to the Diagnostic section of the User’s Manual. 4 Description of information required by the PENTEK Assistant Timer Function: 9905 Motor Nom Voltage: This is the nominal voltage stated on the motor nameplate. If the motor is rated for operation at multiple voltages, select the voltage nearest the utility voltage. Ensure the motor connections correspond to the voltage selected. 9906 Motor Nom Current: This is the nominal current found on the motor nameplate. Do not use service factor amps. 9907 Motor Nom Freq: This is the nominal frequency found on the motor nameplate. 9908 Motor Nominal Speed: This is the nominal speed found on the motor nameplate. Use the number on the motor nameplate. Do not enter 3600, 1800, etc. 9909 Motor Nom Power: This is the nominal horsepower found on the motor nameplate. Do not include service factor unless the service factor is greater than 1.15. 2001 Min Speed (Required for Subs only): This is the minimum speed the motor is allowed to run. This minimum is set to prevent damage to the motor thrust bearings. Refer to motor literature to determine setting. 4011 Internal Setpoint: This is the pressure the system will maintain. 4009 100% Value: This is the full scale reading of the transducer. Ie. The 100% Value of a 200PSI transducer is 200PSI. 4023 PID Sleep Level: Operation below this rpm will cause the drive to stop. 4025 Wake-Up Dev: This is the pressure drop that will trigger the drive to restart. For example, if the set point is 60 PSI and the Wake-Up Deviation is 10 PSI, the drive will restart at 50 PSI. The PENTEK VFD includes four timer functions. Each timer function can include up to four daily / weekly start and stop times. The following example show the parameter changes required to use PID Set 2 on Monday, Wednesday, and Friday from 8:00 AM to 10:00 AM. ParameterSetting 3601 3602 3603 3604 3605 3606 3607 3608 3609 3610 3611 3612 3612 3626 4027 – – – – – – – – – – – – – – – Timers Enable ................ 7 – Enabled Start Time 1 ................... 8:00 AM Stop Time 1 .................... 10:00 AM Start Day 1 ..................... 1-Monday Stop Day 1 ..................... 1-Monday Start Time 2 ................... 8:00 AM Stop Time 2 .................... 10:00 AM Start Day 2...................... 3-Wednesday Stop Day 2 ..................... 3 – Wednesday Start Time 3 ................... 8:00 AM Stop Time 3 .................... 10:00 AM Start Day 3 ..................... 5-Friday Stop Day 3 ..................... 5-Friday Timer Func1SCR ........... 7 = P3 +P2 + P1 PID 1 Param Set ............ 8 = Timer Function 1 Tank Sizing These instructions are only for systems that require tanks. Pressure tanks are generally required to maintain system pressure during periods of low or no demand. Tank precharge must be less than the pressure set point – wake up deviation. The tank can be sized using Boyle’s law (V1 x P1 = V2 x P2). Units are in gallons and PSI. Total Tank Size x (Precharge+14.7) __ Total Tank Size x (Precharge+14.7) Drawdown = (Setpoint + 14.7 – Wake Up Deviation) (Setpoint+14.7) Typically tanks are sized for approximately 20% of pump capacity. For example, a 150 gpm pump typically requires 30 gallon total tank size. 5 Helpful Hints Alarm 2025 upon startup Constant Flow This is a normal alarm, and occurs whenever motor data is changed. The alarm shows for about 15 seconds while the drive performs a motor calibration. After running the pentek Assistant, the drive can be configured for constant flow by adjusting parameters 4006: Units, and 4009: 100% Value. Fault 14 External Fault 1 Constant Flow Example 1: Using a 4-20ma velocity meter with a range of 0 to 10 ft/ sec. We want the display to be ft/sec. Set 4006 to ft/sec Set 4009 to 10 External fault 1 is triggered when the VFD’s output frequency exceeds motor nameplate frequency for more than 10 seconds. Parameter 1806 controls the time delay for this fault. If the system includes a large tank, or requires more time to reach the setpoint, increase parameter 1806 as needed. This fault is designed to protect against loss of prime, broken shafts, etc. To disable this fault, adjust parameter 2002 Maximum speed, to the motor nameplate rpm. Constant Flow Example 2: Same setup as example 1, but we have a 4” pipe and want the display to be gpm. Set 4006 to gpm Set 4009 to 393 (this is the flow in a 4” pipe which results in a 10 ft/sec velocity). Sleep The pentek VFD monitors pump speed to determine demand. The pump is shut off when the rpm goes below parameter 4023: PID Sleep Level. Always set parameter 4023 high enough to trigger sleep mode during low demand conditions. Note that the shut-off head at parameter 4023: RPM, must be higher than the pressure setpoint. The PID sleep level can be determined by putting the drive in local mode, closing the discharge valve, and slowly increasing speed until the set point pressure is reached. The PID sleep level can also be found by using the BEC2 program, or see www.bec2.net. Systems that use small tanks, or have a flat performance curve, may cycle rapidly at intermediate flows. Correct this by increasing Parameter 4024: PID Sleep Delay. Caution: Do NOT increase parameter 4024 to a level that will allow the pump to run with zero flow (dead head). The water in the pump can overheat. Constant Flow Example 3: Using a 4-20ma flow meter with a range of 0 to 100 gpm. We want the display to be gpm. Set 4006 to gpm Set 4009 to 100 Sleep Options The PENTEK VFD can be pass code protected. Pass coding is enabled by parameter 1602. The pass code is entered in parameter 1603. Single Phase Connection If you have single phase input power, use a single phase drive. Saving and Recalling Settings The PENTEK VFD can save and recall (2) sets of user parameters (use parameter 9902). After running the PENTEK Assistant, and making changes, we recommend the parameter set be saved. The parameter set can then be recalled if parameters get accidentally changed. Pass Code Other devices such as flow or float switches can be used to trigger sleep mode. Parameter 4022 determines the method to trigger sleep mode. These options can be used for pump up, pump down, and other on/off applications. Submersible Motor Application Submersible pump motors often have higher current draw than an equivalent above ground motor. Submersible motor size is usually based upon service factor amps (which is higher than full amps). Multiple Systems / Setpoints The PENTEK VFD includes (2) independent process control sets (groups 40 and 41). Group 41 parameters can be selected using Digital Input (DI3). When first set-up, groups 40 and 41 are identical. A set can be changed later with parameters for a second process. 6 Helpful Hints (Continued) Automatic Restarts After Power Failure The PENTEK VFD can be configured to automatically restart after power loss. This will energize the motor whenever power is present. To enable this mode, set parameter 1002 to DI1, and set Dip Switch #1 on the jumper board to ON. Do not use this setting if unexpected starts may cause damage or injury. FIGURE 4: Dip Switch ON Installation Record Record setup values here. Drive Model: Drive Description: Pump Model: Pump Description: Motor Model: Motor Nominal Voltage*: Motor Nominal Current*: Motor Nominal Frequency*: Motor Nominal Speed*: Motor Nominal Power*: Minimum Speed * (required for submersibles): Pressure Setpoint*: Transducer Full value*: Sleep Level*: Wake-Up Deviation*: * Values required by the PENTEK Assistant. 7 IMPORTANT INFORMATION Use of Premium Efficiency Motors Use of Output Reactors and Filters Using variable frequency drives may cause an increase in voltage spikes and motor temperature. These are caused by, but not limited to, several application factors. These include motor lead length, voltage quality, motor loading. Since many of these factors are beyond our control, we recommend using premium efficiency motors. Premium efficiency motors normally contain better winding insulation and wire, and run cooler. The Load Reactor or KDR dampens voltage spikes on the PWM (Pulse Width Modulated) wave from the AC drive to the motor and should be used on standard efficiency or non-premium efficiency ‘above ground’ motors. A KDR will normally eliminate voltage spikes above 1100 volts. The Load Filter or KLC is a KDR with the addition of a capacitor resistor network that adds regulation of the PWM output to further dampening the voltage dampening achieved in the KDR. This further reduces potential for motor damage due to voltage spikes. A KLC will normally eliminate voltage spikes above 950 volts. Output Filters and Reactors Variable frequency drives produce “voltage wave reflection”. This is a function of the voltage rise time and the length of the motor cables. As reflected waves return to their source and encounter other waves, the values add, causing higher peak voltage. Higher peak voltage can decrease motor life expectancy. Installing output reactors and filters can increase motor life expectancy in many applications. Output reactors and filters are available from your PENTEK distributor. The reasons you would use a KLC over the KDR: 1) Where excessive motor lead lengths are used, over 250 feet. 2) Where the cost of replacing the motor would be prohibitive. 3) When using a submersible motor (required with motors over 230 volts). Motor Service Factor In some applications, submersible motors can operate into its designed service factor. Parameter 3007 can be set to allow motors to operate into the service factor range. Example: When using a non-modified catalog product in water under 86° F with proper flow conditions cooling the motor, parameter 3007 can be set to 112%. Submersible motors should always operate within its service factor limit. Program Change: Set Parameter 3007 to the percentage the motor is operating into service factor. Technical /WARRANTY Support Before calling technical support, record the model and serial number of your drive controller. Also note the firmware version of the drive and keypad. PENTEK technical support number is 1-866-9 PENTEK 8