1
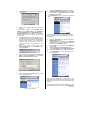
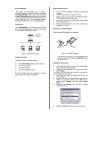
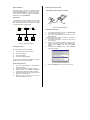
Quick Installation
Installing Your Access Point
This guide is for you to make a connection between
wired and wireless network. You will learn how to
install the Access Point on your network step by step.
If you have any problems during the installation,
please refer to your User Manual.
Take Windows 98 platform for example
Introduction
Congratulations on the purchase of your new access
point. The access point is compliant with the IEEE
802.11b (DSSS) specifications. Small as the sparrow
is, it possesses all its internal organs.
Figure 2: Installation Diagram
WA1300 Access Point
Notebook
Notebook
Installation Instructions
a)
Use straight LAN cable to connect the Access Point
with a hub of the wired network.
Connect the power adapter to the power jack on the
Access Point.
The Power LED (the right one) should be on when the
power adapter is connected.
c)
Use straight LAN cable to connect the PC with the
wired network.
d)
Power on one of the PCs and login if you are asked to.
When you reach the desktop, click Start on the
taskbar, select Settings , and then select Control
Panel.
e)
Double-click the Network icon to open the Network
dialog box as below.
b)
Donald^^11
Notebook
PC
Mac II
Figure 1: Network Connection
Package Contents
The following items should be included:
a)
b)
One Access Point Unit (the device).
One Power Adapter.
c)
One User’s Manual.
d)
One Quick Installation Guide.
If any items listed above are damaged or missing,
please contact your dealer immediately.
Figure 3: Network Configuration
System Requirements
f)
a)
b)
c)
d)
e)
One or more PCs (desktop or notebook) with
Ethernet interface.
TCP/IP protocol must be installed on all PCs.
Network cables. Use standard 10/100BaseT
network (UTP) cables with RJ45 connectors.
All w ireless devices must be compliant with the
IEEE 802.11b specifications.
Microsoft Internet Explorer 5.0 or later or
Netscape Navigator 4.7 or later.
002
2503500500
Select the TCP/IP protocol for your network card.
o)
Click Properties. You will then see a dialog box
shown below .
g)
Click the Configuration tab and type texts in the
Network name field, wirelesslan, for example.
After setting the Network name, click Save,
Reboot, and then OK.
The Configuration screen is shown as the following
figure.
Figure 4: IP Address
p)
Ensure your TCP/IP settings are correct as
follows.
To use static IP address, select Specify an IP
address. Type 192.168.1.200 in the IP address
field and 255.255.255.0 in the Subnet Mask field.
The IP address must be 192.168.1.x. The value of x
should be ranged from 1 to 254 and is never used
by other PCs.
q)
Click OK again. Windows may copy files to your
computer, and then you will be asked to restart
your PC. Click Yes to restart your computer and
initiate the new settings. If you aren’t asked,
manually restart the computer to ensure the
system has used the IP address you just
specified.
r)
Open your Web browser and type
“HTTP://192.168.1.90” in the Address field.
Then press Enter.
s)
Figure 5: Enter Web Address
A logon dialog box will appear. The default User
Name is root and Password is root. Put User
Name and Password and Click OK.
For the purpose of security, you can enable the WEP
function. Follow the steps below (take 64 bit encryption
for example):
h)
i)
j)
k)
l)
m)
n)
Click the Encryption tab, and then select the
WEP enabled function.
Choose 64 bit on the right side of the WEP key
lengths field. Type 10 hex digits into the key box
at the right of the WEP key 1 field.
Choose Key 1 on the right side of the WEP key
to use field.
Select the Deny unencrypted data option.
Choose Shared Key in the Authentication field.
Click Save, Reboot, and then OK in sequence.
The Configuration screen is shown as the
following figure.
Figure 6: User name/Password Dialog Box
t)
After you click OK, the Setup screen is shown
like the following figure.
Once you have configured all of the PCs on your
network with appropriate values of Network name and
WEP key, the access point setup and installation are
complete.
002
2503500500
Figure 7: Setup Screen
For instructions on MAC address filtering or other
advanced configurations, refer to your User Manual.
2503501200