1
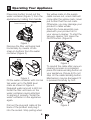
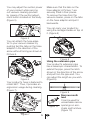
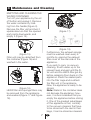
BKS 9220 T
Vacuum Cleaner
User Manual
Read this manual prior to initial operation of the product!
Dear Customer,
We hope that your product, which has been manufactured in
modern facilities and passed through a strict quality control
procedure, will give you very good results.
We advise you to read through this manual carefully before
using your product and keep it for future reference.
The User Manual will help you use your machine in a
fast and safe way.
• Read the User Manual before installing and starting your
product.
• In particular, follow the instructions related to safety.
• Keep this User Manual within easy reach for future reference.
• Also read all additional documents supplied with this
product.
Remember that this User Manual is also applicable for several
other models. Differences between models will be identified in
the manual.
This product has been produced in environmentally friendly, modern facilities
CONTENT
1 Safety Warnings
2
2 Technical Specifications of Your Appliance
3
3 Operating Your Appliance
4-6
4 Maintenance and Cleaning
7
1
1 Safety Warnings
• You may only use your vacuum
cleaner if the voltage indicated
on the label under your vacuum
cleaner complies with the supply
voltage. Otherwise, the motor may
be damaged.
• Never leave your vacuum
cleaner plugged in. Unplug your
appliance when not in use or
when service is required.
• Do not use your vacuum cleaner
on wet floors and outdoors.
• Physically (audio, visual) impaired and mentally handicapped
persons and those without proper
experience and knowledge as
well as children may not use the
product without supervision of a
person in charge of their safety.
Children must be kept under
supervision when the product is
in use and it must be made sure
that children do not tamper with
the product.
• If the supply cable or plug is
damaged, or if your appliance
does not work due to dropping, damage, exposing to outer
conditions or wetting, refer to the
authorized services.
• Do not pull the appliance from
the supply cable. Keep the supply
cable away from sharp edges, hot
surfaces and pay attention not to
pinch it between door frames.
• Do not unplug by pulling the cable. Always hold the plug to take it
out from the socket.
• Do not touch the plug or the
appliance with wet hands.
• Do not drop anything on to the
2
exposed parts of your vacuum
cleaner. Pay attention that the air
ducts and openings are always
open.
• Keep your hands, hair and
clothes away from the running
parts of the appliance.
• Do not use your vacuum cleaner
to clean combustible substances
such as lit cigarettes, matches or
hot ash.
• Always turn off all control buttons on your vacuum cleaner prior
to unplugging it.
• Do not absorb combustible and
explosive liquids with your vacuum
cleaner. Do not use your vacuum
cleaner at areas where such
liquids exist.
• Always unplug the appliance
prior to attaching or replacing the
supplied accessories.
• Do not operate your vacuum
cleaner in a vertical position to the
floor.
• Do not use your vacuum cleaner
when its filters are not attached
and without putting water in it.
Things to be done for energy
saving
• If your vacuum cleaner is
featured with absorption power
adjustment, you can have the appliance draw less energy.
• Cleaning your product’s filters
frequently or replacing the same
will both increase your product’s
performance and also decrease
cleaning time which will provide
energy saving.
2 Technical Specifications of Your Appliance
16 17
15
3 5 674 8
1 2
18 19
14
12
21
11
10
13
24
9
1- Plug and supply cable
2- Carpet brush holder
3- Cable rewind switch
4- On/Off button
5- Absorption power adjustment
button
6- Carriage handle
7- Water container remove button
8- Water container carriage handle
9- Water container
10- Water container filter assembly
11- Appliance suction nozzle
12- Filter assembly opening buttons
13- Rear Wheel
14- Hose cap
15- Flexible hose
16- Handle
17- Mechanical adjustment slide
23
20
22
18- Telescopic extension pipe
19- Telescopic adjustment latch
20- Carpet brush parking hook
21- Carpet brush adjustment latch
22- Parquetry carpet brush
23- Wide-mouth lead
24- Narrow-mouth lead
25- Turbo Brush
Max. power: 2000 W
Net weight: 5.7 kg
Electrical values: 220-240V AC
50 Hz
Dust capacity: 2.1 lt
Usage radius: 8 m
Filter level: 6 steps
All declared values on the product and on the printed leaflets are picked up after laboratory measurements performed according to related standarts. These values may differ
upon usage and ambient conditions.
3
3 Operating Your Appliance
Press lock button to pull out the
water container (Figure 1) from the
appliance by holding from handle.
Press lock button
Handle
the yellow mark on the supply
cable comes out, a red mark will
come after the yellow mark; never
pull further than the red mark.
Otherwise, you may damage your
product’s cable winder.
Attach the hose assembly supplied with your product on to
your vacuum cleaner. To start the
vacuum cleaner, first press the
On/Off button. (Figure 3)
Figure 1
Remove the filter unit being held
horizontally by means of two
snap-on buttons from the water
container (Figure 2)
Snap-on lock button
MAX
SU SEVIYESI
Figure 2
Fill the water container with normal
tap water up to the MAX level
mark as shown in Figure 2.
Required water amount is 600 ml.
Install the filter unit back on the
water container paying attention
to aligning it properly. Install the
water container on the appliance
again.
Pull out the plug and cable at the
back of the product and plug it
into the socket. Stop pulling when
4
Figure 3
To rewind the cable after vacuum
cleaning process is completed
press the cable winding button on
your appliance. (Figure 4) Do not
step on the cable winding button.
Mechanism may be damaged if it
is pressed forcefully by foot.
Figure 4
You may adjust the suction power
of your product while carrying
out vacuum cleaning process
by means of the suction adjustment button located on the body.
(Figure 5)
Make sure that the tabs on the
hose adaptor in Picture 7 are
securely fitted in their places.
To remove the hose from the
vacuum cleaner, press on the tabs
on the hose adaptor and pull it
backwards.
You can carry your product by
using the carriage handle on top of
it. (Figure 8)
Figure 5
You can attach the hose adaptor to your vacuum cleaner by
pushing fast the tabs on the hose
adaptor in the direction of the
arrow without forcing as shown in
Picture 6.
Figure 6
Figure 6
Your product’s hose is featured to
rotate 360°. Thus, it provides an
ergonomic usage during cleaning.
(Figure 7)
Figure 8 8
Figure
Using the extension pipe
Your product’s extension pipe
has a telescopic characteristic. To
extend the pipe, press the latch
shown in the direction of the arrow
and pull from the pipe end. You
can adjust the length as you wish.
(Figure 9)
Latch
Figure 9
Figure 10
fiekil
7
Figure
7
5
Figure 9
Narrow-mouth
lead
It can be used for
unreachable narrow
openings on armchairs and furniture.
(Figure 10)
Figure 11
Wide-mouth lead
It is used to clean
floors, steps, inside
of cars, sofas, armchairs, etc..
(Figure 11)
Using the parquetry and carpet
brush
There is an adjustment mechanism
at the side of the parquet and
carpet brush. The brush is aligned
to the surface to be cleaned by
means of the adjustment mechanism. (Figure 13)
Figure 13
a) Use your brush in normal position (brush hair in hidden position)
for carpets and rugs
b) While cleaning hard floors
such as parquets, marley floors,
linoleum and flat surfaces such
as walls without scratching them,
change the position of the adjustment mechanism to clean them
with bristle brushes.
Using the Turbo Brush
6
It is particularly efficient in collecting the pet hairs. It cleans the
carpets in depth. When vacuum
cleaning the fringes of the carpet,
use the brush by pulling it backwards in the direction of the arrow.
Clean threads and hair entangled
on the brush by cutting them with
a pair of scissors.
Turning off and storing the
vacuum cleaner
Press the On/Off button on the
body to stop operation of the
vacuum cleaner. Do not unplug
the appliance at once to stop the
product operation; first press the
On/Off button and stop the operation of the appliance. (Figure 3)
Moreover, you can store your
appliance horizontally by attaching
the parking part on the back of
your product's brush to the parking slot at the back of the product.
(Figure 14)
Figure 14
4 Maintenance and Cleaning
EMPTYING AND CLEANING THE
WATER CONTAINER
Turn off your appliance by the on/
off button and unplug it. Remove
the water container by holding from the handle (Figure 2).
Remove the filter unit and turn it
upside down so that the opened
part points downwards, and
empty it (Figure 15).
(Figure 15)
Filter unit may be detached from
the container (Figure 16) and
washed in the water.
Snap-on lock button
(Figure 16)
HEPA filter and sponge filters may
be removed from the appliance
and washed (Figure 17 and Figure
18).
7
(Figure 17)
(Figure 18)
Furthermore, the exhaust sponge
must be washed clean every 6
months by opening the exhaust
filter cover at the rear side of the
appliance.
If you wish to carry on vacuum
cleaning, fill with water up to the
relevant level and wait until the filter unit and the HEPA filter get dry
before replacing them back on the
appliance. Place the related parts
into the filter cage and re-attach
the filter unit in the appliance.
Now, the appliance is ready to be
stored.
Note: Water in the container does
not damage the appliance; however, it is recommended that you
empty the appliance before storing
it. One of the greatest advantages
of this appliance is that, contrary
to the vacuum cleaners that have
to be stored with the dust in their
bags, it can be stored as cleaned.
www.beko.com