1
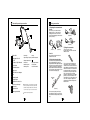
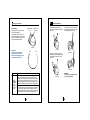
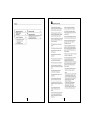
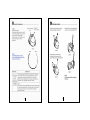
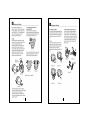
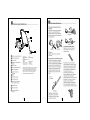
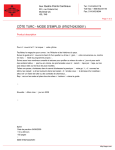
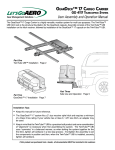
Vacuum Cleaner
User’s Manual
BKS 2422
Please read this manual first!
Dear Customer,
We hope that your product which has been manufactured in modern facilities
and passed through a strict quality control procedure will give you the best
results.
Therefore, we advise you to read through this manual carefully before using
your product and keep it for future reference.
This user manual will...
... help you use your machine in a fast and safe way.
Please read the User Manual before installing and starting your machine.
Particularly follow the instructions related to safety.
Keep this User Manual within easy reach. You may need it in the future.
Please read all additional documents supplied with this machine.
Please note that this User Manual may be applicable for several other
models. Differences between models will be identified in the manual.
This product has been produced in
environmentally friendly, modern facilities
Contents
Safety Warnings
>2
Safety Warnings
Technical Aspects of
your machine
Using your machine
>3
> 4-5
1- Preparing the vacuum cleaner for use
2- Using the telescopic pipe
3- Using the accesories
4- Operating and arranging the power
>4
>4
>4
>5
4
5
Parking the Appliance
>6
Maintenance and Cleaning >
7-8
1- Removing the filthy and filled paper filter
2- Cleaning the exhaust filter
3- Cleaning the engine protection filter
>7
>8
>8
The appliance has been manufactured
for domestic use and it is not suitable for
commercial use or use under severe
conditions.
The appliance has been adjusted for 220240 volts. Please check the
appropriateness of the voltage value
before plugging in the socket.
Before cleaning your appliance and its
accessories, read the safety warning
section of this manual.
Do not use harmful chemicals or corrosive
cleaners to clean your appliance.
Make sure that the appliance is plugged
off after using it, before changing the
accesories, and before cleaning and
maintaining.
Never immerse the housing of your
appliance (the part where the engine is
in) in water, and prevent water from being
poured on your appliance.
Do not unplug the appliance with wet
hands.
The appliance should not be used by
people who are physically (visual, audial)
or mentally impaired, children, and those
who do not have the required experience
or knowledge, in the absence of the
observation of a responsible person for
their safety.
Do not unplug the appliance by pulling
from the cord.
Do not move your appliance over its cord,
you can harm its isolation.
Be careful not to hit the cord to the
appliance while winding it.
Do not use the appliance on wet floor. Do
not vacuum water or other liquids alike.
Do not use your appliance in an upright
position.
Do not use your appliance without
supplying the filters described in this
manual; otherwise, you may harm the
engine.
Do not drop any objects into the open
parts of your appliance.
Do not block the air passages; check it
frequently.
While using the appliance, never hold the
vacuum hose close to your eyes or ears.
Do not attempt to clean glass or other
incisory objects by using this appliance.
Do not vacuum a burning cigarette,
cigarette ash or matches using the
appliance.
Do not use your appliance to vacuum
liquids such as gasoline, thinner, alcohol,
kerosene etc or any corrosive liquids
(acids, etc.).
1
Keep your appliance away from stoves,
ovens and other similar sources of heat.
2
Please keep an eye on children when the
appliance is in use, and make sure that
they do not play with it.
This appliance is not intended for use
by persons (including children) with
reduced physical,sensory or mental
capabilities, or lack of experience and
knowledge, unless they have been
given supervision or instruction
concerning use of the appliance by a
person responsible for
their safety.
Children should be supervised to
ensure that they do not play with the
appliance.
Attention!
Before operating your vacuum cleaner,
read all the information provided in the
guarantee section of your manual
carefully. Once the vacuum cleaner has
been operated, we accept that the user’s
manual was read and the guarantee
conditions have been understood by the
consumer.
Keep the original, or a copy of the, invoice
in case it may be necessary in future for
guarantee procedures. Your vacuum
cleaner has been manufactured for
domestic use. It has not been
manufactured for professional use.
Technical Aspects of your machine
Using your machine
1) Preparing the vacuum cleaner
for use:
10
7
6
5
4
Press the key on suction inlet hose
adapter (Picture 1), and fit the hose
holding piece into the suction inlet.
Pull the cord out and plug it in the electric
socket (Picture 2).
11
9
14
2
8
(Picture 4)
13
15
(Picture 5)
3
3) Using the accesories:
1
12
(Picture 1)
The crevice tool is used
to clean places which are narrow and
difficult to reach.
(Picture 2)
Attention!
1 Suction inlet
Net weight
2 Spare paper filter lid
Adapter Voltage / Frequency : 220-240V~ 50/60 Hz
3 Dust lid
Adapter Isolation Class :
Dimensions
Maximum power
Nominal power
4 Dust bag full light indicator
5 On-off button
6 Cord winder button
: 6.15 kg.
: ø 405 x 325 x 245 mm.
: 2200 W max.
: 1900 W nominal
7 Supply cord
8 Suction inlet hose adapter
Do not pull out longer than the red
indicator on the cord.
2) Using the telescopic tube:
The tubes are telescoped and the length
can be adjustable. By pressing the
adjustment bolt forward, adjust the length
of the tube for your convenience (Picture
3). When you release the adjustment
bolt, the tube will remain fixed at its place.
Fix the accesory that you want to use at
the end of the telescopic pipe.
9 Hose
10 Cleaning handle
adjusting
bolt
11 Telescopic tube
12 Adjustable floor brush for
hard floors and carpet
All declared values on the product and on the printed
13 Crevice tool
leaflets are picked up after laboratory measurements
performed according to related standarts. These values
14 Adjustment bolt
may differ upon usage and ambient conditions.
15 Power regulator knob
The power values were tested at 240 V.
3
(Picture 3)
Fix the accesory that you will select
according to the surface you will clean
at the end of the telescopic tube (Pictures
4,5).
4
The use of the brush for carpets and
hard surfaces: There is an adjusting
mechanism on the left side of the brush,
which indicates a positioning for carpets
and for hard surfaces. This mechanism
is adjusted according to the surface to
be cleaned. To clean your carpets and
kilims, use the brush in the normal
position (the bristle-brushes in a hidden
position). To clean hard surfaces such
as wooden or vinyl, or flat surfaces such
as the walls, change the adjustment
positioning and do the cleaning on the
bristle brushes.
4
Using your machine
4) Operating:
When you press the on/off button, the
motor will start operating.
You can adjust power suction of your
product by turning power regulator knob
clock wise according to the surface that
will be cleaned and the dirtiness.
power regulator
knob
fullness of the
dust bag
Parking the Appliance
Switch off the vacuum cleaner by
pressing the on/off button on the housing
(Picture 7).
You can keep your vacuum cleaner by
fitting the snap on the brush into its socket
on the appliance (Pictures 9-10).
(Picture 6)
(Picture 7)
Attention!
MAX.
Do not press the buttons of the
appliance with your foot. The
defects caused by doing so are not
covered within the gurantee.
MIN.
Plug off the cord, and press the cord
winder button on your appliance in order
to wind back the cord into its socket
(Picture 8).
(Picture 9)
(Picture 10)
Attention!
HOW IT WORKS
FUNCTION
In the cases when paper filter is full while the appliance is
operating at the max. power level, and/or when the motor
protection filter and the sponge become dirty, the light indicator
warns by lighting itself continuously (Picture 6). In this case,
stop the vacuum cleaner by pressing the on/off button. Do the
maintenance and cleaning. (See: Maintenance and cleaning)
Do not carry your appliance when it
is in the parking position.
(Picture 8)
LIGHT
INDICATOR
SHOWING
THE
FULLNESS OF Attention!
THE DUST
Although the paper filter may seem to be empty, as the particles
BAG
from the cleaned surfaces will have clogged the pores of the
paper filter, the light indicator will be on. In this case, a new paper
filter should be fitted in. (See: Maintenance and cleaning)
5
6
5
Maintenance and Cleaning
When the dust indicator is red, stop your
vacuum cleaner and plug it off. Open the
spare paper filter lid (Picture 11-12). Take
out a paper filter and close the lid. Open
the dust lid (Picture 13).
Attention!
While fitting in the new paper filter, make
sure that the filter mouth is open (the
sliding filter lock is not pulled). For
maximum efficiency, use paper filters
tested and approved by Arçelik only.
Otherwise, as the dust holding capacity
of other paper filters that you will get
from the market is inadequate, failures
may occur in your appliance; in this case,
the defect will not be covered under the
guarantee conditions.
Spare
paper filters
5
1) Removing the filthy and filled
paper filter:
Close the filter mouth by pulling the
sliding filter lock upwards. Remove the
paper filter by pulling it out from the filter
lock (Picture 14).
Maintenance and Cleaning
2) Cleaning the hepa filter:
In every five changes of the paper filter,
take the hepa filter casette by pressing
down the opening button, and take the
casette out. Wash the hepa filter in it to
clean (Pictures 17-18).
Attention!
(Picture 14)
Do not use the hepa filter before ensuring
that it is completely dry. Otherwise, the
motor of the vacuum cleaner may be
harmed.
After cleaning the hepa and drying it,
place it in its space, applying the reverse
procedure of taking it out (Pictures 1920).
Fit the new paper filter into its place by
holding it from its end (Picture 15). Place
the back of the filter in its space (Picture
16).
(Picture 12)
(Picture 15)
(Picture 23)
(Picture 20)
Textile Dust Bag:
If you are using a cloth dust bag, you
can empty and use the bag repeatedly.
If the dust bag in your appliance is made
of cloth, take out the cloth bag as
explained in the section titled “taking out
the paper bag”.
7
(Picture 22)
(Picture 18)
(Picture 16)
(Picture 19)
(Picture 13)
After every five uses of the paper filter,
take the motor protection filter casette
out from its socket (Picture 21); then
remove the motor protection filter, and
wash it to clean. When it is completely
dry, put it back to its place. Otherwise,
your motor may be harmed. Fit the
casette back to its place after placing
the filter in it (Pictures 22-23).
(Picture 21)
(Picture 17)
(Picture 11)
3) Cleaning the engine protection
filter:
8
1
2
10
7
6
5
4
11
9
14
2
8
13
15
3
1
12
3
4
MAX.
5
MIN.
6
(Slika 13)
7
8
1
2
10
7
6
5
4
11
9
14
2
8
13
15
3
1
12
3
4
MAX.
5
MIN.
6
21
11
17
12
22
18
23
131
19
7
20
8