1
RD4: 250-280-RI-Cond Detector, User Manual
9
“Settings” – this function is available only when a flash drive is not inserted. On pressing “Settings” softkey, the
following options are presented to the user: “Parameters”, “Calibration”, “Quit” and “Set clock”.
“Parameters” – this screen allows to adjust detector's parameters: flow rate, acquisition rate, apparent
optical path-length, and an analog output controlling the external equipment, see Chapter 7.4.1 for details.
“Calibration” – this screen allows the user to test external equipment connected to the detector, to zero
the UV channels; to change the energy emitted by UV LED light sources; and to re-calibrate all four
detectors channels: UV at 250 nm, UV at 280 nm, Conductivity and RI. See Chapter 7.4.2 for details.
“Set clock” – on pressing this softkey, the user is presented the means to set the real-time clock.
“Save data” – this function is available only when a flash drive is inserted. The softkey allows for transfer of the
data accumulated within the non-volatile memory onto a flash drive. Pressing the “Save data” softkey
automatically creates a directory tree: UnitSerialNumber/Year/Month/Day/ on the inserted flash drive. The
directory's name reflects the date of the data transfer. The data file is saved to this directory with a name reflecting
the time of the data transfer in the 24-hour notation: XXhXXm.txt.
For example, if the detector's serial number is 1503-0-1234, and a data file is transferred to a flash drive at 10.43
a.m. on May 17, 2014 – a directory named “1503-0-1234/2014/MAY/17/” will be created on the flash drive, and a
data file named “10h43m.txt” will be recorded to this directory. If another data file were to be saved to the same
flash drive at 3.18 p.m on the same day – it will be named “15h18m.txt” and saved to the same directory.
Note that the time and date are those of the moment of the data recording, not of the moment when the data
collection had been started. This eliminates the possibility of data file overrides. Obviously, the real time clock
must be set correctly. For more details about the data file see Chapter 9.
7.3. Detailed description of Acquisition Mode
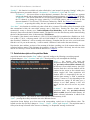
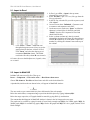
Acquisition mode starts when the “Run” softkey is pressed, leading to the following screen being opened.
Legends change to: “New” “Continue” and “Quit”. Pressing soft keys will accomplish the following:
“New” – the detector will opens the
Acquisition Screen and begin data recording.
Any previously-collected data is deleted from
the detector’s non-volatile memory (but NOT
from the flash drive). All four channels will be
rendered on the screen as four colored traces
(unless toggled off). Data acquisition will
continue until it is suspended by the user, or
until the data memory is filled to maximum
capacity (7 hours to 15 days depending on the
acquisition rate setting). In the latter case, a
message in red “Data memory is full” will
appear, and the unit will not save any more
data.
“Continue” – the detector switches to the
acquisition mode. Any previously-collected
data is recalled from non-volatile memory, all
further collected information is added to the
already-existing data set. This cannot be carried out if the non-volatile memory is full.
“Quit” – pressing this softkey returns the user to the Welcome Screen.
Acquisition Screen displays up to four traces with corresponding vertical axes in four different colors. The
legends over the four soft keys change to: “Traces” “Zoom” “Offset” and “Suspend”. The acquisition state is
conveyed at the top left corner of the screen as a “Running” or “Suspended” message in white font.