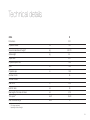
1
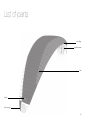
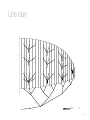
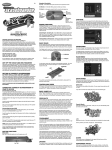
ZETA
Operating manual
Edition 1 / 07_2013
Edition 1 / 07_2013
Contents
Thank you for flying ADVANCE ....................................................... 4
About ADVANCE .............................................................................. 5
The ZETA........................................................................................... 6
Other important details ................................................................ 6
Pilot requirements............................................................................. 7
General advice about paragliding................................................ 7
Using the paraglider......................................................................... 8
Delivery......................................................................................... 8
Basic settings................................................................................ 8
Adjusting the brake lines............................................................... 8
Setting up the speed system ....................................................... 8
Suitable harness............................................................................ 9
Weight range ................................................................................ 9
Flight characteristics ..................................................................... 10
Takeoff......................................................................................... 10
Normal flight.................................................................................11
Turning flight.................................................................................11
Accelerated flight........................................................................ 12
Collapses..................................................................................... 13
Rapid descents........................................................................... 14
Stalling......................................................................................... 16
Landing........................................................................................17
Flying with a wet paraglider.........................................................17
Winching ..................................................................................... 18
Paramotoring .............................................................................. 18
Aerobatics................................................................................... 18
Maintenance, repairs and service intervals .................................. 19
Packing ....................................................................................... 19
Care and maintenance................................................................ 19
What to do if the leading edge gets damaged?......................... 19
Check ......................................................................................... 20
Repairs ....................................................................................... 20
Disposal ...................................................................................... 20
Technical details............................................................................. 21
Technical data............................................................................. 21
Material used .............................................................................. 22
Certification................................................................................. 23
Service............................................................................................ 24
ADVANCE Service Center.......................................................... 24
The ADVANCE website............................................................... 24
Warranty...................................................................................... 24
List of parts..................................................................................... 26
Lineplan........................................................................................... 27
Risers.............................................................................................. 28
Bowline knot................................................................................... 29
3
Thank you for flying ADVANCE
Our sincere thanks to you for deciding on a ZETA - another ADVANCE
quality product. We hope that you will enjoy many rewarding hours in
the air with it.
This Operating Manual is an important companion to the paraglider.
In it there are instructions and important information about safety, care
and maintenance. We therefore recommend that you carefully read
through the manual before your first flight.
On www.advance.ch you will find the latest version of this manual
and more information. Any new safety-related knowledge about the
product will be published here on the website. Please contact your
dealer or ADVANCE direct if you have any questions or problems.
Now we wish you a lot of fun with your ZETA and, as always, “happy
landings”.
Team ADVANCE
4
About ADVANCE
ADVANCE is a worldwide leading paraglider manufacturer based in
Switzerland. Since its founding in 1988 the company has continued
to follow its own policies and ideas in both development and production. The result is fully-finished products with distinctive characteristics.
The team of experts behind the ADVANCE brand share both the passion for and confidence in their ADVANCE products. At home in the air
themselves, they bring valuable personal experience and dedication
to the workplace.
Thorough checking of the production process and supervision of the
working practices in ADVANCE’s own factory in Vietnam guarantee
high quality work. A long-standing relationship with cloth and line
manufacturers means that ADVANCE know-how finds its way directly
into the development of new materials.
ADVANCE place great importance on after-sales service, and have a
well-developed worldwide service network. A continuous exchange
of experience with customers keeps new knowledge flowing in, which
has an influence on ADVANCE products – and so the ”Circle of
Service” is completed.
5
The ZETA
The ZETA is the most precise and dynamic ADVANCE wing. In fact it
specialises in precision and performance. This EN/LTF certified freestyle paraglider demonstrates a high level of passive safety and its pilot stays in charge in any situation. A high trim speed makes the ZETA
an excellent soarer, and thermal flying is fun as well.
Other important details
ADVANCE Standards
ADVANCE pays a lot of attention to small details. Sewn-in tension
straps improve the wing’s stability, and the distinctive winglets reduce
induced drag (vortex-effect). Velcro closures at the wingtips make it
easy to remove debris like sand and snow from the glider. The ZETA
is made from high quality fabrics, and the ball bearings in the speed
system pulleys ensure minimal rolling resistance. Like all ADVANCE
models the ZETA comes with swivels on the brake lines and magnet
clips for the brake handles.
Aluminium acro bars are available as an option.
6
Pilot requirements
The ZETA is intended for freestyle pilots; in other words pilots who
have the necessary feeling for a wing, who fly actively and can anticipate and prevent trouble – and have a good grasp of the normal fast
descent techniques.
General advice about paragliding
Flying a paraglider calls for appropriate training and a sound knowledge of the subject, as well as, of course, the necessary insurance
cover and licence. A pilot must be able to correctly assess the weather
conditions before taking off. His or her capabilities must be adequate
for the paraglider used.
Wearing an adequate helmet, suitable boots and clothing, and the
carrying of an emergency parachute are essential. Before every flight
all items of equipment should be checked for damage and airworthiness. A proper pre-takeoff check must also be carried out.
Every pilot bears sole responsibility for their participation in the sport
of paragliding. Neither the manufacturer nor the seller of a paraglider
can guarantee or be held responsible for the pilot’s safety.
Important: The legal conditions regarding acro flying and ext-
reme flight attitudes should be observed.
7
Using the paraglider
Delivery
Adjusting the brake lines
Every ADVANCE paraglider has to be flown by the dealer before delivery to check for correct settings and trim. The dealer finally enters
the date of the first flight on the type placard fastened on a rib at the
centre of the wing. This entry together with your completed warranty
form ensures that deficiencies in the product, due the manufacturer,
are covered by the ADVANCE warranty. See ‘Warranty’ in the “Service”
section.
The length of the brake lines has been set at the factory so that, with
hands fully up, the trailing edge remains unbraked in accelerated
flight – (no crease in the wing).
ZETA delivery includes a COMFORTPACK rucksack, an inner bag, a
compression strap, a repair kit, speed lines with speedbar, a miniwindsock in the glider colours and a «Getting Started» booklet.
Basic settings
At delivery the basic set up of the ZETA will be the original trim situation that the ADVANCE test team found to be best. Certification was
also gained in this condition. Any alterations or changes to the paraglider, such as altering the line lengths or fitting different risers or
quicklinks, will result in a loss of the glider’s certification. See section
“Certification”.
If the brake line length does have to be reset there should be 8 cm of
initial free brake line movement between the brakes fully released position in unaccelerated flight, and that point where the lines first affect
the trailing edge. We recommend a bowline knot for attaching the
handles. See illustration in the appendix.
Setting up the speed system
The ZETA has a speed system (speedbar), which provides an additional
13 km/h above trim speed. The front risers are shortened in accelerated flight and this reduces the wing’s angle of attack. The ZETA speed
system is designed so that the wing profile shape is maintained
in accelerated flight. This, of course, means that the wing’s good
qualities are kept at high speed.
Set up the ZETA speed system correctly before the first flight. Make
sure that the speed lines run freely through the pulleys on the harness.
Connect the lines to the risers with the Brummel hooks. Finally check
8
that your adjustment means that the full range of the speed system
can be used. To do this it is best to hang the harness up, sit in it,
connect the risers and speed lines, and have someone else hold the
risers up.
The ZETA speed system is arranged so that the profile shape of the
wing is fully retained over the angle-of-attack range of the speed
system. This maintains the beneficial qualities of the profile at high
speeds.
The weight range is given in the section «Technical data». The figures
given there represent the total in-flight weights. This includes the pilot’s body weight, plus clothes, as well as the weight of all the equipment (glider, reserve, harness, instruments etc.).
Info: Experience has proved the theory – a streamlined har-
ness can significantly improve gliding performance.
Weight range
Caution: The speed system is correctly adjusted when you can use the full travel available on the risers. Make certain that the speed lines are not set too short, thus causing the wing to be pre-accelerated all the time.
Suitable harnesses
Basically the ZETA can be flown with any harness that does not have
rigid cross bracing (see section “Certification”).
The chosen harness should ideally have a carabiner distance of ca.
45 cm and a support height of between 40 and 48 cm.
9
Flight characteristics
We recommend that you make your first flights with your new glider in
quiet conditions, in a familiar flying area. A few pull-ups at an easy site
will give you confidence in the ZETA’s handling qualities, from the
very beginning.
Takeoff
Before every takeoff carry out the following pre-takeoff checks:
1.Harness and helmet done up, reserve OK?
2.Lines free?
3.Canopy open?
4.Wind direction and strength assessed?
5.Airspace and field-of-view clear?
The ZETA takeoff behaviour is very smooth and easy for both forward
and reverse takeoffs. The canopy inflates quickly and rises progressively, without hanging back or shooting in front.
Because the ZETA rises very easily it is very important to match the
pull-up impulse to the conditions. This means:
- In a lot of wind and/or on a steep slope the ZETA needs little or
almost no pull-up impulse.
- In calm conditions and/or flat land a relaxed pull-up makes sense.
Takeoff in light wind (forward takeoff)
The ZETA only needs a moderate pull-up impulse even in a light wind.
It is not necessary to step back and ‘run’ into the lines. Guide the glider
up with pronounced leaning forward, but without too much of a pull
on the A-risers, until the canopy is overhead. During the pull-up phase
any correcting should only be done by decisive going-under-the-wing,
without using the brakes. After any necessary correcting and a satis-factory visual check a few determined steps with good leaning
forward will achieve lift off, even in little wind.
Info: A ZETA takeoff is exceptionally easy to do. Match your efforts (as described in the section ”Takeoff“) to the wind conditions and takeoff slope.
Takeoff in stronger wind (reverse takeoff)
The reverse takeoff is mainly recommended for stronger winds. During the pull-up you should walk towards the ZETA necessary. Turning
round and taking off with the ZETA will then prove to be easy.
Tip: Playing with the glider on flat ground in some wind gives a good feeling for the wing. You can get to know the ZETA’s characteristics very well, and try out takeoffs, stalling, shoo-
10
ting forward tendency and collapses – while remaining safely
on the ground. The ADVANCE test team have a motto: one hour ground training is worth 10 high flights.
N.B: Ground handling practice can increase wear on your
glider.
Info: The ZETA is very easy to take off. Just as for the forward takeoff you should also suit your pull-up impulse to the wind and slope when making a reverse pull-up (as described in section “Takeoff“).
Normal flight
In calm air the ZETA best glide is achieved with fully released brakes.
Light braking brings the glider to its minimum sink condition. When
flying into a headwind, through descending air, or when proceeding
to the next thermal, glide performance will be distinctly improved by
appropriate use of the speed system.
Despite the wing’s high stability an active flying style is recommended
– collapses can be almost completely avoided. This means keeping
the lightly-braked glider directly above you, in other words, countering
roll and pitch disturbances.
• When the angle of attack increases (flying into a thermal; wing swings back) the brake lines should be temporarily released fully, until the glider returns to its overhead position.
• When the angle of attack reduces (glider dives forwards, pilot swings back) the wing should briefly be braked more.
Be careful not to get below minimum speed, and don’t overreact with
the brakes.
Turning flight
The ZETA has precise response to brake application. It reacts directly
and progressively to increasing steering demands, once the brake line
free travel has been taken up. Steering can be effectively assisted by
active weight shift. Angle of bank can always be increased, stabilised
or reduced by the appropriate pull on the brake line.
When circling in a thermal choose the desired angle of bank and corresponding turn radius by using the inside brake line, and let the paraglider turn steadily like this. Stabilise the outside wing with outside
brake as required and, in particular, keep a check on the rate of turn.
Too much brake on the outside wing will slow the turn and the airspeed down, and lose the glider’s good steering qualities.
11
A harness that is matched to the ZETA flying qualities helps you enter
and settle on a very steady turn. See also section «Suitable harnesses».
By doing this pitch attitude disturbances will be minimised and good
gliding performance maintained.
Caution: To keep good manoeuvrability make sure to fly your ZETA with enough airspeed while turning in thermals – not too much outside brake.
• If the angle of attack increases (e.g. wing goes back in rising air) the speedbar should be briefly but strongly pushed.
Tip: If a brake line breaks you can steer the ZETA using the
C risers.
Accelerated flight
The ZETA wing remains extremely stable even in accelerated flight.
However, paragliders operate at a lower angle of attack while flying at
their higher speeds, and the degree of stability is generally reduced.
The higher aerodynamic forces involved at higher airspeeds mean
that a collapse can be more dynamic. See also section «Collapses».
When encountering strong turbulence while flying accelerated you
should first release the speedbar completely before applying the brake
necessary to stabilise the wing. The high stability of the ZETA allows
light turbulence to be flown through while accelerated. While doing
this active accelerating should be used, whereby the angle of attack
is accommodated by using the speedbar instead of the brakes.
• If the angle of attack reduces (e.g. wing shoots forward) the speed-
bar should be released.
Caution: Even though the ZETA is stable in accelerated flight you should only use as much speedbar as you feel happy with.
Tip: Make sure that you do not use speedbar and brake at the same time, otherwise you will get into the worst possible gliding situation, to no advantage.
Tip: For best gliding always choose a speed that takes into account actual headwind, sink rate and expected next climb.
12
Collapses
Asymmetric collapse of the wing
The ZETA has a very stiff and stable canopy. With an active flying
technique collapses can be almost completely prevented in normal
flying conditions.
If, however, the wing does collapse asymmetrically at trim speed the
canopy will turn to the side dynamically for collapses of over 50%,
but this is easily contained with light opposite braking. Normally, the
wing will reopen without pilot action.
An asymmetric collapse in accelerated flight causes a more impulsive
reaction because of the increased aerodynamic forces at higher airspeed. The turning behaviour is still quite manageable even following
a collapse at full speed.
If a collapse is slow to reopen, a deep but fast pull on the closed side
brake will help. It is important to completely release the brake again
to let the glider keep its flying speed. Be careful with the brake on the
open side, and only apply enough to keep straight – so as not to stall
the wing.
Poorly flown wingovers can cause a wingtip to fold inwards from the
side, causing it to catch in the lines and create a cravat. Due to the
high drag they produce cravats can lead to strong rotation (spiralling).
Stop an increase in rotation rate by just the correct amount of outside
brake. Then open the cravated wingtip by pulling the orange stabilo
line. Clearing a cravat can be also done more quickly by ‘pumping’.
The appropriate brake should be applied to 75% brake travel within a
maximum of two seconds, and then released immediately.
Symmetric collapse (frontstall)
After a spontaneous or A-riser provoked collapse the airflow breaks
away from the profile and the canopy will pitch back. The pilot swings
back underneath after a short delay. Wait, without applying brake,
until the wing is again above you and returns to normal flight. After a
big collapse reopening may be delayed, but do not forceably encourage reopening by the use of excessive brake, because of the risk of
a fullstall.
Caution: After a very impulsively provoked front collapse in accelerated configuration (for example during SIV training) it can happen that the front of the canopy does not open by itself. Opening should be encouraged with a brief brake 13
impulse, achieved by pulling the brakes down to 75% within one second, then releasing them immediately.
Rapid descents
For quick and efficient ways of getting down the ADVANCE test team
recommend big ears (with or without speed bar) or the spiral dive –
the choice depends on the situation.
Tip: Fast descents should be practised now and then in quiet conditions – so they won’t become emergencies when you need them.
Symmetrical collapsing of the wingtips (big ears)
To enter this manoeuvre pull both outer red marked A lines quickly down together. This will fold the wingtips in, and you can hold them
there easily. To reopen release the A-lines; the ZETA wingtips then
open themselves thanks to the high internal wing pressure.
Sink rate can be further increased by using the speedbar. Depending
on the situation the glider can be steered using weight shift.
Caution: Do not fly spirals or sharp changes of direction with big ears applied; the increased loading carried by fewer lines can damage the structure.
Caution: Be aware that flying with big ears brings the stall closer. Be careful with the brake lines when big ears are applied, and do not use this descent method if the wing is wet. See also section «Flying with a wet paraglider».
Tip: If you want to lose height as quickly as possible and fly away from a danger zone at the same time we recommend the following: apply big ears and use as much speedbar as conditions allow.
Spiral dive
For the most comfortable way of doing this we recommend a neutral
sitting position without active weight shift, and a shoulder-width carabiner distance (approx 45 cm).
Enter the spiral by progressively pulling one brake. Your head and
field of view should be directed in the turn direction. As the angle of
bank increases so will the rate of turn and centrifugal force.
14
The behaviour of the spiralling paraglider can be separated into two
phases: in the beginning the glider begins with a normal turn which
progressively tightens, with increasing angle of bank. In the second
phase the paraglider engages its spiral mode. This means that the
wing dives forward with an increase of acceleration. During this phase
of the manoeuvre try to keep a neutral sitting position and give way to
the centrifugal force – your body will be pushed to the outside.
Recovery from the manoeuvre is achieved by progressively releasing
the inside brake. While coming out of a spiral dive with high vertical
speeds and rotational rates it is essential to release the brake carefully, and/or reapply a little inside brake if necessary, so that you can
prevent the wing pitching back excessively, and then diving in front.
Make sure that you start the recovery with plenty of height remaining above the ground. Generally speaking you should allow the same
amount of time to recover as it took to enter the manoeuvre, but remember that the sink rate will be higher!
Important Safety Information
The ZETA was developed with dynamic and precise handling in mind.
This means that it is a dynamic wing that must be controlled actively.
This precise and dynamic character, combined with high wing loading,
requires the pilot to actively recover from the steep spiral – in every
case. The pilot must therefore apply outside weightshift, and outside
brake until the rotation stops. This active recovery for the ZETA is easy
to do – but it must be done.
Caution: The ZETA does not come out of a steep spiral by itself. With a neutral sitting position and no outside brake this paraglider stays in the stable spiral. Active recovery is neces-
sary.
Caution: The ZETA is certified for harnesses in group GH
(without rigid cross-bracing). Group GX harnesses (with crossbracing) or those with very low hang points could drastically
alter the flying behaviour in the spiral dive. See section «Suitable harnesses».
Caution: Do not fly spiral dives or aggressive changes of di-
rection with big ears applied: the raised wing loading carried by fewer lines can damage the glider.
B-stall
The whole paraglider structure and its profile shape would be severely strained by a B-stall. We recommend that you don’t fly B-stalls on
a regular basis. If the B-Stall is to be flown however, recovery must
15
consist of a complete and hesitation-free release of the B-risers, so
that normal flight is resumed within two seconds. The B-stall is difficult for light pilots to do because of the high force required.
Stalling
Fullstall
One-sided stall (spin)
ZETA brake effect and resistance starts early, but the brake travel is
very long.
When circling tightly in a thermal the ZETA indicates early and clearly,
by strongly increasing brake load, the risk of a stall. Even so, if a wing
does stall you will feel a marked reduction of brake load on the inside
of the turn. If this happens you must immediately release both brake
lines, so that the ZETA can return to normal flight by itself.
If a wing stalls completely the paraglider will go into a spin / negative
rotation. The ZETA will react dynamically, but will still be manageable
by the less experienced pilot. Even so – depending on the situation
from which the paraglider is allowed to fly again – the reaction can be
quite vigorous (shooting forward with a raised risk of collapse). The
canopy can be arrested while shooting forward by well-judged braking. Normal flight can then be resumed without a further collapse.
Tip: Basically, in all out-of-control flight situations, but espe-
cially the onset of a one-sided stall, you should immediately release both brakes fully – hands up!
Entry into a fullstall is achieved by progressively and symmetrically
pulling down both brake lines. Forward speed reduces. Airflow and
wind noise reduce. After reaching minimum speed the paraglider
first goes into a brief phase of parachutal stall. Then further brake will
cause complete airflow breakaway, and the wing will fall back in fullstall. The ZETA has a strong desire to fly again, but is easy to hold in
the stall. A half wrap of the brakes is recommended to fly fullstalls.
To recover, the canopy has to be pre-inflated. To do this the brakes
should, at first, be released slowly and symmetrically, and only fully
released when pre-inflation is complete. The ZETA flies again relatively
gently, with moderate shooting forward.
Tip: Basically, in all out-of-control flight situations, you should immediately release both brakes fully – hands up!
16
Deep stall
Stable parachutal stall cannot be established, whether attempted by
brake or B-stall.
In rain, or if the canopy is wet, the ZETA, like all paragliders, is more
vulnerable to parachutal stall. If the wet glider were to go into parachutal stall you should recover only by accelerating using the speedbar. See also section “Flying with a wet paraglider“.
Landing
Always make a proper landing circuit with a well-planned final approach.
As the ground approaches progressively increase brake to level the
flight-path, before applying full brake to completely arrest the forward
speed.
Caution: Steep turn reversals lead to strong swinging of the pilot, and should not be done near the ground.
Caution: Braking will reduce your speed and increase your sink, but it will certainly seriously restrict your ability to ma-
noeuvre.
Caution: Getting below minimum speed leads to stalling: this should unquestionably be avoided when top landing, and on final approach.
Caution: Never let your glider fall to the ground on its leading
edge. The overpressure so caused inside the wing can rip the cell walls and damage the leading edge.
Flying with a wet paraglider
Flying with a wet glider creates a risk of deep stall. Deep stall is often
the result of a combination of factors. The weight of the wet canopy
goes up, and this increased weight increases the angle of attack,
which always puts the glider nearer the deep stall limit. Added to this,
water drops on the top surface have a detrimental effect on the laminar flow of the boundary layer near the leading edge, which distinctly
reduces the maximum lift coefficient. If the wet glider is also being
flown at its lower weight limit there is a further small effect of increasing the angle of attack, as well as there being a lower airspeed because of the reduced wing loading.
In order to avoid the risk of deep stall with a wet glider the wing
should be braked as little as possible, and big ears not used at all. As
a further preventative measure apply moderate (25-40%) speed bar.
17
All these actions have a small effect in reducing the angle of attack.
Should the wet glider get into deep stall, recovery can only be
achieved using the speed bar. See also section «Deep stall».
Winching
The ZETA is suitable for winch launching. When taking off in windless
conditions, ensure that the paraglider is laid out in an arched or even
wedge shape (to avoid risk of the glider rosetting):
Winch launch is only permitted if:
• the pilot has completed a tow training course (only Germany/DHV);
• the winch system is certified for use with paragliders;
• the winch operator has been fully trained in paraglider winching.
Assuming suitable pilot skill and correct technique, the ZETA is very
good at flying manoeuvres such as the Wingover, Helicopter, Fullstall,
Tail Glide, Looping, SAT, Misty Flip, Asymmetric Spiral, Twister, Parachutal flight, McTwist and Dynamic Fullstall. The materials, design
and construction of the highly stressed parts have been specifically
chosen so that that the ZETA’s long life can be assured.
However: Be aware that dynamic manoeuvres put greater loading on
the structure and can shorten the glider’s life. This means that a regular check of the paraglider is essential for your safety. In addition
there will be the special requirements of your country to be observed.
Paramotoring
The ZETA is not suitable for paramotoring.
Acrobatics
The ZETA was developed with the focus on precise and dynamic behaviour.
18
Maintenance, repairs and care
Packing
Pack your ZETA rib to rib, so that the plastic rods in the ribs at the
leading edge lie as flat as possible on one another, all at the same
height. This will prolong your ZETA’s life and keep its fast and excellent filling qualities at takeoff. You should randomly offset your packing centreline so that the final chordwise fold is not always along
same cell. Only pack and store a dry paraglider, and avoid unnecessary compressing and tight packing.
Care and maintenance
Ultraviolet light, heat, humidity, sea water, aggressive cleaning agents,
unsuitable storing and physical abuse (dragging across the ground)
speed up the ageing process.
The life of a paraglider can be extended significantly by observing the
following advice:
-
-
Allow a wet or damp glider to dry by leaving it completely unpacked at room temperature, or outside in the shade.
If the glider gets wet with salt (sea) water rinse it thoroughly with fresh water.
- Clean the glider only with fresh water, and a little neutral soap if necessary. Do not use solvents under any circumstances.
- If the glider has been subjected to increased stress (such as a tree landing) have it examined by an expert.
- Regularly remove sand, leaves, stones and snow from the cells. Openings with Velcro closures are provided at the wing tips for this purpose.
- Do not leave the glider out in the sun unnecessarily before and after
flight (UV light).
- Do not subject the packed glider to excessive temperature fluctua tions, and do ensure adequate air circulation to prevent condensa tion forming.
- Do not drag the glider across the ground.
- When landing, make sure that the canopy does not fall on its lead-
ing edge.
What to do if the leading edge gets damaged?
If a plastic rod breaks or its seam rips the glider must be taken to an
ADVANCE checking facility where the rod can be replaced or sewn
back in. To guarantee a long lifespan it is important that the wing is
not allowed to fall on its leading edge after landing, otherwise the fabric can be damaged by abrasion. But mainly there is a risk, as in all
paragliders, that the crossports could tear.
19
Check
Disposal
A new ADVANCE paraglider must be given a check every 24 months
(2 years). With intensive use (> 150 flying hours per year, or excessively
demanding use) an annual check is needed, after the first check.
When a check is carried out the condition of all materials is assessed
in accordance with strict guidelines, and tested with great care. Finally
the overall condition of the glider is rated and recorded in a test report.
You can find additional information about the check in this manual in
the section «Service», or at www.advance.ch.
Environmental protection plays an important role in the selection of
materials and the manufacture of an ADVANCE product. We use only
non-toxic materials that are subjected to continuous quality and environmental impact assessments. When your paraglider reaches the
end of its useful life in a number of years’ time, please remove all metal
parts and dispose of the lines, canopy and risers in a waste incineration plant.
Repairs
As a general rule you should not attempt to repair a paraglider yourself. The various seams and lines are made with great precision, and,
for this reason, only the manufacturer or an authorised service centre
may fit identical replacement parts or replace entire cells. Exceptions
to this rule are the replacement of lines and the repair of small tears
(up to 5 cm) or holes in the fabric that may be glued with the self-adhesive ripstop included in the repair kit. After a repair, or the replacement of a line, the glider must always be opened out and checked on
the ground before the next flight.
20
Technical details
ZETA
21
Flat surface
21.0
Projected surface
m2
17.6
Recommended take off weight *
kg
60-110
Glider weight
kg
4.4
Aspect ratio
5.15
Projected aspect ratio
3.62
Span
m
10.4
Projected span
m
7.99
Number of cells
45
Number of risers
3
Max chord
m
2.52
Lenth of risers
cm
50
Maxi length oft he lines with risers
cm
679
Trim speed **
km/h
38-43
Max. accelerate range **
km/h
13
* Pilot, wing, equipment
** depending on take off weight
21
Materials used
We routinely inspect and test our materials many times over. Like all
ADVANCE products the ZETA is designed and produced as a result
of the latest developments and knowledge. We have chosen all the
materials very carefully, under conditions of the strictest quality control.
Leading edge
Skytex 38 Universal 9017 E25, 38 g/m2
Top surface
Skytex 38 Universal 9017 E25, 38 g/m2
Under surface
DOMENICO DOKDO-20MF, 34 gr/m2
Ribs
Skytex 40 Hard 9017 E29, 40 g/m2
Diagonals
Skytex 40 Hard 9017 E29, 40 g/m2
Leading and training edge tapes
Polyester laminiert 20 mm
Intake lower edge tapes Polyamid 16 mm
Lines
• Edelrid Aramid 7343, 230/190/140, covered, 1.7 / 1.5 / 1.3 mm (base lines)
• Edelrid Aramid 8000/U, 90/70/50, uncovered, 0.8 / 0.7 / 0.5 mm (upper gallery)
• Liros Dyneema, DSL 70 / DFL 115, covered, 0.95 / 1.3 mm (brake lines)
• Liros Dyneema, DFLP 232, covered 1,9 mm (brake lines)
Risers
Polyester 13 mm
Riser quicklinks
Maillon Rapide, Inox stainless, 3.5 mm S12
22
Certification
The ZETA has EN and LTF D certification. The test reports can be
downloaded from www.advance.ch.
Certification ratings can only provide limited information about a paraglider’s flying behaviour in thermally active and turbulent air. The certification grading is based primarily on provoked extreme flight manoeuvres in calm air.
During the development of an ADVANCE paraglider, the emphasis is
first and foremost on flying behaviour and handling, and not exclusively on the certification test. The result is a well-rounded product
with the familiar ADVANCE handling. Nevertheless, the certification
rating occupies a significant proportion of the specifications that have
to be met.
23
Service
ADVANCE Service Center
ADVANCE operates two company-owned service centres that carry
out checks and repairs of all types. The workshops based in Switzerland and France are official maintenance operations, which have
many years’ experience and in depth product-specific expertise. The
ADVANCE worldwide service network includes other authorised service centres that provide the same services. All service facilities use
original ADVANCE materials exclusively. You can find all information
on checks and repairs and the relevant addresses at www.advance.ch.
The ADVANCE website
At www.advance.ch you will find detailed information about ADVANCE and its products, as well as useful addresses which you can
contact if you have any questions.
Among the things you will be able to do on the website are:
- complete the warranty card online up to 10 days after purchasing
the glider, enabling you to enjoy the full benefits of the ADVANCE warranty.
- find out about new safety-related knowledge and advice concern ing ADVANCE products.
-
-
-
download an application form in PDF format which you can use when sending your glider in for a check at ADVANCE.
find an answer to a burning question among the FAQs
(Frequently Asked Questions).
subscribe to the ADVANCE Newsletter so that you will be regularly informed by e-mail about news and products.
It is well worth visiting the ADVANCE website regularly because the
range of services offered is continuously being expanded.
Warranty
In order to enjoy the full benefits of the ADVANCE warranty, you are
requested to complete the relevant form on the website in the
«Warranty» section within 10 days of purchase.
As part of the ADVANCE warranty, we undertake to rectify any defects
in our products that are attributable to manufacturing faults. In order
for a warranty claim to be made, ADVANCE must be noti- fied immediately on discovery of a defect and the defective product sent in for
inspection. The manufacturer will then decide how a possible manufacturing fault is to be rectified (repair, replacement of parts or replacement of the product). This warranty is valid for three years from
the date of purchase of the product.
24
The ADVANCE warranty does not cover any claim other than those
listed above. Claims in respect of damage resulting from careless or
incorrect use of the product (e.g. inadequate maintenance, unsuitable
storage, overloading, exposure to extreme temperatures, etc.) are expressly excluded. The same applies to damage attributable to an accident or normal wear and tear.
25
List of parts
Nylon Wyres
Longitudinal straps
Cells
Winglet
Velcro openings
26
Line plan
Z E TA
A1
A2
21
A3
A4
A5
A6
A7
3A1
B1
A8
B2
3A2
B3
A9
B4
B5
B6
B7
3A3
A10
B8
B9
B10
3B1
3B2
St A
3B3
C2
C1
C6
C5
C4
C3
C7
C8
St B
C9
C St
D5
St C
D4
D3
D2
D1
11
3C3
3C2
3C1
8
7
6
5
4
3
2
1
10
9
F4
F3
F2
F1
VR3
VR1
SL low
VR2
Z E TA
SL up
A1
A2
21
27
A3
A4
A5
Risers
4
1.
2.
3.
4.
Pulley speed system
Quick link
Magnetic clips
Swivel
3
1
2
1
28
Bowline knot
29
advance thun ag
u t t i g e n g s t r a s s e 87
ch 3600 thun
f o n + 41 3 3 225 70 10
f a x + 41 3 3 225 70 11
w w w. a d v a n c e.c h
i n f o @ a d v a n c e.c h