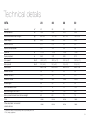
1
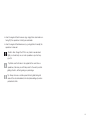
User manual Edition 1 / 10_2014 Contents Thank you for flying ADVANCE. . . . . . . . . . . . . . . . . . . . . . . . . . . . . . 4 About ADVANCE. . . . . . . . . . . . . . . . . . . . . . . . . . . . . . . . . . . . . . . . 5 IOTA – Easy Performance. . . . . . . . . . . . . . . . . . . . . . . . . . . . . . . . . 6 Pilot requirements. . . . . . . . . . . . . . . . . . . . . . . . . . . . . . . . . . . . . . . 7 General advice about paragliding . . . . . . . . . . . . . . . . . . 7 Using the paraglider. . . . . . . . . . . . . . . . . . . . . . . . . . . . . . . . . . . . . . 8 Delivery . . . . . . . . . . . . . . . . . . . . . . . . . . . . . . . . . . . . . . 8 Basic settings . . . . . . . . . . . . . . . . . . . . . . . . . . . . . . . . . 8 Adjusting the brake lines . . . . . . . . . . . . . . . . . . . . . . . . . 8 Speed system with SPI . . . . . . . . . . . . . . . . . . . . . . . . . . 9 Setting up the speed system. . . . . . . . . . . . . . . . . . . . . 10 Suitable harnesses. . . . . . . . . . . . . . . . . . . . . . . . . . . . . 11 Weight range. . . . . . . . . . . . . . . . . . . . . . . . . . . . . . . . . 12 Flight characteristics. . . . . . . . . . . . . . . . . . . . . . . . . . . . . . . . . . . . 15 Takeoff. . . . . . . . . . . . . . . . . . . . . . . . . . . . . . . . . . . . . . 15 Normal flight. . . . . . . . . . . . . . . . . . . . . . . . . . . . . . . . . . 16 Turning flight. . . . . . . . . . . . . . . . . . . . . . . . . . . . . . . . . . 17 Accelerated flight. . . . . . . . . . . . . . . . . . . . . . . . . . . . . . 17 Collapses. . . . . . . . . . . . . . . . . . . . . . . . . . . . . . . . . . . . 19 Rapid descents. . . . . . . . . . . . . . . . . . . . . . . . . . . . . . . 20 Stalling. . . . . . . . . . . . . . . . . . . . . . . . . . . . . . . . . . . . . . 22 Landing. . . . . . . . . . . . . . . . . . . . . . . . . . . . . . . . . . . . . 24 Flying with a wet paraglider . . . . . . . . . . . . . . . . . . . . . . 25 Winching . . . . . . . . . . . . . . . . . . . . . . . . . . . . . . . . . . . . 25 Acrobatics . . . . . . . . . . . . . . . . . . . . . . . . . . . . . . . . . . . 26 Maintenance, repairs and care . . . . . . . . . . . . . . . . . . . . . . . . . . . . Packing . . . . . . . . . . . . . . . . . . . . . . . . . . . . . . . . . . . . . 28 Care and maintenance. . . . . . . . . . . . . . . . . . . . . . . . . . 28 What to do if the leading edge gets damaged? . . . . . . . . . . . . . . . . . . . . . . . . . . . . . . . . . . . 29 Checks. . . . . . . . . . . . . . . . . . . . . . . . . . . . . . . . . . . . . . 29 Repairs. . . . . . . . . . . . . . . . . . . . . . . . . . . . . . . . . . . . . . 29 Disposal. . . . . . . . . . . . . . . . . . . . . . . . . . . . . . . . . . . . . 30 Technical details. . . . . . . . . . . . . . . . . . . . . . . . . . . . . . . . . . . . . . . . Materials IOTA . . . . . . . . . . . . . . . . . . . . . . . . . . . . . . . . 32 Certification . . . . . . . . . . . . . . . . . . . . . . . . . . . . . . . . . . 33 Service . . . . . . . . . . . . . . . . . . . . . . . . . . . . . . . . . . . . . . . . . . . . . . ADVANCE Service Center. . . . . . . . . . . . . . . . . . . . . . . 35 The ADVANCE website. . . . . . . . . . . . . . . . . . . . . . . . . 35 List of parts. . . . . . . . . . . . . . . . . . . . . . . . . . . . . . . . . . . . . . . . . . . Lineplan. . . . . . . . . . . . . . . . . . . . . . . . . . . . . . . . . . . . . . . . . . . . . . Risers . . . . . . . . . . . . . . . . . . . . . . . . . . . . . . . . . . . . . . . . . . . . . . . Bowline Knot. . . . . . . . . . . . . . . . . . . . . . . . . . . . . . . . . . . . . . . . . . 28 31 35 37 38 39 40 3 Thank you for flying ADVANCE Congratulations on your choice of I OTA- a quality product from ADVANCE. We are sure that you will spend many rewarding hours in the air with it. The user manual is an important part of the glider. Here you will find instructions and important information about safety, care of the glider and maintenance, and that’s why we recommend that you read this document carefully before your first flight. Register your I OTA online on www.advance.ch/garantie, so that you will receive product updates or safety-relevant information about the I OTA direct from us. This information can also be downloaded from our website on www.advance.ch/de/services/sicherheit. The latest version of the manual as well as additional information can similarly be found on www.advance.ch. We wish you a lot of enjoyment with your I OTA, and always «happy landings». Team ADVANCE 4 About ADVANCE ADVANCE is a worldwide leading paraglider manufacturer based in Switzerland. Since its founding in 1988 the company has continued to follow its own policies and ideas in both development and production. The result is fully-finished products with distinctive characteristics. The team of experts behind the ADVANCE brand share both the passion for and confidence in their ADVANCE products. At home in the air themselves, they bring valuable personal experience and dedication to the workplace. Thorough checking of the production process and supervision of the working practices in ADVANCE’s own factory in Vietnam guarantee high quality work. A long-standing relationship with cloth and line manufacturers means that ADVANCE know-how finds its way directly into the development of new materials. ADVANCE place great importance on after-sales service, and have a well-developed worldwide service network. A continuous exchange of experience with customers keeps new knowledge flowing in, which has an influence on ADVANCE products – and so the «Circle of Service» is completed. 5 I OTA – Easy Performance ADVANCE launches the new I OTA Series, a High-Level EN B glider for ambitious cross-country pilots. Featuring an optimized, low-weight design, the XC-Intermediate I OTA represents the most accommodating balance between performance and piloting ease within the entire ADVANCE product range. The high performance capabilities of the I OTA open the door to the world of long cross-country flights. New Semi-Light Category Maximum Performance Detailed simulation and stress analysis enabled us to engineer the double 3D shaping and surface ballooning to the greatest advantage. The result for us; an even smoother wing surface and more shape stability – looked at from every direction. Your result: even more performance. The I OTA’s balanced compactness and a carefully-chosen pitch-stable profile mean that you can always make the most of the wing’s potential – in real-life conditions. There is now a new category called “Semi-Light”. Thanks to computationally modelled lightweight-structure design techniques, the I OTA weighs only 4.45kg ( 23m2 size ). And yet the I OTA is a robust and durable product thanks to the material choice of Skytex 32 and 38 from Porcher Sport. The low weight of the canopy improves takeoff behaviour, considerably increases passive safety, and contributes to direct handling. Exceptional passive safety The I OTA features a low minimum flying speed. Approach to the stall is clearly communicated to the pilot via clearly progressive brake pressure. This is all the result of an optimal air intake design. Low I OTA canopy mass means low wing inertia, and an overall compact concept contributes to the reassuring character of the I OTA. All these factors contribute to the I OTA’s high safety level. 6 Pilot requirements As a XC-Intermediate the IOTA is only suitable for the practised thermal pilot who has, at least, carried out some cross country flying and acquired the necessary feeling for a glider in active air. the preservation of wildlife and landscape. He flies actively, can recognize and prevent collapses at their onset, and can carry out the normal fast descent manoeuvres. Wearing an adequate helmet, suitable boots and clothing, and the carrying of an emergency parachute are essential. Before every flight all items of equipment should be checked for damage and airworthiness. A proper pre-takeoff check must also be carried out. Only if these requirements are met will he will be able to make full use of this wing’s performance potential, and fly cross country relaxed and safe. Every pilot bears sole responsibility for their participation in the sport of paragliding. Neither the manufacturer nor the seller of a paraglider can guarantee or be held responsible for the pilot’s safety. Intended use The I OTA belongs to the «Light aerial sport device» category with a weight of less than 120kg. The I OTA is not certified for two-seater flying. General advice about paragliding Flying a paraglider calls for appropriate training and a sound knowledge of the subject, as well as, of course, the necessary insurance cover and licence. A pilot must be able to correctly assess the weather conditions before taking off. His or her capabilities must be adequate for the paraglider used. The paraglider pilot is also required bear a sense of responsibility towards the natural world, especially regarding 7 Using the paraglider Delivery Adjusting the brake lines Every ADVANCE paraglider has to be flown by the dealer before delivery to check for correct settings and trim. The dealer finally enters the date of the first flight on the type placard fastened on a rib at the centre of the wing. This entry together with your completed warranty form ensures that deficiencies in the product, due the manufacturer, are covered by the ADVANCE warranty. See ‘Warranty’ in the «Service» section. The length of the brake lines has been set at the factory so that, with hands fully up, the trailing edge remains unbraked in accelerated flight – ( no crease in the wing ). Basically, this setting should be kept. Delivery of a I OTA includes a COMFORTPACK 2 rucksack, an inner bag, a compression strap, a repair kit, speedlines with speedbar, a mini-windsock in the wing colours and a «Getting Started» booklet. If the brake line length does have to be reset there should be 8 -10 cm ( d epending on the glider size ) of initial free brake line movement between the brakes fully released position in unaccelerated flight, and that point where the lines first affect the trailing edge. We recommend a bowline knot for attaching the handles. See illustration in the appendix. Basic settings At delivery the basic set up of the I OTA will be the original trim situation that the ADVANCE test team found to be best. Certification was also gained in this condition. Any alterations or changes to the paraglider, such as altering the line lengths or fitting different risers or quicklinks, will result in a loss of the glider’s certification. See section «Certification». 8 Example IOTA / 26 Position neutral Speed system with SPI Position 30% The I OTA has a speed system with a Speed-Performance-Indicator ( SPI ), which reads off against 3 positions on the backs of the risers. The red markers on the speed system enable a precise speed bar position to be set to suit the in-flight situation. Best gliding to the next thermal needs an on-going choice of speed to fly, depending on the current values of headwind, expected next climb rate, and the rate of sink. Thanks to its high stability the I OTA can be flown fully accelerated in light turbulence without problem. The choice of accelerated speed for best glide does play an important role for this high performance glider. Position 80% For simplicity the I OTA’s SPI positions are each indicated by a picture showing the degree of headwind, expected next climb rate and current sink speed. Each of the I OTA SPI positions has an icon with a value for headwind, expected climb and sink rate. These indicated positions are effective for only one of their three values, taken in isolation – considered by itself. This means that either the headwind, or the expected rate of climb, or the sink rate applies to that position. The SPI principle is based on the simple ( u sing headwind and sink ) and the extended ( including expected climb rate ) McReady Speed-To-Fly theory. 9 Caution: Even though the I OTA has a high degree of stability in accelerated flight you should only use as much speedbar as you feel comfortable with. Setting up the speed system The I OTA speed system can, with the help of the SPI, be adjusted so that the whole speed system travel can be used. The system is correctly set when pushing the first speed step gives you the 30% position, and pushing the second achieves 80% accelerate. Both toes fully extended should then reach 100% ( pulleys touching ). 1 If, by setting the speed bar line lengths, a first adjustment of the speed system for leg length and harness does not result in the set-up described above, fine adjustment is possible by changing the two-stage settings on the risers. By moving the knots which locate the gear change balls 1 ( see illustration ) the speed system travel and loading can be adjusted. Example: If the knots are moved downwards the changeover from the 3:1 ratio to 2:1 occurs earlier, raising the loading but shortening the total travel. Conversely, moving the knots upwards delays the gear change, and lengthens the total travel of the speed bar. 10 The I OTA speed system is arranged so that the profile shape of the wing is fully retained over the angle-of-attack range of the speed system. This maintains the beneficial qualities of the profile at high speeds. Caution: The speed system is correctly adjusted when you can use the full travel available on the risers. Make certain that the speed lines are not set too short, thus causing the wing to be pre-accelerated all the time. Suitable harnesses Basically the I OTA can be flown with any harness that does not have rigid cross bracing ( see section «Certification» ). The chosen harness should ideally have a carabiner distance of ca. 45 cm and a support height of between 40 and 48 cm. Info: Experience has proved the theory – a streamlined harness can significantly improve gliding performance. The I OTA was specially trimmed for use with a streamlined harness. For this reason we recommend a harness with speedbag in order to get the best out of the I OTA’s great performance. The ADVANCE IMPRESS or LIGHTNESS harness is particularly suitable since the I OTA was designed and tested with them in mind. 11 Weight range The weight ranges for the different wing sizes are listed in the «Technical Data» section. The figures given there refer to total take-off weight. This includes the pilot’s body weight including clothing, as well as the weight of all the equipment ( paraglider, harness, instruments, etc. – everything that’s going to fly ). Flying at the lower or upper limits of the weight range can affect the flying characteristics of the wing, without, however, compromising your safety. The I OTA’s performance remains the same whether flying in its lower or upper weight region. When the I OTA is flown in its upper weight area, the higher wing loading produces a higher trim speed, and a more dynamic and agile flying character. Tip: ADVANCE recommend that the I OTA is flown in the middle to the upper part of its recommended weight range. 12 13 14 Flight characteristics We recommend that you make your first flights with your new glider in quiet conditions, in a familiar flying area. A few pull-ups at an easy site will give you confidence in the I OTA’s handling qualities, from the very beginning. Takeoff Before every takeoff carry out the following pre-takeoff checks: 1. Harness and helmet done up, reserve OK? 2. Lines free? 3. Canopy open? 4. Wind direction and strength assessed? 5. Airspace and field-of-view clear? The I OTA takeoff behaviour is very smooth and easy for both forward and reverse takeoffs. The canopy inflates quickly and rises progressively, without hanging back or shooting in front. Because the I OTA rises very easily it is very important to match the pull-up impulse to the conditions. This means: §§ In a lot of wind and/or on a steep slope the I OTA needs little or almost no pull-up impulse. §§ In calm conditions and/or flat land a relaxed pull-up makes sense. for takeoff. The I OTA inflates reliably from the middle out, and rises very straight with little exertion. Tip: Before takeoff get your canopy into the right shape. Do this while sorting the lines, by pulling the brake lines in until you have the perfect curved shape. Info: You can also use the inner A lines for an I OTA takeoff, but handling is easier using all the A risers. Takeoff in light wind ( forward takeoff ) The I OTA only needs a moderate pull-up impulse even in a light wind. It is not necessary to step back and ‘run’ into the lines. Guide the glider up with pronounced leaning forward, but without too much of a pull on the A-risers, until the canopy is overhead. During the pull-up phase any correcting should only be done by decisive going-under-the-wing, without using the brakes. After any necessary correcting and a satisfactory visual check a few determined steps with good leaning forward will achieve lift off, even in little wind. Info: A I OTA takeoff is exceptionally easy to do. Match your efforts ( a s described in the section ”Takeoff“ ) to the wind conditions and takeoff slope. The I OTA has split A risers. We recommend that you use all the A risers 15 Takeoff in stronger wind ( reverse takeoff ) The reverse takeoff is mainly recommended for stronger winds. During the pull-up you should walk towards the I OTA as necessary. Turning round and taking off with the I OTA will then prove to be easy. Tip: Playing with the glider on flat ground in some wind gives a good feeling for the wing. You can get to know the I OTA’s characteristics very well, and try out takeoffs, stalling, shooting forward tendency and collapses – while remaining safely on the ground. The ADVANCE test team have a motto: one hour ground training is worth 10 high flights. N.B: Ground handling practice can increase wear on your glider. Info: The I OTA is very easy to take off. Just as for the forward takeoff you should also suit your pull-up impulse to the wind and slope when making a reverse pull-up ( a s described in section “Takeoff” ). Normal flight In calm air the I OTA best glide is achieved with fully released brakes. Light braking brings the glider to its minimum sink condition. When flying into a headwind, through descending air, or when proceeding to the next thermal, glide performance will be distinctly improved by appropriate use of the speed system. The SPI helps you do this. See section “Speed-Performance-Indicator ( SPI )”. Despite the wing’s high stability an active flying style is recommended – collapses can be almost completely avoided. This means keeping the lightly-braked glider directly above you, in other words, countering roll and pitch disturbances. §§ When the angle of attack increases ( fl ying into a thermal; wing swings back ) the brake lines should be temporarily released fully, until the glider returns to its overhead position. §§ When the angle of attack reduces ( glider dives forwards, pilot swings back ) the wing should briefly be braked more. 16 It is often more efficient to disregard minor pitching rather than correct it by overcontrolling with the brakes. The test team tried rear riser control but do not recommend it because of the performance reduction due to profile distortion. Turning flight The IOTA has short and precise brake travel when steering. It responds very directly and progressively to increasing steering inputs, as soon as brake line free travel has been taken up When starting a turn be careful how you apply the steering brake – just the right amount; not too much. Active weight shift effectively assists steering. Angle of bank can always be increased, stabilised or reduced by brake line load. The I OTA makes a very agreeable companion in thermals. You do not have to correct for large pitching movements, and this improves your climbing behaviour – and therefore your performance – significantly. When thermalling, choose the desired angle of bank and corresponding radius, and try to let the glider turn steadily at this attitude. Outside brake should be used to steady the wing tip and, in particular, control the rate of turn. Anything stronger will slow the wingtip down and lose the glider’s good steering qualities. Caution: To keep good manoeuvrability make sure to fly your I OTA with enough airspeed while turning in thermals – not too much outside brake. Tip: If a brake line breaks you can steer the I OTA using the C risers. Accelerated flight The I OTA wing remains extremely stable even in accelerated flight. However, paragliders operate at a lower angle of attack while flying at their higher speeds, and the degree of stability is generally reduced. The higher aerodynamic forces involved at higher airspeeds mean that a collapse can be more dynamic ( see also section «Collapses» ). When encountering severe turbulence while flying accelerated release the speedbar fully before applying the necessary stabilising brake. The I OTA’s high degree of structural stability allows it to be flown in normally turbulent air while accelerated. Active speedbar should be employed for adjusting angle of attack under these conditions, instead of brake. Pitch attitude disturbances can be minimised in this way, and optimal glide performance can be maintained. See also section «Speed system with SPI». A harness specifically designed to match the flying characteristics of the I OTA helps you to initialise and stabilise turns of this type, which should be as even as possible. See also section «Suitable harnesses». 17 §§ when the angle of attack increases ( e.g. wing pitches back when entering lift ), the speed bar is briefly pressed harder §§ when the angle of attack decreases ( e.g. wing pitches forward ), the speed bar is released Caution: Even though the I OTA is very stable in accelerated flight you should only use as much speedbar as you feel happy with. Tip: Make sure that brake is not applied at the same time as speed bar, otherwise you will find yourself in the worst possible gliding situation, without gaining any advantage. Tip: Always choose a suitable speed for best glide taking into account the actual headwind, sink rate ( d escending air ) and expected next climb. 18 Collapses Asymmetric collapsing of the canopy The I OTA features a very taut and stable canopy. With an active flying technique in normal flying conditions, collapses can be almost completely prevented. The wing gives very precise canopy feedback and makes it possible to sense an impending collapse early on, thus helping timely pilot reaction. Should a collapse occur the wing will fold in a predictable and progressive manner from wing tip towards the centre. If the glider does, however, suffer a side collapse at trim speed, it will respond to collapses of 50% or more with a slight turning tendency, allowing heading to be easily held with light counter-steering. Normally, the wing will reopen without pilot action. With an asymmetric collapse in accelerated flight the wing will react more impulsively because of the higher forces associated with higher airspeed. The turning behaviour caused by a collapse at full speed is more dynamic, but can be well controlled. Poorly flown wingovers can cause a wingtip to fold inwards from the side, causing it to catch in the lines and create a cravat. Due to the high drag they produce cravats can lead to strong rotation ( s piralling ). Stop an increase in rotation rate by just the correct amount of outside brake. Then open the cravated wingtip by pulling the orange stabilo line. Clearing a cravat can be also done more quickly by ‘pumping’. The appropriate brake should be applied to 75% brake travel within a maximum of two seconds, and then released immediately. Caution: If you want to make an accelerated collapse during safety training we recommend that you lead up to it slowly – starting with unaccelerated and then partially accelerated attempts. If a collapse is slow to reopen, a deep but fast pull on the closed side brake will help. It is important to completely release the brake again to let the glider keep its flying speed. Be careful with the brake on the open side, and only apply enough to keep straight – so as not to stall the wing. 19 Symmetric collapse ( frontstall ) Rapid descents After a spontaneous or A-riser provoked collapse the airflow breaks away from the profile and the canopy will pitch back. The pilot swings back underneath after a short delay. Wait, without applying brake, until the wing is again above you and returns to normal flight. After a big collapse reopening may be delayed, but do not forcibly encourage reopening by the use of excessive brake, because of the risk of a fullstall. For quick and efficient ways of getting down the ADVANCE test team recommend big ears ( w ith or without speed bar ) or the spiral dive – the choice depends on the situation. Caution: §§ To simulate a front collapse all A-risers must be taken hold of and pulled down. §§ After a very impulsively provoked front collapse in accelerated configuration ( for example during SIV training ) it can happen that the front of the canopy does not open by itself. Help the wing to open with a brief brake impulse by pulling the brakes to 75% within one second, immediately and completely release them, then be prepared to control the forward surge. Tip: Fast descents should be practised now and then in quiet conditions – so they won’t become emergencies when you need them. Symmetrical collapsing of the wingtips ( big ears ) The I OTA has split A-risers, which make it easy to apply big ears. To do this pull both outer A-risers quickly down at the same time. The wingtips will fold, and can be easily held in this position. To reopen release the risers; if the wingtips do not open by themselves a brake impulse will help them. Sink rate can be further increased by using the speedbar. Depending on the situation the glider can be steered using weight shift. 20 Remark: Big ears is also possible using two lines ( p er side ) with the I OTA. Here it is important that the glider must be accelerated as well, and the trailing edge must not be braked. Caution: Do not fly spirals or sharp changes of direction with big ears applied; the increased loading carried by fewer lines can damage the structure. Caution: Be aware that flying with big ears brings the stall closer. Be careful with the brake lines when big ears are applied, and do not use this descent method if the wing is wet. See also section « Flying with a wet paraglider». Tip: If you want to lose height as quickly as possible and fly away from a danger zone at the same time we recommend the following: apply big ears and use as much speedbar as conditions allow. Spiral dive For the most comfortable way of doing this we recommend a neutral sitting position without active weight shift, and a shoulder-width carabiner distance ( a pprox 45 cm ). Enter the spiral by progressively pulling one brake. Your head and field of view should be directed in the turn direction. As the angle of bank increases so will the rate of turn and centrifugal force. The behaviour of the spiralling paraglider can be separated into two phases: in the beginning the glider begins with a normal turn which progressively tightens, with increasing angle of bank. In the second phase the paraglider engages its spiral mode. This means that the wing dives forward with an increase of acceleration. During this phase of the manoeuvre try to keep a neutral sitting position and give way to the centrifugal force – your body will be pushed to the outside. Recovery from the manoeuvre is achieved by progressively releasing the inside brake. The body weight should be slightly displaced to the outside of the turn. While coming out of a spiral dive with high vertical and rotational speeds it is essential to release the brake carefully, and/or reapply a little inside brake if necessary, so that you can prevent the wing pitching back excessively, and then diving in front. Make sure that you start the recovery with plenty of height remaining above the ground. Generally speaking you should allow the same amount of time to recover as it took to enter the manoeuvre, but remember that the sink rate will be higher. The IOTA is a very agile and precise wing; this means that it goes into a spiral easily and quickly, and a very high descent speed ( more than 14 m/s ) can result - easily and quickly. 21 Caution: The I OTA only comes out of a spiral dive by itself if the pilot is in a neutral sitting position. From a steep spiral with a high sink rate – more than 14 m/s – recovery requires active outside brake with weight shift to the outside at the same time. Caution: Weight shifting to the inside of the turn results in increased acceleration and stable continued rotation. In this case, active counter-braking with simultaneous weight transfer to the outside of the turn is required to end the manoeuvre ( push your body outwards ). Caution: The I OTA is approved for harnesses in group GH ( w ithout rigid cross-bracing ). Harnesses in group GX ( w ith cross-bracing ) or those with very low suspension points ( c arabiners ) may drastically change the flying characteristics in a spiral. Caution: Do not fly spiral dives or aggressive changes of direction with big ears applied: the raised wing loading carried by fewer lines can damage the glider. Caution: After recovering from a spiral dive it could be that the pilot flies into turbulence that he has caused. Fly actively to prevent a collapse. B-Stall The whole paraglider structure and its profile shape would be severely strained by a B-stall. We recommend that you don’t fly B-stalls on a regular basis. If the B-Stall is to be flown however, recovery must consist of a complete and hesitation-free release of the B-risers, so that normal flight is resumed within two seconds. The B-stall is difficult for light pilots to do because of the high force required. Caution: When B-stalling do not pull the B-riser quicklinks lower than the upper speed system pulleys on the A-risers, otherwise you will also pull the outer A-risers down! This gives you the risk of a rosette. Stalling One-sided stall ( spin ) When circling tightly in a thermal the I OTA indicates clearly, by strongly increasing brake load, the risk of a stall. Even so, if a wing does stall you will feel a marked reduction of brake load on the inside of the turn. If this happens you must immediately release both brake lines, so that the I OTA can return to normal flight by itself. 22 If a wing stalls completely the paraglider will go into a spin / negative rotation. The I OTA will react dynamically, but will still be manageable by the less experienced pilot. Even so – depending on the situation from which the paraglider is allowed to fly again – the reaction can be quite vigorous ( s hooting forward with a raised risk of collapse ). The canopy can be arrested while shooting forward by well-judged braking. Normal flight can then be resumed without a further collapse. Tip: Basically, in all out-of-control flight situations, but especially the onset of a one-sided stall, you should immediately release both brakes fully – hands up! Fullstall Although the I OTA responds early to brake input it has very long brake travel, and very high brake load at the stall point. This means a large safety margin for the pilot. To recover, the canopy has to be pre-inflated. To do this the brakes should, at first, be released slowly and symmetrically, and only fully released when pre-inflation is complete. The I OTA then flies away relatively cleanly, without shooting forward too much. Tip: As a basic principle you should immediately and fully release both brakes in all out-of-control situations, then be prepared to control the resulting surge carefully. Deep stall Stable parachutal stall cannot be established, whether attempted by brake or B-stall. In rain, or if the canopy is wet, the I OTA, like all paragliders, is more vulnerable to parachutal stall. If the wet glider were to go into parachutal stall you should recover only by accelerating using the speedbar. See also section «Flying with a wet paraglider». Entry into a fullstall is achieved by progressively and symmetrically pulling down both brake lines. Forward speed reduces. Airflow and wind noise reduce. After reaching minimum speed the paraglider first goes into a brief phase of parachutal stall. Then further brake will cause complete airflow breakaway, and the wing will fall back in fullstall. The I OTA has a strong desire to fly again, but is easy to hold in the stall. A half wrap of the brakes is recommended to fly fullstalls. 23 Landing Always make a proper landing circuit with a well-planned final approach. As the ground approaches progressively increase brake to level the flight-path, before applying full brake to completely arrest the forward speed. Caution: Steep turn reversals lead to strong swinging of the pilot, and should not be done near the ground. Caution: Braking will reduce your speed and increase your sink, but it will certainly seriously restrict your ability to manoeuvre. Caution: Getting below minimum speed leads to stalling: this should unquestionably be avoided when top landing, and on final approach. Caution: Never let your glider fall to the ground on its leading edge. The overpressure so caused inside the wing can rip the cell walls and damage the leading edge. 24 Flying with a wet paraglider Winching Flying with a wet glider creates a risk of deep stall. Deep stall is often the result of a combination of factors. The weight of the wet canopy goes up, and this increased weight increases the angle of attack, which always puts the glider nearer the deep stall limit. Added to this, water drops on the top surface have a detrimental effect on the laminar flow of the boundary layer near the leading edge, which distinctly reduces the maximum lift coefficient. If the wet glider is also being flown at its lower weight limit there is a further small effect of increasing the angle of attack, as well as there being a lower airspeed because of the reduced wing loading. The I OTA is suitable for winch launching. When taking off in windless conditions, ensure that the paraglider is laid out in an arched or even wedge shape ( to avoid risk of the glider rosetting ): Winch launch is only permitted if: §§ the pilot has completed a tow training course ( o nly Germany/ DHV ); §§ the winch system is certified for use with paragliders; §§ the winch operator has been fully trained in paraglider winching. In order to avoid the risk of deep stall with a wet glider the wing should be braked as little as possible, and big ears not used at all. As a further preventative measure apply moderate ( 25-40% ) speed bar. All these actions have a small effect in reducing the angle of attack. Should the wet glider get into deep stall, recovery can only be achieved using the speed bar. See also section «Deep stall». 25 Acrobatics While developing the I OTA attention was concentrated on simplicity, safety and user-friendliness – both in general use and flying behaviour. Appropriate pilot skill and correct technique are essential in order to successfully carry out the following manoeuvres - especially in the expanded weight range: Wingovers, Helicopters, Tail Glide, Reversal, SAT and Asymmetric Spiral. The wing was tested to the usual 8g load factor, but is not specially strengthened for acro. Be aware that dynamic manoeuvres put greater loading on the structure and can shorten the glider’s life. This means that a regular check of the paraglider is essential for your safety. In addition there will be the special requirements of your country to be observed. 26 27 Maintenance, repairs and care Packing Pack your I OTA rib to rib, so that the plastic rods in the ribs at the leading edge lie as flat as possible on one another, all at the same height. This will prolong your I OTA’s life and keep its fast and excellent filling qualities at takeoff. You should randomly offset your packing centreline so that the final chordwise fold is not always along same cell. Only pack and store a dry paraglider, and avoid unnecessary compressing and tight packing. Always store your glider in a dry and dark place. Care and maintenance Ultraviolet light, heat, humidity, sea water, aggressive cleaning agents, unsuitable storing and physical abuse ( dragging across the ground ) speed up the ageing process. The life of a paraglider can be extended significantly by observing the following advice: §§ Allow a wet or damp glider to dry by leaving it completely unpacked at room temperature, or outside in the shade. §§ If the glider gets wet with salt ( sea ) water rinse it thoroughly with fresh water. §§ Clean the glider only with fresh water, and a little neutral soap if necessary. Do not use solvents under any circumstances. §§ If the glider has been subjected to increased stress ( such as a tree landing ) have it examined by an expert. §§ Regularly remove sand, leaves, stones and snow from the cells. Openings with Velcro closures are provided at the wing tips for this purpose. §§ Do not leave the glider out in the sun unnecessarily before and after flight ( U V light ) . §§ Do not subject the packed glider to excessive temperature fluctuations, and do ensure adequate air circulation to prevent condensation forming. §§ Do not drag the glider across the ground. §§ When landing, make sure that the canopy does not fall on its leading edge. 28 What to do if the leading edge gets damaged? If a plastic rod breaks or its seam rips the glider must be taken to an ADVANCE checking facility where the rod can be replaced or sewn back in. To guarantee a long lifespan it is important that the wing is not allowed to fall on its leading edge after landing, otherwise the fabric can be damaged by abrasion. But mainly there is a risk, as in all paragliders, that the crossports could tear. Checks A new ADVANCE paraglider must be given a check every 24 months ( 2 years ). With intensive use ( >150 flying hours per year, or excessively demanding use ) an annual check is needed, after the first check. When a check is carried out the condition of all materials is assessed in accordance with strict guidelines, and tested with great care. Finally the overall condition of the glider is rated and recorded in a test report. You can find additional information about the check in this manual in the section «Service», or at www.advance.ch. Repairs As a general rule you should not attempt to repair a paraglider yourself. The various seams and lines are made with great precision, and, for this reason, only the manufacturer or an authorised service centre may fit identical replacement parts or replace entire cells. Exceptions to this rule are the replacement of lines and the repair of small tears ( u p to 5 cm ) or holes in the fabric that may be glued with the self adhesive ripstop included in the repair kit. After a repair, or the replacement of a line, the glider must always be opened out and checked on the ground before the next flight. Replacement parts such as lines, quicklinks, and repair material for the I OTA can be obtained from ADVANCE or an ADVANCE Service centre and/or reseller. The general check instructions for ADVANCE paragliders are a standard part of the I OTA handbook. This also contains fundamental technicalities and the glider’s line lengths. 29 Disposal Environmental protection plays an important role in the selection of materials and the manufacture of an ADVANCE product. We use only non-toxic materials that are subjected to continuous quality and environmental impact assessments. When your paraglider reaches the end of its useful life in a number of years’ time, please remove all metal parts and dispose of the lines, canopy and risers in a waste incineration plant. 30 Technical details IOTA 23 26 28 30 Area flat m2 23 26 28 30 Area projected m2 19.2 21.6 23.3 24.9 kg 60 – 85 75 – 100 90 – 115 105 – 130 kg 4.45 4.85 5.15 5.45 5.5 5.5 5.5 5.5 Recommended Takeoff weight 2 Glider weight Aspect ratio flat Aspect ratio projected 3.9 3.9 3.9 3.9 Span flat m 11. 35 11. 95 12.45 12.85 Span projected m 8.65 9.15 9.45 9.75 Trim speed 1 km/ h 38.5 ( + /-1 ) 38.5 ( + /-1 ) 38.5 ( + /-1 ) 38.5 ( + /-1 ) Max. speed 1 km / h 53 ( +/-2 ) 53 ( + /-2 ) 53 ( + /-2 ) 53 ( + /-2 ) Certification EN / LTF B EN / LTF B EN / LTF B EN / LTF B Number of cells 59 59 59 59 Number of risers 3 +1 3 +1 3 +1 3 +1 Maximum chord 249 264 274.6 283.8 Riser lengths 48 50 52 54 Max. accelerate travel 11 12 13 13.5 Max. line lengths incl. risers 707 749 779 805 Max. symmetric brake travel at max.weight 65 69 73 78 Trims none none none none Other adjustable / removable / variable devices none none none none 1 Values depending on wing loading, harness/pilot and glider size 2 Pilot, wing, equipment 31 Materials IOTA We routinely inspect and test our materials many times over. Like all ADVANCE products the I OTA is designed and produced as a result of the latest developments and knowledge. We have chosen all the materials very carefully, under conditions of the strictest quality control. Leading edge Skytex 38 Universal Top surface Skytex 32 Universal Under surface Skytex 32 Universal Ribs Skytex 40 Hard Gallery lines Edelrid Aramid A-8000U-130 / 090 / 070 / 050 Brake cascades Edelrid Aramid A-8000U-190 / 070 / 050 Brake lines Edelrid Dyneema 7850-240 Risers Polyester / Technora, 13mm Quick links MR 3.5mm Delta Inox S12 Sewing thread Polyester Intermediate ribs Skytex 32 Hard Lines: Base lines Edelrid Aramid A-8000U-230 / 190 / 130 / 090 32 Certification The I OTA has EN and LTF B certification. The test reports can be downloaded from www.advance.ch. Certification ratings can only provide limited information about a paraglider’s flying behaviour in thermally active and turbulent air. The certification grading is based primarily on provoked extreme flight manoeuvres in calm air. During the development of an ADVANCE paraglider, the emphasis is first and foremost on flying behaviour and handling, and not exclusively on the certification test. The result is a well-rounded product with the familiar ADVANCE handling. Nevertheless, the certification rating occupies a significant proportion of the specifications that have to be met. 33 34 Service ADVANCE Service Center ADVANCE operates two company-owned service centres that carry out checks and repairs of all types. The workshops based in Switzerland and France are official maintenance operations, which have many years’ experience and indepth product-specific expertise. The ADVANCE worldwide service network includes other authorised service centres that provide the same services. All service facilities use original ADVANCE materials exclusively. You can find all information on checks and repairs and the relevant addresses at www.advance.ch. when sending your glider in for a check at ADVANCE. §§ find an answer to a burning question among the FAQs ( Frequently Asked Questions ). §§ subscribe to the ADVANCE Newsletter so that you will be regularly informed by e-mail about news and products. It is well worth visiting the ADVANCE website regularly because the range of services offered is continuously being expanded. The ADVANCE website At www.advance.ch you will find detailed information about ADVANCE and its products, as well as useful addresses which you can contact if you have any questions. Among the things you will be able to do on the website are: §§ complete the warranty card online up to 10 days after purchasing the glider, enabling you to enjoy the full benefits of the ADVANCE warranty. §§ find out about new safety-related knowledge and advice concerning ADVANCE products. §§ download an application form in PDF format which you can use 35 Warranty In order to enjoy the full benefits of the ADVANCE warranty, you are requested to complete the relevant form on the website in the «Warranty» section within 10 days of purchase. As part of the ADVANCE warranty, we undertake to rectify any defects in our products that are attributable to manufacturing faults. In order for a warranty claim to be made, ADVANCE must be notified immediately on discovery of a defect and the defective product sent in for inspection. The manufacturer will then decide how a possible manufacturing fault is to be rectified ( repair, replacement of parts or replacement of the product ). This warranty is valid for three years from the date of purchase of the product. The period for warranty and service intervals begins from the date of the first flight, entered on the glider’s identification placard. If there is no date visible, the date on which the the wing was transferred from ADVANCE to the ADVANCE retailing partner applies. The ADVANCE warranty does not cover any claim other than those listed above. Claims in respect of damage resulting from careless or incorrect use of the product ( e.g. inadequate maintenance, unsuitable storage, overloading, exposure to extreme temperatures, etc. ) are expressly excluded. The same applies to damage attributable to an accident or normal wear and tear. 36 List of parts Zugbänder Zellöffnungen Obersegel Untersegel Zellen Zellwand Winglet Schmutzauslass 37 Lineplan 23/26/28/30 A13 A14 2AB7 B13 B14 38 C Risers B A2 A1 1. Big Ears System 2. Pulley speed system 3. Brummel hooks 4. Magnetic clips 5.Swivel 6. Ceramic Ring 7. Speed-Performance-Indicator ( SPI ) 8. SPI-Scale ( Back of the C-risers ) 39 Bowline Knot 40 41 advance thun ag u t t i g e n g s t r a s s e 87 ch 3600 thun f o n + 41 3 3 225 70 10 f a x + 41 3 3 225 70 11 w w w. a d v a n c e.c h i n f o @ a d v a n c e.c h