1
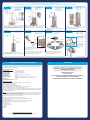
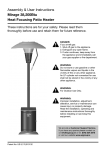
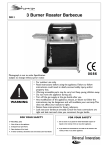
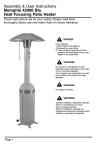
SAFETY INSTRUCTIONS
DO NOT: Attempt to use the heater indoors. This product is only for use in outdoor and well
ventilated areas and is only to be used for space heating. Do not use below ground
level.
DO NOT: Move the heater while it is alight.
DO NOT: Use any other gas except Propane (G31). This unit was designed for propane use
only.
DO NOT: Attempt to clean the heater until it is turned off and fully cooled.
DO NOT: Use naked flame to detect suspected gas leaks.
DO NOT: Allow children or pets to play near the heater.
DO NOT: Due to risk of fire, conventional awnings, tents or gazebos must not be used over
Patio Heaters. Use only purpose made gazebos, designed for such a purpose.
DO NOT: Leave this product unattended when in use.
DO NOT: Use an adjustable regulator with this appliance.
WARNING!
Never attempt to light unit if the hose is loose or damaged in any way. Also never
attempt to light the unit if you have reason to believe that the unit may be leaking gas.
Have the unit fully checked by a competent person, in accordance with the instructions
enclosed. We recommend a frequency of servicing every 100 hours of use.
DO: Place heater on a flat, level and solid surface at all times.
DO: For additional safety if required, fix heater securely through 3 holes in base to a sound
surface in the ground (fixings not supplied).
DO: Remove the protective plastic layer supplied on the parasol deflector before assembling it.
DO: Wait for 3 minutes before relighting, if the burner flame becomes extinguished during use.
DO: Ensure that all naked flames are extinguished before fitting a new cylinder.
DO: Store gas cylinders outdoor, above ground level and in a safe and secure environment.
DO: Make sure that the gas supply at the gas cylinder is turned off after use.
DO: Ensure that servicing of the unit is carried out by a competent person in accordance with
the instructions enclosed.
NOTE: It is normal for the Patio Heater to produce smoke during its first three minutes of use.
This is caused because it burns off the protective oil film on the metal surface.
ALWAYS: Follow any safety instructions supplied with gas cylinders.
ALWAYS: Keep unit well away from glass doors and windows to ensure no possibility of heat
build up and damage.
ALWAYS: Avoid leaving the heater exposed to extreme wind conditions as it might blow over
and damage the unit and other items.
ALWAYS: Ensure a minimum clearance above and beside of 0.6M from flammable material both vertically and horizontally. See fig 2.
• The use of this appliance in an enclosed area can be
dangerous and is prohibited.
• Gas category I3P
• The appliance must be installed in accordance with
instructions and local regulations
USER INSTRUCTIONS
Read the instructions before use. The appliance must be installed in
accordance with the regulations which are currently in force.
The patio heater should be positioned on a level surface.
Use only in an outdoor and well ventilated area. A well ventilated
area must have a minimum of 25% of walls open (see Fig. 1).
To fit a Propane Gas Cylinder:
(Ensure that the area is free from any unprotected combustible
material or substance.)
1. Open “Gas Cylinder Chamber” to access hose and regulator.
Fig.1
2. Attach the regulator to the new cylinder (see instructions with regulator.)
3. Sit cylinder into the cylinder housing, ensuring that the hose is not twisted or
damaged in any way.
4. Use gas cylinders with a gas capacity of 10 - 13kgs.
Lighting instructions:
1. Turn on gas supply at cylinder.
2. Push dial in and turn to position .
3. While dial is held pressed in at position , press spark button repeatedly to ignite the burner.
4. Hold dial in for at least 10 seconds to ensure burner stays lit. If the burner is not
lighting, repeat steps as above, and hold dial in for 20 seconds. Do not continuously hold dial
in as you may cause a build up of gas.
(IF FITTING A NEW GAS CYLINDER,YOU MAY NEED TO HOLD THE DIAL IN FOR AS
LONG AS A MINUTE TO ALLOW ALL THE AIR TO BE EXPELLED FROM THE GAS
LINE.)
5. In windy conditions, shield from wind to ensure easy lighting.
6. Turn dial to one of the higher flame positions as required.
To Turn Off:
1. Turn dial to postition .
2. Push in and turn to position .
3. Turn off gas supply at gas cylinder.
In the event of a gas leak turn off the gas supply at the gas cylinder, and contact a
competent gas technician immediately.
Cleaning: Abrasive cleaners are NOT to be used. Clean unit with a damp cloth when
fully cooled.
Winter Storage: Remove cylinder from unit. For ease of storage we advise that the
parasol be removed. This can easily be done by removing the 3 bolts, and lifting the
parasol off. Be sure that the heater is fully cooled before proceeding with this operation.
Manufactured by
Chairman
Yours Sincerely
Thank you for purchasing one of the products in our range. We wish you
many enjoyable warm hours.
We tried to achieve two targets when developing this product.
The first was to produce the best quality heater on the market. The second
was to produce the most cost-effective heater. We feel that we have
achieved these two objectives, however we would be delighted to hear
from you if you have any comments.
Dear Customer,
15kW Patio Heater User Manual
ASSEMBLY MUST BE CARRIED OUT BY A COMPETENT PERSON.
ALTHOUGH EVERY PRECAUTION HAS BEEN TAKEN TO ELIMINATE SHARP EDGES ALWAYS TAKE CARE WHEN HANDLING METAL COMPONENTS.
1
For assembly step 1,
You will need:
Screws Ref. C x 6
Washers Ref. E x 6
Nuts Ref. D x 6
Upper
cylinder
chamber
supports
2
Upper bolt
For assembly step 2,
You will need:
Bolts Ref. G x 9
Nuts Ref. D x 9
For assembly step 3,
You will need:
Screws Ref. C x 6
Nuts Ref. D x 6
Washers Ref. E x 6
3
For assembly step 4,
You will need:
Bolts Ref. G x 3
Nuts Ref. D x 3
4
Lower
support
pole
Cylinder
chamber
supports
Middle
bolt
Lower
cylinder
chamber
supports
Lower
bolt
Base
Fix wheels (if included) to holes on base. Fix lower cylinder
chamber supports (a,b,c,) to corresponding holes on base.
Fix upper cylinder chamber supports (a,b,c,) to lower
cylinder chamber supports. Fingertighten only at this stage.
5
For assembly step 5,
You will need:
Screws Ref. F x 6
Fix lower chamber panel (1) to bottom of cylinder supports.
Fix upper chamber panel (2) by overlapping panel (1) as
shown and secure using bolts. Fingertighten only at this
stage.
6
For assembly step 6,
You will need:
Washers Ref. E x 4
Screws Ref. F x 4
Upper support
pole
regulator
Table top
Fig A .
Flexible
gas
hose
Lower
support
pole
Fix upper door panel (4) to lower door panel (3) with bolts
les Hang
panneaux
bouteille
sur lescorrect
and Emboitez
nuts provided,
door on
hinges. Ensure
supports
alignment
and bouteille.
tighten bolts securely.
Fix lower support pole to cylinder chamber
supports. At this point ensure all bolts are tightened
securely using spanner.
7
8
For assembly step 7,
You will need:
Bolts Ref. G x 18
Nuts Ref. D x 18
For assembly step 8,
You will need:
Screws Ref. A x 3
Washers Ref. B x 3
Reflector
handle
Top panel
Side panels
Pin
Upper
support
pole
TECHNICAL & SERVICING INFORMATION
This appliance is designed for external use only using Propane (G31) gas at a supply pressure of 37 millibar
and must be serviced by a competent person in accordance with the instructions included. Please read all
accompanying documentation carefully.
Technical Specifications:
Overall Height: 2.13 meters approximately.
Overall Width: 1.0 meters approximately.
Heat input(·Qn): 15 KW Net. ( 44,356 BTU/H )
Efficiency Rating: 75%
Control Valve: Combined gas valve and flame failure device.
Setting Pressure: 37 mbar
Main Burner Type: Pressed steel venturi. Vertical position with cast iron top.
Double wall insulated burner mesh for maximum efficiency.
Injector Size: 2.0 mm
Regulator Outlet Pressure:37mbar
Fit reflector to lantern.
Loosely screw parasol side panels together
overlapping as shown below. Fix the top panel
to the top of assembled side panels.
Attach regulator to other end of hose and secure with hose
clip.(see fig.a) Note: for ease of fitting hose, lubricate
ribbed nipple of regulator with a soap solution.
Using the pre-fitted R-clip
and pin, secure the
reflector handle to the
bracket as shown
Test for leaks with
proprietary leak detection
fluid or soapy water
applied with a small
paintbrush.
Screw by hand flexible gas hose to lantern and gently pinch
with a spanner to secure. Do not over tighten. Feed gas
hose down through pole.
Slide table top over lower support pole and bolt to
cylinder chamber supports securely. Fix upper support pole
to lower support pole.
R-Clip
GUARANTEE
The 15kW patio heater is made by Universal Innovations to an
exacting quality standard and is covered by the following guarantee:
THIS PRODUCT IS FULLY GUARANTEED FOR 2 YEARS,
REGARDING PROPER USE.
This guarantee does not affect your statutory rights in any way.
HELPLINE Dublin Ireland
00 353 1 2873797
IF YOU NEED ANY ASSISTANCE PLEASE DO NOT HESITATE TO
CONTACT US DIRECTLY AT THE FACTORY
DO NOT BRING GOODS BACK TO PLACE OF PURCHASE.
Servicing Procedure:
Servicing to be carried out by qualified gas technician, every 100 hours of use.
• Remove regulator from cylinder.
• Remove reflector “Parasol” Assembly.
• Remove “Burner” for examination and cleaning.
• Vigorously wire brush mesh inside and out to remove any clogging deposits.
• Remove windshield guard to expose main burner assembly.
• Examine, clean or replace main injector, ignition electrode, thermocouple and gas pipe O ring as required.
During storage, particularly, insects or foreign matter may get into gas line/nozzle. Ensure that the gas line
is completely clear before use.
Note: There are a number of ways to check the gas for leaks, we recommend a leak detector spray or soapy
water applied onto the joints with a small paint brush, be used. Leaks can be seen as small bubbles at the
outlet point. DO NOT check for leaks using a naked flame.
Check regularly the condition of the hose. If the hose is in any degraded replace it immediately with the
same specification of hose. Hose length must be 150cm.
The product is fully guaranteed for 2 years regarding proper use.
For servicing contact your local gas supplier or phone Calor Direct U.K. 0800 662
663, Ireland 01 450 5000
For further information on the heater, and its parts please contact the factory direct.
Helpline Hours, 9am - 5pm Mondays to Fridays. (00 353) (1) 2873797.
We are located at:
Universal Innovations.
Kilcoole Industrial Estate,
Kilcoole,
Co. Wicklow,
Ireland.
Do Not Bring Goods Back To Place Of Purchase.
For help, contact the factory helpline. Helpline hours: 9am - 5pm Monday to Friday.
Ph: (00 353) (1) 2873797 or visit us at http://www.uigroup.ie