1
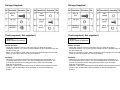
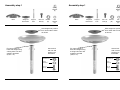
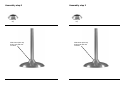
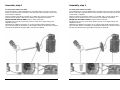
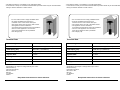
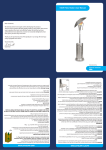
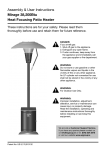
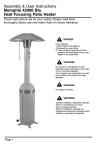
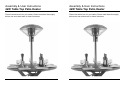
Assembly & User Instructions
4kW Table Top Patio Heater
Assembly & User Instructions
4kW Table Top Patio Heater
These instructions are for your safety. Please read them thoroughly
before use and retain them for future reference.
These instructions are for your safety. Please read them thoroughly
before use and retain them for future reference.
Parts Supplied
Parts Supplied
Fixings Supplied
Fixings Supplied
Spring
Washer
3
Spring
Washer
3
Tools required ( Not supplied )
Tools required ( Not supplied )
• Spanner
• Philips Head Screwdriver
• Spanner
• Philips Head Screwdriver
Before You Start
• Check the contents of the box and make sure you have all the parts
and fittings listed. If not, contact your the Helpline 00 353 1 2873797 who will
be able to help you.
• When you are ready to start, make sure that you have the right tools at hand,
plenty of space and a clean dry area for assembly.
Assembly
• Please lay out all nuts and bolts and check lengths before assembly. It is
recommended that the carton is cut open and spread out on the floor and
used as a protective surface during assembly. Refer to the assembly
diagrams as necessary.
• Important - while every precaution has been made in the manufacture of this
product, care must be taken during assembly in case sharp edges are
present.
Assembly step 1
Base
Spring
Washer
(F)
Weighted
Base Plate
Support
Pole
M6 x 32
Bolt (A)
M6 Nut
(B)
M6
Washer
(D)
Assembly step 1
Base
Hold weight into position
from under side of base
as shown.
Fix support pole to
base and weight using
3 fixing bolts nuts and
washers provided
(A,B,D + F).
Secure bolt
with nut and
washers as
illustrated.
Spring
Washer
(F)
Weighted
Base Plate
Support
Pole
M6 x 32
Bolt (A)
M6 Nut
(B)
M6
Washer
(D)
Hold weight into position
from under side of base
as shown.
Fix support pole to
base and weight using
3 fixing bolts nuts and
washers provided
(A,B,D + F).
Secure bolt
with nut and
washers as
illustrated.
M6 Washer (D)
M6 Washer (D)
Spring
Washer (F)
Spring
Washer (F)
M6 x 32
Bolt (A)
M6 x 32
Bolt (A)
Assembly step 2
Lower pole
cap
Slide lower pole cap
down pole and rest
on base.
Assembly step 2
Lower pole
cap
Slide lower pole cap
down pole and rest
on base.
Assembly step 3
Assembly step 3
Lower guard
Lower guard
Slide lower guard over support pole
Slide lower guard over support pole
Lower Guard
Lower Guard
Support Pole
Support Pole
Assembly step 4
Assembly step 4
Regulator
Gas hose
First, fix the long gas hose
to lantern and secure
tightly.
Feed the gas hose down
through the support pole
as illustrated in the
diagram.
Lantern
Gas Hose
Using snap connector, connect
the short gas hose to gas hose
already attached to heater. Fit
the regulator onto the end of gas
pipe.
Assembly step 5
Assembly step 5
To check patio heaters for leaks
To be performed in a well ventilated area. Lie heater down on the floor as shown
below. Confirm all control knobs are in the off position.Open the gas control valve
on the bottle or regulator.
Check for leaks by brushing a solution of 1/2 water and 1/2 soap over the gas
system joints as shown in the hose connection and regulator connection.
NEVER USE AN OPEN FLAME to test for leaks at any time.
If bubbles form over any of the joints, there is a leak. Turn off gas supply and
retighten all joints.
Repeat test. If bubbles form again, do not use the patio heater. Please contact
your local gas dealer for assistance or the helpline stated in this manual. Leak test
annually and whenever the gas bottle is removed or replaced.
Assembly step 6
M4 x 6
Screw (E)
Secure lantern to support pole
with 3 screws provided.
Assembly step 6
M4 x 6
Screw (E)
Secure lantern to support pole
with 3 screws provided.
Assembly step 7
Assembly step 7
Slide lower guard up pole
through slots in metal lip of
lantern and rotate to secure in
position as shown.
Slide lower guard up pole
through slots in metal lip of
lantern and rotate to secure in
position as shown.
Assembly step 8
M6 Nut
(B)
Parasol
Assembly step 8
Parasol
M6 Nut
(B)
Place parasol into position
aligning the three holes in
the parasol with the three
bolts in the burner head and
secure with 3 M6 nuts.
Ensure lower guard wire
extensions are located in
parasol outer rim holes.
Outer Rim
Parasol
Parasol
Place parasol into position
aligning the three holes in
the parasol with the three
bolts in the burner head and
secure with 3 M6 nuts.
Ensure lower guard wire
extensions are located in
parasol outer rim holes.
Outer Rim
Wire Extensions
Wire Extensions
Assembly step 9
Upper guard
Assembly step 9
M6 Dome
Head Nut (C)
Upper guard
M6 Dome
Head Nut (C)
(fig.a)
Place upper guard
onto parasol and
secure with 3 dome
head nuts provided.
(see fig.a)
(fig.a)
Place upper guard
onto parasol and
secure with 3 dome
head nuts provided.
(see fig.a)
Leak Testing
• To be performed in a well ventilated area.
• Confirm all control knobs are in the off position.
• Open the gas control valve on the bottle or regulator.
• Check the leaks by brushing a solution of 1/2 water and 1/2 soap over the gas system joints,
including all valve connections, hose connections and regulator connections.
• NEVER USE AN OPEN FLAME to test for leaks at any time.
• If bubbles form over any of the joints, there is a leak.
• Turn off gas supply and retighten all joints.
• Repeat test. If bubbles form again, do not use the patio heater. Please contact your local gas
dealer for assistance or the helpline stated in this manual.
• Leak test annually and whenever the gas bottle is removed or replaced.
Gas and Regulator
• This appliance is for propane use only.
• See instructions supplied with regulator for correct use and attachment.
• Propane bottles, normally red coloured, or patio gas green in the UK, or patio gas grey in
Ireland, will supply gas all year round even on cold winter days.
• We recommend a bottle size of 13kg for use with this appliance (in the UK).
• Gas bottles should never be stored on their side.
• Never store gas bottles indoors.
• Suitable propane regulators must have an outlet pressure of 37mbar. This appliance is
supplied with a propane regulator which must only be used for propane gas. NEVER use
an adjustable regulator with this appliance.
• Please consult your gas dealer for the most suitable gas bottles for your regulator.
Siting Instructions
• This appliance is for OUTDOOR USE ONLY and should be placed in a well ventilated area.
• A well ventilated area must have a minimum of 25% of its surface area open.
(Surface area is defined as the total surface of the walls surface.)
• Take care that it is not placed UNDER any combustible surface.
• The sides of the appliance should NEVER be closer than 1.5 metres from any combustible
surface.
• Keep this appliance away from any flammable materials!
• Should you need to change the gas bottle, confirm the gas supply is turned off at the regulator
or bottle / cylinder valve, and there are no sources of ignition (cigarettes, open flame,
sparks, etc.) near before proceeding.
• Hose which can be used with this heater must conform with BS3212 or similar.
• Ensure that the hose bore and regulator are compatible.
• The hose should be secured to the regulator nozzle using a jubilee clip or similar.
• Inspect the gas hose to ensure it is free from any twisting or tension. The hose should hang
freely with no bends, folds, or kinks that could obstruct free flow of gas. Always inspect the hose
for cuts, cracks, or excessive wear before use. If the hose is damaged, it must be replaced with
hose suitable for use with LPG and meet the national standards for the country of use.
N.B. - The date on U.K. orange hose is the date of manufacture, not the expiry date.
Connecting to the cylinder
• Confirm all control knobs are in the off position.
• Connect the regulator to the gas bottle according to your regulator and bottle dealers
instructions.
Use Instructions
Before proceeding make sure you understand the warnings section of this manual.
Use Instructions
Before proceeding make sure you understand the warnings section of this manual.
Lighting instructions:
• Turn on gas supply at cylinder.
• Push dial in and turn to position .
• While dial is held pressed in at position , press spark button repeatedly to ignite the burner.
• Hold dial in for at least 10 seconds to ensure heater stays lit.
• If burner does not light after holding dial in for 20 seconds wait 1 minute and try again.
Do not continuously hold the dial in as you may cause a build up of gas.
• In windy conditions shield from wind to ensure easy lighting.
• Turn control dial to high or low flame position as required.
• Correct operation of the burner is indicated by a predominantly blue quiet flame.
To Turn Off:
• Push dial in and turn to position .
• Turn the gas off and disconnect at the cylinder when not in use.
NOTE: It is normal for the heater to smoke during the first few minutes of use.
To Turn Off:
• Push dial in and turn to position .
• Turn the gas off and disconnect at the cylinder when not in use.
NOTE: It is normal for the heater to smoke during the first few minutes of use.
Care and Maintenance
• Regularly clean your patio heater between uses and especially after extended periods
of storage.
• Ensure the heater control is turned fully to the off position. the gas supply is shut off at the
regulator or bottle / cylinder valve, and the heater and its components are sufficiently cool
before cleaning.
• Never douse the heater with water when its surfaces are hot.
• We recommend that servicing of this appliance should be performed either after every 100
hours of use or annually, which ever is achieved soonest.
Fixings
All screws and bolts, etc, should be checked and tightened on a regular basis.
Fixings
All screws and bolts, etc, should be checked and tightened on a regular basis.
Storage
• Do not leave the patio heater exposed to outside weather conditions or stored in damp moist
conditions.
• The heater should never be operated without the reflector in place.
• If the heater is to be stored indoors, the gas bottle must be disconnected and left outside. in
a dry, well-ventilated area,away from any sources of heat or ignition.
• Do not let children tamper with the bottle.
Service
If your heater needs maintenance or is not working properly, please contact your local
authorized agent for service. It is a necessity to contact an authorized source for replacement of
parts and/or servicing. This work must be carried out by a qualified gas technician. Spare parts
may be obtained by using the helpline stated in this manual.
WARNINGS
• This product is for OUTDOOR USE ONLY
• NEVER use indoors, in an enclosed area or below ground level.
• This appliance is intended for use with LPG bottled gas only. (A regulator of 37mbar for Propane gas
must be used.)
• This appliance has been supplied with a PROPANE REGULATOR (only use with Propane gas).
• NEVER use an adjustable regulator with this appliance.
• This appliance features a flame failure and tilt device. In the event of a wind blowing the flame out or
the unit being tipped over, the gas supply will be cut off from the cylinder. In this event, the knobs
should be set to off and you should wait 3 minutes before re-lighting.
• Failure to read and follow these instructions could result in serious injury or damage to property.
• This product will become hot when in use – take care when touching.
• Keep children and pets at a safe distance from the unit when in use.
• DO NOT move this product when in use.
• Any modification of this appliance may be dangerous.
• DO NOT use heater where the reflector is within 1.5m of any flammable structure or surface.
• NEVER operate the heater with the top half covered (burner head, reflector, etc.)
• DO NOT leave this product unattended when in use.
• Always keep the cylinder level and vertical when positioning inside the base.
• ONLY use this appliance on a flat LEVEL non flammable surface or ground. Positioning, ensure the
unit is a minimum of 1.5metres from flammable items or structure from all sides and above.
• Always leak test the unit before use, annually, or after storage, when parts are replaced/serviced or if
the gas cylinder is removed or replaced.
• When storing the appliance or gas cylinder, ensure they are away from flammable materials or liquids.
• Regularly check that the regulator seal and hose is fitted and that it is in good condition.
Replace parts if necessary.
• The gas cylinder must not be stored next to this or any other appliance.
• Always follow the care and maintenance instructions – regularly maintain your appliance.
• Always replace worn parts – do not use the appliance if a leak, wear, or damage is found.
• DO NOT store or cover the appliance until fully cooled.
• Always shut off the valve at the gas cylinder or the regulator before moving the appliance.
• In the event of high winds particular attention must be taken. Store the unit away or ensure it is at a
safe distance from other items in the event that the unit is blown over.
• Only use with gazebo’s specifically designed to be used with patio heaters.
• Ensure the heater is at a safe distance from glass and PVC doors and windows to stop damage
from any heat build up.
• Read the warning and instructions use before operation.
• The table surface may get very warm, take care with glass and fine wood tables. We recommend the
use of table cloth or similar to protect such surfaces.
• The guard on this appliance is there to reduce the risk of a fire or injury, only use the heater with the
guarding in place. Take care when in use as the guard will get hot.
• DO NOT leave your patio heater uncovered when not in use. Store your appliance in a shed or
garage when not in use to protect against the effects of extreme weather conditions, particularly
if you live near coastal areas. Prolonged exposure to sunlight, standing water, sea-air/saltwater
can all cause damage to your appliance. (A cover may not be sufficient to protect your appliance
in some of these situations)
CAUTION
• Regularly clean your patio heater after every use.
• If you smell gas – turn off the appliance and extinguish all flames. If the odour continues,
immediately contact your gas supplier.
• In the event of an uncontrollable fire, immediately disconnect the gas cylinder moving it away from fire
and contact the fire services. DO NOT PUT YOURSELF AT RISK!
• Ensure aerosols are not used near this unit when in use.
• Ensure all packaging and plastic bags are disposed of safely.
• This table top heater is not suitable for use with plastic tables.
• In the interest of safety we recommend that this table top heater should only be used with tables
having a minimum diameter or width of 90cm.
• For use outdoors and in amply ventilated areas.
• An amply ventilated area must have a
minimum of 25% of the surface area open.
• The surface area is the sum of the walls surface.
• The appliance must be installed in
accordance with instructions and local regulations.
• The use of this appliance in an enclosed
area can be dangerous and is prohibited
• Gas category I3p.
Technical Data
Overall Height:
960mm approximately
Overall Height:
960mm approximately
Overall Width: 520 millimetres approximately.
Overall Width: 520 millimetres approximately.
Heat Input(∑Qn): 4kW NET (15,000Btu/h)
Heat Input(∑Qn): 4kW NET (15,000Btu/h)
Gas Consumption: 324grams per hour at maximum setting.
Gas Consumption: 324grams per hour at maximum setting.
Injector Size: 1.1mm
Injector Size: 1.1mm
Setting Pressure: 37mbar
Setting Pressure: 37mbar
Regulator Outlet Pressure: 37mbar
Regulator Outlet Pressure: 37mbar
CE Approval: 0086
CE Approval: 0086
Specifications are subject to change without prior notice.
Manufactured by:
Universal Innovations,
Kilcoole Ind. Est.,
Kilcoole,
Co. Wicklow,
Ireland.
Keep these instructions for future reference.
Specifications are subject to change without prior notice.
Manufactured by:
Universal Innovations,
Kilcoole Ind. Est.,
Kilcoole,
Co. Wicklow,
Ireland.
Keep these instructions for future reference.