1
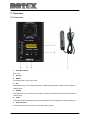
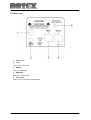
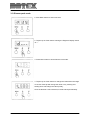
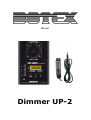
Manual
Dimmer UP-2
Table of contents
1.
Safety instructions ........................................................................................................................... 3
1.1.
2.
3.
4.
FOR SAFE AND EFFICIENT OPERATION ............................................................................ 3
Overview .......................................................................................................................................... 5
2.1.
Front view ................................................................................................................................ 5
2.2.
Rear view ................................................................................................................................. 6
Operating guide ............................................................................................................................... 7
3.1.
DMX address mode ................................................................................................................. 7
3.2.
Switch pack mode ................................................................................................................... 7
3.3.
Dimmer pack mode ................................................................................................................. 9
Technical data ............................................................................................................................... 11
2 / 12
1. Safety instructions
•
Read the safety instructions and also this manual carefully.
•
Keep the manual.
•
Observe all red flags.
•
Observe the manual.
•
To prevent fire or electric shocks, protect the device against rain and
humidity
•
Pull the plug before opening the housing.
•
To prevent an electric shock you should not remove the cover.
•
Do not operate the device in the near of water.
•
Use only a dry cloth for cleaning.
1.1. FOR SAFE AND EFFICIENT OPERATION
Be careful with heat and extreme temperature
Avoid exposing it to direct rays of the sun or near a heating appliance.
Not put it in a temperature bellow 41°F /5°C, or exceeding 95°F /35°C.
To avoid placing on un-stable location
Select a level and stable location to avoid vibration.
Do not use chemicals or volatile liquids for cleaning
Use a clean dry cloth to wipe off the dust, or a wet soft cloth for stubborn dirt. Pull the plug before
cleaning.
If out of work, contact sales agency immediately
Any troubles arose, remove the power plug soon, and contact with an engineer for repairing, do not
open the cabinet by yourself, it might result a danger of electric shock.
Take care with the power cable
Never pull the power cable to remove the plug from the receptacle, be sure to hold the plug. When not
using the device for an extended period of time, be sure to disconnect the plug from the receptacle.
Ventilation
It is not allowed cover fans and air in and outlets.
3 / 12
Safety
Do not remove the grounding. It is for your safety. If you remove the grounding it can cause electric
shocks.
Accessory
Please use only the accessory which is set by the manufacturer.
Important
Damages caused by the disregard of this user manual are not subject to warranty. The dealer will not
accept liability for any resulting defects or problems. Make sure the electrical connection is carried out
by qualified personnel. All electrical and mechanical connections have to be carried out according to
the European safety standards.
4 / 12
2. Overview
2.1. Front view
1. Schutzko Output
Max. 10 A
2. Display
3. MENU
Press this button to get to the menu.
4. UP
With this button you can increase the value. Pressing and holding the button will increase the
value quickly.
5. DOWN
With this button you can decrease the value. Pressing and holding the button will decrease the
value quickly.
6. Fader
This fader adjusts the lightning intensity and complies with HTP (Highest Takes Precedence).
7. External Fader
This fader has the same function as the fader under point 6.
5 / 12
2.2. Rear view
1. Power cord
2. Fuse
F10 A; 250 V; 5x20 mm
3. DMX IN
3pol XLR input male.
4. DMX OUT
3pol XLR output female.
5. Phone jack
Here you can connect the external fader.
6 / 12
3. Operating guide
Plug in the appropriate power outlet, this unit recovers to the function state of last time automatically
by reasons of power failure memory, and the Segment Display shows the DMX address of last
change. If the frequency of power is not stable, the Segment Display will show "AC-0", wait until the
power is stable.
This unit serves as a dimmer pack or a switch pack, depending on operating mode you have selected.
3.1. DMX address mode
1. The Segment Display shows the DMX address of last change
when powered this unit. If you've selected DMX address 123 for the
last time, then the Segment Display will read 123.
2. Each tap of the Up or Down button will change the DMX address
once. Pressing and holding down will change the DMX address
quickly. Once the DMX address is selected, it will be stored into
memory automatically.
Note! During DMX addressing, output is disabled.
3.2. Switch pack mode
1. When DMX address is complete, Press Menu button to enter
next level.
7 / 12
2. Tap the Up or Down button causing the Segment Display shows
"s---".
3. Press Menu button to enter Switch Pack mode.
Switch Pack mode consists of Switch On(S-on) and Switch Off
(S-of).
In the Switch On mode, output is turned on and the fixture lights
regardless of DMX signal.
In the Switch Off mode, output is turned off and the fixture is
controlled by DMX signal. When DMX level is less than 40%, the
fixture is turned off; when DMX level exceeds 40%, the fixture is
turned on.
4. Tap the Up or Down button to change between Switch On and
Switch Off.
5. Once the Switch Pack is selected, press Menu button to return to
DMX Address mode.
8 / 12
3.3. Dimmer pack mode
1. Press Menu button to enter next level.
2. Tap the Up or Down button causing the Segment Display shows
"d---".
3. Press Menu button to enter Dimmer Limit mode.
4. Tap the Up or Down button to change the value within the range
of 10-100. Each tap will change the value once, pressing and
holding down will change the value quickly.
Once the Dimmer Limit is selected, it will be stored permanently.
9 / 12
5. Press Menu button to enter Dimmer Preset mode.
6. Tap the Up or Down button to change the value within the range
of 00-100. Each tap will change the value once, pressing and
holding down will change the value quickly.
Once the Dimmer Preset is selected, it will be stored permanently.
7. Press Menu button to return to DMX Address mode
10 / 12
4. Technical data
Power supply
Voltage
230 V AC, 50 Hz
Channel Output
Max. 10 A
Connections
Current in
Schutzko
Current out
Schutzko
XLR in/out
3pol XLR
Controlling
Dimming curve
Linear
Switch
Switch
DMX512
Yes
Number of canals
1
Dimensions
182 x 92 x 65 mm
Weight
1,7 kg
11 / 12
Importer:
B & K Braun GmbH
Industriestraße 2
D-76307 Karlsbad
www.bkbraun.com
[email protected]
12 / 12