1
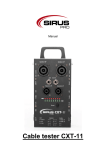
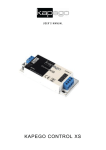
User manual
LED Backtruss Curtain
6m x 3m
Table of content
1.
Safety instructions ............................................................................................................................ 3
1.1.
For safe and efficient operation ............................................................................................... 3
2.
Features ........................................................................................................................................... 4
3.
Setup ................................................................................................................................................ 4
4.
3.1.
Installing of the stands ............................................................................................................. 4
3.2.
Built in of the LED Backtruss Curtain ...................................................................................... 4
3.3.
Functions of the controller ....................................................................................................... 5
3.3.1.
Working modes ................................................................................................................ 5
3.3.2.
Setup of the DMX address .............................................................................................. 6
3.3.3.
Channellist ....................................................................................................................... 6
Technical data .................................................................................................................................. 7
2/8
1. Safety instructions
This device is suitable for indoor use only.
All modifications to the device will void the warranty!
Repairs are to carry out by skilled personnel only.
Use only fuses of the same type and original parts as spare parts.
Protect the unit from rain and humidity to avoid fire and electric shocks.
Make sure to unplug the power supply before opening the housing.
1.1. For safe and efficient operation
Be careful with heat and extreme temperature
Avoid exposing it to direct rays of the sun or near a heating appliance.
Not put it in a temperature below 41°F /5°C, or exceeding 95°F /35°C.
Keep away from humidity, water and dust
Do not place the set in a location with high humidity or lots of dust.
Containers with water should not be placed on the set.
Keep away from sources of hum and noise
Such as transformer motor, tuner, TV set and amplifier.
To avoid placing on un-stable location
Select a level and stable location to avoid vibration.
Do not use chemicals or volatile liquids for cleaning
Use a clean dry cloth to wipe off the dust, or a wet soft cloth for stubborn dirt.
If out of work, contact sales agency immediately
If any troubles arise, remove the power plug soon, and contact an engineer for repairing.
Do not open the cabinet by yourself, it might result a danger of electric shock.
Take care with the power cable
Never pull the power cable to remove the plug from the receptacle, be sure to hold the plug.
When not using the device for an extended period of time, be sure to disconnect the plug
from the receptacle.
3/8
Important:
Damages caused by the disregard of this user manual are not subject to
warranty. The dealer will not accept liability for any resulting defects or problems. Make sure
the electrical connection is carried out by qualified personnel. All electrical and mechanical
connections have to be carried out according to the European safety standards.
-
This Item is not for continuous operation. Consequent breaks will rise the lifetime of the item
-
The minimum distance between curtain and illuminated surface should be 1m.
2. Features
-
All cables installed. It’s a ready to use Curtain.
-
Enormous size 6m width and 3m height.
-
DMX controllable with 5 Channels for 4 LED Groups.
-
Including bag.
-
Will be delivered completely ready to use.
-
Optional you can buy the stands set fitting to this product (Code 28014).
3. Setup
3.1. Installing of the stands
-
Install the two stands on a even surface.
-
Open the bottom holding frames as wide as the stand will stay strong on the surface.
-
Use the plastic parts, included in the package, to fix the cross brace.
-
Make sure that all components are installed well and the stand set is installed safe.
3.2. Built in of the LED Backtruss Curtain
-
Install the curtain with the Velcro lug.
-
Every lug has to be closed around the cross brace.
-
Now connect the controller with the backtruss curtain.
-
Connect the power cable of the controller with the mains.
-
Make sure that your mains have the right voltage of 230V, otherwise the curtain could be
damaged!
4/8
3.3. Functions of the controller
1. Connect the cable to the backtruss curtain.
2. This is the microphone which will be activated when you set the controller to “Sound Active”.
3. Here you can choose the working mode of the controller.
4. Here you can choose the speed of the pattern.
5. This is the DMX Input to connect a DMX controller.
6. This the DMX Output to connect other DMX items in the line.
7. This is the dipswitch to setup the DMX address.
3.3.1.
Working modes
ALL ON
In this mode all LEDs are full on and the complete curtain is illuminated
Sound active
In this mode the mic will be activated and the screen changes the led groups
which are powered on according to the music. The screen has in total 4
groups of LEDs.
Auto
In this mode the curtain plays every program one after another. Here you can
use the speed control to set the speed of the programs.
Fade
In this mode the controller plays several fade programs. Here you can also
set the speed with the speed control.
5/8
3.3.2.
Setup of the DMX address
You can Setup the DMX address using the dipswitches. Every dipswitch corresponds to a value. The
sum of these values is the DMX address.
The values are as follows:
Dip
1
2
3
4
5
6
7
8
9
Value
1
2
4
8
16
32
64
128
256
If you want to set up the address 12 for example, you have to set dip 3 and 4 to ON, because the
Values 8 + 4 = 12
Every curtain needs 5 channels, so if you set up the first curtain to address 1 (dip switch 1 to ON) then
you have to address the next curtain to address 6 at least. (Dip 3 and Dip 2 to On because 4+2 = 6)
That’s why you have to count Startaddress 1 + 5 Channels which the screen needs = Startaddress 6.
If you want to control both curtains in the same way you can just setup the same DMX address.
To activate DMX you have to set the dipswitch 10 to ON.
3.3.3.
Channellist
Channel
Value
Function
Remark
CH 1
0-60
Dimming, Channel 3-7 are working. If value is more than
61 then channel 3-7 are not working.
CH 2
61-120
Flash
121-180
Auto Shift
181-240
Fade
241-255
Sound Aktiv
0-20
Off
21-255
Channel 1 speed adjust of function
Channel 1 value 61-240
speed adjust
CH 3
0-20
But channel 4-7 are
Stop
dimming
21-255
Channel 4-7 speed adjust of flash
CH 4
0-255
Red color dimming 0-100%
CH 5
0-255
Yellow color dimming 0-100%
CH 6
0-255
Blue color dimming 0-100%
CH 7
0-255
Green color dimming 0-100%
6/8
4. Technical data
Power supply
230V / 50 Hz
Fuse
2A
Measures (curtain)
6 x 3 (in m)
Weight
7 Kg
7/8
Importer:
B & K Braun GmbH
Industriestraße 1
D-76307 Karlsbad
www.bkbraun.com
[email protected]
8/8