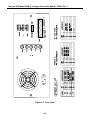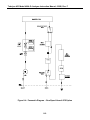
1
INSTRUCTION MANUAL
MODEL 400A
OZONE ANALYZER
© TELEDYNE INSTRUMENTS
ADVANCED POLLUTION INSTRUMENTATION DIVISION
(T-API)
6565 NANCY RIDGE DRIVE
SAN DIEGO, CA 92121-2251
TOLL-FREE:
FAX:
TEL:
E-MAIL:
WEB SITE:
Copyright 1999 API Inc.
800-324-5190
858-657-9816
858-657-9800
[email protected]
www.teledyne-api.com
02260
REV. F
07/20/99
Teledyne API Model 400A O3 Analyzer Instruction Manual, 02260, Rev. F
SAFETY MESSAGES
Your safety and the safety of others is very important. We have provided many important safety
messages in this manual. Please read these messages carefully.
A safety message alerts you to potential hazards that could hurt you or others. Each safety
message is associated with a safety alert symbol. These symbols are found in the manual and
inside the instrument. The definition of these symbols is described below:
GENERAL WARNING/CAUTION: Refer to the instructions for details on the
specific danger.
CAUTION: Hot Surface Warning
CAUTION: Electrical Shock Hazard
Technician Symbol: All operations marked with this symbol are to be performed
by qualified maintenance personnel only.
CAUTION
The analyzer should only be used for the purpose
and in the manner described in this manual.
If you use the analyzer in a manner other than that for which
it was intended, unpredictable behavior could ensue with
possible hazardous consequences.
ii
Teledyne API Model 400A O3 Analyzer Instruction Manual, 02260, Rev. F
TABLE OF CONTENTS
SAFETY MESSAGES .......................................................................................... II
TABLE OF CONTENTS ...................................................................................... III
LIST OF FIGURES ............................................................................................. VII
LIST OF TABLES.............................................................................................. VIII
1 HOW TO USE THIS MANUAL ....................................................................... 1-1
2 GETTING STARTED...................................................................................... 2-1
2.1 UNPACKING ..................................................................................................................... 2-1
2.2 ELECTRICAL AND PNEUMATIC CONNECTIONS ..................................................................... 2-3
2.3 INITIAL OPERATION .......................................................................................................... 2-6
3 SPECIFICATIONS, AGENCY APPROVALS, WARRANTY .......................... 3-1
3.1 SPECIFICATIONS .............................................................................................................. 3-1
3.2 EPA EQUIVALENCY DESIGNATION ..................................................................................... 3-2
3.3 WARRANTY ..................................................................................................................... 3-3
4 THE M400A OZONE ANALYZER.................................................................. 4-1
4.1 PRINCIPLE OF OPERATION ................................................................................................ 4-1
4.1.1 Adaptive Filter......................................................................................................... 4-2
4.1.2 Examining the Ozone Formula Slope and Offset.................................................... 4-2
4.2 INTERFERENT REJECTION ................................................................................................. 4-3
4.3 OPERATION SUMMARY ..................................................................................................... 4-5
4.3.1 Optical Bench Assembly......................................................................................... 4-5
4.3.2 Pneumatic Sensor Board........................................................................................ 4-5
4.3.3 Computer Hardware and Software ......................................................................... 4-6
4.3.4 V/F Board ............................................................................................................... 4-6
4.3.5 Front Panel ............................................................................................................. 4-6
4.3.6 Power Supply Module........................................................................................... 4-10
4.3.7 Pump, Valves, Pneumatic System........................................................................ 4-10
5 SOFTWARE FEATURES ............................................................................... 5-1
5.1 INDEX TO FRONT PANEL MENUS ....................................................................................... 5-1
5.2 SAMPLE MODE ................................................................................................................ 5-4
5.2.1 Test Functions ........................................................................................................ 5-4
5.2.2 CAL, CALS, CALZ, Calibration Functions............................................................... 5-7
5.3 SET-UP MODE................................................................................................................. 5-9
5.3.1 Configuration Information (CFG) .......................................................................... 5-10
5.3.2 Automatic Calibration (ACAL)............................................................................... 5-10
iii
Teledyne API Model 400A O3 Analyzer Instruction Manual, 02260, Rev. F
5.3.3 Data Acquisition System (DAS) ............................................................................ 5-10
5.3.4 Range Menu (RNGE) ........................................................................................... 5-12
5.3.5 Password Enable (PASS)..................................................................................... 5-14
5.3.6 Time of Day Clock (CLK) ...................................................................................... 5-15
5.3.7 Communications Menu (COMM) .......................................................................... 5-15
5.3.8 Variables Menu (VARS) ....................................................................................... 5-16
5.3.9 Diagnostic Mode (DIAG)....................................................................................... 5-16
5.4 STATUS OUTPUTS .......................................................................................................... 5-17
5.5 RS-232 INTERFACE ....................................................................................................... 5-17
5.5.1 Setting Up the RS-232 Interface........................................................................... 5-19
5.5.2 Command Summary............................................................................................. 5-25
5.5.3 TEST Commands and Messages......................................................................... 5-27
5.5.4 WARNING Commands and Messages................................................................. 5-29
5.5.5 CALIBRATION Commands and Messages .......................................................... 5-30
5.5.6 DIAGNOSTIC Commands and Messages............................................................ 5-32
5.5.7 DAS Commands and Message ............................................................................ 5-33
5.5.8 Internal Variables.................................................................................................. 5-36
6 OPTIONAL HARDWARE AND SOFTWARE................................................. 6-1
6.1 RACK MOUNT OPTION ...................................................................................................... 6-1
6.2 ZERO/SPAN VALVE OPTION .............................................................................................. 6-1
6.3 INTERNAL ZERO/SPAN (IZS) OPTION ................................................................................. 6-1
6.4 AUTOCAL SETUP TO SUPPORT IZS AND Z/S VALVE OPTION ................................................ 6-2
6.5 CURRENT LOOP OPTION................................................................................................... 6-4
6.6 METAL WOOL SCRUBBER OPTION ..................................................................................... 6-5
7 CALIBRATION AND ZERO/SPAN CHECKS ................................................ 7-1
7.1 MANUAL ZERO/SPAN CHECK OR CAL WITH INPUT FROM SAMPLE PORT ................................ 7-4
7.2 MANUAL ZERO/SPAN CHECK OR CAL WITH ZERO/SPAN VALVES OPTION .............................. 7-7
7.3 MANUAL ZERO/SPAN CHECK WITH IZS OPTION .................................................................. 7-8
7.4 AUTOMATIC ZERO/SPAN CHECK........................................................................................ 7-8
7.5 USE OF ZERO/SPAN VALVES OR IZS WITH REMOTE CONTACT CLOSURE ............................ 7-12
7.6 EPA PROTOCOL CALIBRATION ........................................................................................ 7-13
7.6.1 M400A Calibration – General Guidelines ............................................................. 7-13
7.6.2 Calibration Equipment, Supplies, and Expendables ............................................. 7-15
7.6.3 Calibration Gas and Zero Air Sources .................................................................. 7-16
7.6.4 Data Recording Device......................................................................................... 7-17
7.6.5 Record Keeping.................................................................................................... 7-17
7.6.6 Dynamic Multipoint Calibration Procedure............................................................ 7-18
7.6.7 Multipoint Calibration ............................................................................................ 7-20
7.6.8 Auditing Procedure ............................................................................................... 7-23
7.6.9 Multipoint Calibration Audit ................................................................................... 7-23
7.6.10 System Audit ...................................................................................................... 7-25
7.6.11 Calibration Frequency ........................................................................................ 7-25
7.6.12 Summary of Quality Assurance Checks ............................................................. 7-26
7.6.13 ZERO and SPAN Checks ................................................................................... 7-30
iv
Teledyne API Model 400A O3 Analyzer Instruction Manual, 02260, Rev. F
7.6.14 Recommended Standards for Establishing Traceability ..................................... 7-31
7.7 CALIBRATION OF INDEPENDENT RANGES OR AUTORANGING .............................................. 7-32
7.7.1 Zero/Span Calibration on Autorange or Dual Ranges .......................................... 7-32
7.8 REFERENCES ................................................................................................................ 7-33
8 MAINTENANCE ............................................................................................. 8-1
8.1 MAINTENANCE SCHEDULE ................................................................................................ 8-1
8.2 REPLACING THE SAMPLE PARTICULATE FILTER .................................................................. 8-3
8.3 CLEANING EXTERIOR SURFACES OF THE M400A................................................................ 8-4
8.4 REPLACING THE IZS ZERO AIR SCRUBBER......................................................................... 8-4
8.5 CLEANING THE ABSORPTION TUBE .................................................................................... 8-6
8.6 LEAK CHECK PROCEDURE .............................................................................................. 8-10
8.6.1 Auto Leak Check .................................................................................................. 8-10
8.6.2 Leak Check Procedure for Standard Unit ............................................................. 8-11
8.6.3 Leak Check Procedure for Units with IZS Option ................................................. 8-11
8.6.4 Leak Check Procedure for Units with Zero/Span Valves ...................................... 8-11
8.7 PROM REPLACEMENT PROCEDURE ................................................................................. 8-12
9 TROUBLESHOOTING, ADJUSTMENTS ...................................................... 9-1
9.1 OPERATION VERIFICATION-M400A DIAGNOSTIC TECHNIQUES ............................................. 9-2
9.1.1 Fault Diagnosis with TEST Variables ..................................................................... 9-2
9.1.2 Fault Diagnosis with WARNING Messages ............................................................ 9-5
9.1.3 Fault Diagnosis using DIAGNOSTIC Mode ............................................................ 9-7
9.1.4 M400A Internal Variables ..................................................................................... 9-12
9.2 PERFORMANCE PROBLEMS ............................................................................................. 9-14
9.2.1 AC Power Check .................................................................................................. 9-15
9.2.2 Temperature Problems......................................................................................... 9-15
9.2.3 Excessive Noise ................................................................................................... 9-17
9.2.4 Unstable Span ...................................................................................................... 9-17
9.2.5 Unstable Zero ....................................................................................................... 9-17
9.2.6 Inability to Span .................................................................................................... 9-18
9.2.7 Inability to Zero ..................................................................................................... 9-18
9.2.8 Analog Output Doesn't Agree with Display Concentration.................................... 9-18
9.3 SUBSYSTEM TROUBLESHOOTING AND ADJUSTMENTS ........................................................ 9-19
9.3.1 Computer, Display, Keyboard............................................................................... 9-19
9.3.2 I2C / Submux Board ............................................................................................. 9-22
9.3.3 RS-232 Communications...................................................................................... 9-24
9.3.4 Voltage/Frequency (V/F) Board Diagnosis and Calibration .................................. 9-26
9.3.5 Optical Bench Assembly....................................................................................... 9-30
9.3.6 Checking the Ozone Scrubber and Main Switching Valve.................................... 9-34
9.3.7 Rear Panel Status/Analog Output PCA ................................................................ 9-34
9.3.8 Power Supply Module........................................................................................... 9-38
9.3.9 IZS Option Diagnosis and Troubleshooting .......................................................... 9-43
9.3.10 Flow/Pressure Sensor ........................................................................................ 9-47
9.3.11 Z/S Valves Option............................................................................................... 9-48
9.3.12 Pneumatic System.............................................................................................. 9-48
v
Teledyne API Model 400A O3 Analyzer Instruction Manual, 02260, Rev. F
10 M400A SPARE PARTS LIST ..................................................................... 10-1
APPENDIX A ELECTRICAL SCHEMATICS ....................................................A-1
vi
Teledyne API Model 400A O3 Analyzer Instruction Manual, 02260, Rev. F
LIST OF FIGURES
FIGURE 2-1:
FIGURE 2-2:
FIGURE 2-3:
FIGURE 4-1:
FIGURE 4-2:
FIGURE 5-1:
FIGURE 5-2:
FIGURE 7-1:
FIGURE 8-1:
FIGURE 8-2:
FIGURE 8-3:
FIGURE 8-4:
FIGURE 9-1:
FIGURE 9-2:
FIGURE 9-3:
FIGURE 9-4:
FIGURE 9-5:
FIGURE 9-6:
FIGURE 9-7:
REMOVAL OF SHIPPING SCREWS & CHECK FOR CORRECT POWER ....................................................................... 2-2
REAR PANEL ........................................................................................................................................................ 2-5
ASSEMBLY LAYOUT ........................................................................................................................................... 2-10
BLOCK DIAGRAM ................................................................................................................................................. 4-4
FRONT PANEL ...................................................................................................................................................... 4-9
SAMPLE MENU TREE ........................................................................................................................................... 5-2
SETUP MENU TREE .............................................................................................................................................. 5-3
CALIBRATION PNEUMATIC DIAGRAM .................................................................................................................. 7-6
REPLACING THE PARTICULATE FILTER ................................................................................................................ 8-5
OPTICAL BENCH ASSEMBLY ................................................................................................................................ 8-7
PNEUMATIC DIAGRAM – STANDARD CONFIGURATION ........................................................................................ 8-8
PNEUMATIC DIAGRAM – ZERO/SPAN VALVES & IZS OPTION.............................................................................. 8-9
CPU BOARD JUMPER SETTINGS ......................................................................................................................... 9-21
RS-232 PIN ASSIGNMENTS ................................................................................................................................ 9-23
V/F BOARD SETTINGS ........................................................................................................................................ 9-29
POWER SUPPLY MODULE LAYOUT..................................................................................................................... 9-39
ELECTRICAL BLOCK DIAGRAM .......................................................................................................................... 9-41
IZS MODULE ..................................................................................................................................................... 9-44
PRESSURE/FLOW SENSOR MODULE ................................................................................................................... 9-46
vii
Teledyne API Model 400A O3 Analyzer Instruction Manual, 02260, Rev. F
LIST OF TABLES
TABLE 2-1: FINAL TEST AND CALIBRATION VALUES ............................................................................................................... 2-9
TABLE 4-1: SYSTEM MODES .................................................................................................................................................... 4-7
TABLE 4-2: STATUS LED’S...................................................................................................................................................... 4-8
TABLE 5-1: SETUP VARIABLES ................................................................................................................................................ 5-9
TABLE 5-2: PASSWORD LEVELS ............................................................................................................................................. 5-14
TABLE 5-3: RS-232 VARIABLE NAMES.................................................................................................................................. 5-16
TABLE 5-4: STATUS OUTPUTS................................................................................................................................................ 5-17
TABLE 5-5: RS-232 MESSAGE TYPES .................................................................................................................................... 5-18
TABLE 5-6: RS-232 MODE SETUP - FRONT PANEL................................................................................................................. 5-20
TABLE 5-7: TYPICAL RS-232 CONFIGURATIONS .................................................................................................................... 5-21
TABLE 5-8: RS-232 SWITCHING FROM TERMINAL MODE TO COMPUTER MODE .................................................................... 5-23
TABLE 5-9: RS-232 TERMINAL MODE EDITING KEYS ........................................................................................................... 5-23
TABLE 5-10: RS-232 COMMAND SUMMARY.......................................................................................................................... 5-25
TABLE 5-10: RS-232 COMMAND SUMMARY (CONTINUED) ................................................................................................... 5-26
TABLE 5-11: RS-232 COMMAND SUMMARY.......................................................................................................................... 5-26
TABLE 5-12: TEST MEASUREMENTS REQUEST COMMANDS ................................................................................................... 5-28
TABLE 5-13: WARNING MESSAGE CLEAR COMMANDS.......................................................................................................... 5-29
TABLE 5-14: STATUS REPORTS .............................................................................................................................................. 5-30
TABLE 5-15: CALIBRATION COMMANDS ................................................................................................................................ 5-31
TABLE 5-16: DIAGNOSTIC COMMANDS .................................................................................................................................. 5-32
TABLE 5-17: DIAGNOSTIC REPORTS ...................................................................................................................................... 5-32
TABLE 5-18: SETUP DAS DATA CHANNEL ............................................................................................................................ 5-35
TABLE 6-1: AUTOCAL MODE SETUP PARAMETERS ................................................................................................................ 6-2
TABLE 6-2: AUTOCAL ATTRIBUTE SETUP PARAMETERS ..................................................................................................... 6-3
TABLE 6-3: AUTOCAL EXAMPLE SEQUENCE SETUP ............................................................................................................. 6-3
TABLE 6-4: AUTOCAL EXAMPLE SEQUENCE KEYSTROKES .................................................................................................. 6-4
TABLE 7-1: TYPES OF ZERO/SPAN CHECK AND CALIBRATION ................................................................................................. 7-2
TABLE 7-2: CALIBRATION CONTROLS...................................................................................................................................... 7-3
TABLE 7-3: MANUAL ZERO CALIBRATION PROCEDURE - ZERO GAS THRU SAMPLE PORT ...................................................... 7-4
TABLE 7-4: ENTER EXPECTED SPAN GAS CONCENTRATIONS PROCEDURE .............................................................................. 7-5
TABLE 7-5: MANUAL SPAN CALIBRATION PROCEDURE - SPAN GAS THRU SAMPLE PORT ....................................................... 7-5
TABLE 7-6: MANUAL ZERO CALIBRATION PROCEDURE - Z/S VALVES .................................................................................... 7-7
TABLE 7-7: MANUAL SPAN CALIBRATION PROCEDURE - Z/S VALVES .................................................................................... 7-7
TABLE 7-8: REMOTE CONTACT CLOSURE TRUTH TABLE ....................................................................................................... 7-12
TABLE 7-9: ACTIVITY MATRIX FOR PROCUREMENT OF EQUIPMENT AND SUPPLIES ............................................................... 7-14
TABLE 7-10: ZERO CALIBRATION PROCEDURE ...................................................................................................................... 7-21
TABLE 7-11: EXPECTED SPAN GAS CONCENTRATION PROCEDURE........................................................................................ 7-22
TABLE 7-12: SPAN CALIBRATION PROCEDURE ...................................................................................................................... 7-22
TABLE 7-13: DEFINITION OF LEVEL 1 AND LEVEL 2 ZERO AND SPAN CHECKS ...................................................................... 7-27
TABLE 7-14: DAILY ACTIVITY MATRIX ................................................................................................................................. 7-28
TABLE 7-15: ACTIVITY MATRIX FOR AUDIT PROCEDURE ...................................................................................................... 7-29
TABLE 7-16: ACTIVITY MATRIX FOR DATA REDUCTION, VALIDATION AND REPORTING....................................................... 7-29
TABLE 7-17: ACTIVITY MATRIX FOR CALIBRATION PROCEDURES......................................................................................... 7-30
TABLE 7-18: CALIBRATION OF AUTORANGE OR DUAL RANGE.............................................................................................. 7-32
TABLE 8-1: M400A MAINTENANCE SCHEDULE ....................................................................................................................... 8-2
TABLE 9-1: TEST FUNCTION VALUES ...................................................................................................................................... 9-3
TABLE 9-1: TEST FUNCTION VALUES (CONTINUED) ................................................................................................................ 9-4
TABLE 9-2: WARNING MESSAGES ........................................................................................................................................... 9-6
TABLE 9-3: DIAGNOSTIC MODE I/O SIGNALS .......................................................................................................................... 9-8
TABLE 9-3: DIAGNOSTIC MODE I/O SIGNALS (CONTINUED).................................................................................................... 9-9
TABLE 9-3: DIAGNOSTIC MODE I/O SIGNALS (CONTINUED).................................................................................................. 9-10
viii
Teledyne API Model 400A O3 Analyzer Instruction Manual, 02260, Rev. F
TABLE 9-4: TEST CHANNEL OUTPUTS.................................................................................................................................... 9-12
TABLE 9-5: MODEL 400A VARIABLES ................................................................................................................................. 9-13
TABLE 9-6: V/F BOARD JUMPERS – FACTORY SETTINGS ....................................................................................................... 9-26
TABLE 9-7: UV SOURCE LAMPS AND DETECTOR DIAGNOSTICS ............................................................................................ 9-30
TABLE 9-8: POWER SUPPLY MODULE SUBASSEMBLIES ......................................................................................................... 9-38
TABLE 9-9: POWER SUPPLY MODULE LED OPERATION ........................................................................................................ 9-40
TABLE 10-1: TELEDYNE API M400A SPARE PARTS LIST ...................................................................................................... 10-1
TABLE 10-1: TELEDYNE API M400A SPARE PARTS LIST (CONTINUED)................................................................................ 10-2
TABLE 10-1: TELEDYNE API M400A SPARE PARTS LIST (CONTINUED)................................................................................ 10-3
TABLE 10-2: TELEDYNE API MODEL 400A LEVEL 1 SPARES KIT ....................................................................................... 10-3
TABLE 10-3: TELEDYNE API MODEL 400A EXPENDABLES KIT FOR IZS ............................................................................ 10-4
TABLE 10-4: TELEDYNE API MODEL 400A SPARES KIT FOR 1 UNIT................................................................................... 10-4
TABLE A-1: ELECTRICAL SCHEMATICS ....................................................................................... A-1
ix
Teledyne API Model 400A O3 Analyzer Instruction Manual, 02260, Rev. F
INTENTIONALLY BLANK
x
Teledyne API Model 400A O3 Analyzer Instruction Manual, 02260, Rev. F
1 HOW TO USE THIS MANUAL
Teledyne API is pleased that you have purchased the Model 400A UV Photometric Ozone
Analyzer. The keyboard, with it’s "talking keys", allows you to quickly and easily set up the
instrument. The built-in tests and diagnostics make problem location and diagnosis easy. In
addition, our customer service department is available to assist with any problems you may have.
The M400A's microprocessor continually checks operating parameters such as temperature,
flow, and critical voltages. If you encounter any difficulty refer to Section 9 General
Troubleshooting Hints.
We recognize that the need for information in this manual changes as time passes. When the
instrument first arrives, it is necessary to get it up and running quickly and verify its correct
operation. As time passes, more detailed information is often required on special configurations,
calibration alternatives and other operational details. Finally there is the need for periodic
maintenance and to quickly troubleshoot problems to assure maximum reliability and data
integrity.
To address these needs, we have created three indexes to the information inside. They are:
Table of Contents:
Outlines the contents of the manual in the order the information is presented. This is a good
overview of the topics covered in the manual. There is also a list of Tables and a list of Figures.
Index to M400A Front Panel Menus:
The Menu Index (Figure 5-1 and Figure 5-2, Table 5-1 and Table 5-2) briefly describes the front
panel menus and refers you to other sections of the manual that have a detailed explanation of
each menu selection.
Troubleshooting Section 9:
The Troubleshooting Section, outlined in the Table of Contents, allows you to diagnose and
repair the instrument based on variables in the TEST menu, the results of DIAGNOSTIC tests,
and PERFORMANCE FAULTS such as excessive noise or drift. The troubleshooting section
also explains the operation, adjustment, diagnosis and testing of each instrument subsystem.
If you are unpacking the instrument for the first time, please refer to “Getting Started” in
Section 2.
1-1
Teledyne API Model 400A O3 Analyzer Instruction Manual, 02260, Rev. F
INTENTIONALLY BLANK
1-2
Teledyne API Model 400A O3 Analyzer Instruction Manual, 02260, Rev. F
2 GETTING STARTED
2.1 Unpacking
1. Verify that there is no apparent external shipping damage. If damage has occurred, please
advise the shipper first, then Teledyne API.
CAUTION
To avoid personal injury, always use two persons to
lift and carry the Model 400A.
2. Also check for internal shipping damage, and generally inspect the interior of the instrument
to make sure all circuit boards and other components are in good shape.
3. Locate the instruction manual that is shipped with the instrument. Remove all red colored
shipping screws shown in the Figure 2-1. Also remove the four red shipping screws from the
optical bench assembly on the inside of the instrument.
NOTE
Save these shipping screws and re-install them
whenever the unit is shipped to another location.
2-1
Teledyne API Model 400A O3 Analyzer Instruction Manual, 02260, Rev. F
Figure 2-1: Removal of Shipping Screws & Check for Correct Power
2-2
Teledyne API Model 400A O3 Analyzer Instruction Manual, 02260, Rev. F
2.2 Electrical and Pneumatic Connections
1. Refer to Figure 2-2 to locate the rear panel electrical and pneumatic connections.
2. Locate the power cord that is shipped with the instrument. Before plugging the instrument in,
check the voltage and frequency label on the rear panel of the instrument for compatibility
with the local power.
3. If you are connecting to a calibrator, attach a vented sample inlet line to the sample inlet port.
The pressure of the sample gas at the inlet port should be at ambient pressure. The exhaust
from the pump should be vented to atmospheric pressure using maximum of 10 meters of ¼”
tubing.
4. Attach the analog output connections to a strip chart recorder and/or datalogger. Refer to
Figure 9-1 for the jumper settings for the desired analog output voltage range.
5. When installing the Model 400A, allow a minimum of 4 inches of clearance at the back of
the instrument and 1 inch of clearance on each side for proper ventilation.
CAUTION
Connect the exhaust fitting on the rear panel to a suitable
vent outside the analyzer area. Use vent line when sampling
from pressurized manifolds. Sample pressure should
not exceed 1.5 in-H20 over ambient.
NOTE
See Figure 2.2 for rear panel pneumatic connections. Sample gas
should only come into contact with PTFE, quartz or glass. Leak check
all fittings with soap solution. Maximum pressure for leak check is 15 PSI.
6. Connect IZS air inlet, labeled DRY AIR on the rear panel, to a clean, dry air supply.
NOTE
The IZS system can be operated successfully at ambient
humidity levels. However, for best stability, the imput air
should be dried to approximately a –20OC dew point.
2-3
Teledyne API Model 400A O3 Analyzer Instruction Manual, 02260, Rev. F
NOTE
Check that analyzer is set up for proper voltage and frequency.
CAUTION
Power plug must have ground lug.
NOTE
Never disconnect CPU or other PCB cards while under power.
2-4
Teledyne API Model 400A O3 Analyzer Instruction Manual, 02260, Rev. F
Figure 2-2: Rear Panel
2-5
Teledyne API Model 400A O3 Analyzer Instruction Manual, 02260, Rev. F
2.3 Initial Operation
1. Turn on the instrument power.
2. The display should immediately light, displaying the instrument type - M400A and the
computer's memory configuration. If you are unfamiliar with the M400A theory of operation,
we recommend that you read Section 4 before proceeding. A diagram of the software menu
trees is in Figure 5-1 and Figure 5-2.
3. The M400A requires about 30 minutes for all internal components to come up to
temperature. During this time temperatures and other conditions are out of specification. The
software will suppress most warning conditions for 30 minutes after power up. After 30
minutes, warning messages will be displayed until the respective warning conditions are
within specifications. Use the CLR key on the front panel to clear warning messages.
4. While waiting for instrument temperatures to come up, you can check for correct operation
by using some of the M400A's diagnostic and test features.
5. Check the TEST functions by comparing the values listed in Table 2-1 to those in the
display. Remember that as the instrument warms up the values may not have reached their
final values yet. If you would like to know more about the meaning and utility of each TEST
function, refer to Table 9-1. Also, now is a good time to verify that the instrument was
shipped with the options you ordered. Table 2-1 also contains the list of options. Section 6
covers setting up the options.
6. When the instrument is warmed up, re-check the TEST functions against Table 2-1. All of
the readings should compare closely with those in the table. If they do not, see Section 9.
7. The next task is to calibrate the analyzer. There are several ways to do a calibration, they are
summarized in Table 7-1. For a preliminary checkout we recommend calibration with zero
air and span gas coming in through the sample port. The procedure is:
NOTE
Words in all caps are messages on the analyzer front panel.
2-6
Teledyne API Model 400A O3 Analyzer Instruction Manual, 02260, Rev. F
Step 1 - Enter the expected O3 span gas concentration:
Set the Expected Span Gas Concentration
Step Number
Action
Comment
1.
Press
CAL-CONC
This key sequence causes the M400A to prompt for the
expected O3 concentration. Enter the O3 span concentration
value by pressing the key under each digit until the expected
value is set.
2.
Press ENTR
ENTR stores the expected O3 span value. This value will be
used in the internal formulas to compute subsequent O3
concentration values.
3.
Press EXIT-EXIT
Returns instrument to SAMPLE mode.
Step 2 – Set the Range of the M400A:
Set the Range
Step Number
Action
Comment
1.
Press
If necessary you may want to change ranges. Normally the
SETUP-RNGEinstrument is shipped in single range mode set at 500 ppb. We
MODE-SING-ENTR recommend doing the initial checkout on the 500 ppb range.
2.
Press
SETUP-RNGE-SET
After SETUP-RNGE-SET, enter 500 and press ENTR. The
instrument will now be in the 500 ppb range.
3.
Press EXIT, EXIT
Returns instrument to SAMPLE mode.
2-7
Teledyne API Model 400A O3 Analyzer Instruction Manual, 02260, Rev. F
Step 3 - Calibrate the instrument:
Zero/Span Calibration Procedure
Step Number
Action
Comment
1.
Input Zero gas
Allow Zero gas to enter the sample port on the rear of the
instrument.
2.
Press CAL
The M400A enters the calibrate mode from sample mode.
3.
Wait 10 min
Wait for reading to stabilize at the zero value. If you wait less
than 10 minutes the final zero value may drift.
4.
Press ZERO
The ZERO button will be displayed.
5.
Press ENTR
Pressing ENTR actually changes the calculation equations and
zeroes the instrument.
6.
Input Span Gas
Switch gas streams to span gas.
7.
Wait 10 min
Wait for reading to stabilize at the span value. If you wait less
than 10 minutes the final span value may drift.
8.
Press SPAN
The SPAN button should be displayed. If it is not, check the
Troubleshooting Section 9.2.6 for instructions on how to
proceed. In certain circumstances at low span gas
concentrations (<100ppb), both the ZERO and SPAN buttons
will appear.
9.
Press ENTR
Pressing ENTR actually changes the calculation equations so
that the concentration displayed is the same as the expected
span concentration you entered above, thus spanning the
instrument.
10.
Press EXIT
Pressing EXIT returns the instrument to SAMPLE mode.
The Model 400A Analyzer is now ready for operation.
2-8
Teledyne API Model 400A O3 Analyzer Instruction Manual, 02260, Rev. F
Table 2-1: Final Test and Calibration Values
Test Values
Observed
Value
Units
Nominal Range
RANGE
PPB
100 - 10,000
STABIL
PPB
0.2 - 1.0
O3 MEAS
mV
4200 - 4700
O3 REF
mV
4200 - 4700
O3 GEN
mV
0 - 5000
O3 DRIVE
mV
0 - 5000
VAC
in-Hg-A
8.0 - 14.0
PRESS
in-Hg-A
25 - 35
SAMP FL
cc/min
800 ± 80
SAMPLE TEMP
o
C
20 - 45
PHOTO LAMP
o
C
52 ± 0.5
O3 GEN TEMP
o
C
48 ± 0.5
BOX TEMP
o
C
8 - 50
DCPS
mV
2500 ± 100
SLOPE
N/A
1.0 ± 0.1
OFFSET
PPB
0.0 ± 5
Span and Cal Values
O3 Span Conc
PPB
50 - 10,000
Noise at Zero (rms)
PPB
0.2 - 0.3
Noise at Span (rms)
PPB
0.5% of reading
Меаsured Flows
Sample Flow
cc/min
Factory Installed Options
Option Installed
Power Voltage/Frequency
Rack Mount, w/ Slides
Internal Zero/Span - IZS
Zero/Span Valves
REC Voltage Range
0-V
DAS Voltage Range
0-V
TCHAN Voltage Range
0-V
PROM #
Date
Serial #
Technician
2-9
800 ± 80
Teledyne API Model 400A O3 Analyzer Instruction Manual, 02260, Rev. F
Figure 2-3: Assembly Layout
2-10
Teledyne API Model 400A O3 Analyzer Instruction Manual, 02260, Rev. F
3 SPECIFICATIONS, AGENCY APPROVALS,
WARRANTY
3.1 Specifications
Ranges
Measurement Units
Zero Noise
Span Noise
Lower Detectable Limit
Zero Drift (24 hours)**
Zero Drift (7 days)**
Span Drift (24 hours)**
Span Drift (7 days)**
Linearity
Precision*
Lag Time
Rise/Fall Time
Sample Flow Rate
Temperature Range*
Humidity Range
Temp Coefficient
Voltage Coefficient
Dimensions (H x W x D)
Weight
Power
Environmental Conditions
Recorder/DAS Output
Analog Output Resolution
Status
User selectable to any full scale range from 100 ppb to 10 ppm
ppb, ppm, µg/m3 (user selectable)
< 0.3 ppb RMS per EPA definition
< 0.5% of reading RMS per EPA definition (above 100 ppb)
< 0.6 ppb per EPA definition
< 1.0 ppb
< 1.0 ppb
< 1% of reading
< 1% of reading
Better than 1% full scale
0.5% reading
<10 sec per EPA Definition
<20 sec to 95% per EPA Definition
800 scc/min. ± 10%
5 - 40oC
10-90% RH, Non-Condensing
< 0.05 % per oC
< 0.05 % per V
7" x 17" x 24"
(178 mm x 432 mm x 610 mm)
37 lb (17 kg) standard unit
39 lb (17.6 kg) w/IZS
110V/60 Hz, 220V/50 Hz, 240 V/50 Hz 250 watts
230 V~, 50 Hz, 2.5A
Installation Category (Overvoltage Category) II Pollution Degree 2, 2000m
maximum altitude
± 100 mV, ± 1 V, ± 5 V, ± 10 V (Bi-Polar), 0-20 or 4-20 mA current loop
1 part in 1024 of selected full-scale voltage
12 Status outputs from opto-isolators
* As defined by the USEPA
** at constant temperature and voltage
3-1
Teledyne API Model 400A O3 Analyzer Instruction Manual, 02260, Rev. F
3.2 EPA Equivalency Designation
Teledyne Advanced Pollution Instrumentation Devision, Model 400A Ozone Analyzer is
designated as Reference Method Number EQOA-0992-087 as defined in 40 CFR Part 53, when
operated under the following conditions:
1. Range: Any range from 100 parts per billion (ppb) to 1 ppm.
2. Ambient temperature range of 5 to 40o C.
3. Line voltage range of 105-125 VAC, 60 Hz; 220-240 VAC, 50 Hz.
4. With 5-micron TFE filter element installed in the internal filter assembly.
5. Sample flow of 800 ± 80 cc/min.
6. Internal or External sample pump
7. Software settings:
A. Dilution factor
B. AutoCal
C. Dual range
D. Autorange
E. Temp/Pres compensation
1.0
ON or OFF
ON or OFF
ON or OFF
ON
Under the designation, the Analyzer may be operated with or without the following options:
1. Rack mount with slides
2. Rack mount without slides, ears only
3. Rack mount for external pump w/o tray
4. Sample/Cal valve
5. Internal zero/span
6. 4-20mA, isolated output
7. Internal pump or external pump
3-2
Teledyne API Model 400A O3 Analyzer Instruction Manual, 02260, Rev. F
3.3 Warranty
WARRANTY POLICY (02024c)
Prior to shipment, Teledyne API equipment is thoroughly inspected and tested. Should
equipment failure occur, Teledyne API assures its customers that prompt service and support
will be available.
COVERAGE
After the warranty period and throughout the equipment lifetime, Teledyne API stands ready to
provide on-site or in-plant service at reasonable rates similar to those of other manufacturers in
the industry. All maintenance and the first level of field troubleshooting is to be performed by
the customer.
NON-TELEDYNE API MANUFACTURED EQUIPMENT
Equipment provided but not manufactured by Teledyne API is warranted and will be repaired to
the extent and according to the current terms and conditions of the respective equipment
manufacturers warranty.
GENERAL
Teledyne API warrants each Product manufactured by Teledyne API to be free from defects in
material and workmanship under normal use and service for a period of one year from the date of
delivery. All replacement parts and repairs are warranted for 90 days after the purchase.
If a Product fails to conform to its specifications within the warranty period, Teledyne API shall
correct such defect by, in Teledyne API's discretion, repairing or replacing such defective
Product or refunding the purchase price of such Product.
The warranties set forth in this section shall be of no force or effect with respect to any Product:
(i) that has been altered or subjected to misuse, negligence or accident, or (ii) that has been used
in any manner other than in accordance with the instruction provided by Teledyne API or (iii)
not properly maintained.
THE WARRANTIES SET FORTH IN THIS SECTION AND THE REMEDIES
THEREFORE ARE EXCLUSIVE AND IN LIEU OF ANY IMPLIED WARRANTIES OF
MERCHANTABILITY, FITNESS FOR PARTICULAR PURPOSE OR OTHER
WARRANTY OF QUALITY, WHETHER EXPRESSED OR IMPLIED. THE
REMEDIES SET FORTH IN THIS SECTION ARE THE EXCLUSIVE REMEDIES FOR
BREACH OF ANY WARRANTY CONTAINED HEREIN. TELEDYNE API SHALL
NOT BE LIABLE FOR ANY INCIDENTAL OR CONSEQUENTIAL DAMAGES
ARISING OUT OF OR RELATED TO THIS AGREEMENT OF TELEDYNE API'S
PERFORMANCE HEREUNDER, WHETHER FOR BREACH OF WARRANTY OR
OTHERWISE.
3-3
Teledyne API Model 400A O3 Analyzer Instruction Manual, 02260, Rev. F
TERMS AND CONDITIONS
All units or components returned to Teledyne API should be properly packed for handling and
returned freight prepaid to the nearest designated Service Center. After the repair, the equipment
will be returned, freight prepaid.
3-4
Teledyne API Model 400A O3 Analyzer Instruction Manual, 02260, Rev. F
4 THE M400A OZONE ANALYZER
4.1 Principle of Operation
The detection of ozone molecules is based on absorption of 254 nm UV light due to an internal
electronic resonance of the O3 molecule. The Model 400A uses a mercury lamp constructed so
that a large majority of the light emitted is at the 254nm wavelength. Light from the lamp shines
down a hollow quartz tube that is alternately filled with sample gas, then filled with gas scrubbed
to remove ozone. The ratio of the intensity of light passing through the scrubbed gas to that of
the sample forms a ratio I/Io. This ratio forms the basis for the calculation of the ozone
concentration.
The Beer-Lambert equation, shown below, calculates the concentration of ozone from the ratio
of light intensities.
Τ
Ι
10 9
29.92inHg
CO3 = −
×
×
× ln
o
α × l 273 Κ
Ρ
Ιo
Where:
I = Intensity of light passed through the sample
Io = Intensity of light through sample free of ozone
α = absorption coefficient
l = path length
CO3 = concentration of ozone in ppb
T = sample temperature in degrees Kelvin
P = pressure in inches of mercury
As can be seen the concentration of ozone depends on more than the intensity ratio. Temperature
and pressure influence the density of the sample. The density changes the number of ozone
molecules in the absorption tube, which changes the amount of light removed from the light
beam.
These effects are addressed by directly measuring temperature and pressure and including their
actual values in the calculation. Temperature and pressure compensation are done automatically.
4-1
Teledyne API Model 400A O3 Analyzer Instruction Manual, 02260, Rev. F
The absorption coefficient is a number that reflects the inherent ability of ozone to absorb 254
nm light. Most current measurements place this value at 308 cm-1 atm-1 at STP. The value of this
number reflects the fact that ozone is a very efficient absorber of UV radiation, which is why
stratospheric ozone protects the life forms lower in the atmosphere from the harmful effects from
solar UV radiation. Lastly, the absorption path length determines how many molecules are
present in the column of gas in the absorption tube.
The intensity of light is converted into a voltage by the detector/preamp module. The voltage is
converted into a number by a voltage-to-frequency (V/F) converter capable of 80,000 count
resolution. The digitized signal, along with the other variables, are used by the CPU to compute
the concentration using the above formula.
Every 6 seconds the M400A completes a measurement cycle consisting of a 2 second wait period
for the sample tube to flush, followed by a 1 second measurement of the UV light intensity to
obtain I. The sample valve is switched to admit scrubbed sample gas for 2 seconds followed by a
1 second measurement of the UV light intensity to obtain Io. Measurement of Io every 6 seconds
minimizes instrument drift due to changing intensity of the lamp due to aging and dirt.
4.1.1 Adaptive Filter
The Teledyne API O3 Analyzer is able to provide a smooth, stable output by means of an
adaptive filter. During conditions of constant or nearly constant concentration the filter is
allowed to grow to 32 samples (2 minutes) in length, providing a smooth, stable reading. If a
rapid change in concentration is detected, the filter is cut to 6 samples to allow the Analyzer to
quickly respond to rapidly varying signals.
4.1.2 Examining the Ozone Formula Slope and Offset
The slope and offset parameters can be examined by pressing the <TST or TST> buttons until
the slope and offset TEST functions appear. The slope and offset parameters are set only during
zero and span calibration routines. These parameters are used to adjust the span and zero values
to the expected values entered in the CAL menu.
If the instrument’s range mode is set to Dual or Auto, then a second set of slope and offset
parameters is used for computing the concentration for the high range.
The current value of the ozone reading that is displayed on the front panel and output on the D/A
terminals on the back panel is computed as follows:
4-2
Teledyne API Model 400A O3 Analyzer Instruction Manual, 02260, Rev. F
1. The Model 400A Analyzer switches into reference mode.
2. The Analyzer waits 2 seconds to purge the sample tube.
3. The instrument measures the intensity of light striking the detector during the next 1.067 sec.
This reading forms the reference intensity Io in the ozone concentration equation.
4. The analyzer now switches to the sample mode and waits 2 seconds as in step 2 above.
5. The instrument measures the intensity of light striking the detector during the next 1.067 sec.
This reading forms the sample concentration intensity I in the ozone concentration equation.
6. The concentration of ozone is computed using the Beer-Lambent equation corrected for
temperature and pressure.
7. Slope and offset corrections are made to the ozone concentration according to the equation:
Corrected Concentration = Slope * Measured Concentration + Offset
8. An average of the last 32 samples is computed and converted to the number displayed on the
front panel.
This is the ozone concentration. The number is also routed to the D/A converter and the
resulting voltage is output to the back panel.
4.2 Interferent Rejection
It should be noted that the UV absorption method for detecting ozone is subject to interference
from a number of sources. The Model 400A has been successfully tested for its ability to reject
interference from sulfur dioxide, nitrogen dioxide, nitric oxide, water, and meta-xylene.
While the instrument rejected interference from the aromatic hydrocarbon meta-xylene, it should
be noted that there are a very large number of volatile aromatic hydrocarbons that could
potentially interfere with ozone detection. If the Model 400A is installed in an environment
where high aromatic hydrocarbon concentrations are suspected, specific tests should be
conducted to reveal the amount of interference these compounds may be causing.
4-3
Teledyne API Model 400A O3 Analyzer Instruction Manual, 02260, Rev. F
Figure 4-1: Block Diagram
4-4
Teledyne API Model 400A O3 Analyzer Instruction Manual, 02260, Rev. F
4.3 Operation Summary
4.3.1 Optical Bench Assembly
The Optical Bench, see Figure 8-2, is where the absorption of UV light by ozone is measured
and converted into a voltage. It consists of several sub-assemblies:
1. A mercury UV lamp, lamp block/sample exhaust assembly, and heater.
2. 40 cm long quartz absorption tube located in a temperature controlled aluminum channel. A
thermistor attached to the quartz tube for measuring sample temperature.
3. Quartz tube mounting block which routs sample gas into the bench assembly.
4. The UV detector/preamplifier. The detector converts UV light to a current, which is
amplified and scaled by the preamp.
4.3.2 Pneumatic Sensor Board
The pneumatic sensor board measures the absolute pressure of the sample gas up-stream and
down-stream of an orifice. The up-stream pressure is used to calculate the sample flow through
the orifice, based on a nominal 800 scc/min flow. There is a TEST function reported for:
1. Sample flow - reported in scc/min
2. Sample pressure - reported in in-Hg-Absolute
3. Sample vacuum - reported in in-Hg-Absolute
The M400A displays all pressures in inches of mercury-absolute (in-Hg-A). Absolute pressure is
the reading referenced to a vacuum or zero absolute pressure. This method was chosen so that
ambiguities of pressure relative to ambient pressure can be avoided.
For example, if the vacuum reading is 25" Hg relative to room pressure at sea level the absolute
pressure would be 5" Hg. If the same absolute pressure was observed at 5000 ft altitude where
the atmospheric pressure was 5" lower, the relative pressure would drop to 20" Hg, however the
absolute pressure would remain the same 5" Hg-A.
4-5
Teledyne API Model 400A O3 Analyzer Instruction Manual, 02260, Rev. F
4.3.3 Computer Hardware and Software
The M400A Analyzer is operated by an NEC V40 micro computer. The computer's multitasking
operating system allows it to do instrument control, monitor test points, provide analog output
and provide a user interface via the display, keyboard and RS-232 port. These operations appear
to be happening simultaneously but are actually done sequentially based on a priority queuing
system maintained by the operating system. The jobs are queued for execution only when
needed, therefore the system is very efficient with computer resources.
The M400A is a true computer based instrument. The microprocessor does most of the
instrument control functions such as temperature control, valve switching. Data collection and
processing are done entirely in the CPU with the final concentration values being sent to a D/A
converter to produce the instrument analog output.
The computer memory is divided into 3 sections: ROM memory contains the multi-tasking
operating system code plus the instructions that run the instrument. The RAM memory is used to
hold temporary variables and current concentration data. The EEPROM memory contains the
instrument set-up variables such as range and instrument ID number. The EEPROM data is nonvolatile so the instrument can lose power and the current set-up information is preserved.
4.3.4 V/F Board
Computer communication is done via 2 major hardware assemblies. These are the V/F board and
the front panel display/keyboard.
The V/F board is multi-functional, consisting of A/D input channels, digital I/O channels, and
analog output channels. Communication with the computer is via a STD bus interface. The
computer receives all of the instrument data and provides all control functions through the V/F
board.
4.3.5 Front Panel
The front panel of the M400A is shown in Figure 4-2. The front panel consists of a 2 line
display, keyboard, 3 status LED's and power switch. Communication with the display, keyboard,
and status LED's is done via the computer's on-board parallel port. All major operations can be
controlled from the front panel display and keyboard.
4-6
Teledyne API Model 400A O3 Analyzer Instruction Manual, 02260, Rev. F
4.3.5.1 Display
The top line of the display is divided into 3 fields, and displays information. The first field is the
mode field. A list of operating modes is given in Table 4-1. The center field displays TEST
values or WARNING messages. The TEST functions are described in Table 9-1. The meaning of
the WARNING messages is given in Table 9-2. In DIAGNOSTIC mode the center field is used
to report the results of the diagnostic tests. The right hand field shows current ozone
concentration.
Table 4-1: System Modes
Mode
Meaning
SAMPLE
Sampling normally, flashing indicates adaptive filter is on
SAMPLE xx (1)
Sampling normally with AutoCal enabled
ZERO CAL x (2)
Doing a zero check or adjust
SPAN CAL x (2)
Doing a span check or adjust
MP CAL
Doing a multi-point calibration
SETUP xxx (3)
Configuring analyzer (sampling continues)
DIAG I/O
Diagnostic Mode, Test digital I/O signals
DIAG AOUT
Diagnostic Mode, Test analog output channels
DIAG D/A
Diagnostic Mode, Configure and Calibrate D/A outputs
DIAG O3GEN
Diagnostic Mode, Ozone Generator Calibration
DIAG TCHN
Diagnostic Mode, Configure Test Channel output
(1) xx = A (AutoCal enabled)
(2) x = M (manual cal), A (cal with AutoCal sequence), R (cal using remote contact closure or RS-232)
(3) xxx = software revision
4.3.5.2 Programmable Pushbuttons
The 8 pushbuttons below the display are programmable by the CPU in that their functions
change depending on the mode of the Analyzer or the operations being performed. The legend
above a button identifies its current function. If there is no legend above a button, it has no
function and will be ignored if pressed.
4-7
Teledyne API Model 400A O3 Analyzer Instruction Manual, 02260, Rev. F
4.3.5.3 Keyboard
The second line of the display contains eight fields. Each field defines the key immediately
below it. By redefining the keys dynamically it is possible to simplify the instrument electronics
and user interface. Figure 5-1 and Figure 5-2 show all of the functions of the keyboard.
When entering data in the keyboard, if the entered value is not accepted, the M400A will "beep"
to notify the user that the value keyed in was not accepted. The original value remains
unchanged.
4.3.5.4 Status LED's
At the right of the display there are 3 status LED's. They can be in three states, OFF, ON, and
BLINKING. The meanings of the LED's are given in Table 4-2.
Table 4-2: Status LED’s
LED
State
Meaning
Green (Sample)
On
Off
Blinking
Monitoring normally, taking DAS data
NOT monitoring, DAS disabled
Monitoring, DAS in HOLDOFF mode (1)
Yellow (Cal)
Off
On
Blinking
Auto cal. Disabled
Auto/Dynamic cal. Enabled
Calibrating
Red (Fault)
Off
Blinking
No warnings exist
Warnings exist
(1) This occurs during Calibration, DAS holdoff, Power-up Holdoff,and when in Diagnostic mode.
4.3.5.5 Power Switch
The power switch has two functions. The rocker switch controls overall power to the instrument,
in addition it includes a circuit breaker. If attempts to power up the M400A result in a circuit
breaker trip, the switch automatically returns to the off position, and the instrument will not
power up.
4-8
Teledyne API Model 400A O3 Analyzer Instruction Manual, 02260, Rev. F
Figure 4-2: Front Panel
4-9
Teledyne API Model 400A O3 Analyzer Instruction Manual, 02260, Rev. F
4.3.6 Power Supply Module
The Power supply module supplies AC and DC power to the rest of the instrument. It consists of
a 4 output linear DC power supply and a 24 volt switching supply. In addition, it contains the
switching circuitry to drive the DC operated valves and several switched AC loads to operate the
Bench, IZS, and UV lamp heaters.
4.3.7 Pump, Valves, Pneumatic System
The M400A is equipped with a vacuum pump capable of pulling 800 cc/min across a critical
flow orifice. This allows a smooth, stable flow of sample through the Analyzer.
An internal pump comes as standard equipment with the M400A. As an option, the M400A can
be supplied with an external sample pump.
A critical flow orifice is used to control the sample flow. The orifice is a precision-drilled
sapphire jewel protected by a 20 micron sintered filter. The critical flow orifice never needs
adjustment and maintains precise flow control as long as the ratio of the up-stream to downstream pressures is greater than 0.53 (sonic flow conditions).
A standard M400A comes with 1 valve. The Sample/Reference valve switches sample gas either
directly from the sample inlet port or gas from the ozone scrubber into the Optical Bench
Assembly. An optional second valve can be supplied either as part of the IZS option or to supply
external calibration gas.
Sample enters the Analyzer through a 5 micron TFE particulate filter element (37 mm dia. Std.
or 47 mm dia. optional) located behind the fold down front panel. The sample then enters
directly into the sample cell. Flow diagrams are shown in Figure 8-3 and Figure 8-4.
4-10
Teledyne API Model 400A O3 Analyzer Instruction Manual, 02260, Rev. F
5 SOFTWARE FEATURES
5.1 Index To Front Panel Menus
Figure 5-1 and Figure 5-2 show a "tree" menu structure to let you see at a glance where each
software feature is located in the front panel menus.
5-1
Teledyne API Model 400A O3 Analyzer Instruction Manual, 02260, Rev. F
Figure 5-1: Sample Menu Tree
5-2
Teledyne API Model 400A O3 Analyzer Instruction Manual, 02260, Rev. F
Figure 5-2: Setup Menu Tree
5-3
Teledyne API Model 400A O3 Analyzer Instruction Manual, 02260, Rev. F
5.2 Sample Mode
5.2.1 Test Functions
NOTE
In any of the following TEST functions, if a value of
XXXX is displayed, that indicates an off scale and
therefore meaningless reading.
To use the TEST functions to diagnose instrument faults, refer to Troubleshooting Section 9.
Range
This is the range of the instrument. The M400A has one physical range that covers the entire
concentration range from 100 to 20,000 ppb full scale. The front panel display will always show
the concentration correctly no matter what range the instrument is operating in. The rear panel
analog output for each range is scaled to fit the range of voltage or current the instrument is set
up for.
There are 3 range modes to choose from:
1. Single range mode sets a single maximum range for the instrument analog output.
2. Autorange mode allows a low range and high range. The M400A will automatically switch
to the other range dynamically as concentration values require. The TEST values will show
the range the instrument is currently operating in, and will dynamically display the alternate
range as the range changes occur.
3. Dual range provides 2 continuous analog outputs on the rear panel, each output is scaled to
the range selected by the user.
NOTE
Each of the range modes Single range, Autorange, and
Independent ranges are mutually exclusive.
5-4
Teledyne API Model 400A O3 Analyzer Instruction Manual, 02260, Rev. F
Stability
The instrument noise is computed using the standard deviation of the last 10 minutes of data,
with the value being updated at the end of each measure/reference cycle. The value only
becomes meaningful if sampling a constant concentration for more than 10 minutes. The value
should be compared to the value observed in the factory checkout.
O3 Measure Voltage
The O3 Measure Signal is the intensity of light when sample gas was in the Optical Bench during
the most recent measurement cycle. This voltage is the digitized mV reading measured by the
V/F board.
O3 Reference Voltage
The O3 Reference Signal is the intensity of light when reference gas was in the Optical Bench
during the most recent measurement cycle. This voltage is the digitized mV reading measured by
the V/F board.
O3 Generator Reference Detector (IZS option only)
This is the Ozone Generator UV lamp intensity measured by the Reference Detector option in
the IZS ozone generator. This signal is used to control the drive current to the lamp, thus
improving the stability of the IZS ozone output.
O3 Generator Drive Voltage (IZS option only)
The Drive Voltage a DC voltage used to program the power supply for the ozone generating UV
lamp in the IZS option. The value of this voltage determines the concentration of ozone
generated by the IZS.
Vacuum
Vacuum is the absolute pressure measured down stream of the sample flow orifice. Typical
readings are 12 in-Hg-Abs.
Sample Pressure
The pressure in the sample inlet line is measured by a solid state pressure sensor, which
measures absolute pressure. Absolute pressure was chosen because it is an unambiguous measure
of sample pressure. This pressure typically runs 0.5" or so below atmospheric pressure due to the
pressure drop in the sample inlet lines.
Absolute atmospheric pressure is about 29.92 in-Hg-A at sea level. It decreases about 1” per
1000 ft gain in altitude. Several additional factors cause changes in atmospheric pressure. Air
conditioning systems, passing storms, and air temperature can change the absolute pressure by a
few tenths of an inch of Hg.
5-5
Teledyne API Model 400A O3 Analyzer Instruction Manual, 02260, Rev. F
Sample Flow
The SAMPLE FLOW test function is computed from the pressure measured up-stream of the
sample flow orifice. The pressure down-stream of the orifice is also checked to assure the
assumptions of the equation are valid. The Sample Flow TEST function will register variations
in flow caused by changes in ambient pressure, but will not detect a plugged sample flow orifice.
The nominal value is 800 ± 80 cc/min.
Sample Temperature
Sample temperature is measured in the optical bench assembly at the midpoint of the quartz
absorption tube. It is used in the computation of the ozone concentration.
Photo Lamp Temperature
The source lamp in the optical bench is temperature controlled to 52 deg C to maintain a stable
UV output. Once the instrument temperatures have stabilized, the photometer lamp temperature
should be 52 ± 0.5 deg C.
O3 Generator Temperature (IZS option only)
The ozone generator housing containing the ozone generating lamp is temperature controlled at
48 deg C to maintain a stable output from the ozone generator. Once the instrument temperatures
have stabilized, the ozone generator temperature should be 48 ± 0.5 deg C.
Orifice Temperature
This TEST function monitors the orifice temperature. The value of the orifice temperature is
used in the calculation of the sample flow to correct for air density changes due to the sample
temperature inside the orifice manifold. For instruments with the IZS option, the orifice is
temperature controlled to 45 deg C to maintain very stable sample flow, which is necessary for
stable operation of the IZS ozone generator.
Box Temperature
This TEST function measures the temperature inside the M400A chassis. The temperature sensor
is located on the I2C adapter card on the CPU board.
DC Power Supply (DCPS)
The DCPS voltage is a composite of the 5 and ± 15 VDC voltages in the Power Supply Module.
This is meant to be a quick indicator to show if the PSM is working correctly. The nominal value
is 2500 mV ± 100 mV.
5-6
Teledyne API Model 400A O3 Analyzer Instruction Manual, 02260, Rev. F
O3 Slope Value
The slope is the ‘m’ coefficient of the straight line equation (y = mx + b). The value of the slope
term sets the calibration of the M400A. The slope can be thought of as a gain term which
determines the steepness of the calibration curve. If DUAL RANGE is enabled there are 2 slope
terms, one for each range.
O3 Offset Value
The offset term is the ‘b’ coefficient of the straight line equation (y = mx + b). The value of the
offset term sets the zero point of the M400A.
Test Value
Many of the internal voltages measured by the M400A can be routed to this analog output
channel for test purposes. See Trouble shooting Section 9 for details on using this function.
Time
This is the output of the M400A's internal time of day clock.
5.2.2 CAL, CALS, CALZ, Calibration Functions
5.2.2.1 CAL, CALS, CALZ
The CAL button switches the M400A into calibration mode. CAL mode allows the instrument to
be calibrated with zero or span gas coming in through the sample port. When in calibration
mode, the expected span gas concentration can be entered. See Section 7 for details on
instrument calibration.
The CALS and CALZ buttons control the operation of the IZS option or Zero/Span Valves
option. CALS switches the IZS valve to admit span gas into the Optical Bench. Span checks or
span calibrations can be done in CALS mode.
CALZ switches the IZS valve to admit zero gas into the Optical Bench. Zero checks or zero
calibration can be done in CALZ mode.
NOTE
When operating the M400A with the IZS option, the CALZ and
CALS operations should be used only to perform zero and span
checks and should not be used to calibrate the instrument.
5-7
Teledyne API Model 400A O3 Analyzer Instruction Manual, 02260, Rev. F
5.2.2.2 Zero
Pressing the ZERO key along with ENTR will cause the instrument to adjust the OFFSET value
of the calibration equation. The M400A will only allow zero adjustment over a limited range of
signal levels, therefore the signal does not have to be exactly zero for the instrument to do a zero
cal. The instrument will not, however allow a zero cal on any signal level, therefore it is not
possible to zero the instrument with span gas in the optical bench. If the ZERO key does not
come on as expected, check Section 9.2.7.
5.2.2.3 Span
Pressing the SPAN key along with ENTR will cause the instrument to adjust the SLOPE value of
the calibration equation. The concentration value will be adjusted to the value entered for the
expected span concentration.
Like ZERO calibration, the instrument will not allow span on any ozone concentration. If the
SPAN key is not illuminated as expected, see Section 9.2.6. It is also possible that at low levels
of ozone that BOTH the ZERO and SPAN keys will be illuminated. If this condition occurs, use
extra caution so the correct operation is done so the M400A does not become mis-calibrated.
5.2.2.4 Ozone Calibration Concentration
Before the M400A can be span calibrated, the expected ozone span concentration must be
entered. This is done by entering CAL-CONC-SPAN, then keying in the expected span value.
5-8
Teledyne API Model 400A O3 Analyzer Instruction Manual, 02260, Rev. F
5.3 Set-Up Mode
This section describes how to configure the Analyzer.
The setup variables are summarized in Table 5-1 in terms of the button sequences used to access
them.
Table 5-1: Setup Variables
Button Sequence
Function
Default
Limits
CAL-CONC-SPAN
Set O3 span value
400 ppb
0-10000 ppb
CALS-CONC-O3GEN
IZS O3 concentration
400 ppb
0-1500 ppb
SETUP-ACAL-SEQ1
Setup auto-cal sequence
Disabled
SETUP- ACAL -SEQ2
Setup auto-cal sequence
Disabled
SETUP- ACAL -SEQ3
Setup auto-cal sequence
Disabled
SETUP-DAS-VIEW
View DAS data
SETUP-MORE-COMM-BAUD RS-232 baud rate
19,200 baud
300, 1200, 2400,
9600, 19.2
SETUP-MORE-COMM-ID
Analyzer ID number
0400
0000-9999
SETUP-MORE-O3- ADJ
IZS lamp setup/adj
SETUP-MORE-O3-DARKCAL
Detector dark offset
calibration
SETUP-MORE-O3-DARKEDIT
Dark signal offset
125 mV
75-175 mV
SETUP-MORE-O3-MODE
IZS feedback enable
SETUP-CLK-TIME
Current time-of-day
00:00
00:00-23:59
SETUP-CLK-DATE
Current date
01 JAN 00
01 JAN 00 31 DEC 99
SETUP-RNGE-SET
D/A output range
500 ppb
100-20000
SETUP-RNGE-MODE
D/A output range mode
SNGL
SNGL, DUAL,
AUTO
SETUP-RNGE-UNITS
O3 conc. units
ppb
ppb/ppm/ug/mg
SETUP-PASS
Cal. Password enab.
OFF
OFF-ON
SETUP-CFG
Software config.
ALL the setup variables are stored in the Analyzer's EEPROM and are retained during power off
and even when new software revisions are installed.
5-9
Teledyne API Model 400A O3 Analyzer Instruction Manual, 02260, Rev. F
NOTE
If a variable is modified, but ENTR is not pressed, the variable will
not be changed and the analyzer will beep when EXIT is pressed.
5.3.1 Configuration Information (CFG)
The software configuration can be displayed by entering the button sequence SETUP-CFG.
PREV/NEXT buttons allow scrolling through the configuration parameters. For example the
M400A should display:
M400A O3 ANALYZER
SBC40 CPU
This feature is useful for showing any special features that are present in the currently installed
PROM.
5.3.2 Automatic Calibration (ACAL)
The AutoCal feature allows the M400A to automatically operate the Zero/Span Valve or IZS
option to periodically check its calibration. Information on setting up AutoCal is in Section 6.4.
5.3.3 Data Acquisition System (DAS)
The Model 400A contains a flexible and powerful built in data acquisition system (DAS) that
enables the analyzer to store concentration data as well as many diagnostic parameters in its
battery backed memory. This information can be viewed from the front panel or printed out
through the RS-232 port. The diagnostic data can be used for performing “Predictive
Diagnostics” and trending to determine when maintenance and servicing will be required.
The logged parameters are stored in what are called “Data Channels.” Each Data Channel can
store multiple data parameters. The Data Channels can be programmed and customized from the
front panel. A set of default Data Channels has been included in the Model 400A software.
These are described Section 5.3.3.1. For more information on programming custom Data
Channels, a supplementary document containing this information can be requested from
Teledyne API.
5.3.3.1 Data Channels
The function of the Data Channels is to store, report, and view data from the analyzer. The data
may consist of ozone concentration, or may be diagnostic data, such as the sample flow or
detector output.
5-10
Teledyne API Model 400A O3 Analyzer Instruction Manual, 02260, Rev. F
The M400A comes pre-programmed with a set of useful Data Channels for logging ozone
concentration and predictive diagnostic data. The default Data Channels can be used as they are,
or they can be changed to fit a specific application. They can also be deleted to make room for
custom user-programmed Data Channels.
The data in the default Data Channels can be viewed through the SETUP-DAS-VIEW menu.
Use the PREV and NEXT buttons to scroll through the Data Channels and press VIEW to view
the data. The last record in the Data Channel is shown. Pressing PREV and NEXT will scroll
through the records one at a time. Pressing NX10 and PV10 will move forward or backward 10
records. For Data Channels that log more than one parameter, such as PNUMTC, buttons labeled
<PRM and PRM> will appear. These buttons are used to scroll through the parameters located
in each record.
The function of each of the default Data Channels is described below:
CONC:
Samples ozone concentration (Low Range) at one minute intervals and stores an
average every hour with a time and date stamp. Readings during calibration and
calibration hold off are not included in the data. The last 800 hourly averages
are stored.
O3REF:
Samples detector reference value at five minute intervals and stores an average
once a day with a time and date stamp. This data is useful for monitoring lamp
intensity over time to predict when adjustment or replacement of the lamp will
be required. The last 730 daily averages (about 2 years) are stored.
PNUMTC:
Collects sample flow and sample pressure data at five minute intervals and
stores an average once a day with a time and date stamp. This data is useful for
monitoring the condition of the pump and critical flow orifice(sample flow) and
the sample filter(clogging indicated by a drop in sample pressure) over time to
predict when maintenance will be required. The last 360 daily averages (about 1
year) are stored.
O3GEN:
Samples ozone generator lamp drive voltage at five minute intervals and stores
an average once a day with a time and date stamp. This data is useful for
monitoring the condition of the ozone generating lamp in the IZS option. A rise
in lamp drive voltage when the ozone generator is being operated in REF mode
is a measure of lamp decay. The last 360 daily averages are stored.
CALDAT:
Logs new slope and offset every time a zero or span calibration is performed.
This Data Channel also records the instrument reading just prior to performing
a calibration. Note: this Data Channel collects data based on an event(a
calibration) rather than a timer. This Data Channel will store data from the last
200 calibrations. This does not represent any specific length of time since it is
dependent on how often calibrations are performed. As with all Data Channels,
a time and date stamp is recorded for every data point logged.
5-11
Teledyne API Model 400A O3 Analyzer Instruction Manual, 02260, Rev. F
5.3.4 Range Menu (RNGE)
The O3 concentration range is the concentration value that corresponds to the maximum voltage
output at the rear panel. The M400A can operate in one of three analog output Range Modes.
The Range Mode can be changed through the SETUP-RNGE-MODE menu. The modes are
described below:
5.3.4.1 Single Range Mode
In this mode, both analog outputs (REC and DAS) are set to the same range. This range can be
set to any value between 100 and 20,000 ppb and is accessed through the SETUP-RNGE-SET
menu. This is the default range mode for the analyzer.
5.3.4.2 Dual Range Mode
Selecting dual range mode will allow you to select different ranges for the REC and DAS analog
outputs. The two ranges are called Low and High. The REC output at the rear panel is used for
the Low range and the DAS output is used for the High range. To set the ranges press SETUPRNGE-SET and select which range you want to edit followed by ENTR. The High and Low
ranges have separate slopes and offsets for computing the ozone concentration. Therefore, the
two ranges must be independently calibrated. See Section 7.7 for details on calibrating the two
ranges.
5.3.4.3 Auto Range Mode
In auto range mode, the analyzer automatically switches between the Low and High range
depending on the concentration. When the O3 concentration increases to 98% of the Low range
value, the analyzer will switch to the High range. The analyzer will remain in the High range
until the O3 concentration drops to 75% of the Low range value. It will then switch back to the
Low range. Auto ranging changes the range for the REC and DAS outputs simultaneously. To
set the ranges press SETUP-RNGE-SET and select which range you want to edit followed by
ENTR.
The High and Low ranges have separate slopes and offsets for computing the ozone
concentration. Therefore, the two ranges must be independently calibrated. See Section 7.7 for
details on calibrating the two ranges.
5-12
Teledyne API Model 400A O3 Analyzer Instruction Manual, 02260, Rev. F
5.3.4.4 Concentration Units
The M400A can display concentrations in ppb, ppm, ug/m3, mg/m3 units. Concentrations
displayed in mg/m3 and ug/m3 use 0° C, 760 mmHg for STP. Consult your local regulations for
the STP used by your agency. The following equations give approximate conversions:
O3 ppb x 2.14 = O3 ug/m3
O3 ppm x 2.14 = O3 mg/m3
To change the current units press SETUP-RNGE-UNIT from the SAMPLE mode and select the
desired units.
NOTE
The expected span concentration values in the new units must
be re-entered into the analyzer and the unit re-calibrated
using one of the methods in Section 7.
Changing units affects all of the RS-232 values, all of the display values, and all of the
calibration values.
Example: If the current units are in ppb and the O3 span value is 400 ppb, and the units are
changed to ug/m3 the span value is NOT re-calculated to the equivalent value in ug/m3. The new
value of 856 ug/m3 must be entered for the expected span concentration.
5.3.4.5 Dilution Ratio
The dilution feature allows you to use the M400A with an additional external system that dilutes
the sample gas. With the Dilution feature you can select the range and display the concentration
at the value and units of the un-diluted gas.
The software scales the diluted sample gas concentration readings so that the outputs show the
un-diluted concentrations. Also, when calibrating the instrument or setting the ranges the values
selected are scaled to reflect the actual un-diluted concentrations. The scaled readings are sent to
the display, analog outputs, and RS-232 port.
To use the Dilution feature:
1. SELECT UNITS. To set units, press SETUP-RANGE-UNIT. Press ENTR after the unit
selection is made, then EXIT to return to upper level menus.
2. SET DILUTION RATIO The dilution ratio of the probe is entered by SETUP-RANGEDIL. Accepted values are 1 to 1000. Press ENTR, and EXIT to return to upper level menus.
A value of 1 disables the dilution feature.
5-13
Teledyne API Model 400A O3 Analyzer Instruction Manual, 02260, Rev. F
3. SELECT RANGE The range selection is the same with dilution as with normal monitoring.
See Section 5.3.4 for information on range selection. You should note however, the value
entered should be the actual concentration of the un-diluted calibration gas. The units of this
number is ppm.
4. CALIBRATION When the above selections have been made, the instrument now must be
calibrated with the dilution system in place. See Section 7 for calibration methods.
5.3.5 Password Enable (PASS)
The M400A provides password protection of the calibration and setup functions to prevent
incorrect adjustments. There are three levels of password protection, which correspond to
operator, supervisor/maintenance, and configuration functions. When prompted for a password,
any of the valid passwords can be entered, but the CPU will limit access to the functions allowed
for that password level. Each level allows access to the functions of all the levels below plus
some additional functions. Table 5-2 lists the password levels and the functions allowed for each
level.
To disable passwords, press SETUP-PASS and select OFF.
Table 5-2: Password Levels
Password Levels
Password
Level
Functions Allowed
No password
0
TEST
MSG
CLR
Operator - 101
1
CALZ
CALS
CAL
Setup - 818
2
SETUP
SETUP-VARS
SETUP-DIAG
5-14
Teledyne API Model 400A O3 Analyzer Instruction Manual, 02260, Rev. F
5.3.6 Time of Day Clock (CLK)
The M400A has a time of day clock that supports the AutoCal timer, time of day TEST function,
and time stamps on most RS-232 messages.
To set the time-of-day, press SETUP-CLK-TIME. The CPU will display the current time-ofday as four digits in the format "HH:MM", where "HH" is the hour in 24-hour format (i.e. hours
range from 00 to 23) and "MM" is the minute (00 - 59). The operator may change the time-ofday and then press ENTR to accept the new time, or press EXIT to leave the time unchanged.
To set the current date, press SETUP-CLK-DATE. The CPU will display the current date as
"DD MMM YY". For example, April 1, 1997 would be displayed as "01 APR 97". Change the
date by pressing the button under each field until the desired date is shown. Then press ENTR to
accept the new date or press EXIT to leave the date unchanged.
In order to compensate for clocks which run a fast or slow, there is a variable to speed up or slow
down the clock by a fixed amount every day. To change this variable, press SETUP-MOREVARS. Press NEXT until the CLOCK_ADJ variable is displayed. To change the setting, press
the EDIT key and enter the value from the keyboard. Press ENTR to accept the change. The
value entered represents the number of seconds per day the clock gains or loses. It should only
need to be set once for each Analyzer. For example, if the clock is running 10 seconds fast each
day, set the variable to -10 and press ENTR. This will cause the clock to run slower by 10
seconds each day.
5.3.7 Communications Menu (COMM)
The COMM menu allows you to set the Baud Rate for RS232 communications and the
instrument ID.
To select the Baud Rate, press SETUP-MORE-COMM-BAUD and select from the available
baud rates and press ENTR.
To select the Instrument ID, press SETUP-MORE-COMM-ID and enter a four digit ID number
for the instrument.
NOTE
Multidrop RS232 operation only supports the use of a three
digit ID number. In this case, set the first digit in the ID to 0.
See Section 5.5 for more details on the operation of the RS232 interface.
5-15
Teledyne API Model 400A O3 Analyzer Instruction Manual, 02260, Rev. F
5.3.8 Variables Menu (VARS)
Table 5-3 lists the variable names which are present in the Variables Menu. Variables are also
accessible through the RS-232 interface.
Table 5-3: RS-232 Variable Names
Variable Name
Legal Values
DAS_HOLD_OFF
0.5 – 20 min
PHOTO_LAMP
0.0 to 100.0o C
O3_GEN_LAMP
0.0 to 100.0o C
O3_GEN_LOW1
0 – 1500 ppb
O3_GEN_LOW2
0 – 1500 ppb
ORIFICE_SET
0 – 100o C
SAMPLE_FLOW_SET
100 – 1000 cc/min
RS232_MODE
0 to 32767 Bit
CLOCK_ADJ
-60 to 60 sec/day
5.3.9 Diagnostic Mode (DIAG)
The Diagnostic menu contains several diagnostic tests and setup menus for diagnosing
operational problems and performing setup functions that are not part of routine operation. The
Diagnostic menu is accessed by pressing SETUP-MORE-DIAG from the front panel and
entering the diagnostic password. Note: The Diagnostic password is always enabled, even when
the other setup passwords are disabled. The diagnostic tests and setup are described in detail in
Section 9.1.3 of this manual.
5-16
Teledyne API Model 400A O3 Analyzer Instruction Manual, 02260, Rev. F
5.4 Status Outputs
Status outputs report analyzer conditions via contact closures located on the DB-50 connector on
the rear panel. The pin assignments are listed in Table 5-4:
Table 5-4: Status Outputs
Output #
PIN Pair
(low/high)
1
Status
Condition
1, 2
ZERO CAL
ON IN ZERO CALIBRATE
2
3, 4
SPAN CAL
ON IN SPAN CALIBRATE
3
5, 6
FLOW ALARM
ON IF FLOW WARNING
4
7, 8
TEMP ALARM
ON ANY TEMP WARNING
5
9, 10
DIAG MODE
ON IN DIAGNOSTIC MODE
6
11,12
POWER ON
ON IF M400A IS RUNNING
7
13,14
PRESS ALARM
ON IF LOW PRESSURE
8
15,16
LOW SPAN CAL
ON IF IN LOW SPAN CALIBRATE
9
17,18
SYSTEM OK
ON IF NO FAULTS PRESENT, OFF IF
FAULT CONDITION EXISTS
10
19,20
LAMP WARNING
ON IF UV LAMP INTENSITY IS OUT
OF LIMITS
11
21,22
HIGH RANGE
ON IF UNIT IS IN HIGH RANGE
5.5 RS-232 Interface
The Model 400A ozone Analyzer features a powerful RS-232 interface which is used both for
reporting test results and for controlling the Analyzer from a host computer. Because of the dual
nature of the RS-232 interface, the message format has been carefully designed to accommodate
both printers and host computers. Tips on connecting the RS-232 port can be found in the
Section 9.3.3.
All message outputs from the Model 400A have the following format:
X DDD:HH:MM IIII MESSAGE<CRLF>
The "X" is a character indicating the message type shown in Table 5-5.
5-17
Teledyne API Model 400A O3 Analyzer Instruction Manual, 02260, Rev. F
Table 5-5: RS-232 Message Types
First Character
Message Type
C
Calibration
D
Diagnostic
L
Logon
T
Test measurement
V
Variable
W
Warning
The "DDD:HH:MM" is a time-stamp indicating the day-of-year ("DDD") as a number from 1 to
366, the hour of the day ("HH") as a number from 00 to 23, and the minute ("MM") as a number
from 00 to 59.
The "IIII" is a 4-digit Analyzer I.D. number.
The "MESSAGE" field contains variable information such as warning messages, test
measurements, DAS reports, etc.
The "<CRLF>" is a carriage return-line feed combination which terminates the message and
also makes the messages appear neatly on a printer. All RS-232 messages from the analyzer are
terminated in this manner.
The uniform nature of the output messages makes it easy for a host computer to parse them.
Input messages to the Model 400A have a format which is similar to that for output messages:
"X command<CRLF>"
The "X" indicates the message type as shown above in Table 5-5 and "command" is the
command type, each of which is described individually below.
The "<CRLF>" is used to terminate the command. Typing "<CRLF>" a few times by itself is a
good way to clear the input buffer of any extraneous characters.
5-18
Teledyne API Model 400A O3 Analyzer Instruction Manual, 02260, Rev. F
5.5.1 Setting Up the RS-232 Interface
The RS-232 communications protocol allows the instrument to be connected to a wide variety of
computer based equipment. The interface provides two basic functions in the M400A.
1. First is a comprehensive command interface for operating and diagnosing the analyzer.
2. The interface can also provide an audit trail of analyzer events. In this function the port sends
out messages about instrument events like calibration or warning messages. If these
messages are captured on a printer or remote computer, they provide a continuous audit trail
of the analyzers operation and status.
The baud rate is set from the front panel by SETUP-MORE-COMM-BAUD. Select the baud rate
appropriate for your application, 300, 1200, 2400, 4800, 9600, or 19,200. It is important to note
that the other device must have identical settings in order for the communications to work
correctly.
Second is physical wiring of the analyzer to the other unit. We have incorporated into the
Analyzer LED's that signal the presence of data on the communications lines, and also switches
to easily re-configure the analyzer from DCE to DTE if necessary. In addition the front panel
diagnostics allow test data streams to be sent out of the port on command. This flexibility and
diagnostic capability should simplify attaching our equipment to other computers or printers. If
problems occur, see the Troubleshooting Section 9.3.3.
Setup from the Front Panel
There are 2 additional RS-232 setups that can be done via the front panel.
1. Set the instrument ID number by SETUP-MORE-COMM-ID, and enter a 4-digit number
from 0000-9999. This ID number is part of every message transmitted from the port.
2. Set the RS-232 mode bit field in the VARS menu. To get to the variable press, SETUPMORE-VARS, then ENTR and scroll to RS232_MODE, then press EDIT. The possible
values are shown in Table 5-6. Typical RS-232 configurations are shown in Table 5-7.
5-19
Teledyne API Model 400A O3 Analyzer Instruction Manual, 02260, Rev. F
Table 5-6: RS-232 Mode Setup - Front Panel
Decimal Value
Description
1
Turns on quiet mode (messages supressed)
2
Places analyzer in computer mode (no echo of chars)
4
Enables Security Features (Logon, Logoff)
8
Enables Teledyne API protocol and setup menus
16
Enable alternate protocol
32
Enable multidrop protocol
NOTE
To enter the correct value, ADD the decimal values of the features you
want to enable. For example if LOGON and front panel RS-232
menus are desired, the value entered would be 4 + 8 = 12.
5-20
Teledyne API Model 400A O3 Analyzer Instruction Manual, 02260, Rev. F
Table 5-7: Typical RS-232 Configurations
Configuration
RS232_MODE Setting
Normal
Status, warning, DAS messages reported.
Characters echoed. Line editing allowed.
No security or multidrop.
8
Computer
Status, warning, DAS messages suppressed.
Characters not echoed. Line editing disabled.
No security or multidrop.
11
Security
Status, warning, DAS messages reported.
Characters echoed. Line editing allowed.
No multidrop.
12
Hessen protocol (optional)
Status, warning, DAS messages suppressed.
Characters not echoed. Line editing disabled.
Alternate protocol enabled; native protocol disabled.
No security or multidrop.
19
Multidrop
Status, warning, DAS messages suppressed.
Characters not echoed. Line editing disabled.
Commands must include ID number.
No security.
Multidrop.
43
Security Feature
The RS-232 port is often connected to a public telephone line, which could compromise
instrument security. If the LOGON feature is implemented, the port has the following attributes:
1. A password is required before the port will operate.
2. If the port is inactive for 1 hour, it will automatically LOGOFF.
3. Repeat attempts at logging on with incorrect passwords will cause subsequent logins (even
with the correct password) to be disabled for 1 hour.
4. If not logged on, the only command that is active is the '?'.
5-21
Teledyne API Model 400A O3 Analyzer Instruction Manual, 02260, Rev. F
5. The following messages will be given at logon.
LOG ON SUCCESSFUL
Correct password given
LOG ON FAILED
Password not given or incorrect
LOG OFF SUCCESSFUL
Logged off
The RS-232 LOGON feature must be enabled from the front panel by setting bit 4. See
Table 5-6. Once the feature is enabled, to logon type:
LOGON 940331 or
LOGON 0400 940331 - if instrument ID is used
940331 is the default password. The password can be changed to any number from 0 to 999999
by the variable RS232_PASS. To change the password enter the command
V RS232_PASS=NNNNNN
which sets the password to the value NNNNNN.
Protocol of Port Communication
The RS-232 interface has two protocols of communication, because if the port is attached to a
computer it needs to have different characteristics than if used interactively. Consequently, there
are two primary styles of operation: terminal mode and computer mode.
When an operator is communicating with the analyzer via a terminal, the analyzer should be
placed into TERMINAL MODE, which echoes keystrokes, allows editing of the command line
using the backspace and escape keys, and allows recall of the previous command. When a host
computer or data logger is connected to the analyzer, it should be placed into COMPUTER
MODE, which does not echo characters received or allow the special editing keys. See Table 5-8
and Table 5-9 for relevant commands.
5-22
Teledyne API Model 400A O3 Analyzer Instruction Manual, 02260, Rev. F
Table 5-8: RS-232 Switching from Terminal Mode to Computer Mode
Key
Function
Control-T (ASCII 20 decimal)
Switch to terminal mode (echo, edit)
Control-C (ASCII 3 decimal)
Switch to computer mode (no echo, no edit)
If the command line doesn't seem to respond to keystrokes or commands, one of the first things
you should do is send a Control-T to switch the command line interface into terminal mode.
Also, some communication programs remove CTRL-T and CTRL-C characters from the byte
stream, therefore these characters will not be sent to the analyzer. Check your communications
program owners manual.
Entering Commands in Terminal Mode
In terminal mode, all commands must be terminated by a carriage return; commands are not
processed until a carriage return is entered. While entering a command you may use the
following editing keys:
Table 5-9: RS-232 Terminal Mode Editing Keys
Key
Function
CR (carriage return)
Execute command
BS (backspace)
Backspace one character to the left
ESC (escape)
Erase entire line
Commands are not case-sensitive; you should separate all command elements (i.e. keywords,
data values, etc.) by spaces.
Words such as T, SET, LIST, etc. are called keywords and are shown on the help screen in
uppercase, but they are not case-sensitive. You must type the entire keyword; abbreviations are
not accepted.
NOTE
To open the help screen, Type "?" and press the Enter key.
5-23
Teledyne API Model 400A O3 Analyzer Instruction Manual, 02260, Rev. F
5.5.1.1 Protocol Selection
The RS-232 interface will support more than one command protocol. Decimal flags 8 and 16
select which protocol is active.
5.5.1.2 Multidrop Mode
The RS-232 interface supports a multidrop configuration (by means of additional external
hardware to handle the line arbitration) which allows multiple instruments to be connected to the
same RS-232 “bus.” The principal difference between multidrop and non-multidrop mode is that
the RS-232 RTS signal is used to turn the drivers in the external hardware on prior to
transmitting messages, and turn the drivers off again shortly after transmitting. This multidrop
protocol assumes that only one instrument will be transmitting at a time. It is up to the
controlling host computer to ensure that this protocol is adhered to.
In addition to hardware-level support, all of the RS-232 interface commands allow an instrument
ID number as part of the command. Regardless of whether multidrop mode is enabled, if you
include an ID number in a command, the instrument will only process the command if the ID
number matches the instrument’s ID number.
In general, the ID number should appear in a command after the first token in the command and
preceded by a space. The printout below shows several commands, each with and without ID
numbers.
?
? 100
logon 940331
logon 100 940331
c zero
c 100 zero
v baud_rate=”2400”
v 100 baud_rate=”2400”
Notice in all of the commands, the ID number of “100” appears after the first token in the
command. The commands including ID numbers would be executed only if the instrument’s ID
number was set to “100”.
5-24
Teledyne API Model 400A O3 Analyzer Instruction Manual, 02260, Rev. F
5.5.2 Command Summary
Table 5-10 contains a summary of the RS-232 port commands.
Table 5-10: RS-232 Command Summary
Commands
Definition
? [id]
Print help screen. ID is an optional instrument ID number.
T [id] LIST
Print all active test messages
T [id] LIST name or
T [id] name
Print single test message "name" from Table 5-13
W [id] LIST
Print all active warnings
W [id] CLEAR name or
W [id] name
W [id] CLEAR ALL
Clear single warning message "name" from Table 5-14
C [id] ZERO [1|2]
Start remote zero calibration
C [id] LOWSPAN [1|2]
Start remote low span calibration
C [id] SPAN [1|2]
Start remote span calibration
C [id] ASEQ number
Start remote calibration sequence number (1-3)
C [id] EXIT
Terminate remote zero or span calibration
C [id] ABORT
Abort rest of calibration sequence and immediately resume sampling
C [id] COMPUTE ZERO
Calculates a new slope and offset during zero calibration. Must be in
zero calibration first.
C [id] COMPUTE SPAN
Calculates a new slope and offset during span calibration. Must be in
span calibration first.
D [id] LIST
Prints all I/O signal values
D [id] name
Print single I/O signal value/state
D [id] name=value
Sets I/O signal to new "value"
D [id] LIST NAMES
Lists diagnostic test names
D [id] ENTER name
Enters and starts 'name' diagnostic test
D [id] EXIT
Exits diagnostic mode
D [id] RESET
Resets analyzer(same as power-on)
D [id] RESET RAM
System reset, plus erases RAM. Initializes DAS, O3, conc readings,
calib not affected.
Clears all warning messages
(table continued)
5-25
Teledyne API Model 400A O3 Analyzer Instruction Manual, 02260, Rev. F
Table 5-10: RS-232 Command Summary (Continued)
Commands
Definition
D [id] RESET EEPROM
System reset, plus erases EEPROM (RESET RAM actions + setup
variables, calibration to default values). Restores all factory defaults.
D [id] PRINT
Prints properties for all data channels (DAS)
D [id] PRINT "name”
Prints properties for single data channel. Quotes around name are
required.
D [id] REPORT "name"
[RECORDS=number]
[COMPACT|VERBOSE]
Prints DAS records for a data channel. Quotes around name are
required. Parameters in brackets are optional.
LOGON [ID] NNNNNN
Login with password NNNNNN
LOGOFF
Logoff – terminate RS-232 session
V [id] LIST
Print all setup variable names and values
V [id] name
Print individual setup variable value
V [id] name=value
Sets setup variable to new "value"
V [id] CONFIG
Print analyzer configuration
V [id] MODE
Print current analyzer mode
Table 5-11: RS-232 Command Summary
Terminal Mode Editing Keys
Definition
BS
Backspace
ESC
Erase line
CR
Execute command
^C
Switch to computer mode
Computer Mode Editing Keys
Definition
LF
Execute command
^T
Switch to terminal mode
Security Features
Definition
LOGON [id] password
Establish connection to analyzer
LOGOFF [id]
Disconnect from analyzer
5-26
Teledyne API Model 400A O3 Analyzer Instruction Manual, 02260, Rev. F
5.5.3 TEST Commands and Messages
To request a test measurement, the host must issue a command of the form:
T measurement
For example, the format of the O3 Reference reading in millivolts would be:
T 194:11:29 0400 O3 REF= 2520mV
For a summary of all test functions issue the command T LIST. Test measurements request
commands are shown in Table 5-12. All the TEST measurements displayed on the front panel
display are also available via the RS-232 interface.
5-27
Teledyne API Model 400A O3 Analyzer Instruction Manual, 02260, Rev. F
Table 5-12: Test Measurements Request Commands
Command
Test Measurement
?
RS-232 HELP screen
T LIST
Summary of all TEST parameters
T O3
Current O3 reading
T RANGE1
Analog output low range
T RANGE2
Analog output high range
T PHOTOMEAS
Current O3 meas reading
T PHOTOREF
Current O3 reference reading
T O3GENREF
Ozone generator reference reading
T O3GENDRIVE
Ozone generator lamp drive voltage
T PHOTOSPRESS
Sample pressure
T PHOTOSFLOW
Sample flow rate
T PHOTOSTEMP
Sample temperature
T PHOTOLTEMP
Analyzer lamp temperature
T O3GENTEMP
IZS lamp temperature
T BOXTEMP
Internal box temperature
T DCPS
DC power supply output
T PHOTOSLOPE
Slope value for Low Range
T PHOTOOFFSET
Offset value for Low Range
T CLOCKTIME
Current time-of-day
5-28
Teledyne API Model 400A O3 Analyzer Instruction Manual, 02260, Rev. F
5.5.4 WARNING Commands and Messages
Warning messages are sent both to the display and to the RS-232 output. See Table 5-13 for a
list of the warning messages. These messages are very helpful when trying to track down a
system problem and for determining whether or not DAS average data is actually valid. An
example of an actual warning message is:
W 194:11:03 0000 SAMPLE FLOW WARN
Warnings may be cleared via the RS-232 interface by issuing a command of the form:
W command
where "command" indicates which warning message to clear. For example, to clear the
"SAMPLE FLOW WARN" message, the host computer can issue the command:
W WSAMPFLOW
Attempting to clear a warning which is not active has no effect. Table 5-13 lists the command to
use to clear each possible warning message. W CLEAR ALL clears all warning messages.
Table 5-13: Warning Message Clear Commands
Command
Warning Message Cleared
W CLEAR ALL
CLEARS ALL WARNING MESSAGES
W WSYSRES
SYSTEM RESET
W WRAMINIT
RAM INITIALIZED
W WPHOTOREF
PHOTO REF WARNING
W WILMPHLT
O3 GEN LAMP SHUTDOWN
W WALMPHLT
PHOTO LAMP SHUTDOWN
W WSAMPFLOW
SAMPLE FLOW WARNING
W WSAMPRES
SAMPLE PRESSURE WARNING
W WSAMPTEMP
SAMPLE TEMP WARNING
W WBOXTEMP
BOX TEMP WARNING
W WO3GENTEMP
O3 GEN TEMP WARNING
W WPHOTOLTEMP
PHOTO LAMP TEMP WARNING
W WVFINS
V/F NOT INSTALLED
5-29
Teledyne API Model 400A O3 Analyzer Instruction Manual, 02260, Rev. F
5.5.5 CALIBRATION Commands and Messages
This subset of messages is concerned with reporting the status of the Analyzer and controlling
the Analyzer remotely. Whenever the Analyzer does a calibration it issues a report to the RS232 output. Table 5-14 lists the status reports.
Table 5-14: Status Reports
Report
C DDD:HH:MM IIII START ZERO CALIBRATION
C DDD:HH:MM IIII FINISH ZERO CALIBRATION
C DDD:HH:MM IIII START SPAN CALIBRATION
C DDD:HH:MM IIII FINISH SPAN CALIBRATION
C DDD:HH:MM IIII START MULTI-POINT CALIBRATION
C DDD:HH:MM IIII FINISH MULTI-POINT CALIBRATION
C DDD:HH:MM IIII START CALIBRATION HOLD
C DDD:HH:MM IIII FINISH CALIBRATION HOLD
To do a remote adjustment via the RS-232 interface, the host computer should issue a message
with the following format:
C command
5-30
Teledyne API Model 400A O3 Analyzer Instruction Manual, 02260, Rev. F
Table 5-15: Calibration Commands
Command
Description
1
C [id] ZERO [1|2]
Start remote zero calibration.
C [id] LOWSPAN [1|2]1
Start remote low span calibration.
C [id] SPAN [1|2]1
Start remote span calibration.
C [id] ASEQ number
Start remote calibration sequence number (1-3).
C [id] EXIT
Terminate remote zero or span calibration.
C [id] ABORT
Abort rest of calibration sequence and immediately resume
sampling.
C [id] COMPUTE ZERO
Calculates a new slope and offset during zero calibration. Must be
in zero calibration first.
C [id] COMPUTE SPAN
Calculates a new slope and offset during span calibration. Must be
in span calibration first.
1
This parameter selects the range to calibrate. Nothing or a value of 1 selects the low range; a value
of 2 selects the high range.
Calibration commands are shown on Table 5-15. When a calibration command is issued, the
CPU will respond by issuing a status report. For example if the host computer issues the
command:
C SPAN
to do a zero check, the CPU will send the status report
C DDD:HH:MM IIII START SPAN CALIBRATION
to the RS-232 output.
5-31
Teledyne API Model 400A O3 Analyzer Instruction Manual, 02260, Rev. F
5.5.6 DIAGNOSTIC Commands and Messages
The diagnostic Signal I/O mode and Ozone Generator Calibration (IZS option) can be entered
from the RS-232 port as well as from the front panel. The diagnostics commands available are
listed in Table 5-16.
Table 5-16: Diagnostic Commands
Command
Function
D ENTER SIG
Enter diagnostic Signal I/O mode
D ENTER O3GEN
Perform ozone generator calibration
D EXIT
Exit diagnostics mode
D LIST
Prints all Signal I/O values. See Table 9-3 for Signal Definitions
D name[=value]
Examines or sets I/O signal. See Table 9-3 for a list of signals. Must issue
D ENTER SIG before using this command.
D RESET
Reset analyzer(same as power on)
D RESET RAM
Resets analyzer and erases RAM. Erases all DAS data. Keeps setup
variables and calibration
D RESET EEPROM
Resets analyzer and erases RAM and EEPROM. Erases all DAS data.
Resets all setup variables to factory default. Resets calibration values.
These commands may be used whether the diagnostics have been entered from the keyboard
(SETUP-DIAG) or the RS-232 (D ENTER).
Whenever the diagnostic mode is entered or exited, a report is issued to the RS-232 output.
Table 5-17 summarizes the diagnostic reports.
Table 5-17: Diagnostic Reports
Report
C DDD:HH:MM IIII ENTER DIAGNOSTIC MODE
C DDD:HH:MM IIII EXIT DIAGNOSTIC MODE
5-32
Teledyne API Model 400A O3 Analyzer Instruction Manual, 02260, Rev. F
5.5.7 DAS Commands and Message
Data from individual Data Channels in the DAS system can be retrieved through the RS-232
interface. The command format for printing the data for a Data Channel is shown below:
D [id] REPORT “name” [RECORDS=number] [COMPACT|VERBOSE]
parameters in [ ] are optional
id is the analyzers ID number (SETUP-MORE-COMM-ID)
name is the Data Channel name(must be enclosed in quotes)
number is the number of records to print, beginning with the most recent(if this parameter is not
specified then all available records for the Data Channel are printed)
COMPACT|VERBOSE refers to the report format.
5.5.7.1 Average Concentration Report
To report the last record from the CONC1 Data Channel in VERBOSE format, type:
D REPORT “CONC1” RECORDS=1 VERBOSE
D 63:11:40 0400 CONC : AVG CONC1 = 482.7 PPB<CRLF>
CONC is a user-defined name used to identify the data channel. Following the colon, the report
indicates that the average concentration of range 1 (“CONC1”) is 482.7 PPB.
5.5.7.2 Calibration Parameter Report
The following DAS report shows the calibration parameters measured during the last span
calibration. Notice that there are three lines of output in the report; this is because three data
parameters are monitored by this data channel. The name used to identify the channel is
“CALDAT,” which stands for calibration data.
In the first line, after the colon, the report indicates that the new slope (“SLOPE1”) calculated is
0.976. In the second line the report indicates that the new offset (“OFSET1”) calculated is
0.0 mV. And in the third line the report indicates that the instantaneous concentration
(“ZSCNC1”) prior to calculating a new slope and offset was 409.9 ppb.
5-33
Teledyne API Model 400A O3 Analyzer Instruction Manual, 02260, Rev. F
To report the last record from the CALDAT Data Channel in VERBOSE format, type:
D REPORT “CALDAT” RECORDS=1 VERBOSE
D 63:11:45 0400 CALDAT: INST SLOPE1= 0.976<CRLF>
D 63:11:45 0400 CALDAT: INST OFSET1= 0.0mV<CRLF>
D 63:11:45 0400 CALDAT: INST ZSCNC1= 409.9 PPB<CRLF>
The same calibration parameter report may also appear in compact format, with all the
parameters on one line, as shown below. This format reduces the amount of output, and is well
suited for parsing by a host computer.
D 63:11:45 0400 CALDAT: 1 0.976 0.0 409.9<CRLF>
Verbose Data Report Format
There are two kinds of data reports: verbose (with a lot of detail) and compact (with just the data
point values). The verbose format looks like the following:
D 31:10:06 0412 CONC : AVG O3CNC1=6.8 PPB
This report uses the format of a leading first character (“D” in this example), a time stamp
(“31:10:06”), and the instrument ID (“0412”).
The other fields in the report are the data collector name (“CONC”), the sampling mode
(“AVG”), the data point (“O3CNC1”), the data point value (“6.8”), and the units (“PPB”). Due
to the length of the message, only one data point may be printed per line.
Compact Data Report Format
The compact format looks like the following:
D 31:10:06 0412 CONC : 1 6.8
The fields up to the colon are the same as for the verbose format, but the next fields are different.
The fields following the colon are the line number (“1” in the example), and the data point value
(“6.8”). Presumably the user (or remote computer) knows all of the other information about the
data point value.
This report format is particularly useful when you are sampling more than one data point because
up to five data points may be printed per line. The line number field is necessary because a
single report may span multiple lines. A compact report with two data points, such as the
PNUMTC Data Channel, looks like this:
D 31:10:06 0412 PNUMTC: 1 800.0 29.7
5-34
Teledyne API Model 400A O3 Analyzer Instruction Manual, 02260, Rev. F
Example 1: To report the last 100 records from the CONC Data Channel in Verbose format type:
D REPORT “CONC” RECORDS=100 VERBOSE
Example 2: To report all the records from the PNUMTC Data Channel in Compact format type:
D REPORT “PNUMTC” COMPACT
Automatic DAS Report Generation
Automatic RS-232 reporting can be independently enabled and disabled for each Data Channel.
For all default data channels, automatic reporting is initially set to “OFF.” If this property is
turned on, the Data Channel will issue a report with a time and date stamp to the RS-232 port
every time a data point is logged. The report format is shown below:
D 31:10:06 0412 CONC : AVG O3CNC1=6.8 PPB
To enable RS-232 reporting for a specific Data Channel follow the procedure in Table 5-18.
Table 5-18: Setup DAS Data Channel
Step
Action
Comment
1.
Press SETUP-DAS-EDIT
Enter DAS menu to edit Data Channels
2.
Press PREV/NEXT
Select Data Channel to edit
3.
Press EDIT
Edit selected Data Channel
4.
Press SET> (5 times)
Scroll through setup properties until RS-232 REPORT: OFF is
displayed
5.
Press EDIT
Edit selected setup property
6.
Toggle OFF to ON
Change RS-232 REPORT property
7.
Press ENTR
Accepts change
8.
Press EXIT (4 times)
Exits back to sample menu
5-35
Teledyne API Model 400A O3 Analyzer Instruction Manual, 02260, Rev. F
5.5.8 Internal Variables
The M400A’s internal variables can be viewed and modified via the RS-232 port, just as the
operator modifies the variables using the SETUP mode.
To view a variable's value, the host computer issues a command of the following format:
V variable
The CPU will respond by sending a message of the following format to the RS-232 output:
V VARIABLE=VALUE WARNLO WARNHI <DATALO-DATAHI>
In both cases "VARIABLE" is the name of the variable that is being viewed. "VALUE" is the
current value of the variable. "WARNLO" and "WARNHI" are the low and high warning
limits, respectively, but may not appear for all variables since some variables do not have
warning limits. "DATALO" and "DATAHI" are the low and high data entry limits, respectively,
and are given for all variables. The CPU will not set a variable's value or warning limits to
values, which are outside of the data entry limits.
For example, to see the analyzer UV lamp temperature set point, the host computer would issue
the command:
V PHOTO_LAMP
and the CPU would respond with something like:
V DDD:HH:MM 0400 PHOTO_LAMP=52.0 51.0 61.0 (0.0 TO 100.0) DEGC
indicating that the current set point is 52.0 degrees, the warning limits are 51.0 to 61.0 degrees,
and the data entry limits are 0 to 100 degrees.
To modify a variable's value, almost the same format of command is used:
V variable=value warnlo warnhi
The “variable” field is the name of the variable being modified, and the “value” field is the new
value. “warnlo” and “warnhi” are the low and high warning limits, respectively, and may only
be given if the variable uses warning limits. They are optional for variables that use warning
limits and, if not given, the warning limits are not changed.
5-36
Teledyne API Model 400A O3 Analyzer Instruction Manual, 02260, Rev. F
After changing the variable's value, the CPU will respond with:
V VARIABLE=VALUE WARNLO WARNHI [DATALO-DATAHI]
which should reflect the new value. The values in square brackets are not required for all
variables. If needed, the values are included on the command line, separated by spaces. For
example, to change the instrument ID, the host computer would issue a command like this:
V MACHINE_ID=1234
and the CPU should respond with:
V DDD:HH:MM IIII MACHINE_ID = 1234 (0-9999)
5-37
Teledyne API Model 400A O3 Analyzer Instruction Manual, 02260, Rev. F
INTENTIONALLY BLANK
5-38
Teledyne API Model 400A O3 Analyzer Instruction Manual, 02260, Rev. F
6 OPTIONAL HARDWARE AND SOFTWARE
6.1 Rack Mount Option
This option, including slides and rack mounting ears, permits the Analyzer to be mounted in a
standard 19" wide x 30" deep RETMA rack.
6.2 Zero/Span Valve Option
The Zero/Span Valve option consists of two PTFE solenoid valves inside the instrument that
admit sample gas or externally generated calibration gas. The valves are controlled from the
front panel push-buttons, an AutoCal sequence, RS-232 commands, or by remote contact
closure.
See Figure 2-2 for details on the pneumatic connections to the zero/span valves. Zero air and
span gas should be supplied in excess of 800 cc/min demand of the Analyzer. The manifold
should be vented outside the enclosure and be of sufficient length and diameter to prevent back
diffusion and pressure effects.
Span gas can by generated by a M700 Mass Flow Calibrator equipped with appropriate options
or an M401 UV Photometric Ozone Calibrator. Zero air can be supplied by the Teledyne API
M701 Zero Air Module.
6.3 Internal Zero/Span (IZS) Option
The IZS option includes a Sample/Cal valve, a Zero Air Scrubber, and a temperature-controlled
ozone generator. The concentration of ozone can be set through front panel controls or the RS232 port. The ozone generator lamp intensity can be monitored and fed back via the CPU for
very accurate and stable ozone concentration if the feedback detector option is purchased.
In the Zero mode, ambient air is drawn through the charcoal scrubber and filter, through the unenergized ozone generator, the energized sample/cal valve and into the Analyzer (see Figure 84).
In the Span mode, the ozone generator is energized and the resulting span gas is drawn through
the energized sample/cal valve into the analyzer.
To set the ozone concentration for the IZS ozone generator, press CALS-CONC-O3GEN and
enter a value from 50 to 1500 in the current units. A value of 0 turns the lamp OFF. See
Section 9.3.9 for information on how to calibrate the IZS concentration setting.
If the IZS feedback option is purchased the ozone generator feedback mode should be set to
REF. To set the feedback mode to REF, press SETUP-MORE-O3-MODE-REF and press
ENTR. The IZS ozone lamp drive circuit will be actively adjusted to maintain the IZS reference
set point.
6-1
Teledyne API Model 400A O3 Analyzer Instruction Manual, 02260, Rev. F
Setup the IZS Option
To set the Low Span concentration (precision point) for Auto-Cal Sequences, press SETUPMORE-VARS. Press NEXT until the O3_GEN_LOW1 variable is displayed. To change the
concentration, press EDIT and enter the desired concentration. If the analyzer is being operated
in Dual or Auto-Range mode then there is a second variable named O3_GEN_LOW2 that sets
the Low Span concentration for the High range. This variable can be changed using the method
described above.
When the CALS button is pressed, the ozone generator is turned on and the lamp drive is
determined by looking up the user-specified concentration in the table computed during the
calibration procedure, and interpolating between the two nearest concentration readings in the
table. This yields the initial lamp drive setting and the IZS reference set point.
6.4 Autocal Setup to Support IZS and Z/S Valve Option
The AutoCal system allows unattended periodic operation of the IZS and Z/S valve options by
using the M400A’s internal time of day clock. A variety of zero or span checks can be
programmed.
The Autocal system operates by executing SEQUENCES. It is possible to program and run up to
3 sequences, each sequence operates in one of 8 MODES as shown in Table 6-1 to Table 6-4.
Table 6-1: AutoCal MODE Setup Parameters
Mode No.
Mode Name
Action
1.
Disabled
Disables the Sequence
2.
Zero
Does a Zero check
3.
Zero-Lo
Does a Zero and low concentration Span check
4.
Zero-Hi
Does a Zero and a high concentration Span check
5.
Zero-Lo-Hi
Does a Zero check
6.
Lo
Does a low concentration Span check
7.
Hi
Does a high concentration Span check
8.
Lo-Hi
Does a low and high concentration span Check
6-2
Teledyne API Model 400A O3 Analyzer Instruction Manual, 02260, Rev. F
For each mode there are seven attributes that the MODE can have that control operational details
of the SEQUENCE. They are:
Table 6-2: AutoCal ATTRIBUTE Setup Parameters
Attribute No.
Attribute Name
Action
1.
Timer Enabled
Turns on the Sequence timer
2.
Starting Date
Sequence will operate after Starting Date
3.
Starting Time
Time of day sequence will run
4.
Delta Days
Number of days to skip between each Seq. execution
5.
Delta Time
Number of hours later each “Delta Days” Seq is to be run.
6.
Duration
Number of minutes the sequence operates
Example of enabling sequence #2, keystroke sequence is in Table 6-2:
Do a span check ½ hour later every other day, lasting 15 minutes, without calibration.
Table 6-3: AutoCal Example SEQUENCE Setup
Mode and Attribute
Value
Comment
Mode and Attribute
Value
Comment
Sequence
2
Define Seq. #2
Mode
4
Select Span Mode
Timer Enable
ON
Enable the timer
Starting Date
Sept. 4, 1996
Start after Sept 4
Starting Time
01:00
First Span starts at 1:00AM
Delta Days
2
Do Seq #2 every other day
Delta Time
00:30
Do Seq #2 ½ hr later each time
Duration
15.0
Operate Span valve for 15 min
Calibrate
NO
Do not calibrate at end of Seq
6-3
Teledyne API Model 400A O3 Analyzer Instruction Manual, 02260, Rev. F
Table 6-4: AutoCal Example SEQUENCE Keystrokes
Step
Action
Comment
1.
Press SETUP-ACAL
This button sequence will cause the AUTOCAL menu to be displayed.
2.
Press PREV-NEXT
Press PREV-NEXT until SEQ 2 is displayed
3.
Press MODE
Select the MODE menu
3.
Press PREV-NEXT
Press PREV NEXT to scroll to SPAN
4.
Press ENTR
ENTR selects the SPAN MODE
5.
Press SET
Select the SET menu to change the sequence attributes
6.
Press PREV-NEXT
Scroll the SET menu to TIMER ENABLE
7.
Press EDIT
Allows changing the TIMER ENABLE attribute, select ON
8.
Press ENTR
ENTR changes TIMER ENABLE to ON
9.
Press PREV-NEXT
Repeat steps 6-9 for each attribute
10.
Press EXIT
Press the EXIT key to return to upper level menus
6.5 Current Loop Option
The M400A can be configured with a voltage-to-current converter for 0-20mA or 4-20mA
current loop output on the REC analog output channel. REC current loop channel is calibrated
independently of the voltage output channel (DAS). This calibration must be repeated every time
an A/D - D/A calibration is performed. To calibrate the current output, see Section 9.3.4.
NOTE
Do not exceed 60 V peak voltage between current
loop outputs and instrument ground.
6-4
Teledyne API Model 400A O3 Analyzer Instruction Manual, 02260, Rev. F
6.6 Metal Wool Scrubber Option
The measurement technique in a M400A is to measure the ratio of light absorbed by sample gas
with and without ozone. A scrubber is used to remove ozone from the sample stream during the
reference cycle. This scrubber option is desirable in some high humidity sites.
The Metal Wool Scrubber uses fine metal wire to create a large surface area to catalytically
scrub ozone. To work effectively, the scrubber must be heated. The temperature is not critical,
therefore the scrubber is continuously heated with a 12 watt heater, which produces a typical
temperature of about 70o C at an ambient temperature of 25o C.
6-5
Teledyne API Model 400A O3 Analyzer Instruction Manual, 02260, Rev. F
INTENTIONALLY BLANK
6-6
Teledyne API Model 400A O3 Analyzer Instruction Manual, 02260, Rev. F
7 CALIBRATION AND ZERO/SPAN CHECKS
There are several ways to check and adjust the calibration of the M400A. These different
methods are summarized in Table 7-1. Calibration controls are shown in Table 7-2. In addition,
all of the methods described in this section can be initiated and controlled via the RS-232 port.
Zero air is used for all calibration procedures, less than 1 ppb of major interferents, and a dew
point of -5o C or less. Ozone should be generated by a stable source and its concentration verified
with an Ozone Primary Standard or Transfer Standard.
Before Calibration
1. Use the SETUP-RNGE menu to set the range the instrument will be operated in.
2. If you are using any of the following features, they must be set up before calibration:
A. Autoranging or Remote Ranging - See Section 7.7
B. Independent Ranges - See Section 7.7
C. Normal calibration assumes that these features are already set up.
NOTE
If you are using the M400A for EPA monitoring, only the
calibration method described in Section 7.6 should be used.
NOTE
If there are any problems completing the following procedures,
refer to Section 9.2.6 and 9.2.7 – Inability to Span and Zero.
7-1
Teledyne API Model 400A O3 Analyzer Instruction Manual, 02260, Rev. F
Table 7-1: Types of Zero/Span Check and Calibration
Section
Type of Cal or Check
Description
7.1
Manual Z/S Check or Calibration
through the sample port
This calibration option uses calibration gas
coming in through the sample port. IZS and
Zero/Span valves, if present, do not operate.
7.2
Manual Z/S Check or Calibration with
Z/S Valves Option.
How to operate Zero/Span Valves Option. Can be
used to check or adjust calibration.
7.3
Manual Z/S Check with IZS Option
How to operate IZS option. Can be used to check
or adjust calibration.
7.4
Automatic Z/S Check with Z/S Valves
or IZS Options
Use of AutoCal to operate Z/S valves or IZS once
per day to check the calibration.
7.5
Use of Z/S Valves or IZS with Remote
Contact Closure
Operates Z/S valves or IZS with rear panel
contact closures. Without valves or IZS, can be
used to switch instrument into zero or span cal
mode. Used for either checking or adjusting
zero/span.
7.6
EPA Protocol Calibration
Covers methods to be used if data is for EPA
equivalency monitoring.
7.7
Special Calibration Requirements for
Independent Ranges or AutoRanging
Covers special requirements if using Independent
Range or AutoRange
7.8
References
Contains a list of references on quality control
and calibration.
7-2
Teledyne API Model 400A O3 Analyzer Instruction Manual, 02260, Rev. F
Table 7-2: Calibration Controls
Button Sequence
Function
CALZ
Begin zero check
CALZ-ZERO-ENTR
Adjust O3 conc to zero
CALS
Begin span check
CALS-CONC-SPAN
Set O3 span cal target value
CALS-CONC-O3GEN
Set O3 generator setpoint
CALS-SPAN-ENTR
Adj O3 conc to span value
CAL
Begin M-P cal.
CAL-ZERO-ENTR
Adjust O3 conc zero value
CAL-SPAN-ENTR
Adjust O3 conc span value
CAL-CONC-SPAN
Set O3 span cal target value
SETUP-ACAL-SEQ1
Setup auto-cal SEQ1
SETUP-ACAL-SEQ2
Setup auto-cal SEQ2
SETUP-ACAL-SEQ3
Setup auto-cal SEQ3
EXIT
Exit calibration mode
7-3
Teledyne API Model 400A O3 Analyzer Instruction Manual, 02260, Rev. F
7.1 Manual Zero/Span Check or Cal with Input from Sample
Port
Operators can manually check the zero and span set-points of the Analyzer while in sample
mode by allowing the instrument to sample calibration gas and pressing the CAL button. This is
also referred to as a multi-point calibration. To do this type of calibration, refer to Table 7-3,
Table 7-4 and Table 7-5. Figure 7-1 shows the pneumatic diagram for calibration.
Table 7-3: Manual Zero Calibration Procedure - Zero Gas Thru Sample Port
Step Number
Action
Comment
1.
Press CAL
The M400A enters the calibrate mode from sample mode. The
zero gas must come in through the sample port.
2.
Wait 10 min
Wait for reading to stabilize at zero value.
3.
Press ZERO
If you change your mind after pressing ZERO, you can still
press EXIT here without zeroing the instrument.
4.
Press ENTR
Pressing ENTR actually changes the calculation equations.
5.
Press EXIT
M400A returns to sampling. Immediately after calibration,
data is not added to the DAS averages.
If the ZERO button is not displayed, this means that the zero reading is too far out of adjustment
to do a reliable calibration. The reason for this must be determined before the analyzer can be
calibrated. See Section 9.2 for troubleshooting calibration problems. Pressing EXIT will bring
you back to the Sample menu or you can leave the instrument in CAL mode if you are also going
to make a span check.
7-4
Teledyne API Model 400A O3 Analyzer Instruction Manual, 02260, Rev. F
Table 7-4: Enter Expected Span Gas Concentrations Procedure
Step Number
1.
Action
Comment
Press CAL-CONC
This key sequence causes the M400A to prompt for the
expected ozone concentration.
Enter the ozone span concentration value by pressing the key
under each digit until the expected value is set. This menu can
also be entered from CALS or CALZ.
2.
Press ENTR
ENTR stores the expected ozone span value.
3.
Press EXIT
Returns instrument to SAMPLE mode.
Table 7-5: Manual Span Calibration Procedure - Span Gas thru Sample Port
Step Number
Action
Comment
1.
Press CAL
The M400A enters the calibrate mode. Ozone span gas should
be entering the sample port.
2.
Wait 10 min
Wait for reading to stabilize at span value.
3.
Press SPAN
If you change your mind after pressing SPAN, you can still
press EXIT here without spanning the instrument.
4.
Press ENTR
Pressing ENTR actually changes the calculation equations and
causes the instrument to read the ozone span value entered in
Table 7-4.
5.
Press EXIT
M400A returns to sampling. Immediately after calibration,
data is not added to the DAS averages.
If the SPAN button is not displayed, this means that the span reading is too far out of adjustment
to do a reliable calibration. The reason for this must be determined before the analyzer can be
calibrated. See Section 9.2 for troubleshooting calibration problems.
7-5
Teledyne API Model 400A O3 Analyzer Instruction Manual, 02260, Rev. F
Figure 7-1: Calibration Pneumatic Diagram
7-6
Teledyne API Model 400A O3 Analyzer Instruction Manual, 02260, Rev. F
7.2 Manual Zero/Span Check or Cal with Zero/Span Valves
Option
Zero and Span checks using the Zero/Span Valves option is similar to that described in
Section 7.1, except that external zero and span gas is supplied to the analyzer through the
zero/span valves rather than through the sample inlet port. Procedures are covered in Table 7-6
and Table 7-7.
The Zero/Span valve option can be operated from the front panel keyboard. With the Zero/Span
valve option the zero and span gas come enters through ports on the rear panel of the instrument.
Table 7-6: Manual Zero Calibration Procedure - Z/S Valves
Step Number
Action
Comment
1.
Press CALZ
The analyzer enters the zero calibrate mode. This switches the
sample/cal and zero/span valves to allow zero gas to come in
through the zero gas inlet port in the rear panel.
2.
Wait 10 min
Wait for reading to stabilize at zero value.
3.
Press ZERO
If you change your mind after pressing ZERO, you can still
press EXIT here without zeroing the instrument.
4.
Press ENTR
Pressing ENTR actually changes the calculation equations,
forcing the reading to zero.
5.
Press EXIT
M400A returns to sample mode. Immediately after
calibration, readings do not go into the DAS averages.
Refer to Table 7-4 to enter expected ozone span concentration values.
Table 7-7: Manual Span Calibration Procedure - Z/S Valves
Step Number
Action
Comment
1.
Press CALS
The M400A enters the calibrate mode from sample mode.
This operates the sample/cal and zero/span valves to allow
span gas to come in through the cal gas inlet port in the rear
panel.
2.
Wait 10 min
Wait for reading to stabilize at span value.
3.
Press SPAN
If you change your mind after pressing SPAN, you can still
press EXIT here without spanning the instrument.
4.
Press ENTR
Pressing ENTR actually changes the calculation equations.
5.
Press EXIT
M400A returns to sampling. Immediately after calibration,
data is not added to the DAS averages.
7-7
Teledyne API Model 400A O3 Analyzer Instruction Manual, 02260, Rev. F
7.3 Manual Zero/Span Check with IZS Option
Using the IZS option, the operator can check the zero and span points of the analyzer by pressing
the CALZ or CALS button. With the IZS Option installed, the CALZ and CALS buttons operate
the ozone generator/ zero air system.
Pressing CALZ switches the Sample/Cal valve to allow the analyzer to draw air through the zero
air scrubber and the un-energized ozone generator. The zero point can be just checked or the
instrument can be zeroed when in this mode. See Table 7-6 for the procedure.
Pressing CALS switches the Sample/Cal valve so that air is drawn through the zero air scrubber
and the energized ozone generator. After a few minutes the O3 reading should approach the span
level. The span point can be checked or adjusted when in this mode. See Table 7-7 for the
procedure.
The IZS ozone generator concentration setpoint can be changed by pressing CALS-CONCO3GEN, and entering the desired ozone concentration. Calibration of the IZS ozone generator is
covered in Section 9.3.9.2.
7.4 Automatic Zero/Span Check
Automatic zero/span checking (Z/S check) must be enabled in the setup mode. The Teledyne
API model 400A Photometric Ozone Analyzer with IZS or Zero/Span Valves option offers
capability to check one zero and two span points automatically on a timed basis, or through
remote RS-232 operation (see Section 5.5).
If the IZS option is installed its concentration must be set separately. Refer to Section 9.3.9 for
information on adjusting the IZS concentration.
Under the SETUP-ACAL menu, there are three separate auto-sequences called SEQ1, SEQ2,
and SEQ3. Under each SEQ, there are five setup parameters that affect zero/span checking: the
mode, the starting date of the check, the time of day for check, the number of days delay between
checks, and time shift each check is executed. These are described individually below. Use the
PREV and NEXT buttons to scroll through the three sequences. The mode for each sequence is
displayed. To change the mode for any of the sequences, scroll to the desired sequence and press
the MODE button. Use the PREV and NEXT buttons to select one of the modes shown below
and press ENTR.
7-8
Teledyne API Model 400A O3 Analyzer Instruction Manual, 02260, Rev. F
Sequence Mode:
1. DISABLED (Sequence is disabled)
2. ZERO
3. ZERO-LO
4. ZERO-HI
5. ZERO-LO-HI
6. LO
7. HI
8. LO-HI
To change the setup parameters for a sequence, press the SET button. Pressing the <SET and
SET> buttons allows you to scroll through the setup parameters and edit them by pressing the
EDIT button. The function of each setup parameter is described below:
Starting Date: The starting date for the sequence is entered in the format of MM/DD/YY, where
MM is the month, DD is the date, and YY is the year. Enter starting date and press ENTR or
EXIT to leave the date unchanged.
Starting Time: To set the time of day for the sequence, enter in the format HH:MM, where HH is
the hour in 24-hour format (i.e. hours range from 00 to 23) and MM is the minute (00 - 59).
Enter the time of day for calibration check and then press ENTR to accept the new time or
EXIT to leave the time unchanged.
NOTE
The programmed start time must be a minimum of 5 minutes later
than the real time clock (See Section 5.3.6 for setting real time clock).
Delta Days: The number of delta days is the number of days between each auto-sequence. Enter
desired number of delay days (0-365) and press ENTR.
Delta Time: The delta time allows the automatic Z/S check time-of-day to be delayed in the
format of HH:MM, where HH is the hour from 00 to 23 and MM is the minutes (00-59). The
delta days and delta time are added together to determine the total delay between sequences. The
delta time parameter allows you to advance or retard the starting time by a fixed amount each
time the sequence is run. For example: Setting the delta days to 1 day and the delta time to
15 minutes will delay the starting time for the sequence by 15 minutes each day. If you want to
have the sequence run at the same time every day, simply set the delta time to zero.
7-9
Teledyne API Model 400A O3 Analyzer Instruction Manual, 02260, Rev. F
NOTE
Avoid setting two or more sequences at the same time of the day. Any
new sequence which is initiated whether from a timer, the RS-232, or the
contact closure inputs will override any sequence which is in progress.
Duration: The duration of each step of the sequence. Enter the duration in minutes(1-60) and
press ENTR.
Range to cal: This setup parameter is enabled only if the range mode is set to Dual or Auto. This
parameter determines which range the sequence will check.
Examples of possible sequences are as following under any one of three available SEQx.
Example 1: to perform a 15 minute zero-span(100 %) check once per day at 10:30 pm, 12/20/97.
1. MODE: ZERO-HI
2. STARTING DATE: 12/20/97
3. STARTING TIME: 22:30
4. DELTA DAYS: 1
5. DELTA TIME: 00:00
6. DURATION: 15
Example 2: to perform a 15 min zero-low span check once per day retarding 15 minutes everyday
starting at 11:30 pm, 12/20/97.
1. MODE: ZERO-LO
2. STARTING DATE: 12/20/97
3. STARTING TIME: 23:30
4. DELTA DAYS: 0
5. DELTA TIME: 23:45
6. DURATION: 15
7-10
Teledyne API Model 400A O3 Analyzer Instruction Manual, 02260, Rev. F
Example 3: to perform zero-low-high span check once per week starting at 11:30 pm, 12/20/97
1. MODE: ZERO-LO-HI
2. STARTING DATE: 12/20/97
3. STARTING TIME: 23:30
4. DELTA DAYS: 7
5. DELTA TIME: 00:00
6. DURATION: 15
Example 4: to perform zero-span check once per day at 10:30 pm and zero-low-high span check
once per week starting at 11:30 pm, 12/20/97.
1. Select any one of SEQx and program as example 1.
2. Select any other SEQx and program as example 3. Avoid setting two or more sequences at
the same time of the day.
7-11
Teledyne API Model 400A O3 Analyzer Instruction Manual, 02260, Rev. F
7.5 Use of Zero/Span Valves or IZS with Remote Contact
Closure
A span or zero check may be initiated by means of two rear panel contact closures. See
Figure 2-2 for connector location. The CPU monitors logic signals once each second and looks
for a positive level on either signal. The instrument responses are shown in Table 7-8. The
external contact closure should be closed for at least 1 second. When both states go to 0 (open) the
CPU will go into DAS hold-off. The remote calibration signals may be activated in any
sequence. It is recommended that contact closures remain closed for at least 10 minutes to
establish a reliable reading. See Section 6.2 and 6.3 for further details.
Table 7-8: Remote Contact Closure Truth Table
Contact Closure States
EXT_ZERO_CAL
EXT_SPAN_CAL
Instrument State
0 (open)
0
Sample Mode
1 (closed)
0
Zero check
0
1
Span check
1
1
Low span check
7-12
Teledyne API Model 400A O3 Analyzer Instruction Manual, 02260, Rev. F
7.6 EPA Protocol Calibration
In order to insure that high quality, accurate measurement information is obtained at all times,
the Model 400A O3 Analyzer must be calibrated prior to use. A quality assurance program
centered on this aspect and including attention to the built-in warning features of the Model
400A, periodic inspection, regular zero/span checks and routine maintenance is paramount to
achieving this. See Table 7-9.
In order that the users have a more complete appreciation and better understanding of the factors
involved in assuring continuous and reliable information from the Model 400A it is strongly
recommended that the publication Quality Assurance Handbook for Air Pollution Measurement
Systems (abbreviated, Q.A. Handbook Volume II) be purchased from the National Technical
Information Service11 (phone 703-487-4650) or Center for Environmental Research
Information11 or the U.S. Government Printing Office (phone 202-783-3238). Special attention
should be paid to Section 2.7 which deals with O3 analyzers and ozone photometers and upon
which most of this section is based. Specific regulations regarding the use and operation of
ambient O3 analyzers can be found in Reference 1 at the end of this Section.
References given in Sections 7.6 and 7.7 are listed in Section 7.8.
7.6.1 M400A Calibration – General Guidelines
In general, calibration is the process of adjusting the gain and offset of the M400A against some
recognized standard. The reliability and usefulness of all data derived from any analyzer depends
primarily upon its state of calibration. In this section the term dynamic calibration is used to
express a multipoint check against known standards and involves introducing gas samples of
known concentration into the instrument in order to adjust the instrument to a predetermined
sensitivity and to produce a calibration relationship. This relationship is derived from the
instrumental response to successive samples of different known concentrations. As a minimum,
three reference points and a zero point are recommended to define this relationship. The true
values of the calibration gas must be traceable to an ozone primary standard.
All monitoring instrument systems are subject to some drift and variation in internal parameters
and cannot be expected to maintain accurate calibration over long periods of time. Therefore, it
is necessary to dynamically check the calibration relationship on a predetermined schedule. Zero
and span checks must be used to document that the data remains within control limits. These
checks are also used in data reduction and validation.
To ensure accurate measurements of the O3 levels, the Model 400A must be calibrated at the
time of installation and re-calibrated as necessary (Section 2.7.2 of the Q.A. Manual 11).
7-13
Teledyne API Model 400A O3 Analyzer Instruction Manual, 02260, Rev. F
Care must be exercised to ensure that the calibration system meets the guidelines outlined in the
revised Appendix D, 40 CFR 50.1 Detailed calibration procedures are also discussed in the
Technical Assistance Document (TAD).2 Dynamic multipoint calibration of the M400A must be
conducted by using either the UV photometric calibration procedure or a certified transfer
standard. The equipment (i.e. calibrator and UV photometer) that is needed to carry out the
calibration is commercially available, or it can be assembled by the user.
Calibrations should be carried out at the field monitoring site. The Analyzer should be in
operation for at least several hours (preferably overnight) before calibration so that it is fully
warmed up and its operation has stabilized. During the calibration, the M400A should be in the
CAL mode, and therefore sample the test atmosphere through all components used during
normal ambient sampling and through as much of the ambient air inlet system as is practicable.
If the instrument will be used on more than one range, it should be calibrated separately on each
applicable range (See Section 7.7). Calibration documentation should be maintained with each
analyzer and also in a central backup file.
Personnel, equipment, and reference materials used in conducting audits must be independent
from those normally used in calibrations and operations. Ozone audit devices must be referenced
to a primary UV photometer or one of the Standard Reference Photometers maintained by NIST
and the USEPA.
Table 7-9: Activity Matrix for Procurement of Equipment and Supplies
Equipment/
Supplies
Acceptance Limits
Frequency and Method
of Measurement
Action if Requirements
are not Met
Model 400A
Performance according to
specifications in
Table 4-1, Sec. 2.0.4
(Ref 11)
Manufacturer strip chart
recording of analyzer's
performance or
equipment documentation
Have the manufacturer
adjust and rerun the
performance checks
Strip chart
recorder
Compatible with output
signal of analyzer;
recommended chart width
of 15cm (6 inches)
Visually observe upon
receipt
Return to supplier
Sampling lines Constructed of Teflon,
and manifold
quartz, glass; fittings may
be S/S
As above
As above
Calibration
system
Check upon receipt
As above
Meets the guidelines of
Section 2.7.9 (Ref 11) and
TAD-2 or TAD-3
7-14
Teledyne API Model 400A O3 Analyzer Instruction Manual, 02260, Rev. F
7.6.2 Calibration Equipment, Supplies, and Expendables
The measurement of O3 in ambient air requires a certain amount of basic sampling equipment
and supplemental supplies. These include, but are not limited to, the following:
1. Equivalent Method UV Photometric O3 analyzer, such as the Teledyne API Model 400A
2. Strip chart recorder and/or data logging system
3. Sampling lines
4. Sampling manifold
5. UV (ultraviolet) photometric calibration system
6. Certified calibration transfer standards
7. Zero-air source
8. Ozone generation device ("calibrator")
9. Spare parts and expendable supplies
10. Record forms
11. Independent audit system
When purchasing these materials, a log book should be maintained as a reference for future
procurement needs and as a basis for future fiscal planning.
Spare Parts and Expendable Supplies
In addition to the basic equipment discussed above, it is necessary to maintain an inventory of
spare parts and expendable supplies. Section 8 describes the parts that require periodic
replacement and the frequency of replacement. Section 10 contains a list of spare parts and kits
of expendables. Based on these requirements, the management of the monitoring network can
determine which parts and the quantity of each that should be available at all times.
7-15
Teledyne API Model 400A O3 Analyzer Instruction Manual, 02260, Rev. F
7.6.3 Calibration Gas and Zero Air Sources
Production of Zero Air
Devices that condition ambient air by drying and removal of pollutants are available on the
commercial market such as the Teledyne API Model 701 Zero Air Module. We recommend this
type of device for generating zero air. Detailed procedures for generating zero air are in TAD2.
Production of Span Gas
Because of the instability of O3, the certification of O3 concentrations as Standard Reference
Materials (SRMs) is impractical, if not impossible. Thus, when O3 concentration standards are
required, they must be generated and certified locally. Ozone concentration standards may also
be required at the monitoring site to check the span and precision of ambient O3 monitors
between calibrations.
Ozone standards can be classified into two basic groups: primary standards and transfer
standards.
1. A primary O3 standard is an O3 concentration standard that has been dynamically generated
and assayed by UV photometry in accordance with the procedures prescribed by the U.S.
Environmental Protection Agency (EPA) under Title 40 of the Code of Federal Regulations,
Part 50, Appendix D (40 CFR Part 50).
2. An O3 transfer standard is a transportable device or apparatus, which, together with
associated operational procedures, is capable of accurately reproducing O3 concentration
standards or producing accurate assays of O3 concentrations which are quantitatively related
to a primary O3 standard.
A Standard Reference Photometer (SRP) has been developed as a primary O3 standard by the
U.S. National Institute of Standards and Technology (NIST) and the EPA. It is a highly stable,
highly precise, computer-controlled instrument for assaying O3 concentrations. NIST maintains
one or more “master” SRP’s in lieu of an SRM for ozone. A nationwide network of regionally
located SRPs enables State and local air monitoring agencies to compare their O3 standards with
authoritative O3 standards maintained and operated under closely controlled conditions. Other
SRPs are located in foreign countries.
7-16
Teledyne API Model 400A O3 Analyzer Instruction Manual, 02260, Rev. F
Currently, the U.S. SRP Network consists of SRP’s located at:
1. EPA's National Exposure Research Laboratory (NERL), in Research Triangle Park, North
Carolina
2. EPA's Region I Environmental Services Division in Lexington, Massachusetts
3. EPA's Region II Environmental Services Division in Edison, New Jersey
4. EPA's Region IV Environmental Services Division in Athens, Georgia
5. EPA's Region V Environmental Science Division in Chicago, Illinois
6. EPA's Region VI Environmental Services Division in Houston, Texas
7. EPA's Region VII Environmental Services Division in Athens, Georgia
8. EPA's Region VIII Environmental Services Division in Denver, Colorado
9. The State of California Air Resources Board (CARB) in Sacramento, California
Commercial UV photmeters meeting the requirements of a primary ozone standard as set forth in
40 CFR Part 50 are available and are currently being used by air monitoring agencies. Agencies
have been encouraged to intercompare their primary O3 standards (and O3 transfer standards) as
part of their routine quality assurance (QA) programs.
7.6.4 Data Recording Device
Either a strip chart recorder, data acquisition system, digital data acquisition system should be
used to record the data from the M400A RS-232 port or analog outputs. If analog readings are
being used, the response of that system should be checked against a NIST referenced voltage
source or meter. Data recording device should be capable of bi-polar operation so that negative
readings can be recorded. Strip chart recorder should be at least 6” (15 cm) wide.
7.6.5 Record Keeping
Record keeping is a critical part of all quality assurance programs. Standard forms similar to
those that appear in this manual should be developed for individual programs. Three things to
consider in the development of record forms are:
1. Does the form serve a necessary function?
2. Is the documentation complete?
3. Will the forms be filed in such a manner that they can easily be retrieved when needed?
7-17
Teledyne API Model 400A O3 Analyzer Instruction Manual, 02260, Rev. F
7.6.6 Dynamic Multipoint Calibration Procedure
The EPA-prescribed calibration procedure is based on photometric assays of O3 concentrations
in a dynamic flow system. It is based on the same principles that the M400A uses to measure
ozone. The theory is covered in Section 4.1 of this manual.
Since the accuracy of the calibration standards obtained by this calibration procedure depends
entirely on the accuracy of the photometer, it is very important that the photometer is operating
properly and accurately. The fact that the photometer makes a ratio measurement (I/Io) rather
than an absolute measurement eases this task.
The checks described in this section, if carried out carefully, will provide reasonable confidence
that a photometer which has the required inherent capability is operating properly. Checks
should be carried out frequently on a new calibrator, and a chronological record of the results
should be kept. If the record of the photometer performance shows continued adequacy and
reliability, the frequency of the checks can be reduced with no loss of confidence in the
photometer. (The record, however, may indicate the need for continued frequent verification of
the system condition.) Even where the record shows excellent stability, the checks should still be
carried out monthly as the possibility of malfunction is always present.
A well-designed properly built photometer is a precision instrument, and once it is operating
adequately, it is likely to continue to do so for some time, particularly if the photometer is
stationary and is used intermittently under ideal laboratory conditions. If the photometer is
commercially manufactured, it should include an operation/instruction manual. Study the manual
thoroughly and follow its recommendations carefully and completely.
7.6.6.1 Linearity test
Because the required photometric measurement is a ratio, a simple linearity check of the
photometer is a good indication of accuracy. Linearity of commercially made photometers may
be demonstrated by the manufacturer. The linearity test is conducted by first generating and
assaying an ozone concentration near the upper range limit (i.e., 0.1, 0.5 or 1.0 ppm) of the
system. Then dilute the concentration using a configuration similar to that shown in Figure 7-1.
Add a flow of zero-air (Fd) to the flow of original generated concentration (Fo) and pass the
mixture through a mixing chamber to ensure a homogeneous concentration at the output
manifold. For this test, the flow rates Fo and Fd must be accurately measured within ±2% of the
true value. To help ensure accurate flow measurements, the two flowmeters should be of the
same general type and one should be standardized against the other. The dilution ratio R is
calculated as the flow of the original concentration (Fo) divided by the total flow (Fo + Fd),
R=
Fo
( Fo + Fd )
7-18
Teledyne API Model 400A O3 Analyzer Instruction Manual, 02260, Rev. F
With stable, high resolution flowmeters and with careful technique, R should be accurate to
within ± 1%. When Fd has been adjusted and R has been calculated, assay the diluted
concentration with the photometer and then compare the diluted assay (A2) with the original
undiluted assay (A1) by calculating the percentage of linearity error (E) according to the
following equation.
E=
A1 − ( A2 / R)
× 100
A1
This linearity error must be <5% in magnitude and should be <3% for a well-performing system.
NOTE
The result is not the true linearity error because it includes possible
errors in the flow measurements, the test is only an indicator.
If the linearity error is >5% or is greater than you expect it to be, check and verify the accuracy
of the flow dilution carefully before assuming that the photometer is inaccurate. The test should
be carried out several times at various dilution ratios, and an averaging technique should be used
to determine the final result. If the linearity error is excessive and cannot be attributed to flow
measurement inaccuracy, check the photometer system for:
1. Dirty or contaminated cell, lines, or manifold
2. Inadequate "conditioning" of the system
3. Leaking of two-way valve or other system components
4. Contaminated zero-air
5. Non-linear detectors in the photometer
6. Faulty electronics in the photometer
7-19
Teledyne API Model 400A O3 Analyzer Instruction Manual, 02260, Rev. F
7.6.6.2 O3 Loss Correction Factor
In spite of scrupulous cleaning and preconditioning, some O3 may be lost on contact with the
photometer cell walls and the gas-handling components. Any significant loss of O3 must be
quantitatively determined and used to correct the output concentration assay. In any case, the O3
loss must not exceed 5%. To determine O3 loss, calibrate a stable ozone analyzer with the UV
calibration system, assuming no losses. Then generate an O3 concentration, and measure it with
the analyzer as close as possible to the actual inlet of the photometer cell. Similarly, measure the
concentration as close as possible to the outlet of the cell. Repeat each measurement several
times to get a reliable average, and measure the concentration at the output manifold. The tests
should be repeated at several different O3 concentrations.
The percentage of O3 loss is calculated as,
% O3 loss =
Cm −
( Ci + Co )
2
× 100
Cm
where
Ci = O3 concentration measured at cell inlet, ppm
Co = O3 concentration measured at cell outlet, ppm, and
Cm = O3 concentration measured at output manifold, ppm.
For other configurations, the % O3 loss may have to be calculated differently. The ozone loss
correction factor is calculated as,
L = 1 - 0.01 × % O3 loss.
7.6.7 Multipoint Calibration
The procedures for multipoint calibration of an O3 analyzer by UV photometry or a transfer
standard have been specified in the Federal Register.1 To facilitate these procedures, operational
and calculation data forms have been developed. These forms will aid in conducting calibrations
and quality assurance checks. A detailed description of the calibration theory and procedures for
UV photometry and transfer standards is in the Federal Register1 and TAD.2,3 Table 7-15 is a
matrix for the actual dynamic calibration procedure.
In general, ambient monitors are always calibrated in situ without disturbing their normal
sampling setup, except for transferring the sample inlet from the ambient sampling point to the
calibration system.
7-20
Teledyne API Model 400A O3 Analyzer Instruction Manual, 02260, Rev. F
7.6.7.1 The Calibration Procedure
Calibration should be performed with a primary UV photometer or by a transfer standard. The
user should be sure that all flow-meters are calibrated under the conditions of use against a
reliable standard such as a soap bubble meter or wet test meter. All volumetric flow rates should
be corrected to 25°C and 760 mm Hg. A discussion of the calibration of flow-meters is in
Section 2.1.2 (Ref. 11).
A newly installed M400A should be operated for several hours or preferably overnight before
calibration to allow it to stabilize. A brand new M400A (fresh from the factory) may require
several days of operation to fully stabilize. Allow the photometer or transfer standard to warm up
and stabilize before use, particularly if stored or transported in cold weather.
7.6.7.2 Zero Calibration Procedure
Since the zero gas concentration is defined as 0 ppb, it is not necessary to enter the expected zero
value. The following Table 7-10 details the zero calibration procedure.
Table 7-10: Zero Calibration Procedure
Step Number
Action
Comment
1.
Press CAL
The M400A enters the calibrate mode from sample mode. Note:
The analyzer does not operate the zero/span valves in this mode,
the zero gas enters through the sample port.
2.
Wait 10 min
Wait for reading to stabilize at the zero value.
3.
Press ZERO
If you change your mind after pressing ZERO, you can still
press EXIT here without zeroing the instrument.
4.
Press ENTR
Pressing ENTR actually changes the calculation equations.
5.
Press EXIT
M400A returns to the SAMPLE mode.
7.6.7.3 Span Calibration Procedure.
Adjust the ozone generation system to produce 80% of the URL. Enter the ozone span gas
concentration using the procedure in Table 7-11. The expected span concentrations need not be
re-entered each time a calibration is performed unless they are changed.
7-21
Teledyne API Model 400A O3 Analyzer Instruction Manual, 02260, Rev. F
Table 7-11: Expected Span Gas Concentration Procedure
Step Number
Action
Comment
1.
Press CAL-CONCSPAN
This key sequence causes the M400A to prompt for the
expected ozone span concentration. Enter the span
concentration value by pressing the key under each digit until
the expected value is set. This menu can also be entered from
CALS or CALZ.
2.
Press ENTR
ENTR stores the expected span value.
3.
Press EXIT
Returns instrument to SAMPLE mode.
Span the instrument by following the procedure in Table 7-12.
Table 7-12: Span Calibration Procedure
Step Number
Action
Comment
1.
Press CAL
The M400A enters the calibrate mode from sample mode.
2.
Wait 10 min
Wait for readings to stabilize at span values.
3.
Press SPAN
If you change your mind after pressing SPAN, you can still
press EXIT here without spanning the instrument.
4.
Press ENTR
Pressing ENTR actually changes the calculation equations.
5.
Press EXIT
M400A returns to SAMPLE mode.
The analog voltage output should measure 80% of the voltage range selected. (e.g. 4.00VDC if
0-5V output is selected.) The readings on the front panel display should be equal to the expected
span concentration entered in the procedure given in Table 7-11. See the Troubleshooting
Section 9.2.8 if there are problems.
After the zero and the 80% URL points have been set, generate five approximately evenly
spaced calibration points between zero and 80% URL without further adjustment to the
instrument. Allow the instrument to sample these intermediate concentrations for about 10
minutes each and record the instrument responses.
Plot the analyzer responses versus the corresponding calculated concentrations to obtain the
calibration relationships. Determine the straight line of best fit (y = mx + b) determined by the
method of least squares (e.g., see Appendix J of Volume I of the Q.A. Handbook6).
After the best-fit line has been drawn, determine whether the analyzer response is linear. To be
considered linear, no calibration point should differ from the best-fit line by more than 2% of full
scale.
7-22
Teledyne API Model 400A O3 Analyzer Instruction Manual, 02260, Rev. F
7.6.7.4 Span Drift Check
The first level of data validation should accept or reject monitoring data based upon routine
periodic analyzer checks. It is recommended that results from the Level 1 span checks
(Section 2.7.2 (Ref. 11)) be used as the first level of data validation. This means up to two weeks
of monitoring data may be invalidated if the span drift for a Level 1 span check is ≥ 25%. For
this reason, it may be desirable to perform Level 1 checks more often than the minimum
recommended frequency of every 2 weeks.
7.6.8 Auditing Procedure
An audit is an independent assessment of the accuracy of data. Independence is achieved by
having the audit made by an operator other than the one conducting the routine field
measurements and by using audit standards and equipment different from those routinely used in
monitoring. The audit should be a true assessment of the measurement process under normal
operations without any special preparation or adjustment of the system. Routine quality control
checks (such as zero and span checks in Section 7.1) conducted by the operator are necessary for
obtaining and reporting good quality data, but they are not considered part of the auditing
procedure.
Three audits are recommended: two performance audits and a systems audit. These audits are
summarized in Table 7-15 at the end of this section. See Sections 2.0.11 and 2.0.12 of the Q.A.
Manual (Ref. 11) for detailed procedures for a systems audit and for a performance audit,
respectively.
Proper implementation of an auditing program will serve a twofold purpose: (1) to ensure the
integrity of the data and (2) to assess the data for accuracy. The technique for estimating the
accuracy of the data is given in Section 2.0.8 of the Q.A. Manual (Ref 11).
7.6.9 Multipoint Calibration Audit
A performance audit consists of challenging the continuous analyzer with known concentrations
of O3 within the measurement range of the analyzer. The difference between the known
concentration and the analyzer response is obtained, and an estimate of the analyzer's accuracy is
determined.
7.6.9.1 Multipoint Audit Procedure
Known concentrations of O3 must be generated by a stable O3 source and assayed by the primary
UV photometric procedure or may be obtained using a certified O3 transfer standard. Procedures
used to generate and assay O3 concentrations are the same as those described in Section 7.6.6. If
during a regular field audit, the differences recorded for most analyzers are either negatively or
positively biased, a check of the calibrator used in routine calibrations of the analyzers may be
advisable.
7-23
Teledyne API Model 400A O3 Analyzer Instruction Manual, 02260, Rev. F
The test atmosphere must pass through all filters, scrubbers, conditioners, and other components
used during normal ambient sampling and through as much of the ambient air inlet system as
practical. Be sure the manifold includes a vent to assure that the M400A inlet is at atmospheric
pressure.
Audit Procedure:
1. Turn on the zero-air flow in the audit device.
2. After stabilization, record the analyzer zero.
3. Generate an up-scale audit point.
4. After stabilization, record the O3 analyzer response.
5. Assay the audit concentration using an audit UV photometer or certified transfer standard.
6. Repeat steps 4 and 5 for the two remaining up-scale audit points. If analyzer is operated on
0-1.0 ppm range, four up-scale audit points must be used.
Results:
Results of the audit will be used to estimate the accuracy of the ambient air quality data.
Calculation of accuracy is described in Section 2.0.8 of the Q.A. Manual.
7.6.9.2 Data Processing Audit
Data processing audit involves reading a strip chart record, calculating an average, and
transcribing or recording the results on the SAROAD form. The data processing audit should be
performed by an individual other than the one who originally reduced the data. Initially, the audit
should be performed 1 day out of every 2 weeks of data. For two 1-hour period within each day
audited, make independent readings of the strip chart record and continue through the actual
transcription of the data on the SAROAD form. The 2 hours selected during each day audited
should be those for which either the trace is most dynamic (in terms of spikes) or the average
concentration is high.
The data processing audit is made by calculating the difference, d = [O3]R - [O3]A
where
d = the difference between measured and audit values, ppm,
[O3]R = the recorded analyzer response, ppm, and
[O3]A = the data processing O3 concentration, ppm.
If d exceeds ± 0.02 ppm, check all of the remaining data in the 2 week period.
7-24
Teledyne API Model 400A O3 Analyzer Instruction Manual, 02260, Rev. F
7.6.10 System Audit
A system audit is an on-site inspection and review of the quality assurance activities used for the
total measurement system (sample collection, sample analysis, data processing, etc.); it is a
qualitative appraisal of system quality.
Conduct the system audit at the startup of a new monitoring system and periodically (as
appropriate) as significant changes in system operations occur.
The recommended audit schedule depends on the purpose for which the monitoring data are
being collected. For example, Appendix A, 40 CFR 588 requires that each analyzer in State and
Local Air Monitoring Networks (SLAMS) be audited at least once a year. Each agency must
audit 25% of the reference or equivalent analyzers each quarter. If an agency operates less than
four reference or equivalent analyzers, it must randomly select analyzers for re-auditing so that
one analyzer will be audited each calendar quarter and so that each analyzer will be audited at
least once a year.
Appendix B, 40 CFR 589 requires that each PSD (prevention of significant deterioration)
reference or equivalent analyzer be audited at least once a sampling quarter. Results of these
audits are used to estimate the accuracy of ambient air data.
7.6.11 Calibration Frequency
To ensure accurate measurements of the ambient O3 concentrations, calibrate the M400A at the
time of installation, and recalibrate it:
1. No later than 3 months after the most recent calibration or performance audit which indicated
the M400A response to be acceptable; or
2. Following any one of the activities listed below:
A. An interruption of more than a few days in M400A operation,
B. Any repairs which might affect its calibration,
C. Physical relocation of the M400A
D. Any other indication (including excessive zero or span drift) of possible significant
inaccuracy of the unit.
Following any of the activities listed in above, perform Level 1 zero and span checks to
determine if a calibration is necessary. If the zero and span drifts do not exceed the calibration
limits in Section 2.0.9 Q.A. Manual (Ref. 11) (or limits set by the local agency), a calibration
need not be performed.
7-25
Teledyne API Model 400A O3 Analyzer Instruction Manual, 02260, Rev. F
7.6.12 Summary of Quality Assurance Checks
Essential to quality assurance are scheduled checks for verifying the operational status of the
monitoring system. The operator should visit the site at least once each week. Every two weeks a
Level 1 zero and span check must be made on the analyzer. Level 2 zero and span checks should
be conducted at a frequency desired by the user. Definitions of these terms are given in
Table 7-13.
In addition, an independent precision check between 0.08 and 0.10 ppm may be required at least
once every two weeks. Table 7-16 summarizes the quality assurance activities for routine
operations. A discussion of each activity appears in the following sections.
To provide for documentation and accountability of activities, a checklist should be compiled
and then filled out by the field operator as each activity is completed.
7-26
Teledyne API Model 400A O3 Analyzer Instruction Manual, 02260, Rev. F
Table 7-13: Definition of Level 1 and Level 2 Zero and Span Checks
from Section 2.0.9 of Q.A. Handbook (Ref. 11)
LEVEL 1 ZERO AND SPAN CALIBRATION
LEVEL 2 ZERO AND SPAN CHECK
A Level 1 zero and span calibration is a
simplified, two-point analyzer calibration used
when analyzer linearity does not need to be
checked or verified. (Sometimes when no
adjustments are made to the analyzer, the Level 1
calibration may be called a zero/span check, in
which case it must not be confused with a Level
2 zero/span check.) Since most analyzers have a
reliably linear or near-linear output response with
concentration, they can be adequately calibrated
with only two concentration standards (two-point
concentration). Furthermore, one of the standards
may be zero concentration, which is relatively
easily obtained and need not be certified. Hence,
only one certified concentration standard is
needed for the two-point (Level 1) zero and span
calibration. Although lacking the advantages of
the multipoint calibration, the two-point zero and
span calibration--because of its simplicity--can
be (and should be) carried out much more
frequently. Also, two-point calibrations are easily
automated. Frequency checks or updating of the
calibration relationship with a two-point zero and
span calibration improves the quality of the
monitoring data by helping to keep the
calibration relationship more closely matched to
any changes (drifts) in the analyzer response.
A Level 2 zero and span check is an "unofficial"
check of an analyzer's response. It may include
dynamic checks made with uncertified test
concentrations, artificial stimulation of the
analyzer's detector, electronic or other types of
checks of a portion of the analyzer, etc.
7-27
Level 2 zero and span checks are not to be used
as a basis for analyzer zero or span adjustments,
calibration updates, or adjustment of ambient
data. They are intended as quick, convenient
checks to be used between zero and span
calibrations to check for possible analyzer
malfunction or calibration drift. Whenever a
Level 2 zero or span check indicates a possible
calibration problem, a Level 1 zero and span (or
multipoint) calibration should be carried out
before any corrective action is taken.
If a Level 2 zero and span check is to be used in
the quality control program, a "reference
response" for the check should be obtained
immediately following a zero and span (or
multipoint) calibration while the analyzer's
calibration is accurately known. Subsequent
Level 2 check responses should then be
compared to the most recent reference response
to determine if a change in response has
occurred. For automatic Level 2 zero and span
checks, the first scheduled check following the
calibration should be used for the reference
response. It should be kept in mind that any
Level 2 check that involves only part of the
analyzer's system cannot provide information
about the portions of the system not checked and
therefore cannot be used as a verification of the
overall analyzer calibration.
Teledyne API Model 400A O3 Analyzer Instruction Manual, 02260, Rev. F
Table 7-14: Daily Activity Matrix
Frequency and
Method of
Measurement
Action if Requirements
are not Met
Characteristic
Acceptance Limits
Shelter Temperature
Mean temperature
between 22o C and 28o C
(72o F and 82o F), daily
fluctuations not greater
than ± 2o C
Check thermograph
chart daily for
variations not greater
than ± 2oC (4oF)
1. Mark strip chart for
the affected time
period
Sample Introduction
System
No moisture, foreign
material, leaks,
obstructions; sample line
connected to manifold
Weekly visual
inspection
Clean, repair or replace
as needed
Recorder
1. Adequate ink supply
and chart paper
Weekly visual
inspection
1. Replenish and chart
paper supply
2. Repair/adj temp
control
2. Adjust recorder time
to agree with clock
note on chart
2. Legible ink traces
3. Correct settings of
chart speed and range
switches
4. Correct time
Analyzer Operational
Settings
1. Flow and regulator
indicators at proper
settings
Weekly visual
inspection
Adjust or repair as
needed
Zero and span within
tolerance limits as
described in Subsec. 9.1.3
of Sec. 2.0.9
(Ref. 11)
Level 1 zero and span
every 2 weeks; Level
2 between Level 1
checks at frequency
desired by user
1. Isolate source error,
and repair
Assess precision as
described in Sec. 2.0.8
(Ref. 11)
Every 2 weeks,
Sec. 2.0.8 (Ref. 11)
Calculate, report
precision,
Sec. 2.0.8 (Ref. 11)
2. Temperate indicators
cycling or at proper
levels
3. Analyzer in samp
mode
4. Zero/span controls
locked
Analyzer Operational
Check
Precision Check
7-28
2. After corrective
action recalibrate
analyzer
Teledyne API Model 400A O3 Analyzer Instruction Manual, 02260, Rev. F
Table 7-15: Activity Matrix for Audit Procedure
Frequency and
Method of
Measurement
Action if Requirements
are not Met
Audit
Acceptance Limits
Multipoint calibration
audit
The difference between
At least once a quarter
the measured and the audit (Sec. 2.0.8 of Ref. 11)
values as a measure of
accuracy (Sec. 2.0.8 of
Ref. 11)
Re-calibrate the analyzer
Data processing audit
Adhere to stepwise
procedure for data
reduction (Sec. 8.4); no
difference exceeding
± 0.02 ppm
Perform independent
check on a sample of
recorded data, e.g.,
1 day out of every 2
weeks of data, 2 hours
for each day
Check all remaining data
if one or more audit
checks exceeds
± 0.02 ppm
Systems audit
Method described in this
section of the Handbook
At the startup of a new Initiate improved
monitoring system, and methods and/or training
periodically as
programs
appropriate;
observation and
checklist
Table 7-16: Activity Matrix for Data Reduction, Validation and Reporting
Activity
Acceptance Limits
Frequency and
Method of
Measurement
Action if Requirements
are not Met
Data reduction
Stepwise procedure,
Sec. 2.7.4 Ref. 11
Follow the method for
each strip chart.
Review the reduction
procedure
Span drift check
Level 1 span drift check
<25%, Sec. 2.7.3 Ref 11
Check at least every 2
weeks; Sec. 2.7.3,
Ref. 11.
Invalidate data; take
corrective action;
increase frequency of
Level 1 checks until data
is acceptable
Strip chart edit
No sign of malfunction
Visually check each
strip chart.
Void data for time
interval for which
malfunction is detected
Data reporting
Data transcribed to
SAROAD hourly data
form; Ref. 10
Visually check
Review the data
transcribing procedure
7-29
Teledyne API Model 400A O3 Analyzer Instruction Manual, 02260, Rev. F
Table 7-17: Activity Matrix for Calibration Procedures
Calibration Activities Acceptance Limits
Frequency and
Method of
Measurement
Action if Requirements
are not Met
Zero-air
Zero-air, free of
contaminants (Sec. 2.0.7
Ref. 11.)
Compare the new
Zero-air against
Source known to Be
free of Contaminants
Return to supplier, or
take corrective action
with generation system
as appropriate
Calibrator
Meet all requirement for
UV photometer as
specified in Sec. 2.7.2
Q.A. Manual, TAD2 and
the Fed. Reg.1 or approve
Transfer Standard
Sec. 2.7.1, Q.A. Manual
and TAD3.
Re-certify transfer
Standard against
Primary UV
Photometer at least
Twice each quarter
Return to supplier, or
take corrective action
with system as
appropriate
Multipoint
According to Calibration
procedure (Sec. 2.7.2
Q.A. Manual Ref 11) and
Federal Register; data
recorded.
Calibrate at least
Once, quarterly;
Anytime an audit
Indicates discrepancy;
After maintenance that
May affect the
Calibration
(Subsec 2.1) Federal
Register1
Repeat the calibration
7.6.13 ZERO and SPAN Checks
A system of Level 1 and Level 2 zero span checks (see Table 7-13) is recommended. These
checks must be conducted in accordance with the specific guidance given in Subsection 9.1 of
Section 2.0.9 (Ref. 11). Level 1 zero and span checks should be conducted at least every two
weeks. Level 2 checks should be conducted in between the Level 1 checks at a frequency
determined by the user. Span concentrations for both levels should be between 70 and 90% of
the measurement range.
7-30
Teledyne API Model 400A O3 Analyzer Instruction Manual, 02260, Rev. F
7.6.13.1 Assessment of Monitoring Data for Precision and Accuracy
A periodic check is used to assess the data for precision. A one-point precision check must be
carried out at least once every 2 weeks on each analyzer at an O3 concentration between 0.08 and
0.10 ppm. The analyzer must be operated in its normal sampling mode, and the precision test gas
must pass through all filters, scrubbers, conditioners, and other components used during normal
ambient sampling. Those standards used for calibration or auditing may be used.
Estimates of single instrument accuracy for ambient air quality measurements from continuous
methods are calculated according to the procedure in Section 2.0.8 (Ref 11). The audit procedure
is described in Section 7.6.8.
7.6.14 Recommended Standards for Establishing Traceability
Ozone is the only criteria pollutant for which standard concentrations for calibration cannot be
directly traceable to an NIST-SRM (National Institute of Standards - Standard Reference
Material).
7.6.14.1 Ozone Working Standard Traced to NIST Ozone Standard
To maintain a uniform and consistent set of references, the USEPA maintains 9 Standard
Reference Photometers (SRP) around the US. It is suggested that the regional office of the EPA
be contacted for the location of a SRP nearby and that the standards be intercompared. This
assures a uniform standard for ozone concentration is applied everywhere.
7.6.14.2 Other Methods of Establishing Traceability
To provide a reference against which calibration standards for O3 must be compared, the U.S.
EPA has prescribed a reference calibration procedure based on the principle of UV light
absorption by ozone at a wavelength of 254 nm.1 This procedure provides an authoritative
standard for all O3 measurement. Ozone transfer standards may also be used for calibration if
they have been certified against the UV calibration procedure.3
7-31
Teledyne API Model 400A O3 Analyzer Instruction Manual, 02260, Rev. F
7.7 Calibration of Independent Ranges or Autoranging
7.7.1 Zero/Span Calibration on Autorange or Dual Ranges
If the analyzer is being operated in Dual Range mode or Auto-Ranging mode, then the High and
Low ranges must be independently calibrated. When the analyzer is in Dual or Auto Range mode
you will be prompted to enter the range to calibrate whenever you enter a calibration command
from the front panel. Press HIGH or LOW followed by the ENTR button to proceed with the
calibration. To calibrate the other range you must exit to the sample menu and restart the
calibration. See Section 5.3.4 for more information on the Range Modes. Table 7-18 shows an
example of how to calibrate the two ranges with calibration gas coming in through the sample
port:
Table 7-18: Calibration of AutoRange or Dual Range
Step Number
Action
Comment
0.
Setup
AutoRange or Dual Range features must be selected from the
SETUP-RNGE menu before calibration.
1.
Press CAL
Analyzer enters M-P calibration mode. Calibration gas source
should be set to deliver zero gas to the sample port.
2.
Press
LOW-ENTR
Select range to calibrate. This will enable zero calibration on
the low range.
3.
Wait 15 min.
Wait for O3 reading to stabilize at zero value.
4.
Press
ZERO-ENTR
Changes calibration equations for Low range so analyzer will
read zero.
5.
Press
CONC-SPAN
Enter span gas concentration for Low range.
6.
Key in span
concentration
Enter span gas concentration for Low Range. Set calibration
gas source to deliver span concentration.
7.
Press ENTR
8.
Wait 15 min.
Wait for O3 reading to stabilize at Low span value.
9.
Press
SPAN-ENTR
Changes calibration equations for Low range so analyzer will
read span value.
10.
Press EXIT
Exits back to sample menu.
11.
Cal High Range
Repeat Steps 1-10 for High Range.
7-32
Teledyne API Model 400A O3 Analyzer Instruction Manual, 02260, Rev. F
7.8 References
1. Calibration of Ozone Reference Methods, Code of Federal Regulations, Title 40, Part 50,
Appendix D.
2. Technical Assistance Document for the Calibration of Ambient Ozone Monitors, EPA
publication available from EPA, Department E (MD-77), Research Triangle Park, N.C.
27711. EPA-600/4-79-057, September 1979.
3. Transfer Standards for Calibration of Ambient Air Monitoring Analyzers for Ozone, EPA
publication available from EPA, Department E (MD-77), Research Triangle Park, N.C.
27711. EPA-600/4-79-056, September 1979.
4. Ambient Air Quality Surveillance, Code of Federal Regulations, Title 40, Part 58.
5. U.S. Environmental Protection Agency. Evaluation of Ozone Calibration Procedures.
EPA-600/S4-80-050, February 1981.
6. Quality Assurance Handbook for Air Pollution Measurement Systems. Vol. I.
EPA-600/9-76-005. March 1976.
7. Field Operations Guide for Automatic Air Monitoring Equipment, U.S. Environmental
Protection Agency, Office of Air Programs; October 1972. Publication No. APTD-0736,
PB 202-249, and PB 204-650.
8. Appendix A - Quality Assurance Requirements for State and Local Air Monitoring Stations
(SLAMS), Code of Federal Regulations, Title 40, Part 58.
9. Appendix B - Quality Assurance Requirements for Prevention of Significant Deterioration
(PSD) Air Monitoring, Code of Federal Regulations, Title 40, Part 50, Appendix D.
10. Aeros Manual Series Volume II: Aeros User's Manual. EPA-450/2-76-029, OAQPS
No. 1.2-039. December 1976.
11. Quality Assurance Handbook for Air Pollution Measurement Systems, Volume II,
(abbreviated Q.A. Handbook Volume II) National Technical Information Service (NTIS).
Phone (703) 487-4650 part number PB 273-518 or the USEPA Center for Environmental
Research Information (513) 569-7562 part number EPA 600/4/77/027A.
7-33
Teledyne API Model 400A O3 Analyzer Instruction Manual, 02260, Rev. F
INTENTIONALLY BLANK
7-34
Teledyne API Model 400A O3 Analyzer Instruction Manual, 02260, Rev. F
8 MAINTENANCE
8.1 Maintenance Schedule
Table 8-1 shows a typical maintenance schedule for the Model 400A. Please note that in certain
environments (i.e. dusty, very high ambient pollutant levels) some maintenance procedures may
need to be performed more often than shown.
NOTE
The M400A must be re-calibrated after any of
the maintenance procedure are performed.
8-1
Teledyne API Model 400A O3 Analyzer Instruction Manual, 02260, Rev. F
Table 8-1: M400A Maintenance Schedule
Item
Jan
Feb
Mar
Apr
May
Jun
Jul
Aug
Sep
Oct
Nov
Dec
Action
Sample Filter
Element
Replace weekly or
as needed
IZS Zero Air
Scrubber
Replace every 6
months
Pump Diaphragm
Replace every 12
months
ZERO Air Filter
Replace every 12
months
O3 Scrubber
Replace every 2
years
Sample Cell
Inspect annually.
Clean as necessary
Sample Flow
Check annually
Leak Check
Check after
maintenance
IZS Zero Air Filter
Replace every two
years
8-2
Teledyne API Model 400A O3 Analyzer Instruction Manual, 02260, Rev. F
8.2 Replacing the Sample Particulate Filter
Procedure - Refer to Figure 8-1:
The particulate filter should be inspected often for signs of plugging or contamination. It is also
common for dirt particles to absorb O3, thus causing those readings to be low.
Any contamination on particulate filter or its holder can affect the output of the analyzer for 15
min. to an hour. This contamination can be as little as fingerprints on the filter element or on the
wetted surfaces of the housing. We recommend that when you change the filter, handle it and the
wetted surfaces of the filter housing as little as possible. Try not to touch any part of the housing,
filter element, teflon retaining ring, glass cover and the Viton o-ring. The analyzer might show a
slight decrease in span concentration after changing the filter. If this is the case, allow the unit to
run until the concentration comes up to the expected span value, this usually takes 15 min to 1
hour.
To check and change the filter:
1. Fold down the M400A front panel.
2. Locate the filter on the left side of the analyzer front panel. See Figure 8-1 for an exploded
view of the filter assembly.
3. Visually inspect the filter through the glass window.
4. If the filter appears dirty, unscrew the hold-down ring, remove the teflon o-ring and then the
filter.
5. Replace the filter, being careful that the element is fully seated in the bottom of the holder.
6. Replace the teflon o-ring with the notches up, then screw on the hold-down ring and hand
tighten.
8-3
Teledyne API Model 400A O3 Analyzer Instruction Manual, 02260, Rev. F
8.3 Cleaning Exterior Surfaces of the M400A
If necessary, the exterior surfaces of the M400A can be cleaned with a clean damp cloth. Do not
submerge any part of the instrument in water or cleaning solution.
CAUTION
Risk of electrical shock. Disconnect power
before performing the following operations.
NOTE
The operations outlined in this chapter are to be
performed by qualified maintenance personnel only.
8.4 Replacing the IZS Zero Air Scrubber
Procedure:
1. Turn off the analyzer.
2. Fold down the Instrument rear panel.
3. Remove the old scrubber by disconnecting the 9/16” fitting at the top of the O3 gen tower,
then removing the DFU filter and scrubber.
4. Replace the DFU filter, if necessary – see Table 8-1 Maintenance Schedule.
5. Unscrew the top of the scrubber canister and replace the activated charcoal.
6. Tighten the cap on the scrubber - HAND TIGHTEN ONLY!
7. Replace the scrubber in its clip on the rear panel.
8. Re-connect the 9/16” fitting to the top of the O3 gen tower.
8-4
Teledyne API Model 400A O3 Analyzer Instruction Manual, 02260, Rev. F
Figure 8-1: Replacing the Particulate Filter
8-5
Teledyne API Model 400A O3 Analyzer Instruction Manual, 02260, Rev. F
8.5 Cleaning the Absorption Tube
1. Remove the center cover from the optical bench.
2. Loosen the knurled nuts at each end of the quartz tube.
3. Using both hands, rotate the tube to free it, then slide the tube towards the back of the
instrument (towards the lamp housing). The front of the tube can now be slid past the
detector block and out of the instrument.
CAUTION
Do not cause the tube to bind against the metal housings.
The tube may break and cause serious injury.
4. Clean the tube with soapy water by running a swab from end-to-end. Rinse with isopropyl
alcohol, de-ionized water, then air dry. Check the cleaning job by looking down the bore of
the tube. It should be free from dirt and lint.
5. Inspect the o-rings that seal the ends of the optical tube (these o-rings may stay seated in the
manifolds when the tube is removed.) If there is any noticeable damage to these o-rings, they
should be replaced. See Section 8.5 for instructions.
6. Re-assemble the tube into the lamp housing and leak check the instrument. Note: It is
important for proper optical alignment that the tube be pushed all the way towards the front
of the optical bench when it is re-assembled. When tightening the knurled nuts, tighten the
nut with one hand and with the other hand pull the tube gently towards the front of the
optical bench as the nut is tightened. This will ensure that the tube is assembled with the
forward end against the stop inside the detector manifold.
8-6
Teledyne API Model 400A O3 Analyzer Instruction Manual, 02260, Rev. F
Figure 8-2: Optical Bench Assembly
8-7
Teledyne API Model 400A O3 Analyzer Instruction Manual, 02260, Rev. F
Figure 8-3: Pneumatic Diagram – Standard Configuration
8-8
Teledyne API Model 400A O3 Analyzer Instruction Manual, 02260, Rev. F
Figure 8-4: Pneumatic Diagram – Zero/Span Valves & IZS Option
8-9
Teledyne API Model 400A O3 Analyzer Instruction Manual, 02260, Rev. F
8.6 Leak Check Procedure
There are two methods of leak checking:
By vacuum: This is the simplest method but it does not show the location of a leak.
If you want to confirm that you do not have a leak, use vacuum.
By pressure: By using bubble solution, this method shows a leak location.
If you know you have a leak, use pressure.
CAUTION
Do not use bubble solution with vacuum. The solution may
contaminate the instrument. Do not exceed 15 PSI pressure.
8.6.1 Auto Leak Check
A quick automatic leak check can be done by the instrument as follows:
1. Press SETUP-MORE-DIAG and enter password.
2. Press NEXT until AUTO LEAK CHECK appears on the top line of the display.
3. Press ENTR.
4. Follow the prompts on the display. You will be asked to cap the sample inlet port (standard
configuration) or the Dry Air Inlet port (units with IZS option.) The rest of the leak check
will be performed automatically and the results of the test will be displayed when it is
complete.
If the instrument fails this test, proceed with a manual leak check as described in the sections
below to pinpoint the leak source.
8-10
Teledyne API Model 400A O3 Analyzer Instruction Manual, 02260, Rev. F
8.6.2 Leak Check Procedure for Standard Unit
1. See Figure 8-3. Disconnect the tubing between the Pressure/Flow Module and the Pump and
cap the tubing end.
2. Cap the end of the Critical Flow Orifice assembly that you just removed.
3. Connect leak checker to sample inlet. Using pressure or vacuum, check for leaks. When
applying pressure or vacuum, be sure to allow enough time (30 sec minimum) for air to bleed
through the critical flow orifice located in the Pressure/Flow Module.
4. The leak-down rate should be less than 1” drop in pressure in 5 min.
8.6.3 Leak Check Procedure for Units with IZS Option
1. See Figure 8-4. Disconnect the nut from the inlet fitting to the sample pump.
2. Cap the end of the tubing that you just removed.
3. Connect leak checker to sample inlet. Using pressure or vacuum, check for leaks as described
above. When applying pressure or vacuum, be sure to allow enough time (30 sec minimum)
for air to bleed through the critical flow orifice located in the Pressure/Flow Module.
4. To leak check the IZS assembly, connect leak checker to Dry Air Inlet port on the rear panel
of the instrument. Leak check as described above. The leak-down rate should be less than 1”
drop in pressure in 5 min.
8.6.4 Leak Check Procedure for Units with Zero/Span Valves
1. Disconnect the nut from the inlet fitting to the sample pump.
2. Cap the end of the tubing that you just removed.
3. Connect leak checker to sample inlet. Using pressure or vacuum, check for leaks as described
above. When applying pressure or vacuum, be sure to allow enough time (30 sec minimum)
for air to bleed through the critical flow orifice located in the Pressure/Flow Module.
4. The zero and span gas inlets should also be individually checked. Since both of these ports
are normally closed, simply connect the leak checker and apply pressure or vacuum.
8-11
Teledyne API Model 400A O3 Analyzer Instruction Manual, 02260, Rev. F
8.7 Prom Replacement Procedure
1. Locate the CPU/V-F card assembly by referring to Figure 2-3.
2. Remove the screw that hold the CPU/V-F card assembly in place and remove the assembly
from the motherboard.
3. Disconnect the three cables that attach the CPU/V-F assembly to the rest of the instrument,
taking note of the polarity.
4. Remove the assembly laying it down on an insulating surface such that the CPU is face up
and the backplane card is on the left. The PROM chip should be at the top center of the CPU.
See Figure 9-1 for component location. The current chip should be labeled with something
like "41AB7STD.1_1". Gently pry the chip from its socket and replace it with the new chip.
Install the chip in the left end of the socket with the notch facing to the right. Make sure that
all of the legs insert into the socket correctly.
5. Re-attach all cables making sure to observe the polarity, then replace the CPU/V-F assembly,
and tighten the screw on the backplane bracket.
6. Turn instrument power "ON" and observe the front panel display. As the analyzer goes
through the setup the version number will be displayed on the front panel. It should read the
same as the version number that was located on the top right corner of the label on the
PROM.
7. Re-enter any non-default settings such as RANGE or AUTOCAL. Check all settings to make
sure that expected setup parameters are present.
8. Re-calibrate the analyzer so that the default slope and intercept are overwritten with the
correct values.
8-12
Teledyne API Model 400A O3 Analyzer Instruction Manual, 02260, Rev. F
9 TROUBLESHOOTING, ADJUSTMENTS
NOTE
The operations outlined in this chapter are to be
performed by qualified maintenance personnel only.
CAUTION
Risk of electrical shock. Disconnect power before
performing the following operations.
General Troubleshooting Hints
The Model 400A has been designed so that problems can be rapidly detected, evaluated and
repaired. During operation, the analyzer continuously performs self-check diagnostics and
provides the ability to monitor the key operating parameters of the instrument without disturbing
monitoring operations.
A systematic approach to troubleshooting will generally consist of the following four steps,
performed in order:
1. Confirm the proper operation of fundamental instrument sub-systems (power supplies, CPU,
display).
2. Note any warning messages and take corrective action as required.
3. Examine the values of all TEST functions and compare to Factory values. Note any major
deviations from the factory values and take correction action as required.
4. Address any dynamic (sample related) problems.
5. Data from our Service Department indicates that 50% of ALL problems are eventually traced
to leaks in the analyzer, calibrator, zero air system, or sample delivery system. Suspect a leak
first.
The following sections provide a guide for performing each of these steps. Figure 2-3 in this
manual shows the general layout of components and sub-assemblies in the analyzer and can be
referenced in performing the checks described in the following sections.
9-1
Teledyne API Model 400A O3 Analyzer Instruction Manual, 02260, Rev. F
9.1 Operation Verification-M400A Diagnostic Techniques
When the Analyzer is turned on, several actions will normally occur which indicate the proper
functioning of basic instrument sub-systems. These actions are:
1. The sample pump should start.
2. The Display should light and display a log-on message followed by a standard "Sample"
display (See Figure 4-2 for illustration of a normal display.)
3. The green sample light on the front panel should turn on.
If these actions all occur, it is probable that the Analyzer's Power Supplies, CPU, and Display are
working properly. If any of these actions fail, this Section contains procedures for diagnosing the
above mentioned subsytems.
9.1.1 Fault Diagnosis with TEST Variables
The Model 400A provides the capability to display the values of TEST functions, which show
key analyzer operating parameters. These TEST functions can be accessed by depressing the
<TST and TST> buttons on the front panel. By comparing the values of TEST functions to
acceptable operating limits, it is possible to quickly isolate and correct most problems.
Table 9-1 provides a list of available Test Functions along with their meaning, their range of
acceptable values, and the recommended corrective actions if the value is not in the acceptable
range. Additionally, Table 2-1 provides a list of TEST values during factory checkout.
9-2
Teledyne API Model 400A O3 Analyzer Instruction Manual, 02260, Rev. F
Table 9-1: Test Function Values
Test Function
Meaning
Acceptable Values
Corrective Action for
Unacceptable Values
RANGE
The full scale range of the analyzer's
analog outputs.
100 to 10,000 ppb
None required
STABIL
Standard deviation of noise reading for
last 10 min of data
Check Table 2-1 for noise
readings at factory checkout
Check Section 9.2.3 for causes and
remedies for excess noise.
O3 MEAS
The most recent detector reading taken in 2500-4700mV
Measure mode.
Check and adjust source lamp and
UV detector as described in
Section 9.3.5
O3 REF
The most recent detector reading taken in 2500-4700mV
Reference mode.
Check and adjust source lamp and
UV detector as described in
Section 9.3.5
O3 GEN
The reading from the IZS feedback
reference detector option.
O3 GEN DRIVE
Drive voltage that programs the IZS ozone 0-5000mV
generator.
VACUUM
Absolute pressure down stream of the
sample flow control orifice.
SAMPLE PRES
The absolute pressure of the sample gas in 0"-2.0" Hg below ambient
the absorption cell
pressure
75-175mV - O3 generator off.
>75mV - O3 Gen on.
Less than ½ of SAMPLE PRES
reading.
Check and adjust the IZS lamp and
reference detector as described in
Section 9.3.9
Most common cause for incorrect
readings is faulty sample pump or
leaks.
Check for pneumatic system
problems. See Section 9.3.12.
Check for pressure transducer
problems. See Section 9.3.10
(table continued)
9-3
Teledyne API Model 400A O3 Analyzer Instruction Manual, 02260, Rev. F
Table 9-1: Test Function Values (Continued)
Test Function
Meaning
Acceptable Values
SAMPLE FLOW
Sample mass flow rate
720-880 cc./min
Corrective Action for
Unacceptable Values
Check for pneumatic system
problems. See Section 9.3.12
Check for flowmeter problems. See
Section 9.3.10
SAMPLE TEMP
The temperature of the sample gas in the
absorption cell
10o-15oC above ambient
See Section 9.2.3
PHOTO LAMP
The temperature of the UV Source Lamp
52oC
See Section 9.3.5
O3 GEN TEMP
The temperature of the IZS ozone
generator lamp option
48oC
See Section 9.3.9
ORIFICE TEMP
Orifice manifold temperature
48oC
BOX TEMP
The temperature inside the analyzer
chassis
1o-5oC above ambient
DCPS
DC Power Supply reference. A composite 2250-2750mV
of voltages provided by the DC Power
Supply
SLOPE
Software gain term
1.0 ± 0.1
Values outside range indicate
contamination, miscalibration or flow
blockage
OFFSET
Software zero offset term
0 ± 20 ppb
Values outside range indicate
contamination.
TIME
Time-of-day clock
00:00 – 23:59
Fast or slow clocks can be adjusted.
See VARS CLOCK_ADJ. Battery in
clock chip on CPU board may be
dead.
9-4
If > 5C above ambient, check fan in
the Power Supply Module. Areas to
the side and rear of instrument should
allow adequate ventilation.
Composite of +5 and ±15VDC.
Values outside range indicate failure
of DCPS.
Teledyne API Model 400A O3 Analyzer Instruction Manual, 02260, Rev. F
9.1.2 Fault Diagnosis with WARNING Messages
The most common and/or serious instrument failures will result in a warning message being
displayed on the front panel. Table 9-2 lists warning messages, along with their meaning and
recommended corrective action. It should be noted that if multiple (more than 2 or 3) warning
messages occur at the same time, it is often an indication that some fundamental analyzer subsystem (power supply, V/F board, CPU) has failed rather than an indication of the multiple
failures referenced by the warnings. In this situation, it is recommended that proper operation of
power supplies (see Section 9.3.8) and the V/F Board (see Section 9.3.4) be confirmed before
addressing the specific warning messages.
9-5
Teledyne API Model 400A O3 Analyzer Instruction Manual, 02260, Rev. F
Table 9-2: Warning Messages
Warning Message
Meaning
Corrective Action
PHOTO REF WARNING
The O3 REFERENCE value is
greater than 5000mV or less than
2500mV
Check and adjust Source Lamp
and UV detector as described in
Section 9.3.5
PHOTO LAMP TEMP
WARNING
Temperature control of the Source
Lamp cannot be maintained at its
52oC set point.
Check source lamp heater and
thermistor as described in
Section 9.3.5
O3 GEN REFERENCE
WARNING
Unable to adjust UV lamp intensity.
Section 9.3.9
O3 GEN LAMP WARNING
The IZS Ozone Generator is unable
to produce at least 1000 ppb at its
maximum output or the IZS
feedback control is adjusting the
Ozone generator drive signal by
more than a factor of two
Check and adjust the IZS lamp
and reference detector as
described in Section 9.3.9
O3 GEN TEMP WARNING
Temperature control of the IZS O3
Gen Lamp cannot be maintained at
its 48oC set point.
Check source lamp heater and
thermistor as described in
Section 9.3.9
SAMPLE PRESSURE
WARNING
The Sample Pressure is less than
15"Hg or is greater than 35"Hg
Check for pressure transducer
problems as described in Section
9.3.10
SAMPLE FLOW WARNING The sample flow is less than 500
cc/min or greater than 1000 cc/min.
Check pressure sensor assembly
using Section 9.3.10
Check pneumatic system using
Section 9.3.12
SAMPLE TEMP WARNING
The Sample Temperature is less than See Section 9.3.2
10oC or is greater than 50oC
BOX TEMP WARNING
The inside chassis temp is less than
10oC or is greater than 50oC
ORIFICE TEMP WARNING
Orifice manifold temp cannot be
maintained at 48oC, check heater or
thermistor
SYSTEM RESET
A power Off-On cycle has occurred
None required
RAM INITIALIZED
Dynamic memory has been reinitialized in response to the
installation of a new PROM or
memory chip
None required
9-6
See Section 9.3.2
Teledyne API Model 400A O3 Analyzer Instruction Manual, 02260, Rev. F
When certain monitored values get outside of normal limits. a WARNING occurs. A warning
message is displayed on the front panel, and a message is sent out the RS-232 port, the FAULT
LED blinks. For certain WARNINGS, a STATUS bit is set. A warning indicates that something
in the system may need to be checked or adjusted. Failure to respond to a warning may result in
poor system performance and/or less accurate data acquisition.
When a warning is displayed, MSG and CLR buttons will appear on display. Pressing MSG
will scroll through the warning messages if there is more than one. CLR will clear the currently
displayed warning message.
If a warning message reappears every time after CLR is pressed, the problem should be
corrected and the Analyzer restarted. Some problems may be temporary and may not reappear
after CLR is pressed, for example the SYSTEM RESET message when the instrument is
powered up.
To ignore the warning messages and display the test measurement again, simply press TST>.
The warning messages will remain active and may be viewed again by pressing MSG.
9.1.3 Fault Diagnosis using DIAGNOSTIC Mode
Diagnostic mode can be thought of as a tool kit to help troubleshoot the instrument.
To access DIAG mode, press SETUP-MORE-DIAG, then press NEXT, PREV to select the
desired mode, then press ENTR. The diagnostic modes are summarized in Table 9-3.
9.1.3.1 Signal I/O
The signal I/O diagnostic mode gives the user access to the digital and analog inputs and outputs
on the V/F board. The digital outputs can be controlled through the keyboard. Any signals
manually changed through the signal I/O menu will remain in effect until you leave the signal
I/O menu. At that time the analyzer will regain control of these signals. To enter the signal I/O
test mode, press SETUP-MORE-DIAG-ENTR. When the diagnostic mode is entered, a
message is sent to the RS-232 channel indicating entry into the diagnostic mode. Use the PREV
and NEXT buttons to scroll through the signals. Edit buttons will appear for the signals that can
be controlled by the user. Press JUMP to skip to a specific I/O Signal.
9-7
Teledyne API Model 400A O3 Analyzer Instruction Manual, 02260, Rev. F
Table 9-3: Diagnostic Mode I/O Signals
No.
Signal
Control
Description
0
SPAN_VALVE
YES
Switches the Zero/Span valve. Use this bit to test
the valve function.
1
CAL_VALVE
YES
Switches the Sample/Cal valve. Use this bit to test
the valve function.
2
PHOTO_REF_VALVE
YES
Switches the photometer ref/meas valve. Use this
bit to test the valve function.
3
PHOTO_LAMP_HTR
YES
Shows the status of the photometer lamp heater.
This has the same function as the LED in the
power supply module.
4
O3_GEN_HTR
YES
Shows the status of the ozone generator heater.
This has the same function as the LED in the
power supply module.
5
LAMP_POWER
YES
Controls input power to the lamp power supply
6
O3_PUMP
YES
Sample pump power
7
ORIFICE_HEATER
YES
Switches orifice mainfold heater
8
PHOTO_DET
NO
Photometer UV detector reading. Typically 25004500mV
9
O3_GEN_DET
NO
O3 Generator UV detector reading. Typically
2500-4500mV
10
PHOTO_SAMP_PRES
NO
Sample pressure in mV. Typical sea level value =
4300mV for 29.9" HG-A.
11
VACUUM_PRESSURE
NO
Pressure reading down stream of orifice
12
DCPS_VOLTAGE
NO
DC power supply composite voltage output.
Typically 2500mV.
13
DAC_CHAN_0
NO
Output of DAC 0 (REC) in mV.
14
DAC_CHAN_1
NO
Output of DAC 0 (DAS) in mV.
15
DAC_CHAN_2
NO
Output of DAC 0 (TEST) in mV.
16
DAC_CHAN_3
NO
Output of DAC 0 (O3 GEN DRIVE) in mV.
17
REF_TEMP
NO
Calibration voltage for thermistor (0oC)
18
BOX_TEMP
NO
Internal analyzer temp in mV
19
ORIFICE_TEMP
NO
Orifice manifold temperature in mV
20
O3_GEN_TEMP
NO
O3 Generator temp. Typically 2270mV for 48C
(table continued)
9-8
Teledyne API Model 400A O3 Analyzer Instruction Manual, 02260, Rev. F
Table 9-3: Diagnostic Mode I/O Signals (Continued)
No.
Signal
Control
Description
21
SAMPLE_TEMP
NO
Sample temp in mV
22
PHOTO_LAMP_TEMP
NO
Photometer Lamp temp. Typically 2740 mV for 52
C
23
REF_TEMP_70
NO
Calibration voltage for thermistors (70o C)
24
CONC_OUT_1
YES
O3 Reading (REC) in mV
25
CONC_OUT_2
YES
Reading (DAS) in mV
26
O3_GEN_DRIVE
YES
O3 Generator Drive in mV
27
TEST_OUTPUT
YES
Test Channel in mV
28
EXT_ZERO_CAL
NO
Shows state of status input bit to cause the M400A
to enter Zero Calibration mode. Use to check
external contact closure circuitry.
29
EXT_LO_SPAN
NO
Shows state of status input bit to cause the M400A
to enter the precision point Calibration mode. Use
to check external contact closure circuitry.
30
EXT_SPAN_CAL
NO
Shows state of status input bit to cause the M400A
to enter the Span Calibration mode. Use to check
external contact closure circuitry.
31
CONTROL_IN_1
YES
Shows state of control input bit for low span check
32
CONTROL_IN_2
YES
Unused control input bit (spare)
33
CONTROL_IN_3
YES
Unused control input bit (spare)
34
ST_SYSTEM_OK
YES
Status Bit - System OK
Logic High = No instrument warning present
Logic Low = 1 or more alarm present
35
ST_LAMP_ALARM
YES
Status Bit - UV Lamp alarm
Logic High = UV lamp output too low
Logic Low = Lamp output normal
36
ST_HIGH_RANGE
YES
Status Bit - Autorange High Range
Logic High = M400A in high range
Logic Low = M400A in low range
37
STATUS_OUT_1
YES
Spare status output
(table continued)
9-9
Teledyne API Model 400A O3 Analyzer Instruction Manual, 02260, Rev. F
Table 9-3: Diagnostic Mode I/O Signals (Continued)
No.
Signal
Control
38
ST_ZERO_CAL
39
ST_SPAN_CAL
YES
Status Bit - Span Calibration mode
Logic high = M400A in Span cal mode
Logic low = Not in Span cal mode
40
ST_FLOW_ALARM
YES
Status Bit - Flow alarm
Logic High = Sample flow out of spec
Logic Low = Flows within spec
41
ST_TEMP_ALARM
YES
Status Bit - Temperature alarm
Logic High = One or more temps out of spec
Logic Low = Temps within spec
42
ST_DIAG_MODE
YES
Status Bit - In Diagnostic mode
Logic High = M100A in Diagnostic mode
Logic Low = Not in Diag mode
43
ST_POWER_OK
YES
Status Bit - Power OK
Logic High = Instrument power is on
Logic Low = Instrument power is off
44
ST_PRESS_ALARM
YES
Status Bit - Flow alarm
Logic High = Sample pressure out of spec
Logic Low = pressure within spec
45
ST_LOW_SPAN_CAL
YES
Status Bit - Zero Calibration mode
Logic high = M400A in Low Span cal mode
Logic low = Not in Zero cal mode
46
SAMPLE_LED
YES
Controls state of green SAMPLE LED on the front
panel
47
CAL_LED
YES
Controls state of yellow CAL LED on the front
panel
48
FAULT_LED
YES
Controls state of red FAULT LED on the front
panel
YES
Description
Status Bit - Zero Calibration mode
Logic high = M400A in Zero cal mode
Logic low = Not in Zero cal mode
9-10
Teledyne API Model 400A O3 Analyzer Instruction Manual, 02260, Rev. F
9.1.3.2 Analog Output Step Test
This test steps the analog output channels from 0% to 100% of Full Scale in 20% steps. To enter
the analog output test press SETUP-MORE-DIAG. Scroll using PREV/NEXT until ANALOG
OUTPUT appears, then press ENTR.
It starts by outputting 0 volts then, every five seconds the output is increased 20%. The analog
outputs will cycle through the following values. The display will indicate the current step.
0%, 20%, 40%, 60%, 80%, 100%, 0% ...
Pressing the key under the display will halt the stepping. To resume automatic cycling, press the
button again.
9.1.3.3 Setting the Analog Output Offset
The analog outputs can be biased to offset the output voltage of each channel ±10% of the output
voltage setting. The default offset is 0mV. To change it, press SETUP-MORE-DIAG, press
NEXT until D/A CALIBRATION is displayed and press ENTR. Press CFG to enter the D/A
configuration menu. Use the NEXT and PREV buttons to select the desired analog output and
press SET. Enter a value of from –500 mV to +500 mV (other ranges will ratio accordingly),
followed by ENTR to accept the change, or EXIT to leave it unchanged. The offset will be
reflected immediately on the analog output.
9.1.3.4 Test Channel Output
Additionally, the values of most TEST functions can output as an analog voltage at the
instrument's rear panel (see Figure 2-2). The TEST function to be output is selected by pressing
SETUP-MORE-DIAG. Press NEXT until TEST CHANNEL OUTPUT appears. Press ENTR.
Select test channel function and press ENTR. Table 9-4 lists the Test functions available for
analog output. In addition to outputting a value to the analog output channel, these tests activate
a new test measurement which displays the analog voltage reading on the front panel as:
"TEST=XXXX.X MV".
9-11
Teledyne API Model 400A O3 Analyzer Instruction Manual, 02260, Rev. F
Table 9-4: Test Channel Outputs
Test Channel
Zero
Full Scale
O3 PHOTO MEAS
0 mV
5000 mV
O3 PHOTO REF
0 mV
5000 mV
O3 GEN REF
0 mV
5000 mV
SAMPLE PRESS
0 "Hg
40 "Hg
SAMPLE FLOW
0 cc/m
1000 cc/m
SAMPLE TEMP
0 DegC
70 DegC
ANA LAMP TEMP
0 DegC
70 DegC
O3 LAMP TEMP
0 DegC
70 DegC
CHASSIS TEMP
0 DegC
70 DegC
DCPS VOLTAGE
0 mV
5000 mV
9.1.3.5 RS-232 Port Test
This test is used to verify the operation of the RS-232 port. It outputs a 1 second burst of the
ASCII letter 'w'. During the test it should be possible to detect the presence of the signal with a
DVM on pin 2 or 3 (depending on the DTE/DCE switch setting) or by the flickering of the red
test LED. A detailed procedure is given in the Section 9.3.3.
9.1.3.6 V/F Board Calibration
The V/F Board is calibrated when the instrument is set up at the factory. Re-calibration is usually
not necessary, but is provided here in case the V/F board needs to be replaced and re-calibrated.
The procedure for using the V/F Calibration routines is in the Section 9.3.4.
9.1.4 M400A Internal Variables
The M400A software contains many adjustable parameters. Most of the parameters are set at
time of manufacture and do not need to be adjusted for the lifetime of the instrument. Some of
the variables are user adjustable, they are listed in Table 9-5.
To access the VARS menu press SETUP-MORE-VARS-ENTR. Use the PREV-NEXT buttons
to select the variable of interest, then press EDIT to examine/change the value, then press ENTR
to save the new value and return to the next higher menu. If no change is required, press EXIT.
9-12
Teledyne API Model 400A O3 Analyzer Instruction Manual, 02260, Rev. F
Table 9-5: MODEL 400A Variables
Name
Units
Default
Value
Value
Range
0
DAS_HOLD_OFF
min
15
0-60
Time that data is not put into
DAS after CAL or DIAG
modes
1
PHOTO_LAMP
o
C
52
0-60
UV Lamp Temperature
2
O3_GEN_LAMP
o
C
48
0-60
Ozone Generator Lamp
Temperature
3
O3_GEN_LOW1
ppb
100
0-1500
Ozone Generator Low
Concentration Setpoint
(Precision point) for Range 1
4
O3_GEN_LOW2
ppb
100
0-1500
Ozone Generator Low
Concentration Setpoint
(Precision point) for Range 2
5
ORIFICE_SET
o
48
0-60
Setpoint for orifice manifold
temp control
6
SFLOW_SET
cc/min
500
400-1000
Nominal sample flow rate
7
RS232_MODE
Bit
Field
0
0-99999
Value is SUM of following
decimal numbers:
1=enable quiet mode
2=enable computer mode
4=enable security feature
8=enable front panel RS-232
menus
16=enable alternate protocol
32=enable multidrop protocol
8
CLOCK_ADJ
sec
0
+-60
Real-time clock speed
adjustment
No.
C
9-13
Description
Teledyne API Model 400A O3 Analyzer Instruction Manual, 02260, Rev. F
9.2 Performance Problems
Dynamic problems (i.e. problems which only manifest themselves when the analyzer is
monitoring sample gas) can be the most difficult and time consuming to isolate and resolve.
Additionally, analyzer behavior which appears to be a dynamic problem is often a symptom of a
seemingly unrelated static problem. For these reasons, it is recommended that dynamic problems
not be addressed until all static problems and warning conditions, as described in the preceding
sections, have been isolated and resolved.
If all the checks described in the preceding sections have been successfully performed, the
following will provide an itemization of the most common dynamic problems with
recommended troubleshooting checks and corrective actions.
NOTE
It has been our experience that about 50% of all analyzer performance
problems are sooner or later traced to leaks in some part of the system.
1. Fluctuations in flow, such as leaks or plugged orifices.
2. Lack of preventive maintenance – dirty/plugged sample filter.
3. Change in zero air source.
A. Air containing ozone leaking into zero air line.
B. Saturation of IZS zero air scrubbers.
4. Change in span gas concentration.
A. Zero air or ambient air leaking into span gas line.
5. Leak in Ref/Measure switching valve.
6. Loose pneumatic fittings.
9-14
Teledyne API Model 400A O3 Analyzer Instruction Manual, 02260, Rev. F
9.2.1 AC Power Check
1. Check that power is present at main line power input. Verify that correct voltage and
frequency is present. If unit is set for 240VAC and is plugged into 115VAC it will appear as
no power fault.
2. Check that the unit is plugged into a good socket. Analyzer must have 3-wire safety power
input.
3. Check circuit breaker. Circuit breaker is part of the front panel power switch. It is set each
time the instrument power is turned on. If there is an internal short causing a trip, the switch
will automatically return to the OFF position when an attempt is made to turn it on.
9.2.2 Temperature Problems
The Model 400A has been designed to operate at ambient temperatures between 5oC and 40oC.
As a first step in troubleshooting temperature problems, confirm the ambient temperature is
within this range and that the air inlets slots on the sides of the cover and the fan exhaust on the
rear panel are not obstructed.
The instrument monitors five temperatures:
1. Sample Temperature
2. Inside Chassis Temperature
3. Source Lamp Temperature
4. IZS Lamp Temperature (Option)
5. Orifice Manifold Temperature
and controls the temperatures of three components by heating:
1. Orifice Manifold
2. Source Lamp
3. IZS Lamp (Option)
If any of the temperature readings appear to be incorrect, check for proper thermistor operation
by measuring the resistance of the thermistor(s). This resistance should be in the range of 7.6K
ohms to 95K ohms, a resistance of 27k ohms corresponds to a temperature of 27oC. If it is not,
the thermistor is defective and should be replaced. Points for measuring thermistor resistance are
as follows:
9-15
Teledyne API Model 400A O3 Analyzer Instruction Manual, 02260, Rev. F
Sample Temperature
Unplug the connector at Motherboard J14 and measure across the leads.
Photometer Lamp Temperature
Unplug the connector at Motherboard J15 and measure across the leads.
IZS Lamp Temperature
Unplug the connector at Motherboard J16 and measure across the leads.
If thermistor resistance(s) are within the proper range, check the temperature linearization
circuits on the I2C Submux Board, see Section 9.3.2.
If temperature sensor readings appear accurate but control temperatures are not being maintained
at their proper value, check the operation of the heaters as follows:
1. Observe the indicator LED's on the Power Supply Module and confirm that the
"PHOTOMETER LAMP HEATER" and "O3 GEN HEATER" LED's are lit or cycling
(turning off and on). If these indicators are not correct, it is probably that the Power Supply
Module, or the V/F Board is at fault. Check as described in Sections 9.3.8.
2. Unplug the heater element from Power Supply Module and confirm that 115VAC is present.
If 115VAC is present, the heater element has failed and should be replaced.
3. Measure heater resistance lead-to-lead and lead-to chassis. Heater resistance should be in the
range 200 – 2000 ohms depending on the wattage of the heater. Resistance of heater-tochassis should be infinite.
WARNING
Hazardous voltages present – use CAUTION!
9-16
Teledyne API Model 400A O3 Analyzer Instruction Manual, 02260, Rev. F
9.2.3 Excessive Noise
1. Check for leaks in the pneumatic systems as described in Section 9.3.12.
2. Confirm the Sample Temperature, Sample Pressure, Photo Lamp Temperature, and Sample
Flow readings are correct. Check and adjust as required.
3. UV Lamp may need replacement. If spare lamp is available, replace lamp and check noise. If
spare lamp is not available, consult factory for assistance.
4. Unplug lamp and plug back in. If noise goes away, change lamp or power supply, change
PROM to updated software.
9.2.4 Unstable Span
1. Check for leaks in the pneumatic systems as described in Section 9.3.12.
2. Check for proper operation of the Main Switching Valve and Ozone Scrubber as described in
Section 9.3.6.
3. Check for a dirty particulate filter and replace as necessary as described in Section 8.2.
4. Check for dirty pneumatic system components and clean or replace as necessary as described
in Section 9.3.12.
5. Check for proper adjustment of DAC and ADC electronics by performing the adjustment
procedure in Section 9.3.4.
6. Confirm the Sample Temperature, Sample Pressure, and Sample Flow readings are correct.
Check and adjust as required.
9.2.5 Unstable Zero
1. Check for leaks in the pneumatic system as described in Section 9.3.12.
2. Confirm that the Zero gas is free of Ozone.
3. Check for a dirty particulate filter and replace as necessary as described in Section 8.2.
4. Confirm that the Source Lamp is fully inserted and that the lamp hold-down thumb- screw is
tight.
5. Check for a dirty Absorption Cell and/or pneumatic lines. Clean as necessary as described in
Section 8.4.
6. Disconnect the exhaust line from the optical bench (the pneumatic line at the lamp end of the
bench) and plug the port in the bench. If readings remain noisy, the problem is in one of the
electronic sections of the instrument. If readings become quiet, the problem is in the
instrument's pneumatics.
9-17
Teledyne API Model 400A O3 Analyzer Instruction Manual, 02260, Rev. F
9.2.6 Inability to Span
1. Confirm that the ozone span gas source is accurate – this is the #1 problem reported by our
service department.
2. Check for leaks in the pneumatic systems as described in Section 9.3.12.
3. Check for proper operation of the Main Switching Valve and Ozone Scrubber as described in
Section 9.3.6.
4. Check for a dirty particulate filter and replace as necessary as described in Section 8.2.
5. Check for dirty pneumatic system components and clean or replace as necessary as described
in Section 9.3.12.
6. Check for proper adjustment of DAC and ADC electronics by performing the adjustment
procedure in Section 9.2.
7. Confirm the Sample Temperature, Sample Pressure, and Sample Flow readings are correct.
Check and adjust as required.
9.2.7 Inability to Zero
1. Check for leaks in the pneumatic system as described in Section 9.3.12.
2. Confirm that the zero gas is free of ozone. Place a charcoal scrubber in sample inlet line.
3. Check for a dirty particulate filter and replace as necessary as described in Section 8.2.
9.2.8 Analog Output Doesn't Agree with Display Concentration
1. Confirm that the DAC offset is set to zero. See Section 9.1.3.3.
2. Perform a DAC calibration and Dark Signal adjustment by following the procedures
described in Sections 9.2 and 9.3.5.
3. Perform analog output step test by pressing SETUP-MORE-DIAG, then scroll to the analog
output step test.
9-18
Teledyne API Model 400A O3 Analyzer Instruction Manual, 02260, Rev. F
9.3 Subsystem Troubleshooting and Adjustments
9.3.1 Computer, Display, Keyboard
When the analyzer is turned on, the front panel display should energize and the green "Sample"
LED should light. If proper DC power is present (see Section 9.3.8), the absence of these will
usually indicate either a CPU or Display failure. To determine which module is defective,
perform the following procedure:
9.3.1.1 Front Panel Keyboard
During normal Analyzer operation, depressing the right-most key of the keyboard should cause a
change of display modes. If it does not, check:
1. Cable connections
2. CPU and Display operation (see Section 9.3.1)
3. If these checks are satisfactory, it is probable that the keyboard is defective and should be
replaced.
9.3.1.2 Front Panel Display
1. Turn off power
2. Remove the ribbon cable from the CPU board to the Display
3. Turn Power on
4. A cursor character should appear in the upper left corner of the display. If it does not, the
display is defective and should be replaced. If the cursor does appear, it is probable that the
CPU is faulty.
9.3.1.3 Single Board Computer
The SBC40 is a full function computer designed for instrument control applications. It consists
of a 16 bit 8080 microprocessor, 2 serial and one parallel ports, standard bus interface, and 4
sockets for memory. The memory sockets consist of: 256k ROM containing the multitasking
operating system and application code, 8k EE prom containing the setup variables, 256k RAM
containing data collected by the instrument, and a time-of-day clock to provide event timing
services. The overall function of this board is quite complex. Complete testing of this board's
functions is not possible in the field. The board outline is shown in Figure 9-1.
9-19
Teledyne API Model 400A O3 Analyzer Instruction Manual, 02260, Rev. F
Like the display, the overall functioning of the CPU can be confirmed by a simple test.
1. Locate the CPU board on the mother board by referring to Figure 2-3.
2. Power the instrument on.
3. Locate the red LED at the top left edge of the board.
4. It should be flashing at a frequency of about once per second.
5. This flashing indicates the board is powered up and is executing instructions.
6. Upon power-up, the CPU does a self-test checking RAM, EEPROM and other functions. If
there is a fault, it will be shown on the front panel display.
Testing and operation of the CPU RS-232 port is described in Section 9.3.3. It is possible for the
UART driver chip to malfunction in either or both of the input or output ports.
9-20
Teledyne API Model 400A O3 Analyzer Instruction Manual, 02260, Rev. F
Figure 9-1: CPU Board Jumper Settings
9-21
Teledyne API Model 400A O3 Analyzer Instruction Manual, 02260, Rev. F
9.3.2 I2C / Submux Board
This board is mounted as a mezzanine board on the CPU card. It serves two purposes, the first is
to transmit digital signals from the CPU to the rear panel status board, and secondly to convert
the thermistor resistance into a voltage which goes to the mother board, then to the V/F board.
The digitized number is sent to the CPU via the STD bus for scaling and linearization.
9.3.2.1 Temperature Amplifier Section
Four thermistors are brought onto the board through connector P2. A single thermistor is
selected from the P1 MSC1 & MSC0 lines, which are then decoded by U2. The analog mux U4
selects the appropriate signal, which is then routed to U7 for conditioning and scaling, then
routed back off the board via P2 to the V/F board.
The temperatures measured are:
1. Box Temp
2. Sample Temp
3. Ozone Generator Temp
4. Block Temp
Proper functioning of this part of the board can be verified by looking at the temperatures using
the front panel TEST functions. Each voltage being read by the V/F board can be checked by
using the SIGNAL I/O feature in the DIAGNOSTIC menu.
9.3.2.2 I2C Serial Bus Section
The second section of this board takes CPU board digital signals from the P1 connector and
passes them to U1, which serializes the signal and sends them to the rear panel board via P2.
The CPU continually monitors the integrity of the I2C bus by sending commands to the rear
panel “slave device” every 30 sec and checking for a valid reply. If the check fails a warning
message is sent to the front panel and RS-232 port.
Front Panel Warning Message: REAR PANEL NOT DETECTED
RS-232 Message: WRPANELDET – REAR PANEL NOT DETECTED
9-22
Teledyne API Model 400A O3 Analyzer Instruction Manual, 02260, Rev. F
Figure 9-2: RS-232 Pin Assignments
9-23
Teledyne API Model 400A O3 Analyzer Instruction Manual, 02260, Rev. F
9.3.3 RS-232 Communications
9.3.3.1 RS-232 Diagnostic Procedures
Teledyne API analyzers use the RS-232 communications protocol to allow the instrument to be
connected to a variety of computer based equipment. RS-232 has been used for many years and
as equipment has become more advanced, connections between various types of hardware have
become increasingly difficult. Generally, every manufacturer observes the signal and timing
requirements of the protocol very carefully. Problems arise when trying to specify connectors,
and wiring diagrams that attach the analyzer to various devices. See Figure 9-2 for pin-out.
9.3.3.2 RS-232 Connections
Connectors:
The problem centers around two areas. First is the physical incompatibility of connectors.
Second is the wiring of the connectors. We will attempt to provide some guidelines for
connecting the Teledyne API analyzers to other equipment.
There are a wide variety of connectors and cables that are specified to operate with the RS-232
protocol. This is because electronics have decreased in size over the years and connectors have
been downsized to match the electronics.
Cables & Adapters come in the following 4 general types:
1. Cables - cables are provided in various lengths from 6 to 50 feet. In most cases they have a
male connector at one end and a female at the other. Variations on this are ones that provide
both a cable and adapter. For example the cable provided with our analyzer adapts a female
DB-9 to a male DB-25 connector. Most cables do not contain a Null modem.
2. Gender changers - convert a male connector to a female connector or vice versa. They do so
WITHOUT changing the pin-to-pin wiring.
3. Adapters - these change from one type plug (DB-9) to another type plug (DB-25). They do so
WITHOUT changing the wiring.
4. Null modems - here the connector changes the internal wiring so that DTE devices can
become DCE or vice versa. The main internal change is swapping pin 2 and 3 so that data is
transmitted and received on opposite pins.
CAUTION
Null modems can also combine gender changer or adapter
features in the design. When making up an adapter cable
be EXTREMELY CAREFUL to note what you are using,
especially with combination null modem – adapter connectors.
9-24
Teledyne API Model 400A O3 Analyzer Instruction Manual, 02260, Rev. F
DTE – DCE Wiring:
As technology has progressed it has become ambiguous which equipment should be DCE or
DTE. The M400A has a switch that allows you to switch between DTE and DCE. Once your
equipment is plugged in and turned on, correct wiring can be confirmed if BOTH red and green
LED’s are illuminated on the instrument rear panel. If only one LED is on, switch the DTE-DCE
switch.
9.3.3.3 Connecting the Analyzer to a Modem
Modem’s are configured as Data Communications Equipment (DCE). All that is needed is a
straight through adapter to connect from the analyzer to the modem. Make sure that none of the
adapters contain a null modem.
In addition to DTE-DCE wiring, modems have pins that need to be at certain logic levels before
the modem will transmit data. The most common requirement is the Ready to Send (RTS) signal
must be at logic high before the modem will transmit. The M400A sets pin 7 (RTS) to 10 volts to
enable modem transmission. DSR and CTS are at ground.
Make sure the BAUD rate, word length, and stop bit settings between modem and analyzer
match, see Figure 9-2.
In DIAGNOSTIC mode, use the RS-232 test function to send a 1 sec burst of “w” characters out
the port. You can verify that the M400A is transmitting data by looking at the red LED on the
rear panel. It will flicker when data is being transmitted.
Get your modem to transmit data to the analyzer, the green LED should flicker as the instrument
is receiving data.
Data Communications Software for a PC
You will need to purchase a software package so your computer can transmit and receive on its
serial port. There are many such programs, internally we use Hyperterminal. Once you set up the
variables in PROCOMM and your wiring connections are correct, you will be able to
communicate with the analyzers. Make sure the analyzer BAUD rate matches PROCOMM.
Check in SETUP-MORE-COMM-BAUD, also check the other details covered in Figure 9-2.
9-25
Teledyne API Model 400A O3 Analyzer Instruction Manual, 02260, Rev. F
9.3.4 Voltage/Frequency (V/F) Board Diagnosis and Calibration
The 00515 V/F board is a complex board, complete testing of all of its functions in the field are
not possible. The following is a few simple tests that will confirm the general operation of the
board:
1. Observe the DCPS - TEST function on the front panel. The reading should be near 2500
±100mV. If it is, this means that the V/F converter is probably working properly.
2. Perform the Analog Output Step Test DIAGNOSTIC test covered in Section 9.1.3. The
output voltages should cycle correctly according to the test. If the board fails the Analog
Output Step test above, the board may be out of calibration. The V/F board calibration
procedure is covered below
3. Confirm the presence of appropriate power by checking for:
+5V between TP 4 and TP 5
+15V at TP 1 and TP 3
-15V at TP 2 and TP 3
If any of these voltages are incorrect, check the DC Power Supply as described inSection
9.3.8.
4. Confirm that all jumpers on the V/F board are set properly, as follows:
Table 9-6: V/F Board Jumpers – Factory Settings
Factory Set Jumpers
Jumper
Setting
B1
1
B2
1-2
B12
3-4 (0-5V)
B14
2-3 (Enabled)
B15
Set to match power
line frequency
JP1
1-2
JP2
1-2
9-26
Teledyne API Model 400A O3 Analyzer Instruction Manual, 02260, Rev. F
5. Confirm that the V/F board DIP switches are set correctly by referring to Figure 9-3.
NOTE
If you change the dip switches for analog output range
then you must do an V/F calibration per this section.
Due to the stability of modern electronics, this procedure should not have to be performed more
than once a year or whenever a major sub-assembly is exchanged or whenever analog output
voltage range is changed.
To calibrate the Analog-toDigital converter on the V/F board, do the following:
NOTE
The accuracy of this calibration will only be as
accurate as the DVM you use.
1. Press SETUP-MORE-DIAG.
2. Enter Diagnostic password and press NEXT until D/A CALIBRATION appears in the
display and press ENTR.
3. Press ADC to calibrate the V/F converter.
4. The M400A display will read "ADJUST ZERO:A/D=xx.x MV.” Put the probe of a voltmeter
between TP3 (AGND) and TP9 (DAC #0) on the top of the V/F board (See Drawing 00514,
Appendix E)
5. The value displayed by the voltmeter should be close (± 20mV) to the value on the M400A
display. If they are not close then the V/F card has probably been configured improperly.
6. Adjust the Zero pot (R27) on the V/F card until the value on the M400A display matches the
value on the voltmeter to within ± 2mV.
NOTE
When adjusting R27, the value on the M400A display will
change, the value on the voltmeter will remain constant.
9-27
Teledyne API Model 400A O3 Analyzer Instruction Manual, 02260, Rev. F
7. Press ENTR.
8. The M400A display will now read "ADJUST GAIN:A/D=xx.x MV.”
9. Adjust the Span pot (R31) on the V/F card until the value on the M400A display matches the
value on the voltmeter to within ± 20mV.
10. Press ENTR.
11. The ADC is now calibrated and the M400A will automatically calibrate all the DAC’s. This
process takes only a few seconds
12. Press EXIT 4 times to return to the sample menu.
9.3.4.1 Output Voltage Range Changes
Output voltage ranges are set by DIP switches on the V/F board. To change the range for the
analog outputs:
1. Turn off instrument power. Remove instrument cover. Locate the V/F board near the front
of the analyzer using Figure 2-3.
2. Locate switches along the top edge of the card. Select the desired range per Figure 9-3.
3. Recalibrate the ADC as described in this section.
NOTE
To adjust the recorder offset, see Section 9.1.3.3.
NOTE
Do not attempt to change the voltage range for DAC3 (S4).
Doing so will result in malfunction of the IZS ozone generator.
9-28
Teledyne API Model 400A O3 Analyzer Instruction Manual, 02260, Rev. F
Figure 9-3: V/F Board Settings
9-29
Teledyne API Model 400A O3 Analyzer Instruction Manual, 02260, Rev. F
9.3.5 Optical Bench Assembly
9.3.5.1 Source Lamp Power Supply Diagnosis and Adjustment
Basic operation of the source lamp and detector can be determined by observing the value of the
O3 REF test function. After the analyzer is warmed-up (15 min. to 30 min. after power-on), this
value will give a good indication of the state of Lamp and Detector operation as shown on
Table 9-7.
Table 9-7: UV Source Lamps and Detector Diagnostics
O3 REF Value
Meaning
4700 mV to 5000 mV
The Source Lamp and Detector are operating, but adjustment is
required
4000 mV to 4700 mV
The Source Lamp and Detector are operating properly; no
adjustment is needed
2500 mV to 4000 mV
The Source Lamp and Detector are operating. Adjustment is
useful but not required
175 mV to 2500 mV
The Source Lamp and Detector are operating, but adjustment is
required
75 mV to 175 mV
Either the Source Lamp or the UV detector is not functioning
Less than 75 mV
The Detector Pre-Amp or V/F Board has failed or is
disconnected
Checking the Lamp Power Supply
A schematic and physical diagram of the Lamp Power Supply are shown on drawings 01217 and
01218 in Appendix E.
It is not always possible to determine with certainty whether a problem is the result of the UV
Lamp or the Lamp Power Supply. However, the following steps will provide a reasonable
confidence test of the Lamp Power Supply.
WARNING
Hazardous voltages present – use CAUTION!
9-30
Teledyne API Model 400A O3 Analyzer Instruction Manual, 02260, Rev. F
1. Unplug the cable connector at J1 on the Lamp Power Supply and confirm that +24VDC is
present between Pins 1 and 2 on the cable connector. If this voltage is incorrect, check the
Power Supply Module as described in Section 9.3.8.
2. Remove the cover of the Lamp Power Supply and check for the presence of the following
voltage:
+24VDC between TP1 and TP14
3. If this voltage is incorrect, the Lamp Power Supply is faulty and should be replaced.
If the above checks are successful, it is more likely that a problem is due to the UV Lamp than
due to the Lamp Power Supply. Replace the Lamp and if the problem persists, replace the Lamp
Power Supply.
Adjustment Required or Adjustment Useful
Adjust the Lamp and Detector Preamp as described in Section 9.3.5. If it is not possible to
achieve an acceptable O3 REF test Value by means of adjustment, it is possible that the lamp has
deteriorated beyond its useful range and should be replaced.
WARNING
UV light present. Do not look directly at the UV lamp
since UV light could cause eye damage. Always use
UV filtering glasses or view through glass.
Lamp or Detector Failure
An O3 REF value of approximately 125mV usually indicates a total failure of either the source
lamp or the detector. To determine which component is at fault, remove the top cover of the
optical bench and observe the "lamp end" of the quartz absorption tube. If a blue-white light is
visible, the lamp is operating and the detector is at fault and should be replaced. If no light is
visible, the lamp power supply should be checked as described in this Section. If the Lamp
Power Supply check is satisfactory, then the lamp has failed and should be replaced.
NOTE
In cold ambient conditions, it may require 5 to 15 minutes of
warm-up before the source lamp initially fires. Be sure to wait
for this period before troubleshooting the lamp/detector.
9-31
Teledyne API Model 400A O3 Analyzer Instruction Manual, 02260, Rev. F
Adjust the drive power of the lamp power supply as follows:
1. Remove the cover of the lamp power supply. Attach a DVM across TP7 and TP14, and
adjust the pot (RV1) until the DVM reads 20 volts ± 1 volt.
2. Remove the cap on the detector preamp cover. Turn pot 25 turns CW, then 5 turns CCW.
3. Adjust the positioning of the source lamp, as follows:
A. At the front panel of the instrument, Press the TEST key until O3 REF=XXXXX is
displayed.
B. Loosen the lamp retaining thumb-screw and rotate the lamp until the O3 REF reading on
display is 4500 mV ± 320 mV. Re-tighten the thumb-screw. (Note that the full range of
lamp adjustment can be achieved within ¼ revolution of the lamp. Note also that the O3
REF display is updated approximately once every six seconds, and slow rotation of the
lamp is needed for proper adjustment.)
4. Adjust the UV Detector Pre-Amp gain as follows:
A. Remove the access cap on the Detector cover at the front end of the optical bench, and
adjust the pot (R7) until the O3 REF reading on the display is 4500mV ± 50mV.
WARNING
UV light present. Do not remove lamp from housing when adjusting.
B. If it is still not possible to achieve a 4500 mV O3 REF reading, increase the UV lamp
drive power by adjusting the lamp power supply as described in Step 1. (DO NOT,
however, allow the voltage measured across the TP7 and TP14 to exceed 21 volts.)
5. Re-calibrate the automatic Detector Dark Current compensation by pressing
SETUP-MORE-O3-DARK-CAL. See Section 9.3.5.3 for dark current adjustment
procedure.
9.3.5.2 Detector Pre-Amp
A O3 REF test value of less than 75mV usually indicates a failure of the Detector Pre-Amp.
Confirm that the V/F is operating properly as described in Section 9.3.4. If the V/F check is
successful, the Detector pre-amp has failed and should be replaced.
9-32
Teledyne API Model 400A O3 Analyzer Instruction Manual, 02260, Rev. F
9.3.5.3 Dark Current Signal Adjust Procedure
The detector dark current changes little as the detector ages. Therefore this procedure should not
need to be performed more than once per year or whenever a major sub-assembly is changed
(such as a new UV lamp or UV lamp power supply) or gain pot on the preamp board is adjusted.
To calibrate the dark current signal, press SETUP-MORE-O3-DARK-CAL and the analyzer
will do the following:
1. Turn the analyzer lamp off
2. Average 6 successive O3 detector readings, taken 1 second apart
3. Turn the analyzer lamp back on
This offset will then be stored and subtracted from all future O3 detector readings.
To view the current dark offset, press SETUP-MORE-O3-DARK-EDIT. Press EXIT when
finished. No password is required to view the dark offset, only to change it. CAUTION: Do not
change the DARK value once it has been calibrated. Doing so will give erroneous readings.
9.3.5.4 Source Lamp Temp
The UV lamp on the Optical Bench is temperature controlled to 52o C. The heater is a ¼” dia
heater, the temperature is measured by a thermistor. The most common problem is that the
temperature will become too high because the Box Temperature is greater than 52o C.
1. Check the TEST functions to see if the heater is controlling to the correct temperature.
2. Check Optical Bench to see that both the heater and thermistor are fully seated in their
respective holes.
3. Check the cycling of power to the heater by observing the “Photometer Lamp Heater” LED
on the top of the Power Supply Module.
4. Use a DVM to see if heater is getting power. The voltage across the heater should be 115
VAC regardless of the instrument in input voltage. The voltage should cycle between 0 and
115 VAC, synchronized with the LED on the PSM. If no power is observed at the heater, the
solid state switch in the PSM could be bad.
9-33
Teledyne API Model 400A O3 Analyzer Instruction Manual, 02260, Rev. F
9.3.6 Checking the Ozone Scrubber and Main Switching Valve
Proper operation of the selective Ozone Scrubber and main Switching Valve can be determined
by performing the following procedure:
1. Introduce Zero-gas at the sample inlet port using either the optional IZS or an external zerogas source, and allow the analyzer to stabilize.
2. Observe the O3 REF Test Function and make a note of its value.
3. Introduce Span-gas of approximately 400 ppb concentration at the sample inlet port using
either the optional IZS or an external Span-gas source and allow the analyzer to stabilize.
4. Observe the O3 REF Test Function and note its value. If the O3 REF value has decreased by
more than 5mV from its value with Zero-gas, then either the Ozone Scrubber has failed or
there is a "cross-port" leak in the main switching valve.
NOTE
If desired, this check can be performed using Ozone concentrations higher
than 400 ppb. In this case, the drop in O3 REF (in mV) should be no
greater than: O3 REV < 5 * (actual concentration)/400.
To determine which, pneumatically bypass the main switching valve by disconnecting the
sample line between the valve and the optical bench from the valve's common port and reconnect
it directly to the output port of the Ozone Scrubber.
Repeat Steps 1 through 4 above. If the decrease in the O3 REF value is now within tolerance,
then the main switching valve is defective and should be replaced or rebuilt. If an out-oftolerance decrease in the O3 REF value persists, the Ozone scrubber should be replaced.
9.3.7 Rear Panel Status/Analog Output PCA
The Rear Panel Status/Analog Output PCA, is a multifunction board. The functions are:
1. Provide 3 channels of analog voltage/current loop output
2. Provide instrument status bits through the 50 pin connector
3. Provide contact closure inputs to control calibration
4. Provide RS-232 communications
The sections below provide an operational test for each one of these functions.
9-34
Teledyne API Model 400A O3 Analyzer Instruction Manual, 02260, Rev. F
9.3.7.1 Analog Outputs
There are 4 analog output channels. Channel assignments are:
0. Ozone output (O31)
1. Output (O32)
2. Ozone Generator Drive
3. TEST Output (TCH)
In the DIAGNOSTIC menu, there is an Analog Output Step Test, which writes stepped voltages
to the DAC’s. This test will verify the correct operation of the analog outputs, refer to
Section 9.1.3.
9.3.7.2 Status Output Lines, External Contact Closures
The status output function reports Analyzer conditions to a 50 pin connector on the rear panel.
The status data is generated in the CPU, routed to a mezzanine board attached to the CPU where
it is serialized and formatted for I2C. The signals travel to the rear panel status board where they
are received and decoded. They are then routed to NPN transistors, which can pass 50 ma of
direct current. See Section 5.4 for status output pin assignments.
Remote contact closures can be used to provide the following functions:
1. If no IZS or Z/S valves option is present, the contact closures will switch the instrument into
zero or span calibration mode if closed.
2. If Z/S valves option is present, the contact closures operate the valves and switch the
instrument into zero or span mode if closed.
3. If the IZS option is present, the contact closures operate the valves and ozone generator/zero
air system plus switch the instrument into zero or span mode if closed
The external circuitry should be capable of switching 12VDC at 50 ma.
9-35
Teledyne API Model 400A O3 Analyzer Instruction Manual, 02260, Rev. F
9.3.7.3 -20 mA Current Output (Optional)
A current loop option can be ordered that will provide 0-20mA or 4-20mA analog output on the
REC channel. The current loop channel can be independently calibrated without affecting the
voltage output. This calibration must be repeated every time an A/D - D/A calibration is
performed. To calibrate the current output, perform the following steps:
1. Perform an A/D - D/A calibration as outlined in Section 9.3.4.
2. Connect a Multimeter capable of measuring milliamperes to the current loop output. The
current output connector is located on pins 7 and 8 of the connector labeled “RECORDER”
on the rear panel. Note: When measuring the current output with a multimeter or similar lowimpedance current measuring device, a 500-1K ohm resistor must be placed in series with the
meter to simulate a load. Failure to do this will result in erroneous readings.
3. From the front panel, press SETUP-MORE-DIAG. Press NEXT until D/A CALIBRATION
appears and press ENTR. Press CFG and the properties for analog output channel 0 will be
displayed on the top line. The display should show something like:
DIAG D/A
NEXT
0) O3_CONC_1,CURR, NOT CAL
CAL
SET
EXIT
This indicates that channel 0 is setup for current output and has not been calibrated. If the
display shows VOLT instead of CURR then the channel must be setup for current output. To
do this, press SET, select CURR as the output type and press ENTR.
4. Next press CAL to begin the calibration. At this point the display should show:
DIAG D/A
U100
UP10
CAL O3_CONC_1,CURR, ZERO
UP
DOWN DN10
9-36
D100 ENTR
EXIT
Teledyne API Model 400A O3 Analyzer Instruction Manual, 02260, Rev. F
The zero point for current output can now be set. Pressing UP, UP10 and U100 will step the
zero point up in increments of 1, 10 and 100 steps. The zero point can be adjusted anywhere
between 0 and 4 milliamps. Press ENTR when you have reached the desired zero point as
measured by your test meter.
5. The display will now prompt you to adjust the Gain, or full-scale output of the current loop.
Using the UP and DOWN buttons as in step 4, adjust the full-scale (usually 20ma) and press
ENTR. This completes the current loop calibration. Press EXIT several times until you are
back at the sample menu.
9.3.7.4 RS-232 Port
An RS-232 port is provided on the board. See Section 5.5 for setup and diagnosis.
9-37
Teledyne API Model 400A O3 Analyzer Instruction Manual, 02260, Rev. F
9.3.8 Power Supply Module
The Power Supply Module consists of several subassemblies described in Table 9-8.
Table 9-8: Power Supply Module Subassemblies
Module
Description
Linear Power Supply
Board
The linear power supply board takes multiple voltage inputs from the
power transformer and produces +5, +15, -15, +12 VDC outputs. The
outputs are routed to two external connectors, P2 and P3. See
Figure 9-4. The +5 is used for operating the CPU. The ± 15 is used in
several locations for running op-amps and IC's. The +12 is used for
operating fans and valves.
Switching Power Supply
The switching power supply supplies +24 VDC at 2 A to the UV
Source lamp power supply. The output is made available through J10
on the Switch Board. There is a load resistor on the Switch Board to
keep the output stable when little current is required from the supply.
Switch Board
The Switch Board has many different functions. It takes logic signals
from the V/F board and uses them to switch 4-115 VAC and 4-12VDC
loads. The board also contains the instrument central grounding tie
point. It routes unswitched AC and DC power as needed. Connector J2
programs the power transformers to take 115, 220, 230, and 240 VAC
inputs.
Power Transformers
There are potentially 2 input power transformers in the instrument. The
multitap transformer T1 is in every M400A and supplies input power
for the Linear Power Supply board described above. A second
transformer T2 is added if 220 or 240 VAC input is required. Input
power selection is done via a programming connector P2 which
provides the proper connections for either foreign or domestic power.
Circuit Breaker/Power
Switch
The front panel contains a combination circuit breaker - input power
switch. It is connected to the PSM through J6 on the Switch Board. If
an overload is detected the switch goes to the OFF position. Switching
the power back on resets the breaker also.
9-38
Teledyne API Model 400A O3 Analyzer Instruction Manual, 02260, Rev. F
Figure 9-4: Power Supply Module Layout
9-39
Teledyne API Model 400A O3 Analyzer Instruction Manual, 02260, Rev. F
PSM Diagnostic Procedures
The Linear Power Supply board can be tested by checking the DCPS - TEST function on the
front panel. It should read 2500mV ±100mV. If the value is outside this range, individual output
voltages can be tested on connector P3, see Schematic in the Appendix for pinouts.
The Switching Power Supply output can be tested by observing the REF VOLTAGE – TEST
function on the front panel. It should be between 2500 and 4500mV.
The Switch Board can be tested by observing the diagnostic LEDS along the top edge of the
board. The following Table 9-9 describes the typical operation of each LED.
Table 9-9: Power Supply Module LED Operation
No.
Function
Description
1.
Measure/Reference Valve
Should switch about every 3 sec.
On = Measure mode
Off = Reference mode
2.
Sample/Cal Valve
Should switch ON when CALZ or CALS button is
pressed.
3.
No function
4.
Zero/Span Valve
Should switch ON when CALS button is pressed.
5.
Pump power
Switches the power to the sample pump. On if instrument
is powered up.
6.
Source lamp heater
Should cycle ON-OFF every 5 sec to 1 min. On
continuously until up to temp.
7.
Sample flow control block
heater
Should cycle ON-OFF every 5 sec to 1 min. On
continuously until up to temp.
8.
Ozone Generator heater
Should cycle ON-OFF every 5 sec to 1 min. On
continuously until up to temp.
9-40
Teledyne API Model 400A O3 Analyzer Instruction Manual, 02260, Rev. F
Figure 9-5: Electrical Block Diagram
9-41
Teledyne API Model 400A O3 Analyzer Instruction Manual, 02260, Rev. F
Checking the Power Sub-Systems
Refer to the electrical block diagram in Figure 9-5 for help.
1. Check incoming line power for proper Voltage and Frequency.
2. Check the Circuit breaker on the Analyzer's rear panel.
3. Check the 3-wire safety power-input plug on the Analyzer's rear panel.
CAUTION
Hazardous voltages are present on the power supply module.
Always remove AC power cord from instrument before
attempting to remove or replace any parts.
Check for proper DC Voltages by measuring for the following voltages on the V/F Board:
+5V between TP4 and TP5
+15V between TP1 and TP3
-15V between TP2 and TP3
If any of these voltages are incorrect, check the DC Power Supply schematic in Appendix 11.1.
9-42
Teledyne API Model 400A O3 Analyzer Instruction Manual, 02260, Rev. F
9.3.9 IZS Option Diagnosis and Troubleshooting
9.3.9.1 IZS Ozone Generator Lamp
This procedure only needs to be done if the lamp is replaced or if the lamp is accidentally
moved. The procedure adjusts the lamp for optimum operation of the IZS and its feedback
circuit. Reference Figure 9-6 – IZS Module.
1. Enter the SETUP menu by pressing SETUP-MORE-O3-ADJ. This causes the lamp drive
circuit to output a constant 2.5 V.
2. If you are installing a new lamp, allow approximately 30 min for lamp output to stabilize.
3. Select the "O3 GEN" Test function on the front panel display. Loosen the IZS lamp and
rotate until the reading on the display is 2500 mV ± 500 mV.
CAUTION
UV light present. Do not pull the lamp from the IZS assembly.
4. Re-tighten the hold-down screws securing the ozone lamp to the IZS generator assembly.
5. Remove access cap from the IZS preamp cover and adjust the pot to refine the front panel
reading to 2500 mV ± 25.
6. The IZS lamp and feedback circuit are now set up. Proceed to Section 9.3.9.2 to finish
calibration of the IZS.
9-43
Teledyne API Model 400A O3 Analyzer Instruction Manual, 02260, Rev. F
Figure 9-6: IZS Module
9-44
Teledyne API Model 400A O3 Analyzer Instruction Manual, 02260, Rev. F
9.3.9.2 IZS Ozone Generator Calibration
The IZS ozone generator can be calibrated against the analyzer calibration by using the
analytical section of the M400A to determine the ozone generator's output. Calibration of the
generator allows the operator to enter the desired calibration concentration directly in ppb.
The M400A should be calibrated from an external ozone source using one of the methods
described in Section 7 before doing this procedure.
Press SETUP-MORE-DIAG and scroll to O3 GEN CALIBRATION to start the calibration
process, which works as follows:
1. The M400A will measure the IZS reference signal and the O3 concentration at 6 different IZS
lamp drive points: 400, 600, 800, 1000, 2000, and 5000 mV.
2. For each test point, the machine outputs the drive setting and waits 10 minutes for the
M400A to stabilize. Then it takes two readings and stores them in a table for future use.
3. During calibration, the analyzer displays % completion so that you can monitor the progress
of the calibration. Full calibration will take 1 hour (6 points x 10 minutes/point).
4. You can abort calibration by pressing EXIT. This will not restore the table contents already
computed, however. If you EXIT within the first 10 minutes of the calibration, none of the
calibration points will be modified.
5. If the procedure is allowed to complete, the IZS is ready for use.
9.3.9.3 IZS Reference Feedback Option
The Internal Zero/Span Feedback Option senses the output of the IZS ozone generating lamp and
uses this signal to control the lamp drive current. This option assures very stable and repeatable
ozone concentrations. If the IZS reference detector feedback option is present press
SETUP-MORE-O3-MODE-REF-ENTR to activate this option.
9-45
Teledyne API Model 400A O3 Analyzer Instruction Manual, 02260, Rev. F
Figure 9-7: Pressure/Flow Sensor Module
9-46
Teledyne API Model 400A O3 Analyzer Instruction Manual, 02260, Rev. F
9.3.10 Flow/Pressure Sensor
The Model 400A uses a critical flow orifice upstream of the sample pump to provide stable flow
through the analyzer. The module is shown in Figure 9-7. Flow is calculated by measuring the
pressure and temperature on the upstream side of the critical flow orifice and performing an ideal
gas law correction on the nominal flow through the orifice. The downstream pressure is also
measured to ensure that the conditions for critical flow are met.
When any flow problem is being diagnosed, the actual sample flow should be measured by
connecting an independently calibrated flowmeter to the sample inlet and measuring the actual
flow. Below are listed some of the possible fault conditions and their solution:
Displayed flow = “XXXX”
This warning means that the condition for critical flow are not being maintained. This condition
is that the ratio of the downstream pressure to the upstream pressure must be 0.53 or higher.
There are two conditions which might cause this, a flow obstruction upstream of the orifice or a
loss of vacuum downstream of the orifice. To determine which is the case, scroll to the Sample
Pressure and Vacuum test functions on the front panel. If the sample pressure is reading
abnormally low, then the cause is likely a flow obstruction upstream of the orifice. First, check
the sample filter and make sure it is not plugged and then systematically check all the other
components upstream of the orifice to ensure that they are not obstructed. If the sample pressure
is reading normal but the vacuum pressure is reading more than half the sample pressure value, it
is likely that the pump diaphragm is worn and it should be replaced.
Actual Flow Does Not Match Displayed Flow
If the actual flow measured does not match the displayed flow, but is within the limits of 720880 cc/min, the flow measurement can be calibrated from the front panel per Section 9.3.10.1.
9.3.10.1 Flow Calibration
To calibrate the flow measurement, connect an independently calibrated flowmeter to the sample
inlet. From the front panel, press SETUP-MORE-DIAG. Press NEXT until FLOW
CALIBRATION appears and press ENTR. Using the keyboard, enter the measured flow and
press ENTR. The Sample Flow test function should now closely match the measure flow.
9-47
Teledyne API Model 400A O3 Analyzer Instruction Manual, 02260, Rev. F
9.3.11 Z/S Valves Option
The Z/S Valves Option allows customer provided zero gas or span gas to be connected to
separate ports on the rear panel. The calibration gasses are routed into the instrument by 2
valves.
Testing these valves can be done by:
1. Pressing the CALZ button on the front panel energizes the Sample/Cal valve, shutting off
sample flow and admitting zero air to the instrument through the unenergized Zero/Span
valve.
2. Pressing the CALS button on the front panel energizes the Sample/Cal valve and the
Zero/Span valve shutting off sample flow and admitting cal gas to the instrument through the
energized Zero/Span valve.
3. These two valves can be also tested by using the SIGNAL I/O part of the DIAGNOSTIC
menu.
9.3.12 Pneumatic System
9.3.12.1 Troubleshooting Flow Problems
In general, flow problems can be divided into 3 categories:
1. Flow is zero (no flow)
2. Flow is greater than zero, but is too low, and/or unstable
3. Flow is too high
When troubleshooting flow problems, it is a good idea to first confirm that the actual flow and
not the flow meter is in error. If the independent flowmeter shows the flow to be correct, check
the Pneumatic Sensor Board as described in Section 9.3.10.
Use an independent flow meter (rotameter or mass flow meter) to measure sample flow at the
sample inlet port at the instrument's rear panel. If no independent flow meter is available, placing
a finger over an inlet port and feeling for a vacuum will at least give an indication whether flow
is present.
Figure 1.3 in this Manual provides a schematic diagram of the Flow in a Model 400A and its
optional IZS subsystem.
Flow is Zero
Confirm that the sample pump is operating (turning). If not, check the 115V power to the pump.
If the pump does not operate with 115V present at its terminal, replace the pump. Check for
plugged pneumatic lines, filters, or orifices.
9-48
Teledyne API Model 400A O3 Analyzer Instruction Manual, 02260, Rev. F
Low Flow
1. Check for leaks as described in Section 8.5. Repair and re-check.
2. Check for dirty sample filter or dirty orifice filter. Replace filters.
3. Check for partially plugged pneumatic lines, orifices, or valves. Clean or replace lines.
4. Check if the pump diaphragm is in good condition. If not, rebuild pump.
High Flow
The most common cause of high flow is a leak around the sample flow orifice. To correct,
remove the orifice, replace O-rings, and re-assemble.
9.3.12.2 Leak Check
An important source of analyzer performance problems is leaks. Fifty percent of all service
problems reported to Teledyne API are eventually traced to leaks in some part of the system.
Please refer to Section 8.5 for a leak check procedure.
9.3.12.3 Pump
The pump causes sample to pulled through the instrument. To check for proper operation:
1. Check that the pump is operating (turning).
2. Do flow check described in Section 9.3.12.1.
3. If the flow check fails, and the pump appears to be otherwise in good condition, rebuild it.
Check the Spare Parts List for pump rebuild kit part number.
9-49
Teledyne API Model 400A O3 Analyzer Instruction Manual, 02260, Rev. F
INTENTIONALLY BLANK
9-50
Teledyne API Model 400A O3 Analyzer Instruction Manual, 02260, Rev. F
10 M400A SPARE PARTS LIST
NOTE
Use of replacement parts other than those supplied by Teledyne API may
result in non-compliance with European Standard EN 61010-1.
Table 10-1: Teledyne API M400A Spare Parts List
Part No.
Description
02230-0000
DC POWER SUPPLY BOARD
00094-10
ORIFICE, 13 MIL
00276-0140
CPU BOARD
00369
FILTER, TFE, 37 MM, QTY 100 (872-006400)
00369-01
FILTER, TFE, 37 MM, QTY 25 (872-006300)
00420-3000
O3 PROM W/SOFTWARE
02271
ABSORPTION TUBE
00514-0200
V/F BOARD
00526-0100
UV LAMP ASSY, SOURCE
02028
PRE-AMP ASSY, M400A DET
01139-XX00
POWER SUPPLY MODULE
02241
ASSY, OPTICAL BENCH
00596
ACTIVATED CHARCOAL
02419
ASSY, UV LAMP, HEATER, THERMISTOR
00612-01
UV LAMP ASSY, IZS GEN
02818
M400A LEVEL 1 SPARES KIT
02819
M400A EXPENDABLES KIT-IZS
00619-02
M400A SPARES KIT FOR 1 UNIT
02260
ISTRUCTION MANUAL FOR M400A
02254
M400A ZERO AIR SCRUBBER (IZS) CHARCOAL
01190-01
SAMPLE FILTER ASSY
00690
SCRUBBER PADS
(table continued)
10-1
Teledyne API Model 400A O3 Analyzer Instruction Manual, 02260, Rev. F
Table 10-1: Teledyne API M400A Spare Parts List (Continued)
Part No.
Description
02061
REAR PANEL CONNECTOR BOARD
01930
KEYBOARD
00728
DISPLAY
02240
M400A SWITCHING VALVE ASSY, W/SCRUBBER
00969
FILTER, TFE, 47 MM, QTY 100
00969-01
FILTER, TFE, 47 MM, QTY 25
01509
UV LAMP POWER SUPPLY
02414-01
ASSY, SAMPLE THERMISTOR
FA010
FAN
FL001
SINTERED FILTER (002-024900)
FL003
FILTER, DFU (036-040180)
FL012
M400A REFERENCE SCRUBBER
02255
ASSY, HEATER, THERMISTOR (IZS)
HW020
SPRING, FLOW CONTROL
HW036
TFE THREAD TAPE (48 FT)
HW037
TIE, CABLE
OP012
UV DETECTOR
OR001
O-RING, FLOW CONTROL
OR012
O-RING, O3 GEN LAMP
OR014
O-RING, OPTICAL BENCH, LAMP WINDOW
OR018
O-RING, SAMPLE FILTER
OR021
O-RING, SCRUBBER
OR026
O-RING, ABSORPTION TUBE
OR030
O-RING, IZS SCRUBBER
OR048
O-RING, UV DETECTOR
PU020
PUMP 115V 50/60 Hz
PU022
PUMP REBUILD KIT
SW006
OVERHEAT SW, IZS OVEN, OPTICAL BENCH
(table continued)
10-2
Teledyne API Model 400A O3 Analyzer Instruction Manual, 02260, Rev. F
Table 10-1: Teledyne API M400A Spare Parts List (Continued)
Part No.
Description
SW026
VACUUM SENSOR
TU001
TUBING: 6’, 1/8” CLR
TU002
TUBING: 6’, 1/8” BLK
TU009
TUBING: 6’, 1/4” TYGON
VA033
TFE, 12V, SAMPLE/REF. VALVE
VA028
IZS, ZERO/SPAN VALVE
Table 10-2: Teledyne API MODEL 400A Level 1 Spares Kit
Part No.
Description
028180000
M400A LEVEL 1 SPARES KIT
Includes:
Qty
000941000
ORIFICE, 13 MIL
1
005260100
UV LAMP ASSY, SOURCE
1
002028000
PRE-AMP ASSY, M400A DET
1
024190000
ASSY, HEATER/THERMISTOR, OPTICAL BENCH
1
006120100
UV LAMP ASSY, IZS GEN
1
022400000
M400A VALVE MODULE
1
015090000
UV LAMP POWER SUPPLY
1
024140100
ASSY, SAMPLE THERMISTOR, M400A
1
022710000
ABSORPTION TUBE, M400A
1
FL0000005
M400 OZONE SCRUBBER (INTERNAL)
2
022550000
ASSY, IZS HEATER/THERMISTOR M400A
1
PU0000022
PUMP REBUILD KIT
2
10-3
Teledyne API Model 400A O3 Analyzer Instruction Manual, 02260, Rev. F
Table 10-3: Teledyne API MODEL 400A Expendables Kit For IZS
Part No.
Description
028190000
M400A EXPENDABLES KIT - IZS
Includes:
Qty
005960000
ACTIVATED CHARCOAL
1
006900000
RETAINER PADS
2
FL0000001
SINTERED FILTER (002-024900)
2
FL0000003
FILTER, DFU (036-040180)
1
PU0000022
PUMP REBUILD KIT
1
Table 10-4: Teledyne API MODEL 400A Spares Kit for 1 Unit
Part No.
Description
028180100
M400A SPARES KIT FOR 1 UNITS
Includes:
Qty
024190000
ASSY, HEATER/THERMISTOR, OPTICAL BENCH
1
022550000
ASSY, IZS HEATER/THERMISTOR M400A
1
FA0000010
FAN
1
10-4
Teledyne API Model 400A O3 Analyzer Instruction Manual, 02260, Rev. F
APPENDIX A ELECTRICAL SCHEMATICS
Table A-1: Electrical Schematics
Drawing No.
Title
005140200
V/F Board Assembly
005150000
V/F Board Schematic
007040000
Keyboard Assembly
007050000
Keyboard Schematic
011391400
Power Supply Module Wiring Schematic
012170000
UV Lamp Power Supply Assembly
012180000
UV Lamp Power Supply Schematic
014780100
Motherboard Assembly
014790000
Motherboard Schematic
015610000
I2C/SubMux Assembly
015620000
I2C/SubMux Schematic
019300000
Keyboard Assembly (CE)
019310000
Keyboard Schematic (CE)
020280000
IZS UV Detector Preamp Assembly
020290000
IZS UV Detector Preamp Schematic
020610000
Rear Panel Assembly
020620000
Rear Panel Schematic
021720000
Pressure/Flow Sensor Assembly
021730000
Pressure/Flow Sensor Schematic
022220100
Power Supply Switch Board Assembly
022230300
Power Supply Switch Board Schematic
022300000
DC Power Supply Assembly
022310000
DC Power Supply Schematic
029820000
M400A Interconnect Diagram
A-1
Teledyne API Model 400A O3 Analyzer Instruction Manual, 02260, Rev. F
INTENTIONALLY BLANK
A-2