1
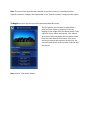
2011
iHome Inventory – User Guide
Technical Support:
MegaTech Inc.
1/29/2011
Introduction
iHome Inventory is an app that enables you to create and maintain a home inventory in the
most efficient manner. A home inventory is an essential part to your planning process. It’s part
of the tool sets required to prepare for disaster, should you need it. Other tools to be
considered include: a Last Will and Testament, life insurance, property insurance as well as a
trust. Without these tools in place before disaster strikes, you may not be able to rebuild back
to your former standard of living should your whole world, within a matter of minutes, crash
down around you, reduced to a pile of rubble. By using iHome Inventory, you are proactively
preparing for the future by establishing financial protection in case of a home disaster.
Features
Primary House Information: iHome Inventory provides the option of including a photo of your
property as well as the address, cost of property and year purchased. The cost of the property
is included in the final report.
Item Data: iHome Inventory enables you to include a photo of each item along with other
important information, such as description, estimated replacement value, and bequest
recipient. Items can also be categorized. An additional capability includes the GPS location of
the picture’s origin which is activated by turning on this feature of your device. Other
information that can be included is the cost, as well as special insurance needed, i.e. jewelry,
antique furniture, etc.
Categories: iHome Inventory has several pre-established categories listed in alphabetical order.
Additional categories may be added to suit your needs.
The Report: iHome Inventory generates a report that is viewable on your device. This report
includes photos (on device only) of the items by category, subtotals of each category as well as
a total that includes the property cost and each sub-total. For example, the cost of each item
listed under “Special Insurance” is itemized and calculated into a sub-total represented in the
“Special Insurance” category of the report.
This report can be e-mailed to yourself or someone else. At this time, the e-mail report does
not include the photos. However, there are plans to develop a web-based site that enables you
to upload your inventory. Then a report with photographs can be generated and e-mailed to an
individual. There will be an additional cost for the use of this site.
Note: The cost of each item that was selected for special insurance is calculated into the
“Special Insurance” category and represented in the “Special Insurance” category of the report.
To begin Start your app and you will be presented with this screen.
The first picture you may want to take will be a
picture of your house or property. Do this by
tapping on the image of the line drawn house. Take
a picture of your house and tap the “Use” button.
Your picture will now replace the line drawn house.
Enter the other data for this screen. If for some
reason you cannot take a picture at this time, you
can come back to this screen another time and add
the picture.
Next, tap the “View Items” button.
On this screen you will add your next item. To add
a picture, tap the “Add Photo” button. Take your
picture, then add the other information on the
screen.
This screen allows you to add your next item. To add a
picture, tap the “Add Photo” button. Take your
picture, then add the other information on the screen.
To put this item in the correct category, tap on the
“Select Category” and scroll to the appropriate
category.
You will also notice a “Needs Special Insurance”
button. If the item is of special value, such as antique
furniture or diamond jewelry, you may want to check
this box. By doing so, the cost of this item will be
totaled in the “Special Insurance” category. This
enables you to see how much special insurance you
may want to have. Once you have completed entering
this data, tap on the “Save” button.
Adding a Category
To add a category, tap on the “Category”
button. Then tap on the + in the upper right
side of the screen.
Enter the new category name and tap on
“Save”.
To generate a report, go back to the main screen and tap on the “Report Button”
The on device Report Screen you will see each
item with it’s recorded data and photo.
At the end of the report will be a sub-total of
each category as well as a grand total.
Note: The cost of each item selected as needing
special insurance is calculated in the “Requires
Special Insurance” category.
##