1
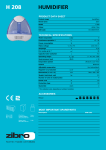
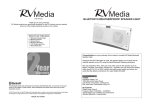
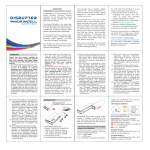
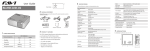
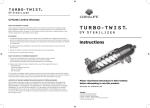
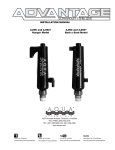
ASEPTIX
Secondary Unit
Primary Unit
1-888-726-8869 www.sanuvox.com
SANUVOX TECHNOLOGIES INC. COPYRIGHT 2013 v.3.0
Secondary Unit
Eight (8) 40" High-Intensity
UVC Germicidal Lamps
Low-Mercury content
Primary Unit
WARNING
Never expose eyes or skin to ultraviolet light from any
source. The UV system MUST be DISCONNECTED
from power source before performing maintenance or
service. Personal injury may result.
65"
Easy to maneuver hand-rail
w/ four (4) integrated InfraRed Motion Detectors
WARNING
Do not touch Lamp glass without gloves. Reduced
performance of Lamp may result. Clean Lamp after
handling.
WARNING
Cooling fan
designed to maintain
maximum UV Lamp efficiency
The UV Lamp contains a small quantity of mercury. If a
Lamp breaks, clean and dispose of with care.
WARNING
Four (4) 4" caster wheels w/ lock
Use only specified replacement Lamps with the UV
system. Use of an incorrect Lamp can result in damage
to the system and/or Lamp.
Retractable power-cord (20 feet)
Primary Unit includes all the features of the Secondary Unit and:
- Two (2) ceramic (UV proof) illuminated push-type buttons
- Built-in Web Server
- Built-in FTP Server hosting instructions & service manuals
- Wireless Multi-unit communication between Primary & Secondary
- Wi-Fi capability: mobile devices such as smart phones & tablets
can access the built-in server & control / monitor operation
- Upgradable software
- Data Logging
28"
Dimensions (per unit): 65" x 28" x 28"
Power: 900 Watts, 15 Amp, double pole
SAFETY CONSIDERATIONS
Do not expose unprotected eyes or skin to direct UV light. The Aseptix Dual Mobile UV Disinfection System is designed to be used in
unoccupied spaces.
GENERAL
Aseptix Dual Mobile UV Disinfection System utilizes a Primary & Secondary unit that is designed to sterilize a patient room or operating
theatre from multiple angles dramatically minimizing the shadow area that is so problematic for other UV sterilizers. The Aspeptix Primary &
Secondary units communicate wirelessly to each other sterilizing a conventional patient room in less than 15 minutes.
ASEPTIX: TERMINAL CLEANING PROCESS
STEP #1 No occupants in room
Before disinfection process, be sure the room is vacant of patient(s) & staff. No persons
can be in the room during the 15 minute UV disinfection process. Should someone enter
the room during a disinfection cycle, the Infra-Red motion detectors will automatically turn
OFF the system. This interrupted cycle will be displayed as an error code on the Smart
Device and on the LED Push Buttons located on the Primary unit (flashing RED LED and
GREEN LED OFF). The Aseptix system can operate in a room with windows. The UVC
germicidal light does not penetrate glass. The Infra-Red motion detectors do not sense
movement through glass.
STEP #2 Prepare room for disinfection
Remove bed linen & raise hand-rails. Place any “high-touch” items in clear view of the
Aseptix units. Make sure items such as tubes, monitors, remote controls and tables are
placed near the UV systems.
An example of a typical Aseptix Primary & Secondary unit
placement to minimize shadow areas
STEP #3 Placement of Primary & Secondary Aseptix units
UV disinfection is line-of-sight technoloy. Ideally, place the UV system to shine directly on any high-touch
items near the patient’s bed. The use of the dual UV system is to minimize shadow areas making for a faster
and effective disinfection process.
For areas such as a bathroom, one or two Aseptix units can be placed within the bathroom to disinfect the
area. Should the area be too small for two Aseptix units, one will operate within the bathroom while the
second unit will operate outside bathroom. Be sure that there are no occupants in the room while the
secondary unit will run.
STEP #4 Using the Aseptix System
For understanding the Push Button LED lights and manual operation please refer to next page.
Once both units are placed in the ideal location. Extend the retractable power cord. There is 20ft. of cord
length to allow both the Primary & Secondary units to be plugged into a wall outlet.
STEP #5 Controlling the Aseptix Unit with a SMART DEVICE
An example of the Aseptix being
used in a patient room bathroom
With a computer or Smart Device (Wi-Fi enabled) select the wireless network: ASEPTIX###.
Enter password: AseptixUV (case sensitive). Open your browser and in the address bar type the following
address: http://192.168.0.1 and press ENTER. The Smart Device must be within the wireless range of the Aseptix to work. You may want to
enter the web address to your “Favorites” .
STEP #6 Using the Smart Device interface
1.
The Aseptix web page will open that will allow you
to control the Aseptix system.
3.
2.
The following can be found on the Aseptix page:
4.
1. Admin Mode: This allows the user to perform
troubleshooting and access the Data log function
2. FAQ’s: Documents are available on-line
3. Language: Options include English, French
and Spanish
4. Enter Room Identification that will Log the
disinfection cycle
5. Start / Stop button
6. Countdown Timer: This window will have both
the 30 second pre-timer and 15 min. disinfection
cycle timer
5.
6.
7.
STEP #7 Aseptix Activation
Upon pressing “START” on the Smart Device or in Manual mode, the Aseptix will begin it’s “countdown operation”(Figure A.). On the Smart
Device you will see a countdown from 30 seconds. There will also be a series of audible beeps from the Aseptix unit that will progressively get
faster until it reaches zero (0) seconds at which time both Primary and Secondary unit will activate illuminating the room with UVC light (Figure
B.). There must be no occupants in the room upon activation. Should a person remain in the room or enter the room during the 15 minute
disinfection process, the Infra-Red Motion Detectors will automatically turn the system OFF and the corresponding ERROR code will be
displayed on the Smart Device and on the LED Push Button Display (see Error code sequence below).
Figure A. The pre-timer “countdown operation” gives the user 30 seconds to leave
the room prior to the Aseptix activating
Figure B. Once the “countdown timer” elapses, the Aspetix begins the disinfection
cycle which will last 15 minutes.
STEP #8 Completed Disinfection Cycle (15 min.)
Upon successful disinfection cycle, the Smart Device will notify the user of completion.
The LED Push Button Display will notify the user as well (see Push Button display below).
Manual Control
The ASEPTIX may be manually operated by the Push Buttons (GREEN ‘ON’) on the Primary unit. If the unit will be used manually, the data log
function will record the disinfection process but the room will be designated as “Room + Date + Hour” by default.
To begin Manual operation press the GREEN LED Push Button.
Understanding the LED Push Button Display
Regardless if the Aseptix is being used in manual mode or via a Smart Device, status information will be provided via the LED Push Buttons.
STAND-BY
Both Primary & Secondary units are plugged in and paired to
each other. Both buttons will stay ON solid RED & GREEN.
Ready for disinfection process.
CYCLE-STARTED
An uninterrupted cycle lasts for 15 minutes. During this 15 minute
cycle only the RED buttons will stay ON solid RED.
CYCLE-COMPLETED
After an uninterrupted 15 min. disinfection cycle the GREEN
button will flash and the RED button will stay ON solid RED
ERROR
In the event of an error (i.e. Motion, Sync, Communication) the
GREEN button will be OFF and the RED button will flash.
*Refer to a Smart Device for the specific error code.
SOLID
GREEN
SOLID
RED
OFF
SOLID
RED
FLASHING
GREEN
SOLID
RED
OFF
FLASHING
RED
Admin Mode
The Admin page can be accessed by clicking the “Lock” icon
on the Aseptix web page. The Admin page is password protected. Sanuvox
will provide the default password and a password may be changed by the administrator.
The Admin Page allows for various options including:
The operation of the Aseptix Primary unit in single mode (The
Primary unit energizes independently of the Secondary unit
which remains OFF).
Pressing the “ADMIN” button “unlocks” troubleshooting options.
By sliding the toggle switches, it facilitates troubleshooting the
different components that make up the Aseptix systems.
These include:
Lamp Relays
Fan
Alarm
The following sliding indicators can be used to troubleshoot:
Lamp Status
Individual Infra Red Motion Detectors
LED Status (Primary Unit)
For troubleshooting please call Sanuvox at 1-888-726-8869 or email [email protected]
where a team member will help you with your issue.
1-888-726-8869 www.sanuvox.com
SANUVOX TECHNOLOGIES INC. COPYRIGHT 2013 v.3.0