1
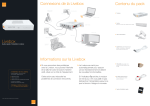
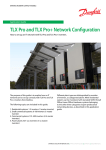
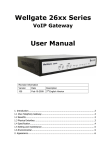
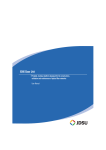
RESCUE SYSTEM via Ethernet connection
1
2
3
Rescue system…………………………………………………………
How to identify your Operating System………………………….
How to configure an IP address with Windows…………………
3.1 With Windows 98SE and Windows Millennium……...……
3.2 With Windows 2000……………………………………………
3.3 With Windows XP………………………………………………
Rescue System via Ethernet Connection. User Manual (v4)
2
8
9
9
13
15
Page 1 of 16
1 Rescue system
The rescue system allows you to restore the internal software of your Livebox.
NOTE: THIS PROCEDURE SHOULD ONLY BE USED AS A LAST RESORT PROCEDURE
IF:
• YOUR LIVEBOX IS OUT-OF-ORDER (NO CONNECTION VIA YOUR WIRELESS
ADAPTER OR ETHERNET CONNECTION)
• YOU HAVE ALREADY TRIED THE FACTORY SETTINGS PROCEDURE WITHOUT
RESULTS
IMPORTANT: Before you start you’ll need a few things to hand.
• Your Livebox close to your PC
• A pen and paper to record some settings
• The ethernet cable that was provided in your original set-up
IMPORTANT: You need to make a temporary change to some settings on your computer this
involves your TCP/IP settings. You MUST do this before continuing. Instructions for your
operating system are below.
Windows 98SE…………………………………………………………………...
Windows Millennium…………………………………………………………..
Windows 2000…………………………………………………………………..
Windows XP……………………………………………………………………..
9
9
13
15
If you are not sure what your Operating System is, please go to page 8 to identify it.
1.2 Launch the Rescue System software
- Insert the Rescue System CD into your CD drive.
- Double click on ‘My Computer’
- Right click the drive labeled (whatever CD is branded)
- Left click on ‘open’.
- Double click the file named ‘TFPTD32.exe’ *
* Windows XP Service Pack 2 users may experience a warning message from the inbuilt Windows security, to
continue you should choose the “Unblock” option.
Rescue System via Ethernet Connection. User Manual (v4)
Page 2 of 16
The following window appears:
1.3 Connect the Livebox to your PC
- Disconnect the Wireless adaptor from the USB port of your PC.
- Disconnect all the cables connected to your Livebox (including the power cable)
- Plug one end of your ethernet cable into the ethernet port on the back of your PC and the
other end into the Yellow socket of the Livebox.
Rescue System via Ethernet Connection. User Manual (v4)
Page 3 of 16
1.4 Prepare your Livebox
- Press and hold the button labelled ‘1’
(at the back of the Livebox)
- Plug the power cable back into your
Livebox while holding button 1
- Hold the button 1 until the three lights below are ON. This usually takes approx 10 seconds
-You can then release the button.
The Rescue System then starts to transfer data from the CD in your PC to the Livebox:
When the transfer is finished, the Livebox will update itself. This can take up to 5 minutes.
Once complete, the Livebox will automatically reboot.
IMPORTANT: DO NOT UNPLUG YOUR LIVEBOX DURING THE OPERATION
Rescue System via Ethernet Connection. User Manual (v4)
Page 4 of 16
1.5 Close the Rescue System
Once the Livebox has rebooted, you've successfully completed the 'rescue':
- Please close the application window (Tftpd32 – this is pictured above).
- Plug in the RJ11 telephone cable to the Livebox and filter plugged into your telephone socket.
1.6 Restore your IP configuration
Remember that you have set your ethernet connection with a fixed IP. You need to restore your
IP configuration as you wrote it down before the Rescue System procedure. You might need to
refer back to the instructions on how to change it so you can navigate back.
With Windows 98SE and Windows Millennium............................................9
With Windows 2000......................................................................................13
With Windows XP..........................................................................................15
1.7 Replace your username and password on the Livebox.
Click on the Configure Livebox or Configure Wanadoo Home icon, which should be installed
on your desktop.
If you haven't got the icon on your desktop, don't worry - you can access the Livebox
homepage by typing the link below into your Internet browser address bar:
http://configuration.adsl
Note: When you wish to use your wireless adaptor with the Livebox again be sure to check
your Livebox is in pairing mode (see section 1.4 above).
The wireless adaptor will need to be re-attached to your computer and will need to be in range
and 'Paired' with your Livebox to access the configuration pages. Alternatively, you can
connect your computer and Livebox using an Ethernet cable.
From the Livebox Homepage, select 'Access to the configuration pages'.
Rescue System via Ethernet Connection. User Manual (v4)
Page 5 of 16
You will be prompted to enter the Livebox username and password.
The username is: admin
The password is: admin
In the Broadband Username field, delete ppp_name and enter your Broadband username e.g.
yourname.wanadoo.co.uk@fs
Delete the 6 dots from the Password field, and replace it with your Wanadoo password
Remember that your password is case sensitive i.e. 'apple' is not the same as 'Apple' or
'APPLE'.
Rescue System via Ethernet Connection. User Manual (v4)
Page 6 of 16
To confirm the changes, click on Submit
You'll need to wait about a minute until ADSL status changes to 'Connected'
You can now disconnect the ethernet cable.
Rescue System via Ethernet Connection. User Manual (v4)
Page 7 of 16
2 How to identify your Operating System
If you do not know which Operating System is running on your PC, follow the instructions
below.
1- Click on ‘Start’
2- Click on ‘Control Panel’
3- Double click on ‘System’ *
*If you cannot see all of the Control Panel options you will need to “Switch to Classic View” using the link on the
left of the Control Panel window.
One of the following will be displayed.
• Windows 98SE,
• Windows Millennium,
• Windows 2000, or
• Windows XP
Rescue System via Ethernet Connection. User Manual (v4)
Page 8 of 16
3 How to configure an IP address with Windows
3.1 With Windows 98SE and Windows Millennium
1- Click the ‘Start’ button.
2- Select the 'Settings' menu.
3- Select the 'Control Panel'.
4- Double click the ‘Network’. (If the Network option is not visible you may need to click the
“View All” option to display all Control Panel contents)
Rescue System via Ethernet Connection. User Manual (v4)
Page 9 of 16
5- Left click on the 'TCP/IP -> ethernet adapter' to highlight it. The exact name shown on your
computer will vary depending on what type of network card you have installed.
IMPORTANT: Do NOT confuse this with the 'TCP/IP -> Dialup Adapter'.
6- Once the TCP/IP ethernet adapter is highlighted, click ‘Properties’
7- Click on the 'IP Address' tab as shown.
Rescue System via Ethernet Connection. User Manual (v4)
Page 10 of 16
IMPORTANT: Please write down your current settings below. You will need to restore these
settings when the Rescue System procedure is finished.
Obtain an IP address automatically
Specify an IP address
IP Address
Subnet Mask
(tick here if this is selected):
(tick here if this is selected):
(copy here if IP address appears):
(copy here if mask appears):
.
.
.
.
.
.
8- Select the option ’Specify an IP address’ and enter the following information.
• IP Address: 10. 7. 58.114
• Subnet Mask 255.255.255. 0
9- Click on the 'Gateway' tab at the top.
10- Enter the following address: 10. 7. 58.112
11- Click ‘ADD’
Rescue System via Ethernet Connection. User Manual (v4)
Page 11 of 16
12- Click the ‘OK’
13 – Click ‘OK’ on network settings to continue and apply the new settings
13- Click the ‘Yes’
After the re-start, your computer is configured with a fixed IP Address and is ready for the
Rescue System.
Rescue System via Ethernet Connection. User Manual (v4)
Page 12 of 16
3.2 With Windows 2000
1- Click ‘Start’
2- Click ‘Settings’
3 -Click ‘Control panel’
4- Double-click ‘Network and Dial-up Connections’
5- Right-click ‘Local Area Connection’
6- Click ‘Properties’
7- Click ‘Internet Protocol (TCP/IP)’
8- Click ‘Properties’
Rescue System via Ethernet Connection. User Manual (v4)
Page 13 of 16
IMPORTANT: Please write down your current settings below.. You will need to restore these
settings when the Rescue System procedure is finished.
Obtain an IP address automatically
Use the following IP address
IP Address
Subnet Mask
Default Gateway
(tick here if this is selected):
(tick here if this is selected):
(copy here if IP address appears):
(copy here if mask appears):
(copy here if gateway appears):
.
.
.
.
.
.
.
.
.
9- Select ‘Use the following IP address’ and enter the following information.
IP Address: 10. 7. 58.114
Subnet Mask 255.255.255. 0
Default Gateway 10.7.58.112
10- Click OK.
11- Click OK
12 – Please restart your computer
Your computer is now configured with a fixed IP Address and is ready for the Rescue System.
Rescue System via Ethernet Connection. User Manual (v4)
Page 14 of 16
3.3 With Windows XP
1-Click ‘Start’
2- Click ‘Control Panel’
3- Click ‘Switch to classic view’ (If this option isn’t available then don’t worry it just means
you’re already in classic view)
4- Double-click on ‘Network Connections’
5- Right click on ‘Local Area Network connection’ and select ‘Properties’ (this is shown
below)
6- Click ‘Internet Protocol (TCP/IP)’ to highlight it
Rescue System via Ethernet Connection. User Manual (v4)
Page 15 of 16
7- Click ‘Properties’
IMPORTANT: Please write down your current settings below. You will need to restore these
settings when the Rescue System procedure is finished.
Obtain an IP address automatically
Use the following IP address
IP Address
Subnet Mask
Default Gateway
(tick here if this is selected):
(tick here if this is selected):
(copy here if IP address appears):
(copy here if mask appears):
(copy here if gateway appears):
.
.
.
.
.
.
.
.
.
10- Select ‘Use the following IP address’ and enter the following information.
IP Address: 10. 7. 58.114
Subnet Mask 255.255.255. 0
Default Gateway 10.7.58.112
11- Click ‘OK’
12- Click ‘OK’
Your computer is now configured with a fixed IP Address and is ready for Rescue System.
Rescue System via Ethernet Connection. User Manual (v4)
Page 16 of 16