1
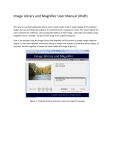
10.1SP Penates 10.1SP User Manual for Windows Windows 7 / 8 / 8.1 Driver Version 8.0 Version:0.3 Release Date:2014/12 Penates 10.1SP Driver Version 8.0 Contents I. General Information.................................................................................................. 3 OVERVIEW............................................................................................................................. 3 PENATES FUNCITONS ............................................................................................................. 3 SYSTEM REQUIREMENTS ....................................................................................................... 3 INSTALLING THE DRIVER SOFTWARE ON WINDOWS .............................................................. 3 VERYFYING HARDWARE ......................................................................................................... 4 HARDWARE INSTALLATION .................................................................................................... 5 USAGE TIPS ........................................................................................................................... 6 MAPPING TO MULTIPLE MONITORS....................................................................................... 6 II. Penates configuration ............................................................................................... 7 THE INFO TAB ........................................................................................................................ 7 THE BUTTON TAB................................................................................................................... 8 Button Name ................................................................................................................. 8 Double Click Time .......................................................................................................... 8 Pen/Eraser Toggle .......................................................................................................... 8 Default........................................................................................................................... 8 EXPRESS KEYS DEFINE TAB ..................................................................................................... 9 Default........................................................................................................................... 9 Re-define Express keys ................................................................................................... 9 Common ...................................................................................................................... 10 Mouse ......................................................................................................................... 10 Multimedia .................................................................................................................. 11 Other ........................................................................................................................... 11 Run .............................................................................................................................. 12 Internet ....................................................................................................................... 13 Hot Key ........................................................................................................................ 14 Show Desktop .............................................................................................................. 14 Switch Application ....................................................................................................... 14 3D Switch Application (Win 7/Vista) ............................................................................. 14 POP MENU .................................................................................................................. 14 THE PRESSURE TAB .............................................................................................................. 15 Pressure Test:............................................................................................................... 15 Clear ............................................................................................................................ 15 Click Sensitivity ............................................................................................................ 15 THE MONITOR SETTING TAB ................................................................................................ 16 THE CALIBRATION TAB ......................................................................................................... 17 Calibration ................................................................................................................... 17 Rotate .......................................................................................................................... 18 THE MONITOR TUNER ......................................................................................................... 19 Brightness .................................................................................................................... 19 Contrast ....................................................................................................................... 19 Color Temperatures ..................................................................................................... 20 Restore Default ............................................................................................................ 20 III. Changing the Pen Tip .............................................................................................. 21 IV. Question & Answer ................................................................................................. 22 2 Penates 10.1SP Driver Version 8.0 I. General Information OVERVIEW Welcome to the world of Penates! You’ll be able to discover how easy it is to control your personal computer by using a U Pen instead of a mouse. The function of the U Pen is able to draw a line very thin, thick, light or dark (called “pressure sensitivity”). You also can write, sign, annotate documents, and draw, sketch or paint as easily as you would on normal paper and simulate the functions like pencil, mark pen, brush, or watercolor pen by using commercial software packages such as Adobe® Photoshop™, Corel® Painter™ and Paint Shop™. PENATES FUNCITONS After installing the device driver, your Penates features have the following functions: Direct pointing – You can move the cursor to any location by hovering the digital pen tip over your Penates screen. Three-button mouse commands - Your Penates provides all the functions of a three button mouse by using its pen tip and two buttons. Pen scrolling – You can scroll documents and Web pages by pressing the middle button of the digital pen over your Penates screen. Pressure sensitivity – This feature allows you to emulate various brushes and pencils so when you press down the pen tip harder, lighter, or stronger, you create pencil lines from very thin to thick. SYSTEM REQUIREMENTS Windows 7 / 8 / 8.1 ; USB and HDMI port; internet connection. INSTALLING THE DRIVER SOFTWARE ON WINDOWS If you are using Microsoft Windows 7, 8 or 8.1 operating systems: 1. Please download the driver from www.uc-logic.com “Support” page. 2. Connect your Penates with a HDMI & USB interface into the computer. (Refer to page 5) 3. Decompress the driver file and run SETUP.EXE . 4. When installing the driver, follow the installation instructions on your screen and press the “Enter” key. After the installation has completed, you need to reboot the computer. → Caution: You have to remove any existing tablet driver before installing the Penates driver (This includes the pen tablet driver from any other manufacturer.) 3 Penates 10.1SP Driver Version 8.0 VERYFYING HARDWARE Your Penates and package contents are shown below. If anything is missing, contact your dealer immediately. 4 Penates 10.1SP Driver Version 8.0 HARDWARE INSTALLATION Connect your Penates with a HDMI & USB interface into the computer after you have finished the driver installation and restarted the Windows system. If the device has been successfully installed, you will see a small Penates icon ( ) appear in the system tray, which is normally at the lower right corner of the screen. 5 Penates 10.1SP Driver Version 8.0 USAGE TIPS 1. Double tapping When you double tap with the digital pen (equivalent to a double click with a mouse), try to keep the pen tip away from the Penates screen, or at least try to lift the pen tip as fast as possible before the second tap. 2. Scrolling function of digital pen The digital pen has the same function as a normal mouse for scrolling pages. Just press the first button of the digital pen (same function as the mouse middle button) over the Penates screen. 3. Using a pen without an ordinary mouse You may install the Penates and a mouse in your computer at the same time. However, only one device is able to work at a time. You cannot use both devices at once. 格式化: 縮排: 左: 0.85 公分, 取 消項目符號與編號 MAPPING TO MULTIPLE MONITORS If your computer is equipped with more than one monitor, your Penates will map to the monitors based upon how they are configured in the DISPLAY PROPERTIES control panel. After you have correctly configured your computer for using it with multiple monitors, you can then adjust your Penates mapping by opening the Penates panel and changing the appropriate options. This enables you to toggle the current Penates mapping and screen cursor between the system desktop or primary display and your other monitors. See working with “Monitor Setting”. → Note: Under the “Duplicate the displays” mode of the “Multiple Display” function, the display resolution of your monitor must be the same resolution of your Penates. Otherwise, the pen cursor will be misplaced on the screen. For Penates 10.1SP, please make sure the other monitor resolution is 1280 x 800. 6 Penates 10.1SP Driver Version 8.0 II. Penates configuration You may configure the Penates by modifying the functions of the pen tip and the two barrel buttons, tap [Start] > [Settings] > [Control Panel], and double-tap the Penates icon ( ), or tap on the Penates icon ( ) in the system tray, usually located at the lower right corner of the screen. THE INFO TAB The Info tab displays the version number of the driver and Tablet PC function. 7 1. 2. Show Icon in System Tray Select to show the Penates icon ( ) in the system tray. Support Digital Ink Select to support the pressure of digital ink settings. → After the Penates driver has been installed in Windows; the Tablet PC function setting will support pen pressure in MS Journal, OneNote (2003, 2007), etc. → If the Tablet PC setting is disabled, most of the art software pen’s pressure (Photoshop, Illustrator, Corel Painter) is still working, but pen pressure will not be available when using MS Journal, OneNote (2003、2007) , etc. Penates 10.1SP Driver Version 8.0 THE BUTTON TAB 8 Button Name You may re-program the functions of the pen two-barrel buttons by selecting the button name from the drop down menu and assign a command of a traditional three-button mouse to it. According to the mouse function, you can select no action, left click, left double click, middle click, middle double click, right click, right double click or Pen/Eraser Toggle. Double Click Time Move the Speed Slider toward “Slow” if you want more time in double tapping with Pen Tip or less time if you move the Speed Slider toward “Fast”. This setting is the same as Double-click Speed on the page displayed by selecting Start ► Control Panel ► Mouse ► Buttons. Changing the speed in one section is the same as changing the speed in the other tab. Pen/Eraser Toggle Pen/Eraser toggle function only works on supported graphics software or digital ink software. You must select “Supports Digital Ink” option on the info tab to activate this function. Default Tap on the Default button to return to the manufacturer settings. Penates 10.1SP Driver Version 8.0 EXPRESS KEYS DEFINE TAB Express Keys: For Express Keys & Scroll Ring settings, you can modify these using the Express Keys configuration page. Default Return the Express Keys to the default settings. 9 Re-define Express keys Select “Common”, “Mouse”, “Multimedia”, “Other”, “Run”, “Internet” and “Hot Key” tabs to re-define the settings. Penates 10.1SP Driver Version 8.0 Common Express key name: Rename the Express Key. Disable: Disable the Express Key name display on the Penates control panel. Default: Return the Express Key name to the default setting. 10 Mouse Mouse function: Select Mouse mode settings. Penates 10.1SP Driver Version 8.0 Multimedia Multimedia function: Select multimedia function settings: “Play/Pause”, “Stop”, “Previous”, “Next”, “Mute”, “Volume Up”, and “Volume Down”. Other Your Penates work zone: Select “Largest Work Zone” or “Screen Ratio”. Show setting: Show Express key name. 11 Penates 10.1SP Driver Version 8.0 Run Run: Use the browser button to select a file and run, or type in a file name with the complete path. Start in: This is the initial folder where the program starts the execution. Parameters: The string type will be passed to the program as parameters. For example, you may type in a document name here and pass it to a word processing program specified in the Run line above. 12 Penates 10.1SP Driver Version 8.0 Internet Network function: Select “Previous Page”, “Next Page”, “Refresh”,” Stop”, “My Favorite”, “IE”, “Email”. Link to: Kind of Service: Select an Internet service to start. For example: browsing a website, or send an email. The exact program initiated (for example, the browser program) depends on system settings. Address: The URL address for the selected service. For example, the Website or e-mail addresses. 13 Penates 10.1SP Driver Version 8.0 Hot Key The key combination to press: Select any key such as alphanumeric key or cursor control key, combined with Shift, Ctrl and/or Alt key. Common function: Select some common used settings. Show Desktop: When the hot-key is set to this function, simply press it to display the desktop immediately. Switch Application: When the hot-key is set to this function, simply press it to switch between all the opened windows. (This function only works on the system which supports this feature.) 3D Switch Application (Win 7/Vista): When the hot-key is set to this function, simply press it to activate Windows Flip 3D function to quickly preview all your open windows. (This function only works on the system which supports this feature.) POP MENU: When the hot-key is set to this function, simply press it to activate the POP MENU for frequently used functions. 14 Penates 10.1SP Driver Version 8.0 THE PRESSURE TAB Pressure Test: There are four different colors for selecting the pressure sensitivity of the Penates, and they can be adjusted in this tab. There is a test area to see the thickness of a line by pressing down on the pen tip to the pad. The numerical value of the pressure level is shown in the field above the “Clear” button. 15 Clear Tap on the “Clear” button to clean the space up in the Pressure Test area. Click Sensitivity By default setting, tapping with the pen tip is equivalent to a left click of a mouse. Move the slider in the sensitivity bar to adjust the response of the pen tip. Light means when the pen tip is very lightly pressed with slight pressure, and the heavy function is just the opposite. Take some time to set up the ideal setting when using the pen. Penates 10.1SP Driver Version 8.0 THE MONITOR SETTING TAB If you are selecting the “Extend the displays”mode under the “Multiple Display” function, please use the Penates "Monitor Setting" page to select your Penates corresponding screen number first in order to facilitate the custmized settings. 16 Click “OK” when you are finished with the setting. Penates 10.1SP Driver Version 8.0 THE CALIBRATION TAB Calibration 17 Check “Calibration” and select”4-Point Calibration” or “9-Point Calibration” to activate the calibration screen. Hold the pen 90 ° vertically on the calibration screen and use the pen tip to click on the center of the crosshairs in the calibration dialogue. Click “OK” to end the calibration. Penates 10.1SP Driver Version 8.0 Rotate Select the degree which you would like to rotate your Penates. 18 Penates 10.1SP Driver Version 8.0 THE MONITOR TUNER If you are selecting the “Extend the displays”mode under the “Multiple Display” function, you may configure the Penates monitor Brightness、Contrast and Color Temperatures. [Start] > [All Programs] > [Tablet] > [ UC Logic Monitor Tuner ] 19 Brightness You can adjust the brightness of your Penates screen by selecting “Increase” or “Decrease”. Contrast You can adjust the contrast of your Penates screen by selecting “Increase” or “Decrease”. Penates 10.1SP Driver Version 8.0 Color Temperatures You can select the default color temperature settings or the “User 1” to customize it. 20 Restore Default Click “Restore Default” to their manufacturer settings. Penates 10.1SP Driver Version 8.0 III. Changing the Pen Tip Pull out the pen tip from U Pen by using the tip remover device built into the pen case. Push the pen tip into the digital pen 21 Penates 10.1SP Driver Version 8.0 IV. Question & Answer Q: How can I get the latest updated software? A: You can download the new driver from our website (www.uc-logic.com). A. Uninstall your old driver: Click [Start] ► [All Programs] ► [TABLET] ► [Uninstall]. B. Download the latest driver version in the download section and save it into your hard disk. C. Unzip the file in a folder on your hard disk (with Windows built-in unzip utility or a program like WinZip for instance). D. Double-click the Setup.exe in the folder where you unzipped the file. Q: My Penates does not work. What can I do? A: Follow these steps as shown below: A. Remove the USB and HDMI plug from the computer. B. Un-install the Penates driver from the system. C. Re-connect your Penates USB and HDMI to the computer. D. You can download the latest version of the driver directly from our website. E. After installing the new driver version, the system will require you to restart your computer. F. After you restart your computer, on bottom right of the screen, you can find the Penates icon ( ) within there. a、 If you can't find the Penates icon ( ) on the bottom right of the screen, it means the driver failed in startup. This might be caused by an incompatible issue. b、 Or check [My Computer] ► [Properties] ► [Hardware] ► [Device Manager], if there is an exclamation mark that is found, it means that the installed driver of Penates is incompatible with the Windows system. If you have this problem, you can contact us for assistance. G. By clicking the Penates icon ( ) on the bottom right of the screen, you can test the pressure sensitivity to see whether the pen pressure function works or not. If you do not have pen pressure, it means the pen might be faulty and you should contact us for a solution. Q: Why is there no sound in Windows after I Install Penates 10.1SP? A: The PC may have automatically selected Penates 10.1SP as the default audio device in Windows. If this happened, to change the audio device, use the following steps to fix common sound problems in Windows 7/8. 1. Right-click the Volume icon (white speaker) on the taskbar.。 2. Click Playback Devices. 3. The Sound window opens. 4. On the Playback tab, click one of the following, such as Speakers: 22 Penates 10.1SP Driver Version 8.0 23 5. Click Set Default. 6. Click OK to close the window. This completes the steps to activate sound.