1
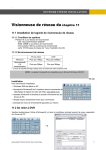
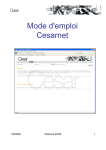
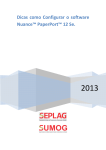
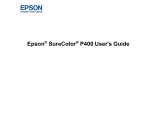
Image Library and Magnifier User Manual (draft)
This easy-to-use Flash application allows you to easily create small or large catalogs of hi-resolution
images that are automatically scaled to a consistent size for viewing on screen. The viewer allows the
user to browse the collection, view catalog descriptions of each image, and study each image using a
magnifier tool to "enlarge" any part of the image to its original resolution.
Here is an example using the Image Library and Magnifier to first browse a sample image collection
(Figure 1), then view detailed information about an image that includes a Great Blue Heron (Figure 2),
and then use the magnifier to locate the heron within the image (Figure 3):
Figure 1: Using the Browse feature to select an image for viewing.
Figure 2: Example of the Details screen providing information about the image.
Figure 3: Example of the Magnify screen showing an image detail.
It is easy to add your own image collection and customize the viewer for your own purposes. The Image
Library and Magnifier is very small (less then 30k) and you can copy this as needed for each image
collection that you assemble. That means that you can easily maintain multiple collections of different
images for different images for different purpose. Perhaps more important you can make multiple
copies of a single collection and distribute them for your own purpose. The Image Library and Magnifier
can be copied to a CD for distribution along with an image collection, or zipped with a collection of
images. You can also upload the Image Library and Magnifier with a collection f image to a Web site, and
visitor can view your images online. You are free to make multiple copies of the Image Library and
Magnifier in these ways. Here are some examples showing how the magnifier can be used:
An artist or artisan can use the tool to submit a collection of artworks for consideration to
galleries. Gallery can easily browse through the images and view details of each artwork.
A museum or gallery can provide an online lookup of a collection of artwork, crafts, historical
objects or other objects with summary catalog information and the ability to magnify the
images.
A study course can use the tool to present a library of images and can even use the tool for
identification purposes. For example, students can be invited to explore an image using the
magnifier and identify birds (See Figures 1 and 2), plants, geological formations, medical
conditions, microscopic life, etc. The tool is so simple to use that it could serve equally well at
the elementary or post- graduate level.
A scientist or anyone in a field of research or medicine can use the tool to examine an image in
detail while keeping a higher-level view.
Families can simply view vacation shots and images of loved ones. There is great pleasure in
viewing the entire image while exploring details of a face of favorite location.
Installing the Image Library and Magnifier
Installation is simple. Just unzip the file named imageViewer.zip to a folder of your choosing. The unzip
process will generate six files (imageViewer.swf, images.xml, and imagesBAK.xml, setup.xml, and
setupBAK.xml and imageViewerUserManual.pdf (this manual), along with a sub-folder named images
that contains three sample images.
The following instructions show you how to use the Image Library and Magnifier, and then how to
customize the product to display your own images.
Using the Application
To run the application, just double-click the file named imageViewer.swf. Your Flash plugin will open
the viewer for you (you may need to install the Flash plugin if you have not already done this). The
Image Library and Magnifier application will run and you will see the following screen:
Figure 4: Image Library and Magnifier main screen
All screens, including this one, contain five action buttons: help, about, browse, details, and
magnify.
Here is an overview of each action button:
browse: If you select this action, you see the
current image on the left with summary information on
the right, along with a scrollable list of all available images that allows you to jump directly to any image
in the collection. You will also see four "slide show" buttons that allow you to browse through the
images one a time, moving forwards or backwards, or jumping to the first or last image.
details: If you select this action you will see the current image on the left with all of the catalog
information available for this image on the right. You can use the slide show button to move to other
images while still in the "details" view.
magnify: If you select this action you will see the current image on the left and a Magnifier window on
the right. Use the mouse to point to any part of the image in the left window and you will see a
magnified version in the right window. The magnification shows the image at its full resolution. You can
use the slide show button to move to others image while still in the "magnify" view.
help: this screen provides some general help instructions when using the application.
about: If you select this action, you will return to the main screen.
Creating your own Image Collection
IMPORTANT: instead of changing the original Image Library and Magnifier, first make a copy of the
folder that contains the viewer and sample images, using a folder name that reflects your collection.
That way you can refer back to the original version if you run into trouble, or make additional copies for
other image collections.
Once you have made a copy, you are ready to add your own images and image descriptions.
Step 1: Add your images:
Add your .jpg images to the images folder. Make a careful note of the file names of each image and the
width and height of each image in pixels. If you are not sure of the height and width, use My Computer
to go into the folder, then right click the file name of the image and choose Properties from the drop
down menu. Click the Details tab and you will see the height and width listed in pixels. Make a note of
these.
Step 2: Add, delete, or modify the image data
Your images are now available to the Image Library and Magnifier, but you need to provide the
application with the file names and descriptions of each image. To do this start any text editor (such as
Notepad) and open the file named images.xml. Don't change anything in this file until you read and
understand the following description of the contents of the file. Your file will look something like this:
<IMAGES>
<IMAGE>
<ID>001</ID>
<TITLE>Blue Heron</TITLE>
<CREATOR>Mike OKane</CREATOR>
<MEDIUM>Photograph</MEDIUM>
<DATE>2008</DATE>
<NOTES>The largest and most widespread heron in North America, the Great Blue
Heron can be found along the ocean shore or the edge of a small inland pond. An all white form
is found from southern Florida into the Caribbean, and used to be considered a separate
species, the Great White Heron.
Can you use the magnify tool to find the Blue Heron on the lake shore? </NOTES>
<URL>blueheron.jpg</URL>
<IMG_W>1600</IMG_W>
<IMG_H>1200</IMG_H>
</IMAGE>
<IMAGE>
<ID>002</ID>
<TITLE>Buffalo Image</TITLE>
<CREATOR>Mike OKane</CREATOR>
<MEDIUM>Photograph</MEDIUM>
<DATE>2008</DATE>
<NOTES>A photograph of the Buffalo skyline</NOTES>
<URL>Buffalo.jpg</URL>
<IMG_W>2272</IMG_W>
<IMG_H>1704</IMG_H>
</IMAGE>
<IMAGE>
<ID>003</ID>
<TITLE>Waterfalls</TITLE>
<CREATOR>Mike OKane</CREATOR>
<MEDIUM>watercolor on Claybord</MEDIUM>
<DATE>2008</DATE>
<NOTES>SIZE: 12 x 9 </NOTES>
<URL>okane_waterfall9x12_2006.jpg</URL>
<IMG_W>1040</IMG_W>
<IMG_H>1397</IMG_H>
</IMAGE>
</IMAGES>
First notice the first and last lines in the file. The entire list of records is enclosed inside a single pair of
<IMAGES> and </IMAGES> tags. These two tags should not be changed.
The description for each image is stored as a record that begins with a <IMAGE> tag and ends with a
</IMAGE> tag. The file can contain any number of these records, one for each record that you wish to
display. Each record contains a series of tags to describe the image:
The <ID> tag is used to hold any ID value you want, whatever is useful for your purposes. The ID
is not used by the application. Type your ID information between the <ID> and </ID> tags or
leave this blank.
The <TITLE> tag is used to hold your image title. This will be displayed in the scroll bar in the
image description. Type your title between the <TITLE> and </TITLE> tags.
The <CREATOR>, <MEDIUM>, <DATE>, and <NOTES> tags can be used for your own purposes.
This information will be displayed in the image description. Type your information between the
opening and closing tags for each item, for example between the <CREATOR> and </CREATOR>
tags.
The <URL> tag must contain the EXACT file name of your image. The software will expect to find
an image with this name in the images folder. Type your file name between the <URL> and
</URL> tags.
The <IMAGE_W> and <IMAGE_H> tags must contain the EXACT width and height of your image
in pixels. This is important - the software uses a formula to scale and magnify the image based
on these dimensions. Type your image width between the <IMAGE_W> and </IMAGE_W> tags,
and the image height between the <IMAGE_H> and </IMAGE_H> tags.
The best way to add new image descriptions to the file is to copy and paste an existing image record and
then modify it as needed to describe the new image.
To delete an image from the viewer, simply select an entire image record (beginning with the <IMAGE>
tag and ending with the </IMAGE> tag for that image) and then delete it.
To modify an image, simply make changes to the record for that image.
Step 3: Save your changes
When you are done, be sure to save your modified images.xml file!
Step 4: View your images
That's it! You can now view your images by double-clicking imageviewer.swf! Note that if the viewer
was already running you must close it and start it again to find your new images. If there any problems,
first be sure that you saved your images.xml file after making your changes. If that wasn't the problem,
look over the contents of the file very carefully. Be sure your file names and image widths and heights
are correct, and be sure that your records all have the correct tags. If you mess up, you can view or copy
the original records from the file named imagesBAK.xml which is simply a copy of the original file.
Creating your own Title and "About" Information
You can easily change the title and the information provided on the About page to meet your own
needs. You simply edit the setup.xml file that comes with your Image Viewer and Magnifier the same
way that you edited the images.xml file to update your image descriptions.
Step 1: Edit the setup.xml file
The title and about information is stored in setup.xml. To change this information, start any text editor
(such as Notepad) and open the file named setup.xml. Don't change anything in this file until you read
and understand the following description of the contents of the file. Your file will look something like
this:
<SETUP>
<MAIN_TITLE>Image Library and Magnifier</MAIN_TITLE>
<ABOUT_TITLE>Image Library and Magnifier</ABOUT_TITLE>
<INTRO_LINES>
<LINE_1>Software Developed Using</LINE_1>
<LINE_2>Macromedia Flash MX</LINE_2>
<LINE_3>This is a Development Version Only</LINE_3>
<LINE_4>Not for Distribution</LINE_4>
<LINE_5></LINE_5>
<LINE_6>Design and Development by </LINE_6>
<LINE_7>Mike O'Kane</LINE_7>
<LINE_8>PO Box 17501</LINE_8>
<LINE_9>Asheville, NC 28816, U.S.A.</LINE_9>
<LINE_10></LINE_10>
<LINE_11>Email: [email protected]</LINE_11>
<LINE_12>http://www.mikeokane.com</LINE_12>
<LINE_13></LINE_13>
<LINE_14>Copyright 2008 Mike O'Kane. All Rights Reserved</LINE_14>
</INTRO_LINES>
</SETUP>
First notice the first and last lines in the file. The entire list of records is enclosed inside a single pair of
<SETUP> and </ SETUP > tags. These two tags should not be changed. You can change the main title,
the title that appears on the left of the About screen, or any of the lines of text that appear on the right
side of the About screen by simply editing the text between the appropriate tags. Be careful not to
change any of the opening and closing tags themselves, and do not add or delete any tags.
Step 2: Save your changes
When you are done, be sure to save your modified setup.xml file!
Step 3: View your changes
That's it! You can now view your changes by double-clicking imageviewer.swf! Note that if the viewer
was already running you must close it and start it again to view your modified text. You may find that
you need to adjust the amount of text in order to fit eh available space. If there any other problems, first
be sure that you saved your setup.xml file after making your changes. If that wasn't the problem, look
over the contents of the file very carefully. If you mess up, you can view or copy the original records
from the file named setupBAK.xml which is simply a copy of the original file.
Making Copies
Once your application is working as you want, using your own images and descriptions, you can easily
make copies. Simply copy the image viewer folder to a CD, USB drive or other disk. The folder must
contain the imageviewer.swf file, the images.xml file and your images folder. First be sure that the
folder does not contain any files or images that you do not wish to be included in the copy.
You can also simply zip the entire image viewer folder and send this to your intended recipients. They
can then just unzip the file and run the viewer.
You can also upload imageviewer.swf to a Web server, along with images.xml and your images folder.
You can add a link to the application from any HTML page using the following link:
<OBJECT classid="clsid:D27CDB6E-AE6D-11cf-96B8-444553540000"
codebase="http://download.macromedia.com/pub/shockwave/cabs/flash/swflash.cab#version=
6,0,0,0" WIDTH="800" HEIGHT="550" id="artViewer" ALIGN="">
<PARAM NAME=movie VALUE="artViewer.swf"> <PARAM NAME=quality VALUE=high> <PARAM
NAME=bgcolor VALUE=#FFFFFF>
<EMBED src="artViewer.swf" quality=high bgcolor=#FFFFFF WIDTH="800" HEIGHT="550"
NAME="artViewer"
ALIGN="" TYPE="application/x-shockwave-flash" PLUGINSPAGE="http://www.macromedia.com/
go/getflashplayer">
</EMBED></OBJECT>
The actual Flash application is 800 x 550 pixels. If you want the application to run at a different size in
your Web page, modify the values of the WIDTH and HEIGHT attributes in the <EMBED tag>. For
example, to change the size to 600 x 412:
<EMBED src="artViewer.swf" quality=high bgcolor=#FFFFFF WIDTH="600" HEIGHT="412"
NAME="artViewer" ALIGN="" TYPE="application/x-shockwave-flash"
PLUGINSPAGE="http://www.macromedia.com/go/getflashplayer">
</EMBED>
Important: if you change either dimension, be sure to change the other proportionately, nd round
down. The ratios are as follows:
If you change the height, the new width will be 1.454545455 x new height.
If you change the width, the new height will be 0.6875 x new width.