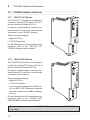
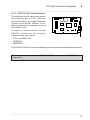
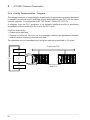
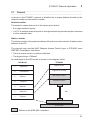
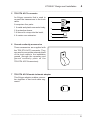
1
________________________________________________________
Contents
___________________________________________________________________________
Section
Page
__________________________________________________________________________________________________
1
Introduction
3
_________________________________________________________________________________________
1.1 Documentation Presentation
3
_______________________________________________________________________________
1.2 The Telemecanique ETHWAY Product Range
4
_______________________________________________________________________________
__________________________________________________________________________________________________
2
ETHWAY Network Presentation
7
_________________________________________________________________________________________
2.1 ETHWAY Layout Examples
7
_______________________________________________________________________________
2.1-1 General
7
2.1-2 Single Network Layout
8
2.1-3 Multiple Network Layout - Redundancy
10
2.1-4 Multiple Network Layout - Concentrator
11
2.1-5 Multiple Network Layout - Bridge
12
2.2
ETHWAY Network Interface
14
_______________________________________________________________________________
2.2-1 TSX ETH 107 Module
14
2.2-2 TSX ETH 200 Module
14
2.2-3 TSX ETH PC10 Interface Board
15
2.3
Services
16
_______________________________________________________________________________
2.3-1 COM Word Service
16
2.3-2 UNI-TE Service
18
2.3-3 Standard Application-to-Application
19
2.3-4 Priority Communication - Telegram
20
2.4
Characteristics
21
_______________________________________________________________________________
__________________________________________________________________________________________________
3
ETHWAY Network Operation
23
_________________________________________________________________________________________
3.1 General
23
_______________________________________________________________________________
3.2 Collision Detection Bus Operating Principles
24
_______________________________________________________________________________
3.3 10Base5 Characteristics
26
_______________________________________________________________________________
3.4 AUI Characteristics
27
_______________________________________________________________________________
___________________________________________________________________________
1
E
________________________________________________________
Contents
___________________________________________________________________________
Section
Page
__________________________________________________________________________________________________
4
ETHWAY Design and Installation
29
_________________________________________________________________________________________
4.1 Hardware Description
29
_______________________________________________________________________________
4.1-1 Connection Accessories
29
4.1-2 Installation Kit
33
4.2
Designing the Network Project
35
_______________________________________________________________________________
4.2-1 Network Calculation Rules
35
4.2-2 Network Design File
36
4.3
Preparing the Tools
38
_______________________________________________________________________________
4.3-1 Setting the TSX ETH ACC12 Strippers
38
4.4
Fitting TSX ETH ACC3 Connectors
39
_______________________________________________________________________________
4.4-1 Preparing the Trunk Cable
39
4.4-2 Fitting the Connectors
42
4.4-3 Fitting Ground Continuity Connectors
43
4.5
Network Installation Rules
44
_______________________________________________________________________________
4.5-1 Grounding
44
4.5-2 Installing the Cables
45
4.5-3 Installing TSX ETH ACC2 Transceivers
46
4.5-4 Installing TSX ETH ACC6 Repeaters
48
4.6
Testing the Network
49
_______________________________________________________________________________
4.6-1 Tests During Installation
49
4.6-2 Tests After Installation
49
4.6-3 Testing the TSX ETH ACC6 Repeater
50
4.6-4 PL7-NET Network Setup Program
51
E
_________________________________________________________________________________________________________________________________________________________________________________
5
Diagnostics
55
_________________________________________________________________________________________
5.1
NETDIAG
Program
55
_______________________________________________________________________________
5.1-1 DIAGNOSTICS Function
55
5.1-2 PERFORMANCE Function
56
__________________________________________________________________________________________________
6
Appendix
57
_________________________________________________________________________________________
6.1 ETHWAY Frame Format
57
_______________________________________________________________________________
6.2 TELWAY Network Restrictions
59
_______________________________________________________________________________
6.3
Glossary
60
_______________________________________________________________________________
6.4 Replacing Stripper Blades
66
_______________________________________________________________________________
6.4-1 TSX ETH ACC12 Strippers
66
6.4-2 TSX ETH ACC16 Strippers
67
6.5
ETHWAY Network Planning Sheet
68
_______________________________________________________________________________
___________________________________________________________________________
2
Introduction
1
_______________________________________________________________________________________
1.1 Documentation Presentation
_______________________________________________________________________________________
This User's Manual is designed for users installing an ETHWAY network.
The complete documentation set comprises:
A Reference Manual (TSX DR ETH V5E) that describes:
• ETHWAY network operating principles,
• Network installation and test principles,
• Operating, adjustment and diagnostics features,
• Technical characteristics of an ETHWAY network,
• A glossary of specific network terminology.
Dedicated User's Manuals that apply to each type of module that can be connected
to an ETHWAY network:
• Device description,
• Set-up and connection to the ETHWAY network,
• Performance levels,
• Operation with Telemecanique software and terminals,
• Support for diagnostics via the network.
The dedicated User's Manuals are supplied with the appropriate product.
The various manuals are supplied in an A5 format binder with dividers that can be used
to separate them.
ETHWAY Network
Reference Manual
TSX ETH PC10
ETHWAY Interface Board
_______________________________________________________________________________________
3
1
Introduction
_______________________________________________________________________________________
1.2 The Telemecanique ETHWAY Product Range
_______________________________________________________________________________________
The spread of distributed automation systems means increased communication requirements. More connection points are required and more data needs to be exchanged.
ETHWAY is the Telemecanique X-WAY communication profile for ETHERNET.
It meets ETHERNET IEEE 802.3 standards and ETHWAY devices can be connected
to any existing installation and work with devices from other vendors that meet this
standard.
Support is provided for all of the features of the X-WAY communication layout (X-WAY
addressing system, UNI-TE message system, COM word distributed data base)
ensuring that ETHWAY networks are compatible with Telemecanique TELWAY,
MAPWAY and FIPWAY networks).
C
17
_______________________________________________________________________________________
4
Introduction
1
_______________________________________________________________________________________
Communication layout reminders:
7
Application
6
Presentation
5
Session
4
Transport
3
Network
2
Data Link
1
Physical
OSI/MMS (MAP on 802.3)
MMS +
ACSE Sub-layer
Presentation
ASN1
ETHWAY
UNI-TE
COM
V
ISO Model
Session
BCS
Transport
Class 4
V
Internet
ES/IS
LLC IEEE 802-2
LLC IEEE 802-2
MAC IEEE 802.3
MAC IEEE 802.3
CSMA-CD
IEEE 802.3
CSMA-CD
IEEE 802.3
@ X-WAY
_______________________________________________________________________________________
5
1
Introduction
_______________________________________________________________________________________
C
17
_______________________________________________________________________________________
6
ETHWAY Network Presentation
2
_______________________________________________________________________________________
2.1 ETHWAY Layout Examples
_______________________________________________________________________________________
2.1-1 General
ETHWAY is specially designed for applications at:
• Level 1: Coordination between PLCs,
• Level 2: Local or centralized supervision and communication with production management computer systems.
These applications are supported by all devices that can be connected to ETHWAY:
• TSX Series 7 modular PLCs,
• Machine tool and NUM robot numerical controllers,
• CCX supervision systems,
• IBM, DEC and Hewlett Packard computer systems,
• FTX 507 terminals.
The high data-rate (10 Mb/s) supported by ETHWAY means that it is a network system
ideally suited to all industrial coordination and supervision applications.
A Telemecanique ETHWAY network can be implemented in a number of ways:
• Simple layout (single network) where a single network segment links all stations,
• Structured layout (multiple network) where a number of network segments are
connected together by shared PLCs (network nodes). There are two types of network
node:
- Bridge type where the node PLC ensures message routing from one network to
another,
- Multiple network station type where the node PLC collects and exchanges data
separately with each network, but does not provide user-transparent data routing
from one network to another.
Note: Interconnection between ETHWAY networks can also be made using ETHERNET standard
filtering bridges.
Network layout examples illustrating the various possibilities are described in this
section.
_______________________________________________________________________________________
7
2
ETHWAY Network Presentation
_______________________________________________________________________________________
2.1-2 Single Network Layout
The example below shows a small scale application typical of a manufacturing process.
The production cell comprises:
• A conveyor system (TSX 7),
• A pallet control station,
• A machining center (NUM 1060),
• A control and supervision station (CCX 77),
• A zone controller for communication with production management systems,
• An IBM PC microcomputer,
• An FTX 507 terminal.
FTX 507
CCX 57
Production
Management
Cell
Control
ETHERNET
C
Bridge
17ETHWAY
Pallet
Handling
Machining
Conveyor
TSX 7
TSX 7
NUM
1060
XGS
XBT
UNI-TELWAY
UNI-TELWAY
FTX 507
XGS
Machine Tool
ATV 5
_______________________________________________________________________________________
8
ETHWAY Network Presentation
2
_______________________________________________________________________________________
This application ensures close coordination between the various controllers, reducing
manufacturing time and eliminating stoppages. Production quality is ensured by
monitoring product and tool condition.
The control position sends commands (Start/Stop) to the controllers and downloads the
production programs. The control system:
• Supports real-time animated man-machine interface displays,
• Returns alarm signals to the management systems,
• Stores all event data, simplifying troubleshooting and providing system operation
statistics.
The zone controller receives production orders from the management level above it. It
returns the following data to the management system level:
• Production result data,
• Product quality data,
• Machine work load levels,
• etc.
The user-transparence ensured by ETHWAY lets all stations within the cell communicate with each other using UNI-TE protocol.
The FTX 507 terminal especially, directly connected to the ETHWAY network, lets the
user access all modes and all functions that are available in local mode (access to
variables, application program transfer, device handling, etc.) with practically the same
response times. User-transparency therefore become total thanks to the high level of
network performance.
When NETDIAG software is installed, the FTX 507 terminal can also be used to de
perform diagnostics on the status of the network and its stations.
PLC type stations use the COM word service to exchange data separately from the
application program. In this example, two stations share this service, so that each has
64 16-bit words that may require updating on each PLC cycle.
For high priority messages, PLCs can use Telegram text blocks to ensure that
application-to-application exchanges take place in less than 30 ms, regardless of their
respective cycle times.
All of these functions support exchanges that are both fast and reliable, ensuring high
levels of availability and performance from the installation.
_______________________________________________________________________________________
9
2
ETHWAY Network Presentation
_______________________________________________________________________________________
2.1-3 Multiple Network Layout - Redundancy
The ETHWAY network layout does not provide any redundancy in the event of a serious
problem on the network. It is possible however to ensure a high level of operating
security using the application program as shown below:
A
B
C
D
Network N1
Network N2
All stations are connected to two separate ETHWAY networks, networks N1 and N2, via
two TSX ETH 107 interface modules.
Each station will therefore have to network-station addresses: N1S1 on ETHWAY
network N1 and N2S2 on ETHWAY network N2.
The application program for each PLC periodically checks its ability to access all stations
via network N1.
If all stations can be accessed, the messages destined for other stations will be sent with
the N1S1 address of the target station.
If a problem is encountered, the PLCs will switch to the second network by replacing the
N1S1 target address of the station with its N2S2 address.
Note:
C
This principle of operation can also be extended to COM words. Station A will then use
COMi,j
17 or COMB,i,j depending on its ability to access network N1 or N2.
_______________________________________________________________________________________
10
ETHWAY Network Presentation
2
_______________________________________________________________________________________
2.1-4 Multiple Network Layout - Concentrator
In the example below, the factory comprises two identical production lines. Their length
and the number of devices to connect preclude using a single ETHWAY network
segment.
Station 1
Station 1
Station 2
Station 2
Station 3
Station 3
Station 4
Station 4
The processes do not require exchanges between networks. Only supervision data
must be made available to the higher management level. In this case, the PLC only
performs to function of data concentrator for information from the two ETHWAY
networks.
This split layout enables intervention on one production line without affecting production
on the other line while releasing the network node PLC from the workload caused by the
bridge function that is no longer necessary.
_______________________________________________________________________________________
11
2
ETHWAY Network Presentation
_______________________________________________________________________________________
2.1-5 Multiple Network Layout - Bridge
In this example, the factory comprises a number of separate production areas, technical
service areas, sales and management departments, etc.
CAD
CAM
Sales
Orders
ETHERNET
Bridge
ETHWAY
TSX 7
TSX 7
FIPWAY
CCX
C
FIPWAY
17
FTX 507
Cell 1
Cell 2
Cell n
Large quantities of data are exchanged between the various functions. Two different
networks are installed to separate the data flows and improve installation performance
levels:
• An ETHERNET computer network that links the various computer systems,
• A number of industrial networks that are used to send production data to the
management levels and vice-versa, for controlling a PLC or a numerical controller
from a station located away from the shop floor (e.g. from the design office).
_______________________________________________________________________________________
12
ETHWAY Network Presentation
2
_______________________________________________________________________________________
The shop floor is divided into a number of separate production lines that are relatively
independent and therefore need only exchange limited amounts of data.
The communication layout will naturally follow the same logic, with an ETHWAY network
for each production shop. The number of devices that can be connected (64) and the
response time guaranteed by ETHWAY ensure fast updating of data between the
various cells that comprise the facility.
A CCX 7 supervisor directly connected to each shop network allows local production
monitoring.
The various shop networks are connected by branches to another ETHWAY network
segment via bridge PLCs.
This network also has computers connected to it. These ensure the link with the factorywide ETHERNET computer network. The FTX 507 terminal is also connected at this
level and supports the same functions as those described in Sub-section 2.1-2 (Single
Network Layout).
This layout primarily enables:
• Separation of the various data flows so that individual network segments are not
needlessly overloaded,
• Intervention on one network segment, if required, without affecting normal operation
in the rest of the facility.
The user-transparency ensured by the Telemecanique Multiple Network layout enables
any device to address any other device on the network.
_______________________________________________________________________________________
13
2
ETHWAY Network Presentation
_______________________________________________________________________________________
2.2 ETHWAY Network Interfaces
_______________________________________________________________________________________
2.2-1 TSX ETH 107 Module
The TSX ETH 107 module is an intelligent
module for use with TSX Series 7 PLCs. It
can be installed in Model 40 PLCs.
7
ETH 10
RUN
DEF
It supports communication functions between these PLCs and any other devices
connected to the ETHWAY network.
RX
TX
NET
These devices comprise:
• Model 40 PLCs,
• FTX 507 terminals.
For a full description of this module and its
functions, refer to the "TSX ETH 107
ETHWAY Module User's Manual".
2.2-2 TSX ETH 200 Module
The TSX ETH 200 module is an intelligent
module for use with TSX Series 7 PLCs. It
can be installed in Model 40 PLCs.
C
It supports communication functions between these PLCs and any other devices
17
connected
to the network.
0
ETH 20
RUN
DEF
RX
These devices comprise:
• Model 40 PLCs,
TX
NET
• FTX 507 terminals,
• Any device that supports the MAP profile on IEEE 802.3 standard networks
and that supports the MMS message
service.
For a full description of this module and its
functions, refer to the "TSX ETH 200
OSI/ETERNET Module User's Manual".
These two modules connect to a TSX ETH ACC2 transceiver via a TSX ETH CBxxx
drop cable.
_______________________________________________________________________________________
14
2
ETHWAY Network Presentation
_______________________________________________________________________________________
2.2-3 TSX ETH PC10 Interface Board
This interface board is used to connect any
microcomputer with a PC AT (ISA) bus
and running OS/2 1.2 or higher Operating
System to an ETHWAY network. It is installed inside the microcomputer, in one of
the available slots.
It supports communication via the
ETHWAY network for the following
Telemecanique applications:
• XTEL and MINI-XTEL,
• NETDIAG,
• XMONITOR
An ETHWAY-OS/2 driver and an installation guide are provided with the interface board.
These two modules connect to a TSX ETH ACC2 transceiver via a TSX ETH CBxxx
drop cable.
_______________________________________________________________________________________
15
2
ETHWAY Network Presentation
_______________________________________________________________________________________
2.3 Services
_______________________________________________________________________________________
2.3-1 COM Word Service
The ETHWAY network supports TSX Series 7 COM (common) word services. The
complete set of COM words forms a data base that is distributed among some or all of
the devices connected to the network.
• The data base comprises 256 words of 16 bits.
• Depending on their configuration, all network stations can access this data base.
• When configuring a module it is possible to:
• Inhibit its COM word activity,
• Enable its COM word activity in read only,
• Enable its COM word activity in read and write,
• Declare the number of COM words (from 4 to 64) handled by the station. All stations
on a network that exchange COM words must be configured to handle the same
number of COM words.
• Each TSX ETH 107 or TSX ETH 200 module has a memory field of 256 words of 16
bits that is reserved for exchanges between PLCs. This memory field is split in to sub
sets of words. Depending on the number of stations that send COM words on the
network, it is possible to have a maximum of:
• 4 COM words per station for 64 active stations,
• 8 COM words per station for 32 active stations,
• 16 COM words per station for 16 active stations,
• 32 COM words per station for 8 active stations,
• 64 COM words per station for 4 active stations,
C
Stations that are declared active for the exchange of COM words must have low
network addresses (e.g. for 32 stations that each handle 8 COM words, these stations
17
must be numbered from 0 to 31).
_______________________________________________________________________________________
16
ETHWAY Network Presentation
2
_______________________________________________________________________________________
Principle of operation
When the COM words of a station have been updated by the CPU, they are broadcast
on the network.
On reception of these COM words, the network interface of any station using the COM
word service updates the corresponding field and makes them available to the CPU.
Use of the distributed COM word data base is recommended for the periodical sending
of status variables without adding extra application program workload. To send data on
brief events, application-to-application communication with a confirm is recommended
as transmission is guaranteed.
Station 63 max.
Station 1
Station 0
OPER.
OPER.
Write:
To COM field in
the station.
Read:
Possible by all
connected stations.
Common Memory Field
(256 words of 16 bits).
_______________________________________________________________________________________
17
2
ETHWAY Network Presentation
_______________________________________________________________________________________
2.3-2 UNI-TE Service
The ETHWAY network supports Telemecanique’s UNI-TE industrial message system
protocol. UNI-TE enables point-to-point communications using a question and answer
dialog called Request/Confirm.
Dialog sequencing
A device that supports the UNI-TE protocol can be a:
CLIENT:
This device initiates communication. It asks a question (reads), sends a
command (writes) or an order (Run, Stop, etc.),
SERVER: This device executes the order sent by the client and sends a confirm after
execution.
The services supported depend on the type of device, e.g. PLC, numerical controller,
programming terminal, supervision system. Depending on its function, each device can
be a Client and/or a Server.
The maximum message length is 128 characters.
1
Request
Server
Client
2
Action
C
3
Confirm
17
UNI-TE is especially suited to applications such as supervision, diagnostics and control.
Exchange integrity
To ensure exchange integrity, the UNI-TE service uses a specific data link level
acknowledgment mechanism (ACK 7).
_______________________________________________________________________________________
18
ETHWAY Network Presentation
2
_______________________________________________________________________________________
2.3-3 Standard Application-to-Application Communication
The ETHWAY network also supports communication between application programs in
point-to-point mode by TXT text block or by sending a UNI-TE Unsolicited Data request.
There is no confirm returned for this request.
This service is especially suited to:
• Sending alarm messages from a PLC to supervision station,
• Exchanging data tables between two PLCs under the control of the application
programs in the source and destination device.
The maximum size of application-to-application messages is 256 characters.
Station 0
Station 1
Station 15
Table of Wi internal or
CWi constant words.
_______________________________________________________________________________________
19
2
ETHWAY Network Presentation
_______________________________________________________________________________________
2.3-4 Priority Communication - Telegram
The telegram service is a special type of application-to-application message designed
to transmit occasional urgent and high priority data between two PLCs on the same
network segment. It is supported by all TSX Series 7 Model 40 V5 PLCs.
A telegram from the PLC processor to its network interface module is processed
immediately without waiting for the end of the PLC cycle.
It can be received by:
• Scanning the fast task,
• Sending an interrupt (as soon as the message reaches the destination network
module) and processing in the interrupt task.
The maximum size of messages sent using this service is restricted to 16 bytes.
IT task read TLG
I
TCY
P
O
IT task Fast or Mast
write TLG
C
17
_______________________________________________________________________________________
20
ETHWAY Network Presentation
2
_______________________________________________________________________________________
2.4 Characteristics
_______________________________________________________________________________________
Layout
Type:
Industrial Local Area Network with an IEEE 802.3 physical layer,
Topology:
Bus with active drops,
Access Method:
Direct access with collision detection (IEEE 802.3 standard),
Transmission
Mode:
Base band,
Coding:
Manchester,
Binary Data-rate:
10 Mb/s,
Medium:
50 Ohm Triax. cable,
Drops:
Four shielded twisted pairs (AUI).
Configuration
Nbr. of Stations:
64 max.,
Nbr. of Networks:
127 max.,
Max. Network:
Length
500 meters,
Max. Distance:
1.5 kms,
between 2 Stations
Max. Drop:
Length
50 meters.
_______________________________________________________________________________________
21
2
ETHWAY Network Presentation
_______________________________________________________________________________________
C
17
_______________________________________________________________________________________
22
ETHWAY Network Operation
3
_______________________________________________________________________________________
3.1 General
_______________________________________________________________________________________
A device on the ETHWAY network is identified by a unique address formed by the
network number and the station number.
Network number
The network number takes one of the values given below:
• 0 in single network layouts,
• 1 to 127 in multiple network layouts or in single network layouts that may be connected
to other networks later.
Station number
The station number is the physical address of the device on the network. It takes a value
between 0 and 63.
The physical layer and the MAC (Medium Access Control) layer in ETHWAY meet
IEEE 802.3 standards, that define:
• The bus access mode: by collision detection,
• The physical layer: 10Base5.
Its relationship to the ISO model is shown by the diagram below:
ISO Model
7
Application
6
Presentation
5
Session
4
Transport
3
Network
2
Data Link
1
Physical
ETHWAY
Higher Layers
Logical Link Control
Bus Acess Control
Physical Interface
AUI
Transceiver
Trunk Cable
Defined in the IEEE 802.3 standard
_______________________________________________________________________________________
23
3
ETHWAY Network Operation
_______________________________________________________________________________________
3.2 Collision Detection Bus Operating Principles
_______________________________________________________________________________________
When a station wants to send data, it starts by listening to the line. If it hears no traffic,
it commences sending as shown in the example below:
Station 1.2 (Network 1,
Station 2) wants to send, it
listens to the line:
Station
1.1
Station
1.2
Station
1.3
Station
1.1
Station
1.2
Station
1.3
If it hears no transmission,
it sends its data.
C
17
_______________________________________________________________________________________
24
ETHWAY Network Operation
3
_______________________________________________________________________________________
If a number of stations commence sending simultaneously, they will generate collisions
that will be detected by all of the stations present on the network.
Stations 1.1 and 1.3 want
to send. They listed to the
line.
Station
1.1
Station
1.2
Station
1.3
Station
1.1
Station
1.2
Station
1.3
Station
1.1
Station
1.2
Station
1.3
Hearing no traffic, they send
their data at the same time.
All stations detect the collision.
Message
Collision
_______________________________________________________________________________________
25
3
ETHWAY Network Operation
_______________________________________________________________________________________
These stations will stop sending and start a contention resolution algorithm. This
procedure requires waiting a random length of time before attempting to send once
again. If during the new transmission attempt another collision occurs, the contention
resolution algorithm is repeated with an increased waiting time. A station may make up
to 16 attempts before an error condition is declared.
Remark:
To ensure that collisions are detected by all network stations, it is necessary to allow for
the time required for message transmission. To ensure this, whenever a message is
sent (regardless of its actual length), the ETHWAY interface controllers will always send
a minimum of 64 bytes.
____________________________________________________________________
3.3
10Base5 Characteristics
_______________________________________________________________________________________
The IEEE 802.3 standard defines the electrical and mechanical characteristics of the
trunk cable and the interface between it and the transceiver. These characteristics are
summarized below:
• 10Base5 means 10 Mb/s, Base band and 500 meters,
C
• Manchester Code,
17
= 1 logic
= 0 logic,
• Transmission level 2 VDC,
• 50 Ohm Coax. cable,
• Segment length: 500 meters max.,
• Type N connectors,
• Between two stations there can be a maximum of three Coax. segments and two pointto-point optical links corresponding to the FOIRL (Fiber Optic Inter Repeater Link)
standard.
_______________________________________________________________________________________
26
ETHWAY Network Operation
3
_______________________________________________________________________________________
3.4 AUI Characteristics
_______________________________________________________________________________________
The Attachment Unit Interface (AUI) supports station connection to the network via a
drop cable. The cable, its connections and the electrical signals used are described in
the IEEE 802.3 standard.
Transceiver
Trunk Cable
AUI
Station i
Station j
SubD 15-point connector pin arrangement (station end)
The pin arrangement of the SubD 15-point connector located on the front panel of the
TSX ETH 107 module corresponds to the one defined in the OSI 802.3 standard for AUI:
Pin Nbr.
802.3 Standard Identification
Function
1
CI-S
(Control in shield)
GND
2
CI-A
(Control in A)
COLL+
3
DO-A
(Data Out A)
TX+
4
DI-S
(Data in shield)
GND
5
DI-A
(Data in A)
RX+
6
Vc
(Voltage Common)
GND
7
Option not used
8
Option not used
GND
COLL-
9
CI-B
(Control in B)
10
DO-B
(Data Out B)
TX-
11
DO-S
(Data Out Shield)
GND
12
DI-B
(Data in B)
RX-
13
VP
Voltage Plus
12 V
14
VS
Voltage Shield
GND
15
Option not used
SubD body
PG
Protective Ground
GROUND
_______________________________________________________________________________________
27
3
ETHWAY Network Operation
_______________________________________________________________________________________
C
17
_______________________________________________________________________________________
28
4
ETHWAY Design and Installation
_______________________________________________________________________________________
4.1 Hardware Description
_______________________________________________________________________________________
4.1-1 Connection Accessories
Telemecanique offers a range of accessories for connecting various devices to
ETHWAY networks.
The full range of these accessories is shown below. For a detailed description of how
to fit the connectors to the cables, refer to Sub-section 4.4:
8
6
1
7
1
4
6
8
3
4
ETH 107
RUN
DEF
RX
TX
NET
2
9
8
6
1
6
3
4
8
4
ETH 107
RUN
DEF
RX
TX
NET
2
1 TSX ETH CAxxx trunk cable,
2 TSX ETH CBxxx drop cable,
3 TSX ETH CCxxx drop cable,
4 TSX ETH ACC2 transceiver,
5 TSX ETH ACC3 N-type male connector,
6 Ground continuity connector,
7 TSX ETH ACC4 female-to-female connector adaptor,
8 TSX ETH ACC5 line terminator (isolated or not),
9 TSX ETH ACC6 repeater,
10 TSX ETH ACC10 installation kit (not shown).
_______________________________________________________________________________________
29
4
ETHWAY Design and Installation
_______________________________________________________________________________________
1
TSX ETH CAxxx trunk cable
A triax cable comprising a standard 50 Ohm coax cable with a shield to ensure
improved resistance to interference. This cable is used for ETHWAY network trunk
cables. Both ends of a network must be fitted with a TSX ETH ACC3 connector.
2
TSX ETH CBxxx drop cable
These cables are available in three different lengths (5, 10 and 20 meters) and
ensure connection between a transceiver and a PLC interface module. These cables
have a 90° bend at the interface end and comprise four shielded twisted pairs. Each
drop cable has, at each end, a SubD 15-pin connector as defined by the IEEE 802.3
standard for AUI.
3
TSX ETH CCxxx drop cable
These cables are available in three different lengths (5, 10 and 20 meters) and
ensure connection between a transceiver and a TSX ETH PC10 interface board or
a repeater. These cables have a 90° bend at the interface end and comprise four
shielded twisted pairs. Each drop cable has, at each end, a SubD 15-pin connector
as defined by the IEEE 802.3 standard for AUI.
4
TSX ETH ACC2 transceiver
These are active devices (supplied by
the station or repeater that they are
connected to) enable the connection of
device to the ETHWAY network. Each
C atransceiver
requires 500mA max.
power.
17They comprise three main elements:
1
3
2
1 A mounting plate and ground continuity plate that the transceiver electronics are mounted on,
2 A SubD 15-point connector for connecting the stations,
3 An adapter that the TSX ETH ACC3
connectors are connected to.
_______________________________________________________________________________________
30
ETHWAY Design and Installation
4
_______________________________________________________________________________________
5
TSX ETH ACC3 connector
An N-type connector that is used to
connect the transceivers to the trunk
cable.
1
It comprises four parts:
1 A metal and plastic connector body,
2 A protective sleeve,
3 A shroud to crimp onto the braid,
4 A center core extension.
6
2
3
4
Ground continuity accessories
These accessories are supplied with
the TSX ETH ACC3 connector. They
are used to connect the external shield
of the trunk cable to the installation
ground (through the mounting and
ground continuity plate on the
TSX ETH ACC2 transceiver).
7
TSX ETH ACC4 female-to-female adaptor
This N-type adaptor enables connection together of two trunk cable segments.
_______________________________________________________________________________________
31
4
ETHWAY Design and Installation
_______________________________________________________________________________________
8
50 Ohm TSX ETH ACC5 terminators
These terminators are used for impedance adaptation of the trunk cable.
They are fitted to a TSX ETH ACC2
transceiver, at each end of a network.
Two models are available:
1
1 An isolated terminator,
2 A non-isolated terminator with a
threaded pin for connection to the
installation ground.
9
2
TSX ETH ACC6 repeater
Repeaters are used to increase the
effective length of a network by amplifying the signals between two network
segments. It is connected to two transceivers (one on each network) using
TSX ETH CCxxx drop cables.
1620
Power
Packet
TCVR
-0
3Com
AUI/AUI
r
Repeate
Collision
Partition
Technical characteristics
Mains supply voltage: 220V,
C Operating temperature: 0 to 40°C,
Humidity level: 0 to 90% (no condensation),
17Max. power consumption (with TSX ETH ACC2 connected) less than 35W.
The repeater conforms to:
• IEEE 802.3 and ISO 8802/3 operational standards,
• UL 1950, EN 60950 and CSA 22.2#950 safety standards,
• IEC 68 environment standards.
10 TSX ETH ACC10 installation kit
This tool kit is used to prepare TSX ETH CAxxx cables ready for fitting TSX ETH ACC3
connectors. It is described in Sub-section 4.1-2. Each of the elements in this tool kit
is available separately.
_______________________________________________________________________________________
32
ETHWAY Design and Installation
4
_______________________________________________________________________________________
4.1-2 Installation Kit
The TSX ETH ACC10 installation kit is used to prepare the ETHWAY (TSX ETH CAxxx)
trunk cable prior to fitting TSX ETH ACC3 connectors. It is supplied in box comprising
four tools:
1
ETHWAY cable cutters (TSX ETH ACC11)
These cable cutters are designed to
cut TSX ETH CAxxx trunk cables.
2
Strippers for the ETHWAY cable outer shield (TSX ETH ACC12)
This tool is designed to cut and split the
outer protective insulation and the aluminum shield of the trunk cable. It
comprises three main elements:
1
2
1 A replaceable blade, available separately
under
reference
TSX ETH ACC13,
2 A button that pivots the blade through
90°,
3
3 A sliding clamp that retains the cable.
This tool must first be adjusted prior to use (refer to Sub-section 4.3-1). The
procedure for replacing blades is described in the Appendix.
3
Strippers for the ETHWAY cable inner shield (TSX ETH ACC16)
This tool is used to prepare the trunk
cable prior to fitting a TSX ETH ACC3
connector. It comprises:
3
1 A plastic body,
2 A replaceable blade cartridge, available separately under reference
TSX ETH ACC17,
3 An adjustment device.
1
2
The procedure for replacing blades is
described in the Appendix.
_______________________________________________________________________________________
33
4
ETHWAY Design and Installation
_______________________________________________________________________________________
5
ETHWAY connector crimping tool (TSX ETH ACC18)
This tool is used to crimp the shroud
and the cable center core extension
onto the cable. It has two positions:
2
1 For fitting and crimping the center
cable core extension,
2 For crimping the shroud supplied
with the TSX ETH ACC3 connector.
1
C
17
_______________________________________________________________________________________
34
4
ETHWAY Design and Installation
_______________________________________________________________________________________
4.2 Designing the Network Project
_______________________________________________________________________________________
4.2-1 Network Calculation Rules
A network can evolve, e.g. lengthening the trunk cable, connecting additional
devices, etc. Precise network calculations and a complete network design file will
be invaluable when planning any future changed to an existing installation.
In accordance with the recommendations of the IEEE 802.3 standard, the following
calculation rules apply:
• Max. network length is 500 meters,
• Max. drop cable length is 50 meters,
• The minimum distance between two transceivers is 2.5 meters,
• To reduce the levels of signals reflected back due to manufacturing tolerances, the
trunk cable segments from the same manufacturing batch must have lengths that are
an uneven multiple of 23.4 meters.
With L the length, L = (2n+1)*23.4 therefore:
L = 23.4 or 70.2 or 117 or 163.8 or 210.6 meters, and so on.
To meet this requirement, Telemecanique supplies trunk cables in 23.4, 117 and
210.6 meter lengths.
• The number of TSX ETH ACC6 repeaters between two stations must not exceed two.
Configuration example with five batches of trunk cable:
Network 1 < 500 m
Batch 1: 210 m
Station
Station
Station
Station
Station
Station
Batch 3: 117 m
Batch 2: 117 m
Station
Batch 4: 23.4 m
Station
Station
Station
Batch 5: 210 m
Network 2 < 500 m
_______________________________________________________________________________________
35
4
ETHWAY Design and Installation
_______________________________________________________________________________________
4.2-2 Network Design File
All too often, a low complexity network is installed without any effort being made to
document its design. When the time comes to extend it, no reference file is available.
The ETHWAY Network Planning Sheet shown below (a blank copy is provided in the
Appendix) can be used to keep an ETHWAY network configuration up to date. The
following information is provided for each transceiver:
1 Its location on the network,
2
2 Its number,
1
3
4
5
Nbr:
3 The length of the drop,
Nbr:
L=
Location:
4 The name of the connected station,
L=
5 The station number,
6 The distance between
the transceiver and the
next one,
LC=
6
7
7 The total length since the first transceiver.
Example:
Segment 1
(11)
20 m
C
(12)
125 m
(13)
85.6 m
10 m
St 1
St 2
5m
17
Rep 1
Machining
5m
Control
Segment 2
(22)
(23)
20 m
23.4 m
St 4
Assembly
20 m
(21)
23.4 m
St 3
Conveyor
To fill-in this sheet, start from one end of the trunk cable and make a note of all
transceivers
encountered and their operational characteristics.
_______________________________________________________________________________________
36
ETHWAY Design and Installation
4
_______________________________________________________________________________________
ETHWAY Network Planning Sheet
Network Nbr:
Nbr:11
L=
20 m
m
LC=
L=
10 m
m
LC=
Machining
Nbr:
1
Nbr:
2
0
Segment Nbr:
1
Location:
L= 125
125 m
Nbr:12
Control
Location:
L= 85.6
210.6 m
ETHWAY Network Planning Sheet
Network Nbr:
Segment Nbr:
Nbr: 21
L=
5m
23.4 m
LC=
Rep 1
Nbr:
Location:
L=
23.4 m
Nbr:22
L=
20 m
m
LC=
L=
20 m
Conveyor
Nbr:
3
Nbr:
4
Location:
L= 23.4
46.8 m
Nbr:23
Assembly
Location:
L=
LC=
_______________________________________________________________________________________
37
4
ETHWAY Design and Installation
_______________________________________________________________________________________
4.3 Preparing the Tools
_______________________________________________________________________________________
4.3-1 Setting the TSX ETH ACC12 Strippers
Before fitting TSX ETH ACC3 connectors to the trunk cable, the user must set the
ETHWAY cable strippers for correct operation.
The strippers comprise four main components:
1
The blade,
2
A button that pivots the blade through
90°,
3
A sliding clamp that holds the cable
while its insulation is being stripped,
4
A knob for setting the cutting depth.
1
2
4
3
There are five steps to setting the strippers prior to use:
1
Position the blade against the cable
insulation and by turning the knob (identified as 4 in the figure) set the cutting
depth to coincide approximately with
the thickness of the grey outer insulation,
2C Place the cable in the sliding clamp
and place the blade approx. 10 cm
17from the end of the cable,
3
Turn the blade approx. 10 times anti
clockwise around the cable,
4
Remove the strippers,
5
The strippers are correctly set when
the grey insulation is fully cut through
and the inner aluminum shield is hardly
scratched, i.e. when the outer insulation peals off easily when the cable is
twisted slightly (the yellow shroud protecting the center core must never be
damaged),
6
Yellow shroud
Grey shroud
If the strippers are incorrectly set, adjust the position of the knob and repeat
the above operations from step 2 onwards.
_______________________________________________________________________________________
38
4
ETHWAY Design and Installation
_______________________________________________________________________________________
4.4 Fitting TSX ETH ACC3 Connectors
_______________________________________________________________________________________
4.4-1 Preparing the Trunk Cable
Important
TSX ETH ACC3 connectors must be fitted on the black marks on the trunk cable and
placed 2.5 meters apart. They can also be fitted at the ends of a network, even where
there are no black marks as long as the closest connector is more than 2.5 meters
away.
In order to ensure ground continuity and mount the TSX ETH ACC3 connector, the trunk
cable must be prepared as shown below:
m
50 m
m
50 m
5 mm 11mm
Grey shroud
3 mm
Cut into the grey shroud
Yellow shroud
Braid
Insulation
Center core
These operations are performed in the following chronological order:
• Cut the trunk cable on a black mark,
• Strip the outer protective insulation and the aluminum braid,
• Cut into the grey outer insulation along a length of approx. 5 cm,
• Strip the trunk cable inner shroud.
Cutting the trunk cable
Cut the cable straight across using the TSX ETH ACC11 cable cutters on a black mark
(these marks are located every 2.5 meters).
_______________________________________________________________________________________
39
4
ETHWAY Design and Installation
_______________________________________________________________________________________
Stripping the external insulation and the aluminum shield
This operation is performed using the TSX ETH ACC12 cable strippers. Proceed as
follows:
• Place the TSX ETH ACC12 strippers
8 cm from the end of the cable,
8 cm
• Turn the strippers clockwise around the
cable approx. 10 times, taking care that
they remain perpendicular to the cable
to ensure a single straight cut,
• Lightly fold the end of the cable to break
the aluminum shield. If this operation
cannot be done correctly, change the
stripper settings (Sub-section 4.3-1) or
replace its blade (refer to the Appendix).
8 cm
Cut into the grey insulation and the aluminum shield along a length of approx.
5 cm
This operation prepares the trunk cable ready for fitting the ground continuity connectors. This is also performed using the TSX ETH ACC12 strippers. Proceed as follows:
•CPlace the TSX ETH ACC12 strippers
approx. 5 cm from the stripped back end
17of the insulation and press down hard on
the stripper to press the blade into the
insulation,
5 cm
• Press the button that pivots the blade
through 90°,
• Pull the strippers along the cable so that
the grey insulation shroud and the aluminum shield are cut. If the insulation
shroud and the aluminum shield cannot
be cut properly, change the stripper settings (Sub-section 4.3-1) or replace its
blade (refer to the Appendix).
5 cm
8 cm
_______________________________________________________________________________________
40
ETHWAY Design and Installation
4
_______________________________________________________________________________________
Stripping the inner cable insulation
This operation is performed using the TSX ETH ACC16 cable strippers. Proceed as
follows:
• Set the adjustable slider on the strippers
to position 5,
• Open the stripper jaws
• Place the stripper jaw against the end of
the yellow shroud protecting the cable
core,
• Close the jaws,
• Turn the strippers anti clockwise around
the cable five times,
• Set the adjustable slider on the strippers
to position 3,
• Turn the strippers anti clockwise around
the cable five more times,
• Set the adjustable slider on the strippers
to position 1,
• Turn the strippers anti clockwise around
the cable ten times,
• Open the stripper jaws and remove the
remains of the shrouds,
• Cut the center cable core so that a
length of 5 mm is left exposed,
• Using a knife or sharp cutting blade, cut
back 2 mm off the yellow shroud,
• Using a knife or sharp cutting blade,
remove the aluminium shroud from the
remaining 3 mm of dielectric insulation.
The cable core is now ready to receive
the TSX ETH ACC3 connector and the
ground continuity connectors.
_______________________________________________________________________________________
41
4
ETHWAY Design and Installation
_______________________________________________________________________________________
4.4-2 Fitting the Connectors
Once the cable center core is prepared, proceed as follows to fit the TSX ETH ACC3
connectors:
• Slide the protective cover onto the cable
(facing the right direction) then place the
end shroud on the yellow cable insulation,
• Using a knife or sharp cutting blade,
flare the two shielding braids and the
intermediate insulation,
• Place the cable core extension against
the end of the dielectric insulation,
• Crimp on the cable core extension, using the TSX ETH ACC18 tool, small
diameter position (the cable core extension must be fully home),
• Slide the cable connector body up against
the dielectric insulation. The end of the
cable core extension must be almost up
against the connector body,
• Slide the shroud back over the braid and
up against the connector body,
•CClamp the shroud down onto the cable
using the TSX ETH ACC18 tool, large
diameter position,
17
• Cover the shroud and the metal part of
the connector with the protective cover.
_______________________________________________________________________________________
42
ETHWAY Design and Installation
4
_______________________________________________________________________________________
4.4-3 Fitting Ground Continuity Connectors
Ground continuity is necessary to improve trunk cable resistance to electrical interference. These connectors are used to connect the outer aluminum cable shield to the
system grounding network. The ground continuity connectors comprise two parts, an
internal connector (small diameter) and an external one (large diameter).
There are two steps to fitting them on the cable:
• First, always fit the internal ground continuity connector between the yellow
cable shroud and the aluminum shield
(previously cut open). The ground continuity connector has small tapered holes
in it to ensure better contact with the
shield,
• Then, fit the external ground continuity
connector on the grey cable insulation,
at the same level as the internal ground
continuity connector.
Once the ground continuity connectors are in place, they are fixed to the mounting plates
behind the TSX ETH ACC2 transceivers when the cables are connected (refer to Subsection 4.5-3).
The network installation rules and grounding requirements are specified in Sub-section
4.5.
_______________________________________________________________________________________
43
4
ETHWAY Design and Installation
_______________________________________________________________________________________
4.5 Network Installation Rules
_______________________________________________________________________________________
4.5-1 Grounding
All of the requirements described here are taken from the TSX DG GND E, "Recommendations for PLC Installation Wiring User's Guide".
The machine or chassis ground is a low impedance path between items of equipment,
that is used for the purposes of equipotentiality (improvement of the immunity to noise).
The purpose of this "ground" is to reduce any accidental or interference voltage that may
exist between the various items of equipment, and this over a very wide frequency range.
This notion takes account of the operating requirements.
The protective earth ground is a low frequency, low impedance path between the
machine ground and the earth ground. It is used in case of a failure between an electrical
circuit and the machine ground. This notion takes account of the protection requirements.
A grounding network is created by interconnecting all the metallic elements (the
building structure, pipes, cable ducts, electrical and electronic equipment and their
enclosures). The quality of the grounding network will be improved with a denser grid
layout (a 3 m x 3 m x 3 m grid is recommended).
The earth ground is the reference earth connection, consisting of a buried rod,
grounding grid, or the grounding belt of the building, to which the grounding networks
are connected. There must only be one earth ground per building.
Grounding PLC modules
The
C PLC racks where modules are located must be correctly connected to the grounding
network.
Grounding
the trunk cable
17
The trunk cable has two separate and isolated shields:
• An inner shield that comprises two layers and two braids, located under the yellow
insulating shroud and serving as the signal reference. This shield must be connected
to the grounding network. This is done via the thread of the 50 Ohm terminator. The
thickness of the wire used for this connection must be at least 2,5 mm2. To avoid any
contact with ground along the trunk cable, all N-type connectors installed on the cable
must be isolated,
• An outer shield that comprises an aluminum foil layer between the yellow insulating
shroud and the grey isulating shroud. This shield must be connected to the grounding
network at each TSX ETH ACC3 connector via the ground continuity connectors
provided. This connection can be made by attaching the ground continuity connectors
to the transceivers or directly to the grounding network when connecting two cable
segments together.
Grounding the transceivers
All transceivers must be directly connected to the grounding network.
_______________________________________________________________________________________
44
4
ETHWAY Design and Installation
_______________________________________________________________________________________
4.5-2 Installing the Cables
Cable installation is described in Section 2 of the TSX DG GND E, "Recommendations
for PLC Installation Wiring User's Guide". The main points are repeated below:
Run the cables (insulated), from end to end, as close as possible to a metallic
ground, such as in a metal cable duct. Ensure the electrical continuity of each
section of the cable duct and connect the metal ground to the grounding network.
Run signal cables in cable ducts that are distinct and separate from noise producing
cables.
Crossings of cable ducts must be made at 90°.
A distance of at least one meter must be allowed between the trunk cable and any
noise producing equipment (such as high voltage cables, high current level cables,
power switches, high frequency antennas, etc.).
Ensure electrical continuity at the interface between the cable duct and the
equipment enclosure.
The minimum curve radius is 500 mm minimum for a trunk cable and 65 mm for a
drop cable.
The cables are not self-supporting. The first cable attachment after a tap should be
no more than one meter away from the transceiver output connector. The cable
must be attached at regular intervals (approx. every 30 meters).
Only install the trunk cable inside one building.
_______________________________________________________________________________________
45
4
ETHWAY Design and Installation
_______________________________________________________________________________________
4.5-3 Installing TSX ETH ACC2 Transceivers
The transceivers comprise three parts:
1 A ground continuity mounting plate that
the transceiver electronics are mounted
on,
1
3
2 A SubD 15-point connector for connecting the stations,
3 An adapter that the TSX ETH ACC3
connectors are connected to and which
comprises a test validation jumper.
2
Fitting the adaptor
To mount the adaptor on the transceiver, proceed as follows:
• Remove the adaptor protective cover,
• Remove the two screws from the front of the device,
• Correctly set the position of the jumper in the adapter to enable or disable the SQE
test.
This transceiver internal test must be enabled when the transceivers are
connected to a station and disables when they are connected to a repeater.
CThe
figure below shows the two possible jumper positions, depending on the
selected test:
17
SQE test disabled
SQE test enabled
• Plug the adapter into the device and replace the two mounting screws.
_______________________________________________________________________________________
46
4
ETHWAY Design and Installation
_______________________________________________________________________________________
Reminders:
TSX ETH ACC3 connectors (and therefore the transceivers) must be installed on
the trunk cable and on a black mark (these can be found on the trunk cable grey
outer insulation every 2.50 meters).
They can also be installed at either end of a network, even if they are not located
on a black mark, on condition that the nearest transceiver be at least 2.50 meters
away.
The transceiver support must be directly connected to the grounding network.
Connecting the trunk cable to a transceiver
The trunk cable connects to the N type adaptor via a TSX ETH ACC3 connector that
should be screwed on finger tight.
The ground continuity connectors must be directly connected to the transceiver
mounting plate (see figure below).
Connecting a drop cable to a transceiver
The drop cable is connected to the SubD
15-point connector. The connector is locked
into place by sliding the connector latch
upwards (see figure opposite).
_______________________________________________________________________________________
47
4
ETHWAY Design and Installation
_______________________________________________________________________________________
4.5-4 Installing TSX ETH ACC6 Repeaters
A repeater is used to interconnect two network segments and regenerate the signals so
that the effective network length is increased. They are connected to each network
segment via a drop cable. They comprise three main components:
1 Two SubD 15-point female connectors
used to connect to the two ETHWAY
networks via TSX ETH CCxxx drop
cables,
3
2 Indicator LEDs,
1620
Power
Packet
TCVR
3 Mains power cord,
-0
3Com
AUI/AUI
r
Repeate
Collision
Partition
1
2
Connection example:
Segment 1
(11)
(12)
St 1
St 2
Rep 1
C
17
(13)
Machining
Control
(23)
Segment 2
(22)
St 4
St 3
Assembly
(21)
Conveyors
Repeaters should always be installed away from any source of interference.
_______________________________________________________________________________________
48
ETHWAY Design and Installation
4
_______________________________________________________________________________________
4.6 Testing the Network
_______________________________________________________________________________________
4.6-1 Tests During Installation
During installation of the network, it is necessary to test each new segment as it is
installed. To do this, start from one end of the network and fit the 50ý terminator. Then,
using an ohmmeter, measure the resistance between the center contact and the
connector body.
The value measured must be approx. 50ý allowing for the precision of the resistance
(1%) and the linear resistance of the cable (approx. 10ý/Km).
If an unusual value is found, check once again that the connector of the last network
segment is tight (the connector must be finger tight), or else identify the faulty connector
and replace it following the instructions in Sub-section 4.4-2).
Important Note: It is essential to test the network as it is installed as it will be much harder
to locate a problem once the entire network is connected.
If the connectors are fitted to the cable prior to installing it, it is possible to test each
segment in the same way as described above, simply by placing a terminator at one of
its ends and by using a female to female adaptor.
Before installing a transceiver, the SQE test must be configured. This test must be
enabled if the transceiver is connected to a station and disabled if it is connected to a
repeater (refer to Sub-section 4.5-3).
To ensure that the wiring is installed correctly, reflectometry tests can be performed
where necessary.
____________________________________________________________________
4.6-2 Tests After Installation
Once the installation is complete, check that the trunk line is correctly grounded.
(Reminder: The inner shield around the ETHWAY trunk cable center core must be
grounded only at one point. Grounding is ensured by via a TSX ETH ACC5 terminator
with a threaded pin for the grounding network).
To perform this test, disconnect the connection between the terminator and ground and
use an ohmmeter to check that the terminator is isolated from ground. Reconnect the
ground and repeat the check using an Ohmmeter.
Ensure that network impedance adaptation is correct at both ends, or else the collision
rate will impede correct network operation.
When the transceivers are connected to powered-up modules or repeaters, their Power
LED should be lit, otherwise ensure that the connectors are correctly in place, if this is
the case, replace the drop cable.
_______________________________________________________________________________________
49
4
ETHWAY Design and Installation
_______________________________________________________________________________________
4.6-3 Testing the TSX ETH ACC6 Repeater
The TSX ETH ACC6 repeater comprises a number of indicator LEDs:
1
1
Partition
Partition
1
24
1620 - 0
TCVR
AUI
Packet
Power
Collision
AUI
AUI/AUI
Repeater
Partition
3
1 Partition: These LEDs are lit when one partition is not part of the network traffic. In
normal operation all of the LEDs should be out. If one of the Partition LEDs is lit, the
corresponding segment is not operating correctly. In this case switch off the repeater
and then switch it back on again. If the Partition LED remains lit, then:
- Check that the Power LED on the transceiver connected to the network segment in
error is lit. If not, check the cable connection and replace it if required,
- Check that the SQE test for the transceiver or the segment in error is in fact disabled
(refer to Sub-section 4.5-3),
- If the error condition persists, recheck the trunk line as described in Sub-sections
4.6-1 and 4.6-2.
2CPacket: This LED lights when there is traffic on the network,
3 Collision: This LED blinks when a collision occurs on one of the segments (according
17to the protocol used by the IEEE 802.3 standard, intermittent collisions on the network
are a normal condition),
4 Power: This LED indicates that the TSX FP ACC6 repeater is switched on.
_______________________________________________________________________________________
50
ETHWAY Design and Installation
4
_______________________________________________________________________________________
4.6-4 PL7-NET Network Setup Program
PL7-NET is used to describe, check coherence and document TSX Series 7 PLC
automation system layouts. PL7-NET runs in the X-TEL V5 Software Workshop on
FTX 507 or FTX 417 terminals.
This software is required to describe multiple network layouts. It is recommended when
setting up single network installations.
PL7-NET supports:
• Complete description of a multiple network layout:
- Selecting the type of network (TELWAY, FIPWAY, MAPWAY, MMS on ETHERNET
or ETHWAY) and entering the name and number assigned to each network (0 to
127),
- Selecting the stations that form a network and assigning the station addresses,
- Interconnecting the networks by selecting PLC bridge stations (the bridge ensures
routing of messages between networks),
- Assigning, for each bridge, the network interface modules used by the various
networks (up to 4 modules allowed in each bridge PLC).
This data is used by PL7-NET to generate the routing tables for each bridge in the
network layout.
_______________________________________________________________________________________
51
4
ETHWAY Design and Installation
_______________________________________________________________________________________
• Transferring files generated by PL7-NET to the bridge PLCs:
- This data is stored in the user memory field in the bridge PLC processor,
- The compare function is used to ensure coherence between the description
generated by the terminal and the one stored in the bridges.
C
17
_______________________________________________________________________________________
52
ETHWAY Design and Installation
4
_______________________________________________________________________________________
• Network layout documentation:
A text file can be generated once the network layout is described. This file can be
printed out and defines all of the elements (and their links) as used in the network
layout
- Networks,
- Stations,
- Bridges.
Network
Network number
Network type
Number of stations connected
List of stations connected
Name
router1
router2
Address
Type
065.08
065.09
1060-TSX
TSXV5
Network
Network number
Network type
Number of stations connected
List of stations connected
Name
router1
pack_1
Address
Type
024.32
024.00
1060-TSX
TSXV4
Bridge
Bridge type
Primary address
Number of connections
Connection
0
1
2
3
ethway65
065
ETHWAY
2
:
:
:
:
:
mapway24
024
MAPWAY
2
:
:
:
:
Net. Address Connection Type
001.03
065.08
002.20
024.32
:
:
:
:
:
MAPWAY
ETHWAY
802-3
MAPWAY
router1
1060-TSX
001.03
4
Rack/Module Address Status
00
07
03
05
For more information refer to the TXT DM PL7 NET V5E "PL7-NET User's Manual".
_______________________________________________________________________________________
53
4
ETHWAY Design and Installation
_______________________________________________________________________________________
C
17
_______________________________________________________________________________________
54
Diagnostics
5
_______________________________________________________________________________________
5.1 NETDIAG Program
_______________________________________________________________________________________
The NETDIAG program provides network diagnostics for ETHWAY, MAPWAY, FIPWAY
and TELWAY networks. It runs in the X-TEL Software Workshop on systems directly
connected to ETHWAY via a TSX ETH PC10 interface board or via the programming
port of a bridge PLC. The main functions of NETDIAG are described below.
____________________________________________________________________
5.1-1 DIAGNOSTICS Function
• Complete network layout diagnostics:
• List and status of each segment,
• List and status of each bridge,
• List of bridges crossed between two network layout segments.
• Network segment diagnostics:
• List of stations and error indication,
• Activity of COM words assigned to each station.
• Station diagnostics:
• Status of PLC processor front panel LEDs,
• Station status (Run/Stop, COM word configuration, etc.).
• Network interface diagnostics:
• Status of interface indicator LEDs,
• Number of UNI-TE messages sent not acknowledged and refused,
88F00501.TIF
_______________________________________________________________________________________
55
5
Diagnostics
_______________________________________________________________________________________
5.1-2 PERFORMANCE Function
This function lets the user analyze the response time of a communication path.
From this information, it is possible to determine the effects of adding or removing a
station from the network. A simple analysis may uncover errors in the user programs for
the application (in programming or operation sequencing for example).
88F00502.TIF
For more information on the NETDIAG program, refer to the TXT DM NTD V5E
"NETDIAG Network Diagnostics Program User's Guide".
C
17
_______________________________________________________________________________________
56
Appendix
6
_______________________________________________________________________________________
6.1 ETHWAY Frame Format
_______________________________________________________________________________________
The general format of an ETHWAY frame is described below:
Preamble
7 bytes
Start Frame Delimiter
1 byte
MAC Address
Destination Address
6 bytes
Source Address
6 bytes
LLC
Length
2 bytes
Data for
COM Word Service
Data
46 to 1500 bytes
CRC 32 Check
4 bytes
Data for
UNI-TE Service
TSX Series 7
Datagram
_______________________________________________________________________________________
57
6
Appendix
_______________________________________________________________________________________
Preamble
The preamble is encoded in seven bits and establishes the synchronization bit and
locates the first start frame delimiter bit.
Destination and source address (MAC address)
The frame identifies the addresses of the source and destination stations on the
network. These addresses are each encoded in six bytes. For Telemecanique ETHWAY
interfaces the following address is used:
IEEE Standard
Telemecanique Address
Code
80
00
F4
Broadcast: 01
Point-to-point: 00
Network Nbr.
Service
01: Series 7 message
02: COM
Station Nbr.
H'00' to H'3F'
Data
Two
C types of data are sent on the network:
• COM word service data,
•17
UNI-TE service data (and application-to-application communication).
Depending on the service used, the data in the frame will differ. The maximum data
length is 256 bytes.
CRC 32 check
These four check bytes ensure that the exchange was performed correctly. The check
code is calculated by the sender station, then sent after the data. The destination station
recalculated the code and compares it with the code sent by the sender. If any
incoherence is found, the message is rejected by the destination station.
_______________________________________________________________________________________
58
Appendix
6
_______________________________________________________________________________________
6.2 TELWAY Network Restrictions
_______________________________________________________________________________________
In a multiple network interface module configuration where a station that is not a bridge
has both ETHWAY and TELWAY interface modules fitted (as shown in the example
below), the TELWAY network number is set to 0 by default and the ETHWAY network
number must be set in the terminal block of the TSX ETH 107 module.
ETHWAY TELWAY
TELWAY
ETHWAY
The PLC does not recognize the TELWAY station as network number 0 is illegal in
multiple network interface module operation.
Remedial action
One station on the TELWAY network must be a bridge. Only a bridge station can assign
a network number to a TELWAY.
ETHWAY
TELWAY
ETHWAY TELWAY
Bridge
Station
_______________________________________________________________________________________
59
6
Appendix
_______________________________________________________________________________________
6.3 Glossary
_______________________________________________________________________________________
A Application
The user program developed on a station connected to a network. This program
establishes exchanges with other stations included in a network layout.
Attenuation
The reduction in the amplitude of a signal sent through a cable or passive device.
Attachment Unit Interface (AUI)
Interface between the transceiver and the station. It is described in the IEEE 802.3
standard, which defines its cable, its connections and its electrical signals.
B Baseband
A transmission method where the signal is sent in its original format, without
modulation. The entire bandwidth of the transmission medium is used.
Bridge
A device that interconnects two network segments or two networks in a transparent
manner at data link layer level. Addressing continuity is ensured both before and after
the bridge. The bridge is used to separate the traffic on the two segments.
Broadband
A transmission modulation method where the original signal modulates a carrier, in
Camplitude, phase or frequency. The resulting modulated signal takes up only part of
the bandwidth of the transmission medium. A number of channels can therefore use
17the same medium.
Bus
The layout of a signal line network. All messages are sent on the same medium and
each device must recognize whether it is affected by the transaction (address
recognition). This is the layout used by ETHWAY.
C Carrier-Band
A transmission modulation method where the original signal modulates a carrier, in
amplitude, phase or frequency. The resulting modulated signal takes up the entire
bandwidth of the transmission medium.
Collision
The state on the line when more than one station sends at the same time.
_______________________________________________________________________________________
60
6
Appendix
_______________________________________________________________________________________
C COM Words
A specific Telemecanique service that enables reading or writing of a database
common to all stations on a network. The data is stored as a list of words shared
between all stations.
CSMA/CD (Carrier Sense Multiple Access with Collision Detection)
Method of access to the bus. This method is defined in the IEEE 802.3 standard.
D Datagram
A structured data packet that transits through the network. Each data packet is a
separate entity on the network.
Data-rate
The transmission capacity of the medium expressed in bits/second (b/s).
Driver
A program included in the operating system that executes transmission/reception
requests via a specified peripheral. A driver is dedicated to a peripheral. It will not
interpret messages read or written.
Drop Cable
The cable between the connector port and the station.
E End Frame Delimiter (ED)
The byte that indicates the end of a MAC frame.
F Frame
A group of contiguous bytes sent over the network containing data or control
information, i.e. MAC frame, TSX Series 7 datagram.
Frame Check Sequence (FCS)
A group of check bytes in a MAC frame that are used to determine if a frame is correctly
received.
Frequency Shift Key (FSK)
A type of frequency modulation where a binary element “0” becomes one frequency
and a “1” another frequency.
G Gateway
A station that interconnects two networks of any type together. It acts as an interface
at application layer level. A gateway performs address and/or protocol conversions
enabling communication between devices on different networks.
_______________________________________________________________________________________
61
6
Appendix
_______________________________________________________________________________________
I Industrial Local Area Network (ILAN)
A Local Area Network used in industrial applications covering a well defined and
limited area.
ISO
International Standards Organization.
L Local Area Network (LAN)
See Industrial Local Area Network (ILAN).
Layer
A layer is a set of services that perform a function as defined by the ISO in their ISO
model for distributed systems. A layer provides an access interface and used the
interface provided by the layer below it:
• Layer 7: Application,
• Layer 6: Presentation,
• Layer 5: Session,
• Layer 4: Transport,
• Layer 3: Network,
• Layer 2: Data Link,
• Layer 1: Physical.
Logical Link Control (LLC)
access to the data link layer. For Mapway this corresponds to a service
CEnables
without connection but with acknowledgement (LLC 3) or without it (LLC 1).
17Manchester
M
Coding used to transport both logical and clock data.
Manufacturing Message Service (MMS)
An industrial message service. It is the application layer protocol designed for
exchanging messages between devices within a manufacturing facility or workshop.
Meets ISO 9506 standards.
Medium
Usually refers to the complete cabling system: cables, connectors, taps, etc.
Medium Access Control (MAC)
A set of procedures that control access to the network medium. With Mapway this
comprises processing the token and sending and receiving data frames at data link
layer level.
_______________________________________________________________________________________
62
Appendix
6
_______________________________________________________________________________________
M Multiple Networks
A network layout where a number of network segments are interconnected by bridges.
N Network
A series of devices connected together via a common medium that observe the same
dialog rules (protocols).
Network Interface (or Module)
A device that provides a station with access to the network. It optimizes exchanges
and provides the highest level possible of service for the connected station (TSX
Series 7 PLC, NUM controllers, FTX 517 terminals, IBM PC or compatible computers,
etc.).
Noise
An externally caused, unwanted electrical signal present on a cable.
P Phase Coherent Frequency Shift Key (Phase Coherent FSK)
A type of FSK (see also FSK) where frequency changes take place when the signal
goes to 0: there is no phase break.
Protocol
A set of rules required to ensure that various elements, often remote can establish and
maintain data exchanges.
R Return Loss
The amount of signal reflected by an impedance discontinuity on the cable.
Router
This device connects at least two networks of different types at network layer level.
There is no addressing continuity between the networks, before and after the router.
As the addressing system is different, in practice a message is addressed to the router
that ensures the required address conversion for the message to reach its destination.
Routing
This function is performed by a station network interface device. It determines the path
to follow to ensure that a data packet will reach its destination on another segment of
the network.
_______________________________________________________________________________________
63
6
Appendix
_______________________________________________________________________________________
S Segment
A section of trunk cable between two 50 ohm terminators not exceeding 500 meters
in length. Segments are connected together through repeaters to form a network.
Slot time
The maximum time that a station that has finished sending must wait to detect
transmission by the next station.
Signal Quality Error (SQE) Test
A protocol that is used between a station and a transceiver. At the end of each
transmission, the transceiver must validate the signal without any collisions for a
period of time, indicating to the station that the transmission was performed correctly.
This test is not used when a transceiver is connected to a repeater, it must therefore
not be enabled.
Star
A network layout where all stations are connected to the same node.
Start Delimiter (SD)
The byte that defines the start of a MAC frame.
Station
A device connected to a LAN segment. A station can exchange data with other
Cstations. It has a unique address on the entire network.
17System Management Access Protocol (SMAP)
This protocol controls the network functions devolved to a Mapway module.
T Telemecanique Network Layout
The ETHWAY, MAPWAY, TELWAY or FIPWAY network segments that are interconnected.
Terminal Block
Used for setting the address coding for the station (Network . Station).
Terminator
A component comprising a 50 ohm resistor that is connected to the transceivers at
each end of a trunk cable segment.
_______________________________________________________________________________________
64
Appendix
6
_______________________________________________________________________________________
T Transceiver
An active device supplied by the network enabling connection of a station to the main
bus.
Trunk Cable
The cable that connects the transceivers together to form the network medium that
transports the messages.
TSX Series 7
Refers to the Telemecanique TSX Series 7 range of modular PLCs and their
proprietary message system. This message system ensures transmission and
reception of datagrams on the network. This includes text blocks, Uni-TE requests,
programming, adjust and diagnostics requests.
U Uni-TE
The Telemecanique proprietary messaging service that provides a single communication interface for all Telemecanique components and those from other vendors that
support Uni-TE. It comprises a list of standard requests bases on a Client/Server
concept providing the following services:
• Access to variables,
• Control of operating modes,
• Network and device management,
• Up/downloading of files and programs,
• Unsolicited data.
V Virtual Time Operating System (VTOS)
The real-time core of the ETHWAY module software.
_______________________________________________________________________________________
65
6
Appendix
_______________________________________________________________________________________
6.4 Replacing Stripper Blades
_______________________________________________________________________________________
6.4-1 TSX ETH ACC12 Strippers
Replacement blades are available under reference TSX ETH ACC13. To replace the
blade, proceed as follows:
• Remove the screw located on the side of
the tool opposite the button that pivots
the blade,
• Remove the cutting tool,
• Insert a replacement blade into the slot
in the metal blade support assembly and
use it to unscrew the metal body, taking
care to avoid injury from the blade,
• Press the button and remove the worn
blade,
• Insert the replacement blade and reassemble the stripper following the steps
described above in reverse order,
• Adjust the strippers as described in Subsection 4.3-1.
C
17
_______________________________________________________________________________________
66
Appendix
6
_______________________________________________________________________________________
6.4-2 TSX ETH ACC16 Strippers
When the blades require replacement, turn the cartridge around (the blades are
symmetrical) or, once both sides of the blades are worn, replace the entire cartridge
(available under reference TSX ETH ACC17). To replace the blades, follow the
procedure below:
• Open the strippers,
• Push the lock and remove the cartridge
by pushing it with a screwdriver inserted
through the hole located under the strippers (take care to avoid loosing the two
red cable supports),
• Turn the cartridge around (or replace it,
if both side of the blades are worn),
• Refit the two red cable supports (the
extended side must be towards the outside of the strippers).
_______________________________________________________________________________________
67
6
Appendix
ETHWAY Network Planning Sheet
Network Nbr.
Segment Nbr.
_______________________________________________________________________________________
Nbr.
Nbr.
L=
Location:
L=
LC=
Nbr.
Nbr.
L=
Location:
L=
LC=
Nbr.
Nbr.
L=
C
Location:
L=
17
LC=
Nbr.
Nbr.
L=
Location:
L=
LC=
Update
A
By
Date
Design:
Drafsman:
Date:
T
Page
B
C
_______________________________________________________________________________________
68