1
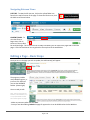
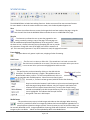
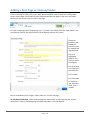
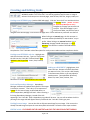
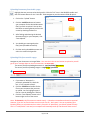
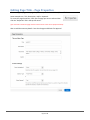
OU Campus VERSION 10 End User Manual Last Update: 9/8/2015 Contact Tish Sailer with comments or questions regarding this Manual. Contents INTRODUCTION ......................................................3 Linking to a DOCUMENT ...................................8 Links and Dependency Manager .......................8 Linking from an image ......................................8 EDITING a Link ...................................................8 HELP DOCUMENTS AND SUPPORT .................................3 ACCESSING PAGES AND LOGIN STEPS .....................3 LOGIN USING DIRECTEDIT LINK .....................................3 NAVIGATING OU CAMPUS USING SITE TREE ...................3 INSERTING IMAGES ................................................ 9 Insert Images:...................................................9 Edit Images: ......................................................9 CHECKING PAGES OUT ............................................4 Checking a Page Back In ...................................4 NAVIGATING BETWEEN VIEWS ......................................5 UPLOADING FILES ................................................. 10 Uploading Images from inside a page ............10 Uploading Documents from inside a page ......11 Uploading Files from outside a page ..............11 EDITING A PAGE – BASIC STEPS ...............................5 WYSIWYG EDITOR....................................................6 Save ......................................................................6 Save As .................................................................6 Paste Option .........................................................6 Link Icons .............................................................6 Spell Checker ........................................................6 Media Insert .........................................................6 EDITING THE NAV BAR ......................................... 12 EDITING PAGE TITLE – PAGE PROPERTIES ............. 13 SUBMIT PAGES FOR APPROVAL AND PUBLISH ..... 14 ADDING A NEW PAGE OR SECTION/FOLDER ...........7 Approval Time .................................................14 Approval and Publish Declined ........................14 CREATING AND EDITING LINKS ...............................8 DASHBOARD ........................................................ 15 Linking to an INTERNAL page ............................8 Linking to an EXTERNAL web site ......................8 TROUBLES? SHARE DESKTOP WITH LYNC ............. 15 Page 2 of 15 Introduction This Manual is meant to be a general reference providing instruction on the most commonly used features. It is not an all-inclusive manual of the functionality included in the OU Campus system. Help Documents and Support Additional help documents are available on the PBSC Web Help page: www.palmbeachstate.edu/Web with more detailed instructions on various topics. For one-on-one help, contact Tish Sailer who can assist via email, phone, Lync and/or desk-side coaching. Accessing Pages and Login Steps To edit or add pages, login by using the DirectEdit link and then navigate, if needed, using the Site Tree. Login using DirectEdit Link Palm Beach State’s DirectEdit link is the copyright symbol found on every page of the website in the footer in the bottom left corner. FireFox is the best browser to use with OU Campus v.10 To login and edit, find your web page on the live site and then: 1. Click on the DirectEdit link. 2. Sign into OU Campus using your normal College ID and password (do not use @palmbeachstate or @pbcc). If you click the DirectEdit link (copyright symbol) on a page you don’t have permissions to, you may get an error message. You are actually logged in but you don’t have permissions to the page you logged in from (i.e. the PBSC home page) so you will now have to navigate to your page instead. Note: Once logged in to OU Campus, clicking on the DirectEdit link from any page on the live Web site will open OU Campus directly to that page without having to log in again. Navigating OU Campus Using Site Tree Once in OU, you can also access pages by navigating the Site Tree. Click on Content and then Pages. Page 3 of 15 Use the CONTENT/PAGES view (shown below) to navigate to the folder/page that needs to be edited. If access to a particular folder or page has not been granted, the folder/page will show up as plain black text instead of a blue hyperlink. Double click the folder to open it and view the pages within. Once the page to be edited has been found, you can hover or mouse over the page line to see the options available – choose Edit or click the blue page name to access it directly. FOLDER CONTENTS: Every folder consists of 4 basic items as shown to the right: _leftnav.htm ---- used to edit the left blue nav bar _properties.xml ---- used to edit the title of the left blue nav bar default.pcf ---- the home page of every area documents ---- the documents folder where you upload PDF files Checking Pages Out Status indicators reflect the state of an OU Campus page. These icons are shown on many screens that display listings of content. For example, a lit light bulb indicates a page is checked out to the currently logged in user and a red lock indicates the page is checked out to another user. The unlit light bulb indicates the file is available to check out. NOTE: Only one person at a time can check out/edit a page. Checking a Page Back In It is important to note that pages will remain checked out to the user until: 1. The page is sent for approval 2. The page is Published - OR 3. The user checks the page back into the system by clicking on the yellow light bulb. Best Practices – Be sure to check the page back in when finished editing, so it can be available to others. Page 4 of 15 Navigating Between Views SITE TREE - To view the left site tree, click on the yellow folder icon found in the top left corner of the page. To close the left site tree, click the black arrow shown below. CONTENT/PAGES - To view the ContentPages view, click on Content in the top blue bar and then Pages. This is the most user-friendly view where you can hover over pages and create new pages. Click the black house icon to get back to the top level of the web folders. Editing a Page – Basic Steps Once you are on the page you wish to update, the edit button(s) will appear. The page may include many editable regions, or just one. Click Edit until you see the WYSIWYG toolbar (shown right). You are ready to edit. Note: The top image (Current Students, Future Students, etc.) is only a placeholder to show how content appears on page. - Make any necessary edits and then Save. - Once you are done editing, Submit the page for approval so it can be Published to the live Web site. Page 5 of 15 WYSIWYG Editor The WYSIWYG Editor includes basic editing functions. Below are some of the most common features. For more details on what the various toolbar icons mean, visit the OmniUpdate Support site. Save - The Save icon allows the user to save the changes that have been made to the page. Using the Save icon will also close the WYSIWYG Editor and take the user to a PREVIEW of the page. Save As - The Save As icon allows the user to save the page with a new name, essentially creating a copy of the page. The new page can then be modified and published independently of the original file. When the Save As icon is clicked, a box will pop up prompting the user to provide the new name. Change the name of the page, but leave the extension of .pcf. This is extremely important. If any other extension is used, the page will not work. Paste Option - The paste button only pastes in plain text, stripping all other formatting. Link Icons - The first icon is to Insert or Edit a link. The second icon is to break a current link. The third icon is to add a link to an email. The icons are not active unless your cursor is on a current link or you have text highlighted to add a new link. Spell Checker - The spell checker can be activated by clicking on the ABC with the checkmark. The default dictionary is English. Misspelled words are identified with a wavy, red line. To fix the misspelled word, click on it. This brings up a window with available options. Select the correct word, ignore the word, or, if access has been granted, add the word to the dictionary. Keep in mind that the browser’s spell checker may be active and marking words while the page is being edited. However, only OU Campus’s spell checker will reference the OU Campus Custom Dictionary. To verify that a word is being marked as misspelled by the OU Campus dictionary, look to see if the spell check icon is highlighted. This indicates that the spell checker being used is the one in OU Campus. Media Insert - This provides an easy way to include images and videos on the web page. When inserting media, it is possible to select from images and videos that have already been uploaded or it is also possible to upload new images yourself. External resources, such as YouTube videos, can be manually identified as well. Images uploaded to the wrong folder will be deleted. You must upload images to your area folder. Videos must be uploaded by MTIS to the Media Server. Page 6 of 15 Adding a New Page or Section/Folder To create new pages and folders, click on Content and then Pages to bring up the following view. To create a new page or folder, click on the “New” button dropdown. Keep in mind that creating a New Section means pages in that folder will have a different Nav Bar than pages in your main area folder. Most times, you will only want to create a new page. To create a new page, select the New Page icon. To create a new folder, select the “New Section” icon. Complete the fields for the page or folder to be configured and then click Create. Follow the guidelines and helpful tips (shown in gray) to complete the required fields. The top 4 highlighted fields are the ones you need to complete. The other fields can remain with defaulted info. Click “Create.” You will be able to come back and edit these fields later, if needed. You can now add text, links, images, videos, tables, etc. on your new page. To edit these fields later, simply check the page out and then click on the Properties tab. Further directions are listed on the Editing Page Title page found later in this User Manual. Page 7 of 15 Creating and Editing Links Links are created by highlighting text or images and clicking the “Insert Link” icon in the WYSIWYG toolbar. The “Insert Link” icon will be grayed out until the text or image is selected. Links can point to internal pages, external sites, PDF files, images, videos, etc. Linking to an INTERNAL page (another PBSC web page): Click the “Insert Link” icon and then click on the browse button. [browse is critical for Dependency Manager to work ] Navigate to the page you want the link to open. If the desired page is not in the current folder, use the Site Tree to navigate to the desired page. Click once on the page name. Insert and Save to preview & test the link. When linking to an internal page, the link can open in the same window (the default) or new window - as you prefer. When linking to an external website or to a document, the page should always open in a New Window. This selection is made in the field labeled “Target.” Complete the “Title” field with a brief description for use by screen readers and site compliance checks. Linking to an EXTERNAL web site Highlight text and click the Insert Link icon. Type in or copy/paste the URL into the “Link URL” field and choose New Window in the Target field. Insert, Save, Preview, Test. Linking to a DOCUMENT Highlight text, click Insert Link icon. Browse to find the document you want to link to. This may be a PDF already in the Documents folder or you may upload a new document. [see upload doc directions] Select File, Insert, Save, Preview, Test. Remember to choose New Window in the Target field. Links and Dependency Manager Dependency Manager automatically updates the hyperlink if the target is moved or renamed. That’s why it is so important to browse for the internal page, as described above, to ensure Dependency Manager will work. When inserting a link using Dependency Manager, instead of the URL appearing in the “Link URL” field, a Dependency tag code will be seen. You can still see where the link is pointing as the target URL will appear directly underneath the “Link URL” field in gray text. Linking from an image You can also link to all these same things from an image. Click once on the already inserted image and open the same Insert/Edit Link window. Follow the same steps as above. EDITING a Link CLICK ONCE ON THE LINK TEXT and CLICK THE LINK ICON IN THE TOOLBAR Page 8 of 15 Inserting Images Insert Images: 1. Click on the “Insert Image” icon in the WYSISYG edit toolbar: 2. Click on the browse button next to the “Image URL” field, and find the image to be inserted. If you are not automatically taken to the Images folder for your area, you may have to navigate there. (contact Tish Sailer to set up this automation) 3. You can use the Filter space to search for an image by name or you can click on the desired image to see a preview or you can use thumbnails and then click “Insert” to choose it. 4. After selecting the image, add a short “Image Description” in the field. - This is required for accessibility standards compliance and will be used by screen readers. 5. Appearance Tab: If desired, update the “Alignment” field (left or right) to allow the text to wrap around image. - Best to size your image BEFORE upload but small dimension adjustments can be made here. - To add some space around the image, use the “Vertical Space” and “Horizontal Space.” This is done in pixels and generally between three (3) and five (5) will provide enough. - A “Border” is also identified in pixels. Leave blank or 0 for no border. If you want a border, two (2) should normally be sufficient. 6. Click “Insert” [Additional settings are available on the Advanced tab] Edit Images: It is best to resize and crop images BEFORE you upload them to OU Campus. You may use Photoshop, MS Picture Manager, Windows Live Photo Gallery or other photo editors. To edit an image already on a page, click once on the image to highlight it and then click the “Insert Image” icon to bring up the Insert/Edit Image window. You may request Photoshop installation from the PBSC Helpdesk. If the desired image has not already been uploaded, it can be uploaded from the screen that pops up when the browse button is clicked. See next section Upload Directions. Page 9 of 15 Uploading Files IMPORTANT: Do not use spaces, underscores or any other special character - except a dash(-), if needed for separation - in document or image file names! Uploading Images from inside a page CPlace your cursor where you want the image. Click the “Image” icon in the WYSISYG toolbar. Click on the browse button next to the “Image URL” field. Note: If you are not automatically taken to the Images folder for your area, you may have to navigate there. (contact Tish Sailer to set up this automation) 1. Click on the “Upload” button. 2. Click the +Add Files button to browse your computer for the desired image file you wish to upload. You can also Overwrite an existing image from this screen by checking the box first. 3. After finding and selecting the desired image file(s) on your computer, click “Start Upload” 4. You should get a message that the file(s) was uploaded successfully. 5. Find the newly uploaded image and select it to insert the image on the current page. HELPFUL TIPS - When uploading images, keep in mind that the image should: be resized BEFORE you upload it to your images folder in OU Campus be no larger than 740 pixels wide which is the max width of the white space have no spaces, underscores or special characters in the file name (you may use a - dash) be a photographic image - no cartoon, clip art or animated images are allowed be of good quality and not stretched out of proportion or they are subject to removal TO VIEW A LIST OF ALREADY UPLOADED FILES, YOU MUST CLICK ON THE PRODUCTION TAB. NOTE: Images uploaded to the wrong place will be deleted, causing a broken link on your page. Page 10 of 15 Uploading Documents from inside a page Highlight the text you want to be the hyperlink. Click the “link” icon in the WYSISYG toolbar and then the browse button for the “Link URL” field. Navigate to your Documents folder & open it. 1. Click on the “Upload” button. 2. Click the +Add Files button to browse your computer for the desired document file(s) you wish to upload. You can also Overwrite an existing document from this screen by checking the box first. 3. After finding and selecting the desired document file(s) on your computer, click “Start Upload” 4. You should get a message that the file(s) was uploaded successfully. 5. Find the newly uploaded document and select it to create the hyperlink. Uploading Files from outside a page Navigate to your Documents or Images folder. You must be in the correct location to upload or you will get an error message about an incorrect extension. In most cases: The correct path for uploading documents is: top/yourfolder/Documents The correct path for uploading images is: top/Images/yourfolder 1. If you want to “Overwrite” a previously uploaded file, check the box. If not, proceed to step 2. 2. Click the +Add Files to browse for the file on your computer that you want to upload. You can highlight several files at a time by holding the CTRL key. 3. Click the “Start Upload” button at the bottom right corner of the screen. Note: To Overwrite, the file name must match exactly. Uploads are immediate and need no approval. However, if you do not see the latest version on the live site - don’t panic! You can try deleting your browsing history or ask someone else to view it from their PC. Most likely, you did the upload correctly. This is a “cache/cookie” issue and your computer will eventually catch up and show the latest version. Page 11 of 15 Editing the Nav Bar To add or remove anything from the Nav Bar (the blue column on the left side of your web page) - you must check out and edit the _leftnav.htm file found at the top of your web area in the Site Tree list. To Delete something from the nav bar, click once on the link and then use the unlink icon to break the link. Then backspace to remove the unwanted text. Save and Submit for Approval and Publish. To Add something, place the cursor where you want the new line to be and hit return to create a new line. Type in the new text. Highlight the text and right-click (or click the Link icon in the toolbar) to open the Insert/Edit Link window. Browse to find the document or internal page you want to link to - or - type in the URL if you want to link to an external page. Remember . . . Target = New Window if linking to a document or external website. Save and Submit for Approval and Publish. Note: When adding new pages and links, update the LeftNav last so you can use Dependency Manager. Page 12 of 15 Editing Page Title – Page Properties After creating the page, some page Properties may need to be added and/or modified. Some examples are: Title, Description, and/or Keywords. To access the page Properties, check out the page you want to edit and then click the “Properties” tab in the top left corner. (you must edit or check the page out first to have access to the correct properties fields) Alter or add the necessary details. Save the changes and Submit for Approval. Page 13 of 15 Submit Pages for Approval and Publish After you have edited and saved your changes, they must be submitted for approval and published to the live site for them to show up. Click the green “Submit” button in the top bar. When the “Submit” button is clicked, a mail window will appear. Sending the page for approval will transfer the checked out status from the current editor to the person to whom the page is sent. 1. The “To” field will be auto-populated with your approver name/email. 2. The “Subject” field is a required field. This is where you should enter “text change only” or “modified links” etc. 3. The “Message” field is available if you need more room to tell the approver what you have changed/updated. If you have added and/or modified any links or images, you need to state which links/images here in the “Message” field. Giving this info will save time and result in a quicker publish process because the approver will not have to review the whole page. 4. The checkbox next to “Send Copy to Email” means the approver will also receive notification in their PBSC email as well as in OUcampus. This should stay checked unless your approver has asked you to remove it. 5. Click “Submit” You should receive a message that your page was successfully sent. Approval Time Pages are generally approved between 5 minutes - 4 hours depending on the approver’s schedule that day. Approval and Publish Declined If there are issues with the submitted page, it may be Declined and you will receive notification of that. Your changes are not lost but you will be asked for further clarification or notified that specific updates are needed and then you can resubmit the page for approval. Page 14 of 15 Dashboard The Dashboard contains user-specific information. You can configure your Dashboard look. Inbox and Workflow are primarily used for the approval process. “My Checked Out Content” shows what pages you currently have checked out and provides an easy way to quickly check them back in. It is advised that this screen be checked prior to logging out for the day, to help realize what you have checked out. Troubles? Share Desktop with Lync Lync allows you to share your desktop so someone else can view what you are doing as it is happening. This is an invaluable tool when requesting help working within the OU Campus system. If you are having problems, open a Chat window by clicking on one of the icons shown above, located in your lower task bar. Send a message to Tish Sailer (or call her at 561-207-5701) to see if she is available. Then follow these steps to share your desktop. 1) Hover your mouse over the monitor icon on the bottom of the chat window. Click to share your monitor. If you have 2 monitors, select Primary Monitor. 2) Once Tish accepts the share invite, minimize the chat window – do not close it. You will now be able to communicate on the phone what steps you are taking in OU Campus that are not working and Tish will be able to watch your desktop actions and walk you through the proper steps. Check often for more info, latest notices, and further directions on the Web Help page at: www.palmbeachstate.edu/Web Page 15 of 15